SEARCH FINESCALE.COM

Enter keywords or a search phrase below:

Mack RW rebuild

2053282 views
239 replies
1 rating 2 rating 3 rating 4 rating 5 rating
  • Member since
    May 2009
  • From: Poland
Mack RW rebuild
Posted by Pawel on Monday, April 19, 2010 6:01 AM

Hello everybody!

I just finished my Porsche, so now I'm movin on to something that has been bothering me for a few years now. In 1993 I built a "U.S. Power Truck" from Italeri - a 1:24 model of Mack RW (Superliner), just without the logo (license fees?). It looks like this:

1:24 Mack RW Superliner

It has a lot of things I'd do better today. Just take a look at this:

1:24 Mack RW Superliner

As it starts to fall apart, I decided to overhaul it. I'll gently pry it apart and rebuild it. What I want to do is to repaint the frame and the axles, stretch the sleeperbox and add some "boxes" along the frame, to give the truck better proportions (the frame is too long for it now). Build a new "wing" on top of the new sleeperbox. Reinforce the hood, as it is slightly warped. Repaint the cab & co.

Could somebody tell me what engines were installed in those trucks and their corresponding "house" colours? (alpine green, sand, blue). How about the tranny?

Thanks in advance for your help, please stay tuned and have a nice day

Pawel

All comments and critique welcomed. Thanks for your honest opinions!

www.vietnam.net.pl

  • Member since
    June 2008
  • From: Piscataway,NJ
Posted by jtrace214 on Monday, April 19, 2010 6:33 AM

The Superliners I believe came with the E-9 500hp. V-8

John

the pic to the left is my weekend condo lol

  • Member since
    May 2009
  • From: Poland
Posted by Pawel on Monday, April 19, 2010 7:09 AM

Thanks a lot, John, but what make would that be?

Pawel

All comments and critique welcomed. Thanks for your honest opinions!

www.vietnam.net.pl

  • Member since
    May 2009
  • From: Brizioland
Posted by Brizio on Monday, April 19, 2010 11:45 AM

Looks great!!! Nice job done!

  • Member since
    May 2009
  • From: Poland
Posted by Pawel on Tuesday, June 22, 2010 7:50 AM

Hello!

It's been a long time, but I'm movin' on with the project.

Brizio, it's probably going to brak your heart Wink, but I already started carefully breaking my first truck apart, to be rebuilt, as written in the original post.

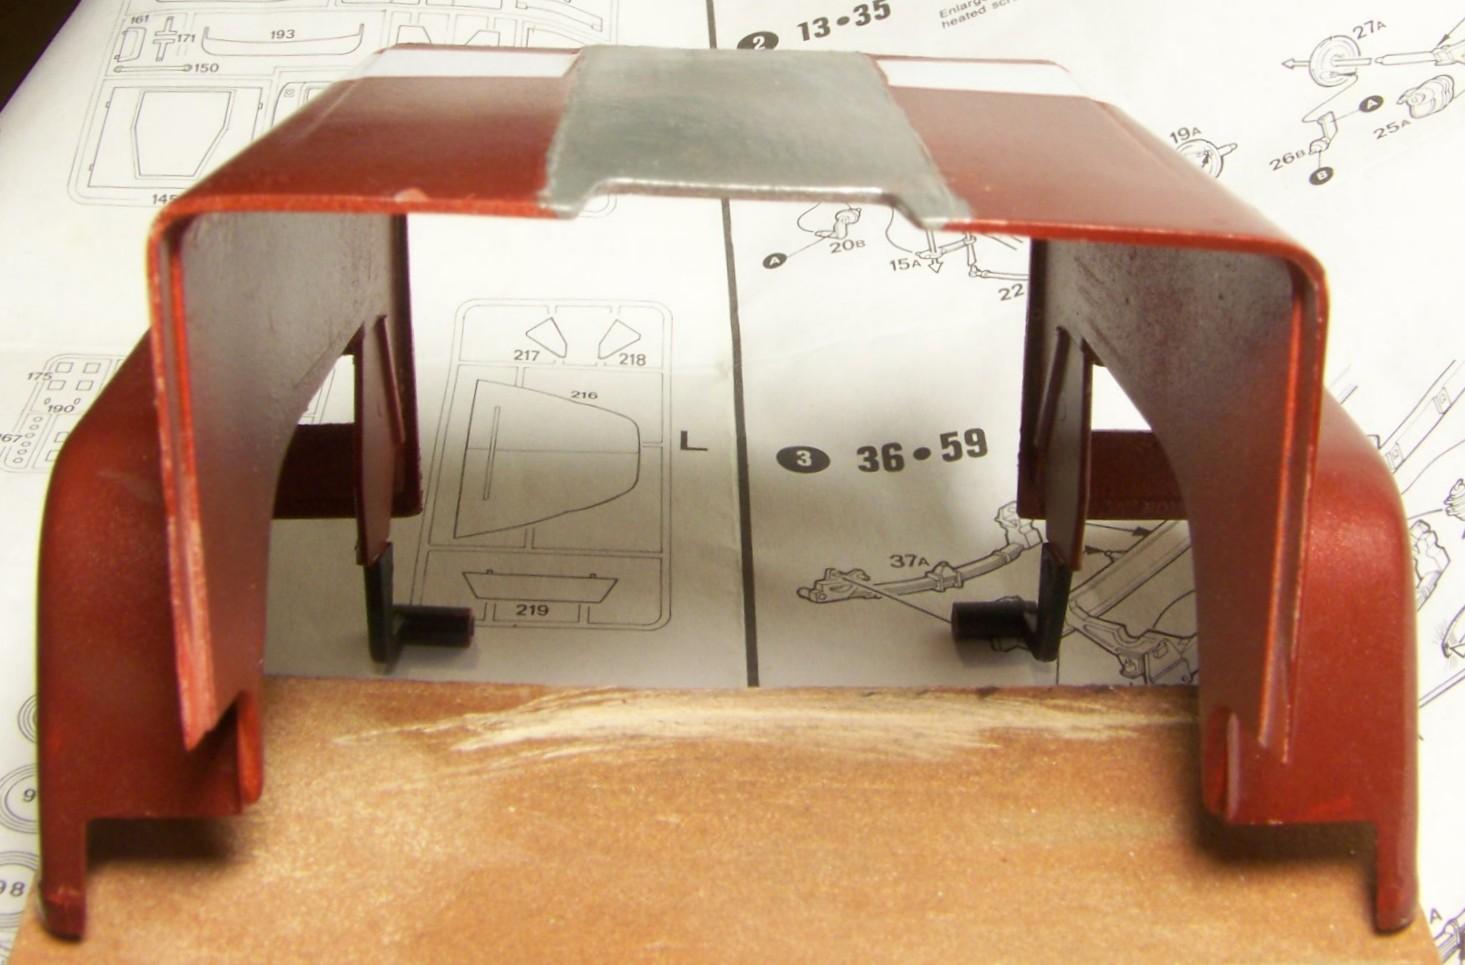
The problem I had from day one - almost - and I couldn't remedy this as I originally built my truck, was the bad hood to cab fit. The hood didn't want to close properly. The first reason for this is obvious after you look at this foto:

1:24 Mack Superliner by Pawel Mroczkowski

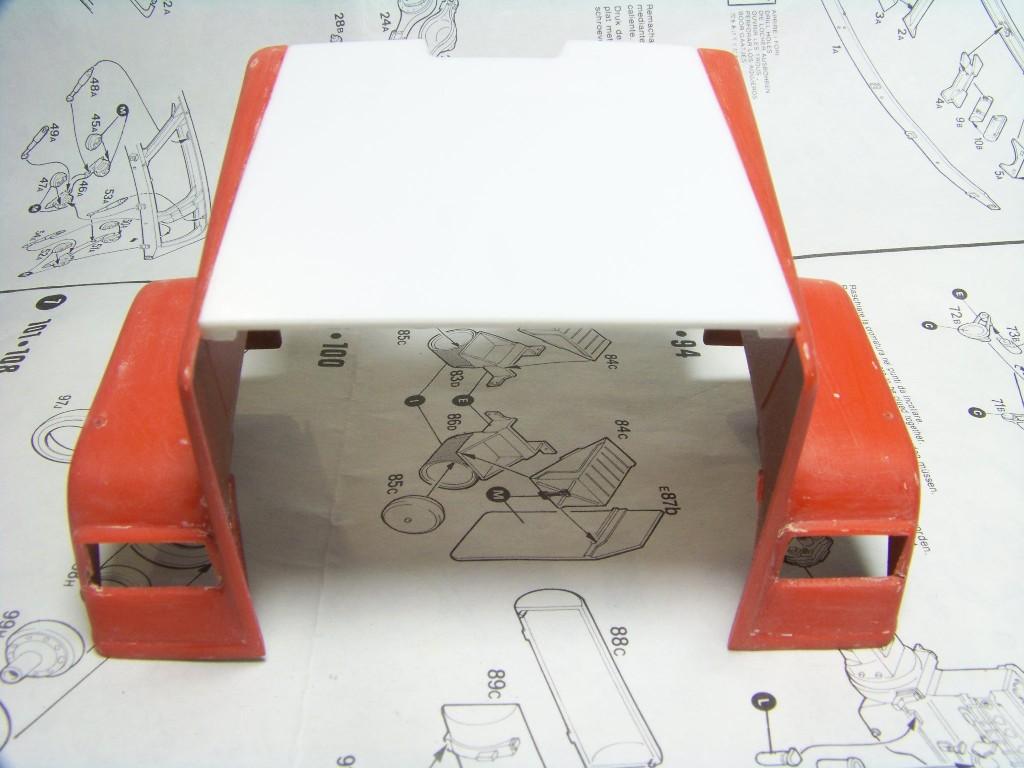
What I did was to cut the entire top out of the hood and substitute a new, straight one out of styrene sheet. Of course it's not that easy, after you find out the top isn't entirely flat, it's slightly curved. To get this curve I glued a strenghtening brace under the hood, this brace also helps to make the hood stiffer. Here's what I got:

1:24 Mack Superliner by Pawel Mroczkowski

While building the hood I read through lots of reference material and here comes the big surprise - this truck is almost no Mack at all. It rides on a stolen Freightliner chassis, and to top it off, the cab is incorrect too. That's why it has no Mack logos on it. I'll describe the modifications I'm going to do here as I work on them, for now only an outline:

-Hood - add Mack logos

-Cab - narrow thecab by 4-5 mm, redo the exhaust stack braces, redo the mirrors

-Sleeperbox - stretch to enlarge it.

-Frame - where the real fun begins - build new front frame portions, new crossmembers.

-Rear suspension - install Mack camelback suspension

By the way - the kit engine is a Cummins, should be beige and I think I'm going to keep it.

Now let's see how it turns out. Thanks for reading, have a nice day

Pawel

All comments and critique welcomed. Thanks for your honest opinions!

www.vietnam.net.pl

  • Member since
    May 2009
  • From: Poland
Posted by Pawel on Monday, July 5, 2010 10:35 AM

Hello everybody!

I'm slowly movin' on with my work. Today I'd only write about where I'm headed and ask for your help.

Now John wrote the Mack came wit an E-9. the E-9 is a V-8 engine by Mack and should be painted gloss black. Italeri supplies an engine for the truck, that looks a bit like a Cummins and should be painted Cummins beige. A Fuller transmission could work with the engine, my question - what colour would the transmission be painted then?

But the biggest problem I've got, is the shape and general appearance of the forward frame portion. I can't find too many fotos of the forward frame of a Superliner on the net, so maybe you could post some fotos? That would help me a lot, so thanks in advance, have a nice day

Pawel

All comments and critique welcomed. Thanks for your honest opinions!

www.vietnam.net.pl

  • Member since
    July 2008
  • From: Florida
Posted by Railfan 233 on Monday, July 5, 2010 6:54 PM

I have to follow this one. I've never seen a "Rebuild" WIP, and I figure it will help me out, since I think some of my older kits will need a rebuild soon.

I like tho original paint. Can you try to re-do it, too? (I love multi-color schemes from the 80's)


http://i6.photobucket.com/albums/y211/razordws/GB%20Badges/WMIIIGBsmall.jpgRed, White, and YOU! group build of 2010

  • Member since
    May 2009
  • From: Poland
Posted by Pawel on Tuesday, July 6, 2010 2:49 AM

Howdy Railfan233, thanks for your comment. It's actually a second time I rebuild an old model. You usually need a really good reason to do that, because it's almost two times the work compared to building it the first time. This truck is important to me, has been with me a long time and I want it to look good again.

As for the paint job - I could only take a shot at the same color scheme if somebody sent me the original decals... So if anybody got them, please let me know. If not, I think I'll go with single color, maybe with some operator logos on the doors.

Thanks for looking, please stay tuned and have a nice day

Pawel

All comments and critique welcomed. Thanks for your honest opinions!

www.vietnam.net.pl

  • Member since
    May 2009
  • From: Poland
Posted by Pawel on Tuesday, July 20, 2010 9:57 AM

Hello!

I disassembled the cab and went on to tackle the interior. Here's what it looked like halfway:

1:24 Mack Superliner by Pawel Mroczkowski

As you can see I already stripped some paint. The big deal here is the cab has to be narrowed 4 mm in order to have almost constant width front to back whereas the kit supplied cab abruptly gets wider in the front, distorting the superliner lines. This is probably due to Italeri wanting to reuse the Freightliner cab floor. Bad ideaBang Head. I already straightened the cab sides, narrowed the floor, and the biggest trick - I narrowed the dashboard 4mm without messing up my original 15 years old decals! I also removed the clutch pedal and it's base - it is to be suspended from the dashboard. I still have to narrow the rear wall. I also build the padding around the cab doors, you can see some of it already in place.

1:24 Mack Superliner by Pawel Mroczkowski

I also worked on the seats - I removed the armrest and replaced portions of the somewhat heavy casting with copper wire. The second seat will follow shortly. The seat bases also have to be relocated, so that the steering column is in the centerline of the driver's seat - otherwise the driver would probably get a bad backache after just a few miles.

Thanks for reading, have a nice day

Pawel

All comments and critique welcomed. Thanks for your honest opinions!

www.vietnam.net.pl

  • Member since
    July 2008
  • From: Florida
Posted by Railfan 233 on Tuesday, July 20, 2010 11:25 AM

It looks great Pawel. I can't wait to see the interior when it's back together. The seats definately look better.


http://i6.photobucket.com/albums/y211/razordws/GB%20Badges/WMIIIGBsmall.jpgRed, White, and YOU! group build of 2010

  • Member since
    May 2009
  • From: Poland
Posted by Pawel on Wednesday, July 21, 2010 9:34 AM

Railfan 223, thanks a lot. I'll have the the cockpit fotos done soon, so please stay tuned. Thanks for reading, have a nice day

Pawel

All comments and critique welcomed. Thanks for your honest opinions!

www.vietnam.net.pl

  • Member since
    May 2009
  • From: Brizioland
Posted by Brizio on Wednesday, July 21, 2010 9:48 AM

You are doing a great job! Looking forward!

  • Member since
    May 2009
  • From: Poland
Posted by Pawel on Friday, July 23, 2010 4:43 AM

Brizio, thanks a lot for your comment, please stay tuned for more!

And here comes more. Recently I painted the cab floor and the front bulkhead with dash:

1:24 Mack Superliner by Pawel Mroczkowski

1:24 Mack Superliner by Pawel Mroczkowski

As I already wrote, the seat bases were relocated some 2mm inboard. There's still some smoothing left on the rear portion of the passenger seat's base.

I also went on with the work on other cab walls. I made some padding out of milliput:

1:24 Mack Superliner by Pawel Mroczkowski

The walls will be painted next, along with the seats. The rear wall still needs to be narrowed. I hope you like it, have a nice day

Pawel

All comments and critique welcomed. Thanks for your honest opinions!

www.vietnam.net.pl

  • Member since
    July 2008
  • From: Florida
Posted by Railfan 233 on Friday, July 23, 2010 10:54 AM

The cab is looking great. I like the padding on the cab walls. I have herd of a trick used in modeling fire apparatus for simulating high-heat insulation in a cab (like for an airport crash truck) that accually involves the use of duct tape. I havn't tried it yet, but it makes sence, because the tape's fibre leaves a pattern that looks so much like the insulation and padding. Then again, it would be really tough to paint it (unless you want a metalic silver padding or insulation)

This truck is coming together and looks great so far. I can't wait to see the rest of the re-build


http://i6.photobucket.com/albums/y211/razordws/GB%20Badges/WMIIIGBsmall.jpgRed, White, and YOU! group build of 2010

  • Member since
    October 2009
  • From: SURREY ,B.C.
Posted by krow113 on Friday, July 23, 2010 4:14 PM

Pawel : You are a very well rounded modeller ,keep it up!

Thank you ,Krow113

  • Member since
    May 2009
  • From: Poland
Posted by Pawel on Saturday, July 24, 2010 5:01 PM

Railfan 233, interesting remark, duct tape could be a very interesting material. I must take a closer look when I see a roll of such tape.

krow113, welcome to my thread, nice to have you onboard and thanks for your kind words.

I'll go on with the build slowly (just the way I am), but consequently. I hope for an update on tuesday. 'Till then, thanks for your comments and have a nice day

Pawel

All comments and critique welcomed. Thanks for your honest opinions!

www.vietnam.net.pl

  • Member since
    May 2009
  • From: Poland
Posted by Pawel on Friday, August 6, 2010 7:53 AM

Of course, when I state a date, that means another deadline to be missed!

But anyhow, I made a little progress, and here are the pictures:

1:24 Mack Superliner by Pawel Mroczkowski

I painted and installed the seats.

1:24 Mack Superliner by Pawel Mroczkowski

I also finished the inside of the cab sides and back. I'm going to put them together soon!

1:24 Mack Superliner by Pawel Mroczkowski

I also started the stressful job of narrowing the windshield. After narrowing the cab the winshield is 4mm to wide. First the frame, the glass will be next!

1:24 Mack Superliner by Pawel Mroczkowski

Thanks for reading, have a nice day

Pawel

All comments and critique welcomed. Thanks for your honest opinions!

www.vietnam.net.pl

  • Member since
    July 2008
  • From: Florida
Posted by Railfan 233 on Friday, August 6, 2010 8:54 AM

Man, that looks great so far. I don't know why, but I can see the Snow Man from Smokey and the Bandit in the driver's seat. right now...


http://i6.photobucket.com/albums/y211/razordws/GB%20Badges/WMIIIGBsmall.jpgRed, White, and YOU! group build of 2010

  • Member since
    June 2010
  • From: Australia
Posted by OctaneOrange on Monday, August 9, 2010 1:01 AM

Nice to see old models rebuilt rather than tossed out. looks like you're going all out to up the standard of this model, which is good also.

  • Member since
    May 2009
  • From: Poland
Posted by Pawel on Monday, August 9, 2010 9:27 AM

Railfan 233, thanks for your comment! Boy, was that a cool movie or what! Although, just checked it, Snow Man had a Ken W-900. But dang, from what I read, the Macks are just legendary, aren't they? Such a pity Italeri treated them this way...

OctaneOrange, thanks a lot - I thought it would be a pity to toss it, the model has a sentimental value for me, like I wrote before. And, I told myself, I'm gonna do it right this time. But the cleaning of the old paint definitly IS a PAIN... If I could only get a new sleeperbox for it, that would make it so much easier...

Well awright, please stay tuned, thanks for looking and have a nice day

Pawel

All comments and critique welcomed. Thanks for your honest opinions!

www.vietnam.net.pl

  • Member since
    July 2008
  • From: Florida
Posted by Railfan 233 on Monday, August 9, 2010 2:26 PM

Yes, Smokey and the Bandit was a great movie (I only saw the first one, so I'm clueless with the seaquels) So, I'm a little off on the truck model, but if it looks the part, I'll think the truck from Smokey and the Bandit was another semi from an episode or two of the A-Team.

That movie probably helped the CB radio craze of the 80's.

Rodger that, I'm East bound and down!Cowboy


http://i6.photobucket.com/albums/y211/razordws/GB%20Badges/WMIIIGBsmall.jpgRed, White, and YOU! group build of 2010

  • Member since
    May 2009
  • From: Poland
Posted by Pawel on Thursday, August 12, 2010 9:17 AM

Yeah, the eighties - wasn't that a great time?

Anyhow, I have a n update for you:

I narrowed the windshield, it lost 4mm:

1:24 Mack Superliner by Pawel Mroczkowski

I also choppeded the roof underside. With just three cuts I managed to lose no internal detail, that's a lot better than I expected. I'll attach the front part when I have the windshield in place.

1:24 Mack Superliner by Pawel Mroczkowski

Yesterdday I finally put the cab walls together. Lots of sanding now, to prepare it for painting, but so far I'm happy with the results.

1:24 Mack Superliner by Pawel Mroczkowski

1:24 Mack Superliner by Pawel Mroczkowski

And the cab sides are finally flat, and not bulging, like in the kit. Italeri, what kind of human do you have to be to do something like you did?Crying

1:24 Mack Superliner by Pawel Mroczkowski

I also bought some drain cleaner / sodium hydroxide and tried to strip paint from the sleeperbox parts. Most of the paint went off no problems, although the 15 years old bugunda paint amazed me with it's resistibility. Funny thing, the resistant paint lays on a layer of primer, which can be removed with sodium hydroxide, so that makes the removal possible.

1:24 Mack Superliner by Pawel Mroczkowski

The sleeperbox is also too wide and has to be narrowed. It should be wider than the cab, but narrower than the trailer. Currently it is exactly as wide as the trailer. I also feel like stretching the sleeper some 24 mm, and I plan to build the exhaust stack cutouts into it. I don't feel like building the interior for the sleeper - a nice curtain will have to do, unless any of you, dear readers, posts a nice foto of a sleeper interior for me to work with. Then I'll reconsider.

That'd be it for now, have a nice day

Pawel

All comments and critique welcomed. Thanks for your honest opinions!

www.vietnam.net.pl

  • Member since
    October 2009
  • From: SURREY ,B.C.
Posted by krow113 on Thursday, August 12, 2010 10:41 AM

Pawel- I am starting to think you may have too much time on your hands......keep up the good werk!

Thank you ,Krow113

  • Member since
    July 2008
  • From: Florida
Posted by Railfan 233 on Thursday, August 12, 2010 4:13 PM

Pawel

 I don't feel like building the interior for the sleeper - a nice curtain will have to do, unless any of you, dear readers, posts a nice foto of a sleeper interior for me to work with. Then I'll reconsider.

It's looking better and better with the cab Pawel.

I will answer your request for the sleeper interior. The one in the photo I found is sparce, but it is basically what most of them are. Mabe a TV, a small, up-right closet/locker, and that would be just about it.


Then, there's the trucks with the extended sleeper. Those things can get to be about the same as a luxury RV with what's in them.


http://i6.photobucket.com/albums/y211/razordws/GB%20Badges/WMIIIGBsmall.jpgRed, White, and YOU! group build of 2010

  • Member since
    May 2009
  • From: Poland
Posted by Pawel on Friday, August 13, 2010 2:52 AM

Steve - thanks for the comment! Too much time? Why would that be?

Railfan 233 - thanks a lot for the pic! I see this as a challenge to do the sleeper interior. Well awright! By te way your picture just goes to prove Italeri messed up the sleeper too. For example it has TWO bunks in a standard low roof, 36 inch sleeper. Kinda tight! As I said I'm going to stretch my sleeper a bit, then I'll add a locker or something like that. Should you come across a superliner, please take some pics for me. Thanks in advance and have a nice day

Pawel

All comments and critique welcomed. Thanks for your honest opinions!

www.vietnam.net.pl

  • Member since
    May 2009
  • From: Poland
Posted by Pawel on Friday, August 20, 2010 5:18 AM

Here we go with another update!

First I started tweaking the sleeper. By tweaking I mean narrowing it 8 mm and stretching it about 25 mm. I found this drawing on the net:

60 inch Able Body Sleeper dimensions

It has dimensions, that's the cool thing about it. Here are the parts I got to work with:

1:24 Mack Superliner by Pawel Mroczkowski

You can see the lines I penciled for the planned cuts, and also, at the bottom, the new floor I fabricated out of 1mm polystyrene sheet. Yesterday I only managed to narrow the rear wall, chop up the roof and glue the left side to the rear by means of a 5mm fillet. Here's what it looks like now:

1:24 Mack Superliner by Pawel Mroczkowski

The tube once used as a cash register paper spool and has a fitting diameter for the exhaust cutouts.

I also narrowed the roof, with only two cuts and also fitted the windshield frame. I sanded the old paint off the cab. Then it shown that a second run of puttying was necessary. For this purpose I use chopped up sprue dissolved in acetone. This is the first project where I do that. For now it seems to be working.

1:24 Mack Superliner by Pawel Mroczkowski

The roof is only laying there for testing purposes.

1:24 Mack Superliner by Pawel Mroczkowski

Watch this one - I tested the cab-hood fit. Now it fits a whole lot better than before. Starts to look mean also!

1:24 Mack Superliner by Pawel Mroczkowski

I still have to chop up the grille a little to add some Mack logos. I hope you liked it so far, thanks for reading and have a nice day

Pawel

All comments and critique welcomed. Thanks for your honest opinions!

www.vietnam.net.pl

  • Member since
    May 2009
  • From: Poland
Posted by Pawel on Thursday, August 26, 2010 8:32 AM

Movin' on with the sleeper box. First I finished the sides of the sleeper with a wider fillet in front of the doors:


1:24 Mack Superliner by Pawel Mroczkowski

Then I cut up the front wall of the sleeper and also decided to stretch the roof using 2-ply polystyrene sheet. I decided I'll make the exhaust cutouts of the cut-off pieces of the front wall. This way the idea of using cut up tube died, as the tube isn't made of polystyrene and I would have to glue it with CA glue, which I didn't like. The parts I got looked this way:

1:24 Mack Superliner by Pawel Mroczkowski

Top we have the stretched roof with it's front still separate and not yet narrowed. In the middle there's the new sleeper floor with lower portions of the exhaust cutouts in place and bottom we have the front wall with the sleeper entrance reopened and sides cut off.

Next step was to narrow the sides a little and to glue the front wall and the reversed sides to the floor. Below you can see the dry fit of the major three assemblies I have now: the floor/front wall to the sides/rear wall and the sleeper roof. The roof front still has to be narrowed and fitted to the roof:

1:24 Mack Superliner by Pawel Mroczkowski

Next I plan to sand it all a little and then I'm going to paint the interior and add some stuff on the inside of the sleeper. After that's done I'll glue the subassemblies together and try to prepare the whole sleeper for painting.

Hope you liked it, thanks for looking and have a nice day

Pawel

All comments and critique welcomed. Thanks for your honest opinions!

www.vietnam.net.pl

  • Member since
    October 2009
  • From: SURREY ,B.C.
Posted by krow113 on Thursday, August 26, 2010 10:23 AM

Your putting a lot of time on this Pawel ,looking good.

Thank you ,Krow113

  • Member since
    July 2008
  • From: Florida
Posted by Railfan 233 on Thursday, August 26, 2010 1:57 PM

Lots of good work here. I'm liking how it's shaping up. I can't wait to see it all cleaned up and glued back together.


http://i6.photobucket.com/albums/y211/razordws/GB%20Badges/WMIIIGBsmall.jpgRed, White, and YOU! group build of 2010

  • Member since
    May 2009
  • From: Poland
Posted by Pawel on Friday, August 27, 2010 12:51 PM

Steve, Railfan 233, thanks a lot for your comments! And you are already regulars here, you know it feels good to know somebody is actually reading this and that I didn't take all the pictures for nuthin'

Steve - lot of time, yeah, the same could be said about your builds. Guess we like it like that!

Railfan 233 - just like me, I'd also like to see it finished. That is good, keeps me motivated. So far work on this have been a lot of fun, even though it's pretty hard to get good references on this one.

Thanks again for reading, please stay tuned and have a nice weekend

Pawel

All comments and critique welcomed. Thanks for your honest opinions!

www.vietnam.net.pl

JOIN OUR COMMUNITY!

Our community is FREE to join. To participate you must either login or register for an account.

SEARCH FORUMS
FREE NEWSLETTER
By signing up you may also receive reader surveys and occasional special offers. We do not sell, rent or trade our email lists. View our Privacy Policy.