SEARCH FINESCALE.COM

Enter keywords or a search phrase below:

Trumpeter 1/35 M198 155mm Howitzer, Finished, 8/09/09

60526 views
157 replies
1 rating 2 rating 3 rating 4 rating 5 rating
  • Member since
    July 2006
  • From: New Jersey
Trumpeter 1/35 M198 155mm Howitzer, Finished, 8/09/09
Posted by redleg12 on Monday, May 18, 2009 7:38 PM

Gentleman - Welcome to the WIP of the Trumpeter 1/35 M198 "Early Version"

Background & Kit in-box review - Here was my kit in box review

http://www.armorama.com/modules.php?op=modload&name=Reviews&file=index&req=showcontent&id=3874

Reference

Hummmm.....where have I seen this picture before!!

Here is a little video to get the juices flowing (watch the door on the left side!!)

http://www.youtube.com/watch?v=v94qdpJqK9w

Also it is handy to have TM 9-1025-211-10

Kit Construction

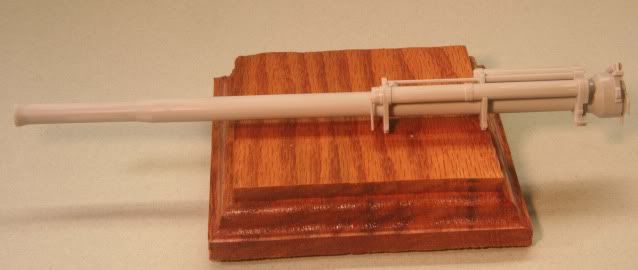
The first step is to assemble the barrel and recoil system.  As noted in my review, the barrel is a two piece styrene barrel. Though the fit was quite good there was still the time and care to sand and in some places fill the seam without making the barrel into a football. Once completed, the recuperating cylinders and mounting brackets are assembled. The breech and breech block are assembled to the rear of the tube and the entire assemble is glued together.

(PS....Please excuse the color of these pictures. My camera setting were screwed up and did not catch up with it until I downloaded!)

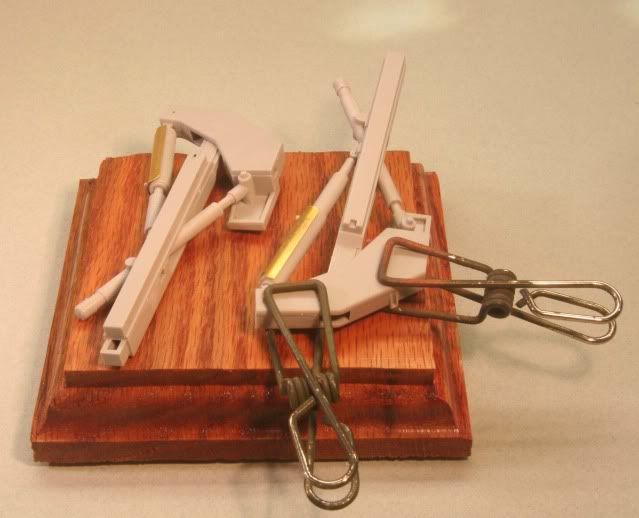
The next four steps are for the assembly of the equilibrators and the upper frames which hold the equilibrators. Step two of directions is poor as the give you a choice of two different length covers for the upper equilibrators.  They do not give any explanation as to which one to use, depending on the finished model.

If you are going to build the model in the emplaced, or as the instructions call it "combat" mode and intend to show the tube elevated, then use the shorter of the two choices (C5). If it will be depicted attached to a prime mover, then use the longer (C9).

In step 4 & 5 the recoil sled and frames are assembled with the equilibrators. Though the molding of the parts were clean they appear to have a very slight warp and require clamps or rubber bands to get a tight fit on the seams of the frame halves. The seams were then filled with Mr Surfacer 500 and sanded.

Step six is the assembly of the frames to the barrel assembly and the attachment of the muzzle brake. The muzzle brake has a flash line around the inside where the mold halves meet which needs removal. Also the flat sections were a bit depressed and required some minor filling with built up Mr Surfacer 500 to get flat and smooth.

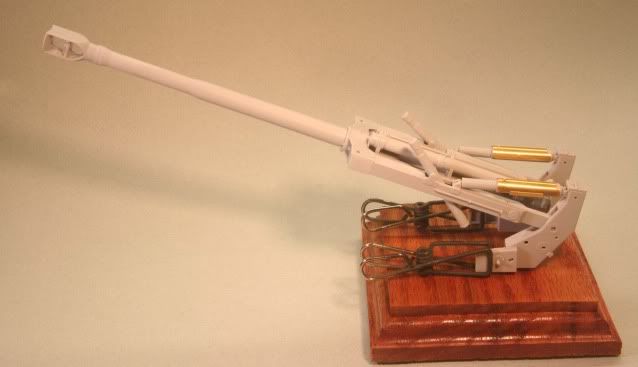
The next two steps finish the upper assembly but areas of the underside would become extremely difficult to paint. I will stop here to prime and base coat the upper assembly and remaining major parts. With that I will skip to the lower carriage/trails

Steps 9 thru 11 are the assembly of the two trails. This entails the attachment of numerous details, grab handles, etc. On both trails there are molded racks for the ramming staffs and aiming posts. I left these off for further detailing along with the sight case and case frame.  In general the fit of the parts are good except where the grab handles fit to the rear as the molded holes are bigger than the handles and require some minor filling.

Also, I left off the wire reel for the right trail as this may have been on the original plans and some "very" early units but nothing I have, even in the early days shows the reel assembly attached.    

Step 12 has the two trails joined to the lower carriage section. Again, the larger pieces when joined require clamping, then filling and sanding. The directions in this step will be confusing (for a non artilleryman) as they show the trail guides (part C35) in the travel position. If the model is in the emplaced mode these guides need to be glued in place to match the trails when open. Also this step shows the application of a decal and then some handles which fit through the decal. Obviously these were left to be applied later after painting.

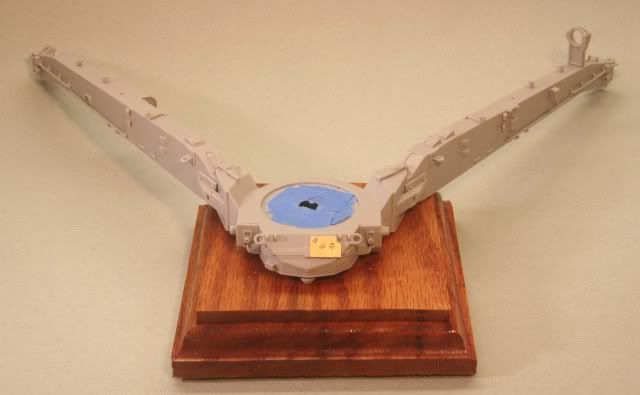
That's it for now. Off to the paint booth for some priming and base coat of NATO Green. (PS..Yes, I went for the "Bill" look with the base in the pics. For size reference, the base is 3 ½ inches square.)

Total hours this update - 6.0 hours

Total hours this overall build - 6.0

Thanks for looking and as always, all comments are welcome.

Rounds Complete!!

"The Moral High Ground....A Great Place to Emplace Artillery."

  • Member since
    November 2006
  • From: United States
Posted by ww2modeler on Monday, May 18, 2009 8:47 PM

Looks pretty cool so far, looking forward to seeing more of it!

David

On the bench:

1/35 Tamiya M26 Pershing-0%

1/144 Minicraft P-38J Lightning-50%

Numerous 1/35 scale figures in various stages if completion.


  • Member since
    July 2006
  • From: Philippines
Posted by constructor on Monday, May 18, 2009 9:24 PM
Thanks for this post. I have the kit and have been contemplating on building it soon. This will make a good guide for my build. The tips are very valuable as these are not included in the instructions. Looking forward to your finished M198!
  • Member since
    November 2005
Posted by Anonymous on Monday, May 18, 2009 10:05 PM
Very cool...how often do you get to "do" your avatar?
  • Member since
    December 2005
  • From: Syracuse, NY
Posted by lexesbenz on Tuesday, May 19, 2009 1:00 AM
Nice works so far. I have a question, what actually makes these things fire off? same with tank rounds, there not a firing pin mechanism right? I especially wanna know how the Karl Morsers shell was fired, ya know the engineering aspect of it. They can't be like modern bullets with a firing pin are they? see I don't know that much about this stuff.
The flying hamster of doom rains coconuts on your pitiful city!!!!
  • Member since
    July 2006
  • From: New Jersey
Posted by redleg12 on Tuesday, May 19, 2009 6:10 AM

David - thanks for stopping by and for your comments.

Constructor - Glad I could be of some help. The directions are not the best! Thanks again for your comments.

Manny - Yep, I looked through the pictures for research, but I thought for posting somehow this one was near and dear to my heart!! Thanks again.

Lexesbenz - Thanks for the comments. Now for your question....Yes, there is a firing pin.

On tank ammunition or semi-fixed artillery ammunition (which is the projectile, bullet, and a casing with powder bags), both have a primer stamed into the bottom of the casing. The breech block and firinglock has a firing pin. when the lanyard or trigger is pulled, just like a pistol the firing pin strikes the primer setting off the round.

On separate loading artillery ammunition the projectile is loaded, the powder bags are loaded. With the breech closed a primer is loaded into a "holder" which puts it in line with the firing pin and can set off the powder to propel the projectile.

On mortars that you see top loaded, they too have a firing pin. It is built into the base of the mortar. The mortar round has a primer built into the bottom of the round. In between the fins of the mortar round is the propellant which is more plastic like than powder. When the round hung and dropped down the tube, it slides down, the primer hits the firing pin, sets off the propellant and "bloop", the round fires.

So yes, there is a pin in all of them. Simple mortars have a fixed pin to artillery which has a mechanical pin which moves when a lanyard is pulled to a modern tank when the mechanical pin is electronically controlled. From WWII to today it has not changed much on the basics of how it works.

Lastly the Karl Morsers shell. This was a separte loading ammunition so the shell would be loaded the special powder bags would be loaded. The breech closed and a primer inserted. The lanyard pulled would actuate a mechanical system where a firing pin would strike the primer and set off the powder. BOOM...

Hope this helps. If you have more questions...feel free to pull my lanyard (a string or cord attached to the trigger mechanism of a large gun which allows you to fire it from a distance)

Rounds Complete!! 

"The Moral High Ground....A Great Place to Emplace Artillery."

  • Member since
    December 2002
  • From: Valrico, FL
Posted by HeavyArty on Tuesday, May 19, 2009 6:56 AM

Looking great Mike.  Good job so far.  Make sure you level all your bubbles before firing it though. 

Be honest, you just made up all that firing pin stuff.  You know its really voodoo magic that we use to fire artillery.  Oh wait, thats the Fire Direction side of the business.Big Smile [:D]

Gino P. Quintiliani - Field Artillery - The KING of BATTLE!!!

Check out my Gallery: https://app.photobucket.com/u/HeavyArty

"People sleep peaceably in their beds at night only because rough men stand ready to do violence on their behalf." -- George Orwell

  • Member since
    January 2009
  • From: clinton twp, michigan
Posted by camo junkie on Tuesday, May 19, 2009 7:17 AM
looks nice so far heavy. have you decided what kind of a paint job your gonna give it? desert/3-tone/o.d.? just curious.
"An idea is only as good as the person who thought of it...and only as brilliant as the person who makes it!!"
  • Member since
    July 2006
  • From: New Jersey
Posted by redleg12 on Tuesday, May 19, 2009 8:40 AM

Gino - LOL......the Funny Duck Club has nothing to do with it......it's the gun chief using "the force" Smile,Wink, & Grin [swg]. On this one, I'm checking the powder temp every time I sit down at the bench!

Glad to see you stopping by......from home Party [party].

The kit has it's drawbacks but is much nicer than the resin versions (we have both been hit with the build it and then they make it in styrene curse). Thanks again.

Camo - Well....going with the NATO 3 color camo. Thanks for you comments and stopping by.

Rounds Complete!! 

"The Moral High Ground....A Great Place to Emplace Artillery."

  • Member since
    June 2007
Posted by squeakie on Tuesday, May 19, 2009 10:35 AM
 redleg12 wrote:

Gino - LOL......the Funny Duck Club has nothing to do with it......it's the gun chief using "the force" Smile,Wink, & Grin [swg]. On this one, I'm checking the powder temp every time I sit down at the bench!

Glad to see you stopping by......from home Party [party].

The kit has it's drawbacks but is much nicer than the resin versions (we have both been hit with the build it and then they make it in styrene curse). Thanks again.

Camo - Well....going with the NATO 3 color camo. Thanks for you comments and stopping by.

Rounds Complete!! 

Red Leg, Gino, or whoever knows,

was looking at the photo you posted of the howitzer send a piece of iron down range. First thing that I noticed was the AG was on the left side of the breech (I've never really paid any attention to this before). But what caught my eye was the round laying in the cradle. I've never seen a 155 round made like that, plus it looks much longer and in a similar shaped ogive to a 175mm round. Also the base (heel of the boattail) has a small round part on the base I've never seen before. Would this be a RAP round or a Copper head? As many thousand 155 rounds we shot in my day I never saw anything that looked like that, let alone one that put out thatkind of thick black smoke. Ours had a like grey smoke, and then not much of it.

gary

  • Member since
    January 2009
  • From: clinton twp, michigan
Posted by camo junkie on Tuesday, May 19, 2009 12:08 PM
 redleg12 wrote:

Camo - Well....going with the NATO 3 color camo. Thanks for you comments and stopping by.

Rounds Complete!! 

anytime. as an arty man myself (only survey...years ago) i can appreciate a good cannon!! Laugh [(-D] btw, guess i got u and heavy mixed up there...sorry...sometimes helps to pay attention! lol

"An idea is only as good as the person who thought of it...and only as brilliant as the person who makes it!!"
  • Member since
    July 2004
  • From: Texas
Posted by wbill76 on Tuesday, May 19, 2009 1:50 PM

Lots of progress in the one post Mike and looks like you've conquered the normal Trumpeter tendency for seams and such very nicely. Thumbs Up [tup]

I can't claim any credit for the use of the small stand in some of the WIP photos...it was a trick I learned when doing close-ups with the macro lense from a photography site when I was trying to figure out how to get my DSLR to behave properly. It gives the camera something else to "look at" in terms of focusing and that's the only reason I use it, to get better depth of field in the shots (and also because it's pretty handy for well, setting stuff on!). Wink [;)]

  • Member since
    December 2002
  • From: Valrico, FL
Posted by HeavyArty on Tuesday, May 19, 2009 2:20 PM
 squeakie wrote:

Red Leg, Gino, or whoever knows,

was looking at the photo you posted of the howitzer send a piece of iron down range. First thing that I noticed was the AG was on the left side of the breech (I've never really paid any attention to this before). But what caught my eye was the round laying in the cradle. I've never seen a 155 round made like that, plus it looks much longer and in a similar shaped ogive to a 175mm round. Also the base (heel of the boattail) has a small round part on the base I've never seen before. Would this be a RAP round or a Copper head? As many thousand 155 rounds we shot in my day I never saw anything that looked like that, let alone one that put out thatkind of thick black smoke. Ours had a like grey smoke, and then not much of it.

gary


It is an HE RAP round.  Other than that it is a standard 155 projo.  4 Square wieght and all.

Gino P. Quintiliani - Field Artillery - The KING of BATTLE!!!

Check out my Gallery: https://app.photobucket.com/u/HeavyArty

"People sleep peaceably in their beds at night only because rough men stand ready to do violence on their behalf." -- George Orwell

  • Member since
    July 2006
  • From: New Jersey
Posted by redleg12 on Tuesday, May 19, 2009 6:40 PM

Gary - The smoke could also be after swabbing and some cook off of RBC, but the RAP could also contribute.

Camo - 82C.....a "bro" Thumbs Up [tup]. As for the confusion, Heavy (Gino) in my younger "brother" Shock [:O]

Bill - Yep, Trumpeter and seams....thank god for Mr Surfacer.

Gino - Well....my generation was more into "rock and roll"......with plain old HE Big Smile [:D] Thanks for getting to the question Thumbs Up [tup].

Rounds Complete!! 

"The Moral High Ground....A Great Place to Emplace Artillery."

  • Member since
    February 2008
  • From: ladner BC Canada
Posted by stick man on Tuesday, May 19, 2009 7:00 PM

Looks good Redleg12 hope to see more soon!

Smile [:)]

I'm 15 and I model I sk8board and I drum what could be better.
  • Member since
    January 2012
Posted by I make stuff on Tuesday, May 19, 2009 7:41 PM

Redleg,

Last night I bivouacked, the coast was clear, then when I woke up, that gun was in place.  Should have put out pickets.

Man, this one is really coming along.

Pardon the hijack, but what exactly is Mr Surfacer, is it a thin putty, or a thick paint, or what?  I see reference to it as a seam hider/gap filler, just wondering.

Looking good, sir.

Bill     

  • Member since
    July 2006
  • From: New Jersey
Posted by redleg12 on Tuesday, May 19, 2009 7:49 PM

Stick - At the bench now....will post some hopefully this weekend

Gary - To explain Mr Surfacer, http://www.swannysmodels.com/Surfacer.html 

Hope that helps. They also have a liquid putty. I like the putty and the 500 grades for filling seams. Thanks for looking....don't spend too much time in the fart sack Shock [:O]

Rounds Complete!!


"The Moral High Ground....A Great Place to Emplace Artillery."

  • Member since
    December 2005
  • From: Syracuse, NY
Posted by lexesbenz on Tuesday, May 19, 2009 9:43 PM
Indeed it does, thank you for taking the time to explain it to me, I really appreciate it.
The flying hamster of doom rains coconuts on your pitiful city!!!!
  • Member since
    January 2009
  • From: clinton twp, michigan
Posted by camo junkie on Tuesday, May 19, 2009 10:11 PM
 redleg12 wrote:

Camo - 82C.....a "bro" Thumbs Up [tup]. As for the confusion, Heavy (Gino) in my younger "brother" Shock [:O]

Rounds Complete!! 

yes sir 82c. thanks 4 the thumbs up. good 2 know heavy is your younger bro....then maybe no one gets mad. Laugh [(-D]

"An idea is only as good as the person who thought of it...and only as brilliant as the person who makes it!!"
  • Member since
    July 2006
  • From: New Jersey
Posted by redleg12 on Sunday, June 7, 2009 8:14 PM

I apologize for not posting sooner but between work and the "beginning of summer" chores, it was all I could just to find bench time. Hopefully, that has "passed" and I can keep up with the updates.

After priming with some flat black and some seam cleanup, I noticed 3 parts which are not mentioned on the directions. I also was looking for the brake system gauges and low and behold there they are.  The parts need to have their locating pins trimmed as the trail section does not have the holes to accept them. The two lines from the gauges to the air system are molded into the trail and the cutout on the back of the gauges sits perfectly on them. The protective plate is then just centered over the gauges (currently in the micro clip.

The upper assembly requires painting before the bottom plate is assembled in step 9 as it will be very difficult to paint inside the sled once it is in place. Trumpeter did a poor job of attachment points for the plate as they have 6 holes in the plate and six pins on the supports for the sled. It should have been reversed. The kit's current setup for the plate leaves six "holes" to be filled on what should be a solid plate.

The seam at the rear of the trail where the spade block attaches to the box channel trail is a welded seam. Arched weld bead does the trick

The brake air pressure gauges and guard attached to the trail

The lower carriage is assembled minus the sight box and holder and the ramming staff holders on either side. These will be added after the camo painting.

Back to the upper carriage, the M90 chronograph bracket was added earlier. Now, I also added the bolts with Archer bolt detail. The side seam on the front assembly (ahead of the bracket) is showing a flat weld done with liquid putty

The front side of the front assembly has a heavy weld bead, which again is Archer weld bead.

After spending some time in the spray booth, here is the base NATO camo pattern with NATO Black, Brown and Green on the lower carriage.

Finishing up the parts on the lower carriage, the sight box, ramming staff holders, spade and spade locking pins, axel and brakes and tires (just fitted).

  • The sight chest is painted US Dark Green with OD straps, Black handle and strap clips and Steel on the handle fitting.
  • The ramming staffs were painted US Dark Green with the holder assemblies painted to match the camo pattern.
  • The brake assembly is flat black and the brake drum is Steel.
  • Tires were worked with a scrub sponge to give edge wear and scuff up the surface
  • The spades were assembled as per the instructions. If the spades are going to be attached, the instructions are poor. You should use a slow setting glue and attach both pins first. Then attach the spade and position the pins in the proper position before the glue on the pins dry. That was fun Banged Head [banghead]
  • Trail locking pins were painted Steel and .005 SS wire used to simulate the retaining wire.

That's it for now. Next, get the upper carriage caught up with the lower carriage.

Total hours this update - 14.0 hours

Total hours this overall build - 20.0

Thanks for looking and as always, all comments are welcome.

Rounds Complete!!

"The Moral High Ground....A Great Place to Emplace Artillery."

  • Member since
    January 2009
  • From: clinton twp, michigan
Posted by camo junkie on Monday, June 8, 2009 5:36 AM
nice job so far red! she's looking pretty sweet! Big Smile [:D]
"An idea is only as good as the person who thought of it...and only as brilliant as the person who makes it!!"
  • Member since
    September 2006
  • From: Central Texas
Posted by NucMedTech on Monday, June 8, 2009 6:36 AM

RedLeg, great job so far. Can't wait to see the business end of this one.

-StephenCowboy [C):-)]

Most barriers to your successes are man made. And most often you are the man who made them. -Frank Tyger

  • Member since
    July 2006
  • From: New Jersey
Posted by redleg12 on Monday, June 8, 2009 10:02 AM

Camo - Thanks for stopping by and the comments

Steve - Yep, looking forward to the working end myself. Thanks for stopping in.

Rounds Complete!!

"The Moral High Ground....A Great Place to Emplace Artillery."

  • Member since
    January 2009
  • From: clinton twp, michigan
Posted by camo junkie on Monday, June 8, 2009 10:14 AM
hey, i'll stop by anytime for anything modern!! Thumbs Up [tup]
"An idea is only as good as the person who thought of it...and only as brilliant as the person who makes it!!"
  • Member since
    July 2004
  • From: Texas
Posted by wbill76 on Monday, June 8, 2009 1:10 PM
Making some good progress here Mike despite the distractions of the summer chores! Base looks good, just don't make us wait so long for the next set of pics. Big Smile [:D]
  • Member since
    January 2012
Posted by I make stuff on Monday, June 8, 2009 1:20 PM
Cool Redleg, this is looking very good.
  • Member since
    July 2006
  • From: New Jersey
Posted by redleg12 on Monday, June 8, 2009 1:37 PM

Bill - Thanks....I'm hopefully out of the woods with the "outdoor opening" projects....whew! Just have to keep up with the grass Whistling [:-^]. That "should" leave me more bench time. Hope to keep up and get back to my weekly reports!

Bill 87 - Thanks for stopping in and your comments

Rounds Complete!!

"The Moral High Ground....A Great Place to Emplace Artillery."

  • Member since
    October 2004
  • From: League City, Texas
Posted by sfcmac on Monday, June 8, 2009 7:34 PM
 I sure hope you know what your doing there! Laugh [(-D] Gotta luv it!
  • Member since
    July 2006
  • From: New Jersey
Posted by redleg12 on Monday, June 8, 2009 7:53 PM

Aaron - Not to fear, there won't be a misfire causing the tube to be punched here!!

Thanks for stopping by.

Rounds Complete!!

"The Moral High Ground....A Great Place to Emplace Artillery."

  • Member since
    October 2004
  • From: Katy, TX
Posted by jthurston on Tuesday, June 9, 2009 1:37 PM

you this is me, adjust fire, over Thumbs Up [tup]

The camo on those trailarms brings me back to slingload school. That old 3-color Reforger look. Ahhh...it's like Old Home Week. If something happened you could touch it up with a rattlecan, then stencil CARC on it...Big Smile [:D]

Ya know, maybe I should start building subjects I've actually worked with in real life. LOL - never drove a Panzer IV...

JOIN OUR COMMUNITY!

Our community is FREE to join. To participate you must either login or register for an account.

SEARCH FORUMS
FREE NEWSLETTER
By signing up you may also receive reader surveys and occasional special offers. We do not sell, rent or trade our email lists. View our Privacy Policy.