SEARCH FINESCALE.COM

Enter keywords or a search phrase below:

Visible B-17, Finally Finished - new pic, last page

20411 views
60 replies
1 rating 2 rating 3 rating 4 rating 5 rating
  • Member since
    January 2007
Visible B-17, Finally Finished - new pic, last page
Posted by Gigatron on Monday, October 12, 2009 7:28 AM

Well, it's been 10 long months, using every last technique I know, but she's finally finished.

Just a few basics; it's the re-release kit that came out last year, it has every PE kit that Eduards makes for it and a ton of scratchbuilt items.

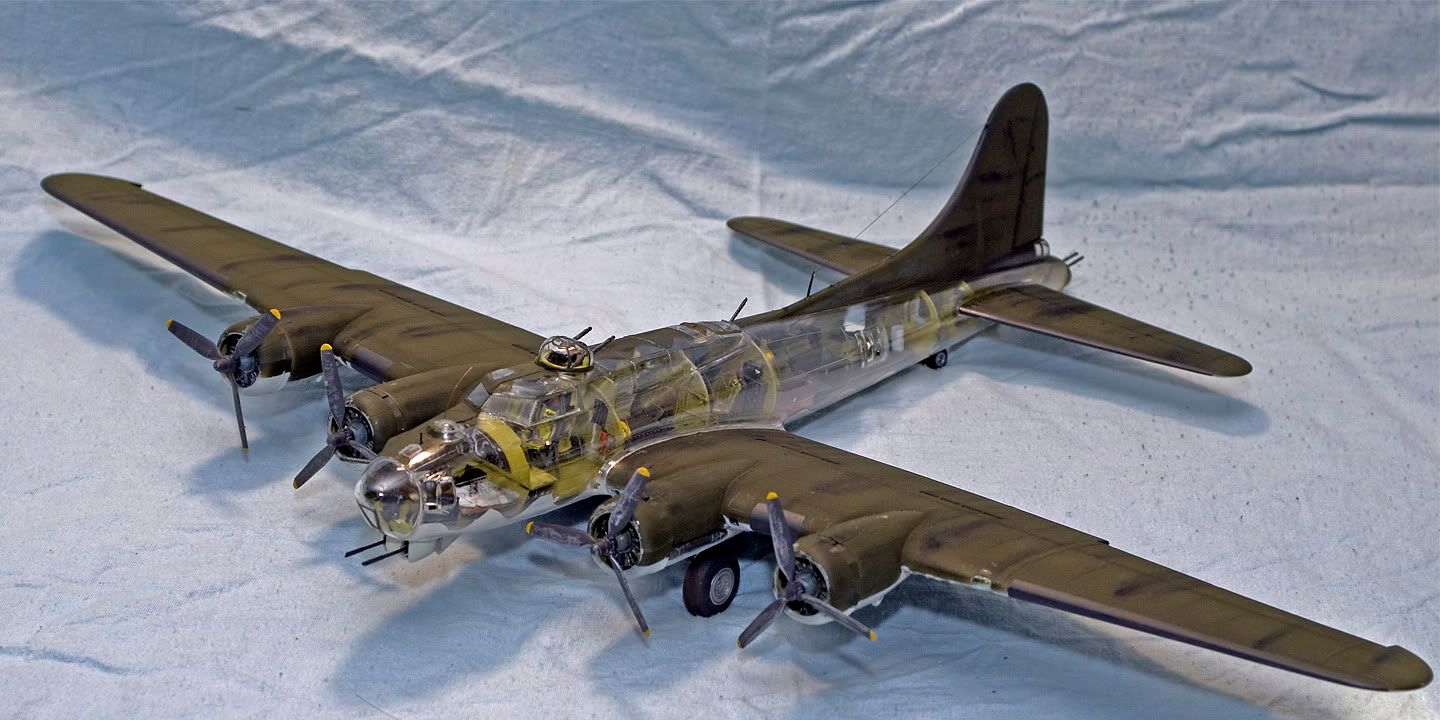
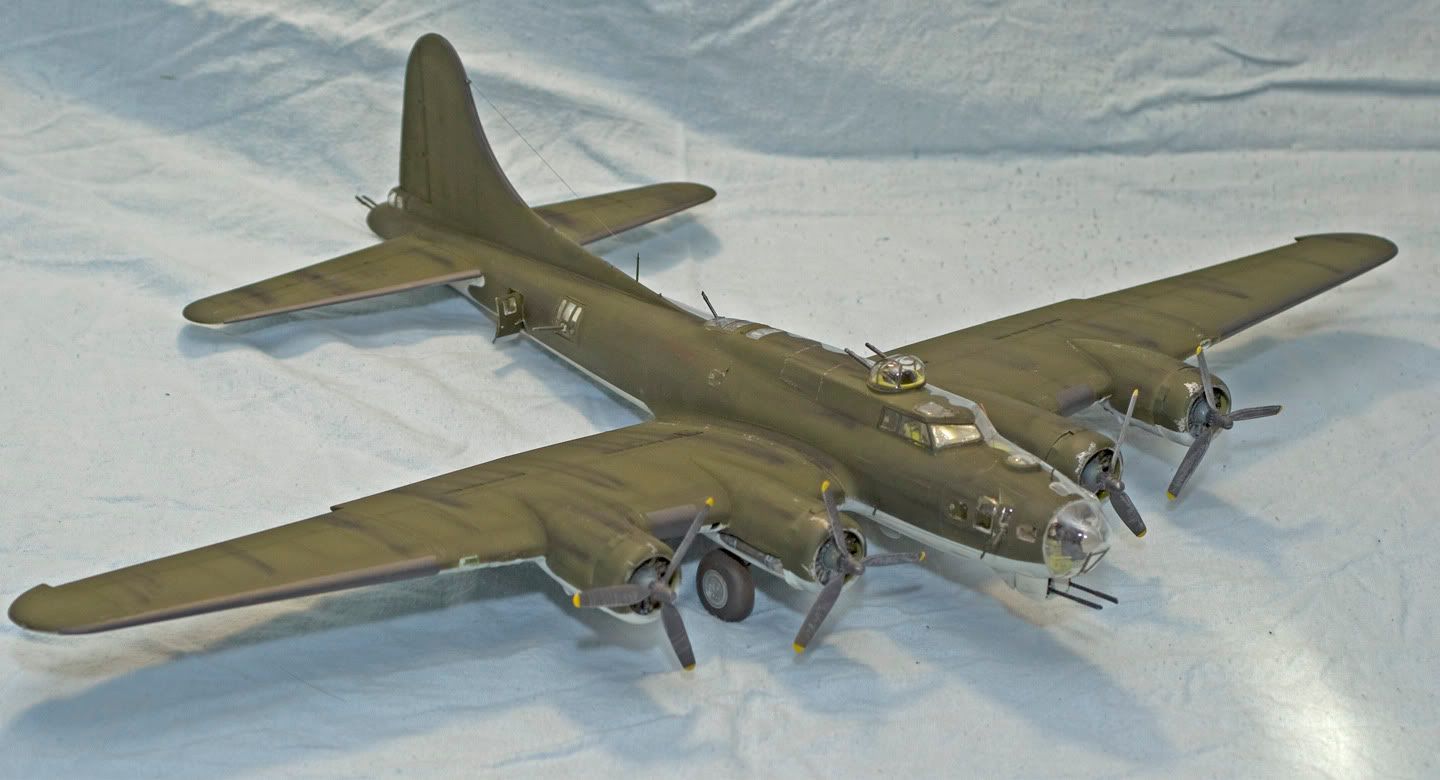
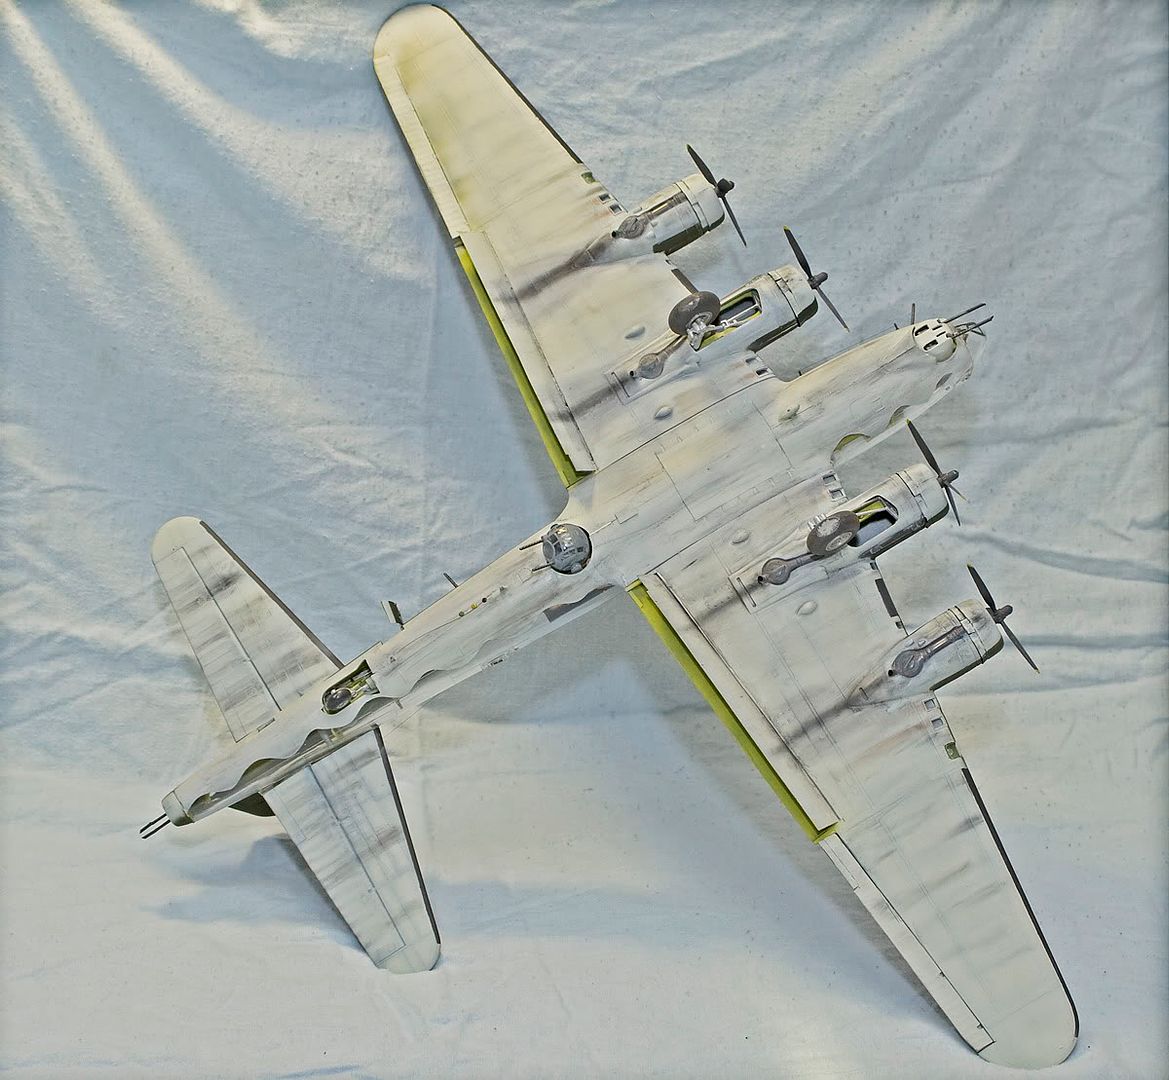
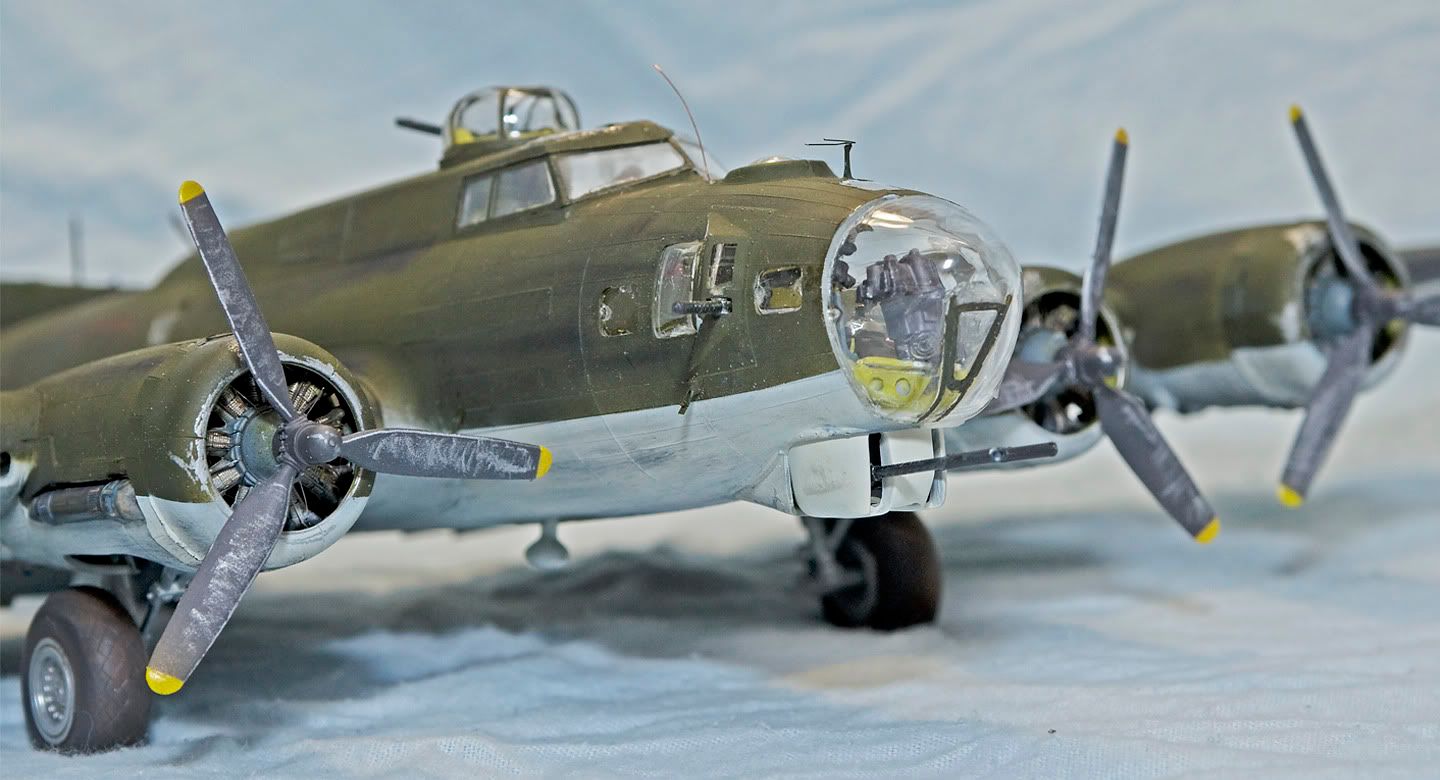
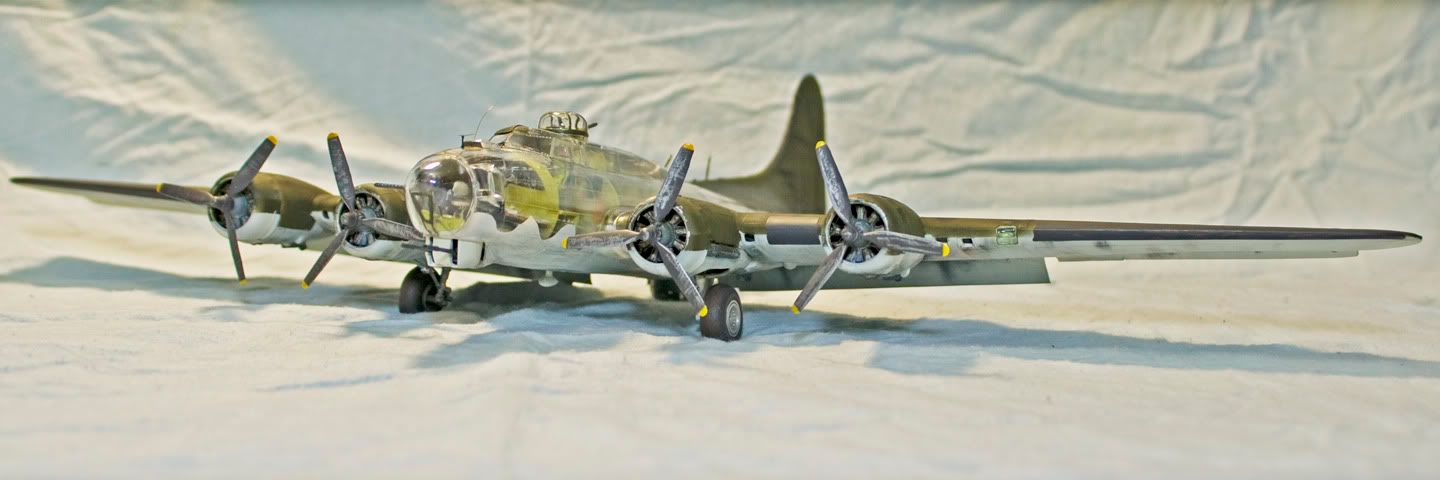
So, without further ado, I am pleased to finally introduce, the completed Visible B-17

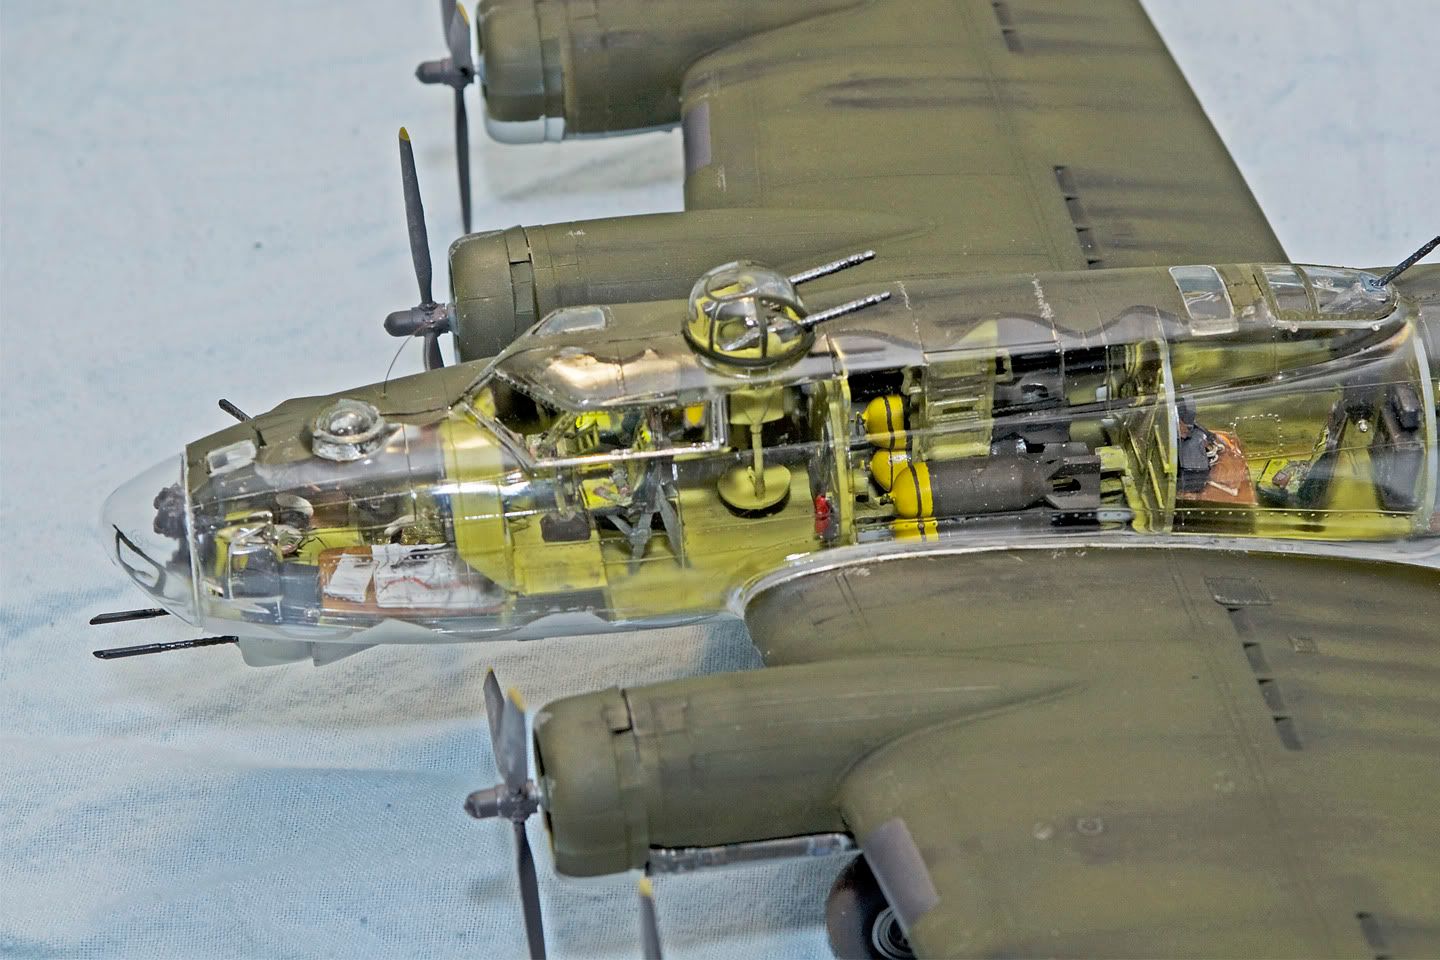
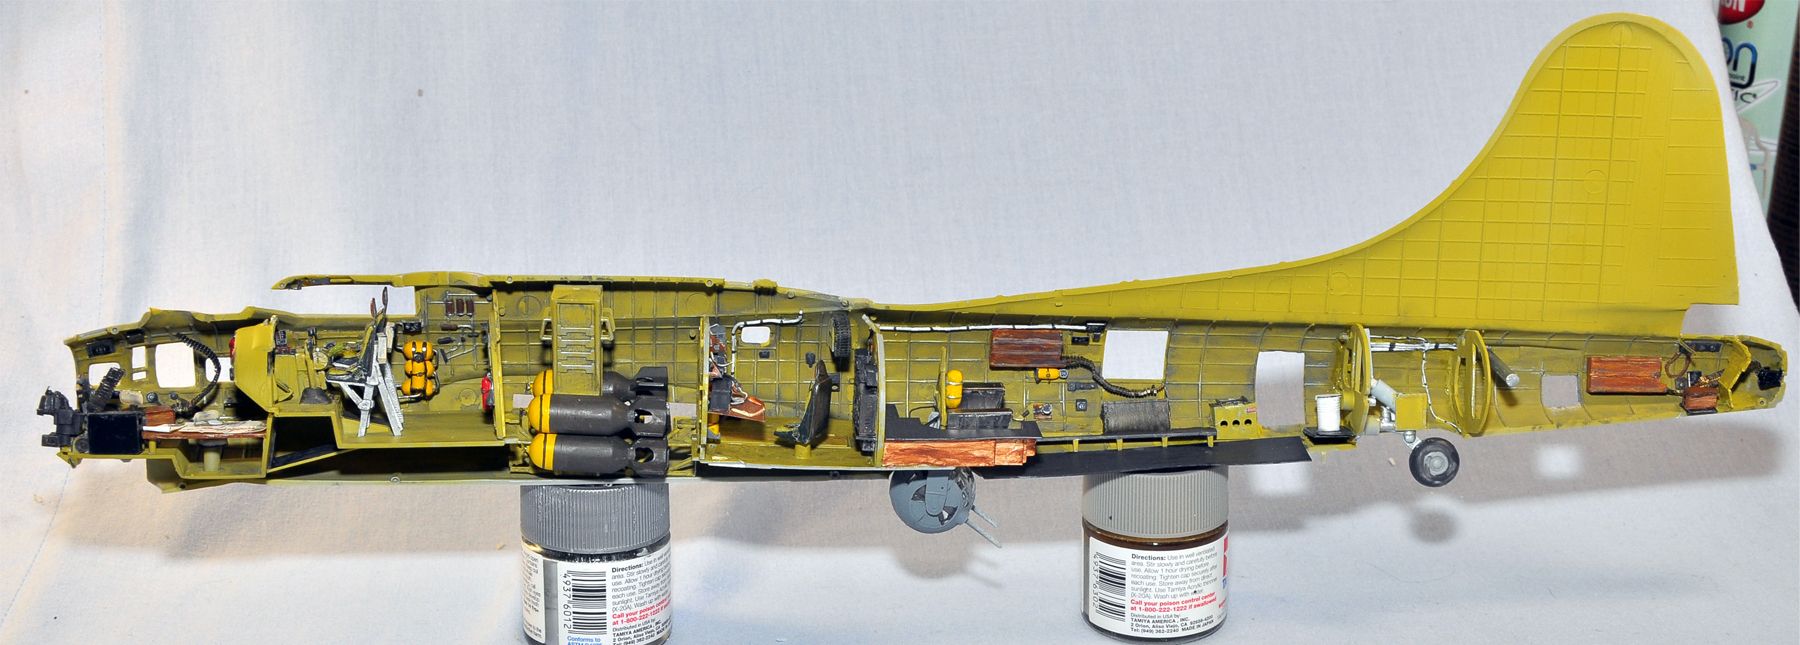
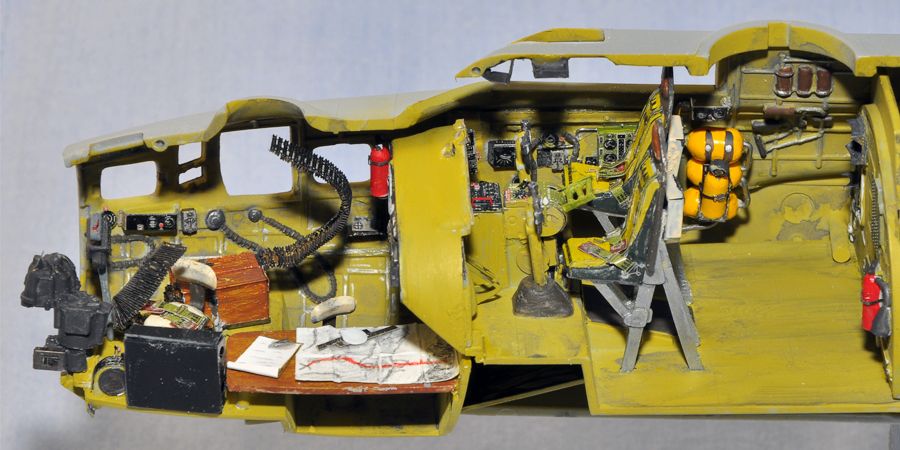
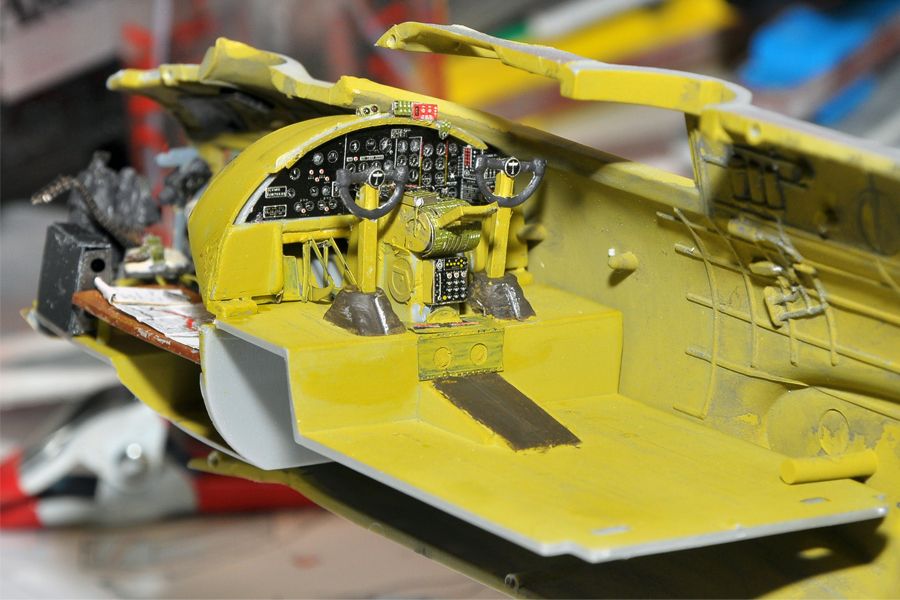
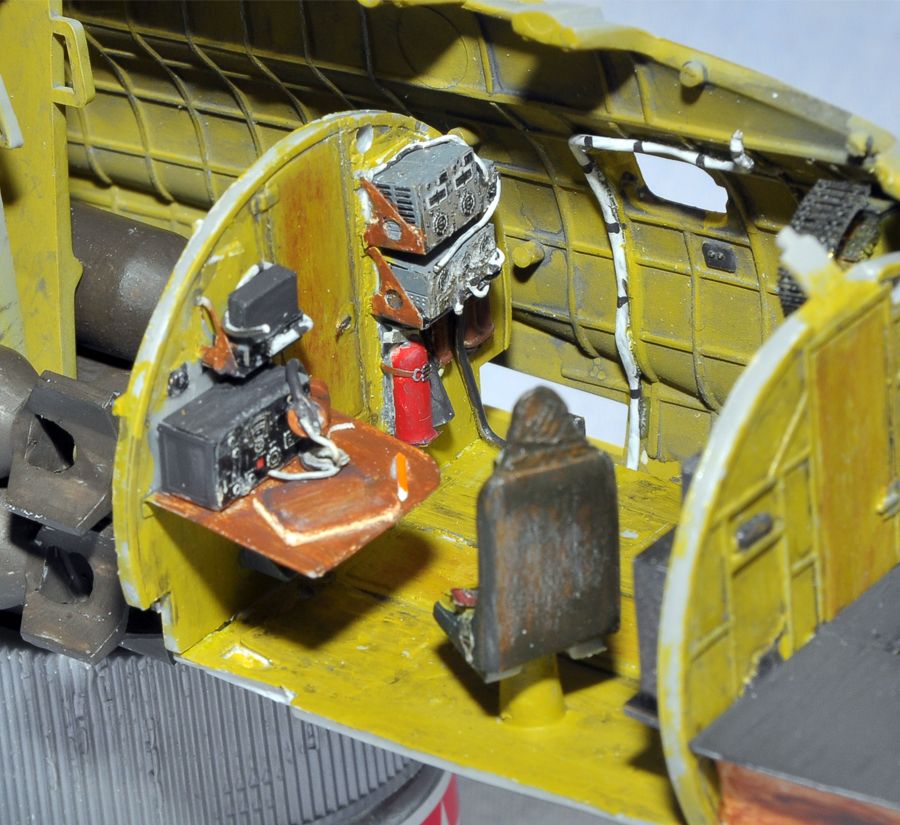
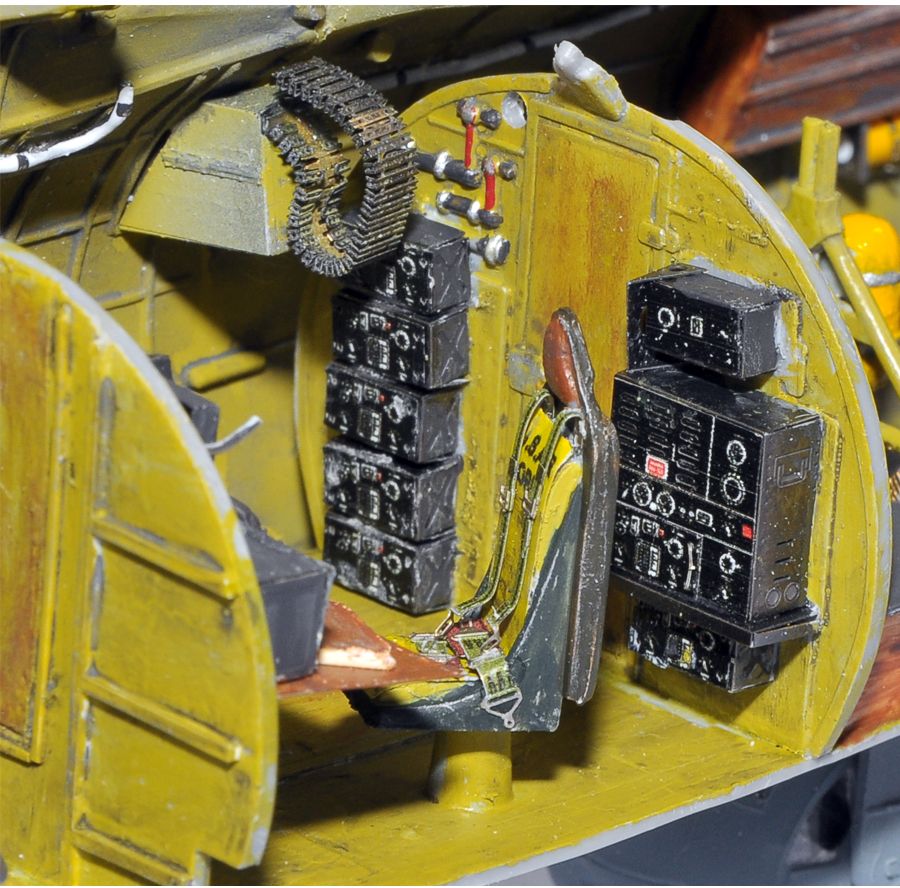
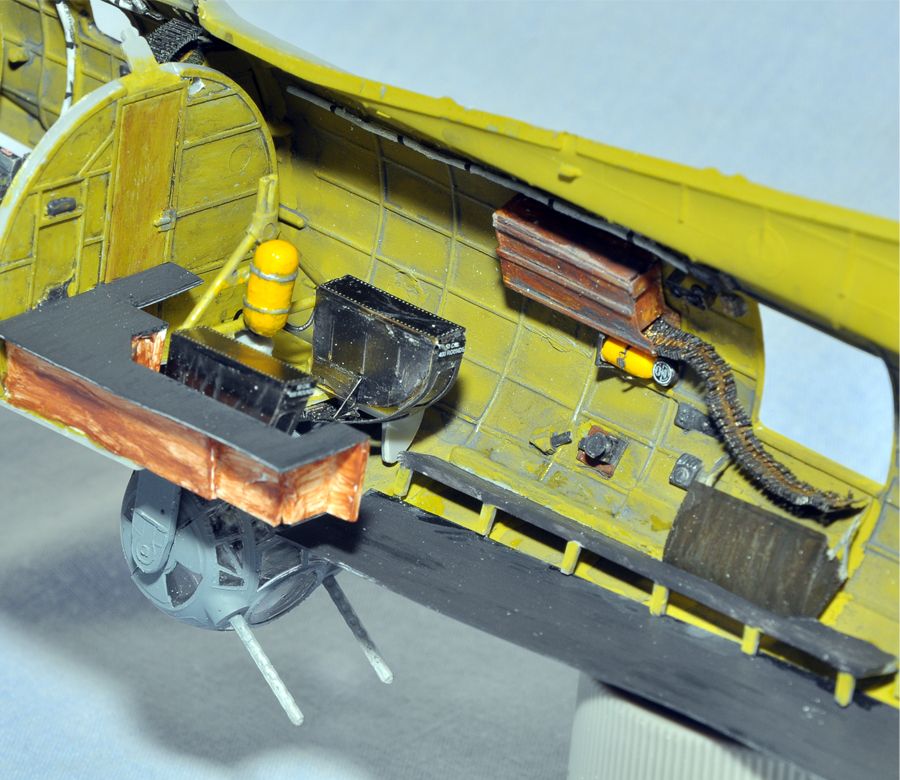
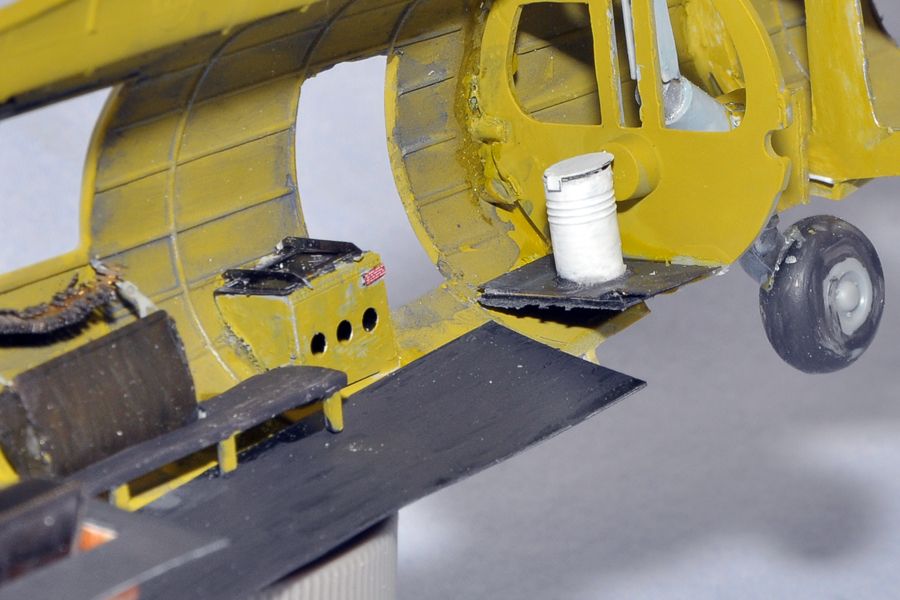
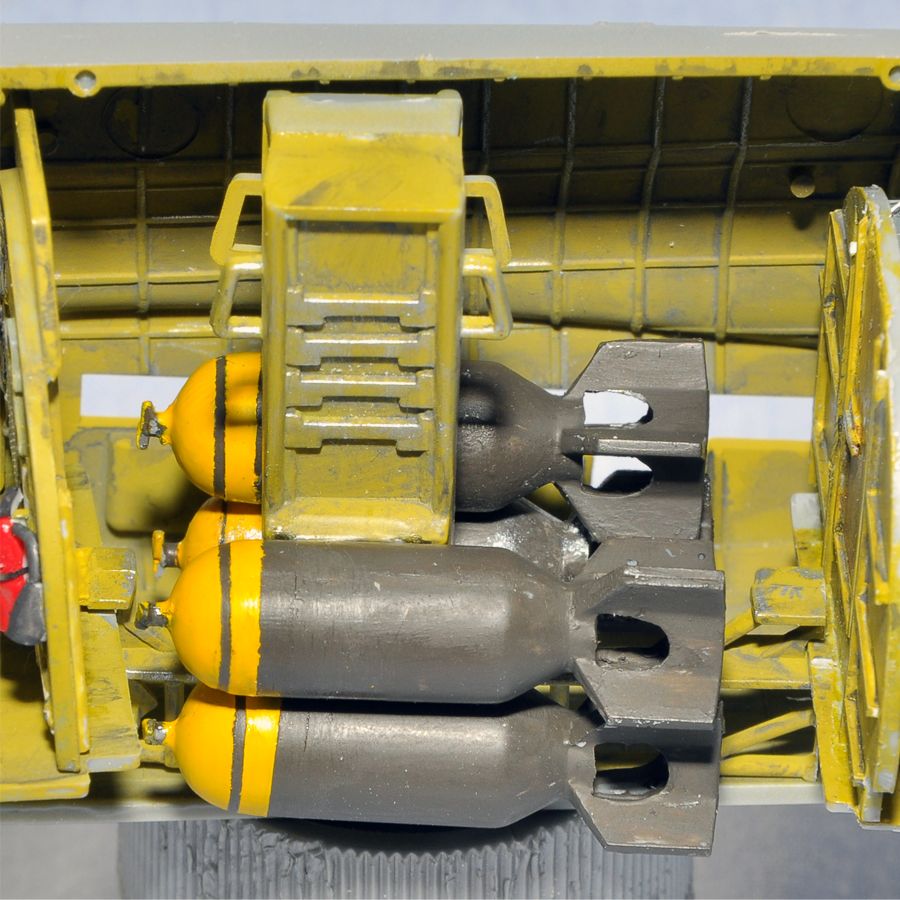
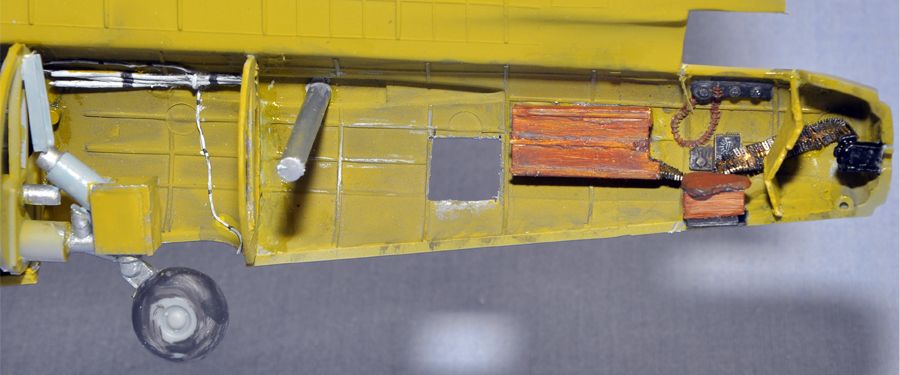
and for those who haven't followed, here's a few pics of the inside before she was buttoned up

As always, cronstructive criticisms and questions are welcome.

Enjoy,

-Fred


  • Member since
    March 2008
  • From: New Jersey
Posted by Dirkpitt289 on Monday, October 12, 2009 8:21 AM
What a truly amazing job. I can see why it took you 10 months to build.

Dirk

On The Bench:

B-17F "Old 666" [1/72]

JU-52/53 Minesweeper [1/72]

Twin Me 262's [1/72] Nightfighter and Big Cannon

  • Member since
    February 2007
  • From: Brunswick, Ohio
Posted by Buckeye on Monday, October 12, 2009 9:07 AM

Awesome work there! Bow [bow]

Mike

  • Member since
    December 2002
  • From: NYC, USA
Posted by waikong on Monday, October 12, 2009 9:24 AM
I've been waiting for you to finish this one, very nicely done. I love builds where you can see into the aircraft - always fascinating.

My website: http://waihobbies.wkhc.net


  • Member since
    February 2003
  • From: A Spartan in the Wolverine State
Posted by rjkplasticmod on Monday, October 12, 2009 9:24 AM

Excellent Build.  The interior detail is amazing.  Curious why there are no National Insignia or other markings.

Regards,  Rick

RICK At My Age, I've Seen It All, Done It All, But I Don't Remember It All...
  • Member since
    October 2007
  • From: Inland Northwest
Posted by Summit on Monday, October 12, 2009 9:59 AM
Fred -  It has been a long 10 months of looking forward to your WIP progress pics. Your B-17 is something to be Really Proud of . I was so dissapointed to have read of the fogging issue, I was glad you were able to fix that.  Very Nicely Done - Bravo Bow [bow] Bow [bow]
Sean "I've reached nearly fifty years of age with my system." Weekend GB 2008
  • Member since
    January 2007
Posted by Gigatron on Monday, October 12, 2009 10:13 AM

Thanks, everyone Big Smile [:D] Cool [8D]

One the one hand, I'm so glad it's over and on the other, I'm going to kind of miss it - all the intricate building and studying pictures.  Of course, after I took the pictures, I realized I knocked off the tail gunner's access hatch and I never took a picture of the part that took the longest - the PE flaps.  The flaps took me almost a month each, to build.  I've never seen such fiddly pieces in my life


 rjkplasticmod wrote:

Excellent Build.  The interior detail is amazing.  Curious why there are no National Insignia or other markings.

Regards,  Rick

Thanks, Rick.  Honestly it was sort of an executive decision.  As I was getting closer to the end, I decided I wanted it to be more of a technical representation of a B-17, than a representation of any particular B-17.  Imagine if the guy at Boeing who did the visual cutaway was tasked with making a 3D representation of it.  I figured there wouldn't be any group or NI markings as they're not important to the "what's where" guide.

-Fred


  • Member since
    July 2008
  • From: USA California
Posted by vetteman42 on Monday, October 12, 2009 11:21 AM
Oh man Fred that is one awesome build !!! I have been following it from close to the beginning and was truly worried when you had the fogging troubles near the end of your build. You pulled it out from being a horriable desert let down beautifully. Very will done. Now we might be seeing this build in the Builders Gallery soon ???  

Randy So many to build.......So little time

  • Member since
    October 2004
  • From: League City, Texas
Posted by sfcmac on Monday, October 12, 2009 11:51 AM
 Oh I like all the details! Well done!  Someday I hope I have some time to put in an effort like this because yours is a true inspiration!
  • Member since
    September 2006
  • From: Bethlehem PA
Posted by the Baron on Monday, October 12, 2009 12:20 PM

It looks fantastic, you did a really great job with the interior.

How did you weather it? It almost looks like you used a variety of the filtering technique, with the exhaust staining.


The bigger the government, the smaller the citizen.


  • Member since
    December 2002
  • From: Northern California
Posted by jeaton01 on Monday, October 12, 2009 12:22 PM
Quite the piece of workmanship, Fred.  I like the wavy line method of handling the clear solid separation, looks akin to what an illustrator would do.  A very interesting model.

John

To see build logs for my models:  http://goldeneramodel.com/mymodels/mymodels.html


  • Member since
    January 2007
Posted by Gigatron on Monday, October 12, 2009 12:30 PM

Thanks, mac Smile [:)].  I suggest if you get a chance, to give it a try.  It really does challenge your building skills - especially if you use the PE.  It completely changes the way you have to build.

Thanks, Randy.  I guess that would be up to the fine folks at FSM and Kalmbach Wink [;)].  First, I need much better pictures, though.  For some reason, these were turning out dark, even with 2 light sources and a flash.  The pictures here were heavily tweaked in photoshop to bring out the colors and lighten them up.

-Fred


  • Member since
    January 2007
Posted by Gigatron on Monday, October 12, 2009 12:43 PM

Thanks, Baron.  The weathering is a combination of pre and post shading.  I used flat black for the pre-shading and Doc O'Brien's weathering powder (from micro-mark) for post-shading.  I used shades of black, grey and rust follwed by lights mists of the base color and then more weathering.  It's a simple layering effect that adds depth.  You can also use a damp papertowel to blend the colors (which I did for the exhaust).

Thanks, John.  That paint scheme actually turned out to be a last minute decision.  I started out planning to leave the side completely clear.  But then I realized that I really didn't like the unfinished seams, so after cleaning them up, I had no choice but to figure out a way to paint them.  I'm happy that the solution turned out as well as they did.

-Fred


  • Member since
    February 2003
  • From: Northern Virginia
Posted by hutchdh on Monday, October 12, 2009 12:47 PM
Wow...you've now raised the bar very high on interior standards.  Simply amazing.  I hope the clear plastic doesn't take away the superb workmanship.....

Hutch

 On the Bench: 1:48 HobbyBoss Ta152-C; 1:48 & 1:72 Hasegawa F-104G NATO Bavaria

In queue: 1:48 Academy F-4B & a TBD Eric Hartmann bird

Recently completed: 1:32 Trumpeter P-51B

  • Member since
    October 2007
  • From: Rhode Island
Posted by jmabx on Monday, October 12, 2009 1:44 PM

Shock [:O] Amazing!

Definitely eye catching. You've put alot of work into that bird and it shows.

Very impressive! Thumbs Up [tup]

Jeremy    Propeller


  • Member since
    December 2002
Posted by Bossman on Monday, October 12, 2009 1:46 PM

Wow - very nice job man.  Very nice detail work and weathering.  I like the way you did the cutaway part with the paint line - rather than making the line at the center seam.  I think takes it look cleaner than it would have - good idea.

Chris 

  • Member since
    February 2003
  • From: Minneapolis, MN
Posted by rossjr on Monday, October 12, 2009 3:16 PM

Hey you forgot to paint the left side of the fueslage!  With such attention to detail in the interior I am shocked that you could miss this!Whistling [:-^]


Seriously, great build, I only hope mine turns out as well.  I have a couple of clear kits to build, I've been afraid of them I think because I think they won't fit right and I'll craze the clear parts...

  • Member since
    March 2007
  • From: Carmel, CA
Posted by bondoman on Monday, October 12, 2009 3:53 PM
Wonderful, Fred! Nicely fought and won.
  • Member since
    March 2006
Posted by TD4438 on Monday, October 12, 2009 4:26 PM
Fantastic.Nothing to criticize on that construction.

  • Member since
    January 2007
Posted by Gigatron on Monday, October 12, 2009 10:39 PM

Thanks again, everyone Cool [8D]

Ross, don't worry about the clear half.  Coat it in Future and you really won't have to worry about much else. 

I find the best way to model is to just do it.  Don't worry about whether or not you think you have the skill.  Tell yourself that you can do it and before you know it, you'll have done it.  When I left the hobby some 20 years ago, there was no PE and scrathbuilding was left to the masters.  When I got back into it 2 years ago, I went whole hog with PE, resin and scratchbuilding.  I had never tried any of it; I just decided I was going to try it and it worked out.  The real skill is in the planning.  Get an idea of what you want to accomplish and work it into the printed directions.  If you want to add a particualr detail, figure out how it would affect the prescribed build and work around it.

-Fred


  • Member since
    February 2006
  • From: Cincinnati Ohio
Posted by DantheMan85 on Monday, October 12, 2009 10:44 PM
Fred, Great looking B-17.  So much detail, and color.  Well done. Thumbs Up [tup]Thumbs Up [tup]

On my Work Bench: Tamiya Ford GT 1/24

Up Coming: ?


  • Member since
    October 2009
Posted by Ultra on Tuesday, October 13, 2009 4:17 AM
That's brilliant!  Amazing talent.
  • Member since
    February 2003
  • From: Sandusky Ohio, USA
Posted by Swanny on Tuesday, October 13, 2009 6:33 AM
Very nice work, I'm impressed.
  • Member since
    July 2004
  • From: Covington, Louisiana
Posted by Tugcap on Tuesday, October 13, 2009 8:18 AM
That is really a very well done job, Fred. I have a visible Zero that has been sitting around my stash for years and I may attack that one now. Good stuff! I like it!

Tommy      Captain

  • Member since
    February 2007
  • From: Bournemouth UK
Posted by Luftwoller on Tuesday, October 13, 2009 9:28 AM

Excellent build Fred. Followed this from the start and your detail work is fantastic. Great to see a Visible model completed on the forums. Top marks,

...Guy

..'Your an embarrassment to the human genus, makes me ashamed to call myself Homo'.
  • Member since
    September 2006
  • From: Central Texas
Posted by NucMedTech on Tuesday, October 13, 2009 12:18 PM

You did a nice job on this. If only they would do a visible B-29!

-StephenCowboy [C):-)]

Most barriers to your successes are man made. And most often you are the man who made them. -Frank Tyger

  • Member since
    February 2003
  • From: Minneapolis, MN
Posted by rossjr on Tuesday, October 13, 2009 1:00 PM
Thanks for the words of encouragement Fred and that is a great idea coating the half with future.  I do that with cockpits and it never dawned on me to do that on a fuselage half....
  • Member since
    June 2005
  • From: Novi, Mi
Posted by Lancair IV on Tuesday, October 13, 2009 2:25 PM

She came out great Fred.  Your giving me inspiration to get mine back on the bench.  Love the colors and weathering.  You should be very proud of her....Bow [bow]


Cheers

Rob Byrnes

Novi, Mi

  • Member since
    January 2007
Posted by Gigatron on Tuesday, October 13, 2009 2:26 PM

Thank you again, everyone.

It's truly an honor to be appreciated by the fine people of this forum.

-Fred


  • Member since
    October 2006
  • From: Lakewood, CO
Posted by kenjitak on Tuesday, October 13, 2009 2:57 PM

Did have to use a bucket to coat the whole fuselage in Future? Did you put it on the inside and outside? Great build BTW!


Ken

JOIN OUR COMMUNITY!

Our community is FREE to join. To participate you must either login or register for an account.

SEARCH FORUMS
FREE NEWSLETTER
By signing up you may also receive reader surveys and occasional special offers. We do not sell, rent or trade our email lists. View our Privacy Policy.