SEARCH FINESCALE.COM

Enter keywords or a search phrase below:

FINISHED! DML Hetzer figure & base tutorial!

10047 views
35 replies
1 rating 2 rating 3 rating 4 rating 5 rating
  • Member since
    January 2007
FINISHED! DML Hetzer figure & base tutorial!
Posted by the doog on Sunday, August 26, 2007 10:35 PM

Well, finally, I've finished my DML Hetzer that has taken me a diligent 4 months or so to complete! I have meticulously detailed all the steps in completing it, and before I actually post the Hetzer, I wanted to first detail the building of the base and figure. Apologies to guys with dial-up for all the photos; if I have posted too many and you don't have hi-speed, let me know if you can't load this post and I will post the Hetzer in two or even three parts!

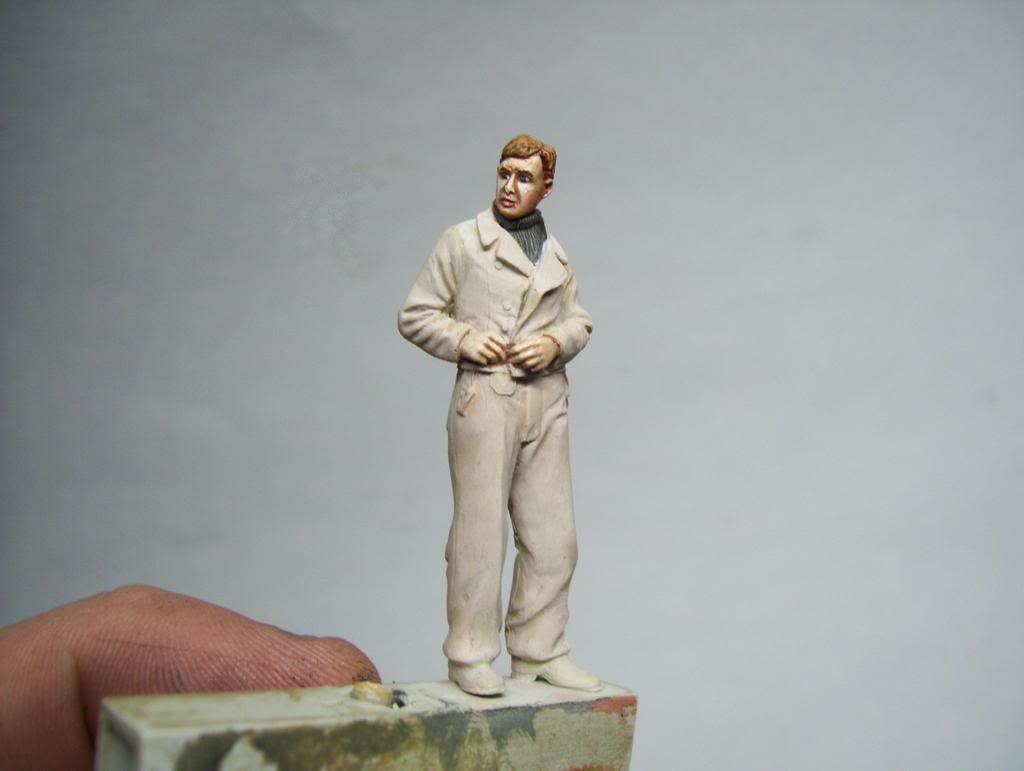
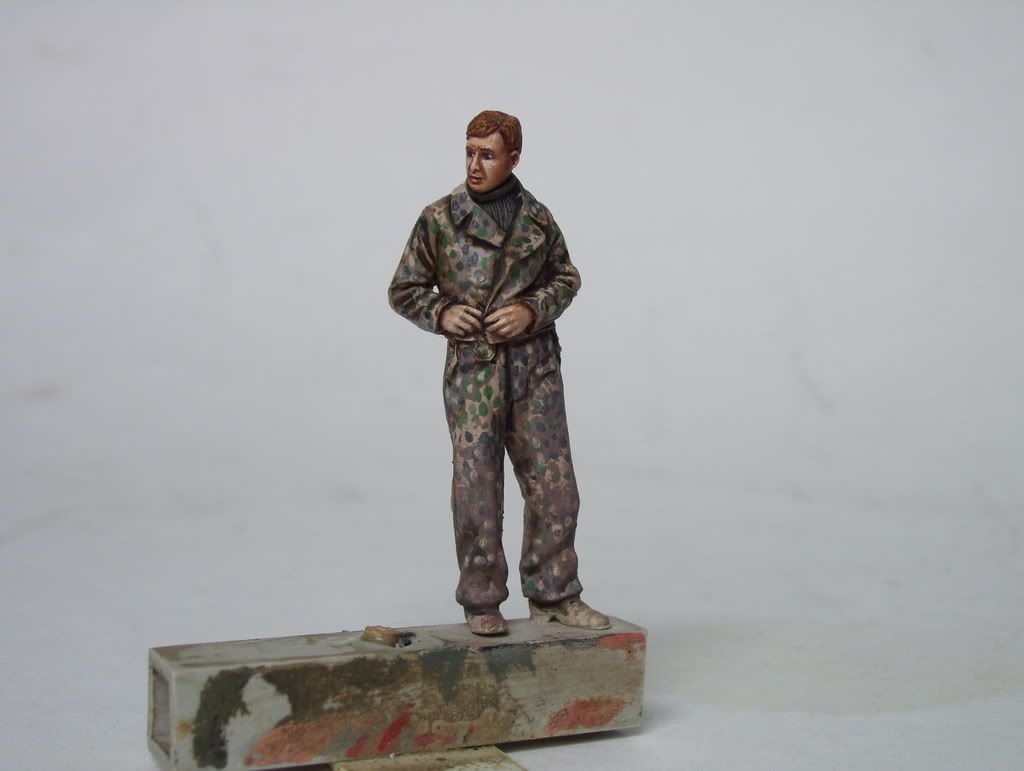
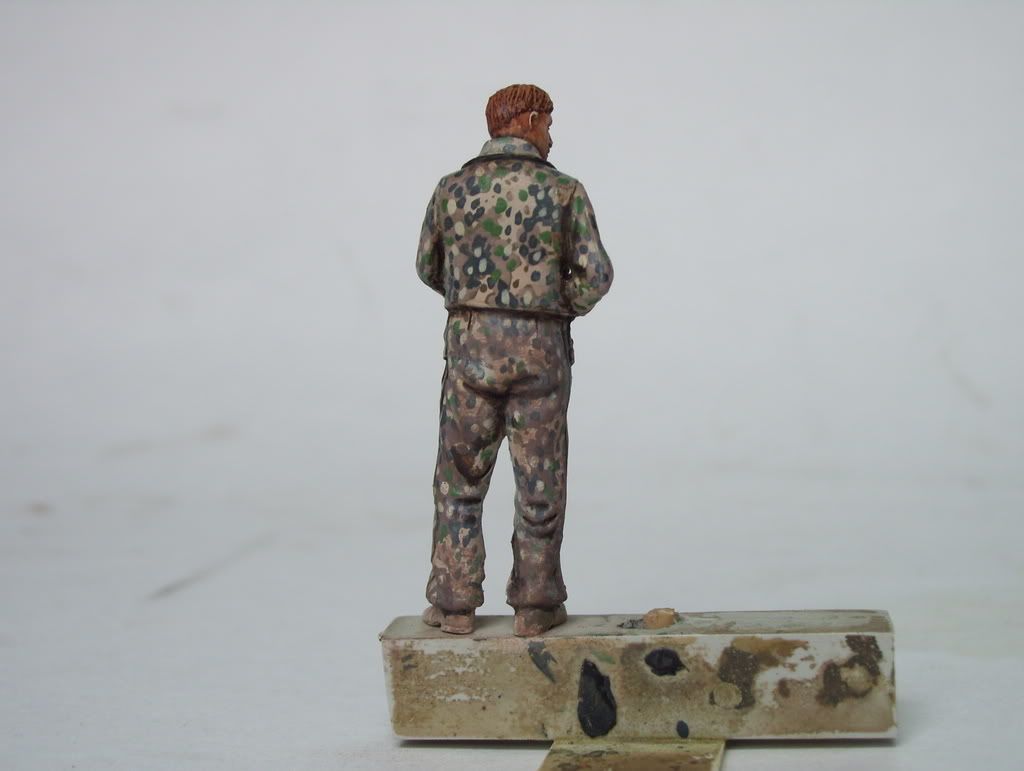
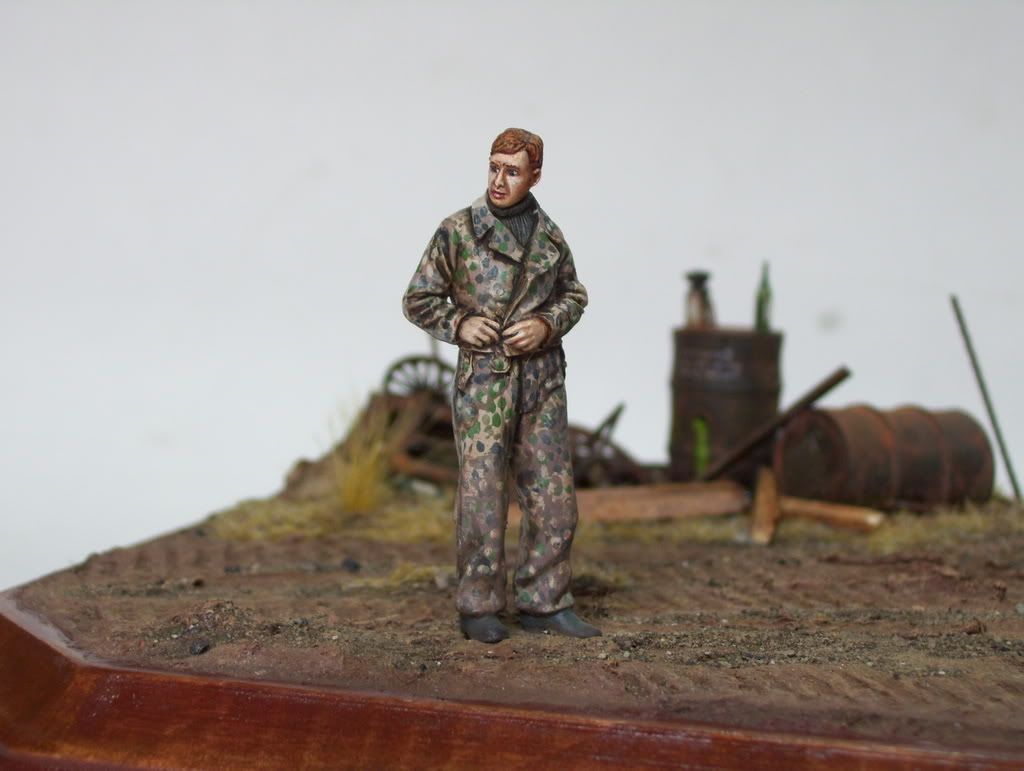
The figure was a resin offering by Wolf #WAW43 "WWII German fastening short panzer jacket". He was first basecoated with Vallejo Violet Braun+Tamiya Buff+White, then a second coat of Vallejo German WWII Beige camo+English Uniform+White was applied to get me here...the face has already been painted using Windsor & Newton's Artist Acrylics.

Well, I have to condense the post a bit, so after the base coat, I used a palette to mix up appropriate colors, using the superb reference book seen in the next photo, and painted the blotches as seen in various greens using a mish-mash of Vallejo and Tamiya paints...

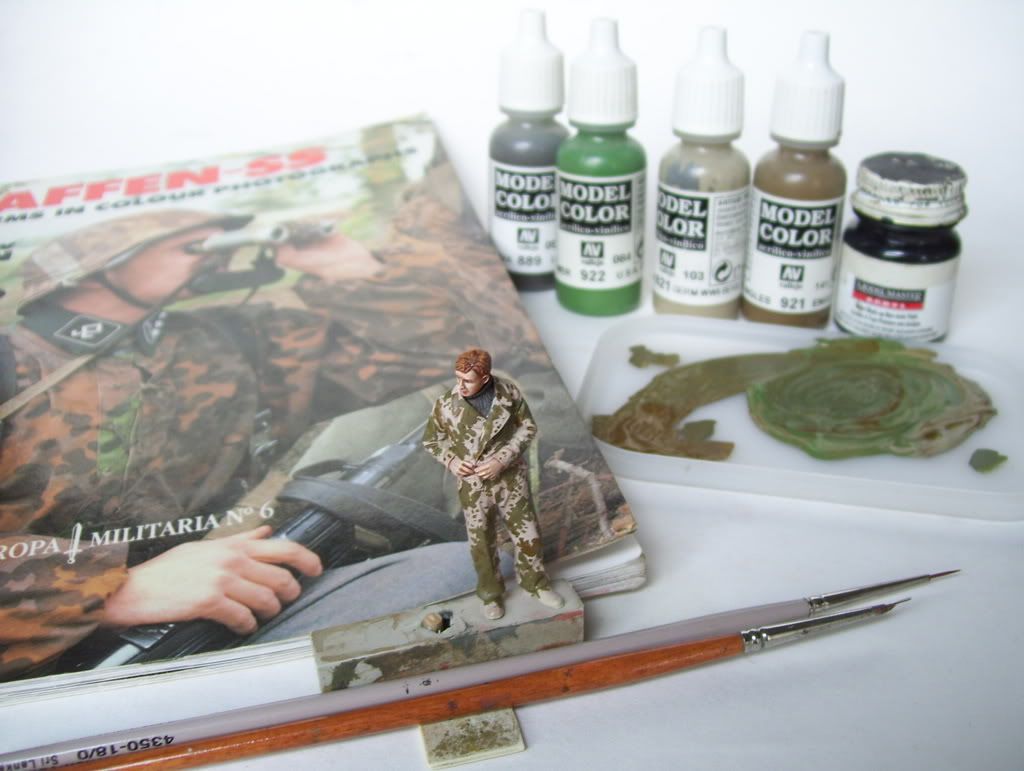
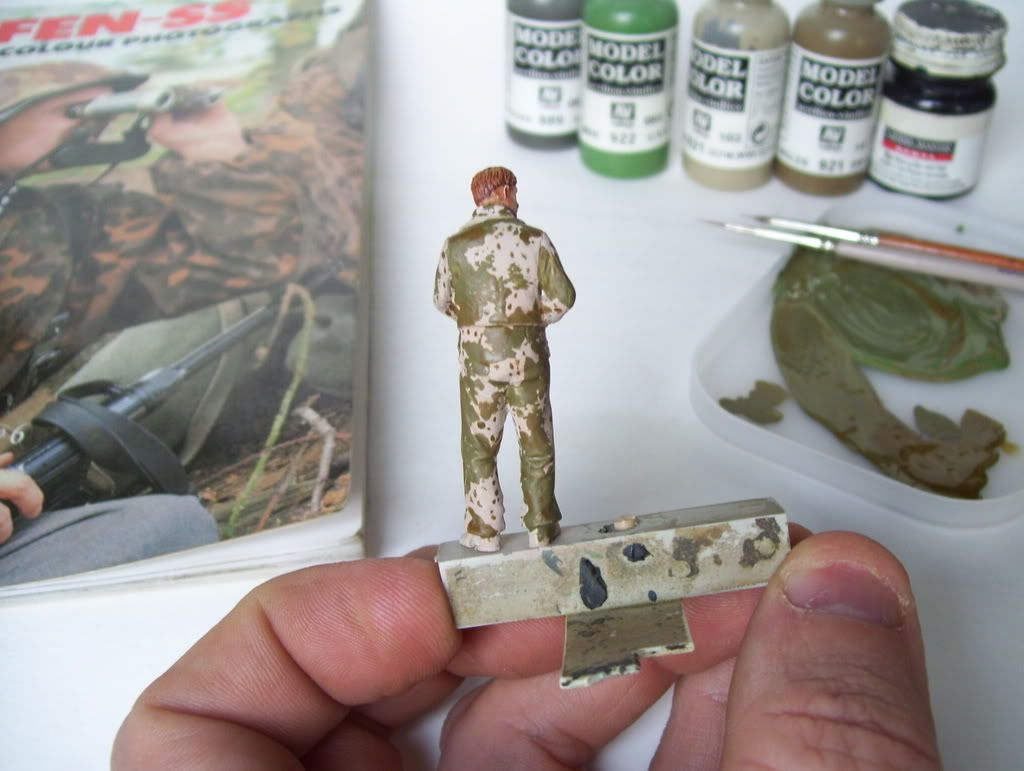
However, I wasn't satisfied with the color distribution, so I repainted a the blotches in a more neutral off-brown color...the spots were then painted in according to reference material; a word here--I never go by "official colors", prefering to mix up the closest approximation to photos of real clothing, so I apologize that I can't give "actual paint color" used; the key is to experiment!

The figure then recieved an oil wash of raw umber+white+yellow (just a pinprick of yellow!) to give a faded dusty tan look to the clothing. Select pin washes in raw umber then brought out details. Lastly, a light dusting of MIG Light Earth powder was used on the pants. Only his shoes are unpainted here...

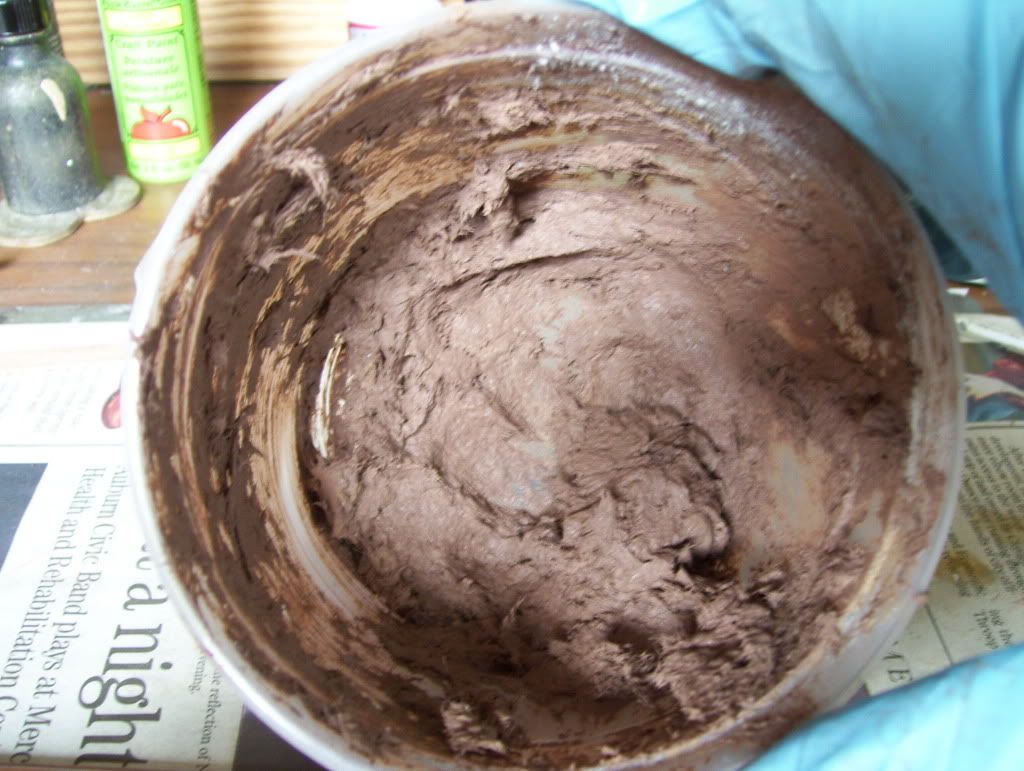
Now to the base: First, my plaque was varnished--a first for me!--and then i mixed up some Celluclay. A lot of guys have expressed dissatisfaction with the drying time of this stuff, but I always use it this way and can have a dry base within 36-48 hours without fail.                   

 I always mix it first with acrylic paint and white glue, both of which are water-based. Stir it into a thick paste, and then just add water at the rate of a half-a-Testors-paint-bottle at a time; mix, test consistency and repeat until you have a plaster-like paste seen here; note that it's already "painted":

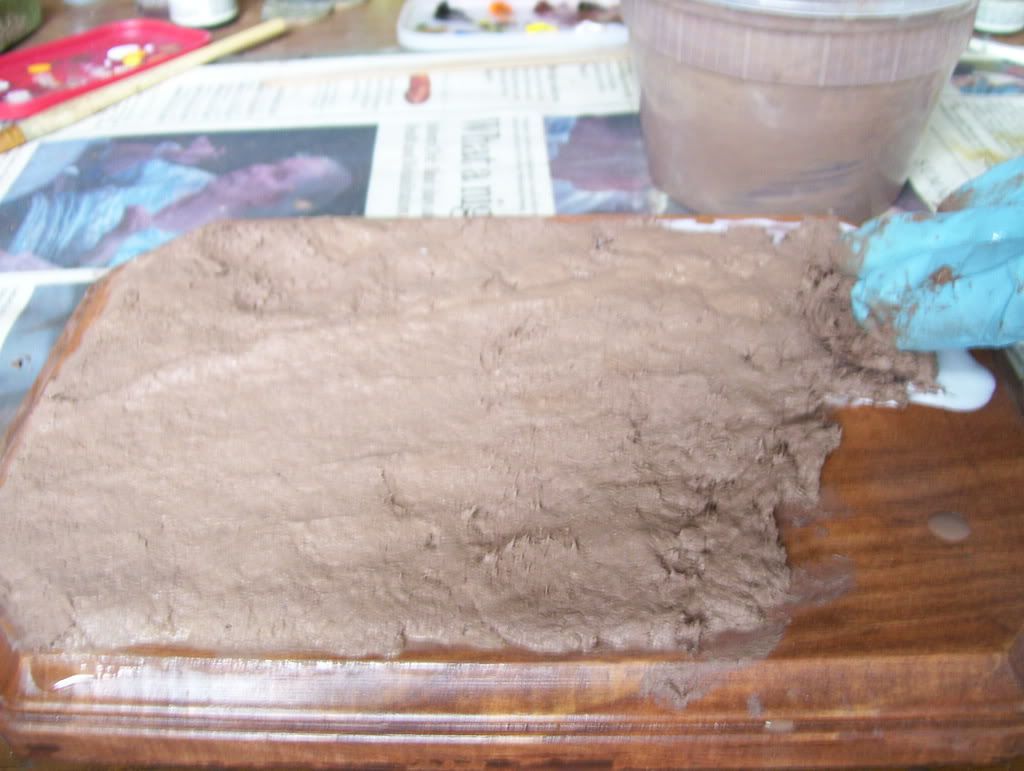
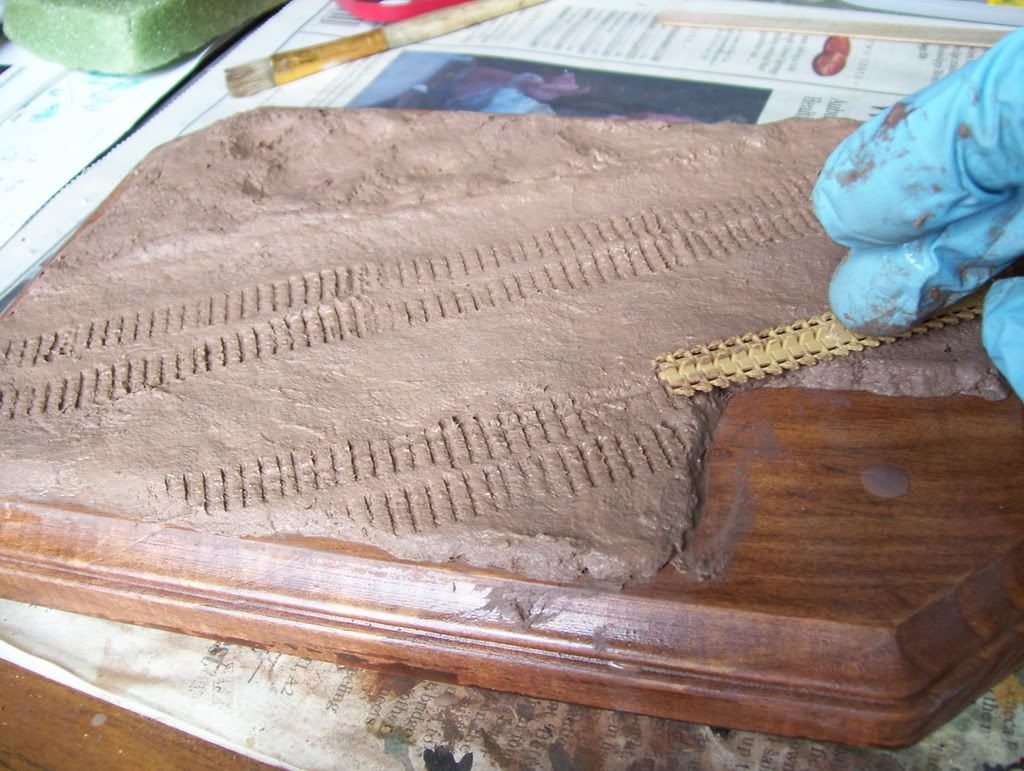
Then, simply scoop it out with your fingers and slop it on, smoothing it out with wetted fingers over a thin layer of wite glue...

After smoothing and shaping it, press a length of track into it of whatever tanks you think would've passed there...you can't go wrong with a Pz IV!. Later, the Hetzer's tracks would be pressed on top of these "old" tracks...

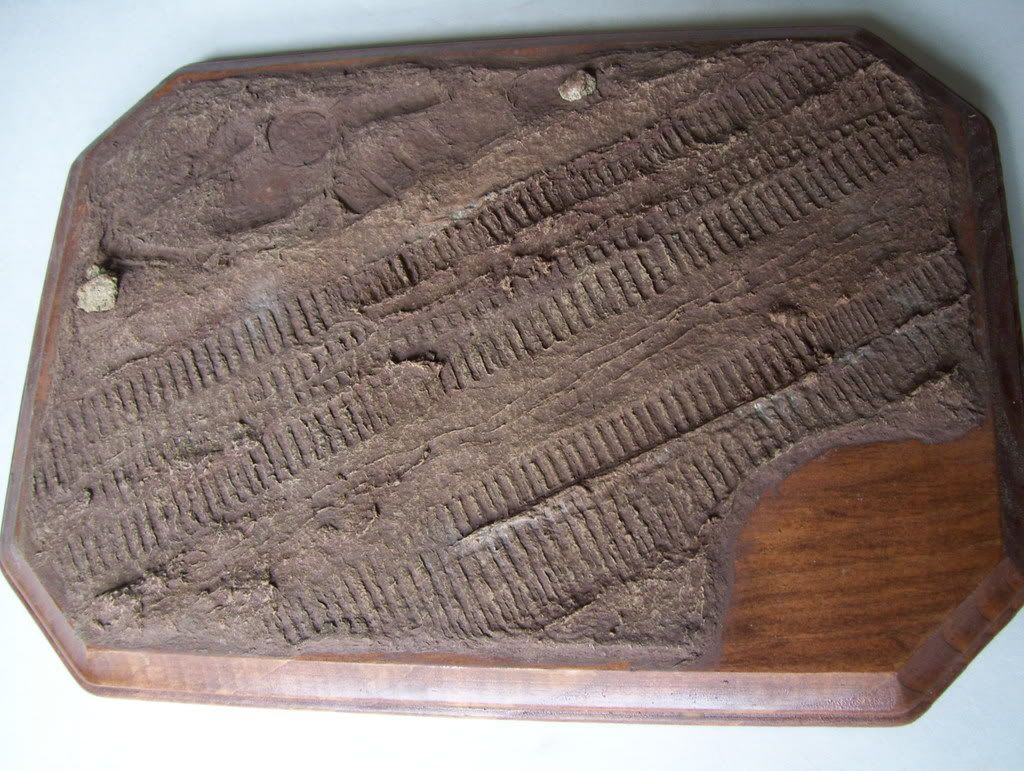
After the base has dried,I drybrushed it...note the Hetzer's skinnier tracks pressed in...

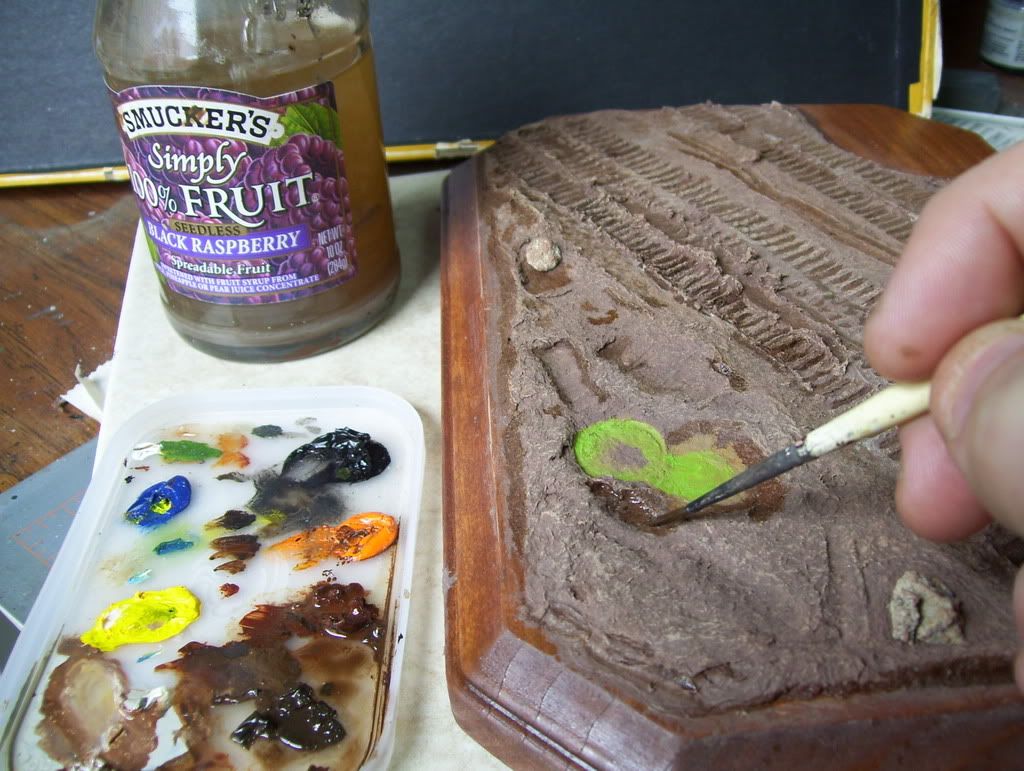
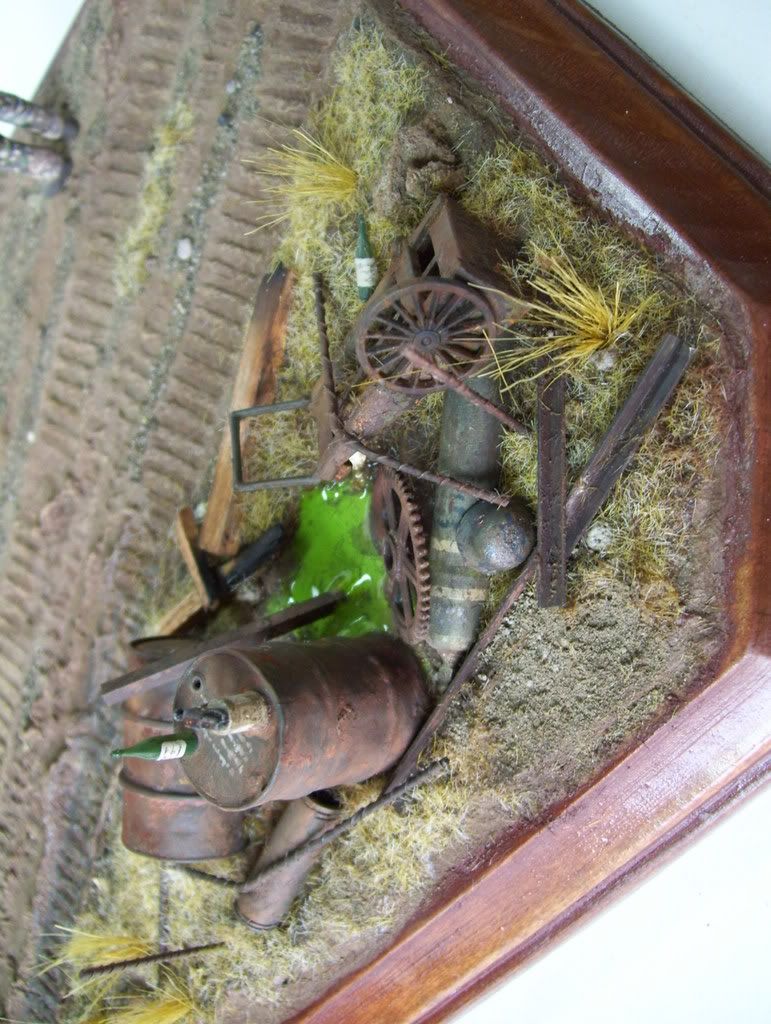
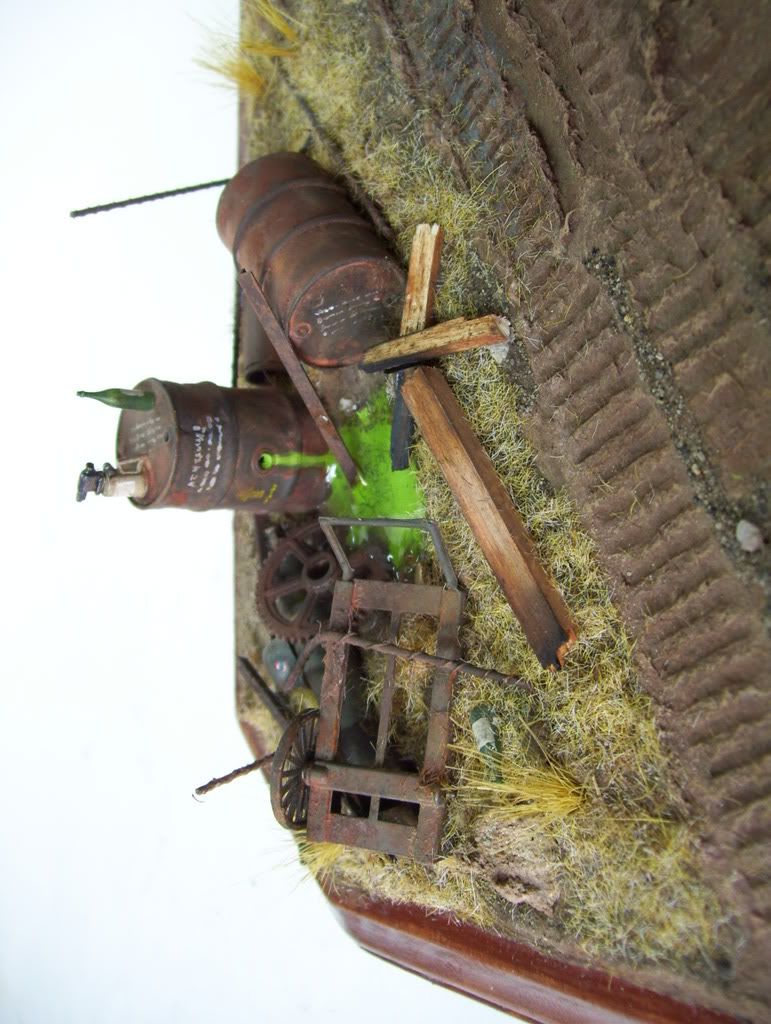
After that, I use thinned oils to tint the recesses of the depressions in the terrain, thinning them with Smucker's Simply Fruit Black Raspberry thinner Laugh [(-D] (just Mineral Spirits!). The green puddle is the base coat for a barrel spill that will be made with green acrylic paint dripped into a puddle of Woodland Scenics' "Realistic Water"; I eventually built up five thin layers of it for depth...

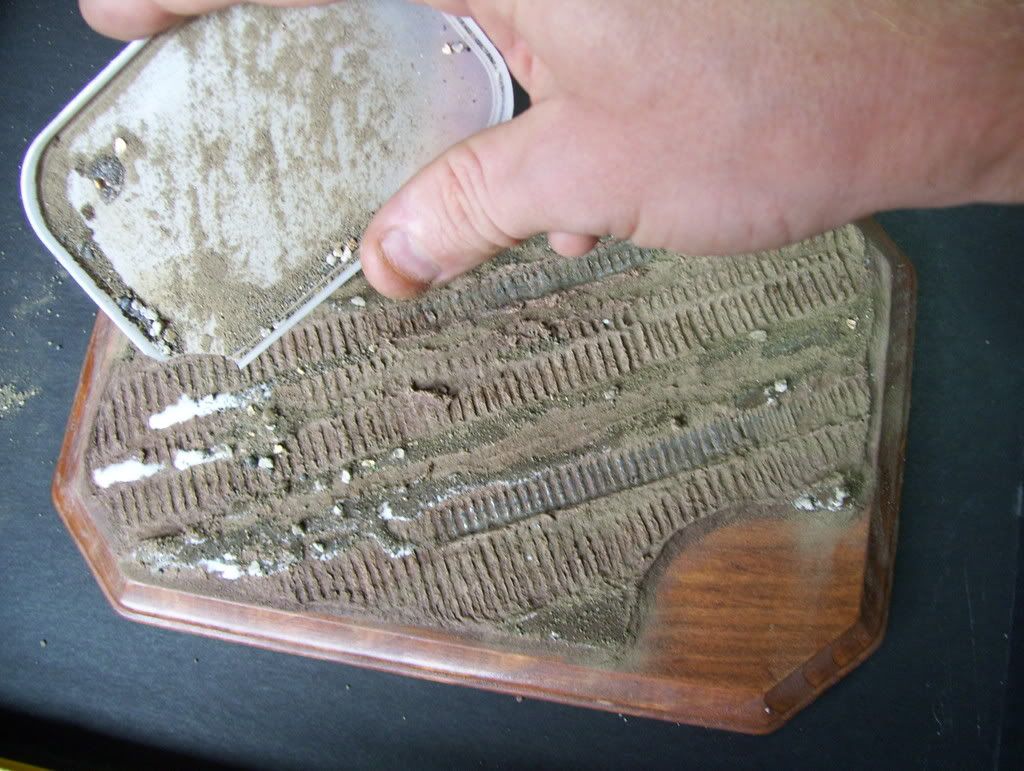
THen, real dirt is added on the "high" spots over white glue...I get the dirt from sun-baked, well-travelled arid construction sites--in this case, a quarry entrance, so as to not have any biological material in it.

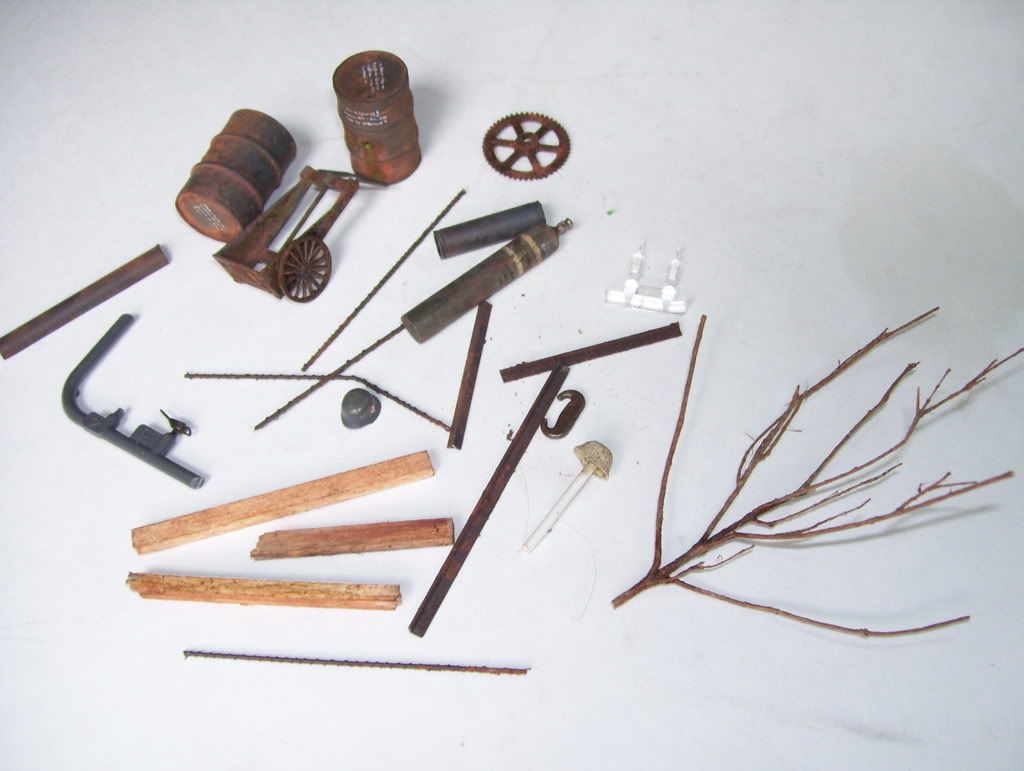
Next, I have prepared a collection of "war debris"--junk to be put on the side of the road...the rebar and rusty rails are just plastic strip and rod...the "tree" eventually was not used...

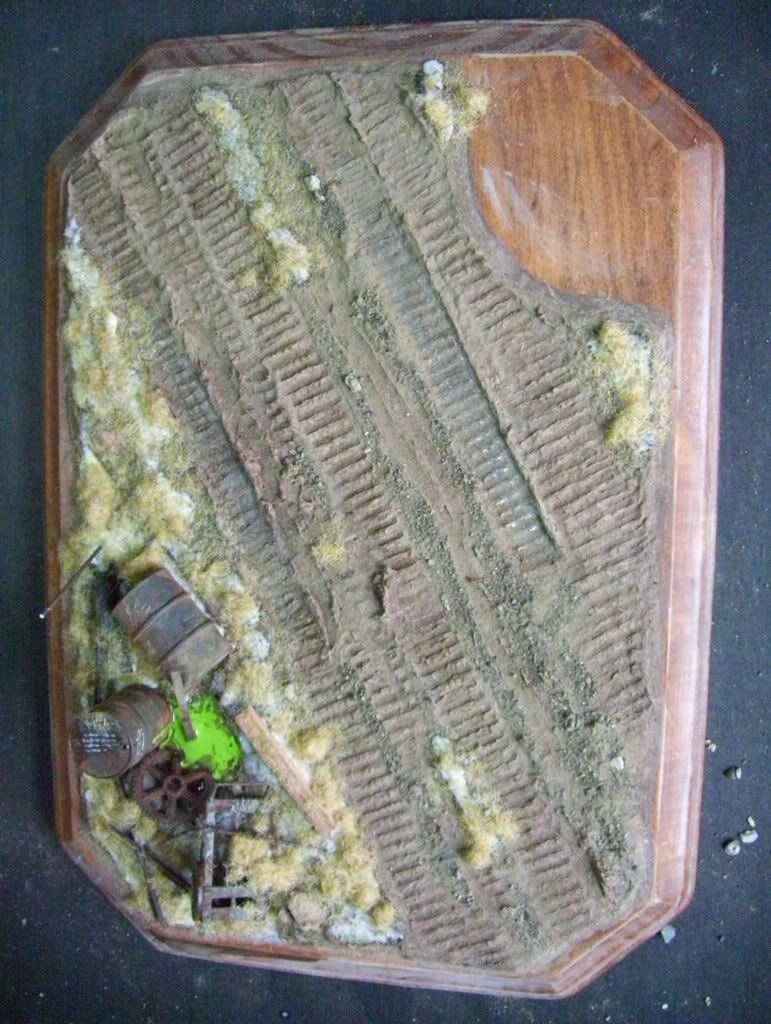
...and put it into the scene. I then repeat the "dirt" step with static grass. Note the "poison puddle" gaining depth...

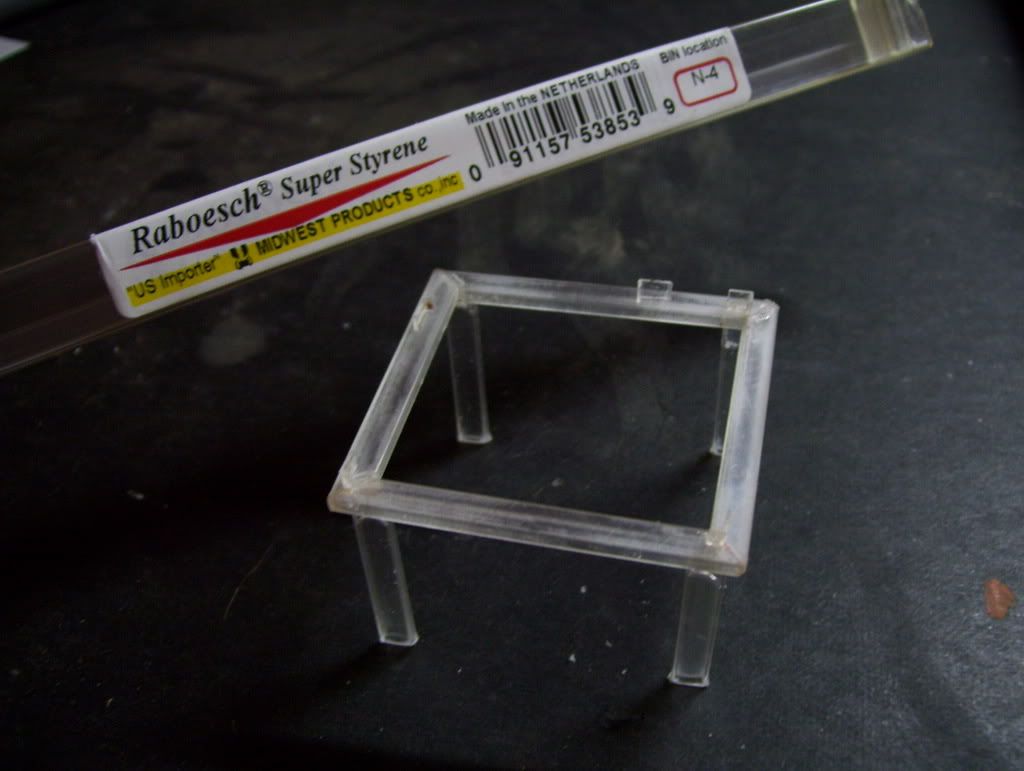
I made this clear plastic "table frame" for the Hetzer's top hull plate from "Super Styrene"; I wanted a way to display it that wasn't permanent and that would allow me to display the Hetzer "with the top on". 

The figure was added, and four holes were drilled into the plaque to accept the legs of the table, which were epoxyed in...

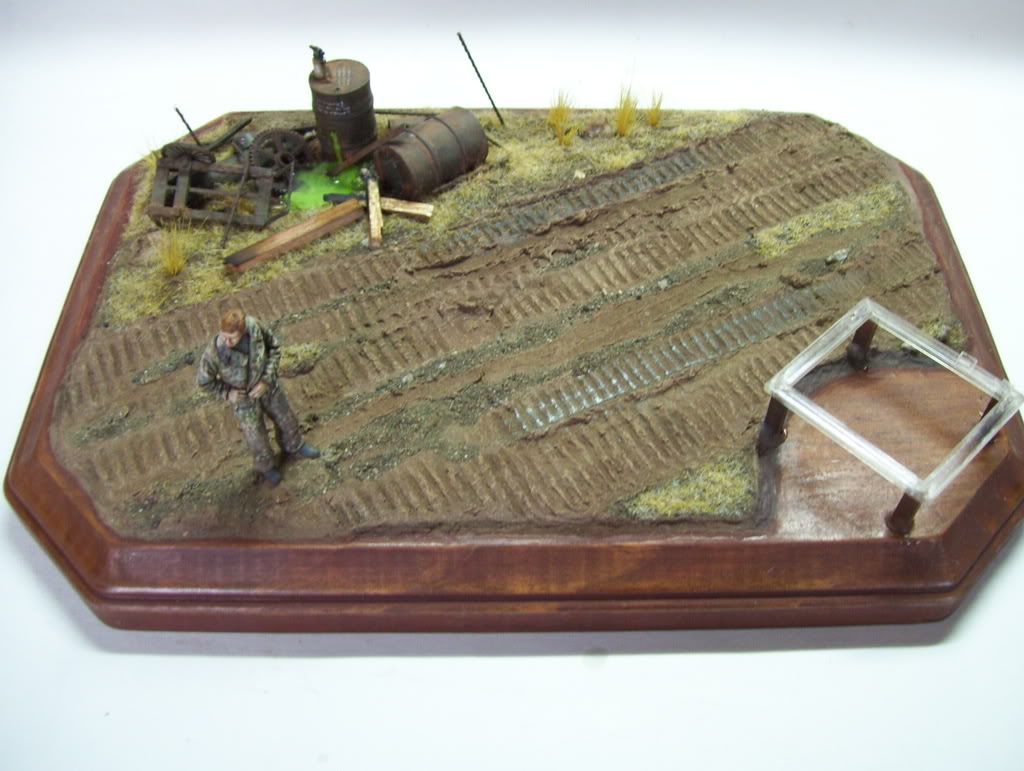
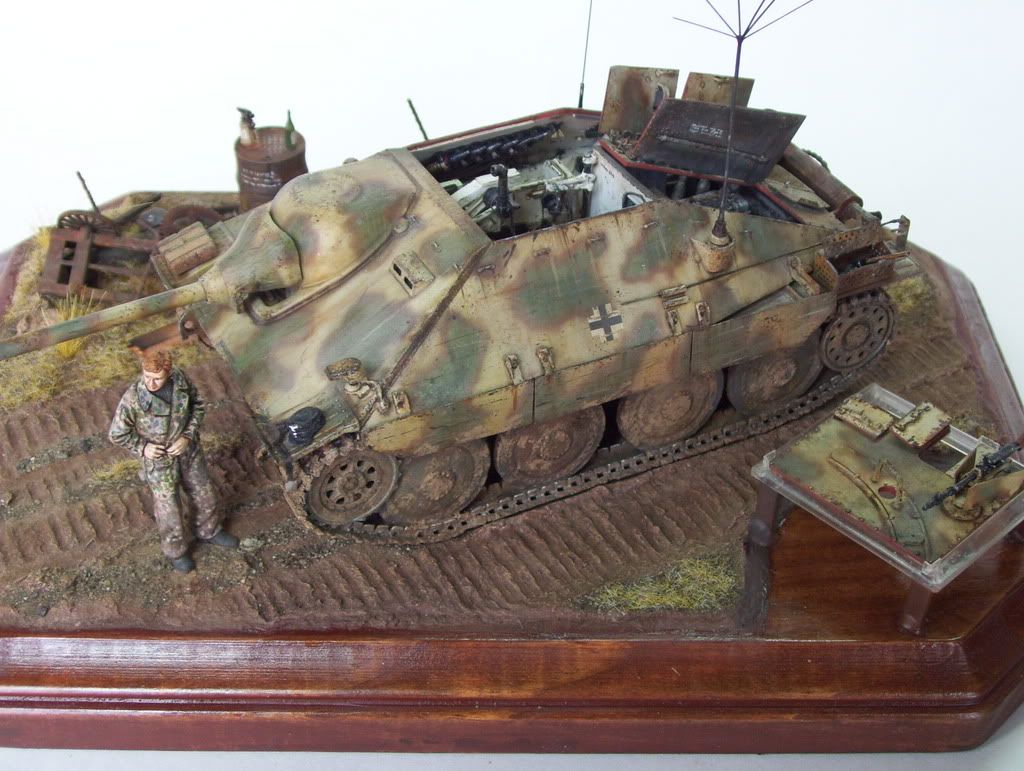
The completed figure in his place:


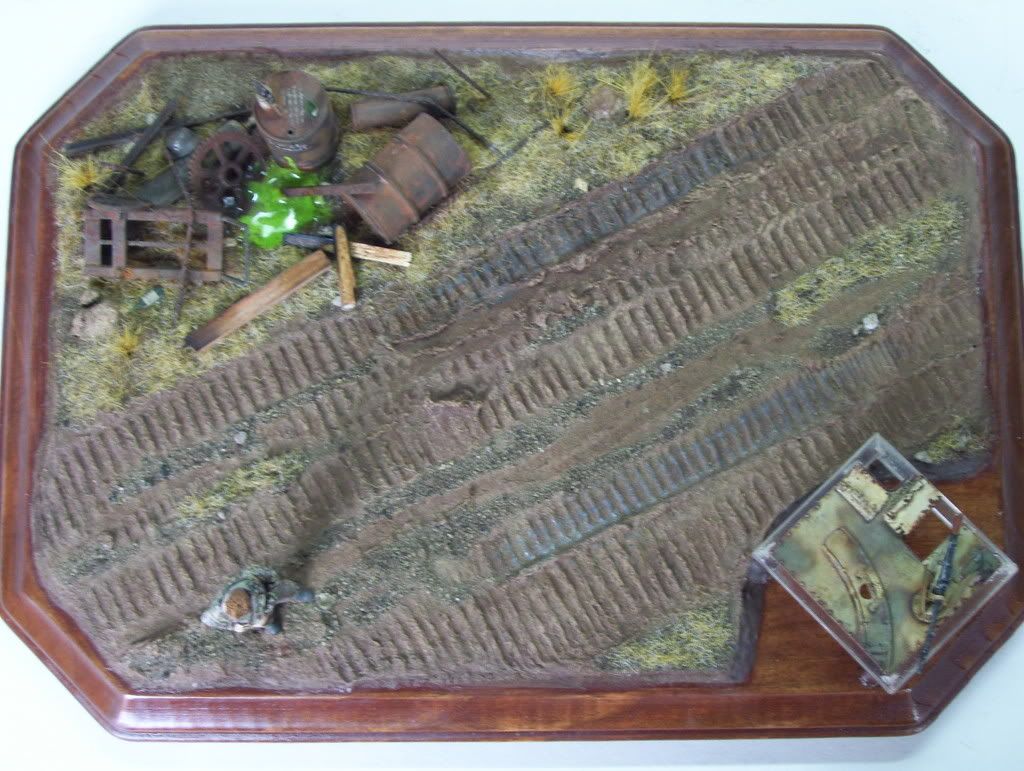
The hull top in its cradle--the remote MG firing mechanism was scratchbuilt; the periscope was taken from the SP box. This table allows for viewing of both. Yes, the firing mechanism turns with the gun!

...and two photos of the roadside pile of junk...note the depth of the "poison puddle"...

...and an overview of the base with the hull top in it's cradle...

Well, I hope you enjoyed the tutorial...I'll be posting the next instllment of the Hetzer's build--finishing and weathering and complete photos in a new post in a few days so, watch this space!  Big Smile [:D]

Comments, questions, and complaints always welcomed! 

LATER EDIT--here is the final, completed scene!


  • Member since
    November 2005
  • From: Somewhere over the rainbow
Posted by m1garand on Sunday, August 26, 2007 10:40 PM

Doog,

Thanks for the tutorial!  Now I have to try mixing paint with glue and celluclay. I've never done that before.

  • Member since
    July 2003
  • From: On my kitchen counter top somewhere in North Carolina.
Posted by disastermaster on Sunday, August 26, 2007 10:50 PM
 m1garand wrote:

Doog,

Thanks for the tutorial!  Now I have to try mixing paint with glue and celluclay. I've never done that before.


Laugh [(-D] Can't wait to see those fingernails! Make sure to use the gloves.

Sherman-Jumbo-1945

"I was so much older then, I'm younger than that now"


  • Member since
    July 2003
  • From: On my kitchen counter top somewhere in North Carolina.
Posted by disastermaster on Sunday, August 26, 2007 11:27 PM

Okay........

              Boohoo [BH] 18 minutes later.

 That's a fine collection of finishes you have there. The rust on the "Junk" is especially appealing to me considering that it is an integral part of my signature. That groundwork has turned out very well and the level of detail is very interesting. From what I can see of the Hetzer roof and the very well done figure, it looks like you are well on your way to the "DIO" section of this forum also.

 Whistling [:-^] Not that it would get much interest, but you got me to thinking about posting a Disaster in progress thread.

Looking forward to the completed Hetzer.............    and, 

Thumbs Up [tup] thanks for showing us the dogie, uh Laugh [(-D] oops, doogie way of doing it


                                      Steve
 

Sherman-Jumbo-1945

"I was so much older then, I'm younger than that now"


  • Member since
    November 2005
  • From: Somewhere over the rainbow
Posted by m1garand on Sunday, August 26, 2007 11:31 PM

Disastermaster,

I happen to go to the nail salon quite often.  I'm sure that girls at the nail shop can get those celluclay out of under my nails.

  • Member since
    July 2003
  • From: On my kitchen counter top somewhere in North Carolina.
Posted by disastermaster on Sunday, August 26, 2007 11:47 PM
 m1garand wrote:

Disastermaster,

I happen to go to the nail salon quite often.  I'm sure that girls at the nail shop can get those celluclay out of under my nails.

Yeah, Yuck [yuck] but that brown paint.

Laugh [(-D] "OOH, M1, Whatcha done been diggin' in"..... 

Don't tell 'em the truth, Big Smile [:D] they'll think yer nuts! 

Sherman-Jumbo-1945

"I was so much older then, I'm younger than that now"


  • Member since
    November 2005
  • From: Somewhere over the rainbow
Posted by m1garand on Sunday, August 26, 2007 11:52 PM
 disastermaster wrote:
 m1garand wrote:

Disastermaster,

I happen to go to the nail salon quite often.  I'm sure that girls at the nail shop can get those celluclay out of under my nails.

Yeah, Yuck [yuck] but that brown paint.

Laugh [(-D] "OOH, M1, Whatcha done been diggin' in"..... 

Don't tell 'em the truth, Big Smile [:D] they'll think yer nuts! 

They already think I'm nuts so I guess I don't have to worry about that. Big Smile [:D]  Maybe I'll tell them that I came to the shop right after changing the diaper without washing hands.

  • Member since
    July 2003
  • From: Perth, Western Australia
Posted by madmike on Sunday, August 26, 2007 11:54 PM

Fantastic work!

I really want to try this Celluclay stuff but have to mail order it from the eastern side of Australia. Not cheap either...

The whole base is simple but very effective, just the ticket to make the Hetaer the focus.

cheers

Mike 

"I do not feel obliged to believe that the same God who has endowed us with sense, reason, and intellect has intended us to forgo their use." - Galileo Galilei
  • Member since
    July 2003
  • From: On my kitchen counter top somewhere in North Carolina.
Posted by disastermaster on Sunday, August 26, 2007 11:59 PM
 m1garand wrote:
 disastermaster wrote:
 m1garand wrote:

Disastermaster,

I happen to go to the nail salon quite often.  I'm sure that girls at the nail shop can get those celluclay out of under my nails.

Yeah, Yuck [yuck] but that brown paint.

Laugh [(-D] "OOH, M1, Whatcha done been diggin' in"..... 

Don't tell 'em the truth, Big Smile [:D] they'll think yer nuts! 

They already think I'm nuts so I guess I don't have to worry about that. Big Smile [:D]  Maybe I'll tell them that I came to the shop right after changing the diaper without washing hands.

HA HA HA HA  Laugh [(-D] Laugh [(-D]

Sherman-Jumbo-1945

"I was so much older then, I'm younger than that now"


  • Member since
    January 2005
  • From: Meeeechigan!!!
Posted by STUG61 on Monday, August 27, 2007 1:28 AM

Great stuff Doog.


That figure is superb!!


Just a hint though..If the base is finished it may be better to rough up the part the celluclay goes on to give it more grip.I've had it  come up on one that I didn't do that to.Alittle late though now!!

Smile! It makes people nervous!! Andy
  • Member since
    March 2003
  • From: Rain USA, Vancouver WA
Posted by tigerman on Monday, August 27, 2007 2:42 AM
Stunning so far. The rust on the junk is very convincing and I'm sure the Hetzer will be amazing.

   http://i7.photobucket.com/albums/y269/wing_nut_5o/PANZERJAGERGB.jpg

 Eric 

  • Member since
    February 2007
  • From: Bournemouth UK
Posted by Luftwoller on Monday, August 27, 2007 5:02 AM

That figure is the biz man. The base is just fantastic. Love the rust. You guys blow me away with your levels of skill. The tutorial is priceless.

Thank you.

...Guy

..'Your an embarrassment to the human genus, makes me ashamed to call myself Homo'.
  • Member since
    January 2007
Posted by the doog on Monday, August 27, 2007 8:50 AM

Thanks, guys! I apppreciate you weighing in on the work here--it takes a good bit of time to post something this long, and I'm happy to see that you apppreciate it as well!

The rust is done primarily with a wash of rust-toned oils first, and then the same with pastel powders; mot necessarily MIG powders, just standard "Earth Tone" Artist's pastels. I put them on over a second light wash of oils, and then take a tiff brush and rub some of them off when the thinner has evaporated. Black pastel also figures into getting the really "old" look, believe it or not. (discovered that by accident!) The base coat was field gray.

Steve: I think a "Diasater WIP" would be priceless! I've seen your work, and would LOVE to steal some of your secrets! Laugh [(-D] LOL! Seriously--you ought to consider it!

StuG61, sorry to hear of your bad luck with Celluclay! I've used the stuff for years and can't say I've ever had that happen; did you mix glue with it too? I always put it down over a layer of white glue, and that seems to stick it pretty good!

Thanks for the compliments, all; now I gotta get working on the Hetzer post(s)!  

  • Member since
    May 2003
  • From: The Buckeye State
Posted by Panther 44 on Monday, August 27, 2007 12:00 PM

Hey Doog,

  Really find this post interesting and informative. I've thought in times past to try and do something along these lines (diorama), but just seemed like it was beyond my skills. You've done a fantactic job of breaking it down (stepwise) and I can feel myself being inticed to give it a shot.

 I do realize however that one (such as yourself) make it look much easier than it really is. I certainly wouldn't expect my results to be on the same level, but do feel your tutorial may be just the thing I needed to give it a shot.

 I'm really looking forward to seeing the next "instalment".

                                                                                                    Joe Big Smile [:D]Big Smile [:D]

Just remember, ignorance is no excuse for the law. - Moe
  • Member since
    October 2004
  • From: Katy, TX
Posted by jthurston on Monday, August 27, 2007 12:15 PM

The soldier is saying, "Hmmm...Wonder why there's a Hetzer roof sitting there on that table..."

No really - this is excellent work, man...I've learned more on this site in the past month than I would have in a year without it - and that's because of builds and tutotials like this! You rock! Bow [bow]

  • Member since
    July 2004
  • From: Texas
Posted by wbill76 on Monday, August 27, 2007 1:38 PM
You can almost smell the ethylene glycol from the "poison puddle" from here! Laugh [(-D] Nice tutorial and base doog, looking forward to seeing the whole thing together. The platform cradle for the hull top is a nice touch as well for showing off the interior but still "keep it all together" on one base. Thumbs Up [tup]
  • Member since
    February 2003
  • From: Southern California, USA
Posted by ABARNE on Monday, August 27, 2007 2:01 PM
Impressive work there Doog.  Even at the three times maginifcation that German soldier appears in the photos on my monitor, the detail and shading still looks outstanding.Thumbs Up [tup]Thumbs Up [tup]
  • Member since
    November 2005
Posted by Anonymous on Monday, August 27, 2007 5:44 PM

...first of all: impressive work on the fig, first-rate in my book and I know that camo is HARD to paint and make it look real...you have brought your A-game to this hunk 'o resin...flesh and face are also top-notch...the subtle weathering on the pants w/ pastels is sublime and makes the camo all the more realistic...you are definately one of the best 35th fig painters in here, and I am basing that opinion on not only this fig, but others I have seen on your AFV's...your use of acyrlics is outstanding...

...as far as the base, I also pre-shade my celluclay with water-based or acrylic paints...cool beans...I love everything but the "toxic spill" coming from the drum...I think in the end it will be a focal point in the dio you might not have intended, but then again I don't know what story you are trying to tell so i could be wrong...maybe, "Hetzer at the Love Canal"?

Seriously, good stuff...and if the turrret piece is indicative af the rest of the Hetzer, we are in for a good show...!!!

  • Member since
    November 2005
Posted by Anonymous on Monday, August 27, 2007 7:17 PM
 STUG61 wrote:

Great stuff Doog.


That figure is superb!!


Just a hint though..If the base is finished it may be better to rough up the part the celluclay goes on to give it more grip.I've had it  come up on one that I didn't do that to.Alittle late though now!!

...another technique I use to give the base some "tooth" is to glue a piece of empty sprue(s) right onto the base to act as plastic "re-bar" for the celluclay to bit into as it dries...it is also a good idea to mix in a liberal amount of white glue with the celluclay to prevent it from curling and shrinking too much as it hardens...

  • Member since
    September 2005
  • From: beacon falls , Ct.
Posted by treadwell on Monday, August 27, 2007 8:57 PM
doogSmile [:)]-- great redering on the figure-- way out of my league (for now!)-- the tutorial is excellent-- could you go into a little more detail on the most critical aspect  of the figure--- the face?--- thanks in advance --- treadCool [8D]


  • Member since
    January 2007
Posted by the doog on Tuesday, August 28, 2007 12:27 AM

Thanks once again guys; once more, I appreciate ya taking the time to chime in!

Joe, I hope you try a dio for yourself! Its great to build a killler model, but even more satisfying to put it "in its element"! GO FOR IT!

jthurston, I agree with you about learning a LOT on this site! I've become a better modeler in 6 months than I had in 10+ years! Thanks for the compliments; glad you enjoyed the tutorial!

wbill76 and ABARNE, appreciate the comments! 

Manny, thanks for your kind comments! That's really appreciated from such a fine figure painter as yourself! I have to admit that I tried your suggestion about washing the face's base coat flesh with an oil wash...worked like a charm for "lowlights"! I referenced some of your posts for inspiration!Smile,Wink, & Grin [swg]

treadwell, I'll do a painting tutorial soon..I wanted to get the Hetzer up and then do a weathering tutorial up on it; I'll have to do a figure and photograph the steps; I didn't do that with this one...Sad [:(] If you have any specific questions about painting faces before then, feel free to PM me, and I'll try to answer back in a timely fashion!

Thanks again guys; and thanks for each and every one of you inspiring ME in different ways! 

  • Member since
    July 2006
  • From: San Francisco Bay Area
Posted by bufflehead on Tuesday, August 28, 2007 12:52 AM

doog, excellent tutorial accompanied by excellent photos!  Better than some of the "how to" books I've bought!  Bow [bow] It will be a while before I tackle anything like this, but its nice to know there's great guys like you willing to share your knowledge, skills and talent with the rest of us!  Thanks for the post and am looking forward to more!Thumbs Up [tup] 

Ernest

Last Armor Build - 1/35 Dragon M-26A1, 1/35 Emhar Mk.IV Female


Last Aircraft Builds - Hobby Boss 1/72 F4F Wildcat & FW-190A8


  • Member since
    February 2007
  • From: NOLA
Posted by roosterpelo on Tuesday, August 28, 2007 6:41 AM
doog, amazing work. thanks for sharing. i have used celluclay before, but never thought about using paint in it, or glue. now it looks like i have a few more tricks to learn. thanks for the tips, and your work is top notch on this one. deffinatly an award winner.
chris d.
  • Member since
    January 2007
Posted by the doog on Tuesday, August 28, 2007 10:35 AM
Thanks bufflehead and Chris! (Roo)--be watching for the weathering tutorial!
  • Member since
    September 2009
  • From: hamilton , Ontario
Posted by EliteModelling on Sunday, September 20, 2009 3:40 PM
wait this was on the magazine! this was you?


  • Member since
    January 2007
Posted by the doog on Sunday, September 20, 2009 3:42 PM

 EliteModelling wrote:
wait this was on the magazine! this was you?
Yes, this is my article that was on the front cover of the ....uh....January 2009 issue?

Big Smile [:D]


  • Member since
    September 2009
  • From: hamilton , Ontario
Posted by EliteModelling on Sunday, September 20, 2009 4:44 PM
man your amazing. how did you get into the magazine?


  • Member since
    January 2007
Posted by the doog on Sunday, September 20, 2009 5:43 PM

 EliteModelling wrote:
man your amazing. how did you get into the magazine?
Thank you; I'm glad you like my work! Blush [:I]

You write the article about how you built your model, and make sure you have the thing photographed at nearly every stage, and then send it in!

If FSM decided to purchase the article, they will be in touch with you. That was my third article published. I have several more to be yet published.


  • Member since
    February 2009
  • From: mass,USA
Posted by scratchmod on Sunday, September 20, 2009 8:59 PM

I hope to this masterpiece next weekend Doog, wow that was an awesome read. It will help alot when I do my next base. As far as the Hetzer goes, well, it a beauty. I love the weathering on it. OK the Fig is awesome, especially the camo Make a Toast [#toast].


Rob

  • Member since
    January 2007
Posted by the doog on Sunday, September 20, 2009 9:45 PM
 scratchmod wrote:

I hope to this masterpiece next weekend Doog, wow that was an awesome read. It will help alot when I do my next base. As far as the Hetzer goes, well, it a beauty. I love the weathering on it. OK the Fig is awesome, especially the camo Make a Toast [#toast].


Rob

Thanks, Rob--I will be excited to see your take on a Hetzer!

Glad you liked my toot here; thanks for the nice compliments! 

JOIN OUR COMMUNITY!

Our community is FREE to join. To participate you must either login or register for an account.

SEARCH FORUMS
FREE NEWSLETTER
By signing up you may also receive reader surveys and occasional special offers. We do not sell, rent or trade our email lists. View our Privacy Policy.