SEARCH FINESCALE.COM

Enter keywords or a search phrase below:

Weathering Tutorial--the doog's DML HETZER

56452 views
110 replies
1 rating 2 rating 3 rating 4 rating 5 rating
  • Member since
    January 2007
Weathering Tutorial--the doog's DML HETZER
Posted by the doog on Wednesday, August 29, 2007 1:15 PM

OK guys, for those of you that have been waiting for it, here's a little tutorial on how I weathered my Hetzer. I got MOST of the steps  the only thing I really missed was the last aplication of powders on the wheels. For those of you interested in the finish of the wheels, there was a previous thread that I'm sure you could find in the "search" engine of this forum.

Well, lets get to it:

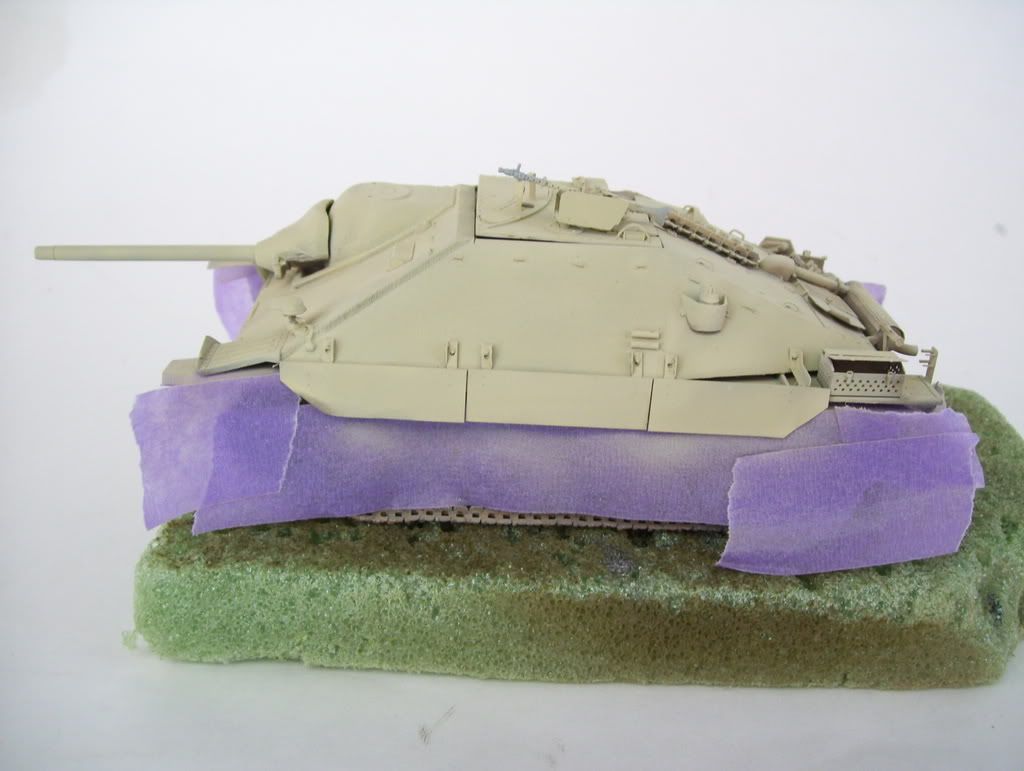
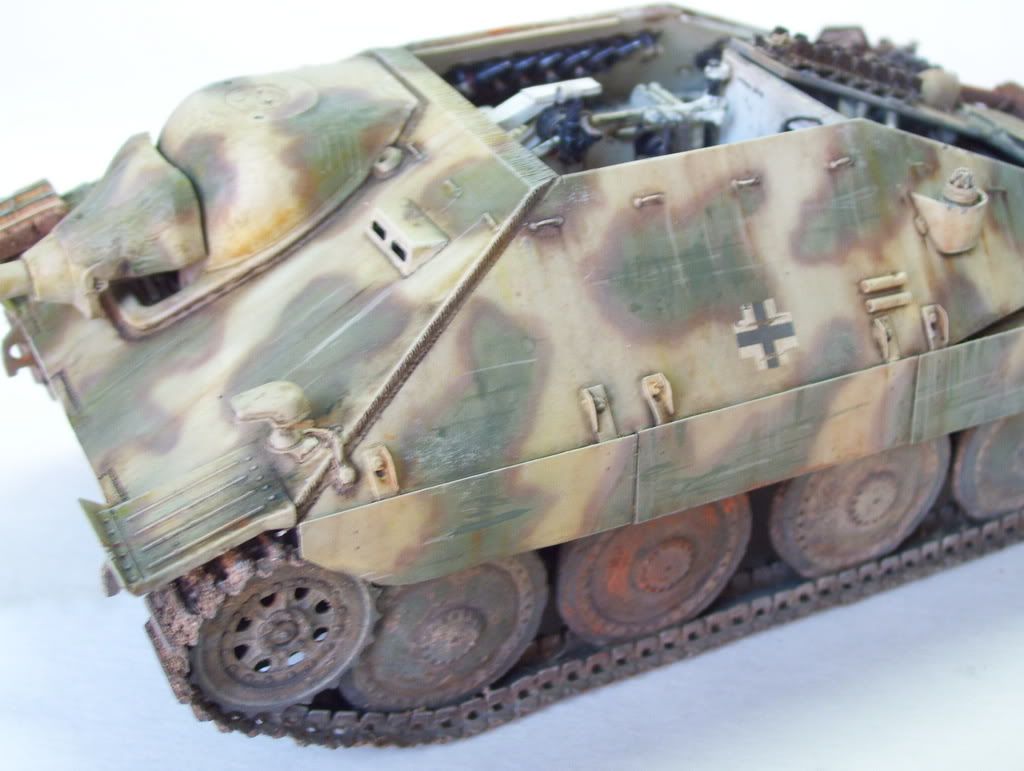
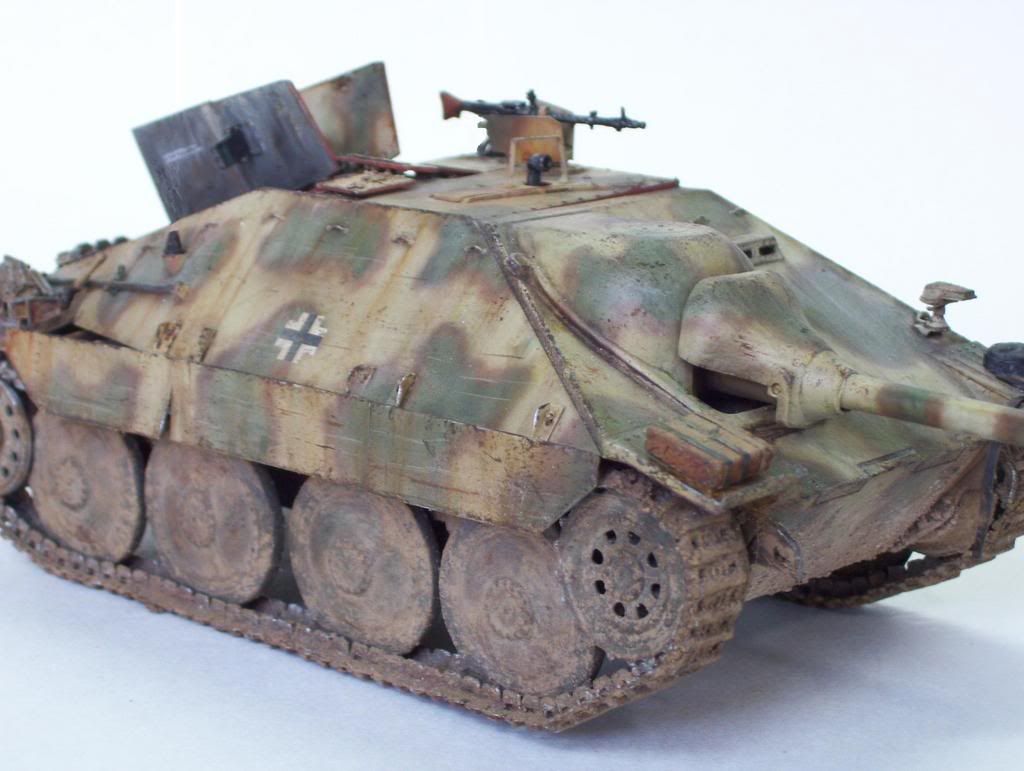
The first photo shows the application of the base coat. The already-painted-and-weathered wheels /tracks have been masked with low-tack masking tape. You'll notice that it's a fairly light tan,,,I mix Tamiya Dk Yellow with Tamiya White in about a 40/60 mix, and then further tint it with Tamiya Buff til it looks right. I have no "standard formula". There has been some discussions about the "correct" shade of Dunklegelb on nearly every site I've been on, and I can only say that I'm a pupil of the "scale distortion" school of thought, first propounded by Tony Greenland in his amazing book. Basically the argument is that light disperses differently on a small object than it does on a large one, so in order to achieve correct color hues, you need to lighten paint in order to achieve the same tint that that color would have in real life. I have found this to be true; a lot of armor that I see painted straight-from-the-bottle looks, IMHO, too dark, too "yellow". Photographic evidence also seems to point us in that direction.Color photos of the Tiger II, Elefant and Jagdtiger at Aberdeen taken just after their capture show drastically faded base coats of near-tan hues.

I have also learned through trial-n-error that the lighter shadeis necessary in order to assure that the weathering process of washing with raw umber oil does not further darken the finish beyond what would be acceptable.

The tortoise-shell pattern was added with unlightened Model Master acrylic Panzer Green...

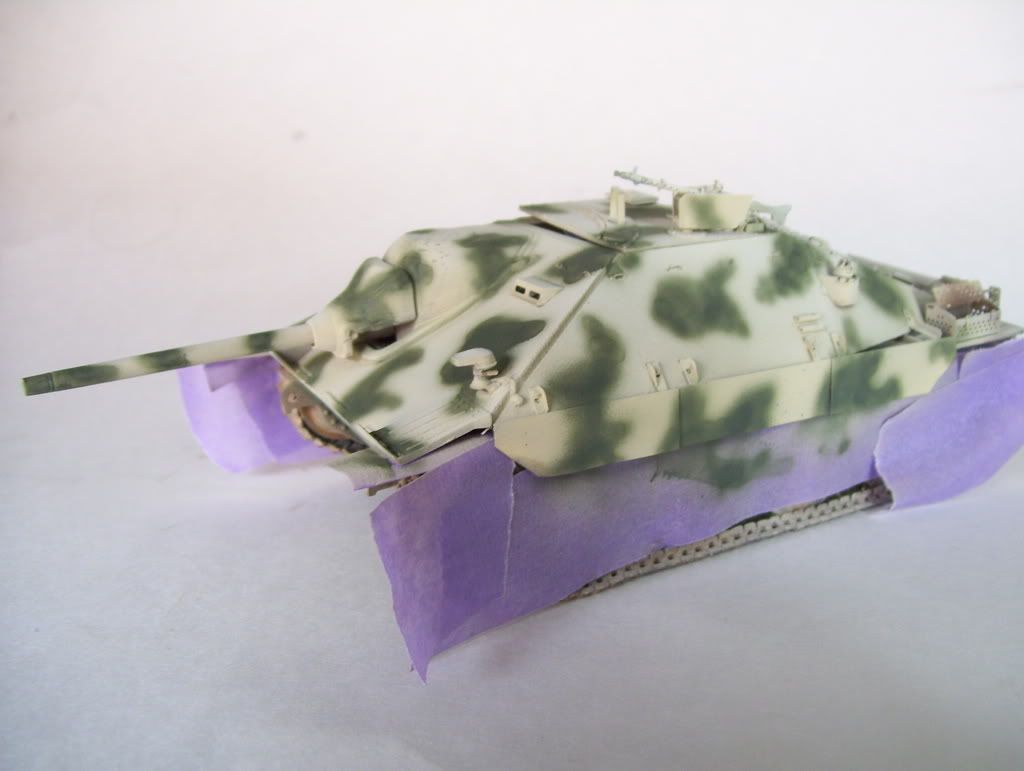
Then, Tamiya Red Brown was used to outline the blotches...


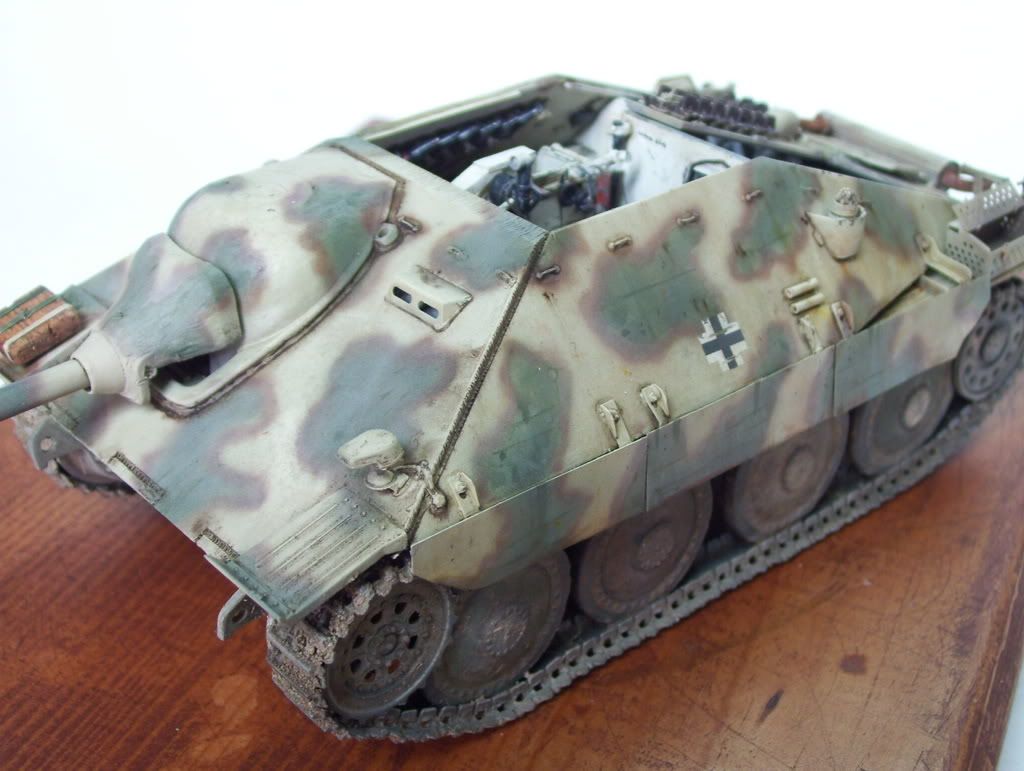
At this point, I carefully cut out the balkenkreuz decal with a razor blade and aplied it directly to the side of the model, snuggling it down with Micro Sol. I didn't feel the need to apply a gloss coat beneath it, as there would be no decal film to tempt with "silvering". Note to "newbies"--if I had put number decals on this tank, I woud MOST DEFINITELY have shot a spot of enamel gloss through my airbrush to lay the decals on; nothing's worse than that dreaded decal "silvering"!. I am not an advocate of "future", the product that so many modelers seem to love and use quite liberally in the modelling world...I think it's difficult to get the model back to an adequate "flat" shade without adding yet another coat or two of dullcoat, and, over time, all those coats of laquer are eventually going to age and yellow, changing the appearance of the finish. So, despite the "hype" about it, I opt out. Whistling [:-^] No disrespect to proponents of it intended!

When I apply the decal, I take a small swatch of facial tissue, ball it up, soak it, tip the top of the Micro Sol bottle against it to soak it, and press that down against the decal to snuggle it down against the model. This works especailly well over odd details and curves!

When the decal was dry, I did two standard washes with Windsor and Newton oils using regular mineral spirit. I have to credit our friend "biffa" with giving me the idea to apply a dunklegelb/tan wash, which I simply mixed using raw umber/white/yellow (only a pinprick of yellow!!) in order to age the camo a bit. (THANKS RON!) When that was dry, I then did a  complete detail/pin wash using raw umber, outlining all the details with a small brush.

In the next photo you can see the "cloudiness" of the tan wash in the blotches. Also, notice that I then took a thin brush and, using the same Panzer Green acrylic, I painted a  bunch of superficial "scratches" into the blotches. I also added some orange/burnt sienna streaks/dots by putting a tiny dot of paint where it's origin would be and then, with a wider brush dipped in thinner, "pull" the paint down several times until it's what you want. You can use that very same brush to just poke and stab at the model to transfer that same diluted paint onto the model and make rusty blotches and spots.
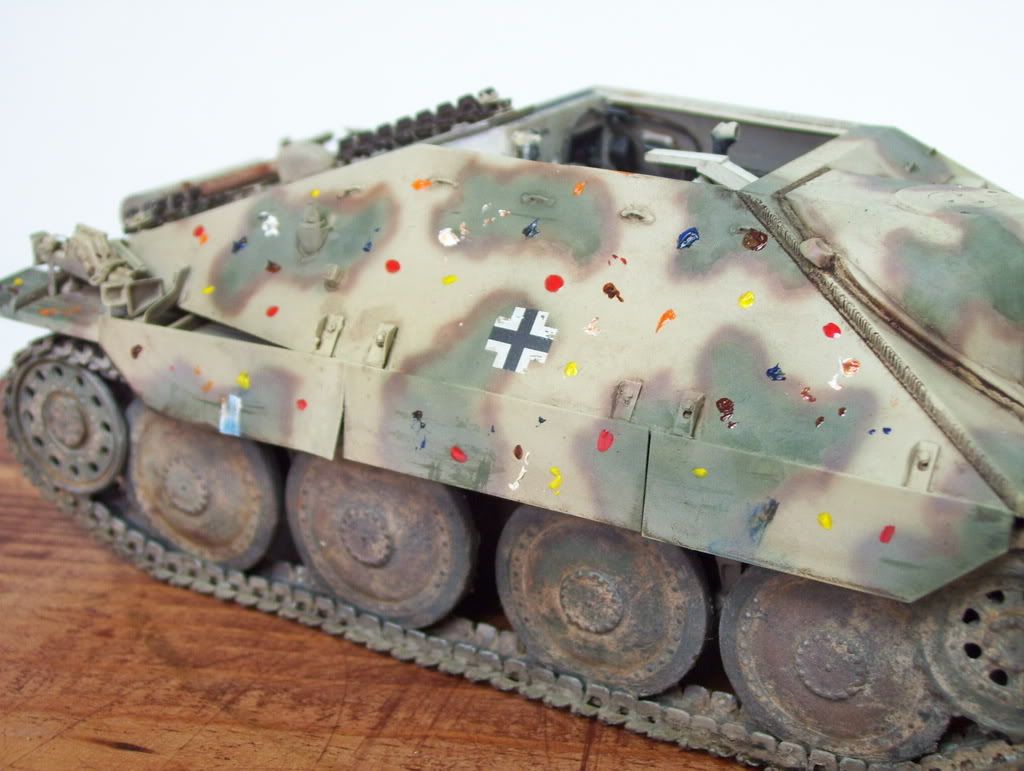
 

OK, now the fun REALLY begins!Big Smile [:D] After sealing the model with some rattle-can dullcaot and letting dry overnight, I set about doing the "dot" step. You may have seen biffa talk about and use this method as well, Althoug I'd like to give him credit for teaching it to me, I actually learned this first from the AMAZING tutorial by several of the outstanding Spanish modelers in ARMOR magazine, available through Squadron.

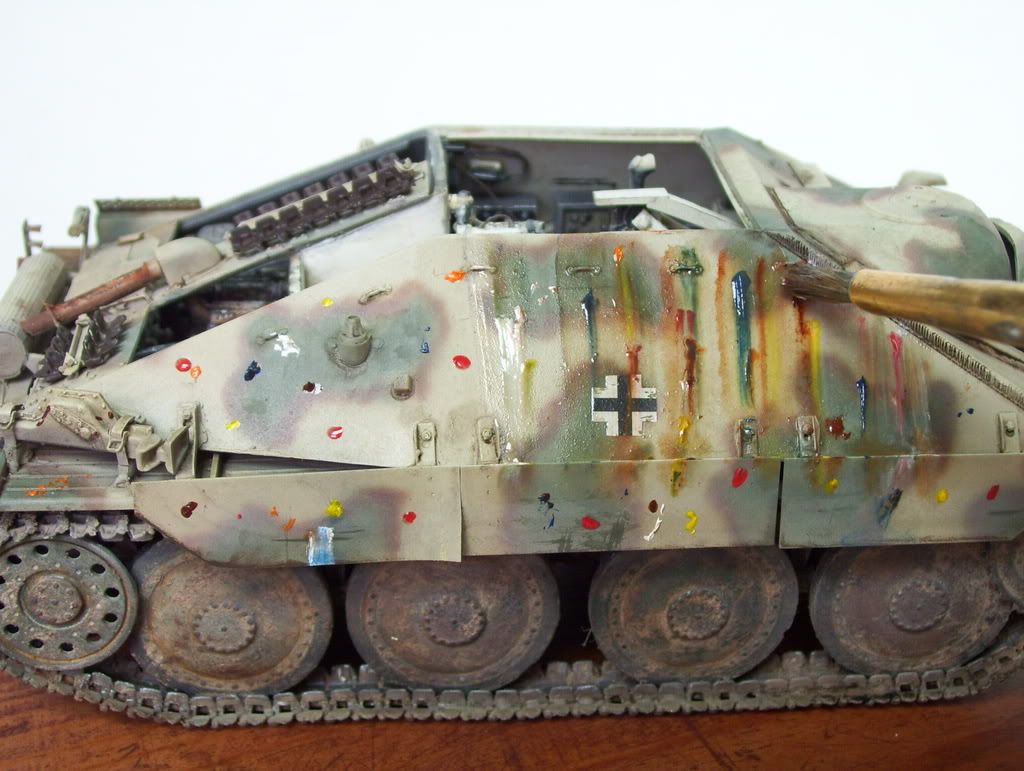
Here's what you do:prepare a small palette-a plastic lid-with paint dollops of oil paints--the more colors the better EXCEPT FOR BLACK(!!!)--and then, using a small brush, put random "dots" of paint all over your model. Do one area or panel at a time! (use black pastel for ant "blackened" areas such as the exhaust; it's way more subtle!)

OHHH! DON'T BE SKEERED! Laugh [(-D] Then, using a thinner-soaked brush, start wiping up and down with the brush, liberally smearing the paint. Don't be afraid to clean and re-wet the brush from time to time. You want to really just about wipe the paint away--but not ALL, really!...

BRRRAP!! That's the sound of my brush here, wide-open! Laugh [(-D] Just swab the paint vigorously, til it starts to disappear...

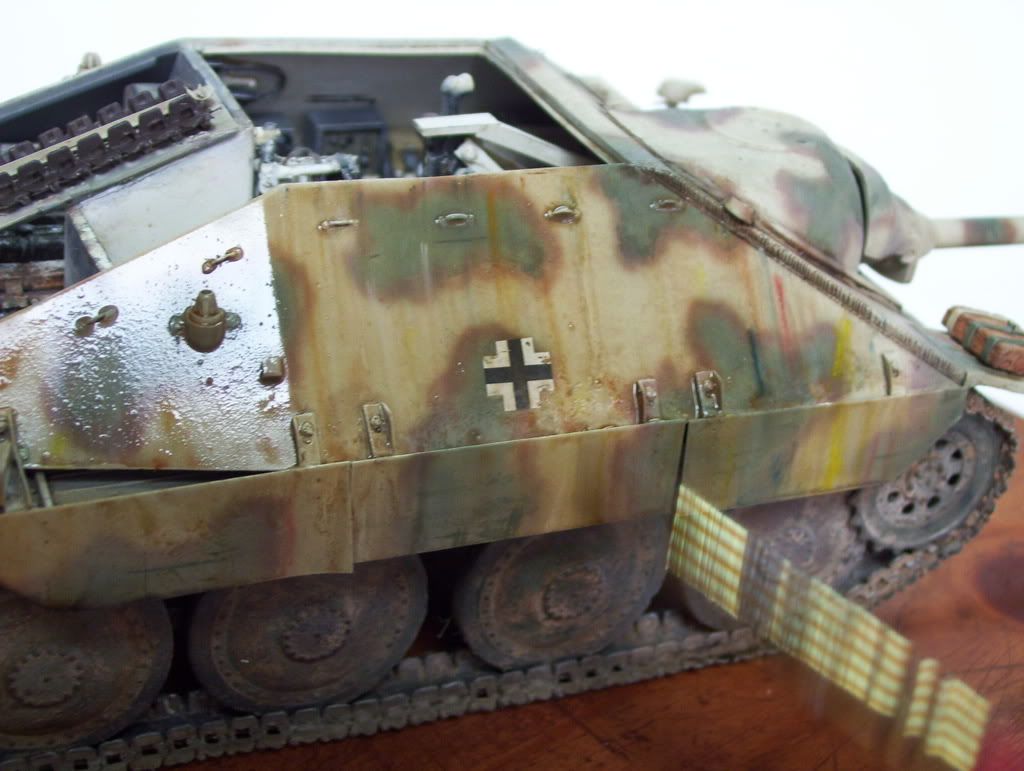
Then, take a ball of facial tissue and blot away the excess thinner...

Here you can see the difference between the finished hull, and the top roof which still has to be done...

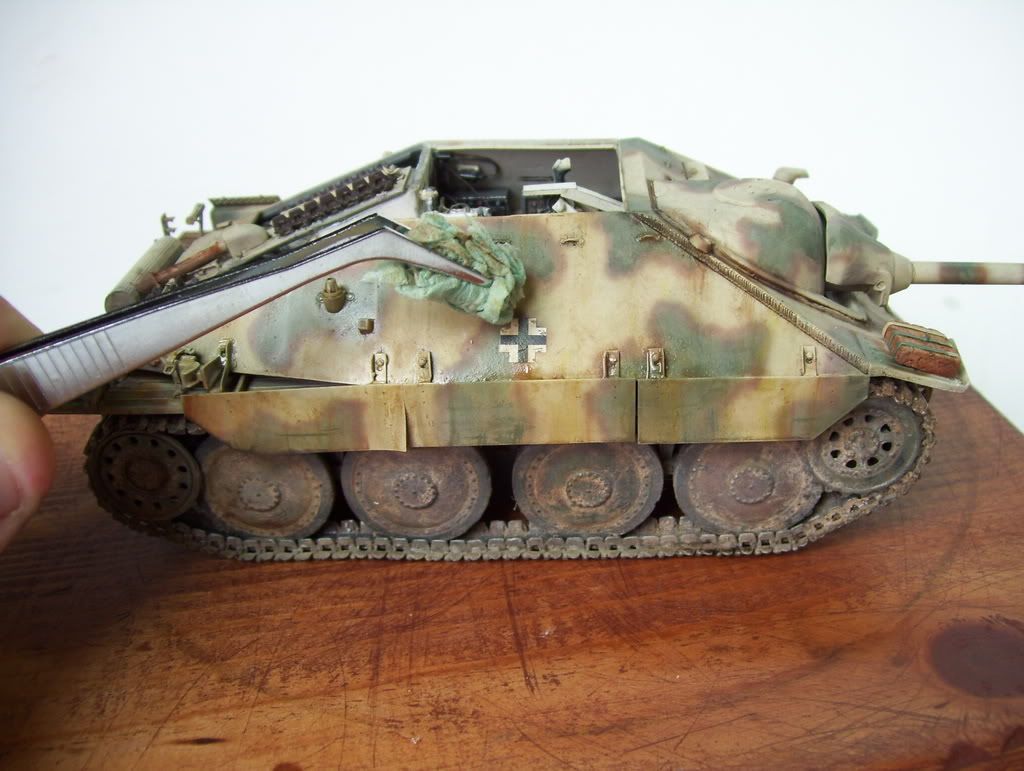
After that had dried, I used some "tan" mixed oil and applied "dusty" streaks and "scratches", as well as some more Panzer Green superficial "scratches"....you can realy see them on the skirts...


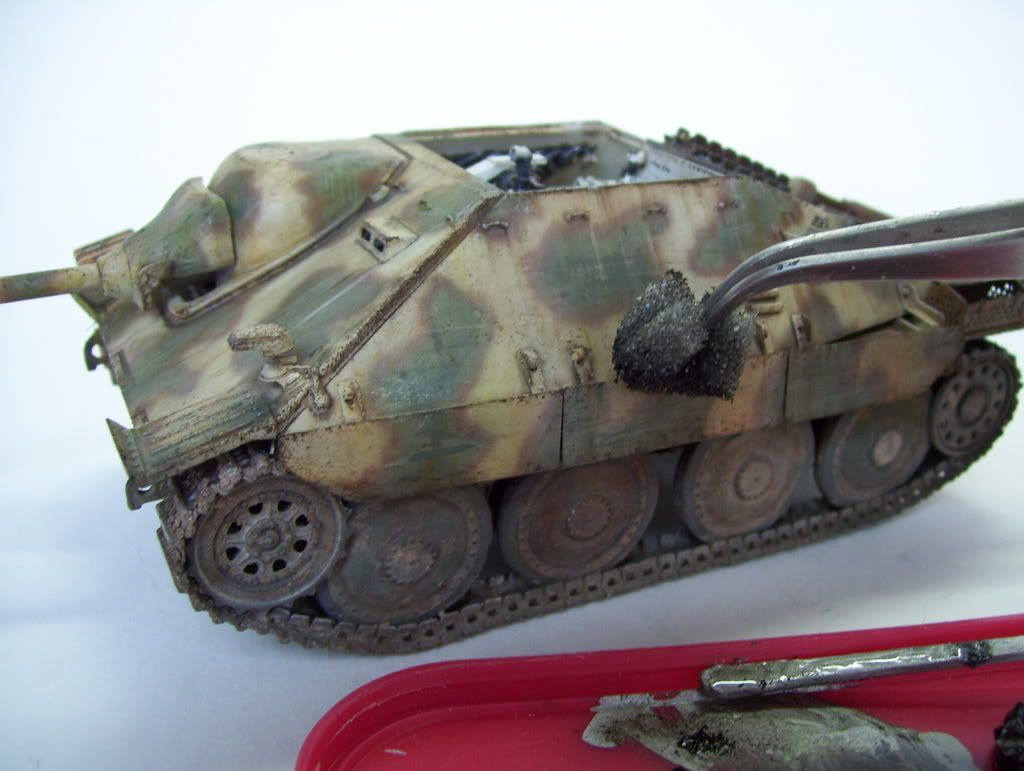
Now, the "chipping" phase: first, my tools: a palette (I've got a million of these tops from General Foods International French Vanilla Cappuchino tins!, a tweezer, a swatch of grey packing foam, and a mix of Testors enamel Steel, raw umber oil, black oil, and orange oil--all the colors you'll ever need!


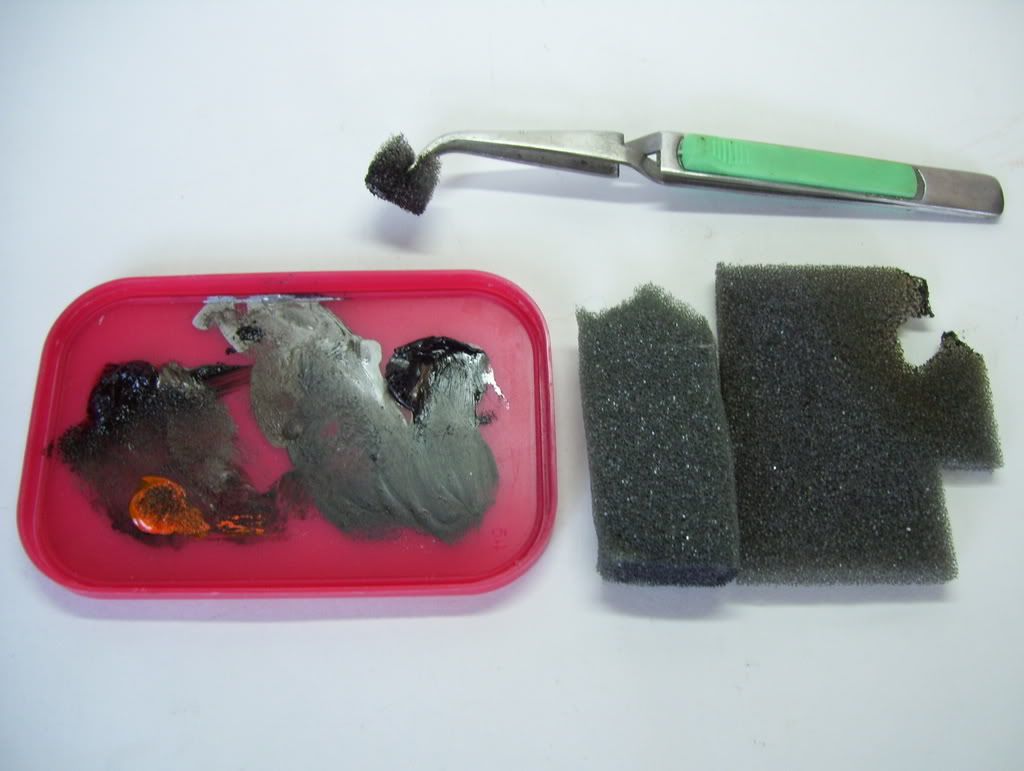
Using the foam, dip it in the mix, and start dabbing the chips alond the edges, the high points, the parts that would ordinarily get dinged up and damaged in real life. It's IMPORTANT to NOT just mindlessly slap the scratches down EVERYWHERE and without thought! You CAN add them in the middle of panels and on flat spots--paint DOES chip and deteriorate in harsh conditions--but try to think about REAL WEAR! I STRONGLY SUGGEST that you go out and photograph and look at construction/landscaping heavy equipment--front end loaders, bulldozers, dump trucks, etc--to see what it really looks like! LESS IS MORE ,if you're in doubt!

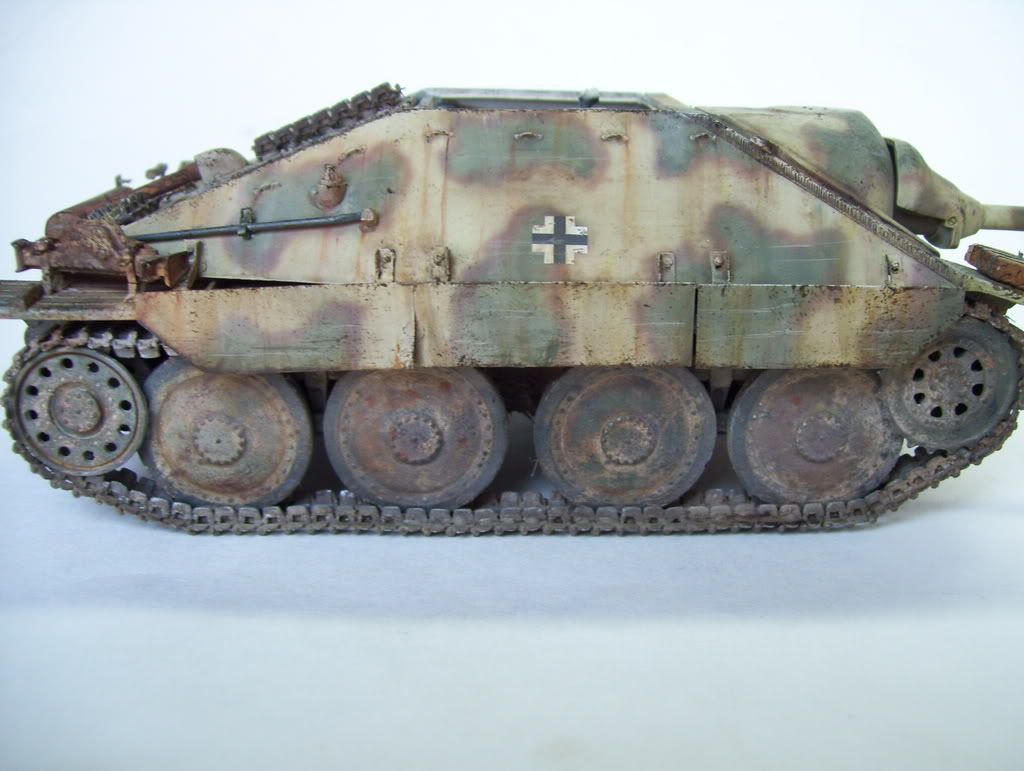
Here's the finished result--notice that the edges have recieved he most abuse. Also note that  I put specific scratches with a thin brush in the decals to beat them up a bit. I also have applied more rust/grime streaks coming down from the foliage loops. A light coat of dullcoat was applied to remove any unwanted sheen, and a final, light drybrushing of Testors Silver and Steel was used for very fresh scrapes and scratches. 

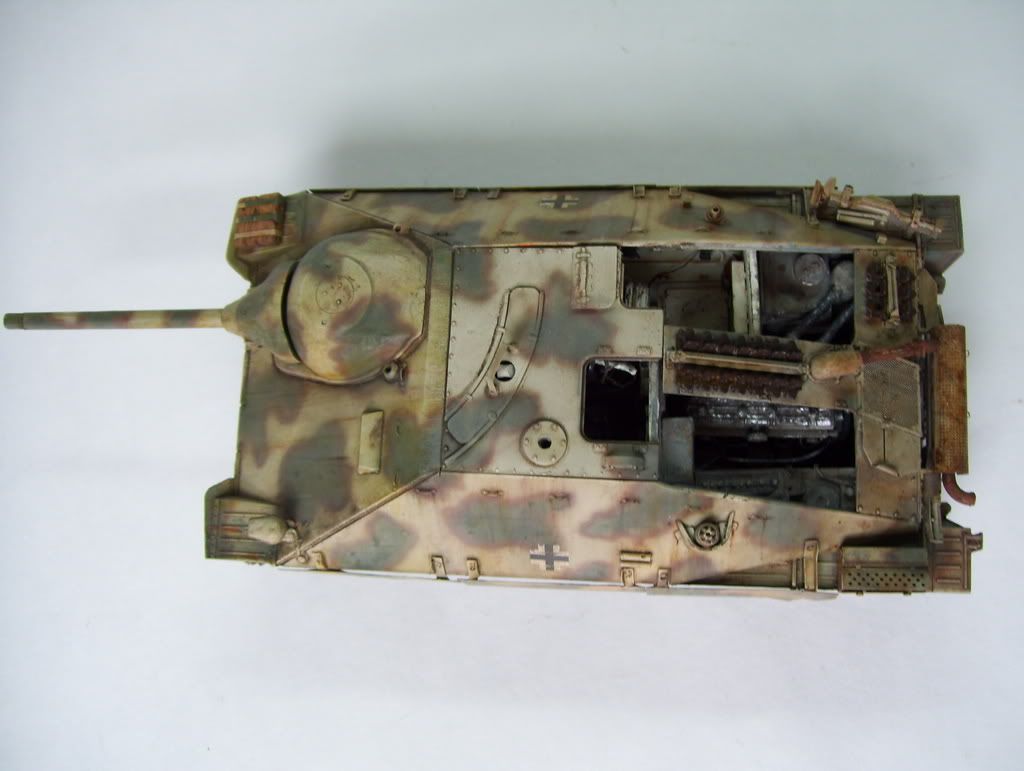
At this point, I applied MIG pigments to the roadwheels and hull, simply by dumping a bit of the pigments into a mixing cup and, with a brush that has been dipped in mineral spirits, I dipped the brush into the powders and just slapped 'em on. Use discretion in doing this--I have found that when they dry, they will lighten up quite a bit, and also reveal more coverage than they looked when wet, when they tend to "disappear" a little bit. Less is more is once again the mantra....in this picture, you can see the results and the final finish...


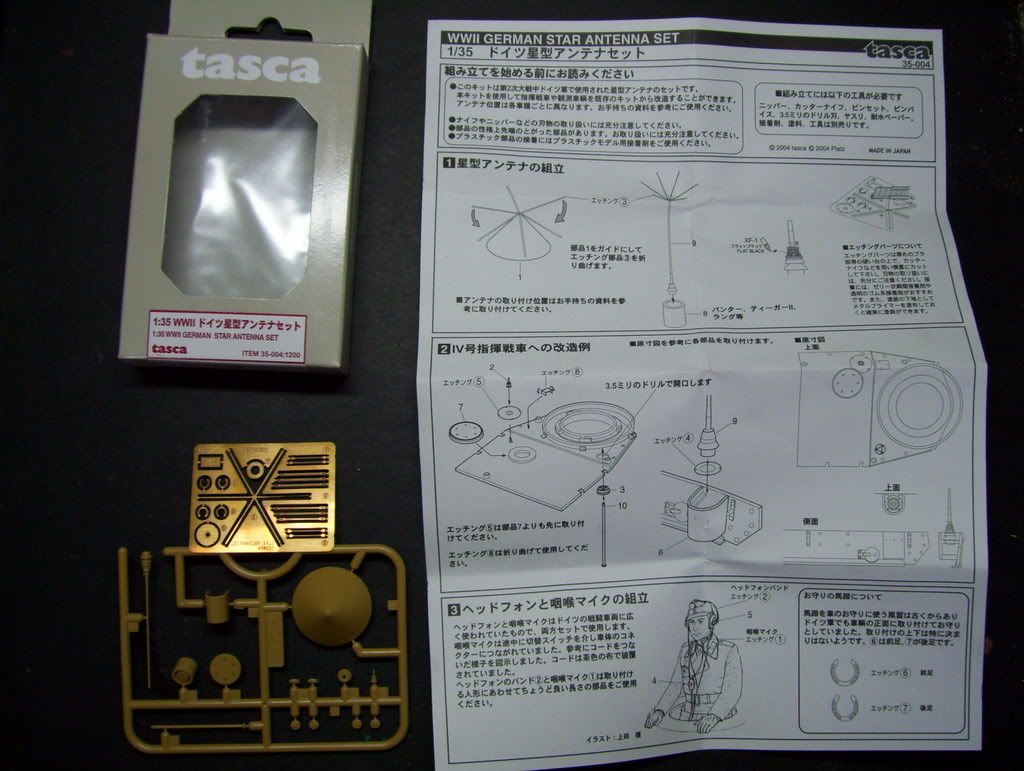
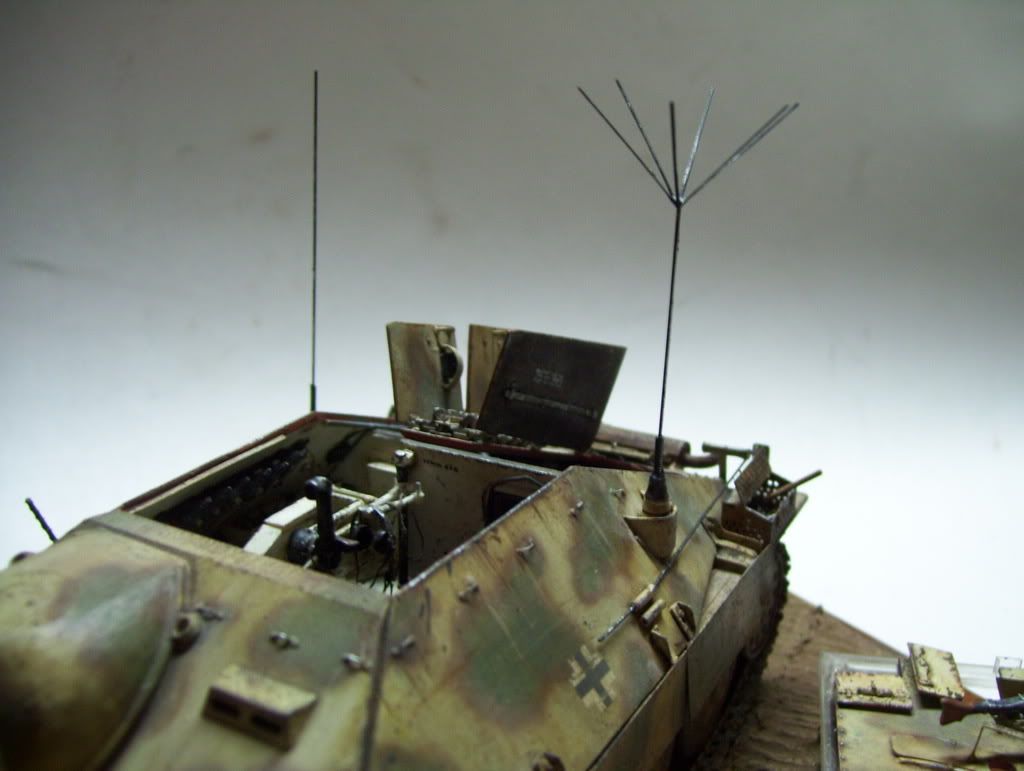
The last detail was the TASCA star aerial, necessary for he depiction of this Hetzer as a "Befehlspanzer"--a command tank with an extra radio. Here's the kit. The little plastic cone is a jig provided to fold the "star" aerial over; worked like a charm!

I had originaly used the plastic "post" provided in the TASCA kit as part of the antenna, but after wbill76 pointed out the discrepancy (THANKS, BILL!!)between the spare (mounted there behind the tool box on the side hull) and the plastic part, I corrected the part by using an old guitar string--which was also used for he spare AND the opposite antenna. To make an antenna, get a string--anywhere from .024 to .046, and strip off the outer winding around the core. Save a centimeter or so of winding to simulate the springy "base" of he antenna and drill out the lastic mount with a pin drill and fix the antenna into the hole with gap-filling superglue. 
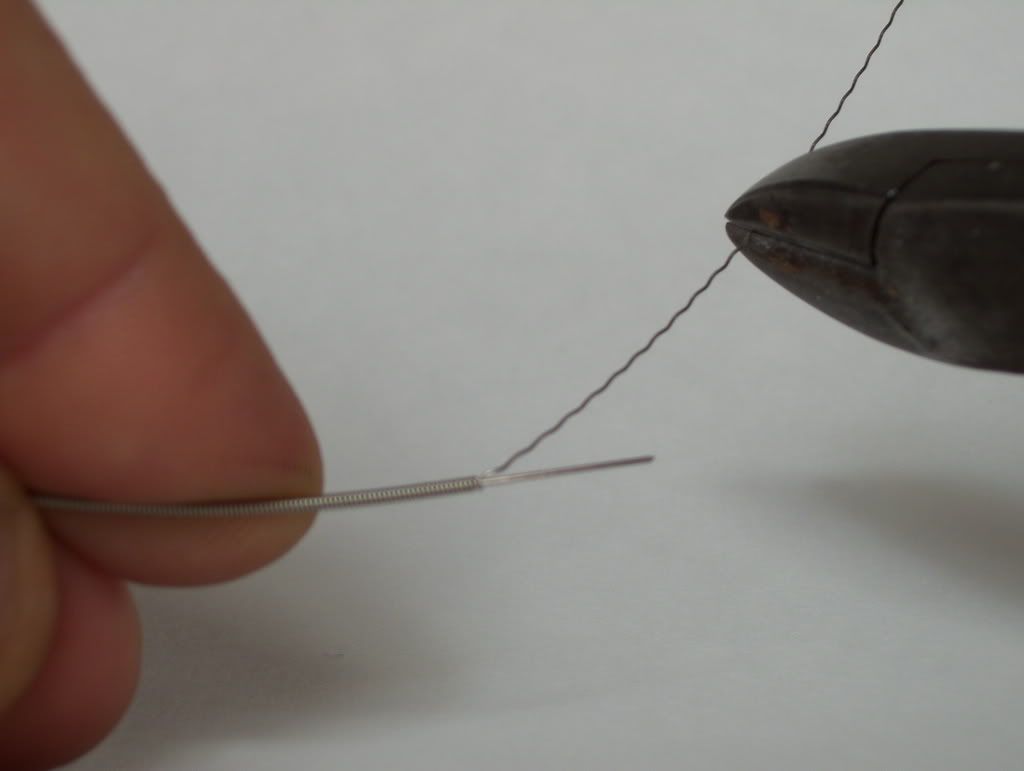
Her you can see the difference between the original plastic piece and the corrected guitar string; note the difference in thickness! 

The "old" plastic antenna:

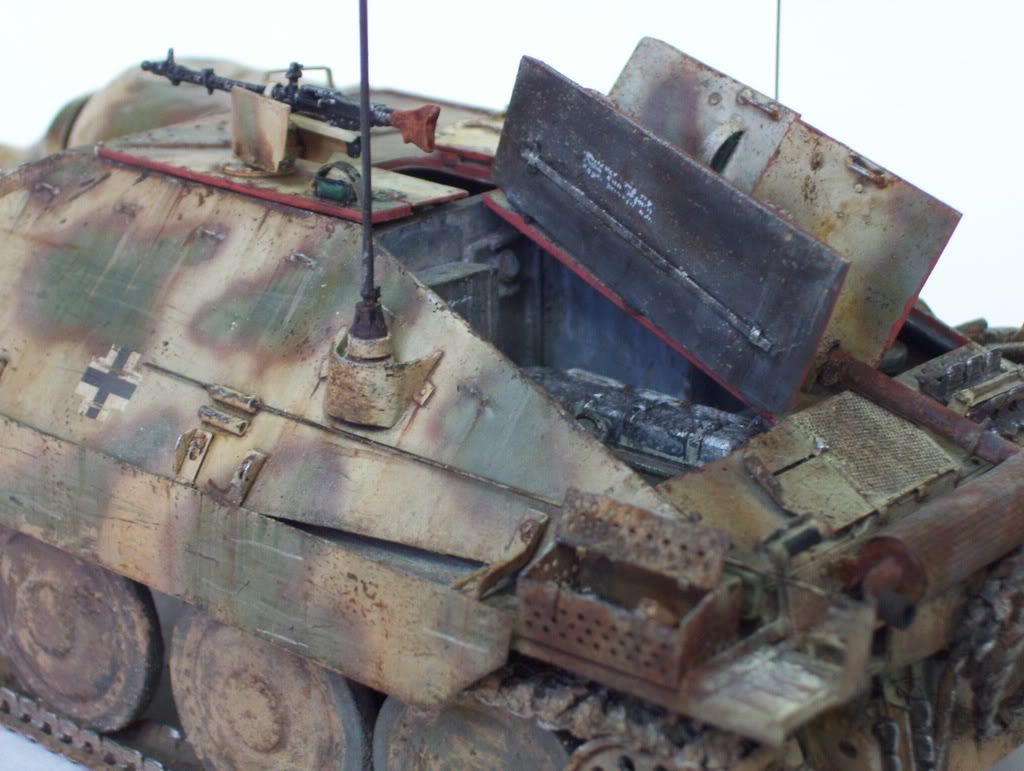
...and the "corrected" guitar string antenna...LISTEN! Can you hear the sustain?...wwwWWWAAAAA! Laugh [(-D]

Well, I think that pretty much sums it up! I hope I covered everything clearly enough that you get some ideas and inspiration for our next build! If you have any detailing or finishing  questions, be sure to leave me a post here and I'll try to answer them when I get home later tonight from the little lady's house! Big Smile [:D] (If I have any energy left! Whistling [:-^] Laugh [(-D])

Thanks to all you guys who have inspired me to be a better modeler! I hope that in doing this post, perhaps I can be returning the favor! 

*EDIT Nov 25th 2007* You can also find a related tutorial on another Hetzer build which deals with both Silly Putty masking techniques and more "oil dot" wash photos by typing:

                      Doog's "Silly" Helo Hetzer painting tutorial

...into the"Search" feature of the forums!


  • Member since
    October 2004
  • From: Katy, TX
Posted by jthurston on Wednesday, August 29, 2007 1:27 PM
Holy smokes, dude. I can almost hear all the kits in my stash right now, shuddering at all the abuse they're about to take...he he heMischief [:-,]
  • Member since
    July 2004
  • From: Sonora Desert
Posted by stikpusher on Wednesday, August 29, 2007 1:31 PM
Very impressive work! Do you build/finish any Allied armor with similar techniques? I'd like to see what you do with an OD/Khaki Drab/Soviet Green monocolor finish.


F is for FIRE, That burns down the whole town!

U is for URANIUM... BOMBS!

N is for NO SURVIVORS...

       - Plankton

LSM


  • Member since
    May 2003
  • From: The Buckeye State
Posted by Panther 44 on Wednesday, August 29, 2007 3:21 PM

Hey Doog,

  Thanks a million. Got this post book marked. Happen to have an Italeri Hetzer nearing completion. Time will tell and we will see.

                                                                                                 Joe Big Smile [:D]Big Smile [:D]

Just remember, ignorance is no excuse for the law. - Moe
  • Member since
    October 2005
  • From: Yuma, Arizona
Posted by Brumbles on Wednesday, August 29, 2007 5:47 PM
Excellent toots, Doog!  Have printed it out and MAY actually use it this coming long weekend (although my base Dunkelgelb is significantly darker than yours...)
  • Member since
    March 2003
  • From: Rain USA, Vancouver WA
Posted by tigerman on Wednesday, August 29, 2007 6:03 PM
Outstanding Doog. You and Ron are at another level of weathering. Great tutorial, the pictures are quite helpful. I hope to incorporate some of these techniques in futture builds.

   http://i7.photobucket.com/albums/y269/wing_nut_5o/PANZERJAGERGB.jpg

 Eric 

  • Member since
    July 2003
  • From: Perth, Western Australia
Posted by madmike on Wednesday, August 29, 2007 6:25 PM

Certainly looks excellent!

I will attempt some toned down versions of your methods with 1:72 and see how it goes.

cheers

Mike 

"I do not feel obliged to believe that the same God who has endowed us with sense, reason, and intellect has intended us to forgo their use." - Galileo Galilei
  • Member since
    March 2007
  • From: Northeast WA State
Posted by armornut on Wednesday, August 29, 2007 6:45 PM
 great job doog,very helpful info. i've actually taken some of your advice on the chipped metal around gun breachs(breeches?)i need practice but it woked goodSmile [:)] its nice to know i'm not the only one who doesn't like to use future,i cant get the stuff to stop puddeling or dry fast enough you know the drill,anyway great hetzer and thanks again for the info.

we're modelers it's what we do

  • Member since
    January 2007
Posted by the doog on Wednesday, August 29, 2007 9:16 PM

 stikpusher wrote:
Very impressive work! Do you build/finish any Allied armor with similar techniques? I'd like to see what you do with an OD/Khaki Drab/Soviet Green monocolor finish.
Hey stikpusher! Thanks for the reply and compliment!

Yes, this method works as well with dark green/OD tanks--although I would add in a step of drybrushing with light tan before the chipping phase.

Or, alternately, I might do a slightly heavier oil,wash of dusty tan and then DB with the basecoat, to show the details peeking through the heavy dust coat. 

I haven't done one in a while, but I'll remember to post a pic of the next Russian tank I do!  Maybe you ought to try it on one before that? Go for it! Big Smile [:D]

  • Member since
    July 2003
  • From: Perth, Western Australia
Posted by madmike on Wednesday, August 29, 2007 10:06 PM

oh ho! I might try that as well!

cheers

Mike 

"I do not feel obliged to believe that the same God who has endowed us with sense, reason, and intellect has intended us to forgo their use." - Galileo Galilei
  • Member since
    November 2005
  • From: Somewhere over the rainbow
Posted by m1garand on Wednesday, August 29, 2007 10:20 PM

Doog, Doogster, Doogie, Doogman,

Do you do a private tutoring in painting models?  How far are you from L.I.?

  • Member since
    July 2003
  • From: Perth, Western Australia
Posted by madmike on Wednesday, August 29, 2007 11:26 PM

Painting panzer grey is a real problem, particulalry in 1:72.

I think I have an answer buy drybrushing lightly over each panel in increasingly lighter tones. Looks ok and seems to provide a nice tonal diff. If I airbrushed my 1:72 armour, I would do something similar with the "cloud technique".

cheers

Mike 

"I do not feel obliged to believe that the same God who has endowed us with sense, reason, and intellect has intended us to forgo their use." - Galileo Galilei
  • Member since
    November 2005
Posted by Anonymous on Thursday, August 30, 2007 4:47 AM
wow, thanks heaps for that, it helps soooooooo much!!!!!!! Merci Beaucoup!
  • Member since
    January 2007
Posted by the doog on Thursday, August 30, 2007 6:48 AM
 madmike wrote:

Painting panzer grey is a real problem, particulalry in 1:72.

I think I have an answer buy drybrushing lightly over each panel in increasingly lighter tones. Looks ok and seems to provide a nice tonal diff. If I airbrushed my 1:72 armour, I would do something similar with the "cloud technique".

cheers

Mike 

Mike, you DON'T airbrush your 1:72 armor???! WHY?!!!Confused [%-)]

I can't imagine a good reason not to! Brush strokes are brush strokes in any scale!

Panzer gray in 1:72 should be lightened drastically; then use black washes to darken it and emphasize the shadows. You can try preshading with standard panzer gray first as well, and then shoot lightened gray over it. Or you can do the heavy tan wash route and DB in gray; that will give you nice effect.I'd be interested in seeing your method-post a photo?

 m1garand--I'm over near Syracuse--Finger Lakes region, town of Auburn--nice vacation area, small town, just don't get caught here when we get those "lake effect" snows! ABout 5 hours from LI!

still-learning, it would be nice to see some of your photos when you've got something to show; glad you liked the tutorial!

Thanks again, all!Big Smile [:D]

  • Member since
    November 2006
  • From: Massachusetts
Posted by jadgpanther302 on Thursday, August 30, 2007 7:28 AM
good work doog. bookmarkin it
  • Member since
    October 2004
  • From: Katy, TX
Posted by jthurston on Thursday, August 30, 2007 7:48 AM
 the doog wrote:
 

I'm over near Syracuse--Finger Lakes region, town of Auburn

Hey, the home of talking movies! Headphones [{(-_-)}] We used to go up there on vacation when I lived in Jersey...small world


  • Member since
    July 2003
  • From: Perth, Western Australia
Posted by madmike on Thursday, August 30, 2007 9:43 AM
 the doog wrote:
 madmike wrote:

Painting panzer grey is a real problem, particulalry in 1:72.

I think I have an answer buy drybrushing lightly over each panel in increasingly lighter tones. Looks ok and seems to provide a nice tonal diff. If I airbrushed my 1:72 armour, I would do something similar with the "cloud technique".

cheers

Mike 

Mike, you DON'T airbrush your 1:72 armor???! WHY?!!!Confused [%-)]

I can't imagine a good reason not to! Brush strokes are brush strokes in any scale!

Panzer gray in 1:72 should be lightened drastically; then use black washes to darken it and emphasize the shadows. You can try preshading with standard panzer gray first as well, and then shoot lightened gray over it. Or you can do the heavy tan wash route and DB in gray; that will give you nice effect.I'd be interested in seeing your method-post a photo?

 m1garand--I'm over near Syracuse--Finger Lakes region, town of Auburn--nice vacation area, small town, just don't get caught here when we get those "lake effect" snows! ABout 5 hours from LI!

still-learning, it would be nice to see some of your photos when you've got something to show; glad you liked the tutorial!

Thanks again, all!Big Smile [:D]

Well I build aircraft normally as you know and have the issue with permanent location of a spray booth. 

At this time my armour is brushpainted using Vallejo paint which does not leave much in the way of brushmarks (if any) if applied properly. However when I start disruptive camo, then my airbrush will get a workout. But, I am enjoying using the brush currently. I am recovering from a BIG aircraft model burnout, so just uncomplicated painting and assembling is my road to recovery.

Oops, now just how did that Me109E-4 get in there?

I started with a black lacquer base coat to give the subsequent acrylics tooth for the dry brushing to follow, then I worked up with about 5 different shades. I will edge in a light shade after a green filter, then pinwashes of raw umber and black. So far the drybrushing of varying tones is almost done and you can see the fading, which is good.

Anyway, this is your post and I will take on board some of your techniques. 

cheers 

Mike

"I do not feel obliged to believe that the same God who has endowed us with sense, reason, and intellect has intended us to forgo their use." - Galileo Galilei
  • Member since
    February 2007
  • From: NOLA
Posted by roosterpelo on Thursday, August 30, 2007 12:13 PM
wonderful tutorial doog, thanks a million. i will surely have to add these to my bag of tricks. gotta say, the dot method.......mmmmmmmmm...........god that looks scarey!! i shudder just looking at the pics, hoping it will turn out good, and in your case, it did, perfect actually. i'll have to try the non-future method, as i always find that it takes a few to many coats of dullcoat to get rid of that sheen you were talking about. awesome!!
chris d.
  • Member since
    July 2006
  • From: New Jersey
Posted by redleg12 on Thursday, August 30, 2007 12:47 PM

Impressive, Most Impressive!Thumbs Up [tup]Thumbs Up [tup]

The only thought for US/Allied armor or artillery is the use of graphite for highlights and wear areas. then use a little burnt umber pin wash over them to dull the graphite.

You ought to take the entire three threads you have posted and submit to the mag for a good armor article. You already have it 95% done. Just copy, clean up and submit. Besides I getting tired of all the airplane articles. This would make a great armor article.

Rounds Complete

"The Moral High Ground....A Great Place to Emplace Artillery."

  • Member since
    November 2005
Posted by Anonymous on Thursday, August 30, 2007 1:27 PM

...maybe the best series of threads I have yet seen in the forum...very helpful to many who want to learn some new techniques...it is one thing to describe in words how you got to a finished model and have that finished model in a pic; it is totally another to have pics of steps along the way to show how these techniques actually look as a WIP...I think that many who have never used the "dot" or "sponge" technique will give it a whirl, and after all, isn't that why we are all on here---to learn something new?

Great work, but I think the better compliment is: "thanks for taking the time to show us how you did it...that took effort and time...and it is appreciated..."

...if I ever decide to weather any of my models I will certainly reference back to this thread...LOL...Big Smile [:D]


  • Member since
    July 2004
  • From: Texas
Posted by wbill76 on Thursday, August 30, 2007 1:33 PM
Very informative and insightful doog, sure to be helpful to many. Thumbs Up [tup]
  • Member since
    July 2006
  • From: San Juan, Puerto Rico
Posted by Thomas on Thursday, August 30, 2007 1:38 PM

Hello the doog

FineScale should put an eye in this impressive weathering tutorial. 

Greetings

TDC

TDC
  • Member since
    October 2004
  • From: Katy, TX
Posted by jthurston on Thursday, August 30, 2007 2:40 PM

Hey, that's not a bad idea! You should submit this to the Mag for an article!

  • Member since
    January 2005
  • From: in the tank factory in my basement
Posted by biffa on Thursday, August 30, 2007 4:01 PM
Beautiful Hetzer Doog i love the layered weathering everything blends perfectly and the step by step is very well done and as already said im sure it will be useful to many people, ive taken a few notes for future reference, thanks for taking the time. Smile [:)]
Ron g.
  • Member since
    January 2007
Posted by the doog on Thursday, August 30, 2007 4:35 PM
 jthurston wrote:

Hey, that's not a bad idea! You should submit this to the Mag for an article!

Well, I guess I should tell you all; I was gonna post it as "Great News on the Hetz!" but I didn't want to upstage Steve's post about making the magazine...Wink [;)]...but I shoulld tell you that I emailed a few photos to Matt Usher and asked him if FSM would be interested in it as a Build and Finishing Article, and he enthusiastically replied "Definitely!"!!!  SO I will be submitting a rewritten article for publication in the near future!

I should also add that it might take a while to see it though; I sold an article on my "Judges Best-of-Show" winner to FSM in the spring, and I only recently got confirmation that it will be published in January 2008's FSM! (on stands in December).  YAHOO!

So we may not see it for a while--IF they decide to purchase and run it, so...KEEP YOUR FINGERS CROSSED!!!

Anyhoo...madmike: that's right, I remember now, you've got those lousy neighbors! SoapBox [soapbox] Well I must say, your ME109e is gorgeous; much better than I'd ever do! The finish is perfect, I concede! Comment on "brush strokes" retracted!Black Eye [B)]Big Smile [:D]

Roo, thanks for weighing in; and try that finish without the Future. You've turned out some fine stuff using it, but just so you have the benefit of the experience of the results from NOT using it, you should try it and then decide what technique you prefer!

Redleg: Good suggestion on the graphite for green finishes! Thanks for the Thumbs Up [tup]!

Manny: thank you again for your kind words, and I would LOVE to see some of your models weathered! Whistling [:-^]Laugh [(-D] Not that they lack anything really as you portray them; you are indeed a master of the "Greenland, clean" finish!--and your planes are the best I've ever seen! (Guys, check out this guy's planes!)

wbill76--I'm currently using your build review on "bpmodels" for a build guide on the 15 cm Sturm-Inf-Ges. III that I'm doing OOB for a break! Thanks for your help and invaluable advice!

Thanks to you too, Thomas!

Ron! (biffa) Hey I've been wondering where you've been! I have to admit that I was curious as to what you'd think about my Hetzer; it goes without saying that you are indeed one of the true "Masters" Bow [bow] of Finishing on this and other sites, and I doubt that I could teach you anything that you don't already know! But I really appreciate your comment; it means a lot coming from a recognized expert, and I IMMENSELY enjoy your posts and models as well--got a few bookmarked for reference myself! I used your idea of a dunklegelb/tan wash on this model for the first time, so thank you for teaching ME something! And I can't wait to see your finished Tamiya Hetz!

Like I said guys, keep your fingers crossed for me! I'll surely keep ya all updated on any news! Big Smile [:D]


  • Member since
    August 2006
  • From: The Green "Mountains", Vermont
Posted by IanIsBored2000 on Thursday, August 30, 2007 5:13 PM
Wow, thanks for the step by step, absolutely wonderful.  This post  help me decide to order some Mig Pigments and artist oils, thanks for the inspiration! One thing I've already noticed, is with streaking/oil dot method you have to go VERY light with the black.  I tried a 1:1:1 ratio of dots of black, raw sienna and yellow ochre and all you could see was pure black when I started to "smear"! nice thing is its such a forgiving method, it's an easy fix (and of course this was just on a an old stug that was in about 30 pieces anyways. ) You seem to have the balance of colors down perfectly, which is why I like the technique- easy to learn, difficult to master.  Also interesting to see you used dots of blue and other crazy colors- seldom seen in weathering, but needless to say, whatever you did worked beautifully! Great work, and thanks for the time on the Step by Step!
"Scanlon: work your knobby hands on the table in front of you, constructing a make-beleive bomb to blow up a make-beleive world."
  • Member since
    July 2004
  • From: Texas
Posted by wbill76 on Thursday, August 30, 2007 6:04 PM
Doog, looking forward to seeing what you do with the SiG 33B and hope the blog is of some use to you, it's a brute of a vehicle with plenty of opportunity for weathering and the kit is a fun way to play around with. Thumbs Up [tup]
  • Member since
    January 2007
Posted by the doog on Thursday, August 30, 2007 6:22 PM

 IanIsBored2000 wrote:
Wow, thanks for the step by step, absolutely wonderful.  This post  help me decide to order some Mig Pigments and artist oils, thanks for the inspiration! One thing I've already noticed, is with streaking/oil dot method you have to go VERY light with the black.  I tried a 1:1:1 ratio of dots of black, raw sienna and yellow ochre and all you could see was pure black when I started to "smear"! nice thing is its such a forgiving method, it's an easy fix (and of course this was just on a an old stug that was in about 30 pieces anyways. ) You seem to have the balance of colors down perfectly, which is why I like the technique- easy to learn, difficult to master.  Also interesting to see you used dots of blue and other crazy colors- seldom seen in weathering, but needless to say, whatever you did worked beautifully! Great work, and thanks for the time on the Step by Step!
Thanks Ian, glad you enjoyed the tutorial and have already done your own experimenting--the one thing I should have said ( and I will correct in the post) is DON'T USE BLACK! That's the only color that you really don't want; use it for pin washes, and use black pastels anywhere elso you might want a blackened area, such as the exhaust...the unorthodox colors actually help to blend and tint all the other "predictable" shades, just experiment with ratios--you can always just wipe away what you don't want witha thinner-dipped tissue if you commit a disaster! LOL!


  • Member since
    July 2003
  • From: Perth, Western Australia
Posted by madmike on Thursday, August 30, 2007 8:31 PM

 the doog wrote:

Anyhoo...madmike: that's right, I remember now, you've got those lousy neighbors! SoapBox [soapbox] Well I must say, your ME109e is gorgeous; much better than I'd ever do! The finish is perfect, I concede! Comment on "brush strokes" retracted!Black Eye [B)]Big Smile [:D]

Mate that Me109E was an airbrushed build. sorry I should have been more clearer with that Smile [:)]

I will try and get some pics of the Sturer build so far, hopefully the pics might show the effect I am trying to achieve with the fading of the grey.

Like others I would say go for the FSM build article...seriously!

cheers

Mike 

"I do not feel obliged to believe that the same God who has endowed us with sense, reason, and intellect has intended us to forgo their use." - Galileo Galilei
  • Member since
    July 2003
  • From: On my kitchen counter top somewhere in North Carolina.
Posted by disastermaster on Thursday, August 30, 2007 10:48 PM

 Thumbs Up [tup] I'm absolutely, and without a doubt, happy for you on your acceptance with the Finescale article(s). Your humility for not wanting to upstage another's accomplishment shows your integrity.

 You deserve Finescale modelers attention. I'm sure that this will, without a doubt, inject some life into their sometimes rather repetitive agenda. You have an excellent handle on this subject and a fine manner of communicating with your fellow modeling colleagues..... so, when all is combined, qualifies you as the perfect contributor for Finescale. Make a Toast [#toast] Go doogie go.

 I can see from your desktop picture (another thread) that you are a very creative person by the montage you have created and the content that is displayed.

                                                                                 Steve Davis
 

Sherman-Jumbo-1945

"I was so much older then, I'm younger than that now"


JOIN OUR COMMUNITY!

Our community is FREE to join. To participate you must either login or register for an account.

SEARCH FORUMS
FREE NEWSLETTER
By signing up you may also receive reader surveys and occasional special offers. We do not sell, rent or trade our email lists. View our Privacy Policy.