SEARCH FINESCALE.COM

Enter keywords or a search phrase below:

Car rally in the 1950s

4133 views
10 replies
1 rating 2 rating 3 rating 4 rating 5 rating
  • Member since
    August 2014
Car rally in the 1950s
Posted by Ozmac on Monday, June 8, 2015 7:18 PM

Hi, my diorama building to date has been limited to a couple of ships at sea and an old Ford Trimotor plane in Antarctica, but this time for my first ever car diorama I'm planning to create a scene from a famous Australian car rally of the 1950s, called the "Redex Trial".

The Redex Trials were a big hit in the early 1950s. It consisted of ordinary cars driven for thousands of miles across the continent, with roads ranging from some tar on the main highways, dirt everywhere else, and for some very long stretches not really any roads at all. Lots of river and creek crossings, lots of sand, and lots of broken cars. They held several of these "reliability trials" in the 50s, but the first one is probably still the most famous one.

There were 192 entrants, and 136 finishers, and the winner was a pharmacist (Ken Tubman) from a country town (Maitland, NSW) in a humble little Peugeot 203. Also doing well in the rally were a number of Holden 48/215s. For both car brands, their Redex success saw sales take off in a big way. So my diorama will feature the Peugeot 203 crossing a creek, while the Holden waits on the road behind, to take his turn.

One extra detail for my diorama is that there's a film crew there to shoot the action. The real-world film crew from Cinesound, which did make the documentary about the 1953 Redex Trial, did the whole 6500 miles of the trial, and they did it in a Peugeot 203 Commerciale (ie, a wagon or estate car).

For the diorama I am building a Heller 1/43 plastic kit of the Peugeot 203 sedan, and modding a diecast 1/43 Peugeot 203 Commerciale for the film unit's van, and also modding a 1/43 diecast Holden.

Here's a few photos to set the scene.

The 1953 winners with their Peugeot 203, Ken Tubman (right) and his navigator, John Marshall, who was the owner of the car.

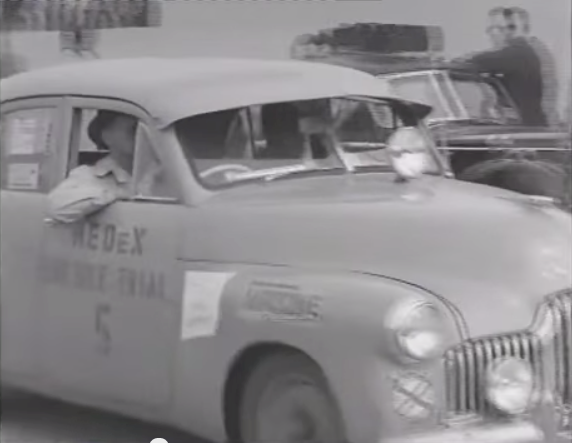
The Holden, which came 10th overall but I chose it as it was the first car to cross the line at the finish.

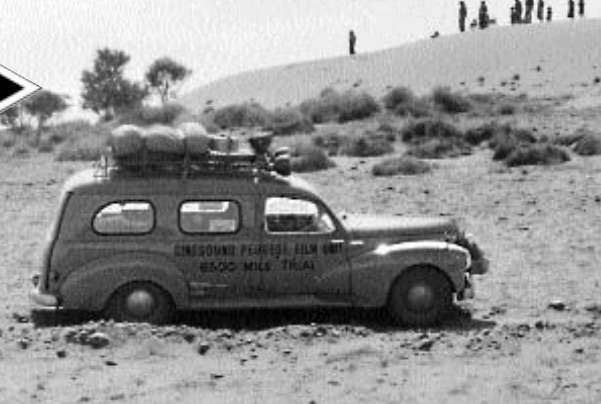
The Cinesound Film Unit Peugeot 203. My model doesn't have roof racks, so I'll need to add those, plus scratch build the hand-wound winch mounted on the front bumper bar.

And of course I have a stack of decals to design in Indesign and Photoshop to dress up the cars.

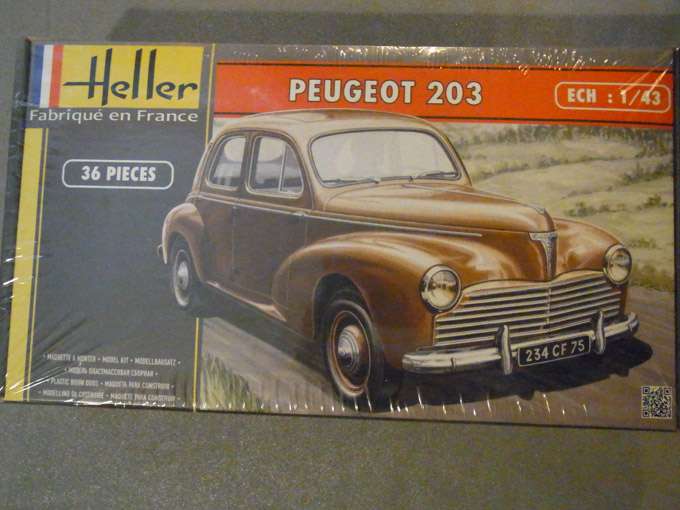
The Heller kit is ultra basic but it's the right car, the early model Peugeot 203A. The top of the box says "36 pieces" and the side of the box says "40 pieces". I bet you the correct answer is 38!

I've never created a diorama on ordinary "land" before so I am sure I'll have  steep learning curve and will make plenty of mistakes. I'm going to include some spectators, the film crew. lots of gum trees and rocks, sandy roads, hopefully a kangaroo too (if I can find a 1/43 scale one). It should take several weeks, but I am sure it is going to be fun. I'll post some updates when I have news to report.

  • Member since
    August 2014
Posted by Ozmac on Wednesday, June 17, 2015 9:54 PM

Progress!

The cars are taking shape.

From left to right, the FX Holden is a diecast 1/43 model (by Trax) with added decals and spotlights, plus a scratch-built sunvisor.

The Peugeot 203 sedan in the centre is the Heller plastic kit, with added decals and spotlights.

The Peugeot 203 van is a Solido 1/43 diecast model, with added roof racks & equipment, lots of extra spotlights, scratch-built winch, plus added decals.

I thought I'd take a photo of them in "showroom" condition, because the next step is to splatter them with mud, dirt, dust and grime for the diorama.

The Heller plastic 1/43 scale kit of the 203 sedan is not very impressive. The body castings are rough in places and the front windscreen is too small, but it's nice to have a home-built model as part of this, my first car diorama. I'm not going to weather the cars just yet. I might spend a few spare hours detailing them a bit more. 

But I'm also keen to make a start on the landscape for the diorama. I am sure once I get the landscape with trees and the creek taking shape, I'll be more motivated to finally start throwing dirt, mud and dust at my nice little model cars.

Finally... I've mocked up how it might look...

Based on a photo sent to me, I think I'll have the creek crossing in the foreground, with the action closest to the viewer. For this mockup my "high ground" of foam blocks and ceramic dishes is  far too high, but in the final edition the slopes will be gentler and the rises not so high. But this is the basic idea. Already I'm having second thoughts. The creek bank is too straight ... I think it'll have some curves in it somewhere ...

  • Member since
    June 2010
  • From: Australia
Posted by OctaneOrange on Friday, June 19, 2015 9:32 PM

this is a cool idea and am interested in how you work things out. is it me or is the peugot wagon bigger than the sedan?

  • Member since
    August 2014
Posted by Ozmac on Friday, June 19, 2015 10:37 PM

It's a little bit the camera angle that makes the wagon look bigger, but it was a longer car than the sedan by a fair way. And ... the plastic model of the sedan is a tiny bit undersized compared to the diecast model wagon, but in the diorama the wagon will be in the background, up on a hill and the differences will be impossible to detect.

  • Member since
    August 2014
Posted by Ozmac on Monday, June 29, 2015 2:49 PM

Some progress to report.

I've started to create the landscape by building up the shapes for a few hills, the road leading down to the creek, and the creek itself. I've used strips of cardboard stuffed with paper to form the shapes, then overlayed all that with overlapping layers of paper towels dipped in plaster of Paris.

After that dried fully (and it took days), I then sprayed the land with my airbrush, using a couple of different greens, two browns and a reddy brown to create a typically parched Australian soil.

Now I've started to add the first of the shrubs and trees. For the trees and larger shrubs, I used fine end twigs off a eucalyptus tree in my garden, some of which were given a white acrylic wash for the trunks. I then bought some foliage stuff from a model shop, but I have spray painted the green foliage with both grey and tan, to create a more Australian colour for the foliage. I used a glue gun to attach the foliage to the twigs.  

The landscape still needs a lot more work, such as lots of straw-coloured grass, lots of rocks, sand for the road leading down to the creek, etc.

For the creek itself (which is looking more blue in this photo than it is in natural light) I am in the process of covering the painted base with Mod Podge, a craft glossy glue which goes on white and dries clear. Mod Podge has been good for creating watery effects when I have built some ship dioramas, so I hope it'll do the trick here, too. 

Once the river effect is finished, I'll need to create a wake around the front and sides of the car as it enters the water.

But before I do that I'll need to weather the cars so they look like they've been driving 2000 miles on dusty dirt roads.


  • Member since
    August 2014
Posted by Ozmac on Wednesday, July 1, 2015 1:49 AM

Well, I'm about two-thirds there, so another update on progress.

The fake water is Mod Podge, a glossy craft glue which has worked OK on my ship dioramas. The rocks are from my bonsai pots, and I'm still looking for some suitable larger, flat "boulders" to complete the creekside rockery effect.

This morning, I started making the "wake" for the lead car as it enters the water (using clear silicone sealer dry-brushed with off-white paint), and I put the car in place to test that the fit was snug. It looked pretty good already, so I decided to take a photo or two.

I haven't weathered the cars with mud and dust yet, that's my next project. As I haven't weathered a car before, I have a cheap "crash test dummy" car I am going to experiment on, and once I think I've got my act together on car weathering, I'll do all three cars.

There's still more work to do on the landscape (more grass, and some boulders in particular) but it's starting to look like the diorama I had in mind.

  • Member since
    August 2014
Posted by Ozmac on Friday, July 3, 2015 2:10 AM

Finally, it is completed, so here it is.

  • Member since
    May 2015
Posted by Griffin25 on Friday, July 3, 2015 12:14 PM
That's great. Very original and well done. How long did it take? Was the Heller kit a old kit or are the still around as a manufacturer? I remember in the 80's they had really cool kits with subject matter that you don't see here in the USA. Heller is french right?
Your project would be a great display for a car museum or something like that.


Griffin

  • Member since
    August 2014
Posted by Ozmac on Friday, July 3, 2015 3:15 PM

The Heller kits are French, and I think they must still be around, as I bought two kits (a Peugeot 203 and a Peugeot 403) and both looked to be very new and in mint condition.

As for how long it took to do, I started about six weeks ago, but I have been fortunate in that I am semi-retired, only working occasionally as a freelancer when needed, and lately things have been fairly quiet, work-wise! So I've spent many days happily building and modding the cars, then making my first attempt at a landscape diorama, which has also been a lot of fun.

  • Member since
    November 2009
  • From: SW Virginia
Posted by Gamera on Tuesday, July 7, 2015 10:42 AM

Really coo! It's always nice to see something a little different and you did a great job on the cars and landscaping!

"I dream in fire but work in clay." -Arthur Machen


  • Member since
    February 2003
Posted by Jim Barton on Tuesday, July 7, 2015 1:16 PM

Cool and unique diorama!

"Whaddya mean 'Who's flying the plane?!' Nobody's flying the plane!"

JOIN OUR COMMUNITY!

Our community is FREE to join. To participate you must either login or register for an account.

SEARCH FORUMS
FREE NEWSLETTER
By signing up you may also receive reader surveys and occasional special offers. We do not sell, rent or trade our email lists. View our Privacy Policy.