SEARCH FINESCALE.COM

Enter keywords or a search phrase below:

First Diorama, Bronco 155mm Howitzer, Verlinden Figures (COMPLETE! 4/25/16)

5859 views
18 replies
1 rating 2 rating 3 rating 4 rating 5 rating
  • Member since
    April 2015
  • From: Detroit, MURDER CITY
Posted by RudyOnWheels on Saturday, April 30, 2016 4:26 PM

Thank you!!! I spent a whole night making the sandbags out of modeling clay, then painted them, and finally applied a wash. i could have spent forever making them more alike in size, and didn't have any success in applying texture (using a knurled knob or piece of material) and I tried painting a few a different color, gray or brownish, but it just did not look right. i went a little overboard on making the  bags, and ended up removing about 1/4 of them to make them fit on the base.

i LOVE bish's diorama, especially the antenna. One of my other hobbies (just in the last 2-3 years) is Ham radio, and home-made antennas are a big part of it.... 


Rudy

  • Member since
    November 2009
  • From: SW Virginia
Posted by Gamera on Thursday, April 28, 2016 8:55 AM

Oh gee, somehow I missed the finished photos there. Nice work and fantastic job for your first diorama. The gun looks good, nice work on the figures and placing them, and I like those sandbags. 

You might want to check out Bish's 251 diorama over on the armour section for ideas on your next one. I know I've been studying it. 

"I dream in fire but work in clay." -Arthur Machen


  • Member since
    April 2015
  • From: Detroit, MURDER CITY
Posted by RudyOnWheels on Wednesday, April 27, 2016 10:12 AM
Thanks for the tips and input Cap'n.. I will put them to use on the next one. What do you guys think?!? Rudy
  • Member since
    November 2005
  • From: Formerly Bryan, now Arlington, Texas
Posted by CapnMac82 on Monday, April 25, 2016 12:24 AM
One of the significant differences in Army kit during Korea versus WWII was that it was somewhat more uniform. During WWII web gear was in several shades, from WWI mustard khaki, to 1941 khaki, to any one of several shades of OD. Which also included 1943 issue where the bodies of the items were in khaki, and the seams in OD. During WWII, the uniforms were a mix of cotton and wool, and in a mix of khaki, green, and brown. By Korea, combat uniforms had stabilized to herringbone twill OD fatigues, with web gear on OD. Leather items were russet leather (note, some items, like binocular cases would be a darker brown). Note, EE-8 field phone cases run from a medium green to an olive brown.
  • Member since
    April 2015
  • From: Detroit, MURDER CITY
Posted by RudyOnWheels on Wednesday, April 13, 2016 12:00 PM
Thank you for that Input Gino, I always appreciate your help. You are a wonderful source. I will see what I can find! Gamera, Ok, thank you for the tips about the eyes and color usage! I will pick up some Ivory paint tomorrow. Ive been mostly mixing my own colors using the cheapo wall-mart craft paints, they come in handy when you need to mix and create colors. I have never tried to airbrush them, however.Just a side note, Before I ever attempt that, I might try a new brand of airbrush, like a Badger or an Iwata. I have a Paasche Talon, and even with my second one (out of pocket) I am still not really happy with it. Paint always seems to leak back out of the airbrush body and into the air valve under the trigger, and the only way to un-stick that is to completely disassemble and soak the valve. I can spray Model master enamels ok, but have issues with anything else. Even using enamels, I still have the issue. I hear these stories of guys using the same badger AND needle (!!!) for 30 years(!!!!) I really would prefer to spray acrylics, as they are not so damn stinky in the house (even using my little booth) but seem to have issues every time. Thanks! Rudy
  • Member since
    November 2009
  • From: SW Virginia
Posted by Gamera on Tuesday, April 12, 2016 12:30 PM

Actually I've been using a 000 brush for eyes etc. And try 'ivory' or else mix a little pink or brown into white paint, straight white is way too stark. Then I use a pen with a good sharp point to put in the eyeballs.

And no worries, if you muff it up, you can always just paint over it.  

"I dream in fire but work in clay." -Arthur Machen


  • Member since
    December 2002
  • From: Valrico, FL
Posted by HeavyArty on Tuesday, April 12, 2016 11:31 AM

Looking good so far.  I would get rid of the walkie-talkie radio though.  Artillery, up to as late as the mid-'90s, used wire line for communication between the guns and the FDC (HQ).  The standard in WWII would have been a wire to a field telephone (EE-8, EE-8A, or late-war EE-8B).  These can be pretty easily scratched or one can be found in one of the old Italeri acessories sets.


Gino P. Quintiliani - Field Artillery - The KING of BATTLE!!!

Check out my Gallery: https://app.photobucket.com/u/HeavyArty

"People sleep peaceably in their beds at night only because rough men stand ready to do violence on their behalf." -- George Orwell

  • Member since
    April 2015
  • From: Detroit, MURDER CITY
Posted by RudyOnWheels on Monday, April 11, 2016 9:27 PM
Thanks guys!I really want to paint the eyes and lips and such, but I'm scared I'll screw it up bad! My finest brush is a "0000" is that the finest?! That's what I used for the "detail" painting and intersecting areas.... Rudy
  • Member since
    November 2009
  • From: SW Virginia
Posted by Gamera on Monday, April 11, 2016 8:23 PM

Good to see you making progress on this Rudy, we hadn't heard from you and I was wondering if you'd scrapped the progress.

Figures are a pain, I've been doing them twenty years now and still am not totally happy with mine. And my first ones, well they could've been rejects from 'White Zombie'... Dead

"I dream in fire but work in clay." -Arthur Machen


  • Member since
    January 2016
  • From: A Galaxy Far, Far Away
Posted by Hunter on Monday, April 11, 2016 7:03 PM

Rudy - 

Coming along nicely....My hat's off to you for taking on figures. Not much of a fan of figures but we have to have them to complete a successful dio. Keep up the great work, and keep posting the photos.

Hunter 


  • Member since
    April 2015
  • From: Detroit, MURDER CITY
Posted by RudyOnWheels on Monday, April 11, 2016 3:46 PM

See 4/11/16 Update above to original post... Thank you for the heads up On those figures Gamera and Hunter! Figures I already had the verlinden ones by then :(


  Rudy

  • Member since
    November 2009
  • From: SW Virginia
Posted by Gamera on Friday, March 18, 2016 7:54 AM

Thanks Hunter! I coulda looked it up but I was feeling lazy at the moment... Sleep


"I dream in fire but work in clay." -Arthur Machen


  • Member since
    January 2016
  • From: A Galaxy Far, Far Away
Posted by Hunter on Thursday, March 17, 2016 6:51 PM

Gamera
Masterbox or MiniArt, I forget which makes this set, but it's the early/middle Second World War uniform which is incorrect for the Korean War.
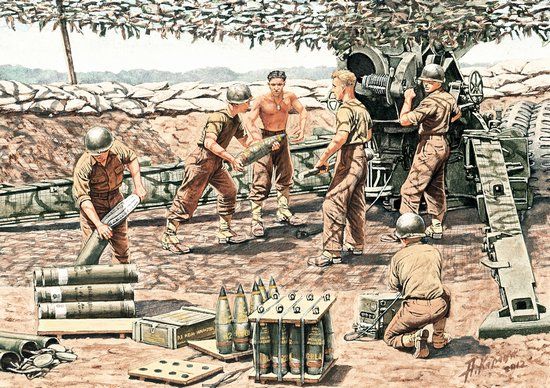
Hello Cliff ..... MasterBox makes this kit, and you are correct about the uniforms pictured

Hunter 


  • Member since
    November 2009
  • From: SW Virginia
Posted by Gamera on Thursday, March 17, 2016 4:25 PM

Hey Rudy I was looking for a set of figures to go with my Korean War M40 SPG and couldn't find any either.

Masterbox or MiniArt, I forget which makes this set, but it's the early/middle Second World War uniform which is incorrect for the Korean War.

Dragon does make these three sets which are correct with the late Second World War uniform. US troops in Korea as well as the South Korean Army were given these.
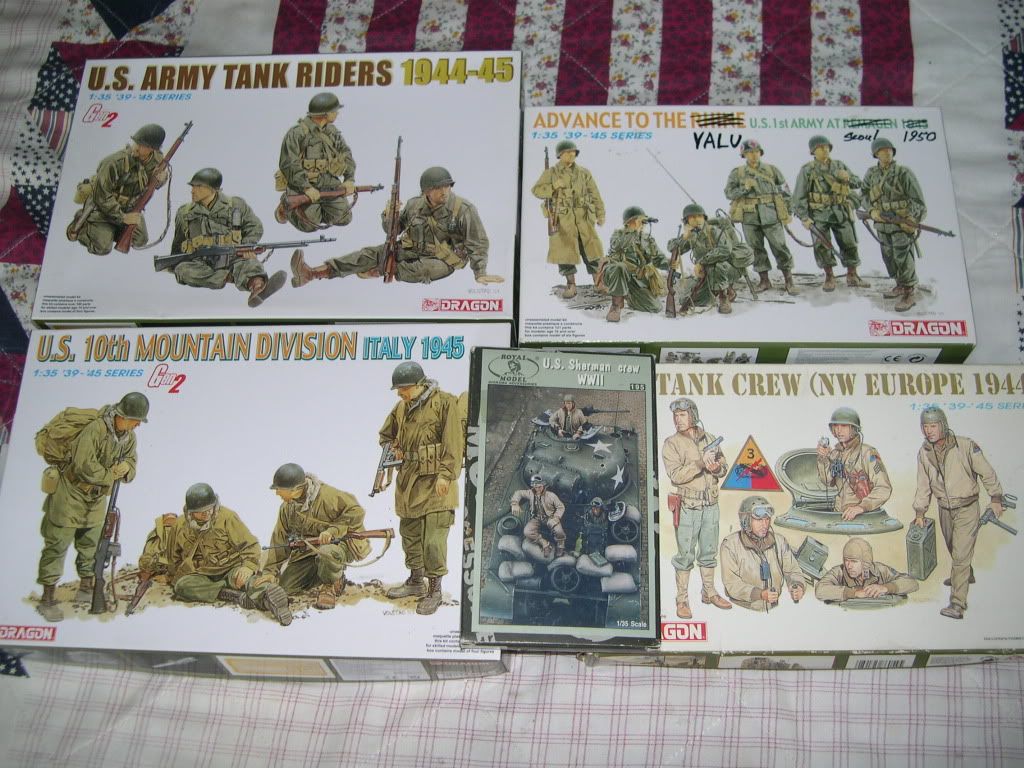
I was going to kitbash the upper set with the lower ones to try to get what I want. Maybe you could do something like this? Hope it helps some. The Advance to the Rhine set is really useful, I've got about three boxes now and have used one for kitbashing different projects.

As to groundwork I've been using Durham's water putty. I find it stronger than plaster and doesn't chip. But if you're looking to put footprints or tire tracks etc in it do it while it's wet. They advertise it as setting up as rock hard and they ain't kidding!

"I dream in fire but work in clay." -Arthur Machen


  • Member since
    May 2009
  • From: Poland
Posted by Pawel on Thursday, March 17, 2016 4:05 PM

Hello!

I like to paint very complicated assemblies with Gunze Mr. Color paint - something dark, maybe black, maybe dark brown. This way I don't have to scrape the paint off when I use lacquer thinner for welding the parts together - which I usually do. The lacquer thinner just automatically strips the paint and everything works like a charm. I also get the "shadows" this way, and everything on the outside gets painted later. The darker areas inside look good, and form natural "shadows".

As for olive drab, it is said, that it shouldn't be to green - it's a "drab" colour. My best tip is Humbrol 66 - matches my old machine gun ammo box almost perfectly.

Good luck with your build and have a nice day

Paweł

All comments and critique welcomed. Thanks for your honest opinions!

www.vietnam.net.pl

  • Member since
    April 2015
  • From: Detroit, MURDER CITY
Posted by RudyOnWheels on Thursday, March 17, 2016 11:47 AM

Thanks guys! I was pretty sure it was used through Vietnam, but didnt want to catch crap from the rivet-counters. As far as the uniforms go, you are correct. There seems to be nearly zero  field artillery crew figures, and even less Korean-War Era figures of ANY sort. I usually build, sand/file and clean up stuff and THEN paint it, but I decided to do things differently on this kit. I can tell there will be very hard to access places when trying to paint AFTER the Gun is built, so I decided to prime and paint everything, assemble, then go back and re-coat with paint after everything is assembled.  I only had a few drops of Olive Drab green paint, so I had to use some "Italian Army Green" instead. It is definitely "more green" than the "more olive" of the olive drab, but It gets it done for a base coat. Quick useless pic after I was done stinking up the house with Model Master Enamels:

What do you guys reccomend using for ground work? Plaster? Cellu-clay? or ?


Thanks! Rudy


  • Member since
    November 2009
  • From: SW Virginia
Posted by Gamera on Wednesday, March 16, 2016 2:58 PM

Yeap as Pawel said the gun was in use from the Second World War up to Vietnam. Some of the details did change as it was upgraded but I think it should be ok for Korea. Gino and Stikpusher would know. 

The figures are I believe the wrong uniforms though, that's an early Second World War uniform with the leggings on the boots. There was a late WW2 version that was used though Korea. Again Stikpusher and Gino would know way more than me here. 

Good luck, this will make a fantastic gift for your uncle! 

"I dream in fire but work in clay." -Arthur Machen


  • Member since
    May 2009
  • From: Poland
Posted by Pawel on Wednesday, March 16, 2016 2:21 PM

Hello!

Well, then, good luck with your project! I believe this 155mm howitzer was used all the way from WWII to Vietnam, and then probably some. Pity this is not going to be a Vietnam dio! Keep 'em pictures comin' and have a nice day!

Paweł

All comments and critique welcomed. Thanks for your honest opinions!

www.vietnam.net.pl

  • Member since
    April 2015
  • From: Detroit, MURDER CITY
First Diorama, Bronco 155mm Howitzer, Verlinden Figures (COMPLETE! 4/25/16)
Posted by RudyOnWheels on Wednesday, March 16, 2016 12:15 PM

(COMPLETE! SEE PICS AT BOTTOM OF POST)

I completed my diorama friday, gave it to my uncle saturday. He broke down in tears. I am pretty happy with how it turned out. I need to work on my figure painting, and I am not sure if I attached the "firing lanyard" to the actual firing mechanism, or if it is the latch for the breech, but I thought it needed one. I also fixed the "sag" in the line after I took these pics. Let me know what you think, good, bad, or indifferent.


Thanks!  Rudy

Hi Guys, just an intro to my very first Diorama, Nothing too exciting to show as of yet, but follow along as I struggle my way through it! I am doing a Field Artillery Scene, as a gift to my uncle. His father just passed away, he Served in the 1st Cavalry in Korea 1950-52 in field artillery, and in his memory I want to buld a little field artillery scene. I am not completely convinced they used this particular piece of artillery in Korea, but it seemed to fit the bill. I am not concerned with accuracy on this one. I didnt want the diorama to get too big with a "Long Tom" artillery piece. Off the top of my head, and not having the gun built to see how it looks, I plan to make this thing 12" wide and 11.5" deep when viewed from the side.  I have Only attempted to paint one 1/35 figure so far, so we shall see how it goes!! This project will be filled with all sorts of "firsts".I am excited to get going on it, as I think my uncle will REALLY appreiciate it, and it may help him greive. Thanks for following!

  Rudy


Hi guys, Update on my first diorama of a U.S. 155MM Howitzer and Verlinden Crew, as a gift to my uncle in memory of his Late father who served in Korea in the Cavalry, field Art'y. (yes I know uniforms are wrong, oh well)

I have completed the initial build of the Field gun, it will need a new coat of paint, will need to paint the barrel,(steel) and I will paint on some wear and tear and possibly use some washes on the rest of it. I also made the mistake of gluing on the wheels before I painted the tires. (doh! this thing is DELICATE!)

As this is my first set of figures, and first experience with Resin, I dont have much to compare to , but I think they went together excellent. I have completed the majority of the initial painting on them, still undecided if I will attempt eyes or painting the lips. I do plan to dull-coat them and do some washes and such, however.

For the Base, the wife brought home a 12x12 "trophy base" which is really just a .375" thick piece of plywood. I started on the groundwork last night, I made a frame of 1X6" around it, but did not secure it to the base, trying to avoid holes. I also did not paint ot coat the base, which I probably should have done. I used some 'SculptAmold" I got in a bag at the local hobby shop, mixed it up and made a rought landscape, with a couple large rocks. I did use some "press N seal" plastic wrap from the kitchen to somehwat seal around the edges of the frame, but I left the middle open hoping it would "attach itself" to the base somewhat. We shall see how it works out. Ill probably let it sit another 24 hourse before I even think about removing the frame. I also picked up some trees, and other stuff for the base, although I hope to use it sparingly. As expensive as that stuff was, hopefully Ill get a few more dioramas out of it!

Thanks for following along with my trials and tribulations.....


Rudy

Sight, made of 10 pieces:

These things were a real PITA, the "springs" are styrene, and the pieces that are metal shown here were supposed to be kit styrene pieces as well!

I screwed up and glued a couple pieces toghether that were not supposed to be, so I had to make some "extensions" to the springs so they could meet their attachment points, oops. (see connection point nearest end of barrel)

I made the mistake of painting the barrel steel before assembly... The tollerances between the pieces the barrel slides through and the barrel itself were too tight to go together even before paint I beleive...

Body parts!!!


#11 blade shown for size comparison:

I ended up just copying off of the paint schemes on the box for the most part:


Hi Guys! Another update, I am nearing completion. I got quite a bit done sunday night.


Painted with craft-store paints before applying ground cover:


Spent a butt-load of time making sandbags out of clay... I probably should have spent even more time making sure they were similar in size and such, but it is quite the task>

A pic from the end of the night of the Gun mocked-up, still needs to be repainted and weathered.

I still need to stain the base, and work on the figures some more, but I got this to add: I think my uncle may Cry when I give it to him.


JOIN OUR COMMUNITY!

Our community is FREE to join. To participate you must either login or register for an account.

SEARCH FORUMS
FREE NEWSLETTER
By signing up you may also receive reader surveys and occasional special offers. We do not sell, rent or trade our email lists. View our Privacy Policy.