SEARCH FINESCALE.COM

Enter keywords or a search phrase below:

Edward Hopper: House by the Railroad in 1:48 (start to finish)

20257 views
148 replies
1 rating 2 rating 3 rating 4 rating 5 rating
  • Member since
    December 2002
  • From: Northern California
Posted by jeaton01 on Friday, October 2, 2020 1:29 PM

Very interested!

John

To see build logs for my models:  http://goldeneramodel.com/mymodels/mymodels.html


  • Member since
    March 2003
  • From: Towson MD
Posted by gregbale on Friday, October 2, 2020 5:21 PM

To paparaphras the famous line:

"If you post it...they will come."

Greg

George Lewis:

"Every time you correct me on my grammar I love you a little fewer."
 
  • Member since
    October 2019
  • From: New Braunfels, Texas
Posted by Tanker-Builder on Saturday, October 3, 2020 12:07 PM

Methinks ;

   You should do this. I and others would benefit. G.J.Geracci

                                                            President--New Braunfels, Tx. Railroad Museum   

      LEGO has one that I " Restored" into a liveable home with a rear deck and a pool! We use LEGO for some of the sets in the "0" and 027 Layouts. We use more in the " G " Scale because they are outside.

  • Member since
    March 2012
  • From: Louisville, KY
Posted by Builder 2010 on Sunday, October 4, 2020 3:50 PM

I just wrote about five paragraphs of brilliant thoughts and then, inadvertantly, opened another web page on top of it without hitting the + sign and lost all of it. DOH! It is not the first time I've done this bone-headed maneuver and won't be the last. 

Three people saying "GO" is sufficient for me to continue. This site is a bit annoying for two reasons, 1) it does not use the OS spell checker which I need, and 2) has an archaic image adding system where all the images must be uploaded to an image site and then downloaded here. I post on many sites and this one is the most awkward. Be that as it may, it's an important site with many participants so it is worth the effort. 

As I said, I would take y'all back to the beginning and tell the whole story. This project is as much a drawing challenge as it is a model building one. Once I decided on building another Hopper painting and chose this one, what I was presented with was a series of drawing challenges. One of the most essential were those characteristic Mansard windows. They make the building and if I couldn't draw them, I couldn't print them. And if I couldn't print them, there would be no model.

What follows is a lot of information about 3D Printing. If you're already up-to-speed or not interested, you can skip down to the bottom. I think it's germane to this project as a whole, since so much has been created on the printer and more time was spent producing those parts than building the structure itself. 3D printing has changed the modeler's question from "How do I build that?" to "How do I draw that?". If I can draw it, I can make it.

I've been 3D printing since June of '19, when the price of high resolution resin printers dropped from over $3,000 to $350 or less (much less). The reason for this precipitous drop was the mergining of the cell phone LCD screen and some UV LEDs to the resin printing process. Up to that point, resin printers employed either lasers to draw the object in the UV curable resin (very expensive) or DLP video projection to create the layer images in the resin (just plain expensive). Then along comes some innovators who created the layer images on the LCD screen and illuminated it with the UV LEDs and Volia! a printer basically cobbled together with off-the-shelf parts that are produced by the millions. The price dropped, but the resoution did not. My little $350 Elegoo Mars printer can produce parts down to a layer thickness of 10 microns. That's a layer that's 0.00075" or four times finer than a human hair. I generally produce parts with layer thickness of 40 to 50 microns.

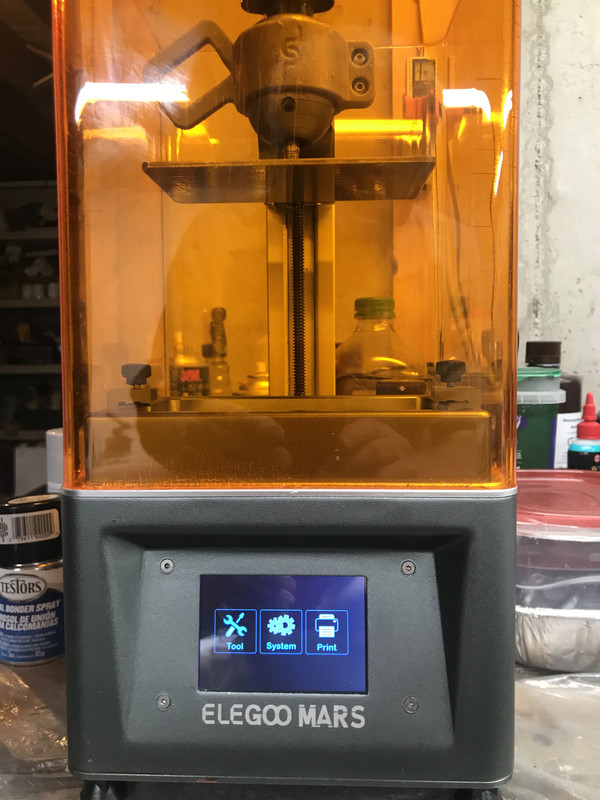
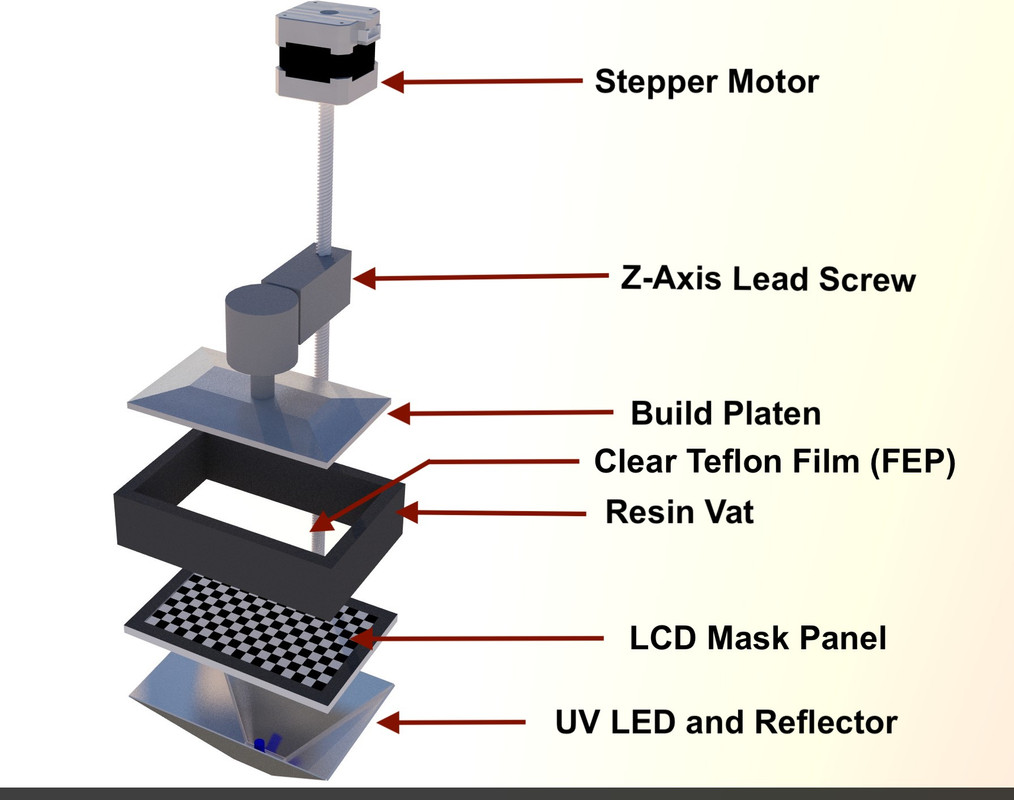
The orange cover blocks ambient UV light from curing the resin in the vat at the bottom. Elegoo has just come out with the "Saturn" model which is about 2.5X the volume of the Mars. The resolution of the Mars is actually a bit better. Besides the vertical resolution which is controlled by how fine the Z-Axis stepper motor can control, the lateral resolution is a result of the pixel density of the LCD screen. The Mars has a 2k screen which gives a pretty fine horizontal resolution. The Saturn uses a 4K UHD screen, but it is 2.5X the area, so the actual resolution is a slight bit less.

You may be familiar with the more common Filament Deposition Printers (FDM) which I call "String Printers". FDM machines work by melting a polymer and extruding a thin string of molten polymer into a pattern driven by X-Y-Z stepper motors. It resembles the process used when decorating a cake. These are seen at all the Maker Fairs and almost every school has them now. FDM machines have their place, but it's not producing parts in our model making scales of 1/32 and smaller. As each layer of string is deposited there are visible lines like a tiny log cabin being built. For 1:1 parts, FDMs are quite useful. FDM machines' lower limit is about 50 microns, but they're very temperamental at that resolution. Generally they print layer thickness over 100 microns (1/10th of a mm). At that resolution in 1:48 you have visible layer lines that need fixing.

Resin printers work by creating an image of pixels representing a layer that needs to be created in the resin. The UV light cures this resin on an aluminum build plate. The exposure time varies with the layer thickness you've chosen and the type of resin you're using. My exposure times are between 8 and 9 seconds per layer. Where the UV light illuminates the resin partially it hardens and then the build plate rises to break the seal between the last cured layer and the clear teflon film that seals the liquid resin vat from the LCD/UV light system that lies directly below. The build plate then returns one-layer-height above its previous location and the process starts over, only this time, the LCD projects the image of the next layer. This process repeats over and over again until the completed object rises out of the vat, like magic. The curing is partial so the next layer will stick and blend with the previous layer.

That was a very simplified explanation of what you need to know to make successful prints. There are many variables. The same is true for string printers. They are not fool proof. Resin printers are neither. 

After the part is formed, you must wash it with 95% isopropyl alcohol to removed the layer of uncured resin that comes out of the vat with the part. You then have to cut off any supports (more about this later) and then fully cure the part in a UV chamber. Mine is a UV light array bought from Amazon mounted through the wall of a cardboard box lined with aluminum foil. I also bought a AC powered turntable to evenly illuminate the parts. I have the UV light and turntable powered through a digital timer. I generally post-cure parts for 15 minutes. Before I got the timer I over-cured some parts. They turn brown and get as brittle as glass.

Print Success Variables:

The first varialble are the first layers. These first layers must stick to the build plate, and stick hard. The most common failure is the object not connecting to the build plate at all or failing to adhere sometime later in the print. I was having problems with this and finally resorted to pre-coating the build plate with a thin layer of resin and curing it for about a minute in my UV curing box.

The build plate (z-Axis) must be able to pull the forming part off the teflon film so new resin can backfill into the vacated space to create the next layer. There is suction created between the formed part and the teflon. This suction can be very strong. When the suction exceeds the build plate adhesion the part will stick to the film and the print fails. When the part can't be lifted the next layer doesn't form since no new resin can displace the previous layer. It's quite frustrating. One of the strategies is to print the part on an angle that minimizes the surface area contacting the teflon.

Resin printers have only one moving part and that's good. It's an optical process. The Z-Axis is driven by a stepper motor through a precision lead screw. I experiemented with different Teflon films to find the one that works best most of the time. The only mechanical adjustment is ensuring the build plate is parallel with the Teflon film. This is done by bringing the machine down to the base 0 position with the build plate set screws loosened. When the plate settles in, you lock the screws. That's it! It's so easy to set up, that you're printing within 15 minutes of unpacking the box.

The other print variable is the support scheme. This is a bit arcane so bear with me. For an object to form every part of it must be anchored back to the build plate. It makes sense that if you can't lift any previously cured resin off the teflon, the next layer can't form. With simple objects having no overhangs, you just orient the object straight up on the build plate. But many complex parts have overhangs and edges that may start to form before the object connecting it to the whole has formed. These non-forming entities are called "islands". There is software to help identify where they are.


You draw the object in 3D drawing software. I used SketchUp. There's a free version that's cloud-based and an expensive pro-version. I'm using a client-based free version that Trimble stopped supporting three years ago. The 3D printers can't interpret 3D drawing program output. They need to be converted. But that's not all. These converted draw files need to be sliced. They need to be broken down into individual layers so the printer can create them. This is a two-step process. First the SketchUp drawing is converted to an STL file. This is a conversion program available for 3D software programs. There are two meanings for this acronym: Standard Translation File or Stereo Lithography File.

The STL File describe in explicit detail the outer surface of the object. For the STL file to render the object, the object must be a solid. This is a specific term used in 3D drawing. It means that if you filled the object with water, it would not leak out of any space. It means that all surfaces and edges are connected with no gaps. Any surface not connected is seen as invisible to the STL converter.

This is what the part looks like in the STL display. In this image you see that something's wrong. It appears that surfaces are missing. As you'll see, this is the result of non-normal facing surfaces present in the origianl SU drawing.

It gets worse. Not only must the object be "Solid", but it must have all "normal facing surfaces". This one trips up a lot of designers. In SketchUp you can draw a face with it's outer surface facing outwards or it's inner. The outer surface is considered "normal-facing". You can push or pull an object while drawing it, and depending on which way, will create a shape with inside or outside faces on the outside. STL converters do not recognize wrongly facing surfaces. They are invisible. So there are two factors that make a 3D drawing unprintable. This is analagous to pulling on your socks one way and having the outside facing outwards, or pulling from the other way and having them inside out. Inside out faces DO NOT PRINT.

The slicer creates the actually machine file that commands the printer to generate each layer. The slicer shows images of the part as it will be when formed. You can manipulate this image to position it at angles and add supports where needed. It also shows any unprintable surfaces. They just image as black holes. You have to pay close attention to all these aspects to create successful objects.

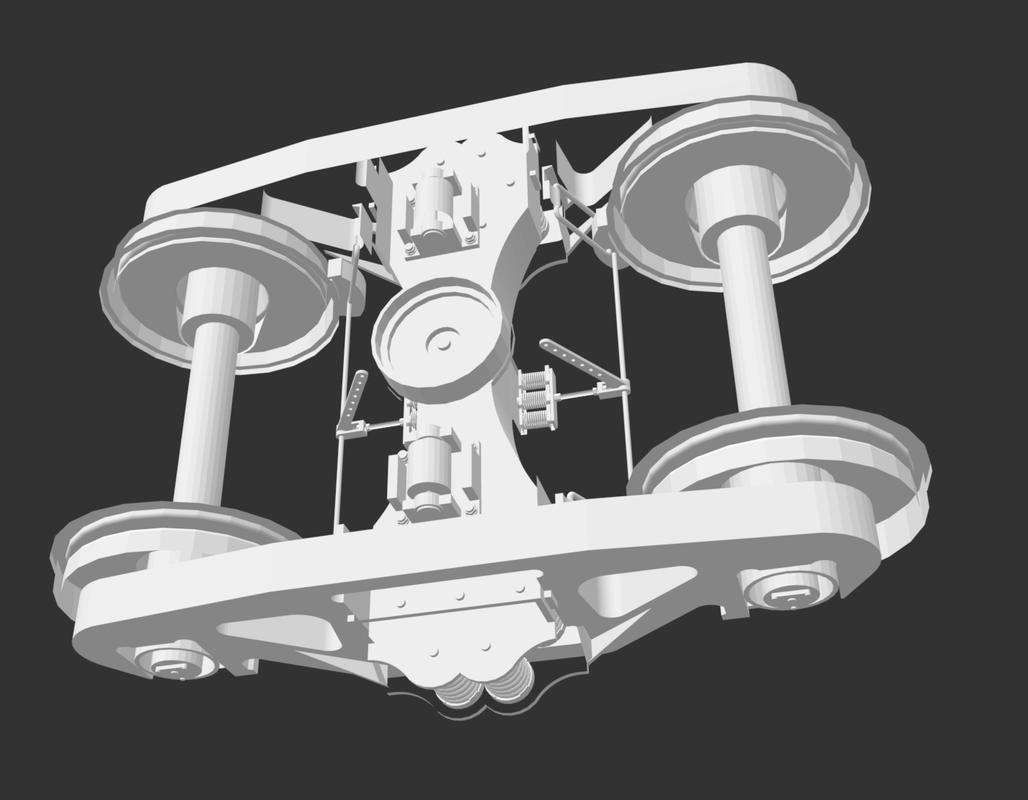
Here's a screen print of what you see in the slicer display showing the forest of supports needed to successfully print the part. This is one half of a model locomotive diesel engine. The object is printed at an angle to reduce the contact footprint which helps to prevent the vacuum suction from pulling the object off the build plate. In the printer, it prints upside down so as the part forms in the resin it is being pulled upward. When printing highly detailed parts such as this half engine, I also have to spend a lot of time ensuring the supports aren't attaching to any delicate details, like those pushrod tubes. Small details can be destroyed in the process of cutting off the supports.

Many of the objects I create use drawings downloaded from the SketchUp 3D Warehouse. Some these drawings are gorgeous, but unprintable. The artists were drawing with the goal of creating a nice looking drawing, but weren't concerned with 3D printing. When downloaded, I turn off the color and set SU to show any reversed faces in bright, hard-to-ignore, colors. I quickly find what editing needs to be done.

Everything in this drawing that's bright red shows a reversed face. None of this would be seen in the STL converter and thusly, nothing would be seen in the slicer. I you refer back to that STL image you can see all these red faces showing up as invisible surfaces.

When a reversed face is brought into the slicer, the missing surface shows up as black. None of these black faces would print. I you put it in the machine it would look like something coming from a failed transporter transmission on Star Trek. It would just be a mess.

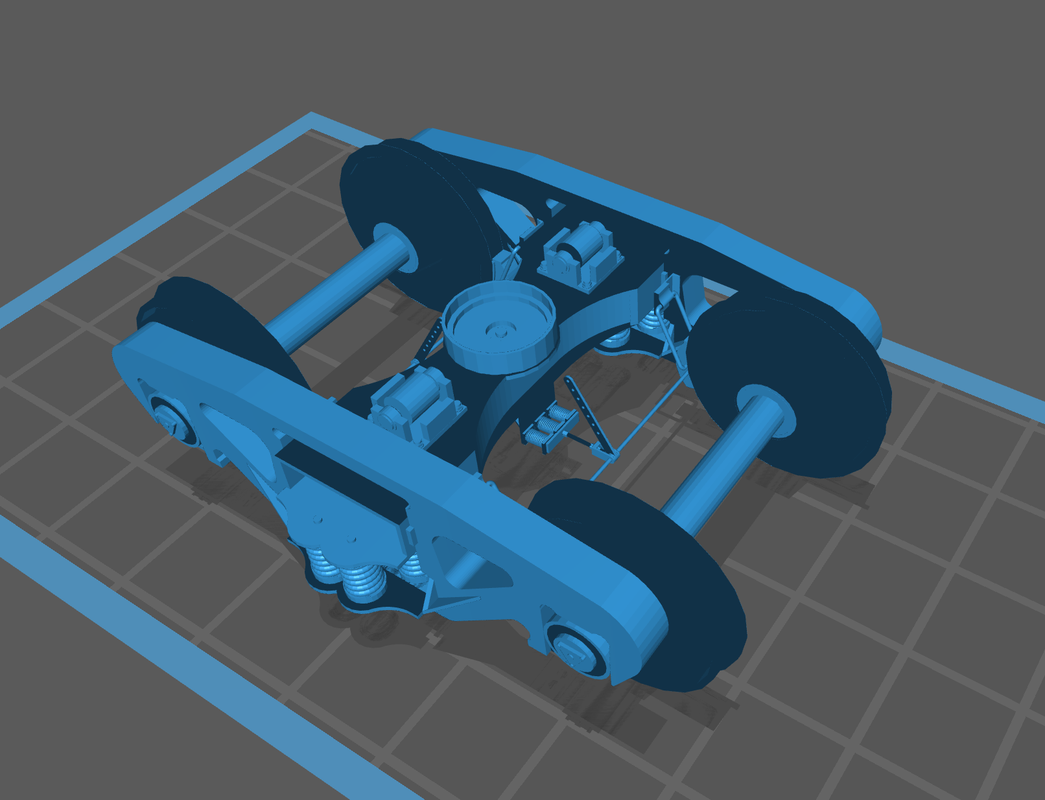
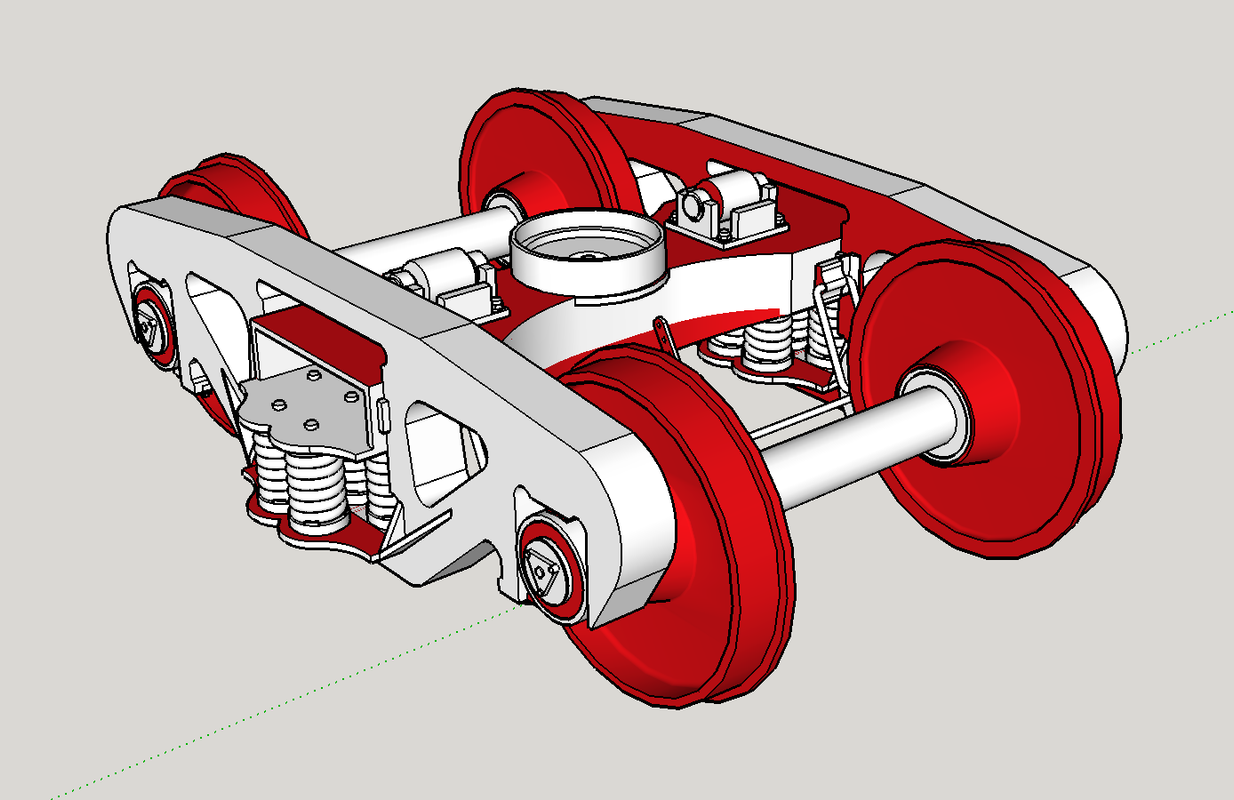
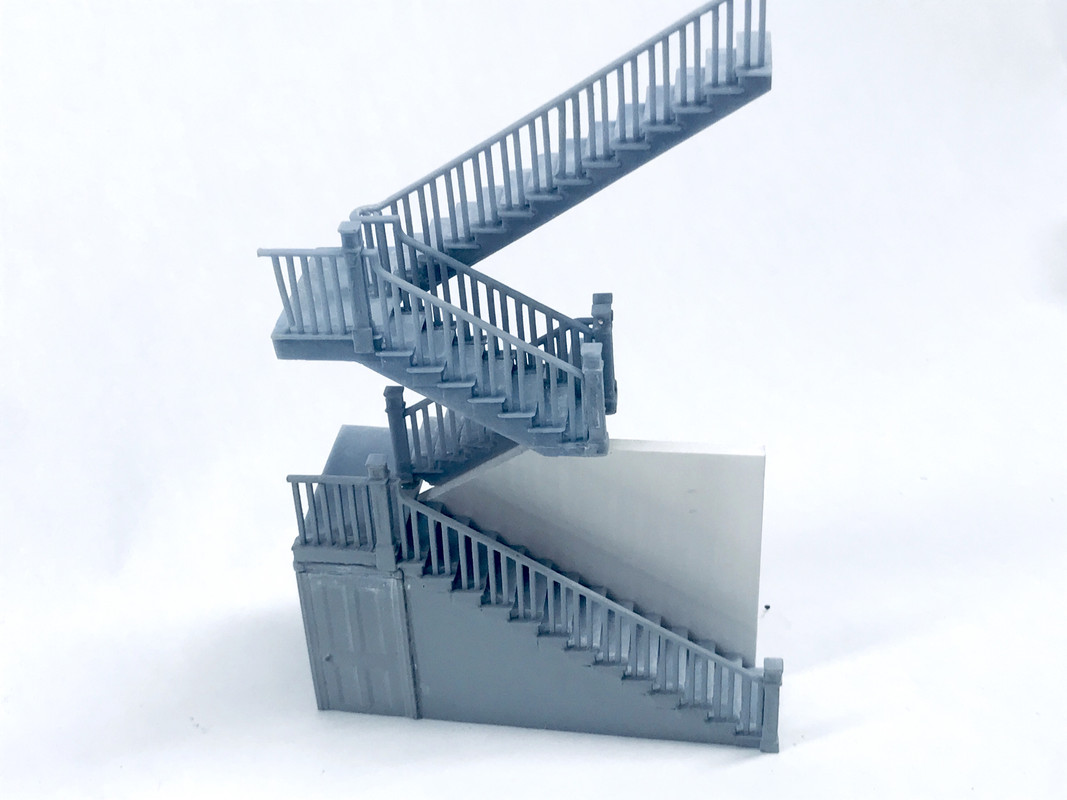
If you buy or download complete and tested STL files you don't have to worry about any of this, but if you plan on developing your own images or download drawing from the SketchUp Warehouse, you need go be prepared to do some more work. That railroad truck with all the reverse faces was downloaded that way from SU. Some of the drawing take many hours of editing to prepare them for printing. This is what happened when I downloaded the basis for the elaborate staircase in the House. 

While I could have custom-drawn an entire stair case, I always choose to download rather than draw from scratch if possible. It can save a lot of time. In the stair's case, much had to be modified... almost everything.

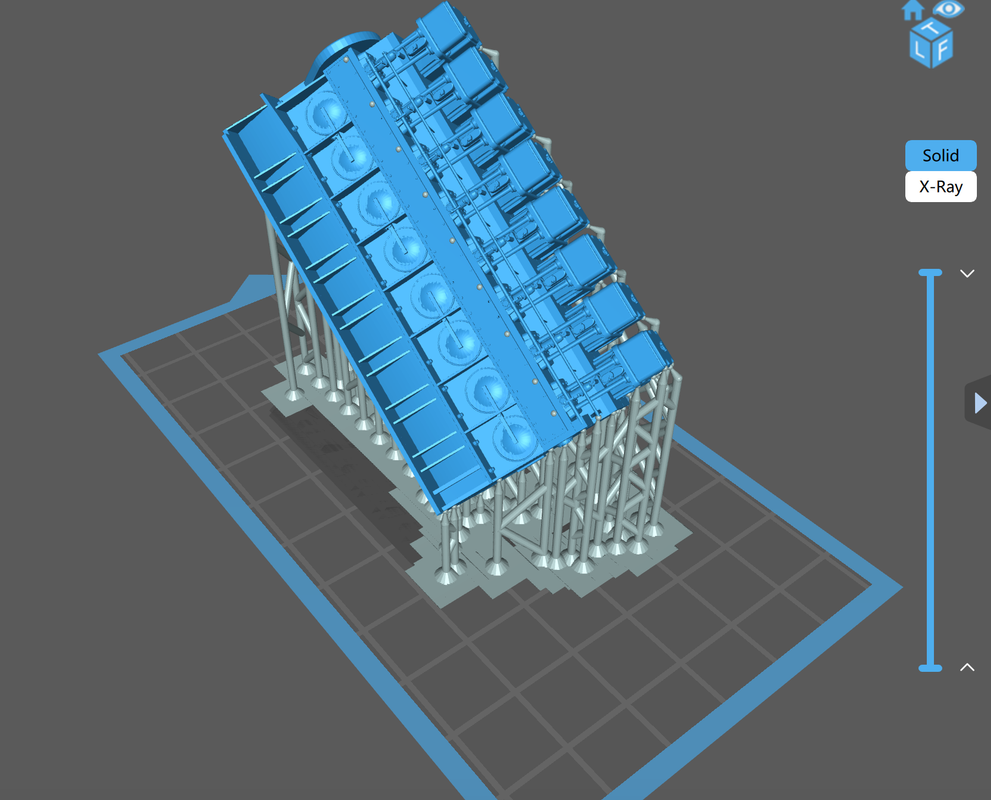
This is what I downloaded. At 1:48 there are some other considerations. Note: this screen capture was taken AFTER I had corrected all the reveresed faces. An unsupported surface much thinner than 3/64" ends up being too fragile to exist in the real world. So those wrought iron rail spindles, while very attractive, would be a disaster. The printer would attempt to resolve them, and probably could print something, but they would shred in trying to remove them from the build plate. I had to come up with another design.

I went to a turned spindle and printed two attempts. The first was pretty scale (read that too thin) and they didn't hold up at all. The second attempt was a little better, but wouldn't produce a reliable job. I finally came up with a very plain square spindle that would be correct for a house of lesser opulance, but it would have to do. The difficulty arose where the spindle curves ended up created islands that required supports directly attached to them. While removing these supports a large number of spindles ended up destroyed.

Then I needed to add another full flight, and develop turned railings at the inside turns, new newel posts, change the run lengths, and adjust the tread widths from the 2nd to 3rd story. In other words, I practically had to redraw the entire stair. 

This is what I ended with. This print is 11 parts. In order to print the stair treads AND railing connected, I couldn't print the entire stair. I required supports on the spindles. I ended up dividing the tread portion in two with a short section holding the spindles and railing, and the other making up the tread remainder. These were then glued together with CA. CA cures very quickly in the presence of the resin.

The other material used in finishing the prints is Bondic. Bondic is basically a higher viscosity version of the same UV resin of which the part is made. It can fill holes and join parts like welding and cures in five to ten seconds with the little UV LED that comes with it

This is a lot of information for the first post, so I'll stop now and see who's watching. The story will continue...

  • Member since
    March 2003
  • From: Towson MD
Posted by gregbale on Sunday, October 4, 2020 4:56 PM

Builder 2010
That was a very simplified explanation of what you need to know to make successful prints. There are many variables. The same is true for string printers. They are not fool proof. Resin printers are neither.

Thank you for taking the time to go through the process. That's the clearest explanation of 3D printing I've seen to date.

Looking at various computer renderings of printed parts on the Shapeways website, I've always wondered at the elaborate lattice of 'support' structures beneath. I obviously realized it had to be a generic outgrowth of the printing process...but this is the first time it's clear why.

(I may not be the brightest crayon in the box to start with. Whistling)

By the way, I think we've all 'lost' long post texts at one time or another. Many of us have taken to composing lengthy ones elsewhere, then pasting them in. Just one of the several 'joys' of this...ahem...cutting-edge forum architecture.

Looking forward to the next installment.

Greg

George Lewis:

"Every time you correct me on my grammar I love you a little fewer."
 
  • Member since
    March 2012
  • From: Louisville, KY
Posted by Builder 2010 on Monday, October 5, 2020 10:48 AM

Thanks for the positive feedback. With one person responding I will continue the journey.

I can't emphasize enough that 90% of printing success takes place in the design and slicing process, not on the printer. The printer's just the final act. Yes! Things can go wrong directly in the printing process, but much can be avoided by designing for printing from the get go. This imposes some restrictions on the concept. While printers can resolve a nit on the nut of a gnat (to quote my dear father), the part may not be viable. I found when printing miniature work tables, that the broad, flat table tops had to be a 1/32" thick or more to have enough material to not end up as a fragile as tissue paper.

UV curing resins come in many varieties. It's about a 25 year-old technology and a lot of work has been done. You can get resins that are actually UV curing investment casting waxes enabling jewelers and dentists to go from computer design to wax master to precious metal final products. The "normal" resins are brittle when cured. If you drop the part, it will shatter. Ask me how I know. Now there are high impact resins that have more toughness. These extend all the way to completely flexible resins. And you can mix flexible resin with more brittle varieties to make your own blend. 

The downside of more "rubber-like" the resin is longer the cure times between layers. It's tradeoff between brittle/flexible and short/long cure times. With a 1,000 layer print (not unusual), 8 seconds exposure time (UV LED light on time) is an 8,000 seocond print time, about 2.2 hours. Make that a 15 second exposure time and you've doubled the print time. Additionally, the more rubbery resins have a higher vicosity requiring a longer dwell time when the plate rises to permit new resin to flow underneath. This higher viscosity may also require the resin to be warmed beyond room termperature needing a heated vat or other means to raise the temperature. In other words, it ain't that simple. My goto resin is Elegoo's ABS-Like Standard. It was an improvement over their earlier standard and has some reduced brittleness, but it's not rubbery by any measure and will still shatter when a part is dropped.

Reversed faces are not the only bugaboo that you need to repair before creating a viable drawing. I wanted to create a heavy-weight forklift truck for my O'scale engine house. I found a great drawing on the SU Warehouse. It was very realistic and would make a great model. There were problems. Of course there were the reversed faces, but more importantly, most of the surfaces had no depth. The artist was drawing sheet metal surfaces as single planes. Looked great, but can't exist in our 3D world. Surfaces without thickness cannot exist outside of the world of 2D geometry. Even something as thin as a sheet of paper is 0.003" thick. Everything has thickness.

This was the first evaluation of the drawing. Magenta = reversed faces = unprintable.

Then I found that all the sheet metal chassis parts were drawn as single planes. Every surface has to be modified to add thickness, and not just any thickness. For a broad surface to have enough strucrtural integrity to be usable, as I noted above, it has to be greater than 1/32". The redraw took hours and hours. 

Look at these foot steps. See the downfolded edges? They are single planes. They have no thickness and WILL NOT PRINT. This occurred in many places on the model. In the main body parts as long as the object was a solid, have all of the edges connected to one another, it would bring as a block. The body was not a solid and spaces had to be closed to create one. In fact, I did print the entire body, minus cab, as a single part. Even though the printer could print the handrails, I eventually replaced them with phos-bronze rod. I also replaced all hydraulics with scratch-built brass units.

Sometimes it's better to print things as subassemblies and the fork lift was no exception. I broke it into useable pieces that could print without too much support rod destruction. And my little printer has a pretty small print volume, so there's that. This was my first attempt at the parts breakdown. I ended up placing additional cross-bracing between the cab window pillars so they wouldn't warp. I also thickened every surface in the cab so they would withstand printing and handling.

I tried to print the fork as a single assembly, but it was unsuccessful. I changed it too look like this. As I noted, eventually, due to poor print results, I replaced all the hydraulics with real metal. Sometimes, the best thing to simulate metal is metal.

The final print scheme had me combining the engine cover and the remains of the body as a single part. I did have to go back and do repair where printing was sub-par, but the end result was worth it. The engine being carried is also a 3D print project. I made my own decals as well.

That's enough general info about the 3D printing process, so let me bring it back to the House project. As I noted, it was the Manard windows that was the critical path in building this structure. The Mansard windows have curves going in two directions. There's the main arch that penetrates the entire window and then secondary curves on the side panels that blend the shape into the roofing. When the window was a solid shape with the arched top, you can punch through the inner-arch, but then you can't push through the side arches since they're going through a penetrated space. 

In this instance, you create a round cylinder the radius of the side curves and intersect this shape with the window. If you have SU pro, it has a boolean tool set that lets you add or subtract shapes together and you can subtract the cylinder's volume from the window volume leaving the curved shape behind. I have the Free version. To do shape interaction with my version is more time consuming. Here you place the cylinder into the window shape and choose, "INTERSECT FACES". Whereever the shapes intersect leaves new lines and edges. You then go about erasing any lines and faces that DON'T LOOK LIKE WHAT YOU WANT. It's what Michaelangelo said about sculpting David, "I just keep cutting away everything that doesn't look like David", (or something to that effect).

Intersecting faces this way can become very complex very quickly. It can take many minutes to carefully remove the unwanted parts of the intersection. I chose to go further with this print. I printed the window frames and mullions integral with the window frame. This would save me assembly time. I had Rail Scale Models laser cut the acetate for the windows in the exact shape to drop into the finished windows. Pre-planning all this can really help the build. The is the STL image as seen in the Mac Finder Preview.

Another 3D printing consideration is how much resin you're comsuming. Resin ain't cheap! I'm paying about $30 for 500g. Each part doesn't use that much, but it adds up. The thick window walls would unnecesarily use resin and could be redesigned.

I hollowed out their backs and then put in some cross-bracing to prevent warping. Yes... thin section prints can warp. 

With this modification I was able to successfully print the eight required windows and I was off to the races. Here's the Manard window being used to cut the openings in the balsa Manard skin.

The were a ton of main house windows that needed to be printed. These were a somewhat simpler geometry but had their own challenges; those decorative drops. It took a couple of trials to position the print successfully so all the aspects would print. Once you dial in the setup, the printer will print successfully over and over. I was able to print four windows per load and did the whole print in about a week. I would start the printer at night and find the parts waiting for me in the morning. The number of parts on the build plate do not change print time. Only the height (number of layers) and exposure time/layer determines print time. So as long as all the parts fit, print away.

There is a balustrade railing that surrounds the balcony. I found a nice prototype in the SU 3D Warehouse, and was able to use it almost without editing, but it did need some. Again, there were reversed faces and I had to create lengths that could be combined to make a contiguous railing. The porch columns did warp in some cases, but they'll probably work.

Inside doors were more challenging that I expected. In fact, I just redesigned them last night and will print them today. They were too thin for the wall thickness. I wanted an up-scale door frame with bullseyes in the upper corners. I attempted to print them with details on both sides. One side had to have supports and in removing them almost obliterated the upper details including those bullseyes. I made a field repair by cutting off the top frame and just reprinting it with good bullseyes. This solved that problem, but they were still too thin. My re-design has the doors being printed in two halves so I can print them flat on the build plate. This way both sides will have perfect detail and I will join them as a post-print operaton.

I also expect that any warp will be cancelled out when I join the two door faces back-to-back. 

All in all I printed close to 100 pieces over several months in preparation for the project. Meanwhile, I had the flat parts laser cut at Rail Scale Model. In the interim I was building the Typhoon and the Sherman. The printer works unattended so it's producing something while I'm producing. Resin printers when they're lined out work better independently than FDM printers. When you're messing with molten plastic extruded through a heated nozzle and three stepper motors, more can go wrong than a basically optical process with one stepper motor. It all depends on the drawing and the setup.

The only part I did not print was the large cupola casting. It was just too big for my machine. I had this done at the University of Louisville's Advanced Manufacturing Institute, one of the most sophisticated in the USA. It was done on an FDM machine and has the characteristic thread lines. They will not be a problem on the curved Manard roofing portion since they'll be covered with shingles, but I may have to fill the frames if the lines are too obvious.

Notice too I printed four fireplace faces, a few sets of window frames that will be in the open position, and those chimneys. Due to their length and height, I printed the chimneys in four sections, again, vertically directly connected to the build plate so there were no supports to cut away. When I tried it in a more normal approach the supports destroyed the mortar lines. I glued the sections together with CA. The bag contains the paired corbel sets that go under the eaves. This represents a huge amount of work!

That's enough for this session...

  • Member since
    November 2005
  • From: Formerly Bryan, now Arlington, Texas
Posted by CapnMac82 on Monday, October 5, 2020 6:35 PM

I have a love/hate relationship with SU.

This is probably based in too much experience with other CAD software (notably AutoCAD).

I have a hihgly jaded veiw of the various models of things out there, too. (I can build a better REVIT family of a Component than I can download, at better than 8 in 10; I've been selling ACAD blocks for decades now.)

I've been to some of the RP wars, too.  It seems like only yesterday that resin STL printers were around $60,000 and you needed an entire garge for all the units.

The new, inexpensive resin printers have definitely caught my eye (much abetted by Luke Cowen and Kathy Millet).

Seeing large scale results is very promising and encouraging.

  • Member since
    March 2012
  • From: Louisville, KY
Posted by Builder 2010 on Tuesday, October 6, 2020 9:11 AM

Here's a good example of several things. First of all, having your own machine lets you redo things that you don't like. Buying from Shapeways, while feasible, is expensive. You don't want to have to do things over. One small print at Shapeways is $40.00. That's the cost of a entire bottle of resin. Another thing is that you can always do something better. And lastly, rethinking the scheme can produce better results.

Here's yesterday's example.

When I first printed the interior doors I chose to print them as an entirety with both front and back detailed. This required support regardless of how I attempted to support it. If I printed it sticking straight up and down door knobs, some overhanging trim edges and the characteristic bullseye had islands and supports needed to be run directly to them. These were very delicate details and and support removal would damage them. If I tipped it over at an angle, then even more supports would be needed. I chose the best compromise, but the support removal damage was so servere that I had to saw off the top frame with the bullseyes and print that part separately flat on the build plate, and glue it to the previous print. The results were still sub-par.

This image is of the less detailed back. There is no carving on the door frames.

The impetus for the change was the bad batch didn't fit the space like I wanted. The frame was just the wall width, but I wanted the trim to project a bit. This meant a redo. So if I'm going to redo it, then why not make it better.

I woke up on Sunday reimagining this problem. I do most of creative thinking in those moments of approaching lucidity in the morning when just waking or when I'm staring at my steadily aging face in the mirror when shaving.

Instead of making it in one piece, if I split it in two with matching back-to-back pairs I could print it flat on the build plate face up with no supports at all. No supports means no clean up.

Since I wanted it to be thicker anyway, I was able to make each half with enough material in it that I would have a decent print. And since they were going to be glued back-to-back, all the warps would be in one direction so when glued it would cancel out.

The results were exactly what I wanted. Printing flat meant that each print only took 26 minutes. Remember, print time is directly related to how tall the object is, not how wide since the entire layer prints at the same time. In FDM printers print area DOES affect print time directly since the string is laid down one at a time. More string equals more time.

I was able to put four halves on the machine at a time.

Here's a comparison between the old and new design. This first pass failed on the door knobs. I redrew that aspect and printed it again. This time it was successful.

Here's the new design in the wall. I don't know about you, but that's a nice looking Victorian era door. Laying on the floor is my first baseboard design. That too is going to be reprinted with a new thicker and taller design. I may do some crown molding, but that would be crazy, wouldn't it. I'm also making some sets with frame and door separate so I can pose some of them open.

I have an SU plug-in, Profile Builder, that gives you hundreds of millwork designs for everything: chair rails, baseboards, crown molding, etc. It's not a free program, but it's worth it if you doing architectural work. It didn't take long to find another base design and further modify it for 1:48. At this scale you have to exaggerate certain aspects so it will print well. In also building modern plastic kits, they are now able to mold some incredibly thin cross-sections, but even then, some of these parts are so fragile, you end up with a kit that you can't pick up without breaking something.

  • Member since
    March 2003
  • From: Towson MD
Posted by gregbale on Tuesday, October 6, 2020 9:28 AM

I custom-built industrial models by hand years ago, doing my own masters for complex parts and then making molds to cast them in resin. The leap from that era to this is barely imaginable...like going from the Flintstones to Star Trek.

Once again, most appreciative that you're taking the time to post this whole process! Enjoying it immensely...reading every word...and learning a great deal.

Greg

George Lewis:

"Every time you correct me on my grammar I love you a little fewer."
 
  • Member since
    November 2009
  • From: SW Virginia
Posted by Gamera on Tuesday, October 6, 2020 11:42 AM

Sorry, I would have responded sooner but I wanted to read everything before I commented. 

Oh wow, that's amazing Builder. Nice rundown on 3D printing, I've read about it, and sorta understand the rudiments of it but nothing to that detail. 

I wonder if you could 3D print that insane spiral staircase from 'The Haunting' now... 


"I dream in fire but work in clay." -Arthur Machen


  • Member since
    March 2012
  • From: Louisville, KY
Posted by Builder 2010 on Tuesday, October 6, 2020 9:02 PM

Thank you for following along. Since this project is about 3 weeks underway, I'll be going back to the beginning, but not providing the level of detail that I would do if posting it in real time. Once I catch you all up, I'll be posting in more detail. 

You could probably do a spiral staircase, but it would have to obey the limitations that I noted yesterday. If the members are too frail the part will either fail in the printer or fail when you try to clean it up. It would have to be printed in subsections that could be properly supported. I've thought about doing one for the turret, but chose not to make this beast any more complicated than it already is.

It's time to talk about the building itself and the design ideas. SU enables you to display the model on the screen in a number of ways including sections. You can take a screen print of all of these. I have a bunch pasted on the parts-catching walls I've added to prevent small parts from entering the dimensional rift.

Here's a section view of the house. You can clearly see the staircase and the fireplaces. There are four fireplaces with the same hearths in all four locations. The hearths are set away from the wall which would be the chimeny chase. My fireplace location is different than the Hopper painting. I couldn't figure out where to put his fireplaces based on my floor plan, so I took some architectural license.

In my actual model I did not build out the fireplaces as much as you'll see. My rooms just aren't that wide. 

Work began with some planning... and I'm not done yet. I didn't want to erect all four walls yet since I wasn't sure how I was going to handle the floors. The first floor plate sits inside the walls. Below the first floor plate will be a faux stone block 4 scale feet high. The porch is at the first floor level and I have laser cut traditional lattice for the front bottom of the porch.

I used 1/8" square stock for corner reinforcement as well as some selective pieces of 1/4" square basswood. I didn't put full length pieces in, just long enough to give some corner reinforcement while not being too obtrusive. I had to notch the base plate to clear these blocks. 

The second floor plate is two layers of 1/8" MDF. The reason for the lamination is two-fold. I wanted to give a reasonable scale thickness of 1 scale foot for floor thickness and I needed to provide relief for the bases of the stair railing. I wanted the spindles to come out at floor level. This necessitated dropping the rail base about /18" below floor level. This complicated the design and laser cutting, but I think it's worth it. This detail drawing shows a place where the rail sits at floor level.

I used Titebond II wood glue to hold the big pieces together. Normally I used Aleen's Tacky glue for all the wood stuff and then often add some thin CA to lock it together without too much clamping. The Aleen's then can dry at its leisure without the joint falling apart. I used styrene sheet for the chimeny facing. I was just easier for me to use it since I didn't have the right kind of aircraft ply and didn't want to make a trip to Scale Reproductions, Inc. just for that.

The fireplace walls were glued so the hearth front drops over the first floor plate. I had to notch the second floor plate to clear the fireplace entirely since this was going to dropped down from above and was ending up below the second floor fireplaces. To ensure that the fireplace sat correctly on the first floor, I held the floor plate up against the side wall while gluing the fireplace unit in place. This image is looking straight down. BTW: I got that spiffy hearth design from the SketchUp 3D Warehouse.

I decided to glue up adjacent corners and then wait until I complete the entire shell. I chose to do this since I'm wallpapering all the interior walls and it would be much easier to do this when the walls were completely accessible. This goes the same for installing windows and any window trim. Once I'm satisfied that most of the work that can be done is done, I will make the structure whole. I used Aleen's and CA to hold the walls together. I have some of those corner clamps that help. They're really designed for HO structures. O'scale structures are pretty big, but they give enough support that I can work around their shortcomings.

I put together the turret walls and found that my laser cutting was off in this area. First of all, I really wasn't sure what was happening with the mid-turret cornice. I had the turret walls cut as a two-story affair only to find out that I included the cornice in the extension of the roof plate that included the second floor of the turret. I had to split the turret walls and remove the 1/4" that represented the roof thickness. The main roof plate (attic floor) is also two layers of 1/8" MDF for two reasons. It includes the step back of the eaves and it also has the 1/8" rabbet for relief of the attic stairwell railing just as I did for the rail on the second floor. Designing this building really was a bit of architecture. There were many drawing hours completed long before I could ever think of actually building a model. When you buy a kit you never get into this world.

I also found out that my tab slots were one material thickness too wide in the front wall. This is not the first time I've made mistakes with tab and slot design. I don't know what my problem is. It happened on the distillery project and again on the engine house. I've resorted to building the model in CorelDraw, which is where I draw my laser cut plans. Regardless, I worked around the error and even though the walls will be slightly out of square looking down, it's not very discernible.

After assembling the turret walls I tested the window fit. I had already tested the fit on the main walls. I also started putting the upper fascia boards on all the walls. The turret windows impinged on these boards AND the side single window slots were about 1/16" too tight. The double window holes are good. I also had to relieve the fascia board to accept the curved window tops. Notice too I installed the angle trim on the corners.

That's enough for tonight. By the end of the week this thread will be current.

  • Member since
    November 2009
  • From: SW Virginia
Posted by Gamera on Wednesday, October 7, 2020 9:46 AM

That's amazing Builder. I've been wanting to build a demolished building for a 1/35th diorama- I love what you're showing us here. 

"I dream in fire but work in clay." -Arthur Machen


  • Member since
    March 2012
  • From: Louisville, KY
Posted by Builder 2010 on Wednesday, October 7, 2020 6:03 PM

My worklife started in the late 1960s as an Industrial Arts Teacher. I went from there into industrial training and ultimately to senior learning management, but I've never lost the desire to help others do stuff... better. These fourms on which I post incessantly, serve that purpose. I receive as much positive inspiration from the folks who read all this as I think I give them. It's very symbiotic. I really appreciate the feedback. It makes it worthwhile. So thanks! I've been posting the entire railroad build in all its gory details on the O'guage Railroading Forum since 2012. I have readers who've been following it for years. It's a tough audience and I have keep upping my game.

I left off with the wall assembly. The stairway was a connudrum from its inception. I was never quite sure if it was going to fit as I thought. To have the first flight starting where I wanted it to I had to lengthen that flight and shorten the flight from the landing to the second floor. The first flight from the second floor to the landing was the short run and the final flight to the attic was the long run. The second flight ended with a newel post and the 3rd flight started with one, but the 3rd to 4th flight turn needed a continuous handrail. This was a challenge to draw and a challenge to print and assemble. I realized that all these pieces needed to be assembled outside of the building and inserted somehow during construction. There was no way in the world that I could have assembled them in situ.

What confounded me was the step and floor alignment. As it works out, the second floor plate had to be relieved to clear the newel post bases. I never was sure if my floor opening for the stairwells was correct, and didn't truly understand what was going on until I had the parts in my hand. I first thought the second floor gap was in the wrong place and cut away an 1/8" off the back and added it to the front, only to find out when I got the walls together and re-fit the stairs, that my original dimensions were correct. So I reversed my mods. Like I said, I didn't really know what was going on.

I'm getting good at making "Board Extensions" replacing stock when things are too short. Anyone can cut things shorter, it takes some real skill to make things longer. It reminds me of the famous quote by Etore Bugatti when asked why he was making race cars in the 1930s with cable-operated brakes. "Anyone can make a car stop. It takes a genius to make a car go fast."

These were the relief cuts for the newel posts. Notice the filler to hid the "board extension". Notice also there is a space between the narrower second flight and its adjacent wall. This week I did make a filler piece to close that gap.

The attic floor is a laminate. I glued it together and clamped it in a wood workers vise and other clamps to make it nice and tight and flat. It too has an opening for the attic flight and the attic railing. The railing recesses into the rabbet around this opening. After fitting I found 1/8" drop was too deep, so I packed it up with some strip wood. The railing and the floor now matched nicely.

While all these tiny modifications could have been built in during the laser cutting, I'm not that good. If I were cut the house again, much of these changes would be baked in. But even then, I probably would find more refinements. My hat goes off to companies like Bar Mills that knock out their very nice laser-cut structures where everythng is perfect. But I must say, they're not including 3 story staircases, fireplaces and as you'll see, chandeliers, baseboards and crown molding.

The cupola, as I noted, is a single piece FDM print. It has some conspicuous filament lines which I'm debating about. I may or may not fill them. The Mansard portion gets shingles (Laser-cut Rail Scale Models Victorian Fish Scale Shingles), but the painted portion may be needing some filling. I'm not looking forward to it.

I epoxied the cupola to the turret cupola floor and then went back and used some Micro-balloons and epoxy to fill the bottom seam. This open seam was the result of some warpage in the lower level. I did some careful measuring, but in looking at it yesterday, it doesn't seem to be perfectly centered. In all the roof overhangs, there will be a ledger board on the outside so it will be the rain gutter system.

I printed pairs of the nice corbels that are so essential in this building's design. I found on the SU Warehouse. I wasn't sure if my eaves were big enough to hold them so I had to test. I think the test was successful.

By printing them in pairs I eliminated one headache of having to position them near each other. I printed more than I need, but it doesn't matter. If I need more, I print more. I keep the print files. That's the beauty of having this marvelous machine sitting at my side.

The Mansard roof is built on formers like building a wooden model ship or airplane. Having built a major RC, four-engined, 1:16 scale B-17 completely out of balsa on commission I learned a lot about using formers and skins. I specified too thin a material for the attic structure. I inadvertantly used thin ply where it should have been 1/16 minimum. This resulted in very flexible pieces that needed beefing up all over the place. Alls well that ends well and I was able to make it work. Again, if I was cutting this building again, I would fix this too. It's almost impossible (for me at least) to draw up a complex orignial structure, have it laser cut and have it all work first try.

This view shows the formers which slot into each other by cross-lap joints and all the corner braces to strengthen it. My clue that I specific the wrong stock was the 1/16" slots that were almost empty with the thin ply. This thin stock also reduced the gluing surface area for the balsa skin that followed.

Another RC trick to get balsa skins to bend nicely is to soak the outside curve side with vinegar. It penetrates and swells the fibers on that side and makes conforming to curves much easier. I don't screw around with any glues except CA when gluing these skins. I sprayed the contact zone with accelerator and then bathed it with medium CA. I align the piece at the bottom, hold my fingers to the top reversed curve and tack that, then move downward on the curve until the whole deal is glued. Needn't be neat here since it's all behind the scenes.

Where the roof met the turret wall it needed a sharp edge. I measured where the turret would fit and placed alignment lines on the balsa to cut it with a very sharp #11 blade.

One of the most challenging part of making a reverse curve Mansard is the corners. I could have drawn up corner formers on SketchUp and have done so in other projects. In this case I laid down the first roof panel extending it way past the corner. I used the adjacent former to approximate where the roof corner would actually be, and then cut it about 1/16" or large further out. Then I used a straight piece of wire lying on the formers to locate a more precise cut line and shaved it down so it was pretty close. When laying the adjacent roof piece it's easiers since you now have the other roof's curve to trim to.

When doing this it's really important that the formers are positioned correctly from the start. I drew a datum line around the roof perimeter with the former set back after carefully centering the attic frame on the attic floor.

Again, I let it extend out past and then shave it back to coincidence. Filler makes it all pretty.

After all the skins were in I had to open up the skin to accept the Mansard windows. This was another challenge. Since the roof curved out so far at the bottom I couldn't simply hold the window up to the roof and trace it. I needed to open the roof some so I could push the window in deeper.

I used the #11 blade held parallel to the plywood former behind the skin. I punctured a few places on the vertical portion...enough so I could visualize the line. I used a small square and then sliced all the way to the roof base and removed the scrap. I then pushed the window in as far as it would go and trace-cut the curved top portion. My first attempts were crude and left me with large gaps. I got better as I went along.

I tried in all the windows after the cuts were made and the building was starting to look like the picture. This image shows the too small roof plate.

There are gaps at the edge of the lower roof panel where it meets the main roof. Last week I went back and glued some 1/16" square basswood to the roof at the gap. I then shaved these pieces down so they approximated a smooth transition, sanded it with a rubber former and sand paper, and ended up with Tamiya Fine Filler. I still have to do final sanding on all this.

Lots of filler. Filler is my friend. This view also shows the packing around the opening for the attic stair opening.

The upper roof plate was supposed to extend out past the last Mansard curve enough to afford a smooth reveresed curve transition. My laser cut roof didn't do this. It was about 1/8" too narrow in both directions. I had some 1/8" Masonite laying around and cut a new piece. This piece is notched to wrap around the turret.

The skin curve over top of the windows was so thin in some instances that it fell apart. I went back and reinforced these areas with double balsa or 1/32" aircraft ply. I also added balsa behind the window opening, reshaped the opening and then filled the gap with the balsa serving as a backstop. The arrow points to the doubling. I also had to add more formers. Having just a center former was not sufficient since it left floppy balsa right next to the window opening and made cutting it more difficult.

I have a reasonably complete model shop for these kinds of projects. To build a railroad of this size and complexity you need a lot of stuff. The only woodworking tool that I would really like is a table saw. I have a big chop saw, scroll saw and portable saber and circular saw, but none of these are really good for ripping long lengths. I make do by putting up wood plank guides to hold the hand saws on the line. In this case, I used the chop saw to start the roof cuts, and finished them on the scroll saw once I had a nice square line. 

I also have enough power sanding equipment for the work I do. I had a 1" band sander for a long time and recently added a 4" belt/disc sander combo. Both of these were Harbor Freight deals. They aren't great, but for my work load, they're perfect. Can't beat the price. My chop and scroll saws are old Craftsman. They're rugged.

That's enough for tonight.. see y'all tomorrow.

  • Member since
    March 2012
  • From: Louisville, KY
Posted by Builder 2010 on Friday, October 9, 2020 10:28 AM

The story continues... as I said, by today we'll be current. 

I made the ill-founded decision to put in as complete an interior as I could. I say, "ill-founded" since it will be very hard to see unless I make a wall to swing out and it takes a whole lot of effort. I don't believe I can put the building close enough to the viewer for anyone to make sense out of it.

The interior needed partitions, doors, trim, wallpaper, floor coverings and lighting.

I had the partitiions laser cut. I got completely confused with this since I didn't make the parts via the laser. The two floors ended up with slightly different ceiling heights with the first floor being higher. I mixed these pieces up and was cutting walls shorter only to find out that the heights were different and I was removing stock from the higher wall. I was assuming that the heights were equal. A lot of time had elapsed from the design to the cutting to the building. The partitions had slots and tabs, but these two needed adjustment once the staircase was placed in the building. The whole darn job seems to revolve around where those stairs ended up.

I had to open new slots and fill others. It's not difficult, just annoying. Again... I've said it before... I really respect Bar Mills, etc. for being able to knock out perfect laser-cut kits. They've had a lot of practice, and we never see their failures. Again, I used some strategic corner blocks to strengthen the joints. I think I missed a wall... there should be one behing the stairway. I custom cut one and install it.

With a computer and decent printer I can do anything.  I searched Google for Victorian style wallpaper and found a bunch. I found good samples with which I was able to scale and tile to make large enough coverings for the walls. I planned on covering all the walls. I printed them on HP glossy photo paper and then sprayed them with Tamiya flat to kill the gloss. The photo paper is thick and has a lot of body.

I drew these shapes based on direct measurements from the assembled interior walls. Even with that, I got the height wrong on the first floor panels. Don't actually know how I do that sometimes. I used MicroMark Pressure Sensitive Adhesive (PSA). I first applied it to the paper and then, when set a bit, stuck it to the wall. This wasn't so hot. I changed approach to apply the PSA to the wood and when set stick on the paper. This works much better. The corner reinforcements complicated the wallpapering job, which is why I wish I didn't have to use them. But I was able to put some patch pieces on them, so no harm, no foul. You can see the shorter wall covering. That space is going to be covered by crown molding. Yes! You read that correctly! I've 3D printed crown molding.

Notice also that I drew the wainscotting for the first floor wall covering. It was easier than trying to make 1:48 3D paneling. It could be done, but not fun. I could have 3D printed it including attached baseboards. Next time.

My first attemp at inside doors was sub-par. I redesigned them to make them into front and back halves and was able to print them with no supports. I talked about this earlier. The doors had to be shaped to best fit the openings. Better too big than too small.

I made sets that were closed, and then decided I want some to be open. I split the drawing into frame and door and printed them separately. It worked very well. This is the closed, single-piece door. The piece lying on the floor is my first attempt at baseboard. It was too small and insubstantial. I re-designed and printed more.

Here's the open door. In both of these images, nothing is glued in. All the trim needs painting before I do that. That's new design baseboard in this image. I have an SU Plugin, "Profile Builder 3" that lets you select and draw hundreds of different real millwork and structural profiles. It's not a free program, but worth the investment. I've got baseboards because I have tools that make it easy to draw them. The door's a bit thick. If I were to do it again, I'd thin down the back-to-back halves a bit. By printing flat on the build plate you can print thinner objects. All this will be viewed through O'scale windows don't forget.

I had purchased some fiber optic filament last year from MicroMark just to experiment with it. I came up with an idea to make a functional 1:48 chandelier. If I was working in doll house 1:12 scale I could buy or make a good functional chandelier. 1:48 is a different animal. You could craft a chandelier, but it wouldn't be lit. My plan was to use the fiber filaments as the arms, form a faux bulb on their ends using Bondic UV cured filler, and then light it remotely with a bright LED. 

This is my SU model. In this version, the spindle butts up against the ring. In practice, I was able to open up the ring hole to 1/4" and insert the spindle held with thin CA.

I used a single piece to see how far it could bend without kinking. I used this dimension to set the overall diameter. If came out a bit overscale, but there's nothing I could about it. I drew a spindle and it too is a bit fat since 8 filaments had to base down its middle. The filaments are robust at 0.037". The ring that holds the arms and the spindle were both printed directly on the build plate so there was no clean up. The parts printed quickly.

You can't see it in the picture, but the filament hole spacing was printed on the reverse side that helped in drilling the small holes. My first test article was with just some short filaments, but it proved that the light carrying capacity was as desired.

Then I built the first working version using long filaments with the driving LED tied to the end of the bundle with shrink tubing. It worked, but I couldn't bend the bundle tight enough to bring it out of the dining room into the hall closet where I thought the power would be connected.

Then a reader in my O'Guage Railroading Forum suggested, "Why not embed the LED directly into the spindle, thereby reducing the wiring challenge." Brilliant! I opened up the upper part of the spindle bore with a #24 drill to accept the wider flange of the 3mm warm white LED.

I created "bulbs" on the filament ends with Bondic. Again... my first attempts of putting on the drop with the chandelier in the its normal position (as above) wasn't so hot because the drop started running down the filament before I could get the curing UV LED on it and solidify it. I changed this procedure to putting the drop on with the chandelier inverted. This was great since I would wait a bit to let the drop sag and round out, and then apply the UV light. This technique was perfected on version #4.

The illumination test with the imbedded LED was very bright, but it does shine right through the spindle.

Using Micro-Scale Liquid Mask I masked the bulbs and then primed it with Rust-oleum Oxide Red. 

Over this went another coat of Tamiya Gold. My third article failed later when one of the filaments broke at the bend. I thought this may have been due to chemical interaction. That article was primed with Tamiya lacquer, but another broke on one of the earlier tests and I'm thinking that it's due to mechanical stress. The filaments have some brittleness.

My next power test showed pretty good light blocking except right at the LED. I'm going to wrap this section with some Bare Metal Foil, repaint and then we'll have a working chandelier. When I scraped off the liquid mask, the bulbs got a bit frosted and it was a benefit. It helped diffuse the light better.

This whole exercise proves that if you can conceive of something, there's a good chance you can make it happen. It why one of my favorite humans (despite his faults) is Elon Musk. He's the Thomas Edison of our age. Armed with a computer, a 3D Printer, a lot of good old shop tools and imagination, you can do a whole lot of cool stuff. I started on this creative run in around 2008 when I attempted my first scratch-build project, a Victorian RR Station in all styrene based on a HO construction article on same. I was 63. I had been building kits since I was 8 in 1953, but waited all that time to get "out of the box". Every project onward kept moving the goal posts. Each project had some unique aspect that made it more sophisticate or just plain unique. This one's going the same way.

We're just about current.

The last thing I did yesterday was a decision to put on a porch swing. That big porch cried out for swing. I was going to download an already-drawn one from the SU 3D Warehouse, but couldn't get the password to work, so I took 20 minutes and drew my own. I printed 3 of them. This time with supports and it's a very fragile little thing. I will use the Dremel with flexi-shaft and diamond burrs to remove the supports to avoid damaging the parts. I always print more than one if I can since I will always lose at least one.

The swing will be suspended from the balcony joists by some small chain. Thread will not hang right.

And with that, we are now current. From now on all these posts will be daily activity.

  • Member since
    March 2012
  • From: Louisville, KY
Posted by Builder 2010 on Friday, October 9, 2020 9:33 PM

Happy Friday. Unlike normal humans, I'm a person who is happier on Monday than Friday. The reason? I have a deal with my wife to not work in the shop after 5:00 p.m. during the week and no work on weekends. So Monday gets me back to building stuff. It wasn't like that when I was a working person. Retirement is a hoot.

I'm back to exercising (recumbent bike and elliptical) every other day. On those days I don't get quite as much build time. Today was one of those days. But I always get something done. Today was a mixed bag.

I sanded the added filler on the Mansard skin, put up the attic "drywall", painted two coats on the attic floor, prepared the chandelier for more light blocking, created the missing mid-wall partitiion on the 2nd floor, and created the foyer closet door. If I had planned ahead just a tad more and made the window opening in the Mansard frames to match the INNER WINDOW opening, the drywall would have been unnecessary. I didn't have the Mansard window details in CorelDraw. I created the 3D printing output directly from SketchUp.

Just for fun, this is what this whole deal looks like right now. It's a monster!

I tried using Bare Metal Foil to seal the chandelier spindle, but the gold paint didn't like the adhesive and it didn't work. I then painted it gloss black, masked the bulbs and will airbrush it gold on Monday. I think the two extra coats will stop the light leakage.

I used the plastic caps that come on these really neat cheap eyeliner makeup brushes. They cost less than 8 cents a piece from Amazon, and they come with these little plastic sleeves. I didn't want to reapply the liquid mask so I'm trying this.

I applied the "drywall" fillers on the Mansard frames using PSA. I put it on the wood, let it set up a few minutes, then using a burnishing tool, I pressed the pieces of Bristol Board into place. It holds well as long as you press it tight enough. I then found some craft paint acrylic (Cocoa) and brush painted the first coat on the floor. When this dried, I applied a second coat the same way. I think this should be sufficient. I may or may not illuminate the attic. What do y'all think? I'm always open for suggestions.

I had to paint into the window boxes since the floor is actually within that space. The water gutter area will probably be painted black and then the ledge (which I haven't added yet) will be trim color.

I measured and cut the rear stair wall for the 2 floor hallway from the scrap roof that I replaced. I found an extra main entry door that I fitted to this space and will use some baseboard trim around it. The doorway's a bit weird since the hall came out so narrow. The House needs to be 50% larger in width and some in depth to make the spaces as elegant as they would be, but I had to selectively compress the model so it would fit on the railroad. In HO, I could have made it larger, but not in O'scale. 

To get this wall to fit exactly next to the steps AND settle down into the rabbet at the rear of the stairwell, I had to notch the lower edge of the wall piece. I used a razor saw to make the rabbet cut and the scroll saw for the initial notches.

Last thing I did was create the missing closet door. I had to cut away part of the Masonite and insert the door in its place. I don't know how this happened, but it was exactly the right width. I must have been paying attention when I drew this wall originally.

I realized at this time that the walls flanking the stairs needed wall paper too. I may have to print more if I can't find any scraps to fit. I also double-checked that I had enough Rail Scale Models laser-cut Victorian-style shingles. I do!

Everyone have a safe, healthy, non-boring weekend.

Did one more thing today (saturday). I redid the flooring prints now that I have a full inkjet catridge. I found a better parquet pattern on SU's Podium extension material warehouse, and then found my black-white checkboard tile that I used on the Nighthawks project and elarged the tile size. This will give me enough material for the flooring in the House.

  • Member since
    November 2009
  • From: SW Virginia
Posted by Gamera on Monday, October 12, 2020 11:53 AM

Ohhhhhh wow! Love the wallpaper and the porch swing. And that chandelier- good luck with it- it's so cool looking I hope it works out. 

"I dream in fire but work in clay." -Arthur Machen


  • Member since
    March 2012
  • From: Louisville, KY
Posted by Builder 2010 on Monday, October 12, 2020 5:37 PM

Thank you! The Chandelier is a success (so far... haven't hung it yet). Got the rest of the paint on it and finally blocked all the light. After this picture I found a few other spots that I brush painted to finally block it all. This was just a whim thinking I could simulate light bulbs on the end of fiber optic filament. I didn't know if it would work. It does! It won't light the room, but it will throw some light on the ceiling.

I now drive all my LED lighting with CL2N3 LED drivers. They're terrific and solve the problem of finding the right current limiting resistor. You put anything from 5-90vdc in and out comes 20ma which LEDs love. The higher the imput voltage the more LEDs you can power in series sicne they each drop about 3VDC. They're not happy driving parallel circuits so after you've reached the series limit, you feed another CL2 and run another string. 

The rest of today was spent in painting various things. The first thing I painted was the inside attic walls. I used a creamy yellow color craft paint which I had chosen way back when I was doing the drawings. It took two coats and I may add more. I will also be painting the inside of the Mansard windows the same shade, but in that case, I'll match the craft paint with a Tamiya mix so I can airbrush it. Craft paint doesn't airbrush very well. I added another coat on the floor just because it needed it.

I painted the inside of the cupola and the upper turret with the same color. I did two coats, but the cupola, with its black base color, will need one more coat. I also cut some Bristol Board ceilings for both of these spaces. They will be lit, which is why I'm going to the trouble of painting their insides. I don't want them lit too brightly, so I will attenuate the LED by painting it. This image shows the turret assembly upside down.

I cut and installed the checkerboard "tile" floor using PSA. (not glued yet in this image)

While this was going on I was re-printing the baseboards and crown moldings. I made them both about 30% larger. I think they work better this way. I threw out the old crown molding, but kept the smaller baseboard to use as casing trim like around windows.

Here are two images to show the comparison.

As I'm cleaning all this molding up, I'm sticking it to some cardboard in preparation of airbrushing it all at once.

The last thing I did was the most difficult; painting the main stair. I airbrushed it with Tamiya Flat White, then coated that with DullCoat so the white wouldn't bleed when I brush painted the dark brown details. Newel posts and handrails aren't too hard to paint. Stair treads are a different thing altogether. Of course I'm an idiot wanting to have contrasting stair treads. I could have left the whole thing white.

I was using my tiny makeup brushes for the edging and tight spots, but needed to add an extender so I could reach the top steps in the long run. Some of the defects will need to be back painted, but others are going to be hidden by the stair runners that I printed.

I began by painting the first flight newels, handrails and the tread front edges. I then when back and painted the full treads and then the landings. Before I ended today I got the rest of the newels painted. I would have been much easier if it wasn't all glued together. But it is what it is.

I'm good at back-painting and after a couple of iterations the demarcation lines wil be acceptable. They're not in this picture.

After all the painting is done, I have to apply wallpaper and baseboards and then the aforementioned tread runner. Any defects in the middle of the tread will be well hidden.

  • Member since
    October 2019
  • From: New Braunfels, Texas
Posted by Tanker-Builder on Tuesday, October 13, 2020 8:54 AM

Hello;

 Well, I was going to follow this build. When I click on the Photo Icon I get an error and danger warning. Can you repost those pics so we all can see them?

  • Member since
    March 2012
  • From: Louisville, KY
Posted by Builder 2010 on Tuesday, October 13, 2020 11:06 AM

Don't know why that's happening since you're the only person that has noted the problem. Here's a direct link to Photo-image with the full set of the House images.

https://postimg.cc/gallery/ZZcLHwW

If this doesn't work, I don't know what to do. There doesn't appear to be any privacy settings that I can change.

  • Member since
    March 2013
Posted by patrick206 on Tuesday, October 13, 2020 3:32 PM

WOW, this is one fantastic project, thank you so much for taking the time to post all of it. You can bet I'll be following with interest, I've wondered about the 3D process for some time, you presented the most useful and understandable information about it that I have ever seen.

First class construction as well. Thanks again.

Patrick

  • Member since
    November 2009
  • From: SW Virginia
Posted by Gamera on Thursday, October 15, 2020 11:35 AM

I've been seeing your photos fine. 

The chandelier turned out perfect! And that staircase is friggin' amazing!!! 

"I dream in fire but work in clay." -Arthur Machen


  • Member since
    March 2012
  • From: Louisville, KY
Posted by Builder 2010 on Thursday, October 15, 2020 6:43 PM

I really appreciate the feedback. In fact, I was energized enough to send a letter to Aaron Skinner, the new Editor of FSM offering to author a Kalmbach book on 3D Printing Primer for Modelers. We'll see if he agrees with me.

The other day I started writing a response furthering the discussion about 3D printing. I got interrupted and ended up killing it by inadvertantly opening another Internet page on top of what I was doing. Gone! I think I'll finish that discussion now. I'm a little OCD and a lot ADD, so I am often compelled to finish things that I start.

I wanted to relate the impact that mastery of drawing skills are so important to the 3D printing challenge. I got my printer in June of last year. After printing the file that came with the printer to prove it worked, I printed an engine lathe in 1:48 that I wanted to include in the yet-to-be-built engine house machine shop. It wasn't successful at first, but eventually I did print something that worked. I immediately turned my attention to printing a 1:48 diesel locomotive prime mover. The engine I chose to print was this one.

It's 1940/50's Electromotive Division of General Motors (EMD) 567 V-16, 2-stroke locomotive diesel with 1,500 hp. It was one of the cleanest designed engines in use at the time with all the injectors and their piping hidden behind the simple valve covers. I found a good cross section of the engine that I imported into SketchUp (SU). SU has a feature called "Match Photo" that lets you import a 2D photo to the workspace and draw a 3D object directly over it.

This engine had a bore of 8.5" inches. Armed with that one dimension I was able to scale the cross section. You draw in full scale in SU and then reduce the scale when you export the STL file. To reduce a full-sized drawing to 1:48 you use a scale factor of 0.021.

With a scaled cross section I was able to correctly shape the profile of the cylinder block. In reall life, this engine was a combination of castings and sheet metal. The oil pan area and the curved airbox area were sheet metal. That curved area was one of those shapes that I was concerned about when trying to imagine building this engine WITHOUT 3D printing. With the profile nailed down, what was left was trying to get the length correct. I couldn't find an engineering drawing of this engine so I used SU's match photo with an image like that above to literally draw the length. I also found other 3/4 views from the pump end that I used.

Match Photo is not 100% accurate. It's directly influenced by the focal length of the lens used to make the original photograph. If an "normal" 50mm lens was used, the photo's length going back into the image could be pretty close to the correct proportions. But if other focal lengths were used, the depth dimension can be distorted. Wide angle lenses exaggerate the depth and telephoto lenses condense the depth. I found that many of the engineering photos I found had these problems and I was having to adjust the depth accordingly. For example: knowing the cylinder bore and then approximating how close together they were and the cylinder wall thickness, I was able to get the length proportions so it was relatively close. When I was lucky enough to actually get profile drawings like I did with the ALCo engine, it was much easier. 

While the block and valve covers were simple geometry, those Roots Blowers hanging on the back end were an enigma. There were two areas that needed solution: The egg crate ribs on the blower housings and the plenum onto which they sit, and the inside compound shape of the plenum so it cleared the massive flywheel. BTW: if those blowers look familiar, their shape is almost the same as the ubiquitous GMC 6-71 blowers that were used on drag racers for decades. GM Detroit Diesel engines and the EMD locomotive engines are the same engine except the latter is a a whole lot bigger than the former. The power packs, unit injectors, four-exhaust valves per cylinder, air boxes and Roots scavenging blowers are all the same.

To draw the egg crate I had to learn a new SU add-on called "Curvi-loft". It enables you to drape one 3D set of shapes onto the curve surface of another. I drew the egg crate as a regular shape and then draped it around the blower and plenum curves.

While this took some time to both learn and execute, it was nothing compared to trying to build the plenum's back curve. I had a help from a forum reader in France, but he wasn't much more successul than I was. Not only did I have to get this curve, but it had to perfectly mate with the entire length of the front portion with the egg crate. There could be no gaps or the STL converter wouldn't recognize it as a "solid". The image shows the final shape I got. I probably re-drew it five times before getting "right". While not perfect, it was sufficient.

Surprisingly, drewing all that complex valve gear wasn't as hard. The shapes were more regular and manageable. I did want to have the engine with one of the valve covers open to show this wonderful detail. My prints came out strange. Pieces were missing. I kept messing around with positioning the part in the Machine, but it wasn't correcting the problem.

Later, in looking at a SU tutorial on picking drawing styles, I found that I could change the color of reversed faces to make them more observable. I used this technique to highlight that drawing of all the valve gear and found that all kinds of parts had reversed faces and therefore didn't print. Example: the cam shaft rollers, the sides of the hold-down power pack clamps, the ends of the rocker arms. The above screen print was made BEFORE I learned this trick. If you look closely, you'll see that those parts are a darker gray/green. That's the default color for reversed faces. Later, when I made the color change all those faces were identified so I could fix them. The heads then printed perfectly.

Here's the front end of the engine. Once I figured out how to draw a decent water pump and got the piping to draw correctly, I kept using those pumps on every other prime mover I printed.

The end result was a very successful engine print. As I've noted many times before, it's not a printing challenge, it's a drawing challenge. With the little weathering I added, the engine looks pretty reasonable.

Well... that's enough printing stuff. Back to the House. I decided it was an exercise in futility to paint the main staircase treads brown and attempt to leave the risers white (like the steps are in my house). Some of the long runs were very hard to reach into to do the painting. I added a long extension to my makeup brush to reach in, and it let me hold the brush with two hands and control my normal shakes. I realized too that it's also okay to have the treads and the rises as natual wood. This greatly simplified the painting challenge. That's not to say it was easy. It wasn't, but it wasn't impossible either.

This image was taken yesterday so I hadn't done any final touch up yet.

This was taken today with the touch up complete. I went over all the blemishes with some brush painted Dullcoat so the brown wouldn't bleed into the white. Old Tamiya paint will dissolve in new Tamiya paint regardless of how long it sets up. It doesn't polymerize like some other acrylics do.

The stairs are now ready for wallpaper and tread capeting. We're getting there.

I also added the parquet flooring to the living and dining rooms and got baseboards and crown molding installed. I put the ceilign on to show how it looked. Ceiling will be white also.

The wider baseboards and crown molding work. I first tried to install them using the 3M transfer adhesive tape, but it was just too hard to handle in the thin strips needed for the molding. It is strong, but difficult. I then resort to the PSA which seems to be working, but we'll see how it holds up over time. The molding is all warped so to get it to lie flat puts pressure on the ends. Over time, this stress will probably releases the PSA. I may have to go back and hit it with some CA. This picture shows that warp.

I got some PSA on the photo-printed parquet flooring and found that Goo Gone was able to remove it without screwing up the surface. I was worried, but it was a false alarm. A whole lot of effort's going into an interior that may or not ever been seen. But hey... we all know it's there.


  • Member since
    November 2009
  • From: SW Virginia
Posted by Gamera on Friday, October 16, 2020 8:42 AM

The house is coming along great and that engine- that's insane- WOW!  

"I dream in fire but work in clay." -Arthur Machen


  • Member since
    November 2005
  • From: Formerly Bryan, now Arlington, Texas
Posted by CapnMac82 on Friday, October 16, 2020 12:07 PM

The tricky part, sometimes, is in taking a hard-won complete 3D CAD model, and "tearing it down" into cast-able bits. 

Getting parts broken out can also take hours off the printing time, too.  And can reduce the amount of material used to make the print as well.

Now, that also means having to learn the fine art of mating surfaces and printing tolerances.  Vexingly, butt joints and simple miters are better than tabs and slots and the like.

  • Member since
    March 2012
  • From: Louisville, KY
Posted by Builder 2010 on Friday, October 16, 2020 6:32 PM

So true. The work effort definitely moves from crafting to drawing and strategizing. 

I was in and out of the shop today so, while I got some stuff done, it could even have been more. The stair case for all intents and purposes is complete. I also finished up the first floor trim including baseboards and crown molding. The stairs needed some carpentry to fill out the area over the foyer closet. I then did the wall papering and started getting the tread runners in place. Almost got them finished when it was dinner time. The moldings were breaking away which I suspected due to the warp. I ended up reinforcing it with strategically applied thin CA. This worked. For the stair trim I avoided the PSA entirely and went right to the CA. As I noted before printed resin parts seem to set CA very quickly. It doesn't give you much repositioning time.

I installed the stair for this image. Looks pretty real. I even attempted miter joints in the crown molding. Nuts! They could be a bit better... practice makes perfect, and I'm not getting enough reps.

The wallpaper on the stairs had its challenges due to the stair trim that I needed to cut around. I cut it to length and glued it to the part of the wall where it was going to end up. I then used a burnisher and a strategic fingernail to press the paper against the stair trim to guide the #11 blade.

Once the paper was on, the staircase looked finished. I got the tread runner on the main run, and don't know if I'll put it on the treads that will be facing away from the viewer. You really won't be able to see it unless you 1.5" tall and decided to walk up them. I also need to case in the underside of the stairs that are open in this picture. Easy job to do that. I had to raise the top of the foyer closet a little less than two MDF thicknesses. I needed to shave just a bit off the double layer to get the second floor to sit flat over the entire partition.

Another thing I did was break off the turret top floor walls from the cupola floor and reposition it. It was badly off-center and I didn't want it to be that way. It's the center piece of the building and it would be noticeable. I wasn't quite sure how it came out wrong. When getting into the fixing I realized that I had cut a hole in the Masonite piece that I had to scratch-build. My hole was rough and not measured carefully. When I went to glue the turret walls to this part, I was constrained by gluing it to the edges of the hole, otherwise, I would be gluing into thin air. With the hole being off-center, the resultant glue job was off-center also. 

I fixed it by adding some filler pieces of MDF and moving the glue location to the actual centered position. I use Aleen's and added a heavy weight to it while it dried. It now looks much better.

Here is the filler that I needed to insert so the wall would have something solid upon which to glue. It was two layers of 1/8" MDF. Generally, if it just structural, you can almost fix anything.

And now for something completely different... There's model making and then there's MODEL MAKING. In the 1930s, during the Depression, the heiress to the Domino Sugar fortune was sad that people weren't able to see really fine things especially in the area of decor and furniture. Her name was Thorn. She commissioned the finest miniaturists in the world to re-create famous rooms and furniture in the United States in 1:12 scale. These masters were stupendous and the miniature rooms they created must be seen to be believed. Most of them are on display in a basement exhibition hall in the Art Institute of Chicago. There are other rooms scattered around the country, but the buld of them are in Chicago. I've seen them twice. If you did model making, these rooms are Mecca.

The rooms are displayed in a curved hall of shadow boxes. The lighting is very realistic and makes for great picture taking. These were pictures I took. To see more go to: https://www.artic.edu/highlights/12/thorne-miniature-rooms

There's a display of how these masters went about the job. They had to invent tools to do it. They wove tapestries and material for scale drapes, carpets and upholstery.

Whenever I think I'm good, I look at this work and it brings me down to earth. This was 90 years ago and they didn't have 3D printers. Obviously, you can do more in 1:12 than you can in 1:48. Regardless, this stuff is awesome in the literal sense of the word. It inspires awe. The rooms toured the country and people did get to see it.

It's Friday already. That means two days of no model building. As said this before, I'm weird. Most people look forward to weekends so they don't have to work. For me weekends mean I'm not doing what I really want to do. This is especially acute now when you can't really go anywhere.

So have a nice, safe, healthy weekend. And wear you damn mask!

  • Member since
    February 2011
Posted by GreySnake on Saturday, October 17, 2020 1:27 PM
Amazing work and the detailed write up on 3D printing was very insightful.    
  • Member since
    March 2012
  • From: Louisville, KY
Posted by Builder 2010 on Sunday, October 18, 2020 5:57 PM

Thank you! I'm still waiting on Aaron Skinner's response to my idea of creating a Kalmbach 3D Primer for Model Builders.

Even though it's the weekend, it doesn't stop me from doing design on the laptop. I sit in my Eames Chair in the same room as my dear wife, and can interact, watch TV and be modeling productively all at the same time.... multi-tasking.

I just created a Federalist convex wall mirror for one of the downstairs rooms. Found a nice prototype on Google and traced it. Then had to add contours. I shaped the roundel part and the shell at the bottom, but chose to just profile the upper decorations and not sculpt them. I also left off the drop since it would probably break off just getting it off the build plate. It's going to be really small and if the parts print too thin they'll fall apart. I could do it as a post op. I'm printing four different sizes working up from scale to a bit larger. You can clone and scale objects right in the slicer which is a nice feature.

SU has a FREEHAND LINE TOOL that let me trace around the top details. You do have to go back and clean up any stray lines and to make sure it's all connected. You can't extrude any depth unless it is a fully connected surface.

Here's the slicer arrangement. I'm printing directly on the plate to avoid any supports. I will use Bare Metal Foil or the Molotow Chrome pen to make the mirror look right. The printer will reproduce all those details. Print time will be about 26 minutes. I used the "FOLLOW ME" SU tool to create the convex and concave shapes. They didn't close completely and I had to draw in the connectors to make them solids.

I took a picture of our dining table's pedestal and duplicated it in SU. I now am going to print it. I will sit under the chandelier. The table was an easy job. After measuring the 1:1 size of the pedestal I was able to trace half a profile, work out the kinks and then use FOLLOW ME to lathe it to a circular design. I didn't round out the cabriole legs since it greatly complicated the drawing AND won't be seen. The table is a Kittinger Queen Anne that an aunt gave us many, many years ago. They had a house of wonderful high-end furniture, but her only daughter and my sister chose to not accept the offer. We jumped at it. It was just what we wanted, and at the time, we couldn't afford a Kittinger ashtray. The pedestal height from the floor was 26" and the legs extended 13".

Armed with that I drew this.

Here's the print scheme. I'm doing two sets of legs; one with supports and one directly on the plate. The slicer indicated there were trouble spots under those legs. We'll see who wins. I put some heavy reinforcements under the table to resist warpage. Table's surface will be flat but not very smooth since the plate has some texture. I can polish it or not bother. Let's just hope it all prints well. The legs many be self-supporting which is why I'm chancing growing them directly on the plate. Remember: this stuff grows upside down from this image. The supports are in a place where removal shouldn't do too much damage.

Print time is estimate at something over 2 hours. The table top would print in about 15 minutes if I was printing them alone. I will print this and the mirrors tomorrow.

The table was the easy part. The Chairs are a totally different thing. If I wanted to part with some $$ I believe Shapeways has 1:48 dining chairs, but I want to experiment. Here's what I'm talking about from Shapeways. They use high-end laser printers and don't need the supports. At $10 per chair, that's $60 for six. It would take about $1.00 worth of resin to print all six. I'm thinking that I could do this if I built them in pieces. At that rate, it wold cost about $1,000 to furnish the whole house, and that ain't gonna happen.

  • Member since
    December 2002
  • From: NYC, USA
Posted by waikong on Sunday, October 18, 2020 11:40 PM
This is fantastic! Its a master class in 3d design, 3d printing, model making, and art. I have a fdm printer and am waiting to get the eelago saturn when its available again. Thank you so much for sharing your knowledge and experience. The Hopper buildings you have built are really nice.

My website: http://waihobbies.wkhc.net


  • Member since
    March 2012
  • From: Louisville, KY
Posted by Builder 2010 on Monday, October 19, 2020 10:11 AM

Thank you very much for all the moral support. It really keeps me pushing the envelope. I pushed that envelope some more. I did design the Queen Anne Chair to go with the table.

The challenge was the Cabriole Leg. When I was a shop teacher I made myself a Queen Anne Writing Table Desk modeled after a Henkel-Harris product. To make a cabriole leg you take a piece of glued up stock about 4" on a side and draw the profile on the two adjacent front corners. You take it over to the band saw and cut off the profile in one direction trying to keep you cuts as continuous as possible. You then nail all the cut off pieces back onto the stock and turn it 90°. You then cut out the other profile. All the scrap falls away and Voila, there's a cabriole leg. Because of nailing back on the scrap is why you try to limit the number of intial saw cuts.

I basically did the same thing in SU. I drew a rectangle the overall size of the leg on which I drew the profile. I used PUSH-PULL to extrude that profile into the total leg depth. I then copied it. I moved the copy off the leg and rotated it 90° and then shoved it back into the leg so the corners coincided. It took two trys to get it right since the first time I didn't have it coinciding perfectly.

I then used the INTERSECT FACES function to delineate everywhere they touched. All I then had to do was carefully erase all the extraneous lines that WERE NOT a cabriole leg. It's a bit tedious and you have to keep enlarging the image to pick out all the lines that have to go. This image is a WIP showing the extraneous lines that I was removing. If you're lucky enough to have the SU Pro version, you have tools that would do the intersecting for you. You would simply subtract the two objects and what was left would be the leg. It would save about 1/2 hour's time, but the Pro version is $800.00. Nuff said.

After you've erased everything you go back and double check to make sure that it's an entire solid. There were a couple of faces that I had to replace. You don't erase the faces. You remove the bounding lines and the faces disappear. A face has to have 3 or more contiguous edges. Remove one and the face is gone. You can see one of the missing faces on the knee area of the left side. I know it's missing becasue I can see inside the leg.

For the back, I took a picture of our Hickory Chair back and drew over that like I did on the table pedestal. I edited the image to make it B&W so it would be easier to trace. I also changed the seat to the fiddle seat like that of our chairs.

After tracing with the freehand tool, I went back with arc and line tools to clean up all the curves. I will print the backs separatedly and flat on the plate. I'm also printing the seat and legs as one part. And again, I'm printing it two ways to see which one works best. The amount of resin consumed is minimal.

I need six and printing seven. Time to print is a little over an hour. I could have all these print jobs today if all goes well. That, of course, is a big IF.

I've photographed our china cabinet and a very nice South Carolina mahagony server reporoduction for more dining room furniture. At least I can get the dining room furnished.

  • Member since
    March 2012
  • From: Louisville, KY
Posted by Builder 2010 on Monday, October 19, 2020 6:14 PM

Two posts in one day... don't get used to it. But the printing was so successful and I had a full afternoon of work so there's progress on all fronts.

First, here's the Federalist-style convex wall mirror. All four prints were successful. The one I chose was the 2nd largest. It seemed right. I first applied the aluminum foil bright side out, with Microscale Foil Adhesive. I burnished it down with a burnishing tool and then a Q-tip. I painted the frame with Tamiya gold. It's really a tiny cool thing. This close up is too close. 

With that done I started the printer to do the dining table. While that was printing I finished up the stairs for good. I added the tread runners all the way up, even those flights that were facing away from the viewer. I did that just because I could. I then added a piece of Bristol Board to cover the underside of the top flight which you can sort of see. I also finshed the first floor inner-walls wallpaper and moldings, and painted the doorknobs.

I got all the floors done on the second floor and got 2/3 of the inner walls wallpapered. This is the 2nd floor hall.

And here's the front left bedroom.

In the stairs pic you may have noticed the dining table. The experiment showed that the direct print pedestals printed perfectly and required almost no cleanup. The pedestals on which I put supports printed okay, but I broke off a foot in attempting to remove the first support. That is exactly what I was afraid of. These were the "light" supports. 

The tables printed witout warp thanks to the beefier ribs below. I glued the legs on with Bondic and put it back in the UV chamber to harden the glue and further cure the assembly. I inadvertantly added some resin that contain Sariya Tennacious, a more flexible resin. In this case that was a good mistake since it added some more resiliance to the tiny legs.

Here's the good legs. The Xacto knife shows scale. They're very tiny, fragile and look fantasitc.

Here's the leg with the support struture. The supports overwhelm the part.

And here's the assembled table being displayed in the future dining room.

I couldn't be more pleased with how those pedestals came out. They exceeded my expectations.

The chairs finished printing at 5:14 so I was right. I was able to print all the new stuff today. Again, the chairs stuck directly to the plate printed perfectly. The chairs with supports were a bust. Three of them separated from their supports completely. That means I have to clean out the vat next session since some cured resin's going to be floating around in there. I broke the foot off one chair leg with the razor scraper I used to pry the objects off the plate. With my pre-coating routine, they stick like crazy. I don't get adhesion failures very much anymore. I do get support breakage as seen in this picture. This is right off the machine after alcohol wash. I scrape them off directly into the ultra-sonic cleaner so I'm handling them as minimally as possible.

I'm glad I printed 7 of each when I only need six, but even if I break more, in 1:15 I can have another batch. I scapped all the support seats.

I just took them out of the ultrasonic and put them in the curing chamber. I think I lost another foot on one of the leg sets. I may reprint a bunch just for spares. When they're hardened they'll be more handleable. I still have to glue the backs to the seats. More on this next time.


  • Member since
    March 2012
  • From: Louisville, KY
Posted by Builder 2010 on Tuesday, October 20, 2020 6:24 PM

Getting the bedrooms finished. Here's the first bedroom with paper and trim.

And here's bedroom #2. By the time I finish these I'll finally be able to do the crown molding. Notice I even got the paper pattern matched in the corner.

And then there's the dining room set. I made three chairs from the first print. Here's the first chair.

Here are three chairs.

I ran the second print. I put a very thin pre-coat layer seeing if that would be better and not leave as much of the pre-coat on the finished part. It was a partial bust. I got five out of 10 bottoms with legs printed (I needed three), but all but one of the seat backs stuck to the FEP requiring a vat emptying and clean out. I had three successful backs left over from the first run, so that gave me seven complete chairs. And here they are. It's pretty neat that I drew all four legs to be equal length and reach the ground and they printed exactly the same way.

I really didn't think this gambit would work, but indeed it did. It's harder to do this level of fineness with an LCD printer because of those pesky supports, but I was able to print all of the good stuff directly on the build plate and avoid any supports. Now I have to paint it all without damaging it. The Tenacious blend did impart more flexibility to the legs so they bent instead of fracturing if I bumped them... which I frequently did. Notice the carpeting is laid in the dining room.

Using Bondic to glue the seat back to seat worked excellently. I put as small bead on the seat back edge, held it as steady as I could with a tweezers at the correct angle and then hit it with the light. The Bondic actually starts setting almost instantly. I was able to let go of the tweezers as soon as it would stop moving on its own. I then kept the UV light on it for another five to 10 seconds and it was solid. As I've noted many times before since Bondic is exactly the same chemical composition as the resin of which the part is grown, the joint is a true weld. I had sanded a slight bevel to the bottom of the seat back so it would glue to a slightly inclined angle like the prototype.

I have a few more pieces of trim on the second floor and that will be done.

My daughter, after seeing all this cool interior stuff, thinks I need to be able to display the insides like a doll house. It makes me want to hinge one of the sides so it can be opened up. I'll give it some thought. Unless the building is just a few inches off the edge of the layout, you won't be able to visualize the interior. I know this from experience. I detailed the inside of the boiler house, the switch tower, the Victorian RR Station, Woodbourne Gallery, the Newtown Chocolateria, and Nighthawks. Only the Chocolate Shoppe, Woodbourne and Nighthawks can easily be seen. The House will NOT be in a location that will be easy to see the interior.

  • Member since
    March 2012
  • From: Louisville, KY
Posted by Builder 2010 on Wednesday, October 21, 2020 6:15 PM

We had a lovely October day with the temps near 80 and very little wind so it was time to paint all the architectural detail parts outside. I stuck all of them to a large piece of cardboard with rolled wide 3M blue tape. Some of these parts needed painting on both sides. My plan was to spray the first side, let it dry enough to handle and then turn them over.

I used Rust-Oleum gloss white primer/top coat paint. I wanted the details to be gloss white and was going to prime them with Tamiya white primer and then airbrush Tamiya gloss white. I didn't realize that I had the Rust-Oleum white on the shelf and using it elimiated a step.

This pic was after the first side was painted. I set SIRI on my iPhone for 25 minutes (the recommended drying time for handling) and turned over the parts which the two sides weren't initially exposed. Between the masking that was exposed and the natural stickiness of the previously applied paint, I was able to stick the parts well enough to keep them from blowing away from the spray.

Here they all were painted.

Again I gave it all about a half hour to set up and then brought it all inside. I carefully removed all the parts from the masking and placed them to on the work table to fully cure. I won't be installing these for a couple of days. It's a lot of parts! I also did some touchup painting to the inside paint on the cupola.

I didn't paint the chimneys since they get a different treatment.

I finished the 2nd floor trim and then thought outside the box. Instead of gluing the stair case to the 1st floor which would have made installing the second floor much more difficult by not letting me put in that mid-wall, I found that I could effectively glue the stairs into the 2nd floor. It would drop straight down into proper position. In these images, I haven't glued it in yet. I'll do that tomorrow, but this really changes my routine. I was convinced that the stairs needed to be glued into the first floor.

I got the 2nd floor hall rail in place, but then had to go back (after taking this image) and re-glue the rear portion. It had broken loose which is why is slightly off plumb in the picture. There will be two key places to glue this into the 2nd floor; the top of the entry closet and the long side of the 4th flight to the attic. I'm thinking about what kind of cement I'm going to use. I sort of leaning towards the contact cement dots that I used to glue the appliances to the appliance store floor.

I exercised today and still got stuff done. Tomorrow is a full work session so watch out.

  • Member since
    November 2009
  • From: SW Virginia
Posted by Gamera on Thursday, October 22, 2020 9:27 AM

Oh wow, despite your problems the table and chairs came out fantastic! And cool work there on all those windows and doors! 

"I dream in fire but work in clay." -Arthur Machen


  • Member since
    March 2012
  • From: Louisville, KY
Posted by Builder 2010 on Thursday, October 22, 2020 6:35 PM

Thank you! They blew my mind too. I'm now designing a breakfront china cabinet. I'm going to print it as a front that will lay flat on the build plate and the cabinet portion that I may also print flat the same way. I will be able to glaze the cabinet front before gluing the two together. That would preserve all the wonderful frontal detail without any supports.

Before I could glue in the steps I had to do all the wiring for the 1st floor lighting. I came up with another idea yesterday when I was cutting out some of the wall paper. I realized that blank HP photo paper is a perfect gloss white that I could use for ceilings instead of painting them. I used this idea on the first floor ceiling and I like it.

I needed to route a wire trench into the ceiling for the chandelier LED leads. I set my Dremel router attachment to 1/2 the ceiling thickness and cut the trench.

I located where I wanted the other surface-mount LEDs (SMLED) and laid down the copper foil. I was hoping to make it a single series circuit with one CL2 LED driver. I put 2 LEDs in the living room and one over the fireplace in the dining room plus the chandelier. I then further routed the trench so the chandelier leads could find their way to the foil.

I have using SMLEDs down to a science. I cut about a 1/32" gap in the foil, tin both sides and place the correctly-oriented LED over the gap. I heat the tinned solder next to the LED while keeping light pressure on the LED with a tweezers. When the solder flows and the LED drops into the puddle, I hold the heat on for just a few seconds more to insure fusion, remove the heat and continue holding the tweezers until it solidifies. I test the LEDs before putting them in the circuit and then test them again by isolating it by applying power to the foil on either side of the SMLED. I did find one where the solder hadn't fully fused and a little more heat was needed. You have to be careful. If you overheat these little gems it will kill them. I then test the series circuit as each LED is added.

The above circuit was my second iteration. I tested the entire circuit with the chandelier and the SMLEDs were dimming and the chandelier was just plain dull. The LED in the chandelier was drawing more than 3 volts so the series drop was adding up to more than my supply voltage of 12VDC. I split the circuit and added a second positive system with its own LED driver. 

I then tested the building with the 2nd floor in place. It lit correctly.

Then I realized that I hadn't put the light in the foyer. And this was after I fully covered the ceiling with the white photopaper. Here was the living room side.

Here's the ceiling before the LED mod. The cutout for the lead attachment coincides with the entry hall closet. I opened up the closet roof so the power leads will pass through and down to the basement and out of the building. I pressed on the paper to emboss where the SMLEDs were and cut openings for them. The ceiling cover is held with PSA.

I opened the ceiling where the foyer light would go and cut a gap in the spot I noted on the circuit image above. The chandelier was the only LED on that branch so adding another didn't cause any problems. Now all the lights are on and bright. The foyer light is too bright and I'm going to put some paint on it so it dims a bit.

I need to secure the chandelier to the ceiling better than I have since it seem that the LED to spindle joint is failing (too much light leakage). The leads exiting under the closet door are forcing the staircase upward. When the wires are led down through a hole to the basement, the staircase will sit down better. The staircase is lifting the entire second floor as you can see by the crown molding gap. That will be better when all is in final location.

  • Member since
    November 2009
  • From: SW Virginia
Posted by Gamera on Thursday, October 22, 2020 7:13 PM

Very cool!

I want to build a haunted house now!!!

"I dream in fire but work in clay." -Arthur Machen


  • Member since
    March 2012
  • From: Louisville, KY
Posted by Builder 2010 on Thursday, October 22, 2020 7:56 PM
I have to find a way to publish all the drawings. I need to correct them first.
  • Member since
    December 2002
  • From: NYC, USA
Posted by waikong on Friday, October 23, 2020 2:51 PM
The lighting is fantastic!

My website: http://waihobbies.wkhc.net


  • Member since
    March 2012
  • From: Louisville, KY
Posted by Builder 2010 on Monday, October 26, 2020 7:22 PM

Not much construction, but a lot of activity. I decided to use photo methods to create the dining room table top. I photoed our own table, did some Corel PhotoPaint work to remove the highlights from the room lights and the cleaned up the shape and then dropped it into a shape that exactly matches the table I printed. I will print it both as a decal and on HP Photo Paper to see which one is better. I also found some 19th Century upholstery fabric and will cover the chair seats with it.

I'm also doing the same thing on the little Baker Server we have in the dining room. I've drawn that and will print it, and will use the images to create the surface. It will be on the new back wall in the dining room so you'll be looking at it head on. 

My China Cabinet print failed in a very strange way. It actually didn't fail. The sliced file already had the errors in it. The printer just did what it was told. The holes for the glazed portions closed up in the print. I went back and ran the animation of the sliced file and found that in the middle of the print a layer formed that closed the openings this ruined the print. I've re-set it at an angle with supports on the its back and will reprint it.

The back part of the cabinet printed perfectly. 

I got the wiring and lighting done for the 2nd floor ceiling. Again, I had to split the circuit and drive it with CL2s in parallel. I'm assuming that these surface mount LEDs draw drop more than 3.0 VDC. When I split the circuit they were perfectly bright. I did put some gold paint over the foyer LED so it will not be so bright. I tied the two power ends of the CL2s together and soldered the hot sides together along with the attachment lead. They now lit as they should. I will have to check the specs on those LEDs to see what I'm missing.

I added a new partition wall to the dining room. I needed more wall space for the now-acquired furnishings. I removed the floor and wall coverings before gluing this piece is so it had solid MDF to which to glue. 

Now onto the aforementioned furnishings.

I found on Thingaverse the same artist who did the scale furniture that was listed for sale on Shapeways. She had downloadable STL files. They were oversized, probably 1:32 or larger. I imported the STLs into SU and measured them. The file had the 1:1 size of the furniture in the file name. So for example, if the sofa was 56" wide, I scaled the STL file in SU to 56" so I knew what its 1:1 size would be. Then I reduced it by the O'scale .021 factor and got the O'scale version. When I calculated the actual difference in size between the Small Things file and the O'scale and found it needed to be reduced about 78%. ChiTuBox (the slicer) has a scaling feature, so instead of bringing all the files into SU to do the scaling, I just dropped the STLs into the Slicer and scaled it 78%. The artist was kind enough to have files that were already set up to plop onto the plate and print without supports. I just finished two sofas, a sofa table and a wing chair in one go. It's hardening as I write this.

Here's what the End Table array that I will print at one time (upside down of course). I like how she did the cabriole legs. I doubt she used SketchUp.

So with this find, plus what I'm drawing or already had, I now have all the furnishing I need and will be able to button up the building fully furnished. As a 19th building, I'm going to put the kitchen in the basement and therefore don't have to furnish one. I have a Chippendale sofa, a chaise sofa, two Chippendale love seats, sofa and coffee tables, all the end tables I'll need, nightstands and two beds (the same as I've used in the Tie Hacker's Cabin), a china cabinet, a console server, and the piece de resistance, a spiral staircase. All I need is decor and table lamps. Have to think about how to do those.

Yes! You read that correctly. I needed a way to get from the 2nd floor turret to the cupola. I'm assuming that if that space was usable there had to be a way to get up there. I searched the SU 3D Warehouse and came up empty. I then did a search on the STL sites and the same artist had a stone-looking version that would work in a pinch and was entirely printable.

I ended up drawing my own. My first version, while mechanically correctly, didn't have enough meat in it and therefore created a lot of islands in the print process forcing me to go with supports and this is the mess that would have printed. I would not have been able to extricate the part from the supports without damage.

I re-designed the stair to tie the steps to one another thereby eliminating the islands and (hopefully) printing without supports. This is how the revised version looks on the slicer. The only questionable areas will be the horizontal supports. They will be constrained with the vertical rods. This part is on the printer now and will be ready tomorrow. It's a 10 hour print job.

Here's how it will go into the building. The hardest part is cutting the access hole in the cupola floor. I'll have to rout that out and hope for the best. Wished I would have thought of this addition BEFORE gluing the cupola on the turret walls.

During the time I was writing all this up the furniture finished up. The main parts printed nicely, but the reason pre-coating can be a problem showed up. There are square holes in the undersides of the upholsetered pieces to accept the separate legs. The precoat formed a hard (but thin) layer over these openings and traped un-cured resin inside. I had to sand off the precoat layer to expose the holes which did form underneath as they should. The square lugs on the legs look bigger than the slots. I may have to trim the legs a bit to fit into these holes with some careful filing. Otherwise, they will do quite well. 

This crazy project certainly has been a perfect example of "scope creep". I wasn't sure, when I started, about furnishing and now in one weekend I basically furnished the whole deal. I'm going to produce some grand artworks and this time I'm going to 3D print the picture frames. Again... nuts... right! But it keeps producing more proof of concept.

  • Member since
    March 2012
  • From: Louisville, KY
Posted by Builder 2010 on Tuesday, October 27, 2020 8:42 AM

The redesign of the spiral stair worked! I haven't pulled it off the machine, but it looked like this when I checked it this morning. The vertical rods are a bit squirrely, but they should be okay. It will delicate until it gets post-cured. I'm still using the Tenacious/Elegoo resin mix which is imparting some flexibility.

Now all I have to do it punch that 1.5" hole through the bottom of the FDM PLA formed cupola. Because it's a thermoplastic, when I use the carbide router with the Dremel it immediately melts all around the cutter and it stops working. I have to run it at the lowest speed to have half a chance.

The lesson for today: Pay close attention to what the slicer shows you. If it looks like it's not going to work, don't print it. It won't work. Go back to the drawing board (or its digital analog) and redesign so it can be successfully printed. There's always a way.

A note about SketchUp: I made the individual step design a "Component". In SU, once something is a component, you can copy it an infinite number of times, but if you edit one item the change is instantly reflected in all its copies. It a very powerful and useful tool. So when I wanted to change the step design to attach each step to the one above, I only had to make the changes on one step and all the others changes as well. It turned a potentially tedious operation into relatively easy one.

Today's a full work day and the printer's going to be running the entire time. All the furniture should be printed by this time next week.

  • Member since
    March 2012
  • From: Louisville, KY
Posted by Builder 2010 on Tuesday, October 27, 2020 5:38 PM

As noted earlier, I did get a pretty full day in the shop. My full day starts around 1 p.m. I cleaned up the spiral stair and it was decent. There was some delamination under each step, but it wasn't a show-stopper.

What was almost a show-stopper was my original measurements. I made it too tall by one full step. It seemed to have fit in the SketchUp model, but not in the real-world one. What to do? I thought about re-drawing it correctly and reprinting, but I first tried to do some selective surgery to remove the extra step and associated railings. 

In order to actually test it I had to cut that hole in the cupola floor. I was almost ready to purchase a MicroMark powered Sword Saw to do the plunge cut. I held off and went the 1/16" carbide router route. The FDM printed PLA plastic is tough, but melts. The carbide, even at my slowest Dremel speed quickly loaded up with melted plastic. I found I could plunge the running cutter into a wooden plank and melt and fling the plastic off so I could continue cutting.

I first had to knock off the reinforcing ribs, scribe the circle and start cutting. After I opened up the rough hole I finished it with a sanding drum, again at the slowest speed.

And here's the hole opened out before sanding.

Here's how the incorrect stair looked when installed in the opening.

I used the Dremel with a diamond coated conical burr to cut away the extra step. I cut the upper railing and a few of the vertical rods. I then had to add a landing so you could step off the stairs onto the floor. I needed to add a little extension on the landing to push the now-unsupported top rail which was springing inwards.

With spiral staircase properly fitted I airbrushed it with semi-gloss black.

The spiral is not finally glued yet. There was more to do. I had to cut the same opening in the ceiling liner of the turret room. I also installed the single grain-of-wheat incandescent bulb in the turret ceiling. I drilled a small hole in the cross-bracing in the cupola top and a similar hole in the ceiling liner. I then used Bondic to glue the bulb into the hole. I'm running the wires down the front corner of the turret room so it will be difficult to view. These wires will be tied into the hot and ground before the CL2s in the 2nd floor wiring.

Speaking of the second floor, I got the white photo paper ceiling installed there also. I drilled holes through the back center rooms of both second and first floors to take the wiring down to the basement. I also opened the first floor in the entry closet space to bring those wires to the basement also. The open space with the wiring is not visible because these back rooms have no windows. There will be an exterior door, but its windows are too small for effective viewing.

I got the legs installed on all of yesterday's printed furniture. They look pretty cool.

And just before dinner I pulled the re-printed china cabinet front off the Machine and cleaned it. I'll cut the supports off tomorrow. The drawer pulls did resolve and the surface finish is nice too.

Lastly, I printed the table tops and server in both photo paper and white decal film. I tried the decal for the seat cushion and it worked great.

I then tried the decal on the table top and it wasn't so hot. I then tried the photo paper version and it will work nicely. Stay tuned. I'll continue printing furnishing and should have that done by weekend or early next week.

  • Member since
    March 2012
  • From: Louisville, KY
Posted by Builder 2010 on Wednesday, October 28, 2020 4:31 PM

Work continued today on the furnishings with the completion of the china cabinet, the little Baker Server, a gaggle of Queen Anne occassional tables and now two beds are on the Machine being created. 

The china cabinet came out about as good as I can handle. I removed the supports before post-curing using the abrasive burr method to prevent any breakage, but I have to say, using the Tenacious/Elegoo ABS-Like resin mix has definitely reduced the breakage. The tiny legs on the server are still somewhat flexible even after post-curing which is a good thing. I haven't upped the exposure time even though you're supposed to use the cure time of the longest curing resin in a mix. Tenacious' recommended time is 15 seconds/layer. I'm running at 9. But it's working.

This is the china cab front test fit to the back. 

My difficulty with finishing this piece was the glazing. I made a rabbet around the inner edge of the shelf portion of the back to accept the clear styrene sheet. I wanted the styrene to set into the groove so the front would fit flush around the perimeter. I did have to sand the front surface of the back which reduced the rabbet's height so the styrene stood just a bit proud. It was not a problem. The painting, on the other hand, is a problem. I would have loved to airbrush this, but I knocked my Tamiya brown onto the floor on Monday and only have a tad left, not enough to make an airbrush mix. I had to brush paint it. And I could paint it assembled unless I find a way to nicely mask the glazing which has to go in before it's stuck together. Even with this, it's not bad. 

I bought a Testor's Gold Paint Pen which really helped in doing the hardware. When the brown is nice and cured tomorrow I'm going to maybe do some gloss on it and then pick out the drawer grooves using some panel line accent. But you have to do that on gloss or the accent bleeds into the flat paint. I also wish I could have put some stuff in the cabinet, but that would be overkill.... Ha... ha... me talking about overkill.

I printed two complete Baker servers and I'm glad I did since one set was sub-par, but the other was very usable. I cleaned up and assembled both and tried the decals on the test article. I believe it works.

Here's the good one ready for the decals.

And here's the test article.

The tables are in the post-cure box and will need almost no cleanup since they were printed directly on the plate and upside down. The beds do require a bit of cleanup, but I know the scheme is good since I printed the same model for the Tie Hacker's Cabin.

I also finished up running the wiring down through the turret upper room and drilled the main roof so the wiring would pass down to the porch roof (balcony) and will also tie into the eventual porch lighting. For the porch I think I'm going incandescent so it won't be too harsh.

  • Member since
    March 2012
  • From: Louisville, KY
Posted by Builder 2010 on Thursday, October 29, 2020 6:13 PM

The occassional tables printed beautifully. To remove the pre-coat layer, instead of using the hobby knife to slice of the excess, I just sanded the table tops with fine grit until the layer almost disappeared and then I just flick it away with a fingernail.

The beds printed perfectly and I removed the base plate before post-curing, but didn't remove the supports themselves until after curing. The supports respond to the diamond burr better when they're hardened a bit. The beds are identical, but they're on opposites sides of the house and can't be viewed at the same time. Or viewed at all through the windows.

The tables are very nice and I now have a choice of nightstands: I can use the ones that I printed before for the Hacker's Cabin or I can use the ones in this set.

I quickly drew some picture frames and downloaded a series of old masters painting to hang on the walls. Using the SU Profile Builder add-in, I picked some different crown molding styles and made them into picture frames. It went quickly. I first imported each picture and placeed it on the 1:1 SU wall to get an idea about how big I wanted to make them. I then drew the frame around each image using the Profile Builder and changing the profile for each. (Is that anal or what???) I shrunk each frame to 1:48 and then measured their width to the nearest 1,000th of an inch. I then went to CorelDraw and set guidelines to exactly that dimension for each frame. Yes! You can work to three decimal places in CorelDraw. I imported each picture one at a time to match the frame that was sized for that picture and placed and expanded each picture to perfectly match the width guidelines I just set up. This had to be done for each image since they were all different sizes and proportions.

This is the famous Jan Van Eyck picture of the pregnant married couple. I put three frames on the plate at a time to print. This was the first batch and the only one that was successful. I had let the crown molding shape taper back as it does in real life, but this left a fragile front edge that didn't hold up in the printing process. I scrapped the other two and went back to SU and re-drew the frames to square of the back edge so it will be well supported. I print the new ones tomorrow. But this test showed the picture fitting perfectly. As an aside, have you ever noticed that a majority of Dutch Masters painting had the light coming from a window on the left... just ask'n?

I completed the Baker Server. Here's the actual piece of furniture in our dining room. It's a lovely piece of Federalist-period furniture. Our dining room is not too large and it's proportions fit perfectly.

And here's its little brother (sister). Going photographic was definitely the way to go with this tiny piece. These were decals inkjet printed on white background decal paper. I didn't attempt to reproduce that filagree at the leg joints. I'm nuts, but I'm not THAT nuts.

I threw the Van Eyck up against a wall (2nd floor) to see if the proportions worked. My wife asked why it was sitting on the floor. And then she answered her own question by kidding, "I know, you haven't hung it yet."

It was time to get working on the balcony, specifically because there's lighting considerations for the porch. Again I'm using the copper foil circuit method and tying this circuit to that of the cupola lighting. The cupola circuit is in parallel to the LED porch lights. Both of these circuits are entering the main house and I'm going to fish the wires down the chimney chase. There is a clear channel the entire length of the chimney chaase. So if anyone is so inclined to stare through the windows and try and find how the wiring is getting below the layout, good luck. You won't see any wires.

I'm using 1X12s for balcony joists. These needed to be relieved around the window and main door openings.

You can see the two SMLEDs that will illuminate the porch. I'll probably attenuate them with some paint so they won't be so glaring.

I'm using a neat laser-cut Joist Jig from Rusty Stumps to lay in the balcony joists. I glued some spacers so the two jigs would keep their orientation. I rarely get the opportunity to use them, but when I do, they're very helpful. I'm also using that length stop add-on to my Chopper II to cut all the joists. The copper foil has a little thickness so I'm cutting some shallow relief cuts on the joists so the rest of the wood lies flush with the surface.

Notice: when I use separate pieces of copper foil to add or change a circuit, I follow up with solder to ensure that those joints are electrically conductive. Notice also the CL2 driver that feeds the SMLED circuit. The other circuit is that incandescent bulb and will just get 12VDC. Those grain-of-wheat bulbs actually work at a higher voltage so it will burn for a long time.

Just completed on the Machine are two Chippendale love seats that I may put facing each other in the living room instead of the longer single sofa. The living room space is narrow so this may or may not work. I'll clean these up tomorrow.

  • Member since
    November 2009
  • From: SW Virginia
Posted by Gamera on Friday, October 30, 2020 10:09 AM

Oh WOW!!! I skipped a few days and let you get ahead of me! Love that crazy spiral staircase!!! And everything else looks amazing too! 

"I dream in fire but work in clay." -Arthur Machen


  • Member since
    March 2012
  • From: Louisville, KY
Posted by Builder 2010 on Saturday, October 31, 2020 1:11 PM

Well then.... let that be a lesson. Don't miss any days! Stick out tongue

I had strange failures of the picture frames. They kept printing as solid blocks of resin with no bevel framing. I thought it was the printer's fault. Nope! It's an aberration in the slicer. Here's the sequence from the slice animation.

When laid on the build plate the part looks exactly as it should: thick flat backing and the shaped framing.

But as the slice builds, it fills in the entire space between the frames with solid layers, almost to the very top. You can see this looking at how high up the side edge is with the solid filler.

At the very end, the slicer starts building the raised frame, but it's way too late. I don't know what's driving this. The same thing happened to the china cabinet front. What's even more curious, the slice animation now shows the insides open as it was at the start. It's like those layers were never there. But they are! And the printer prints them forming a big flat block of resin that ended up in the trash.

I had to reset all the picture frames on an angle and used supports just on the back so they won't mar the delicate frame designs.

I also had to trash the two love seats I printed. They printed perfectly! But when I dropped them into the living room to see how they'd fit facing one another in the middle of the room, they were HUGE! What??? It turns out that I forgot to scale them. After doing the comparison of sizes in SketchUp, I had to reduce the print size 54% to make them O'scale 1:48. They were probably 1:25 model car scale. They're now in new files waiting to be printed. Resin's not cheap and I hate to waste it, especially when it was just carelessness on my part.

I got all the joists fitted for the wide part of the balcony. I realize I need another SMLED over the front door. Three in series don't seem to be bright enough, but really bright isn't what I'm looking for here, so I may just insert another one in the circuit and see how it looks.

This shot shows the relief cuts I made in all the joists. Don't know if it was worth the effort, but this way nothing is pressing on the somewhat delicate copper foil.

I've set up to produce some coffee tables, but with the success of the dining table and the Baker server, I'm going to reproduce our Henkel-Harris oval Federalist-style coffee table. I took actual meausurements and pictures and will draw it up.

  • Member since
    March 2012
  • From: Louisville, KY
Posted by Builder 2010 on Monday, November 2, 2020 6:19 PM

While I don't work in the shop on the weekends, I do a lot of stuff. It's when I do most of my computer design work. I got the Henkel-Harris coffee table drawn and it just came off the machine a few minutes ago. I also designed a grandfather clock based on a nice two-view drawing I found on Google. I also found a nice clock face that will be inserted in the space that I custom-fitted for it. I finished all the joists for the balcony and found that my idea to run the wires down the inside of the fireplace chase won't work. There's a chunk of 1/4" styrene blocking the path down to the bottom. Plan B will be to build an external chase to run the leads on the outside of the building. I reprinted the oversized love seats and attempted to do another picture frame. The frame still seems to have a problem. And I dropped the main exterior door and basically destroyed it. No harm no foul. It didn't fit the laser cut space correctly and really needed to be redone. I re-drew it to properly fit the space and split the door as I did with the interior doors so both sides would have nice clean details especially around the door knobs and dead bolt. 

I added the extra SMLED and tested the circuit and with three they were very dim. That wasn't right! Three of these only drop around 9 VDC and I'm using a 12VDC 30Watt LED power supply. I tested each light individually and lo and behold the middle LED was dim. There was resistance there. I re-heated the solder joints on both sides in case there was a faulty joint. There was! With that fixed all three lights were fully bright.

I'm spending a lot of time looking at all the sub-assemblies to see what's missing. I found that the rear wall of the lower turret room was showing clapboard. It should not. I cased this is to add thickness to the wall and provide a surface for some molding. 

Here's what the boxed in section looks like from above.

Here's the broken front door. The new one will be better in many respects. The beauty of having the Machine sitting in the shop is if something breaks you just pull out the file and make it again. Additive manufacturing is definitely a game changer. At least it sure has changed my game. The door's printing now and it'a six+ hour job, so I'll be getting it tomorrow.

Now onto the new designs. 

The coffee table printed beautifully just like I did with the dining table. The Federalist-style pedestal has for legs that are splayed at an angle. 

The print is again two-parts, table top printed flat on the plate face side down. The pedestal is printed also on the plate on it's rectangular pad. I made three sets in case I break anything or if something doesn't print well. Of course all three printed perfectly.

The grandfather clock is being printed in four parts: Base, Main Body, Head and Pediment. The base is printing on an angle with supports since it has some reverse curves that wouldn't print if I did it flat. The body is just sitting on its back flat on the plate. The head is also flat on its back. The pediment is directly on the plate, but drew in some supports for the scroll at the top which I remove after printing.

This is the drawing I found on Google.


This is my drawing as it appears on SketchUp. I beefed up some parts. I added more meat on the base and the finials. The original art's finials wouldn't work at 1:48. This image shows one face that I found.

Here's the face that I settled on. The above face had no hands. This one does. Plus the shiny metal wouldn't print as nicely. This was the drawing that I produced to make the decals. I also printed the Henkel-Harris table top and the face on photo paper. The actual face is a bit smaller than the image on your screen.

It's going to be a lovely model. So I still have a few printing days this week to finish up all the furniture. I need to install all the furnishings before putting the building together. With the wiring complication, the floors won't be easily removable.

  • Member since
    December 2002
  • From: NYC, USA
Posted by waikong on Monday, November 2, 2020 9:14 PM
still very impressive, that staircase looks great

My website: http://waihobbies.wkhc.net


  • Member since
    March 2012
  • From: Louisville, KY
Posted by Builder 2010 on Tuesday, November 3, 2020 6:23 PM

Thanks!

Mixed bag of work today. The love seats printed and will work now that they're in the right scale. I printed the Henkel-Harris coffee table and it's exceptional. The Tenacious/Elegoo ABS-Like blend is producing pretty strong prints. I successfully reprinted the main entry door frame and this time it fits as it should. I also printed another round of picture frames with a different slicer arrangement. Unfortunately, the gremlins are still there and only one came out with the frame fully resolved. The other three had a flat area obscuring the top frame detail. I thnk there's a bug in the slicer and I'm going to find out why. Lastly, I started creating the interior wall detail for the main outer building walls. It's time consuming, tedious, and frankly, I'm not sure it's worth it. It will only be viewed obliquely from the outer windows. In fact, I'm not sure you'll see any of the interior walls that are not actually facing the windows. The jury's still out.

First the love seats. Here's a top view showing how they'll sit in the living room.

This is the coffee table. 

Here's how the bottom looks. I held the pedestal to the table top with Bondic. The UV curing light shines through the resin to harden it underneath. This only works for the UV resin since it's partially transparent to UV 405nm.

And just for fun, here's what 1:48 looks like on 1:1. I will apply an image of that inlaid tabletop to the model so it will look just like its big brother.

The front door fit so tightly that I needed to relieve the door opening and shave some off the resin part. But it's the way I like it.

And this shows how it's fitting the opening. After these images, I glued the two halves of the door together, sanded it for fit into the door opening and then glued it in the open position with Bondic.

While working on fitting the door I realized that I needed to address the main wall insides. I started with one window and saw what I could do. The resin windows frames protrude into the room by about 0.080". I wanted to pack this out so the wall would be flush with the window. It turns out that a sandwich of one piece of 0.017" thin ply and two layers of Bristol Board made the wall flush with the window protrusion.

I glued the new wall in place and started adding the trim molding using the undersized baseboard left over from before. I then fabbed a window sill out of some 0.030 X .156" styrene strip, and finished it off with some more trim on the bottom. Looks spiffy, but was a ton of work and you won't be able to view it unless the front wall is removable.

Viewed with the wall in place and it looks okay.

I then added baseboard and wall paper to finish it off.

I made a mistake with this wall. I had the wall upside down when I scribed the partition wall position. I was off by about a 1/4" which I can add. But this begs the question. "Does this effort amount to anything of value?" It took a long time and a lot of fussing to do this little bit and there will be about another 8 windows where this needs to be done. The work I'm doing with the furnishings and the inside wall decor is substantial, but you will be able to see some of it through the generous windows, but the walls behind the windows are really going to be hard to visualize, if not impossible. I need feedback.

  • Member since
    March 2012
  • From: Louisville, KY
Posted by Builder 2010 on Wednesday, November 4, 2020 6:40 PM

Another multi-tasking work day... 3D printing, airbrushing, window building, interior detailing, and conferring with my darling wife when stuff kept coming up on the 24/7 news shows.

I built the 4-part grandfather clock and wasn't satisfied with the results. Too many details were lost in the cleanup and some added edges due to the residual from the pre-coat layer that forms part of prints that are directly on the plate. I then quickly redesigned the clock. I needed to make two changes to ensure that the parts printed with fidelity. The pediment had to have some supports added in the drawing. The slicer won't allow you to put specific supports in one place with the same accuracy. I also needed to change how the base profile was built so it had plenty of support and still showed the details. 

Here are the added supports to help the finials print. As you'll see, the only finial that was at all successful was the center one. While the others printed they were simply too delicate to hold up. I printed the clocks six-up on the plate. I really needed all six to get a good one. In actuality these supports are really tiny and were easy to remove with a #11 blade. I attempted to use the Dremel with the diamond burrs, but the vibration alone was enough to break them off. This was the orientaton on the plate so these details would suddenly appear in parallel to the build surface and this often is not very successful. Furthermore, you can see that the bowl of the finial would start printing attached to nothing... i.e., an island. Islands don't work in a resin printer and simply float away when the plate rises to begin the next layer. The diagonal supports would grow and catch the newly forming islands. It worked.

The base change involved making the front profile full-depth and then making the side details shallow with a solid backing. This enabled both to form while laying flat.

The result was very pleasing seeing all six clocks reasonably well formed. If you look closer, however, you'll see that even on the plate, some of the tiny finials didn't form or were destroyed just by brushing on the alcohol cleaning wash.

After separating them, ultrasonic cleaning and post-curing here are the passel of clocks. You can see that only a few have all three finials.

I tried to salvage side finials and Bondic them on to make one good one, but I couldn't even remove one without it being destroyed. So I made one really nice clock without the side finials and it looks great. If the model was 30% bigger the finials would have enough mass to maybe hold together. They're so small I couldn't even machine real ones out of brass. You'd need a true watchmaker's or swiss-type lathe to machine little pieces of jewelry like this.

Vallejo Acrylic Paints had a color in their Air series called "Mahogany" and it was the perfect color for all of this period furniture I'm creating. Vallejo flashes off pretty quickly, but it needs at least 24 hours to fully cure. Otherwise, it's kind of sticky and you really shouldn't handle it. You can see the clock in the lower right. The big table tops are not fully painted since they're receiving actual top photo images.

I printed another pile of smaller cross-section base boards if I'm continuing with covering those window walls. I did a photo test to get an idea of how much you could actually see through the windows. And yes! You can actually see those attached walls so I'm going to continue with the wall covering process. The windows are pretty big and do let you view the interior.

While I was trying the exterior wall for the above picture, I discovered this.

When I did the "field mod" by adding that back wall to the dining room (to better display some furniture), I neglected to see that the wall was smack dab in the middle of a window. DOH! That wouldn't happen in a real house since you'd be in the room looking at that window. I will have to change this. The 2nd floor's partitions sit just to the rear of the fireplace and just touch the window opening. I knew what I was doing there. I didn't in this case. Field mods always get me in trouble.

I stopped work on this part because, in addition to painting the furniture, I airbrushed the new front door assembly AND the laser-cut Cupola windows. With my ADD attention now looking at the cupola windows I decided to see how they fit and they weren't great. I believe the cause is due to the inherent resolution inaccuracy with FDM machines. They have inbuilt difficulty in forming tight right-angle corners. If the cupola was resin printed I believe the tolerance would have been ridiculously close. As it is, there is a 1/32" gap on the window tops.

I had drawn window stops into the cupola design, but they only FDM printed on one side of the opening AND they didn't really have a lot of definition. I added my own stops. I used 0.060" sq. styrene held with med CA.

I had to trim the laser-cut window just a tad in height (about 1/64" or less) so they wouldn't be deformed. I then built one full set. I was surprised that the acetate glazing is a little undersized in width. I designed these pieces so it's my problem. It's never the laser cutter. It's always me.

I really needed to get these windows figured out since I can't finish painting the cupola until I knew how the window would interact the space. I'm still in a quandry about how to deal with the strand lines on the cupola. It may not be a problem based on the viewing distance. I'm spoiled. The resin printer produces such amazing surface smoothness especially when parallel to the liquid surface. I may put some flexible trim to encase the window and close all those gaps. The strand lines are especially noticeable in the arches.

Whew! That was a busy day. Tomorrow I have my semi-annual Dr. checkup. In this case it's an annual since it was Covid-delayed. I'm 75, have the usual controlled, pre-existing conditions that almost everyone of my age has; high blood pressure and elevated cholesterol, both of which have been well controlled for 30 years. Thank you modern medicine. I also have Afib which is surprisingly easy to live with. That too is managed. So all in all, life is good. On Friday, I'm escorting my daughter to pick up their new Tesla Y in Cincinnati. They will become a 2-Tesla family. Needless to say, they're really happy with electric cars.

  • Member since
    March 2012
  • From: Louisville, KY
Posted by Builder 2010 on Thursday, November 5, 2020 9:10 PM

Spent some time further refining the drawing I made upon which this project is based. As I've messed with interior details, partitiion placement, etc., some stuf got out of kilter and I needed to put it back. Mainly the problems were concerned with the turret walls and windows. I also added a TV antenna.

SketchUp has many different drawing styles that you can use. This one simulates a watercolor. It's fitting since this house was based on a piece of artwork. I also finished coloring the porch, balcony surface and getting all the trim changed from Kelly Green to blue. I'm using blue on the model. I had green trim on the Nighthawks Cafe and this would be right next door.

There's still a large amount of work to do. The table with all the parts is overwhelming.

  • Member since
    April 2004
Posted by Jon_a_its on Friday, November 6, 2020 3:48 AM

Astonishing work!

Your insights on Sketchup have illuminated my own poor (self-tought) efforts with printing.

And your chandelier has also given me insight as to how to complete my own first LED lighting project.

I look forward to seeing more.

East Mids Model Club 32nd Annual Show 2nd April 2023

 http://www.eastmidsmodelclub.co.uk/

Don't feed the CM!


  • Member since
    November 2009
  • From: SW Virginia
Posted by Gamera on Friday, November 6, 2020 11:26 AM

So you're not making working grandfather clocks? Wink

All joking aside everything looks fantastic! Shame about the lost detail on the clocks but they still look great! 

"I dream in fire but work in clay." -Arthur Machen


  • Member since
    March 2012
  • From: Louisville, KY
Posted by Builder 2010 on Friday, November 6, 2020 6:13 PM

Thanks guys! I really like inspiring others. It keeps me going.

The lost detail is a non-issue. As you can see, the clock is a reasonable facsimile and will serve well. I'd have to shrink myself down to 1:48 to make a working clock. Ugh! I'm sure there's some demented craftsman somewhere in the world who would attempt it.

Sitting along side is the Henkel-Harris oval coffee table that graces our living room. The photo was a slightly different contour than the actual top, and the photo paper is relatively thick in this scale. When I painted the white edges so of the paint wicked into the photo paper. I'm being really anal here. You'll barely see it through the windows.

I still have to put the table top image on the dining table and the decals on all the dining chairs. I had them staged today to do, but didn't get to it.

Working with Ed Tackett at U of L's Additive Manufacturing Institute we came up with a successful solution to printing the picture frames. He was having the same slicer abberations that I was getting so he tried printing them without the back material and this produced a successful print. Based on this finding, I re-drew them without any backing, just the frame perimeter. This worked. I got four successful frames out of 6 which gives me five wall hangings since I already had one from the previous attempts.

Instead of gluing on a flat piece of styrene for the back, I'm just going to use the photo paper perimeter to the glue the image to the frame. Here's a frame placed on a John Singer Sergeant masterpiece. Actually, not trying to cut the picture to fit inside the frame results in a much flatter image. If the cut picture is just slightly oversized the edges would curl up and distort the reflectivity of the image. Silver lining...

I'm using the Testor's Gold Paint Pen for these frames. I find that the felt tip is too broad and crude for detail painting so I placed some drops on a piece of Press-n'seal and thinning it with a few drops of low-odor mineral spirits so it brush painted smoothly. It's a great metallic paint with lots of luster.

I decided this morning when waking that I needed to add some lighting to the attic. I had originally thought not to do that, but there's that nice stair rail surrounding the stair well in the attic that would be a shame to not be seen. I used copper foil with two SMLEDs and a driver. Again, I used the plain white photo paper as a ceiling cover.

Not as much production as I would have wanted today (Friday... no work on the weekend), but I took time out of the day to re-drew all those picture frames. I had to clean the printer twice due to the failed frames. Nothing was on the vat bottom so it was effort without a reason. I'm using the EPAX non-FEP film which is very forgiving. I also had painted the balcony balustrade upside down. I mistook the bottom for the top and vice versa. The wide part is the top rail. It was a beautiful day so I stuck them all on a piece of cardboard and painted the top rail with the Rust-oleum white one-coat rattle can. 

I'm reaching the point where I need to delineate a check list to keep track of all the details needed to be done for completion. The table with all the parts is such a mess that  it's really easy to get lost in the weeds. Besides, thinking about the sequence to finish is helpful in deciding what to do and how to do it.

  • Member since
    March 2012
  • From: Louisville, KY
Posted by Builder 2010 on Monday, November 9, 2020 6:57 PM

Happy Monday. For about 1/2 my readers I can assume that it's VERY HAPPY Monday. For the other 1/2 I hope they can find peace. There was no fraud. It was one of the cleanest electrions we've had AND it was done in the midst of a raging epidemic with all kinds of obstacles and yet, the highest vote percentage since 1900 before women got the vote. Go America!

Spent most of the day painting furniture, making wall art and fixing that misplaced wall. First thing I did was apply the photo to the dining table top and trimming the edges. I learned in doing the coffee table to be more careful with the trim painting and it worked. I glued it on with dots of med CA instead of the pressure sensitive stuff. It was easier to control in this situation.

The top is very (intentionally) glossy. There's a couple of schools of thought about fine furniture finishes. Henkel-Harris and Kittinger used a hand rubbed satin finish. Kindel and Baker used high gloss. I went with the latter. Applying the photo worked exactly as I thought it would.

I applied some Tamiya gloss to the occassional table tops and called them done. I then mixed up some custom colors and painted the upholstered seating. I was able to attach the artwork to the frames directly using some strategic med CA.

What's missing are knick-knacks and other items on the tables. I may 3D print some stuff. I also need some table lamps, but I'm not planning on lighting them. It's possible, but not easy in this scale.

I got the decals applied to the dining room chairs. So that room is complete. Again, nothing on the bare table and server. In this picture you can see the moved back wall. Took a bit of surgery to do that. I had to recover the back room floor since there was a big slice out of it where the wall previously was attached to the sub-floor. I'm going to make that small space into a kitchen. I'll print some stuff for it. I already have appliances that used to populate Loopie Louie's Appliance Emporium. Once you have the files, it's very easy to make more of something.

When you think about it, the fireplace location is ridiculous. It probably should have been in the midwall and possible two-sided. Oh well...

Here's a view through the kitchen window showing how the new placement just slides by the fireplace and hits the rough opening. There won't be room for any molding on that wall.

I did put together a rough project plan today. working steadily, the project will complete sometime in early January. That's assuming that we make no family trips and until the vaccines are readily available, travel is still a no-no. There's a ton of work to do and I'm glad I memorialized it because it's real easy to find yourself painted into a corner (literally and figuratively).

Lots still to do...But, at least now I have a road map. One of the programs I really miss with my MAC was MS Visio. I suppose I can run it on my Windows emulation. It had a very easy Gantt Chart facility that I used all the time. It was also terrific for flow charting. I became expert at flow-chart with business groups in real time. We'd project the program and I would build it with the group. No flipcharts and no transcription. Visio was a drawing program for idiots. I'm going to look into it. I tried to get a Gantt program for OS, but wasn't happy since most wanted monthly rentals. I don't do enough of this to justify the monthly rental of darn near anything.

  • Member since
    March 2012
  • From: Louisville, KY
Posted by Builder 2010 on Tuesday, November 10, 2020 5:29 PM

Exercise day and some drawing time. I decided that there should be a small kitchen in that back room. It didn't take me long to find a small Japanese style kitchen on the Podium Browser. The Browser is a part of the package you get when you purchase the Podium rendering package. It has tons of 3D drawings that are fully textured that you can drop into a drawing. I then added one of the refrigerators I created for the Appliance Store. Didn't take long to prepare it all for 3D printing. It's on the Machine now and will be done at 9:00 if it all works okay. 

Here's the kitchen and how it fits on the wall.

And here's kind of what it will look like through the windows.

I decided to brush paint the cupola exterior trim. I first tried some Tamiya Gloss White, but its coverage was very poor. I thought about spraying gray or white primer, but then I thought to decant the Rust-oleum White Primer/Top Coat. I was able to brush it on and in 3 coats covered pretty well. The paint is high solids so it partially filled the strand lines on the FDM-printed part. I may put one more coat on tomorrow to finish it off. I also put a single coat on the shingle area to give more for the self-adhesive shingles to hold onto.

I also finished assembling all the cupola windows and making sure they all fit before painting.

I finished up the one exterior wall I started last week and started working on the living room front wall. Once I decided to do these, I got right to it. It's also the first item on the completion check list. The cupola was not, but since I already started that last week I decided to get it off the bench as a finished sub-assembly. These interior walls will go faster now that I have a scheme that works.

See y'all tomorrow.

  • Member since
    October 2019
  • From: New Braunfels, Texas
Posted by Tanker-Builder on Wednesday, November 11, 2020 6:47 AM

YOU MAKE ME SICK ! ! ! 

      Sick with Jealousy! ! Why? Well, you are all the way over in Kentucky and not here in New Braunfels,Tx. and a member of the RailRoad Museum I am President of. Boy, could I use a machine like that. I would be turning out Turn of the Century yachts constantly! Oh, and 1/16 scale Rail Cars of Note. ( The Old Time Moguls Cars)

     I do my yachts from Kitbashing and stealing parts from other boat models bought with damaged or missing parts. Your Skills are KILLAH ! That house seems to be one that everyone even LEGO like to do. I can't stop following this. Build on my friend ,You caught my interest! The More I think about it, I could turn out 1/48 scale Dining and Club cars for display or sale.

     I keep seeing that Cupola roof with Copper Sheathing between the windows, with a nice patina of course! Please don't forget the weathervane, Okay?

  • Member since
    March 2012
  • From: Louisville, KY
Posted by Builder 2010 on Wednesday, November 11, 2020 6:32 PM

It's your kind of feedback that keeps me writing all this stuff! Thank you! I went on Google Earth to find New Braunfels. It's basically a suburb of San Antonio. Must be a nice place to live.

I would have liked to have had this capablility when I was doing ship building too. There are some great 3D printed details available from Shapeways, but it will cost you. If you're going to do it yourself, you MUST master the drawing process. 3D printing in 90% 3D drawing and 10% running the machine. Get the drawings right and the printing becomes an afterthought.

The little kitchen printed nicely and it's ready for paint and installation. I was happy that the slender faucet printed well. I watched it grow on the slicer and it looked like it was going to work. I had to add a slice of styrene on the front of the range hood. I thought this surface was suspect and I was right, but it didn't jeopardize the job.

I put another coat of white on the cupola window frames, this time using the Tamiya Gloss White. It's pretty good and I don't think it needs another coat.

I designed and printed some bricabrac (spelling?) including plates on placemats, vases and some table lamps. This was a marginal success. Some stuff is just too unsubstantial to print. Here's the drawing used for the place settings.

The cup and wine glass didn't work at all and left little tiny bump on the Vat Film. With the EPAX film I'm using, you can pop off this debris and just go back to printing again. It's very forgiving. The flatware shows up but it's so insignificant as to be not really there. With very careful work with the Molotow Chrome Pen I may be able to make the flatware visible. But the plates did work.

I found some various vases and a table lamp on the SU 3D Warehouse and attempted to fix the drawings and then print. The thin walls of the vases had to be filled up. I should have done that with the coffee cup and wine glass, but didn't. Those walls in 1:48 would have been in the few thousandths of inches in thickness and I don't care how good the printer is, it ain't going to resolve that because the resin simply doesn't have the wall strenght to pull off the FEP.

I put those diagonal supports from the lamp base to the shade so the shade would start printing. I also doubled the thickness of the lamp stem. Even with that 2 or the 4 lampshades broke off when cleaning them up. That crazy faceted vase had another problem; a lot of the interior was hollow so some failed, again, due to the thin walls.

You can see how one of the side walls of that vase broke loose. But I do have some successes.

And I got two lamps complete and the other two will be fixed with a piece of brass rod holding the shade. I had to make the shade solid. I suppose a piece of paper in a cicular tube could be used to make a "real" shade, but you're not going to be able to look down on these. You'll only see them from their side, so the solid shades will work.

I spent more time decorating the exterior walls. I got the right side done and started the left side of the fireplace. I ran out of wide baseboard and crown molding so I printed some more late this afternoon. I'm definitely suffering from AMS on this project (Advanced Modelers Syndrome). I mean, seriously, mitering crown molding on a 1:48 model railroad structure. This is similar to the work that Lex Parker does on his narrow guage layout. He's Canadian so maybe that's why.

Here's another view of that crown corner. This is when I ran out of stock. Again... run out? Print some more. Just save the files. I've kept these trim files on the thumb drives since I suspected that I might have to re-run them. By printing on the plate, the moldings take all of 25 minutes to do a run.

I have to paint the fireplace fronts. Still thinking of what I want to do with that. By packing out around the windows gives a real nice scale thickness to the building's walls.

I had four to five days to finish these interior walls and I'm sticking with that estimate. It's painstackingly slow work.

  • Member since
    October 2019
  • From: New Braunfels, Texas
Posted by Tanker-Builder on Thursday, November 12, 2020 11:31 AM

Oho!

     That Engine would look so good with another one in the engine room of a 1/48 or 1/87 scale ship model engine room! I must make a correction in your thinking though. San Antonio is a suburb of ours! At least when I go to Hill Country Hobbies it feels that way! LOL.LOL. Geez this has got my brain in high gear. I even went so far as to put P.E. Rails on a paper ship because of this. You Know, How can I make this better?

 One more thing. Are you going to put the Ghost of the Captain and Mrs.Muir in there? That looks so period correct. I am amazed at how you've covered all those bases. Juest a thought.You can get labled Wine Bottles and such from LEGO to use as patterns.This includes Flutes and Flatware. Well, they did offer it for a while.

  • Member since
    March 2012
  • From: Louisville, KY
Posted by Builder 2010 on Friday, November 13, 2020 8:41 AM

You comment about "All how you look at it", reminds me of the Stan Freberg, "Columbus Discovers America" bit on his classic 1960s album, "Stan Freberg Presents: The United States of America - The Early Years." For the uninitiated, Stan Freberg was an outstanding comedian and satirist in the 1950s and 60s. He was often on Ed Sullivan's show. (I'm really showing my age here.) The album featured a series of vignettes accompanied by great music. In Columbus, Freberg tells the natives who he met when arriving, "I want to take some of you back with me to prove I discovered you." The chief responds, "You discovered us? We discovered you on beach here. It's all how you look at it." It was classic. My buddies and I at Michigan State in the 60s, played the album so much that we had the entire thing memorized and used a lot of one-liners in our daily communications, just as folks do quoting famous lines from Princess Bride. (I do that too). I then got my kids into the album and my daughter even plays it for our grandsons.

Freberg passed in 2015 at 88 years old. He was one of my all time favorites. If you've never heard about him, check him out on Wikipedia. So, all how you look at it has some comic significance for me. Sorry for the diversion.

Had 2.5 hrs in the shop today, but don't have too much to show for it. I spent a lot of time preparing the new crown and baseboard moldings for paint, painting the kitchen and getting a reasonably successful print of the dining room stuff.

To make it a bit better I went back to the drawing board and redesigned the wine glass, coffee cut and flatware. I also scaled it a tad bigger. The scale factor for 1:48 is 0.021. I used 0.024. As it was, even with my changes, the flatware failed to really materialize, the wine glass had a 70% failure rate which I corrected a bit by gluing them back on with Bondic. The coffee cups were more successful with some actually forming the finger loop. I made the insides of the cup and glass solids. I also attempted to raise the silverware off the surface and put support structure underneath, but it was just too small to form separate resin layers. I printed at 30 microns. You can just catch the shadow of the silverware. I think I'm finding the downward limit of detals that can be successfully reproduced by a LCD resin printer. The printer will print it, but you can't do anything with it since just dropping it in the ultrasonic cleaner breaks off the details.

Here's the placemats on the table.

By upsacleing, the placemats took up more table space so I sanded the placemat down a bit, and of course, knocked off a couple more wine glasses in the process. The above image shows these sanded placemats.

I painted the placemats in prep for painting the rest. I also painted (poorly) the kitchen unit. It was the end of the day and I was rushing. When I'm rushing I usually make a mess of things. You'll also notince four table lamps. I did put a piece of 0.032" brass rod to re-attch the shade to the base. That will give me lamps for each of the four night tables in the bedrooms.

I got more work done on the next room and with the newly printed molding got back to adding crown and baseboard.

I also finished painting the beds. So there's that. Tomorrow won't be full session day either. I'm now tasked with picking up grandson #2 at high school on Fridays. I'm making a stop at the hobby shop to drop off more decals I made for the plastics department manager.

  • Member since
    October 2019
  • From: New Braunfels, Texas
Posted by Tanker-Builder on Friday, November 13, 2020 9:17 AM

Oho!

 Question! Are you going to put a stuffed Sailfish or Marlin above the fireplace instead a Moose or Deer? Please don't . Add a Painting from one of the more interesting artists.

  • Member since
    March 2012
  • From: Louisville, KY
Posted by Builder 2010 on Friday, November 13, 2020 9:44 AM

Nope. Either paintings or the convex mirror. I'm going to have to put wall paper on them and have to print more of it. I also thought of painting that protrusion, but wall paper seems to be winning out. Some of those doodads are going onto the mantel too.

But... now that you mention it, I could print some animal heads. Anything is possible.

  • Member since
    October 2019
  • From: New Braunfels, Texas
Posted by Tanker-Builder on Friday, November 13, 2020 10:09 AM

 How about this?

      A very neat 1/12500 Sailing Ship?

  • Member since
    March 2012
  • From: Louisville, KY
Posted by Builder 2010 on Friday, November 13, 2020 5:59 PM

Visited the hobby shop today and picked up some of what's needed to finish this project. Then went to Michael's Crafts to get the rest. I needed more heavyweight Bristol Board, and some more 1/8" foam core. My building bases are a laminate of 1/8" Masonite and 1/8" foam core. This builds the base up to be one curb height over the green foam board that makes up the village streets. The Masonite's on top to give a more robust work surface for decoration, ground cover, etc. It also provides a stronge surface into which to implant utility poles, signage and fence posts.

Here are the finished beds ready to go into the bedrooms.

I got the place settings painted and attached to the dining table. My wife cracks me up. Her only comment was, "You're serving coffee and wine at the same time?" I explained that the setting that I downloaded looked like that. I know... lame...

Rather than fret about the missing silverware, I just took the Molotow pen and drew them in. You're not going to see it since you're viewing the table from the side. 

Here's the stuff onto the dining table. Two views.

I conveys what I wanted it to convey.

I cleaned up the paint job on the kitchen and put a backsplash on the wall with PSA. Nothing's glued in yet.

I put the casing around the window I started yesterday and started brush painting the fireplaces. I toyed with airbrushing them, but it would have created alot of masking. This was with two coats of gloss white. On Monday, I'll give it two more. I also touched up the trim. This image was taken with the 2nd floor in place so you can see lots of reflections off that glossy white ceiling. When the lights are on, it will look totally different. I can't wait.

I did reprint more wall paper for the fireplace fronts. It's why I started painting them now so I didn't have to worry about getting paint on the new paper. I painted those 1/4" square blocks in the corners to make them look like some kind of architectural detail. I does look better than raw wood.

Everyone have a nice, socially distant, weekend.

  • Member since
    March 2012
  • From: Louisville, KY
Posted by Builder 2010 on Tuesday, November 17, 2020 10:30 AM

Short time yesterday, but work continued on the interior side walls. Got the Living Room first floor side completed. And I did put some artwork over the fireplace. Just noticed that the trim is short on that far right window casing. Oh well... I may have to reprint the smaller casing and I can redo that... or not. Since it's so far over it may not be visible.

Got a good start on completing side two (dining and kitchen).

For the second floor windows I may go less elegantly. I'm thinking that those windows should be obscured by drapes and/or shades so very little will be seen. I may put the wall paper directly on the outer surface and not spend the time to pack it all out so the window casing overlap the window frames like I'm doing on the first floor.

Based on a suggestion on the Elegoo Mars Facebook Group I downloaded and tried using the PrusaSlicer, a free product that is more comprehensive than ChiTuBox which is included with the Mars and must be used to feed the Machine. While PrusaSlicer may be more elegant, I was dubious about the support array in the auto setting. It looked insubstantial for such a massive object. BTW: I redrew the kitchen unit to solve some of the problems with the previous print (warpage, detail obliterataion).

The processs to use the PrusaSlicer with the Mars is two-step. First, you import the STL file into PrusaSlicer and let it set up the supports. Second, you export this supported part as another STL file into the ChiTuBox to slice for the Mars. Here's how the imported STL looked sitting on the Mars slicer.

Like I said, this scheme seeme a little light. And it most certainly was. This is what greeted me this morning.

Total BUST! And will require a significant clean up to remove the cured blob that most certainly is stuck to the FEP. That EPAX film is getting a bit tired anyway so it will give me an excuse to replace it. Since I already printed this part successfully using the ChiTuBox support setting, I know the part is printable, so I'm now concerned about PrusaSlicer. Like ChiTuBox, Prusa has a lot of customization (even more) so I could have added more supports. Next time, I'll use my intuition and my 1.5 years of printing experience. If it looks skimpy, it probably is. Considering how long the supports are, the part may have broken free later in the print when more mass was hanging on the supports.

  • Member since
    March 2012
  • From: Louisville, KY
Posted by Builder 2010 on Tuesday, November 17, 2020 6:25 PM

With another shortened work session (haircut day), I finished up the dining/kitchen wall, and mounted the kitchen units into the first floor. I put the convex mirror over the fireplace, but noticed it's slightly off center. Hard to tell when the walls are in place, but I see it.

Then I noticed something bad. The 2nd floor ledge on the back wall was 1/8" below the ledge on the left side wall. I then made a bad decision... kindof like those kids in the Geico commercial when they decided to hide behind the chain saws. I thought I had glued on this ledge on the wrong side of the line I drew to denote the floor line. And then I went at hacking it off which then caused the side wall to split. This is entirely due to PVA glued joints often being stronger than the substrate to which they're glued.

Here's where that line is.

And here's the split side.

The only problem with all this and why my decision was so premature is the floor ledge in error was NOT that back wall. It was the left wall that I had just completed. I glued that ledge on the wrong side of the datum line. After checking the other two sides they concurred with the rear wall. Now I have to remove all that molding, the wall coverings and attempt to reposition that ledge... UGH. And then I see this.

The dining partition wall is horribly out of square. Part of this will be corrected when the ceiling height is reduced when I fix the floor ledge, but the wall is still terrible. Light will leak badly. Right now I have no additional lighting in the kitchen. I may have to add that since the kitchen is now a decorated space.

This was definitely a two-steps forward and one back kind of day. Those floor ledges were installed way back in the beginning of the project and now I'm paying for a simple error, forgetting which side of the line was the correct side. I was wondering why the open wall below those 2nd floor windows was so narrow. Now I know.

It will all work out in the end. The split wall is an easy fix. Clapboard is weak because the wall thickness is greatly reduced at the bottom of the board milling. It's just annoying. And I didn't start pulling the printer apart to replace the FEP. That can wait since I've nothing to print right now.

  • Member since
    March 2012
  • From: Louisville, KY
Posted by Builder 2010 on Wednesday, November 18, 2020 6:54 PM

Woke up this morning thinking about attacking this problem. You can tell I'm living in a low stress environment when the only thing I worry about when arising is how to fix an error in my House project. I decided to go right at it.

I was more judicious in using my Xacto so I didn't damage the exterior wall. I was able to cut the wall paper, Bristol Board, styrene strips and then removed the 1/8" square ledger board. I removed the 1/8" and lowered the board so if conicided with the other three walls. The project was looking a rehab on "This Old House", in the "demo stage".

Actually, it was sort of fortuitous that this error happened since putting all the crown molding on this wall as I had done, was not correct. It would have been interrupted by the dining room partition wall. When I repositioned the crown molding I correctly mitered it at the corner intersecting with this partition. Then I examined the partition-side wall intersection and found that I hadn't provided correctly for that either. The partition was not nesting against the side wall since it was being pushed off by the wall packing and covering, plus the crown moldings weren't shaped correctly. I needed to do more surgery to get it all correct. This image shows how the wall (buried deep in the image) now connects to the side wall. Without fixing this, it would have pushed the exterior wall out of plumb and would have created joint problems at the top of the wall.

Then there was that out-of-square partitiion itself. Instead of ripping it out and making it again, I just shimmed and sanded a filler to close the gap. Here was the gap that needed attention.

The fix require stripping the paper and crown molding from the dining room side and the crown molding from the kitchen side. The fix worked. The good thing about using the MicroMark Pressure Sensitve Adhesive is that it's strippable. I was able to peel the paper off without too much hassle and it's still sticky enough to attach the new paper.

I got all this back together and then... finally... got back to putting on the rest of the window wall paneling. The middle space will not have any real observable space and is where the wiring harness from the upper floors will pass through. The right side is the back living room wall. The four windows are been in position to hold the wall evenly off the work surface since one window is needed to be in place to position the spacers.

The last thing I did was add another LED for the kitchen. And of course this got a little more complicated. When I added the 4th LED in the same series circuit, the lights were way too dim. I needed to add a third parallel circuit with its own CL2 driver. Again, the PSA allowed me to peel the entire white ceiling covering add all the circuitry and stick it all back on with a little help from med CA in edges.

The kitchen is now lit... and brightly so.

Tomorrow is a full shop day. Since I promised my wife that I would work out on the recumbent bike and elliptical every other day instead of every three, it does cut into modeling time a bit, but I'm able to do both. The 65 minutes on the equipment is helpful.

I'm really itching to get the new iPhone 12 Pro especially for the cameras. I'm taking well over 1,000 pictures a year with all the project documentation I'm doing. I average around 400 images per project and usually get about 3 done per year. In reviewing the camera capbility of the 12 Pro I think it could help me a lot. I like that it can do good night and low light photography since some of the best images of the model railroad are when the room lights are out, but the iPhone 7 doesn't do well in low light.

If any one has any opinions on the subject, I open to suggestions.

  • Member since
    November 2009
  • From: SW Virginia
Posted by Gamera on Thursday, November 19, 2020 1:23 PM

Sorry, been away since I'm on vacation and the motel wi-fi does not like picture heavy threads with lots of ads like this one.

Weird about the floors being of whack like that but looks like you've got control of the situation now. Nice work!!!

"I dream in fire but work in clay." -Arthur Machen


  • Member since
    March 2012
  • From: Louisville, KY
Posted by Builder 2010 on Thursday, November 19, 2020 6:46 PM

Welcome back! I'm on a perpetual vacation. That's what retirement is. Vacation is just changing venues, which now is not so easy.

I've done about as much of the interior as I want to do. I've skimped on the bedrooms since I'm going to use window treatments to restrict the view. My addition of all this trim has made the original scheme—inserting the 2nd Floor from the top after the walls are all joined—not so doable. The various baseboards form locking grooves that need to have the floor inserted from the side, not from the top. So the floors will be glued into one set of sides and the other brought into alignment with it.

I finished putting the wall covering on the upstairs and did some final fitting of the 2nd floor to all sides. There was some minor trimming of some of the wall panels to permit the edges to mate properly mate. I didn't proceed with the mating at this time. It's too big of a step to rush into and I want to make sure I've got the process down pat. There's the question of when and how to install all the furnishing. It would be best to do it when the floors are not attached.

No window molding is on the 2nd floor and I ran out of the window casing and didn't want to print another batch. I do have a lazy streak...

Instead of charging ahead, I started to build the foundation. It's essential that the foundation and the main building work together so now was the time to do it. I'm using 3/16" X 1" balsa for the frame, with Chooch flexible cut stone wall on top. I'm going to repaint all the stones since I've already used there basic color scheme on the Appliance store.

They've modified their process for attaching this product. Instead of self-adhesive being on the back of the stone, they've included a sheet of transfer adhesive which has backing paper on both sides. You peel off the first backing and stick it to the substrate, then you peel off the other backing leaving the adhesive attached to the surface ready for the stone. I had to splice stones together since the stone sheet wasn't quite big enough to do all four sides. The stones are random, but I found enough facing one another to notch them and make the splice inconspicuous. I will do some crafting at the corners to make the stones appear more realistic.

I have a picture frame clamps that was my dad's and must be 70 years old which is helpful in gluing things like this. I used Aleen's and then thin CA to cure it quickly and let's me keep moving while the Aleen's slowly dries. 

The last thing I did was create a paper pipe to carry the upper stories to the basement. I didn't have any existing tubing of sufficient size to do the job so I rolled up some HP photo paper glued together with med CA. It took a couple of tries to get it of the right diameter right. It's not glued in, but will be when the floors are installed in the building. This back room will not be visible. The windows in the back door are simply too small to provide a view, plus there will no lighting.

  • Member since
    March 2012
  • From: Louisville, KY
Posted by Builder 2010 on Friday, November 20, 2020 5:59 PM

On a digression, I found out today that my Typhoon Model is featured in the "Reader's Gallery" in FSM's Jan 2021 issue. I found out from Brian Bunger (proprietor of Scale Reproductions Inc. - one of the finest hobby shops in the USA) via Facebook. We're members of the Military Modelers Club of Louisville which Brian was a co-founder 40 odd years ago.

Before completing the foundation I wanted to make sure the porch worked with it. I made a field change that caused me some hours of rework. In the original design I had the porch so scale feet below the front door, as shown in the orginal plan. The arrows show the offset.

But when I put the porch blank next to the wall, it lined up perfectly ON TOP of the stone wall ledge and was flush with the front door sill and I liked how it looked. I was able to make some spacer blocks exactly the same 1" height of the foundation and glued them on to the bottom.

As usual with my "field changes" they had some unintended consequences. The steps needed some shimming so they would mate with the band boards under the porch. Since the steps were so warped I sanded the bottom of the first step and the back of the top step so they would mate with their respective surfaces. I used the big 4" belt sander to do this. I then added .120" of shim to bring the steps up to the right height.

And the columns were now too darn long. 

They were really long! I had two choices: cut the columns or re-draw and re-print them. The original prints didn't come out so good. They warped badly, had supports in strategic spots that made for a ragged cleanup. Cutting and splicing the columns looked doable. I held the building together with a big rubber band capturing the first floor plate and then clamped the balcony to its position snug up against the turret first floor and measured the distance. It came out to 2.63". The columns measured an average of 3.10". I did the simple subtraction and of course got it wrong. Instead of .47" I used .57" and wondered why they were so short.

At the cuts I drilled for 1/32" phos-bronze wire. The wire let me pull out the column to get it too fit properly.

In the above I started filling the gap with Bondic. After a couple of these, I realized my stupid math error and removed the correct amount of stock on the remainder. As it is, Bondic and resin printed parts are a marriage made in heaven. Since it's the same compound, it not only serves as a good filler, it's also one heck of a glue. When I finished all the splices, the columns are solid. Furthermore, I was able to correct some of the more eggregious warps, by reconnecting them in a more straight orientation, adding more Bondic around the perimeter and then removing the excess with the belt sander.

After belt sanding I used my round object sander (don't have a better name for it) to finish them off.

In this case, the column snapped when I tried to rebend the warp. I took the .47" out of the middle where the warp was the worse. It will look acceptable after painting.

After all the mods were complete I tried them all out in their positions. This approach took some more time than reprinting would, but maybe not so much since I would have to modify the drawings, re-slice them, print them and then clean them up and paint. If they weren't resin, the Bondic solution would not have been so elegant.

I needed to scribe the porch to simulate some wood planking. I toyed with planking with real wood slats, but it would have raised the height above the door sill. Since I had already glued all the blocks underneath, removing the 1/32" of height so I could plank it would have been a pain. Instead, I'm scribing the planks. Porch will be painted so I just need the hint of planks underneath.

I measured off the planks about 10 scale inches. I used my Starrett machinist dividers. they hold their size setting very well. I used a machinist square and marked the lines with pencil.

I then used a razor saw and the square to actually cut the groove. Scribing Masonite doesn't work so well since the surface is friable and leaves a messy groove. Actually cutting the grooves works better.

I'll finish this up on Monday. As I've said time and time again, my weeks go by so fast that I'm shocked when it's Friday again. I wish they would have past so quickly when I was working.

I reckon it's becuase of this. First, I no longer get up at 6:15, commute anyhwere between 45 minutes to over an hour to get to an office, and not leave the office until 6 p.m. and have another massive commute. Regardless of where I worked in my career, my commutes were never easy.

Now I get up when I want, usually between 8 and 9, have breakfast, read all the crap on the laptop, take care of business and get to the shop between 1 and 2 depending on whether it's an exercise day. And then I quit by house rules at no later than 5 p.m. So instead of a tiring 12 hour work day, I'm spending an enjoyable 2 to 4 hour day in the shop building cool stuff. And that's why time is going so fast.

Have a great weekend and don't do anything stupid.

  • Member since
    March 2012
  • From: Louisville, KY
Posted by Builder 2010 on Saturday, November 21, 2020 5:31 PM

Well folks, here's a rare Saturday progress report. It was a nasty, cold and rainy day, and my darling wife asked, "would I like to play in the basement?" Of course the answer was a resounding "YES". And play I did.

The day was a "painting day". It started out noticing that the Chooch transfer adhesive was not holding the rubber stone sheeting. I ended up going around and using judicious applications of med CA to secure it all around. The adhesive was holding to the balsa well, but was not holding the stone. That surprised me. You'd think that the adhesive included with the flexible stone would at least work with that product.

I cut, trimmed the corners and filled any gaps with Bondic and then airbrushed medium gray for the stone base coat. On Monday, I'll go back and do some more work on the stones drybrushing highlight colors and doing more with the mortar lines.

Before installing the windows in the turret it had to be painted. Before painting I added some 1/16" square bass wood around the upper perimeter of the intermediate roof to act as the rain gutter stop. I then painted the clapboard with craft paint "Vanilla" a nice off-white color. I then painted the actual roof area Tamiya Nato Black, and finally the trim with a medium blue from Vallejo. So for this little structure I used three different kinds of paint. The blue is very close to the color I selected within SketchUp. I debated whether or not to paint the corner trim blue or wall color. Blue won. Again, it's the way I've displayed it in SU and I'm familiar with it.

Last thing I did was paint the chimneys. I thought that the gray base color would work for the mortar so I just dry-brushed the brick color (Vallejo Dark Flesh). Didn't quite work as I planned and the color filled in some of the mortar lines. I did paint the upper parts with concrete color for the cap base, a lightened brick color (yellow added) for the terra-cotta flue stack, flat black inside the flue and then added black powder for the soot.

I also put the base coat on the porch. This time I used tube medium gray artist's acrylic paint, so that makes four types of paint. After it fully cures, I'll see what else I should do, maybe some panel line accenting, or not. I also may sand the paint to expose base Masonite to show some strategic wear. The saw-cut scoring worked for the planks.

So like I said "it was a painting Saturday". I like working on occasional Saturdays. Have a nice Sunday!

  • Member since
    April 2004
Posted by Jon_a_its on Sunday, November 22, 2020 2:15 AM

superb work, as ever.

Isn't there a phrase about learning more from your mistakes?

Because it is very useful raeding about your recovery from them. I look forward to seeing the finished article.

East Mids Model Club 32nd Annual Show 2nd April 2023

 http://www.eastmidsmodelclub.co.uk/

Don't feed the CM!


  • Member since
    March 2012
  • From: Louisville, KY
Posted by Builder 2010 on Sunday, November 22, 2020 3:05 PM
It's why I'm so "smart". I make a LOT of mistakes!
  • Member since
    November 2009
  • From: SW Virginia
Posted by Gamera on Monday, November 23, 2020 11:52 AM

Ohhhh congrads on the Typhoon and you're making fantastic progress on the porch!  

"I dream in fire but work in clay." -Arthur Machen


  • Member since
    March 2012
  • From: Louisville, KY
Posted by Builder 2010 on Monday, November 23, 2020 6:12 PM

Happy Monday!

Started the day getting the chimneys fitted. After marking where they would locate on the very fragile balsa Mansard skin, I used the #11 blade (new and sharp) to open up the skin. I knew I would have this complication since you can see the former looking down on the Mansard wall. That former is ply so using the Xacto was not the best way to remove it.

But before cutting out the scrap, I had to reinforce the edges of the Mansard since the balsa would be unsupported for the entire span between the windows and that would NOT BE GOOD. I traced the profile on some thin aircraft plywood, hand-sketched a parallel line to the traced line to account for the thickness and then cut it out with the #11. I used all kinds of CA to hold these pieces in. Before I did this I did almost destroyed the skin on the opposite side and had to glue pieces back together.

This view shows the new formers installed to reinforce the skin next to the window openings. This is important because the act of attaching the self-stick shingles puts stress on the skin as I burnish it down. If the skin wasn't supported it would simply blow through and be a wreck.

I even used a piece of MDF for one of these formers to even make it stronger. Remember, I had specified the wrong material for the formers in the first place. They should have been much thicker. And I should have designed the laser cutting to have former at each side of the window openings.

I used the Dremel Flexi-shaft with the 1/16" carbide router to forcibly remove the former.

The upper part of the Mansard needed a little bit of relief to so the chimneys sat plumb. While fussing with all this cutting and fitting I broke out another of those thin sections over the window openings. I decided to get radical by reinforcing all the week ones with some of the balsa I used for the foundation walls. This greatly strengthened this very thin and fragile area. It was necessary.

This is a top view of the new reinforcements.

With both chimneys able to sit correctly, I had to relieve the upper roof. I marked it out and cut the notches on the scroll saw. Had to be careful because there is an electronic chip on the underside that's feeding the lighting which also is complete.

I stopped work on the Mansard and got back to finishing up the turret. I painted it last week and wanted to get it fully complete and that meant shingles. Like I did with my last two Victorian projects, I'm using actual copper for the roof flashing. I'm pre-treating the copper tape (same as I'm using for the lighting circuits) using JAX copper aging chemicals. I used both the Dark Brown and Patina liquids starting with the brown and then patina. I treated the tape with the backing on the tape. I first I thought I made a mess when the backing paper started falling apart due to all the liquids. But I persisted and the backing did come off correctly. It's not as green as I would like, but the chemicals tend to have a delayed reaction. 

Here was the flashing applied to the turrett.

I used the Victorian mix from Rail Scale Models which is a mixture of straight and fishscale shingles. You start the process with the starter row strip that is a separate part number you purchase. The starter row provides a strong purchase for the 1st row shingle tabs and prevents them from drooping or bending.

The patten is the same as I've used before and is traditional Victorian of three straight alternating with three fishscale shingles. The distances are very short and in couple of places required some CA to get it to stick. The filament pattern created by the FDM printing was a two-edged sword. It makes for less surface area impacting the self-adhesive shingles' adhesion,but because they were so parallel, it made it easy to ensure the shingles were horizontal.

I got two full sides complete including trying out the newly designed peak capping shingles (included with the starting row set).

 I will have this part done tomorrow and then install built the little peaked roof and install the windows. I'll finish the Mansard completely this week as well.

  • Member since
    March 2012
  • From: Louisville, KY
Posted by Builder 2010 on Tuesday, November 24, 2020 5:41 PM

Between exercising and going to Costco (among other stores) I was still able to get about an hour in the shop and was able to finish shingling the turret roof. With the paint and the shingles it's harder to identify that this was an FDM 3D print job.

I stuck the turret assembly back onto the building to look at it. Of course everything is just plopped there. I will finish up this assembly tomorrow which will include the little roof that goes on top, the upper and lower windows, the spiral staircase and then the corbels (which I still have to paint). Then it's onto finishing up the Mansard. I'm sort of working from top to bottom.

Shingling the Mansard is like shingling the turret roof on steroids. It's much easier to shingle in long continuous strips, but the Mansard is nothing but interrupted surfaces. I want to shingle it with the windows in place because  the flashing and shingles must fully remove any of the gaps between the rough roof and the windows.

Until tomorrow...

  • Member since
    March 2012
  • From: Louisville, KY
Posted by Builder 2010 on Wednesday, November 25, 2020 6:05 PM

Didn't get much done today. Was out of pocket for the early afternoon. Got the turret top roof put together and then wanted to paint the corbels, but I couldn't find them!!! I think I put them in a "safe place" so they wouldn't get lost or damaged. Now they're lost. It's no big deal I can reprint them. But I had to change the FEP on the 3D printer and that took the rest of the time I had. Oh well.

The upper turret roof consists of four laser cut segments with some laser cut formers underneath. In SU you're able to take a plane on an angle, a hip roof part for example, and flatten the planes so you can export them as developed surfaces. This works pretty well. After gluing it all together I coated it with some sanding sealer and will finish sand and paint it all tomorrow. I cut some relief in the roof bottom to clear the grain-of-wheat bulb and wire that's protruding out of the top of the turret underframe. I needed to use some Bondic to seal the roof segment joints.

I'm going to paint this part BEFORE gluing it onto the turret. The printer is ready to print as soon as I get to it tomorrow. I'm sure that I will find those corbels once the printer begins making the new ones. Murphy's law...

  • Member since
    November 2009
  • From: SW Virginia
Posted by Gamera on Friday, November 27, 2020 11:39 AM

She's still coming along great! Love the shingles! 

"I dream in fire but work in clay." -Arthur Machen


  • Member since
    March 2012
  • From: Louisville, KY
Posted by Builder 2010 on Friday, November 27, 2020 5:54 PM

Thank you oh faithful follower!

Didn't work on TG, but did today. After looking more closely at my own design, I realized that the turret roof transitions to the turret walls with a curve and another layer of roof structure. 

I added another piece of MDF sized for the turret wall top, drilled the same clearance hole in the middle and laminated it to the existing turret roof. I then started to produce the fillet. The first step was filling it with Bondic. Since Bondic cures in seconds with the UV light it's a great way to start the filling process. I laid it down in 3 layers since you don't want to get too thick before curing that layer. 

I pre-shaped the Bondic to give the rough curved shaped with a round sanding head on my MicroMark Power Sander. To finish it off I completed the fill with Tamiya Fine Filler. I shaped it reasonably well and will let it fully cure over the weekend and sand it on Monday. If the filler isn't fully hard it doesn't sand right.

I tried the new roof onto the turret and it will look good when finished.

Next up was completing the turret double hung windows. Again, I used PSA which is great for glazing since it doesn't run, graze and sticks instantly. I installed these windows using Gel CA. 

While this was going on I was attempting to reprint the corbels. For some reason, the file on the black thumb drive must have been corrupted. It attempted to print it twice and abbended both times after about five minutes. Each time that happened I had to scrape off the little bit that DID form, scrape off the pre-coat, clean it up and pre-coat it again.

Finally, I went back to the computer, redid the entire slicing file, and this time saved it to the blue thumb drive and the print was successful. Actually much more successful than when I did the first run months ago. I don't believe I was pre-coating then and had some failures where the corbel pairs separated. One run isn't enough for the building and the second batch just finished. I'll take care of them on Monday. If you see that very thin film attached to some of them, it's the pre-coat. It's only a couple of thousandths thick, maybe even thinner so it doesn't affect the parts sizing.

Since I couldn't completely finish the turret due to the top roof curing I got back to work on the main roof. My main roof supports are a bit skimpy and when I held the hip roof pieces in place I realized that gluing them to the supports and the roof one at a time wouldn't work. Here is the cross-lapped the support structure glued to the main roof.

The problem with this support scheme is no contact area in the important corners. It supports the middle of the roof panels, but the mating edges float all over the place. So this time I did it a bit differently. I gave the lower and mating edges of the roof panels a quick sanding to impart a better junction angle. I then taped the roof sections together with some Tamiya tape. When the panels are butted together and taped tightly, they automatically fall into the correct hip roof angle due to the panels laser cut directly from the SU drawings of the same.

This view was looking at the bottom. I then spritzed the joints with accelerator and then added med CA to the junctions where the tape wasn't. I then removed the tape and finished it up. I then used Gel CA to close the little larger gap at the hip peak. I sanded the corners to remove any irregularties.

With the roof shaped and strong I slathered Aleen's Tacky Glue to the edges and the supports and then glued the roof down with some clamps until it dried.

I started glazing the Mansard windows. The laser cut acetate fit perfectly so that all worked out, since we're talking about going from an SU drawing and creating a laser cut drawing file and a 3D print file and having them fit together. Whoopee! Even the little circular top light dropped into place. Again, using PSA to hold them in. I also did some more Mansard balsa repair in prep for shingling.

When I was handling the main roof, I was concerned I was putting too much stress on the pair of CL2 LED drivers that are attached on the bottom. After looking closed at the soldered pair I didn't like that the hot leads were touching that dead, cut-off center lead. It would provide a bypass to the LEDs and instantly burn them out. So I attempted to cut the center lead closer to the chip, and of course, cut off one of the power leads. I installed a new CL2, but this time kept them apart and joined the red leads about an inch down the run. Checked it out with power and everything worked.

Have a nice weekend, everyone.

  • Member since
    October 2019
  • From: New Braunfels, Texas
Posted by Tanker-Builder on Saturday, November 28, 2020 3:17 PM

Hey;

    Hurry up with my Model Room will ya! I need to be able to fling my rubber powered planes out the windows for test Flights

  • Member since
    March 2012
  • From: Louisville, KY
Posted by Builder 2010 on Sunday, November 29, 2020 5:07 PM

When I was a kid in the late 50s, and would build a model/week, and when my shelves would fill up I would toss them out of the windows to see if they would "fly". They didn't. I'll see what I can do about the model room.

  • Member since
    October 2019
  • From: New Braunfels, Texas
Posted by Tanker-Builder on Monday, November 30, 2020 11:46 AM

Hey ! 

 Builder 2010! I did that way more times than I should've. One didn't fly at all and hit my Granpa in the head! Turns out, the rubber band broke the little stud in the back and didn't do nuttin!

  • Member since
    March 2012
  • From: Louisville, KY
Posted by Builder 2010 on Monday, November 30, 2020 6:29 PM

Probably not the best person to hit... My parents were good sports. My mom always knew where I was and what I was up to. In addition to build many plastic kits, I also had a modest permanent Lionel layout in the basement. So my teen years before the car, guitar and girls (in that order) I was occupied with creative pursuits that have stood me well to the present.

Before cleaning up and painting all those corbels I wanted to finish up glazing the Mansard windows. I had put the self-stick adhesive onto two of them on Friday and was attempting to stick the acetate to it. I ended up pressing too hard on the first one and blew the mullion frame right out of the structure. DOH! It took some creative use of CA, making a mullion out of 0.040" X 0.040" square strip styrene. I also used some Bondic. All's well that ends well, and I got them back together.

Here was the notching I made to accept the styrene and provide more gluing surface area. I started the notch with the micro razor saw and then with a jewelers file.

And here's the repaired frame. If you look closely you can see some of the seams where the frame broke out. It was completely detached. Have I mentioned that 3D printed parts can be brittle? This was printed before I've been adding the Tenacious flexible resin to my mix. That does hold up better against shock when added about 20%. At 100% the resin is elastic and bounces. This frame is the one that completely broke. The one above just lost one mullion

Here are all eight windows with their glazing ready to be installed into the Mansard roof. They're really pure white. The lighting here was funny.

I cleaned up both corbel runs and then stuck them to some rolled masking tape. If you look closely you can see which was the first and second run. The second run's pre-coat was thinner so the flat piece that's tying the corbels together was thinner and warped. Those corbels have the diverging angle. The backing is very thin and when glued to the building they will be parallel. Neither run produced a single failure.

I mixed the Vallejo blue with some AK Acrylic Thinner and then added a few drops of Acrylic extender to prevent drying in the airbrush nozzle. I then sprayed all the corbels. These will dry overnight.

I finished the sanding of the turret top roof fillet and then spraying the blue parts. If finished up by masking off the little top roof portion and brush-painted NATO Black to simulate roofing.

Last thing I did was detail paint those little decor items. I base-coated them with a Sharpie Silver and Gold felt-tip pens and then over-coated them with clear red, blue, or green. I used the Rust-oleum gold paint pen to do the bases of the lamps since it's a much more reflective paint. I couldn't photo them because I couldn't handle them. I'll take pics tomorrow.

  • Member since
    March 2012
  • From: Louisville, KY
Posted by Builder 2010 on Tuesday, December 1, 2020 5:47 PM

To continue with the decor items, here's one of the lamps glued to the sofa table that's going in the living room. I used the same "vanilla" craft paint that's going on the exterior walls to paint the lamp shade.

And here are the other vases on the mantles in both rooms. I felt that it didn't really matter to have different objects displayed. No one is ever going to see them.

I did alternate sides...

Today I also completely finished the turret structure. I glued the top roof in place with gel CA. I then installed the 6 sets of corbels. I was rewarded with these little pieces being exactly what I wanted them to do. I wanted to do this step before the windows so I wouldn't have any extraneous glue problems.

I then had to install the spiral stair. I needed to do this at this time because I needed access through the open cupola window spaces so I could manipulate the stair and get glue into the few places that would be holding it. I first tried to use Bondic, but it wasn't ideal so I resorted to the Gel CA. There aren't many contact points between the spiral stair and the openings. I got glue in as many spots as I could. The critical thing was keeping the bottom pad flat on my work surface so it was installed plumb.

Once this was in place, I was able to glue the turret windows in place. I thought about putting some trim around the laser cut window frames, and after doing the rear window decided that it wasn't really worth the effort. I used Testor's Transparent Parts cement to glue the windows in place since it's very forgiving while drying fairly strong.

With the windows install, the turret assembly was essentially finished except for a downspout which will go in when the building is assembled.

With the turret down it was back to the Mansard roof. I installed a window into each opening and traced the footprint. I did this so I could find the demarcation line for the NATO Black "roofing tar" that will simulate the rain gutter area. I then brush-painted the black to my lines.

I again, using the transparent part cement, glued in all the Mansard windows. As I noted the other day, these windows need to be installed to do the flashing and roof shingle installed. Here're a couple of images with this step completed. All my fussing over these window fits seems to have paid off. The windows fit nicely.

I've altered my exercise schedule a bit so it doesn't cut so much into the real stuff that I do. I was doing it every other day, but that made alternating weeks where I was exercising on M-W-F. I'm now doing it on T-TH-Sat and then taking off two days. I'm not obsessed by model building, but I am compelled to do it. Days when I'm not in the shop feel unfulfilled. So it's a compulsion, not an obsession. Is that any better... hmmmm...

Tomorrow I'll continu working on the Mansard and it will take a couple of days to complete. I toyed with the idea to start installing the furniture, but that's going to wait until I'm actually ready to glue in all the walls. I want them to be protected and having them in the rooms, but not in the building does not meet that standard.

  • Member since
    March 2012
  • From: Louisville, KY
Posted by Builder 2010 on Wednesday, December 2, 2020 10:30 PM

Work continues apace on the upper works of the House. I got the main roof completed with the additon of membrane roofing. My membrane consists of some pre-used printer paper cut into 1" (4 scale feet) strips on my paper cutter. I coated the bare roof with PSA and also applied a line of PSA on the top edges of the previously laid strips. I did the roof in sections corresponding to the roof contours. I masked the flat areas so no PSA got onto the paint there.

For the hip roof peaks I used some more of the laser-cut starting strips. I was first attempting to use smaller strips of the plain paper, but it wasn't working well enough so I switched.

It wasn't until I painted it all NATO black that it really started looking like a roof. After pulling the previous masking, I re-masked the very edges so they remained trim blue and then painted the rest of the flat areas with NATO black so it looked like it was weather-proofed. It looks pretty "roofy" to me...

Finally I got to work on the Mansard itself. The Testors' canopy glue worked perfectly and locked all the windows in place. The first step was preparing more chemically-aged copper tape for the flashing. In this case, I chose to use the "stairstep" method of putting counter flashing. It made it easier to keep it uniform. Around the top curve I resorted to using longer strips with the part that was on the flat surface with relief cuts so it would bend around a curve.

It takes about 15 minutes to put the flashing on each window, so it's a time consuming process. I think it's worth doing since it adds a terrific note of realism. Again I used the JAX darkening solution first and then the patina solution. The patina didn't make much different. My chemical treatment vat is the top of a plastic egg carton.

It took a little practice to get the flashing to be uniform and I'm sure by the time I get around to window #8 I'll be perfect. I did two windows and then started shingling to break the monotony and to see how cool it's going to look.

The flashing really helps close the gaps around the windows... kind of like it does in the 1:1 world.

With the shingles on the window looks like it was grown in that spot, not glued there.

Here's a view with the roof plopped on.

It will take probably until Friday to finish this aspect.

  • Member since
    November 2009
  • From: SW Virginia
Posted by Gamera on Thursday, December 3, 2020 11:32 AM

If I'd busted my grandpa's head he's have tanned my hide so I couldn't sit down for a month... 

Great job there on the roof. I love the blue! 

"I dream in fire but work in clay." -Arthur Machen


  • Member since
    March 2012
  • From: Louisville, KY
Posted by Builder 2010 on Thursday, December 3, 2020 5:24 PM

Thank you!

Completed the right side Mansard including the first chimney install. I used gel CA to hold the chimney in place. I flashed the lower portion where the chimney entered the sheathing, and also flashed the window to its right. And I just noticed in this image that the round window is not longer in contact on it's right side. I'll have to fix that.

Up to the point where the chimney and the roof are not in contact, I shingled both sides. Then I fed a single piece behind the chimney for a few courses until it again made contact with the upper reverse curve. This was a "Two-Tweezers" job to slide it through and manipulate it to keep it all squared. 

When I got to the top course I again used a piece of starter strip to finish it off. In this care I had to cut eyebrows out so it would snug against the window. I was tired of estimating this curve by eye and made a template out of some thin ply.

I tucked the strip up to the chimney's edge and then noted the center of the curve. After cutting the piece just dropped in nicely. I ended the session by shingling the right side of the right-hand window and putting flashing on the left rear window. I greatly underestimated the amount of copper I would need. When I estimated the strip length, I neglected to add the amount of overlap between each piece of flashing. I'll need to treat another batch almost the same size as the first. I may make the pieces longer since they don't have to correspond to the flashing length.

If you're eagle-eyed you'll notice some areas that need some touchup NATO Black paint. That will all be taken care of when all the shingling is complete. If I don't finish this tomorrow, I will make a big dent. The rear roof is simpler than the others without the chimneys.

  • Member since
    October 2019
  • From: New Braunfels, Texas
Posted by Tanker-Builder on Friday, December 4, 2020 10:56 AM

Hey Gamera!

 My Buttocks were tanner than the rest of me for days!

  • Member since
    November 2009
  • From: SW Virginia
Posted by Gamera on Friday, December 4, 2020 11:26 AM

TB: I'm not surprised!!! 

Builder: I can see a few little gaffs but she looks pretty darn good from here. I'm really impressed by all that work in the shingles. 

"I dream in fire but work in clay." -Arthur Machen


  • Member since
    December 2002
  • From: NYC, USA
Posted by waikong on Friday, December 4, 2020 2:37 PM
Continues to be a beautiful build!

My website: http://waihobbies.wkhc.net


  • Member since
    October 2019
  • From: New Braunfels, Texas
Posted by Tanker-Builder on Saturday, December 5, 2020 8:37 AM

Gamera;

 He really was mad. Now the upside? He showed me how to fix it and make it fly right. I didn't know grandpa had ever been around planes. He said that Great Grandpa had a "Jenny" whatever that was. I found out it was a plane!

  • Member since
    October 2019
  • From: New Braunfels, Texas
Posted by Tanker-Builder on Saturday, December 5, 2020 8:38 AM

Hey!

        Did you cut all those fish scale shingles? Or did you buy them?

  • Member since
    January 2010
Posted by rob44 on Saturday, December 5, 2020 9:14 AM

A truly wonderful explination of resin 3D printing and a fantastic build. May I suggest you contact FSM to see if they can more this to a more public space or consider publishing it?


You may want to also explore putting it on some seperate web site.


Rob

  • Member since
    March 2012
  • From: Louisville, KY
Posted by Builder 2010 on Saturday, December 5, 2020 11:16 AM

Thank you all! Let me answer the questions in their order.

The shingles are a product of Rail Scale Models. They offer an entire line of shingles in different styles (among lots of other model railroading related products). I'm using the Victorian mix which includes an equal mix of fish scale and square plus the Starter Row and Ridge Shingles set. Here's a link:

https://www.rail-scale-models.com

Re: 3D printing. I've gone further. I've sent a proposal to Aaron Skinner (FSM's new Editor-in-Chief) about having me author a Kalmbach Book on "3D Printing for the Model Maker". Most of what I've read about this topic deals with creating trinkets or fantasy figueres or gets into industrial Additive Manufacturing which is way beyond our needs.

While helpful, it doesn't address the first steps, i.e., creating the drawings in the first place, or creating parts that have to interact with others and all in small scales. I don't know how many pages it will be, but it could get into the weeds pretty quickly. I have not outlined the content until interest is shown on their end to the concept.

Aaron has chosen (so far) to not respond in any way. Some pressure from my faithful followers could prompt a response. It the answer is "No", then so be it, at least let me know you received the communciation. I've been published in FSM in 2001 with a soldering article and authored a few Tips and Tricks over the years. The topic is too complex to be a single article. It could be a series, but FSM doesn't roll like that.

  • Member since
    March 2012
  • From: Louisville, KY
Posted by Builder 2010 on Sunday, December 6, 2020 10:40 PM

This was the little bit of work I got done on Friday. Had to make a Hobby Shop run (Soically distanced with Masks) since my med CA was kicking and getting too gooey. 

I had to make that second batch of flashing. This batch even came out more grungy than the first. I like it. This should be enough to finish the job.

I then almost got the long roof shingled. I'm well more than 1/2 way through the shingles and should be done tomorrow or Tuesday.

It's amazing how the shingles make the whole thing come together.

Tomorrow's Monday so back to the shop.

  • Member since
    March 2012
  • From: Louisville, KY
Posted by Builder 2010 on Monday, December 7, 2020 8:34 PM

Happy Monday!

Finished the back Mansard wall, the left wall with the other chimney and made a good start on the final little bit.

The top trim strip needed some gluing help in the upper right corner so I used med CA and of course it soaked through and made a bit of a mess. I will match the gray and paint it. I'll also add some minor weathering which will help blend the paint in. The shingles really trim up that ragged bottom edge. Hides a lot of ugly.

On the second chimney wall I tried changing the flashing method on the chimeny. I marked the wall's curve on the chimney's brick side and then applied the flashing with the chimney off the model. Again, I had to cut little fingers on the side of the flashing that needed to stretch around the curve. I had to apply the gel CA and install the chimney with the flashing attached in one go. I did this and then saw that I had cut the fingers on the right side flashing facing in the wrong direction. That wouldn't work! But it was too late to pull the chimney off and redo, so I just ripped off the bad flashing and did the right side the way I did on the other chimney, i.e., piece by piece. 

I also realized I didn't have to put an entire strip of shingles behind the opened-back portion of the chimney since it was out of sight. Instead, I just put pieces on both sides just long enough to nestle behind the gap.

I got flashing on the last window and then started to put on its shingles when I ran out of time. I will finish up the Mansard roof tomorrow. I had to install the attic stair surround railing before I forget. I also have to attach one of the LED leads whose foil tore in all the handling.

See y'all tomorrow.

  • Member since
    March 2012
  • From: Louisville, KY
Posted by Builder 2010 on Tuesday, December 8, 2020 10:15 PM

Mansard roof is about 99% complete. I just have to do some internal relieving to clear some of the newly re-routed wiring. Got the shingling done, put on the drip edge, painted the blue trim and re-painted the NATO black and installed the upper roof and Turret.

After finishing up the shingles on that one window, I went around and reinforced the upper trim edges with some UV-cured Bondic and then trimmed any excess. I put the ridge shingles on all the corners after carefully applied some PSA to reinforce this particular shingling job. They're under some tension and the self-stick adhesive has been letting go.

I then appied the 1/16" square stripwood drip edge around the perimeter of the Mansard roof. I first checked to see if I could get the turret into position with the edging in place. I was, so I glued in the edging in that front space.

When the glue dried enough so the strips didn't fall off, I brush painted the edging and underneath the eaves. I could be sloppy since I was going to go back with the NATO black and back-paint to the edging.

When I put on the black it quickly started dissolving the blue which wasn't totally cured at all. To keep my progress going I overcoated the blue in the gutter area with Dullcoat. This image was while the Dullcoat was drying. This sealed the blue and enabled me to do the black in the same work session. As I've said many times before, "I am NOT patient, I am persistent!" When I screw up it because rushing either paint or glue before it's dried.

In addition to painting the gutters, I went into the window areas and did some final touchup there too.

After painting the black touchup, the roof was pretty much done.

I needed to get the attic stair rail installed before putting on the top roof. This was not difficult and after a little trimming, I got it glued in place.

Then things got a little bit sideways. I went to install the cupola and found that the rear-most corbels impinged on the Mansard roof and it was preventing the turret from seating properly. The back corbels would have been imbedded in the roof and wouldn't have been seen, so I broke them off.

The second thing that happened was I was no longer able to get the top roof on. It was blocked in two ways. First the chimneys prevented sliding the upper roof forward so it slipped under the turret roof. I had to remove the turret which I had just glued in place. Luckily, I used Aleen's PVA instead of CA. It wasn't yet cured so the turret came off easily.

And then problem number two reared its head. I couldn't drop the roof over the chimneys. I could get one notch in on one side, but then it looked like this. 

First I thought all I needed to do was make the relief slots deeper and I did this. 

But then I found that at least on side had to be wider to drop over the chimney's width. So more surgery and I did this.

I had to re-attach the LED leads whose copper foil had failed, and realized that these leads needed to join the leads from the 2nd floor ceiling that were going down through the back-center (un-windowed) room. I was going to bring them down through the turret joining the non-polarized leads from the grain of wheat bulb in the cupola. That really wasn't the best route. I re-routed the attic leads backwards across the attic ceilig and camoflaged the leads with white duct tape, and then drilled a hole in the rear of the attic floor to pass the leads through. I had to made more clearance in that front beam where the wires go over it. And I will also have to cut some relief in one of the attic partitions since the wires back there are holding the roof from setting down correctly. But other than that, the entire upper works are finished! This was the most complex part of the project and I'm happy that it's now in the rearview mirror.

The touchup painting really tightened up the total deal. After gluing down the upper roof I'll have to flash around the chimney notches and maybe build a TV antenna... although I haven't printed a TV for the interior. I can... I printed two versions of 1950s TVs for the Appliance Shop.

I tested the lighting and took a picture through one of the windows. It looks pretty.... atticky... if there's such a word.

I'll finish up all these odds and ends tomorrow and then get cracking on finishing up the main building. If I need to produce a TV I better do it soon since the furniture's going in and then it's going to be closed up. I have to paint the exterior walls and do all that detail painting for the stone foundation. I'm going to join all the various parallel circuits in the stone base so only one set of leads goes below the table level.

  • Member since
    March 2012
  • From: Louisville, KY
Posted by Builder 2010 on Wednesday, December 9, 2020 5:44 PM

I had a nice shipment from MicroMark (early Hanukkah Harry delivery) today taking advantage of their holiday free shipping offer. You had to order over $100.00 so I did. One of things I bought was a small powered cutoff saw made for model-sized stock. It didn't have a depth stop so I spent part of today's session building a base and a positionable depth stop. I then got back to the House.

I was able to raise the roof, and hold it with a wood block, and got inside to cut some relief cuts to clear those re-positioned wires. If I would have originally run them down the back the partitions wouldn't have some into play. But I didn't and had to do some crazy rework. I tend to not think in 3D and didn't think about just what those repositioned wires would now be interfering with. The wiring had a lot of my attention and I kept waking up in the morning thinking about how all those various leads were getting to the basement. The attic ceiling's were particularly vexing and now I know why. I had them routed poorly.

Another one of the things I bought was some #11-sized saw blades which was perfect timing since I was immediately put one to use in cutting away the attic partition through the 3/4" opening I was able to make in the roof. I took this picture through that gap.

With the relief cuts the roof just about fit. I used servo tape strips to attach the roof to the Mansard walls. The fit wasn't so hot, but it's holding. Servo tape holds like crazy.

So with that, the roof is actually done.

I started installing furnishing and the interior doors in preparation for attaching the main walls. I'm using drops of Gel CA to hold everything down. It works pretty well for this app. I started with the doors (held with Canopy Glue) and then the dining room and finished with the living room. And of course I forgot to lay the living room carpeting before installing the furnishings. And that Gel CA doesn't let go, so there was no removing the furniture to lay the carpet. I compromised and used the carpet at the doorway.

And the living room.. The doors really help with the illusion.

I put the grandfather clock in the foyer and also got some bedroom furniture (and carpeting) in place which I didn't photograph. Tomorrow I'll start working on the exterior painting and prepping all the windows for installation. I still have to paint the repaired porch columns, finish the balcony, paint and install the porch lattice screens and build the chain suspension of the porch swing. But, we're getting near the end.

Oh... and the site needs to be created! So we're not that close to the end...


  • Member since
    November 2009
  • From: SW Virginia
Posted by Gamera on Thursday, December 10, 2020 8:40 AM

Oh cool! And I know what you mean about stuff that should fit not fitting after everything is in place- been there, done that, got the t-shirt... 

Still it's great watching you work your way to the finish line. So are you building another cool house next or a railroad related building or business? 

"I dream in fire but work in clay." -Arthur Machen


  • Member since
    March 2012
  • From: Louisville, KY
Posted by Builder 2010 on Thursday, December 10, 2020 10:08 AM

Next up is the Meng Bradley AFV with full interior.

As I've noted, I like to alternate between challenging plastic kits and stuff for the railroad. I generally don't build armor, but the Sherman project was so much fun that I want to do another fully-detailed tank.

After the Bradley, I'm going to build another unusual railroad project, a Bourbon Warehouse (Rickhouse) under construction. I already have a superb distillery building and it needs a place to put all that bourbon, but constructed rickhouses are boring structures. BTW: There's a 3-part article on building the distillery starting in the Oct 2018 Railroad Model Craftsman magazine.

Rickhouses are just a metal-sided box with a bunch of little windows in them. Like I said, "boring"!

However, when you peel back the skin, you get this... A forest of lumber.

I drew this up on SketchUp and will build it entirely out of stripwood. Heaven Hill Distilleries has over 50 of these buildings and has probably close to 2 million barrels aging. Each full barrel weighs over 500 pounds and the new Heaven Hill Cox's Creek Rickhouse complex has buildings that hold over 62,000 of them. Just for the record, each empty barrel costs $175. That's $350 milllion in inventory just for the oak barrels and not counting the vast amounts of alcohol.

Here's the distillery I built for my railroad. I built another for the Heaven Hill Bourbon Experience Center in Bardstown, KY. The distillery was based on a single picture on the lobby wall of the current Heaven Hill modern distillery in southwest Louisville. The building depicts the I.W. Bernheim distillery as it appeared in 1870. It was razed during Prohibition. The Shapira family bought the rights to Bernheim in the mid-1930s and own Heaven Hill to this day. It was mostly laser-cut. I made resin molds and cast the chimney, vents and stacks since I was contemplating making it into a kit. In the end, it was too complex to make a kit that I could feel confident that others could successfully build.

The material handling system on the right side is a selectively compressed version of that which exists today. The building on the left is the boiler house. The picture wasn't clear as too what was on that left side so I winged it. There are detailed boilers and all associated apparatus in that building.

This was an illustration that I produced for the not-to-be-produced Bernheim Distillery Kit. The beauty of using SketchUp to design the project was the ease of creating exploded drawings for instructions. I chose not to include an interior since the window area was pretty small. The interior is illuminated. To hide the exposed tab slots I had to create addtional cover strips.

To create the elaborate crenalated adornment I had to make layered laser cut and etched pieces that laminated to give the relief. This is the laminate for the auxiliary building which I labeled, "The Kitchen".  The instructions would have been great, too bad the kit was a bear. My engineering left something to be desired.

Here's where the rickhouse is going on the layout. It's a tight fit, but it will work. The Hopper House is going to replace that blue building that across the street. I have a big Grove mobile crane that will adorn the site along with piles of lumber and dirt. Should be interesting.

And after that?? I'm thinking about building the Ryefield Models Abrams with full interior. So I have plenty of projects lined up into 2021. I like to plan ahead...

  • Member since
    November 2009
  • From: SW Virginia
Posted by Gamera on Thursday, December 10, 2020 11:24 AM

Oh sorry, musta missed your alternating between military and railroad kits. Looking forward to the Brad. The Meng kits I've built I've loved, though I've never built one with a full interior though. And that distillery is pretty friggin' awesome!!

"I dream in fire but work in clay." -Arthur Machen


  • Member since
    March 2012
  • From: Louisville, KY
Posted by Builder 2010 on Thursday, December 10, 2020 6:11 PM

Thank you!

I almost forgot to get the House dwellers ready to move in before buttoning up the building. One of my readers of this same thread that I post on O'Guage Railroading Magazine's forum, asked if I was going to include some people. I definitely am. Most of my other buildings with full interiors are populated. One of my readers several models ago sent me some posable 1:48 figures which I was able to kit bash and use in the Nighthawks Cafe.

I had enough left over that I could get folks into the living, dining and foyer. 

These figures are true 1:48. Many O'scale figures are bigger, more on the order of 1:43 which is UK O'scale. I have some of those and they wouldn't have fit on those dining chairs or got their legs under the table.

I have a conversation group for the living room.

For the foyer I have this guy and a person that looks like his mom that I didn't stand up.

I started painting them all and decided to make it a diverse group.

I'll finish painting them all tomorrow. They'll be placed and then the interiors will be ready to install into the House. When I do this kind of painting, I stick a bit of Press-n'seal onto my work surface and use it as a disposable pallete. With figure painting you're constantly mixing in between colors. I have trouble painting eyes on figures this small. They're not very well resolved so it's hard to get the paint where it's supposed to go. Tomorrow all the base coats will be nice and dry which will help. I force dry acrylics with a TopFlite Heat Gun. I have to be careful because it puts out enough heat to melt styrene.

  • Member since
    November 2009
  • From: SW Virginia
Posted by Gamera on Friday, December 11, 2020 8:46 AM

Oh those figures are neat- the perfect finishing touch!!! 

I use a small pen with a pinpoint tip and just dot the eyes with that.

https://www.fabercastell.com/products/pitt-artist-pen-superfine-199-black-box-of-10-567199?_pos=1&_sid=59ecbfa6f&_ss=r

"I dream in fire but work in clay." -Arthur Machen


  • Member since
    October 2019
  • From: New Braunfels, Texas
Posted by Tanker-Builder on Friday, December 11, 2020 8:50 AM

Please, Please, Don't put a telebishion in dere.

     When we got ours( a Monster that also contained a Radio, Record player and Record storage) the family started watching, and the Piano and Instruments we all played got ignored. Then no one sat and talked. They just watched that ridiculous tiny screen.

      Plus the worst of all, We stopped doing reading night. That was when the grandparents and parents would sit and listen to us kids read from our Schoolbooks or the Bible. Or a book we had gotten ( Gasp!!) from the LIBRARY! These were the things that went on in our old great big Farmhouse.

  • Member since
    March 2012
  • From: Louisville, KY
Posted by Builder 2010 on Friday, December 11, 2020 6:20 PM

The fine pen is a good idea. I'll get one of those.

And okay... no TV. These people are strictly old school, they sit in the living room and have conversations.

It took approx. 3 hours to fully paint the folks in two sessions. It's a highly diverse group that reflects the street where we live.

The standing younger guy and his "mom" will be greeting people at the front door.

In the dining room we have the older dude and his grandson?. Put a hat on her and she looks like Queen Elizabeth...

And there's a small gang in the living room.

I painted the front door mahogany and attempted to give it some grain using two coats.

All the folks are glued in place so the interior is ready to place when the exterior is done. To that end I put two coats of craft paint "vanilla" on the walls and then masked all the trim. I then gave the trim and tape edge a coat of Dullcoat to seal the edges and pre-fill the grain for the trim blue that I'll paint on Monday.

While that was drying I decided to add more trim to the roof/Mansard junction. The roof was not fitting tightly and I didn't like it. I'm installing fascia boards that will be painted trim blue. I got about 1/3 applied before running out of time. 

I just wasn't happy with that top edge and the new trim helps.

Everyone have a safe, socially distant weekend!

  • Member since
    October 2019
  • From: New Braunfels, Texas
Posted by Tanker-Builder on Saturday, December 12, 2020 9:31 AM

Oh Boy! I am liking where this is going.

  • Member since
    March 2012
  • From: Louisville, KY
Posted by Builder 2010 on Monday, December 14, 2020 6:08 PM

I like that you like it.

The fascia boards are on and I closed up the gaps around the chimneys where I had to enlarge the slots to get the roof on. I used basswood pieces shaped to conform to the roof edge profile. I filled any remaining gaps with Bondic. 

I painted all the Fascia.

I then went back and flashed the chimneys with my last pieces of treated copper. Didn't want to mess around with treating any more so I'm glad I had enough.

So NOW the upper works are 100% complete!

I was able to carefully disassemble the front door and reverse it so it's now opening correctly inward. Luckily, I detailed both sides of the door so it didn't take much work getting it ready. Interestingly, when I separated the door, the Bondic that was in the middle of the joint was NOT cured since the UV light didn't reach it. And of course the two folks standing in the foyer were now right where the opening door was. So I had to rip them off and will re-glue them when the walls are in place so they'll be in the right spot. The standing man in the living room also had to be detached since he was where the fireplace hearth base was going. The room is NARROW.

I painted the smaller doors with mahogany like the main door. I then test fit them in their openings and realized I hadn't paid too much attention to these since they didn't fit the holes. They're almost 1/8" too long and slightly too wide. Easy fix... make the openings fit the door. They needed to be lower on the wall anyway. 

I painted all the other trim and corner posts on the walls in anticipation of them being joined. There's just a couple of spots where the blue leaked under the masking. I'll touch this up tomorrow.

Next up is glazing all the remaining windows and installing them. I don't have much of the trim blue left and I'm hoping that it will hold out for the porch and porch steps painting. If it does, I'll classify it as another "Hanukkah Miracle." I'm going to install 1/16" brass pins in the porch columns to hold them for painting and then to provide a solid attachment points for installation. 

  • Member since
    March 2012
  • From: Louisville, KY
Posted by Builder 2010 on Tuesday, December 15, 2020 4:50 PM

Exercise and work day... can't get much better than that!

Got the touchup painting done on the building trim. Piece of cake. 

Did a lot of painting. I did have another "Hanukkah Miracle" since my trim blue, not only lasted for all the painting, but I actually have some left for any accidents that may occur. I painted the edge boards of the porch, the entire edge and framing of the balcony, and the front steps, including the gray stair treads. I used MicroScale Liquid Mask to mask the LEDs before the airbrushing began.

After airbrushing the steps blue, I hand-brushed the gray treads.

I also painted the porch-bottom lattice. I didn't try and get them perfect since in real life, these lattices are not generally well cared for.

I drilled the bottom of the columns 1/16" with the drill in the Dremel Flexi-shaft after drilling a small starter hole with a pin vise. Unlike styrene, UV resin doesn't melt and you can power drill it without creating a gooey mess. The pins facilitated sticking them in foam to repaint all the repairs I did on them. I airbrushed them Tamiya flat white.

I finished opening up the small door openings and got them fitted without binding. When they were binding it was causing the thin wall to warp a bit so they needed to be a slip fit.

Last thing I did was start glazing all those windows. The task started with the doors. My laser cut demi-lune window acetate needed so triming since it was a little oversized. I never did laser cut the side lights for the front door. I just cut some scrap acetate from the fret for them. I had been toying with the idea of making some stain glass, but it's really not going to show up very well. I did put stain glass on the transom lights on the distillery and you really don't know they're there.

I got eight main windows glazed and have about 10 more to do tomorrow.

And with that, the final assembly will begin. My estimate of early January was too conservative for the main building. I find with modeling, once all the subassemblies are finally complete, the main assembly goes pretty quickly. However; I have not started working on the site itself and that will take some time. I know what it looks like in my head.

  • Member since
    November 2009
  • From: SW Virginia
Posted by Gamera on Wednesday, December 16, 2020 11:19 AM

Grumble, no matter how carefully you plan there always seems to be something that doesn't fit... 

Great job bringing everything in line! I really like the white with blue trim, it looks better everytime I see it. 

"I dream in fire but work in clay." -Arthur Machen


  • Member since
    March 2012
  • From: Louisville, KY
Posted by Builder 2010 on Wednesday, December 16, 2020 6:18 PM

Thank you! it's a really nice color which I didn't have to mix... right out of the bottle. I have a ton of images today. I had a long work session and covered a lot of varied ground requiring picture taking.

I started the session completing the porch: locating columns, gluing them in and installing all the lattice.

After deciding the setback, I marked it with the digital caliper used as a marking gauge. I then figured out the spacing using a metric ruler, calculator on my phone, and a pair of dividers (old school sort of). I then drilled a pilot hole to keep the 1/16" drill in place and drilled the seven holes with the drill in the Dremel. Because of the different lengths of the two sides, the spacing differed on each side.

I glued the columns in place with Gel CA.

Two columns were a tad short so I shimmed them with some Bristol Board.

I glued the steps in place with Gel CA and then reinforced the joint from behind with a piece of 3/32" square basswood. I then installed the lattice starting with the steps left side. When I had to joint two pieces of lattice I glued it to a small backing piece cut from the lattice's fret.

Not only did I reinforce the step joint, I also added some square stock to all the lattice corners.

I set this aside and used a cosmetic sponge to highlight the foundation stones. I used Nato Black, Flat Aluminum and White to add some interest to the field stone foundation. This is a common foundation material in Philadelphia where I grew up.

It was time to start getting serious. I glued the balcony to the front/right side of the building. It needed clamping and it helped bring that critical subassembly into square. I used Aleen's and then backfilled the joint with Med CA. The two red leads that are coming up through the turret floor feed the grain-of-wheat bulb that will light the cupola. I will have to splice these two leads to the two coming down from the roof assembly.

I set this aside and got lunch. When I got back to work I glued in the first floor to the front and right walls. Again it needed some strategic clamping to put it together and again I used a combination of Aleen's and Med CA.

I set this aside to dry and decided to attack the site situation. It took six trips under the layout and as many climbing around on top. Luckily, even at 75, due to my regular use of the bike and elliptical, I still limber/strong enough to do this. Frankly, when I started rebuilding this layout in 2012, I didn't know how many years I would be able to do it, but since I am, I'm still doing it. I can only reach this site by scooting under the platform and coming up in the gap at the back of the town between the gulchs. So each time I had to get onto the platform I first had to go underneath.

I'm moving the Gravely Building out of its position and putting it at the layout front facing away from the viewer. I had to disconnect it's power leads and, of course, the first two wires I disconnected were not the correct ones and had to get underneath again to do it right.

This is what the site looks like.

I took a piece of Strathmore Paper and measured this space and again, it took several climbs onto the layout to get it correct. I use a piece of packing dunnage which resembles a paper honeycomb to protect the track and my knees when crawling on top.

It's a tight fit! The picture distorts the fit since the black balcony floor is above the paper by 3 inches so it's not really overlapping as it appears.  There is a nice space in the back for a garage, and Rail Scale Models has a nice old style garage that would work nicely.

Here's Gravely tried out it its new location. Another reason to NOT GLUE you buildings in place.

And here's the view from the layout's edge. I'm going to add some details in the back. I have a nice Tichy fire escape kit that I'm going to use. I think I'll add a window or two in the rear with the fire escape and then have some trash/junk piles to roughen it up a bit. Adding a 3rd floor window is going to destroy that nice add mural. I have to plan the sight lines carefully so you can still look into Nighthawks. 

With the wall and floor dried I tried it with the newly completed porch. The gaps you see at the column tops will be closed when it's put up into the final position.

I went to put in the front door so I could correctly re-locate the two folks that would be posed there. I found that putting the door opening inward now made it impossible to get the door assembly in. I broke the joint, put in the door frame and then re-glued the door in place. With that done, I was able to put the folks back in position. You're not going to see hardly anything of that wonderful staircase. You can't see it through the open doors from the side rooms, and you can't see a whole lot looking in the front door. I spent a whole lot of hours on that foyer. One saving grace will be the illumination. Whatever you can see will be well lit.

I had to do more surgery on the 2nd floor plate. The changes I made to the wiring bundle caused some of it to interfere with the hall closet's ceiling. It was forcing the 2nd floor upwards. I took the Dremel and router and drastically cut away most of it. I kept checking to see if the wiring cleared. I had to sacrifice some crown molding that you'll never see. In fact, I didn't even have to have the closet hiding the wiring.

Gratifyingly, the staircase was not difficult to glue in by simply running a bead of med CA down the seams that connected it to the 2nd floor. My plan to attach the stairs to the 2nd floor and then drop it over the first floor with no first floor gluing. The reverse would have been impossible since you had to contort the stairs to get them to nestle into the 2nd floor. You'll see much more of the staircase through the turret windows in the 2nd floor since there's that big wall opening into the stairwell.

Here's looking straight down at 2nd floor as I'm attempting to get the left and back walls in place. There are some pinch points that will have to be massaged to get it into place, but that will wait until tomorrow.

Whew! Big day finished.

  • Member since
    October 2019
  • From: New Braunfels, Texas
Posted by Tanker-Builder on Thursday, December 17, 2020 11:33 AM

Hoo Boy!

 Now that's Awesome! Speaking of Stained Glass. Did you know you can use thinned model Car candy top coats to create it? Also you mentioned a Conversation. Most folks around here would say," What's That" .Oh, and one more thing. I am looking for twenty,Count them Twenty assorted Vehicles in " O " scale . Can you suggest anyone particular Mfgr? This would be for the rail Museum's Kids Run the Train layout which is Lionel " O "  and American Flyer "O27".

  • Member since
    March 2012
  • From: Louisville, KY
Posted by Builder 2010 on Thursday, December 17, 2020 6:25 PM

Due to the absolute probability of nobody seeing any of that front door detail from 5 feet away, I'm going to forego the stained glass, but thanks for the input.

Here's a good place to start looking for die cast cars. There are huge price differences in what's available from jewel-like resin models from NEO to plastic or die cast toys from various Chinese sources. There are several high-end British companies like Brooklin that produce splendid models, but they run $100+ each. I find NEO to be the most detailed 1:43 cars avaiable. 

https://www.diecastdirect.com

The other big die cast car vendor is American-Excellence. I've bought from both.

https://www.american-excellence.com

BTW: 1:43 is British O'guage. If you cut that scale in half you end up with 1:87 and that just so happens to be the global standard for HO (i.e., Half-O) scale. American O'scale is 1:48 which, as you know is also a great plastic modeling scale. Most model die cast cars in that size rang are 1:43 since many of the big collectors and builders were Bristish. They're slightly oversized for O'guage trains, but no one will notice. 

Getting true 1:48 car models is difficult. However there are some construction equipment models in true 1:48 (Classic Construction Models)

https://ccmodels.com

and many, many in 1:50 so they're slightly undersize. You see the most size troubles when you have a 1:43 car working with a 1:50 bulldozer. Oh well... CCM's models can get quite expensive especially if they're brass models.

http://www.dhsdiecast.com

This will get you lots of choices.


  • Member since
    October 2019
  • From: New Braunfels, Texas
Posted by Tanker-Builder on Friday, December 18, 2020 1:11 PM

Thank You;

    As you know,If I have mentioned it,I am the sitting President of the Board and Chairman of our model Museum and club. I have to keep the different departments in check. We've already spent more on the " Kids Run The Train" this year just to have committed projects for the H.O.T. Money request. The autos would really stuff it up tight!

     I guess I will start hitting the Flea Markets for something close!

  • Member since
    March 2012
  • From: Louisville, KY
Posted by Builder 2010 on Friday, December 18, 2020 7:01 PM

Yes! You can easily go broke buying little cars. You can also go broke buying little people, trees, etc., etc. My railroad is quite large so even silly stuff like gravel ballast for the tracks can add up quickly. I used roofing granules for ballast because it was the correct size, color and cheap @ 50# for $20. Even at that I needed almost 150 pounds of the stuf.

Another milestone day... The four walls are all connected, the foundation is on, and I got the porch swing installed.

The Walls:

I've learned a long time ago "when something is supposed to fit and it doesn't, don't force it!" I had been putting the wall sets next to their respective floor edges for quite a while, but that's not the same as actually gluing it up so the corners meet properly. I had tried to fit it on Wednesday and saw that it was trickier than I thought so I left it alone until today. Again, I tried to get it together, but it was being resisted in a couple of spots. I went after them one by one. Some of the culprits were baseboards and crown moldings that were interfering with the same on the new walls. Others were getting the partitions to nestle next to the fireplaces. I had to remove a little slice of the 2nd floor as it was interfering with the fireplace. After trial and error, I did get the corners to mate cleanly. I glued the floor edges and the corners and didn't worry if the partitiions were glued. They're not holding any loads. Still to go on are the corner trim strips that are already painted. 

The arrow denotes a 1/32" gap resulting from incorrectly cutting the side fascia board one thickness too short. I left the other long, but that was the wrong one. One of these days I figure out how this is supposed to go.

I needed to get the back door in place, but was faced with a dilemma. The door extended to the bottom of the first floor plate. This pushed the door further out of the building. I had three choices: extend the door opening higher, cut off the door bottom, or let it protrude a bit and trim it. I chose number three. You can see in this image that the door is at the bottom of the plate.

And here it is with the trim wrapped around. It may still need another coat of white. I toyed with using styrene, but ended up using stripwood.

Here's the house with all the walls now connected.

While this was drying I got working on the porch swing. It needed to be installed before the porch was installed since it would block access. I bought some 27 link chain that was bright copper colored and soaked it in the chemical blackening agent to age it.

I drilled the swing seat to receive 0.022" wire eye bolts. These are pre-bent ship parts that I bought years and years ago. I can make my own eyes too, but it's easier when they're already done. I measured the spread and drilled the balcony joists and installed eyebolts with some med CA.

I'd been thinking about the sequence on how to do this. I made short segments that would be the spreaders mounted on the seat. It was just an eyeball job based on the aglarity that looked right. I thought that the eyebolts were a little thick to directly connect to the chain links, so I used some 0.010" brass wire twisted to hold the chain to the eyebolts. I didn't like it.

Then I opened one of the eyebolts eyes and found that the eyebolt wire threaded right through the chain link. I scrapped all of the twisted wire connections and redid them all with the direct connection.

This worked great. I then cut the long chains to connect to the joists. I found that unlike the end chain links which only have one link taking up space in the loop, the middle chain link openings were too tight to let the eyebolt ring pass. I had to resort to the twisted wire method. But this this was only two connections instead of six.

This whole exercise took quite a while, but it was well worth it.

And here it is fully mounted on under the balcony. As careful as I was trying to be in getting the chains equal, I had to do some adjustment to get it to hang reasonably straight. It was also hanging too low even though I originally measured the overall height and the height I wanted the porch to sit to figure out the chain lengths, but I still had to fuss with it to get it right.

With the swing in place I installed the house proper on its foundation. I used Aleen's for this and it will dry over the weekend.

The house is now ready to receive all the windows, have the roof assembly installed and have the porch connected. My storage area is basically empty. Whew!

On another topic I want to have a dumpster behind one of my buildngs (the appliance store) and saw one of DHS Die Cast Construction Equipment site. It was $7 plus shipping, but that was a lot of money for one not-very-significant detail. Heck! I can print my own.

I went online, found some pictures and specs for a Waste Management 2 yard dumpster and drew it up on SketchUp in about an hour. I printed the bin and lid as two parts. The bin printed this afternoon. I did it 3-up figuring they all wouldn't be pefect. I was right, on one the supports broke free and the top rim warped. 

Here's the drawing that I produced.

The lids just came off the Machine while I'm writing this. I set the lids up four ways on the printer to see which one was most successful. Guess what? They all printed perfectly. Go figure? I will print the decals on white-background decal paper and the inkjet.

I got the lids. You can see that regardless of their orientation, they all came out pretty good. I should get two nice dumpsters out of this run. You can see layer lines pretty clearly on the one that I printed flat on the plate. The reason? The lid had a peak... a slight taper to the middle. Even at layers of 40 microns, a slight taper causes the aliasing, just like a shallow angle line on a bitmap drawing. The more angular the placement on the platen, the greater the number of layers to cover the same distance and the less obvious each one is. It's another reason to print on an angle.

I've put this drawing up on SketchUp's 3D Warehosue. It's pay-it-forward. I've downloaded a lot of stuff on that facility and put stuff up there whenever I have a model that's worth sharing. I had to thicken the walls on the lifting lugs. They're just think plate steel, but that woud be too thin in scale to be a functional model.

This little project will be all finished on Monday and I'll show it to you. With a 3D printer, SketchUp and an inkjet printer, the capabilities are almost limitless.

  • Member since
    October 2019
  • From: New Braunfels, Texas
Posted by Tanker-Builder on Sunday, December 20, 2020 7:20 AM

Hi ;

       Everytime I see printed stuff I wish I had the funds and grasp of the Computereze it takes.  I could produce modern ship parts with abandon. Those pieces look good. I found a possible source for autos. On hold till they get back to me.

       I have a question on the swing. Did you stand a figure next to it to check for seating heighth?

  • Member since
    March 2012
  • From: Louisville, KY
Posted by Builder 2010 on Monday, December 21, 2020 6:54 PM

You can get an actual hi-res 3D LCD Matrix resin printer for well under $300.00, but for the whole workstation you're looking something north of $500. That's not a lot of money for such a powerful process. You have to add to that the consumables which add up. I've kept track of every cent I've spent on this process since I first got into it in June 2019 and it's something around $1,300.00 and that includes even the alcohol used in cleaning the parts. For that investment, I've probably printed 4X that much if I was to pay commercial prices to have it done.

The swing? Just guess about where their knees would come to. It's not a critical dimension. What were important measures, as you see is fitting the windows under the balcony framing and getting the roof works to center properly on the rest of the building. 

WINDOW INSTALLATION DAY:

As I noted on Friday, I needed to install the window shades on the 2nd floor windows before gluing them in and installing the roof works. I used manila file folder stock to make them. I cut the strips on the paper cutter, but had to adjust them as I installed them. I used PSA to hold the shades to the window sash. I glued the shades onto the windows BEFORE installing them. I held the windows in place with Gel CA. I did the 2nd floor first.

Left Side: I also put a step up to the balcony door out of one of the large bedrooms.

Rear:

Right side:

I installed the remaining corner trim and filled those corner fascia board gaps. I then touched up the blue and any vanilla that was needed.

Of special concern was getting the windows to slip under the porch framing. While I thought I had boxed out the framing with enough clearance for them to slip in. I was wrong! I had to trim away some of the timbers, and then actually start chopping the curved top off the windows. In hindsight, that was the correct thing to do; just not have a curved top on those windows.

This one fit with just the framing trim and some minor arch reduction.

This was the trim job:

And here it is installed.

In this one, I just ground off the entire arch when I realized how much framing was going to be sacrificed.

With the windows in place I was ready to glue down the entire top works. I fed the lighting leads through their respective places. The attic wires came down through the tubular chase in the back room. The cupola light's leads came down through the turret rooms.

I was unable to center the roof over the building. The attic stair was forcing the building to the right by almost a 1/4". I was unable to detect this in all my trial fittings as a result of not having the walls tightly glued in place. You simply can't see that stair emerge in the attic from almost any view, so I sacrificed the top steps and rail allowing the roof to slide to the left and get centered. Being centered took priority over having and unseen stair.

This is the scrificical part.

I glued the entire roof in place with Aleen's and put a weight on top to hold it under it set. It's really starting to look like something.

I had to splice the cupola light leads that were sticking out of the turret window. Notice: I remembered to put the shrink tube pieces on the leads BEFORE I soldered them. Pretty sloppy splice job... not up to my standards.

 I then folded the leads unto themselves and stuffed them into the front left turret corner. I then covered them with a slip of balsa to hide them forever.

You can barely see this cover through the side turret window.

After getting the cupola wiring complete I was able to finally glue in those last turret winodws. And with that, all the windows are installed. Some of the gloss white on the windows will need some touchup.

Here's the underneath showing the various lighting leads.

I figured it was time to see if all the lights still worked... not that if the inside lighting didn't work could I do anything about it. All of the interior lights worked perfectly. And the cupola Grain of Wheat light worked too. But the porch lights did NOT. Of all the lighting problems I could have had, this was the only one that I could actually fix. I tested the circuit at various points and found that one LED seemed to work and two did not.

I used some MEK to remove the dried acrylic paint from the copper foil and broke out the joists to give me access. I will make this repair tomorrow. Don't know why the circuit failed. I may have to use surface wiring and put new ones in if I can't get newly soldered LEDs to work. But it's accessible. So in this case, Murphy's Law did not pertain. The worse thing would have been if the circuit feeding the chandelier would have failed. That would have been a bummer.

To bring the porch wiring down into the foundation, I'm going to run it in a simulated drain pipe. Once it goes into the porch plate I'll make a right turn and penetrate the foundation wall. Before installation I will age that brass.

Tomorrow I'll get these lights working and put in all the corbels. Then I install the porch and the balustade railing. Lastly, I will tie the circuits together under the foundation with a single point of contact to connect to layout power. I'm also going to craft a small wooden staircase from the ground to the back door. (about 4 scale feet).

  • Member since
    March 2012
  • From: Louisville, KY
Posted by Builder 2010 on Tuesday, December 22, 2020 5:25 PM

Short session due to a couple of things. My oldest grandson came over today to pick up my Meade EXT-125 computerized Maksutov-Cassegrain telescope kit. He wanted to look at the "Great Conjunction". It hadn't been out of the closet in at least 11 years since we moved to Louisville from Bucks County, PA. It's just too bright around here to use it without loading it in the car and going out where it's dark. I just didn't have the motivation to do that. He's young. He has a nice AWD Subaru so he'll get some use out of it. It's a wonderful instrument.

I fixed the lighting problem. I de-soldered the LEDs and on the bench they worked. So I soldered them on again, and they didn't. I did this one more time and the left one worked, but the right one didn't. Again, it tested okay on the bench. I surmised that the foil to LED solder joint was causing a problem. I soldered leads to the LED, tested it. It worked. Then I soldered the leads to the foil and tested it and Eureka! It worked. It also moved the LED closer to the front door which is what I wanted anyway.

After taking the picture, I replaced the joists and repainted the blue. It looks fine again.

With the lighting working I aged that brass tube, drilled a 3/16" hole in the porch to accept the tube and a corresponding hole in the foundation at right angles to the tube to pass the wires into the foundation space with the other wiring. 

It was time to glue the porch on and held it with a gravity clamp. I think I glued it about a 1/32 too low since the lattice is sticking out below the foundation. I may not fret this too bad since it gives a little lip up to the front door which is better. I may trim the lattice or... What I'm thinking is to put a thin coat of Scuptamold on the base and sink the building into it a bit. It would accommodate this slight misalignment and make it look like the building is actually anchored in the ground. Arrow shows the alignment.

Tomorrow, I'll put on the corbels and put on the balustrade. That will actually finish the model. What's not finished is all the work on the site. That will take a couple of days also. But I am ahead of my project plan schedule which had me completing the just the building around the first week in January.

I have two kinds of fencing for the property: picket and hairpin. I'm leaning towards the hairpin fencing. Both of these are laser-cut affairs. I'm also going to build a three-car garage for the back. I'm getting ready to buy the materials for that. I want the site completely finished before moving to any other projects.

  • Member since
    October 2019
  • From: New Braunfels, Texas
Posted by Tanker-Builder on Wednesday, December 23, 2020 12:08 PM

Now;

 The question is this. When the house is finished and the Electrical and Plumbing inspections have been done,When can I move in? I have a lot of models to move into that Model room! LOL.LOL. Looking Great!!

  • Member since
    March 2012
  • From: Louisville, KY
Posted by Builder 2010 on Wednesday, December 23, 2020 5:45 PM

The Certificate of Occupany is probably tomorrow or Friday. Utilities are hooked up so it's good to go.

As promised, today almost saw the end of the house building part of the job. I got the wiring harness finished. I got the corbels in place and then got the balustrade installed. All that's left is to do some white paint touch up, make the downspouts and possibly do a little roof weathering. The house was recently re-habbed so the paint and trim is all spiffy. I think this is where the owner of the distillery lives.

I initially was going to use copper foil tape as a positive and negative bus bar to tie the three circuits together and then jumper that to the power connector. I affixed the foil tape and then realized it was silly. I simply twisted the plus and minus leads together (separately, not as a one gigantic short-circuit) and then used ferrules to lock them all together. I use Euro-style connectors for two reasons. They really slick and I game back from Germany with a ton of them which is where the model railroad was first created. You can buy ferrules State-side from Ferrules Direct. The long red-black zip cord is long enough to reach under the layout and tie into the DC power distribution.

Carefully I rotated the model to each side and applied the corbels. I put the end ones in first, found the mid-point and put in that one and then divided the space again and put in the intermediate ones.

I carefully put the model upright and then started installing the balustrade. My first piece was glued using Testor's Transparent Parts glue. It was too slow. I then switched to med CA. I put in the two longest pieces and then started working the pieces that needed cutting. Luckily, I printed way more than required, because I almost used all of them. I printed these in the days when I was using straight Elegoo standard resin and it's quite brittle. In the process of cutting and fitting I blew up three of them. Yes! You read that right. They basically exploded.

I also had to grind a cope cut on the fitting end so each section would nestle into the end post of its neighbor. I was cutting the parts with my razor saw and it was putting way too much stress on the parts which was one of the failure modes. I then tried my brand-new mini-chop saw and it was a dream. I cut the resin like butter and made perfectly square cuts without over-stressing the rest of the part.

Here's the cope cut.

The front gap took me three tries. Try #1: I was using an end post and a small section of the rail. It looked ridiculous. Try #2: I just used a rail section. In the process of doing the final fit, I pushed down too hard and it exploded. Try #3: I used the mini-chop saw and was able to finesse the sizing using my 1" belt sander and careful pressure and got a nice fit.

I filled the little remaining gap with Bondic and sanded it off with my MicroMark power precision sander. I will touch up the white paint tomorrow. Notice: I was able to notch under the spindle so I could maintain the spindle spacing.

I got the remaining pieces on the right side and then need a short piece for the back right end. It needed a corner post on both ends. I was able to slice off a post on the chop saw and then splice it to the properly lengthed side piece. The glued in nicely and the balustrade was installed.

While the house is not "Completely" finished, it's close enough to show off. All that's missing is the downspouts and some weathering.

Just as a reminder, here's where it started.

And here was my final drawing used to create the model.

Being that all the 3D and laser cut parts were created directly from this SketchUp drawing, it is not a surprise that the model looks so much like the drawing. They are essentially the same thing. Every single thing you see was drawn by me before creating the model. No commercial parts were used except the laser-cut shingles. We're living in a marvelous age for model makers with the ability to say, "Gee... I wonder if I can build that?" and then doing it. If I can draw it, I can build it.

There are some differences between my model and Hopper's painting, mostly due to the inability to define what's going on in the unseen areas. But the flavor of the house is unmistakable. And we know that Hopper took license with the Haverstraw, NY house on which his painting was based.

When it's 100% finished I will take some more serious pictures will all the lights on, on the site, and then on the layout.

  • Member since
    March 2012
  • From: Louisville, KY
Posted by Builder 2010 on Thursday, December 24, 2020 5:27 PM

Punchlist Thursday:

While not 100% done, I did want to take some pics with the lights on. 

You'll notice a couple of things. The porch lights are too bright so I coated them with some Tamiya Clear Yellow to see if I can dull them down a bit. And you see that the roof to house seam is showing some light leaks. On the front of the house I used Bondic to fill the gaps and then painted them with blue. For the sides I found it more effective to use some Bristol Board slips to fill the gaps and then paint them. After taking the image I put some more blue on the right side piece.

I filled the few gaps in the balustrade with Tamiya White Fine Filler and then sanded and painted gloss white when the filler was dry.

I took some other closeup pics to show the interior. Dining room through the front window.

Dining room through the side window.

And the living room through the front window. It's hard to focus the iPhone 7 so it focuses on the room and not on the window's surface. I'll be taking more pictures with my Canon when it's 100% complete

I reattached the wiring harness below with Bondic when I found the servo tape was letting go.

And then I created the downspouts. I used 3/32 K-S brass tubing. I bend it with the K-S spring coil tube bending tools. Funny... Something plugged up the middle of my 3/32 bender. It was something plastic or epoxy that hardened right in the middle and I couldn't get it out. I tried driving it out with a piece of 3/32 drill rod, but all I succeeded in doing was spreading the spring's coil. I had enough of the tool on either end to make the bends I needed. JUST ENOUGH. If the bends were any further along on the tube, I couldn't have done it.

After the success I had with the mini-chop saw yesterday cutting the resin rails, I decided to change the blade to the non-ferrous cutoff wheel I bought along with the tool and used it to cut the brass. It was sweet! Perfectly straight almost burr free cuts. I was very pleased. After bending and cutting to length, I shaped some loops using MicroMark Parallel Jaw Loop Making Pliers and bent loops that needed soldering onto the brass. I used 1/32" phos-bronze wire for this. 

I used the Resistance Soldering Unit for this since it really is effective in working on parts needing good solder flow. 

I cleaned the excess flux in MEK and then popped them in the ultrasonice cleaner. Here are the four downspouts ready for chemical treatment.

I soaked the pipes in a bath of JAX Metal Browning soulution, rinsed them and then put them in a bath of JAX Patina treatment.

I'll pull them out this bath tomorrow and they'll be ready to install. All that's left is the roof weathering. I was going to make a TV antenna for the House, but decided, based on some input from readers, to not do it. I still have some more touchup painting to do and that will be done tomorrow also. And then it WILL BE DONE.

Merry Christmas to ALL and you're forgiven if you're not reading this on Christmas Eve or Day.

  • Member since
    March 2012
  • From: Louisville, KY
Posted by Builder 2010 on Friday, December 25, 2020 6:02 PM

Hope everyone is having a nice Christmas. Today was the official completion of the House by the Railroad part of the project. There's still more work to do, but not on this part. For starters, I took more pictures with my Canon EOS Rebel. The first is a composite of Edward Hopper's painting and my version. There are some differences which I described throughout the build, but the similarities are quite obvious. His appears taller and narrower, but if I were to build it to that spec, the rooms would have been very small or it would have been very large and very tall. As it is, the ceiling heights on the first floor are about 12 feet.

My perspective is a little off and I'm going to try and match it more perfectly next picture I take. His sight lines look to be at the center of the first floor window frames. I was centered on the balcony.

As you can see the downspouts are installed and I also got the plumbing stack vent located approximately where the kitchen and upstairs bath are. I never did detail a bath since there are no windows in that space and it's a collection point for all the electronics for the 2nd floor LEDs. I added some tar strips on the roof and did some minor weathering with pastels.

The only thing I didn't do was touch up the white on the window frames where they've been abraded by laying the building down on its various sides to work on it. I took 

I also set the building on the site template and I'm, frankly, worried. It really doesn't fit, or... if it fits it's really tight like right up to the next property lines and almost no space for a four foot pavement. The front steps will be right at the pavement. I may have to rethink this whole thing. The red lines are the template edges.

Angling the building did not help. Here are some more images of the total building.

And then I did some focus stacking closeups to try and show the interior. Notice that I did tone down the porch lighting quite a bit. Dining room:

Living room two views:

The kitchen:

And finally the front door area. It's pretty dark in that hallway and I wish I would have not attenuated that light. Image stacking with Zerene Stacker lets you get infinited depth-of-field to do shots like this. For closeups, depth-of-field is very short. Good model photography needs large DoFs to look more realistic. It's time consuming so I save it for the final shots of my models. You can just glimpse that staircase. Too bad. There were tons of hours of work on that.

So dear readers, stay tuned for the rest of the job with the site work and the carriage house. Again, hope you holidays have been good so far and have a Happy, Healthy, Safe and Socially Distanced New Year.

  • Member since
    March 2012
  • From: Louisville, KY
Posted by Builder 2010 on Monday, December 28, 2020 5:57 PM

Happy Monday. 

Just two House items today. I got the back steps built and printed and installed an electrical meter/mains hookup.

I also put together a 2 yard Waste Management Dumpster to put behind some of my businesses. I found specs for this online and then drew it in SketchUp. I printed it in two pieces; base and lid, and then glued them together with Med CA.

I have a Waste Management graphic that I will convert to a decal and apply after I paint it.

I have a laser cut kits to make wooden open steps from Rusty Stumps models. It consists of laser cut stringers and treads and a resin cast jig to hold the stringers in position during glueup. I needed to put a positive stop on the jig to keep the stringers aligned fore and aft. I tried gluing the stop onto the resin, but glue didn't stick to it. It probably is coated with mold-release. I then drilled and pinned the stop and that worked well.

As I usually do, I started using Aleen's Tacky Glue and followed it up with thin CA. The CA cures quickly in presence of the water-based PVA glue and then holds everything while the glue dries at its own pace.

I then notched the top and bottom steps to accept a piece of square stripwood and glued them in place. I topped it with a scale 1 X 3 and made a workable railing.

The electric meter is a print that I used before on my Appliance Store, but the foundation is a little taller so I went back to the original drawing and modified it. I also put a rib down the back of the conduits so they would be flat on the build plate eliminating overhangs and the need for supports. I printed it 8-up knowing that some would be scrapped. I actually only got two really good ones. I only needed one. Some of them had delamination in the thin parts. That's why I always print a lot.

After post-curing, cleaning it up, using Bondic to create the meter glass dome and then painting my "Galvanized Steel" mix, the piece was ready for installation.

I painted the steps neutral gray which is similar to the porch color. In this image it's just posing for the camera. I won't glue it in place until the House is set on its base. The utilities hookup is glued in. With a meter, the House can get its Certificate of Occupancy...

The steps are sitting a bit high and I'm going to shave some stock off the bottom of the stringer to lower it. The first step is taller than those that follow so there's some stock to remove.

With House building part behind me, I started, but did not complete, a major shop cleanup and some reorganization. I have a couple of workbench mod/build projects that I want to do to streamline some of the tasks I do. I want to move all the 3D printing stuff to a newly reconstituted table with a shelf above that will hold all the chemicals. I'll finish all of this over the next couple of weeks. Meanwhile, I'll be building the base for the House vignette.

I got some good news today. The editor of Railroad Model Craftsman magazine told me my Engine House article is in the to-be-published queue, and he agreed to accept an article on this project with a caveat. It must be a single part article of 2,500 words and only 20 images. I can do that, but it won't be easy for me. I am, if nothing, verbose, and it's a very complicate project. Wish me luck.

  • Member since
    October 2019
  • From: New Braunfels, Texas
Posted by Tanker-Builder on Tuesday, December 29, 2020 8:42 AM

Okay;

       Listen, verbose or not, you will figure it out. I have faith in your abilities!

  • Member since
    March 2012
  • From: Louisville, KY
Posted by Builder 2010 on Tuesday, December 29, 2020 9:34 PM

I appreciate your support. I'm writing the article now and I will conform to the editor's requests. It's not easy, but it will fit.

As I usually do, I only really clean up the shop between projects. I'm terrible that way. As a shop teacher I wasn't much better. I'd get engrossed with the kid's and the bell would ring. I would think it was the first bell. It was the second and they would all drop what they were doing and scoot out of the shop. It happened a lot. My lead teacher in the wood shop, would stop in my room ocassionally and just shake his head. It thought I was a total failure. I found out later, after I had left teaching and was working in industry that my students saw it completely differently. My shops were where the coolest stuff would happen. It's a shame I didn't know it when I was actually doing it.

I cleaned up all the benches and reorganized a bit. I'm going further with some bigger bench modifications which will happen after all the House work is done.

I have got a lot of modeling stuff!

After the cleaning I got to work in earnest making the base plate for the house. Before I had made the paper template. Today I transferred the design to some 1/8" Masonite. I made a seam past the House's foot print so I can work on the Garage portion on its own base. 

After cutting the pieces out with the saber saw, I was going to glue it to an equal thickness piece of foam core to build up to the correct thickness to give a proper curb. But before I did that I stopped, took a breadth and decided I better test fit the Masonite in the space on the layout before gluing on anything. And sure enough, it was just a tad too big. Maybe about 1/16".

Looking more closely you can see the very small area of overlap that I need to remove to be a perfect fit. Better too big than too small...

I trimmed the excess on my 4" bench belt sander. I tested it again took a bit more off and I know it's right. I put the pieces upside down on some kraft paper and sprayed it with 3M 90 Hi-strength adhesive. Unlike the more common 3M 77, this one doesn't let go over time. I wiped the pieces down with some IPA to remove any dirt and dust before gluing.

I bought the "erasable board" foam core. I glued it to the paper backside since I didn't trust the adhesion on the eraseable side. The glue holds like crazy and you don't let it dry first. You stick it together when wet.

I had gotten a bit of adhesive on the front side and removed it with GooGone. Tomorrow I'll trim the foam core to conform to the Masonite. I will drill the hole for the wiring and duplicate it on the layout. Then I will fully landscape the base off the layout. Splitting the base also makes it easier to handle the parts getting them onto the layout.

  • Member since
    October 2019
  • From: New Braunfels, Texas
Posted by Tanker-Builder on Wednesday, December 30, 2020 9:49 AM

Sir? Sir?

 I only charge $10.00 dollars to mow lawns, even if they are an odd shape. Very Neat My Friend.

  • Member since
    March 2012
  • From: Louisville, KY
Posted by Builder 2010 on Wednesday, December 30, 2020 6:16 PM

Thank you. I've written the article and did get it to 2,504 words and 19 images. I have another to add so it will be exactly 20 images. I hope the editor is impressed.

Today was an "out-of-the-box" kind of day. I spent a while cutting the foam core to conform to the Masonite. I located the power lead hole and drilled it and then tried the base on the layout. It fit well, but was too shallow. I added another layer of foam core to give me an adequate curb. 

I was still not happy with the house fit on the site or the viewpoint. While on my knees on the layout I looked over at the Idaho Hotel that sitting kind of isolated in a nice spot. I discounted that site because I didn't think it had the depth, but from my vantage point on the layout it looked promising. I went underneath, disconnected its light power leads and tried it out on the new base I made for the House. It sort of fit in two differnt directions.

One way:

Another way:

I took my House template over the site vacated by the Idaho Hotel and it fit nicely. Actually, it fit better than it would on Main street. The first view is from the rear.

And here's the new site from the main aisle.

It's a pretty neat location and gives uninterrupted view from the aisle.

I decided to put the House there! I cut another piece of Masonite and checked it out with the House's profile on it.

The set of transfer punches is serving as a gravity clamp on some road surface that delaminated and I'm regluing.

I then brought the house to its new location to see if I'm right.

The new site solves a lot of problems. It provides a terrific view of the front. It also is up against railroad tracks so it conforms to the title of Hopper's painting. And you can view it closeup and personal from the rear in the open middle of the railroad enabling folks to actually look in the windows and see some of the interior.

As seen in the above image, there will be some Sculptamold grading needed to blend the base into the landscape. I didn't even have to lose the trees that flanked the hotel. I'm very encouraged. Landscaping the new location will not take long.

But wait! There's more. I also tried the Idaho Hotel in the open lot at the front of the layout. It would face inwards, but It's not my favorite building being one of the few kits I built, and it looks pretty neat looking down Front Street. It looks appropriate next to Saulena's Cafe. I'll need to create some more sidewalk so the two buildings work together. BTW: That's a 56 Caddie Eldorado, which is one of my favorite cars of all time.

From the rear it has some interest with lots of windows.

There's some land behind and along side that will look good with some attention. Perhaps a Waste Management dumpster... Some parking on the side too. 

And the Gravely building will go back to where it was originally. I will cut out the new "old" base I did for the House so Gravely will drop into the space. It doesn't need the thickness since it's already on a base of the correct thickness. 

It's a win, win, win! And another reason why you should never, ever glue your buildings down. You never know what can happen to make you want to lift them off the layout.

  • Member since
    October 2019
  • From: New Braunfels, Texas
Posted by Tanker-Builder on Wednesday, December 30, 2020 6:33 PM

Hmmmm;

 You did that just so I would only charge you $ 5.00 to mow yer lawn. Ain't gonna happen!. See! The story continues. You saw a lead to a more sensible location and solved a problem for both buildings. Great going! Love your work, by the way.

  • Member since
    November 2009
  • From: SW Virginia
Posted by Gamera on Thursday, December 31, 2020 9:09 AM

Builder: WOW!!! She turned out fantastic! I'd love to see some more photos of your layout, I wish I could visit! 

"I dream in fire but work in clay." -Arthur Machen


  • Member since
    October 2019
  • From: New Braunfels, Texas
Posted by Tanker-Builder on Thursday, December 31, 2020 11:38 AM

Hey;

 I just noticed. Is that a 59 Caddy parked out front of the Hotel?

  • Member since
    March 2012
  • From: Louisville, KY
Posted by Builder 2010 on Thursday, December 31, 2020 5:13 PM

Yup! A 59 Caddie Eldorado. I was partial to 1950s Eldorados, or so it would seem. If you really want to see what my railroad is all about, there are two routes you can take. The first is my 8-year continuously running saga about its construction with literally all the gory details. It's up to 91 pages so it's a heck of read, but it's all there. You can access it here.

https://ogrforum.ogaugerr.com/topic/continuing-saga-of-the-pandampprr?page=1

Additionally, I've taken a number of YouTube vids about it over the years, from the first running a train until last year. It's interesting to see how it fills in over the years. It's under two names, Mylesandmore and myles marcovitch

https://www.youtube.com/user/mylesandmore

https://www.youtube.com/results?search_query=myles+marcovitch

Between all of this you will know more about my railroad than you've ever wanted.

Happy New Year.

  • Member since
    November 2009
  • From: SW Virginia
Posted by Gamera on Thursday, December 31, 2020 5:45 PM

Awesome thanks!!! Will check them out this weekend!

And Happy New Year to you sir!!!

"I dream in fire but work in clay." -Arthur Machen


  • Member since
    March 2012
  • From: Louisville, KY
Posted by Builder 2010 on Monday, January 4, 2021 6:04 PM

Happy Monday!

Started to work the new site for the House. Instead of using a ton of Sculptamold to fill in the back slope, I cut some foam core to fill the bulk of the space. I used 3M adhesive transfer tape to quickly and securely hold the three layers of foam core together. They were stair-stepped underneath to snug up to the slope. Notice I scribed and painted the four-scale-feet wide pavement on the street-sdie of the base. I also drilled the hole for the lighting wires and a corresponding one through the layout below.

I wrapped the base plate with Press-N'seal to keep the Sculptamold plaster from getting all over the base, and making the base removable. I glued the foam sandwich to the layout using Liquid Nails construction adhesive.

While this was curing I started fitting the scale railroad tie retaining wall parts in place. Before the wall can be actually built, I will put a bed down of sculptamold so the ties will look like they're actually set in the dirt. I ran out of time for the plastering, but I did mix some raw sienna artists tube acrylic in the water I'm using for the plaster to pre-tint it. This way, if it gets chipped it doesn't show bright white plaster. I used railroad ties in the distillery building next door as well. It makes a realistic and reasonable retaining wall and let me extend the backyard a bit since as it was, the back steps wouldn't fit.

  • Member since
    November 2009
  • From: SW Virginia
Posted by Gamera on Tuesday, January 5, 2021 8:18 AM

Some really good ideas on how to emplace the house on the layout- clever!!! 

And thanks again for the links! 

"I dream in fire but work in clay." -Arthur Machen


  • Member since
    March 2012
  • From: Louisville, KY
Posted by Builder 2010 on Tuesday, January 5, 2021 5:52 PM

Glad you enjoyed them. Just how far did you get on the OGRR Forum thread?

I got the sloppy stuff done today. I created all the grades with Sculptamold and embedded the first course of the RR Tie retaining wall into wet plaster so it will provide a realistic base for the wall.

As you can see I got the Sculptamold to a pretty good dirt color. When dry it will be lighter, but it won't be white. It still needs a coat of paint to glue all the ground cover in place. I also splurged and bought some complete floral pieces of Scenic Express. I normally don't do this, but I want it to have a garden with some color. This is a real focal point for the railroad and needs some special treatment. Sculptamold is a mixture of plaster of paris and some fibrous material. It adds bulk and formability to the mix. My mix might have been a little wet, but I was able to sculpt it reasonably well. I made it level with the Masonite baseplate.

Here's another view of the plaster as it was laid in.

And a closer look at the base of the retaining wall.

I'm not a big fan of landscape work. It's a little too sloppy and imprecise for my sensibilities. It's funny since a young boy I would play in the dirt for hours and had some great earth moving machines to do the job. I kind of grew out of it.

When the plaster set up a bit so it wouldn't slump I pulled the baseplate. I didn't want it to be cemented in, since, as you'll see, I'm going to do more work on it.

This is from the inside-layout view.

And a view from the aisle.

After pulling the base I masked off the areas where the house will sit so I can use a thin layer of plaster so the house beds down a little. As I noted some time ago, the porch lattice and front steps are a little proud of the foundation. Having an 1/8" of plaster will let the house settle in and even out the mismatch. The house just sits inside the mask line.

I will taper the plaster up to the mask, featheing it down to the edge. The edge matches the STM so I don't want to create a step. The house will be glued to the baseplate, but the baseplate WILL NOT be glued into its socket.

I'll work on the baseplate tomorrow. STM takes a long time to fully cure. The plaster of paris sets in hours, but the fibers retain moisture for days. Before you paint it with latex paint to hold the ground cover, you need to have the STM fully dry. It takes patience. I don't think I'm going to use STM on the baseplate. I stay will basic plaster for a smoother finish.

  • Member since
    November 2009
  • From: SW Virginia
Posted by Gamera on Wednesday, January 6, 2021 4:38 PM

Well actually I didn't get beyond the first page... Embarrassed I need a little time to work though the 91 pages!

Neat work on working her into the layout.


"I dream in fire but work in clay." -Arthur Machen


  • Member since
    March 2012
  • From: Louisville, KY
Posted by Builder 2010 on Wednesday, January 6, 2021 5:28 PM

Keep trying... I regularly change the intro to reflect what's currently happening. I also change the title to reflect this. It was requested by one of my many followers to change the title so folks would know something new was on the thread. The House will be done soon and I'll be working on the Bradley. So another post will be forthcoming from me, but on the modeling topics.

Today I got the retaining wall in place today using Aleen's Tacky Glue. With the first courese firmly glued in the STM it was pretty easy. If I hadn't retained that first row, I would have had to pin it with brass rods like I did with the Distillery retaining wall. 

You can see some of the STM is fully dried (the lighter stuff) and some thick parts are darker and still wet. By tomorrow it should be dry enough to paint and put on ground cover. I will add some weathering powders to age the ties a bit. They look a little bit fresh. I didn't get the platform done becasue my wife and I were distracted by the sedition taking place at our capital. I don't know about you, but I found it terribly upsetting and made making models not my first priority.

  • Member since
    March 2012
  • From: Louisville, KY
Posted by Builder 2010 on Thursday, January 7, 2021 6:31 PM

The first layers of Sculptamold (STM) is dry and I decided that I'd just use it again to do a finish coat that would fill in the gaps and level the backyard. It's still a bit rough and I might put a skin coat on it to remove some of the irregularities.

I also used STM on the House base. I realized that the fancy masking i did was unnecessary. I wanted the plaster to be under the House's edges so the house would embed in it. I pulled off the tape except for the small part from the sidewald up to the front steps. I then slathered on a layer of STM making it thickest at the house foundation edges and feathering out to the edges do it would still conform the plaster on the layout base. It will be dry tomorrow. This too might need a skin coat of regular plaster before the grass goes in. Consider all this as "rough grading" before the top soil goes down.

The end is truly in sight.

  • Member since
    October 2019
  • From: New Braunfels, Texas
Posted by Tanker-Builder on Friday, January 8, 2021 8:18 AM

Hmmm;

 How much longer do I have to wait to move in? I need to get my trains set up in the Study.

  • Member since
    March 2012
  • From: Louisville, KY
Posted by Builder 2010 on Friday, January 8, 2021 5:25 PM

Be patient young Padewan. Soon... very soon.

First thing I did today was work to get the House baseplate to fit into the socket on the layout. It took about 20 minutes of cajoling and sanding with a Multi-tool to relieve the tight spots and get the plate to slip in. The arrow shows the area of most interference.

It finally slipped in.

And here's the reverse view.

With the plate finally fitting, I needed to improve the surface finish of the applied STM. I used DAP Spackle that goes on pink and turns white when dry. It worked as it should and filled most of the low spots so the grass will have a nicely graded topsoil on which to grow. Before I did this I had to figure out why the steps were sitting almost a scale foot above the base. It turns out that there was globs of plaster underneath the house and porch that was pushing the building upwards. I had to resort to chisels and putty knives to remove the errant plaster.

I applied spackle liberally to fill the House's base.

And then did the same for the layout portion of the base.

And again the reverse view.

As an aside, while this was all drying, I was working on some other small detail projects. Included in them are two Waste Management dumpsters that I scaled from their documentation on the web, and two parking self-ticketing kiosks that I also found on the web. Both of these I drew on SketchUp and 3D printed. The printer's running great! That said, my next print is most definitely going to bomb. In Yiddish it's called giving something a "Kin-o-hurah" (sounds Irish), meaning enticing bad things to happen. All of this is 1:48 scale.

The dumpsters are a two-part print and the kiosks as single part. I produced the decals from images also found on the web and scale in CorelDraw. It's a several step process to do all this, but it's fun.

I had to create separated decals to fit inside the depressed section housing the keypad. With a 3D printer, some graphics software and access to the Internet, the sky's the limit in what you can do in modeling in the 21st century.

  • Member since
    October 2019
  • From: New Braunfels, Texas
Posted by Tanker-Builder on Saturday, January 9, 2021 8:25 AM

If I had Known;

     When you took those Kiosk pictures I would've gotten out of my Nomad and given you a big smile-LOL;LOL; If I had known a camera was pointed my way! Looking Good My friend!

  • Member since
    March 2012
  • From: Louisville, KY
Posted by Builder 2010 on Saturday, January 9, 2021 6:31 PM
Sorry! If I'd known you were there I would have warned you, "You're on camera." That's an old Franklin Mint 1:43 model so it has full engine detail and opening everything including the 2-part tailgate. I have two of their models that I've purchased over the years. The other is that 59 Eldorado convertible.
  • Member since
    October 2019
  • From: New Braunfels, Texas
Posted by Tanker-Builder on Sunday, January 10, 2021 9:31 AM

Aw C'mon;

 That is Franklin Mint? I didn't know they made them that small! Gotta tell you a funny. What would call a place where you pay for parking in a lot? There is a place not far from the Museum Building where they have to pay for parking. Many ask " Where do you pay for Parking?" And they are standing right next to the machine Clearly labeled KIOSK! LOL.LOl.

  • Member since
    March 2012
  • From: Louisville, KY
Posted by Builder 2010 on Monday, January 11, 2021 5:51 PM

Well now you can pay for parking in my little town since the machine is installed.

And another view...

I also placed the first WM Dumpster behind the appliance store after I gave it a coat of DullCoat to seal the decal.

As precise and finicky building the House, putting on ground cover is the exact opposite. It's sloppy, crude, rushed and very inprecise. I really see it as a necesary evil and I'm not very good at it. But regardless, it's very forgiving and things in nature aren't that precise in the first place.

The rushed part is the way the process works. I did the base under the house first and then did the socket on the layout. When I bring the two together I will add some more cover at the seam so the House will look like it part of the terrain. I used some medium tan house latex paint as the base coat. While it's really wet I sprinkle the various colors and textures of the ground cover. I used fine turf for the groomed grass and coarse turf elsewhere. When I said "rushed" it's becasue the latex starts drying quickly and stops being sticky enough to hold the material. I then used "wet water" (water, a few drops of dish detergent and some IPA) with a pippette dropper and then follow up with Woodland Scenics Scenic Cement also applied with a pippette. The problem I had was not matter how smoothly I laid down the ground cover, nor as gently as I added the droplettes, I still pushed the "grass" outwards that left little blank craters. The more you mess with it the worse it gets. So you keep wetting and adding more stuff until all the gaps are sort-of filled.

I have a hairpin fence that's going on the house boundary and I have some garden goodies (shown further down the page). I started to add undergrowth and bushes, but quickly realized that I had to wait for all the previously applied stuff to fully dry so I could use the heavier viscosity W-S Scenic Glue without messing up the grass. I'll do that tomorrow.

Here's another view.

The above was shot when there was still a lot of wet glue around.

I then did the same thing to the socket. I ran the ground cover into the existing terrain and feathered it so it won't look like it's just plopped there. I also vacuumed off all the debris and redid the track ballasting that was very disturbed during all this work. I have some more ballast work on the top right corner.

The aisle view shows some bare plaster on the very front edge of the grass. I will have to retouch those areas, leaning far over the layout and working backwards. 

Like any construciton site with existing "old" trees, they can get disturbed and the one on the left is just about shot. I will have to cut it down and replace it. I bought some garden stuff from Scenic Express that will go in at the end. I bought roses, forsythia, and some violets. The roses are tall and I'm afraid that I might have to craft some trellises. We'll see how it goes.


  • Member since
    October 2019
  • From: New Braunfels, Texas
Posted by Tanker-Builder on Tuesday, January 12, 2021 7:09 AM

  Hi;

          You could use Woodland Scenics Trellises or just take some Boxcar roof walks and cut them up and stand vertical in the line behind the garden!

  • Member since
    March 2012
  • From: Louisville, KY
Posted by Builder 2010 on Tuesday, January 12, 2021 5:49 PM

All good thoughts. However, with SketchUp and a 3D printer, I took literally a few minutes, drew a trellis, and printed it. The print took all of 15 minutes. Took longer to clean it up than it did to print them. The design was very simple so drawing time was very quick.

Here are the printed parts during the cleaning process.

I simply stuck them into some floral foam and shot them with Krylon Gloss White and they were done.

I had trimmed some dried Oak Leaf Hydrangia blossoms a couple of years ago thinking I was going to turn them into trees. They had a pretty good shape and could either be deciduous or evergreen. I was discouraged since I thought I have to remove all the little un-opened blossoms before flocking them, so they just sat on a box on the floor. I was going to throw them out in my cleaning spree, but after looking at their shape again, didn't toss them. Then today I realized that those un-opened blossoms would serve as more surface area to glue the flocking. 

I had to clip the dried actual blossoms, but left all the un-opened ones. I then sprayed them with the 3M-99 and dipped the branch into a pile of medium and dark green coarse turf and the results were pretty decent. Of the pile of branches that I have, most had a pretty severe bend in the top branches, so I didn't use them. The bush has a bunch more dead blossoms and I'm going to collect them. They have a good branching structure that's better than the W-S plastic trees, AND THEIR FREE.

The other one is smaller so I put it near the other existing tree. Incendetally, I simply pulled the old tree out and inserted the new big tree in the same hole.

With yesterday's ground cover nice and dry and I added all the garden flowers. I laid down a glob of W-S Scenic Glue and placed the plants in nice places. Then I went around the two sides and placed W-S undergrowth in alternating colors around the foundation. 

It was time for the roses. I used a #53 drill and pin vise to drill two holes; one for the trellis and ther other for the roses. Another blob of glue and they were in. I needed my phone light to see the holes through the ground cover that wanted to fall back into the holes.

I placed the house back into the socket to take a status shot, but it's not fitting quite right and I'll have to remove it tomorrow and do a little more shaving. Some of the spackle found its way into the socket tightening up the fit a tiny bit.

When it's fully seated it's going to look really good.

I painted the laser-cut hairpin fencing while still in its fret. I airbrushed it with gloss black.

After clipping them out of the fret, I made a dilling jig to simplify the field work.

This is why I had the #53 drill in the pin vise. It the clearance hole for the fence posts. Here's the pile ready to install tomorrow. The distance from the steps to the left edge is exactly two fence sections. I don't know that the length is going towards the right.

I'll fit the fence tomorrow when the House is off the layout. I'll have to be careful putting it back in the socket, which is another reason why I need more slop in the socket. I don't want to force anything. Once it's finally in the socket, I clean up the joint gap, hook up the lighting power underneath and the HOUSE PROJECT WILL BE DONE.

  • Member since
    March 2012
  • From: Louisville, KY
Posted by Builder 2010 on Wednesday, January 13, 2021 6:01 PM

Today, the House by the Railroad project is complete. My original project plan had completion on January 6. I'm exactly one week late. The new owners will be gracious and accept their house. The power was turned on today so they got their CofO.

Before the house could be turned over to the owners I had to finish up the fence installation, clean up the landscaping, fit the base into the socket and then landscape the joint. All was completed.

The trickiest part of fence installation was connecting it at the corners. Since this was laser-cut out of laser board it was effectively a two dimensional affair. This left the corners very insubstantial with effectively no gluing surface. I had to thicken the corners and create and end post since the sections had an end-post on one end, but none on the other. I used some thin strip stock which I doubled, used med CA to glue together and then re-shaped the mounting tab so it conformed to my #53 drilled holes. After assembling the fence I re-painted all this gloss black.

This was what the corner post looked like prior to touch up painting. The flowers had to protrude through the fencing, which took some careful manipulation with a tweezers to coax them through the fence bars.

After installing all the fencing which I had (as I noted yesterday, there was enough for the perimeter) I went back and touched up the landscaping at the edges in preparation for reinserting into its socket.

Here's a shot with all then fencing installed and re-painted. I did this work in the shop on my normal workbench.

I had to shave some spackle out of the socket area and sanded the house base to taper it a bit from the bottom layer upward so it fit more easily. It dropped in! Then I had to fill the gaps. I think I erred here. Some of the scenic cement got into the joint and it will effectively glue the house base into the socket making future removal difficult. I'll worry about that when I have to worry about that. Since the lights went on perfectly, and none of the furniture or people broke loose in all the manhandling, I won't have to pull it up for a long time. Probably when I'm gone and my wife or kids want to sell it all off.

So let's start with the only final rear view I made with the iPhone. I made most of the final pictures with my Canon using Zerene Stacker Depth-of-Field enhancement software. I added the steps which crosses over the socket gap. I also re-touched the RR tie retaining wall. The seam is effectively hidden on this view. I carefully added the scenic cement and sprinkled the ground cover, held with wet water and scenic cement to lock it all in.

Notice that the fence ends 3/4 the way back on the sides. I bought this fencing from River Leaf Models and I don't think Andre Garcia is currently running that business.

Now for the finished front shots.

I don't know about you, but it came out looking exactly as I foresaw it in my mind's eye. I wanted a garden in front, and there's a garden. I wanted an interior and you can see it from the front, and from the rear you can get really close. You can't see the dining room from the rear since you're looking at the kitchen, but you can see it from the front. It was singularly the most complex scratch-build project I've ever attempted. It all started being able to draw those Mansard windows. It couldn't have been donw without 3D capablility... a ton of 3D printing. The interior was a whim that was a load of fun. It's heavy and miraculously, I didn't break anything in all the moves I had to make to get it done.

I'm expecting that this will be an upcoming article in Railroad Model Craftsman magazine. No publication date has been given and it could be 2022.

Thank you all for following along. My next project will be the Bradley with BUSK.

  • Member since
    October 2019
  • From: New Braunfels, Texas
Posted by Tanker-Builder on Thursday, January 14, 2021 9:57 AM

Now;

      The finished home is gorgeous. Now what are the property taxes set at? After all, I need to be able to move my ever increasing horde of models and trains in there. I must say, following this build, although NOT in a model Rail Magazine is different, it has been a pleasure.

      I would love to live next door to you. You need to do a Vessel of Class( A Motoryacht ) of the period in that scale. Boy, could we have fun with that!, I now await the sound of the lonely steam engine whistle in the background! GREAT JOB my friend!!!

  • Member since
    March 2012
  • From: Louisville, KY
Posted by Builder 2010 on Thursday, January 14, 2021 5:53 PM

Thank you! I asked about where in FSM's forum would I post it and was told to do it in Dioramas. I think it was a good place to do it. There's really no difference between making a scale model vignette and building a reasonably scale model railroad.

Model railroading is such a vast hobby encompassing everything from creating a functioning railroad enterprise with timetables, freight bills, etc., all done in replicating a specific railroad in a specific period of time, to a toy train layout running around in circles with a little man popping milk cans out of a freight car. And everything in between.

My railroad is one of those weird hybrids combining scale buildings and scenery with 3-rail track and sort of running around in circles... big circles.

I chose 3-rail becasue it's just so much easier to wire and run. With a dedicated power rail track cleaning is much less of a big deal. There's that dedicated spring-loaded roller picking up the power.

With 2-rail, although more scale, power is picked up by a set of wheels on one side of the loco and neutral on the other side. This means that track dirt that normally gets on the wheels can interrupt the power flow. Then there's the polarity problem. 2-rail is DC so one rail is hot and the other ground. When the track turns back on itself in a reversing loop, the polarity would shift creating a direct short. Therefore; you need to insulate one of the rails as it rejoins the loop. All of this makes 3-rail much more forgiving. 

But because I have large curves, I can run big engines. 2-rail curves are always wider than 3-rail, which has it's lineage back to Lionel O'guage with 31" diameter curves to run around under a Christmas tree. With larger curves available in 3-rail, scale-length engines and cars became available in the 1990s and that's when I got back into the hobby.

The modern locomotives are all DC. When running on 3-rail AC, they have rectifiers inside to get the DC. And all of them have terrific sampled sound systems with computers equivalent to old IBM 386s. It was those sound systems that got me back in the hobby. I had toy trains as a kid with a permanent layout. I sold all the stuff in 1992 thinking I would never have trains again. In 1995 I got it all started again.

  • Member since
    March 2012
  • From: Louisville, KY
Posted by Builder 2010 on Tuesday, January 19, 2021 5:44 PM

My next plastic job is the Meng Bradley with Busk and full interior. That will be started in a week or so. And I just put this baby on layaway at Scale Reproductions. It intrigued me as it's rated as the most complete helo kit ever. As I've said before, I tend to buy models on uniqueness, complexity, parts count, decal quantity and how big the instruction book is. This one ticks all those boxes. I haven't built a helo kit since I was a kid in the late 50s. And that's a long time ago, folks. So stay tuned for a build thread on this one. I'm going to search the FSM Forum to see if any have been posted before me.

I'm partial to kits with interiors and engines and this one has both. I'm going to detail the engine compartment since it's so much fun. Another reason for this kit was being able to pose it with blades folded. I don't have room for a 1:35 helo with spread rotors. So stay tuned.

  • Member since
    October 2019
  • From: New Braunfels, Texas
Posted by Tanker-Builder on Wednesday, January 20, 2021 10:30 AM

Oh!

 You are a modeler like me! I just loved Submarines and other things like Planes where you can take one side and see all the goodies inside. If they don't have it, I build it! Now I will find out with the TreibFlugel how 1/35 kits other than Armor have come along. 

   I used to love Bandai's early 1/48 scale armor. Always a challenge to hide the seam where I opened it up to show the included interiors. Tamiya's ME-232? I loved thaat it was all clear. You should one .You can see all the greeblies I loaded it with!

JOIN OUR COMMUNITY!

Our community is FREE to join. To participate you must either login or register for an account.

SEARCH FORUMS
FREE NEWSLETTER
By signing up you may also receive reader surveys and occasional special offers. We do not sell, rent or trade our email lists. View our Privacy Policy.