SEARCH FINESCALE.COM

Enter keywords or a search phrase below:

"Foiled" Again: B17G Build

21292 views
101 replies
1 rating 2 rating 3 rating 4 rating 5 rating
  • Member since
    December 2013
Posted by seadog30 on Monday, February 17, 2014 8:06 PM

Thanks! Working my way back toward the tail.  Chaplain's Office had several panels damaged and tore loose when the tail broke.  I cut this area away and will make foil panels to simulate this later.

  • Member since
    December 2013
Posted by seadog30 on Sunday, March 30, 2014 11:56 AM
I FINALLY finished the fuselage except for the cockpit roof.  I'm going to do that when I install the windows.

I began the wings last week.  "Chaplain's Office" #3 engine broke off from its mount upon crash landing.  I therefore cut away the kit firewall and scratch built one.  

  • Member since
    January 2012
  • From: Hatfield
Posted by Misty on Sunday, March 30, 2014 5:46 PM

awesome foil job, i admire your skill and patience!

  • Member since
    December 2013
Posted by seadog30 on Sunday, March 30, 2014 8:07 PM

I was able to get one of the engines foiled up.  

I also cut away the side where the super charger pipe would pass.  I cut an aluminum tube in half and filled it in.  

  • Member since
    December 2013
Posted by seadog30 on Sunday, March 30, 2014 8:08 PM

Thanks for looking!

  • Member since
    December 2013
Posted by seadog30 on Sunday, March 30, 2014 8:14 PM

I cut away the area where the super charger pipe passes because of the wheel well.  I then cut an aluminum tube in half and filled it in prior to foiling.

  • Member since
    December 2013
Posted by seadog30 on Sunday, March 30, 2014 8:18 PM

  • Member since
    December 2013
Posted by seadog30 on Friday, June 20, 2014 5:40 PM

I FINALLY got the wings almost finished.  Progress on them was slow but I like the way they turned out so far.  I still have a few touch ups but hope to be moving on to the vertical stabilizers soon.

  • Member since
    January 2011
  • From: Commonwealth of Virginia
Posted by Tal Afar Dave on Friday, June 20, 2014 7:58 PM

Great efforts on the wings!!  Looks awesome, love the foil finish!!

Keep up the great work!

2022 New Year's Resolution:  Enter 1 group build and COMPLETE a build this year!!  Why Photobucket did you rob me of my one Group Build Badge???  Must be part of the strong anti-Monogram cartel!!!

 ]

  • Member since
    December 2013
Posted by seadog30 on Friday, June 20, 2014 8:44 PM

Thanks for the kind words.  I finished one of the wings and discovered the B-17G's had vents on the wing tips because of the Tokyo Tanks.  I had to pull the foil, and cut out an opening in the wing tip.  I then used a spare wing and carefully cut one of the vents and put it in place.  More sanding and I got the result I wanted.  Set me back a few weeks and then I needed a break from the foiling!  

  • Member since
    June 2013
Posted by bvallot on Saturday, June 21, 2014 9:12 PM

These are really coming along!  Can't wait to see more.  =]

On the bench:  

Tamiya F4U-1  Kenneth Walsh


  • Member since
    June 2014
Posted by Charles_Purvis on Monday, July 14, 2014 2:26 PM

Bravo!  Beautiful, meticulous work.  Will follow with real interest.

  • Member since
    January 2012
  • From: Hatfield
Posted by Misty on Monday, July 21, 2014 4:42 AM

i was wondering if you had made progress, I noticed a fall in availability of foil and an increase in aluminium prices Stick out tongue

those wings look awesome.

  • Member since
    December 2002
  • From: Bury St Edmunds, Suffolk, England
Posted by Bish on Monday, July 21, 2014 5:34 AM

Nice work on those wings.

I am a Norfolk man and i glory in being so


On the bench: Airfix 1/72nd Harrier GR.3/Fujimi 1/72nd Ju 87D-3

  • Member since
    December 2013
Posted by seadog30 on Monday, July 21, 2014 2:03 PM

LOL! I finished my last piece of foil and can finally start putting this thing together.  You should be able to get Reynold's Wrap in the stores again! :)

  • Member since
    December 2013
Posted by seadog30 on Monday, July 21, 2014 2:05 PM

LOL! I'm done with the foiling portion, the stores should be able to stock up again!

Vertical Stabilizer(s)

  • Member since
    December 2013
Posted by seadog30 on Monday, July 21, 2014 7:51 PM

Finished the roof of the cockpit.  Windows and other details will come later.  I'm starting on the engine cowlings and cowl flaps.  Hopefully I'll be able to do some assembly soon.......

  • Member since
    December 2013
Posted by seadog30 on Saturday, November 29, 2014 6:09 PM

I've been working on the engines, cowl flaps and engine nacelles.  Almost done and hope to start assembling the entire plane!  Here's the process, step by step.

  • Member since
    September 2003
  • From: AandF in the Badger State
Posted by checkmateking02 on Saturday, November 29, 2014 7:27 PM

This is turning out great!  Exceptional work!


  • Member since
    December 2013
Posted by seadog30 on Saturday, November 29, 2014 7:58 PM

Thanks. It took several attempts to figure out how to do this and make it look the way I wanted.  Then, I had to do four times.  I'm almost done with both wings and hope to be moving on the assembly soon!

  • Member since
    December 2013
Posted by seadog30 on Sunday, May 17, 2015 9:23 PM

I finally began painting "Chaplain's Office".  "Chaplain's Office" was an O.D. painted aircraft and was not left in aluminum like later in the war.  After painting the initial O.D and Gray, I LIGHTLY ran fine sand paper over the surface which brought out the surface detail, seams and panels.  Later on I'm going to use pastels but haven't got that far yet.  I've also found it much easier to work with sub-assemblies rather than the whole plane at once.  The wings and horizontal stabilizers will go on last after the windows and decals.

Starboard wing. The "blobs"are small pieces of artist gum that cover the flak hits.  When removed, the holes will be visible with the aluminum exposed around the damage. Tape pulled off my black de-icer boot color which needs a touch up too.

#4 engine.

#1 engine

Here's my tail gun modification.  I drilled out the plastic, used Miliput to form the canvas and hand made the piece where the barrels will be mounted.  Still needs some additional work but I'm getting there.  Hope to put in more time this week.  I'm at a point where EVERYTHING is a sub assembly that takes time. Thanks for looking.

  • Member since
    February 2011
  • From: Bent River, IA
Posted by Reasoned on Sunday, May 17, 2015 9:41 PM

Quite an impressive undertaking and fantastic story to boot.  Given all that tedious work I think I'll refer to you as "Job", because you have to have his patience.

Science is the pursiut of knowledge, faith is the pursuit of wisdom.  Peace be with you.

On the Tarmac: 1/48 Revell P-38

In the Hanger: A bunch of kits

  • Member since
    July 2011
  • From: Armpit of NY
Posted by MJames70 on Sunday, May 17, 2015 10:44 PM

Story gave me a bit of a pause, and reminded me of a bit of poetry I first came across in one of my high school English textbooks -

en.wikipedia.org/.../The_Death_of_the_Ball_Turret_Gunner

  • Member since
    June 2013
Posted by bvallot on Monday, May 18, 2015 7:55 AM

Seadog, I missed your last couple of installments here.  This is starting to come together now! =]  I'm thinking about it more now about how jealous I am that your rivets are all raised.  I'm about to mount a massive campaign to rivet a B-17E but alas they will nearly all be lowered into the surface with my riveter tool.  I do plan on getting some Archer rivets to use in conjunction...but let me says "hat's off to you" bud.  You've even given me something to think about with regards to the engine nacelles.  =]

Can't wait to see more.

On the bench:  

Tamiya F4U-1  Kenneth Walsh


  • Member since
    April 2015
  • From: New Hampshire, USA
Posted by UKguyInUSA on Tuesday, May 19, 2015 10:56 AM

Great foil work...look forward to seeing how this baby turns out! : )

  • Member since
    June 2013
Posted by RobGroot4 on Tuesday, May 19, 2015 4:33 PM

This looks really awesome.  I'm pretty certain I would not have the patience to foil a whole aircraft and then paint over it.  The results are speaking for themselves though!

Groot

"Firing flares while dumping fuel may ruin your day" SH-60B NATOPS

  • Member since
    June 2007
  • From: New York
Posted by jcbitter on Tuesday, May 19, 2015 6:54 PM

Very impressive

  • Member since
    December 2013
Posted by seadog30 on Thursday, November 26, 2015 11:46 AM

Progress was slow but steady and I finally got time to post.  Couldn't find the parts I wanted to represent the flanges for the supercharger piping.  I finally came up with an idea and can't believe it worked-flex staws cut and glued together!  Try it!

Here's the installed straw piping.  The picture is dark but it looks pretty good installed.  Once weathered I hope to bring out the details.

Radio room gun mount ring still in progress.


Gloss coat and 384th BG decals from Mike Grant.  Bullet holes and tail damage too.

And finally the nose..........I can't begin to say how much Mike Grant helped me with the decals!!!! GREAT GUY!  I'm in the process of sealing the decals and putting the flat coat back on.


And here's the rest of the sub-assemlies.  I have never build a model in sub-assumblies before but because of the size have found it to be MUCH easier!  Right now all the large portions are compleded and ready to go.  I have to put in the windows and a few more minor interior details and will be ready for assembly soon!


Hope you like it, Happy Thanksgiving!


Rick

  • Member since
    August 2009
  • From: Borlando Fla home of the rat
Posted by TREYZX10R on Thursday, November 26, 2015 10:56 PM

Just caught up with this Rick,excellent craftmanship! Looking forward to the next update!

jkz
  • Member since
    March 2016
Posted by jkz on Tuesday, March 22, 2016 4:53 PM

seadog30

Hi,

I'm new to the Forum although I have been following it for years.  I'm partial to building B-17's and wanted to post the project I've been building for quite some time.  I'm a long time military collector/model builder and have always wanted to do something unique.  Several years ago, I acquired artifacts from a pilot in the 384th Bomb Group.  His B-17, "Chaplain's Office", was damaged by German fighters on November 26, 1943.  When the crew bailed out, the ball turret gunners parachute got caught on the plane so the pilot and bombardier stayed behind to try and help him.

The German fighter pilots saw what was taking place and instead of shooting "Chaplain's Office" down, they escorted the stricken bomber back to a German Luftwaffe base.  The pilot and bombardier could not pull the wounded gunner back inside the plane and they crashed landed at the base.  The Germans later took several photos of the crashed bomber and it was clear to me that this would be the basis for my project.

I began with Monogram's 1/48 B-17 G and the challenges began almost immediately!  

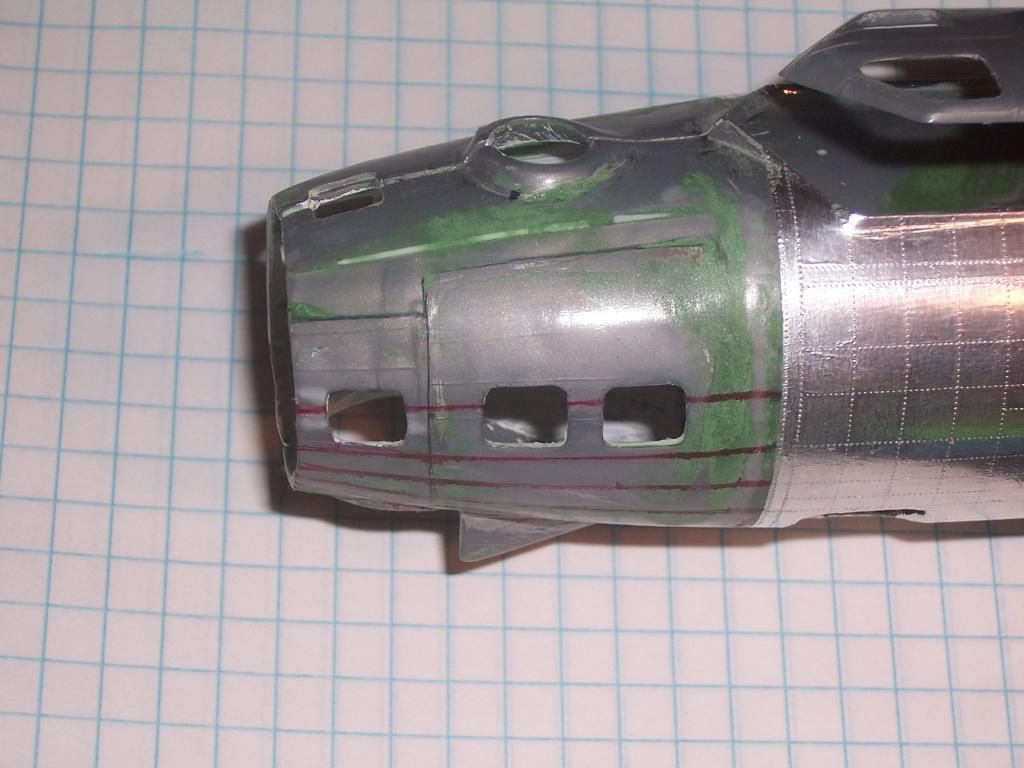
Above: "Chaplain's Office" did not have modified windows on the port side nose. I therefore had to use an additional kit and conform the nose to match that particular aircraft. 


Hi Rick,

Followed with interest your project.  The pilot of the plane was my Uncle Ted.  Appreciate your having gotten the story out there. 

J. Zitnik

JOIN OUR COMMUNITY!

Our community is FREE to join. To participate you must either login or register for an account.

SEARCH FORUMS
FREE NEWSLETTER
By signing up you may also receive reader surveys and occasional special offers. We do not sell, rent or trade our email lists. View our Privacy Policy.