SEARCH FINESCALE.COM

Enter keywords or a search phrase below:

Eduard Me110 - Felix Brandis

7828 views
31 replies
1 rating 2 rating 3 rating 4 rating 5 rating
  • Member since
    September 2013
Eduard Me110 - Felix Brandis
Posted by AdeB on Sunday, September 28, 2014 9:34 AM

Begun this Eduard weekend kit for my girlfriend who loves Dashhounds, told her the story of Brandis and his dogs during the war.

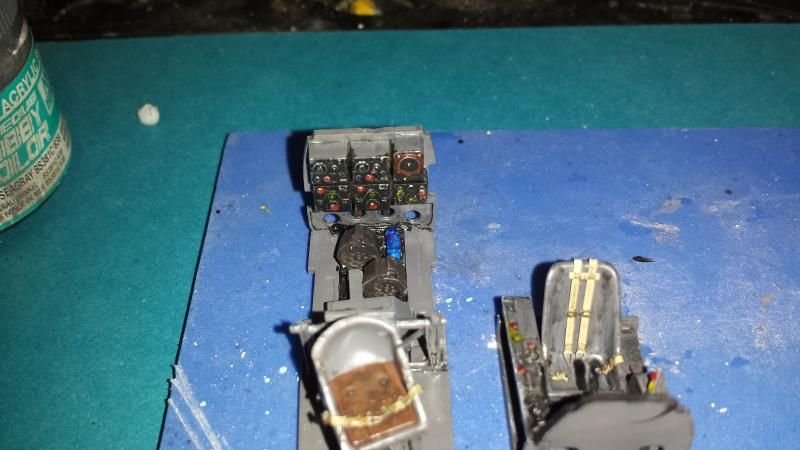
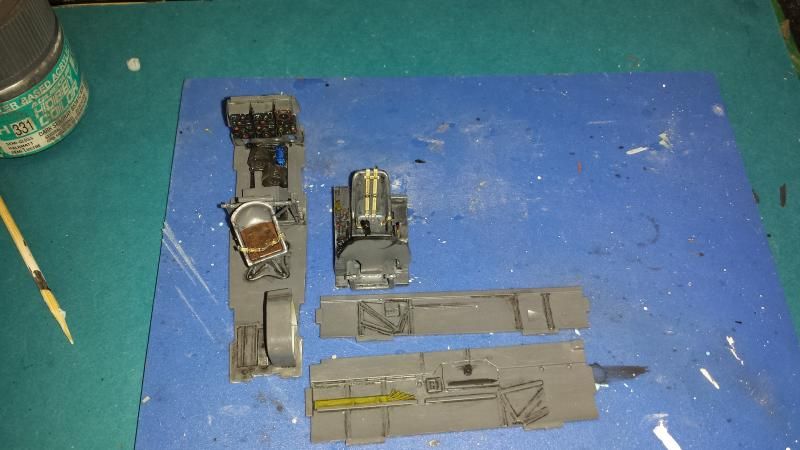
Begun the cockpit, another coat needed on oxygen bottles. I added some belts, figured most would be hidden as it will be closed up so didn't bother threading pilots belts through seat back.

More updates as I progress.

  • Member since
    September 2013
Posted by AdeB on Sunday, September 28, 2014 9:43 AM

The belts are Eduard too.

  • Member since
    December 2002
  • From: Bury St Edmunds, Suffolk, England
Posted by Bish on Sunday, September 28, 2014 10:00 AM

Nice start, which 110 variant is this.

I am a Norfolk man and i glory in being so


On the bench: Airfix 1/72nd Harrier GR.3/Fujimi 1/72nd Ju 87D-3

  • Member since
    September 2013
Posted by AdeB on Sunday, September 28, 2014 12:31 PM

BF110E

  • Member since
    November 2003
  • From: State of Mississippi. State motto: Virtute et armis (By valor and arms)
Posted by mississippivol on Sunday, September 28, 2014 9:29 PM

Looking forward to seeing the rest of the build.

  • Member since
    March 2010
  • From: MN
Posted by Nathan T on Sunday, September 28, 2014 11:00 PM

Nice cockpit. This kit is hard to find now in the Profipack boxing.


  • Member since
    December 2013
  • From: Greenville, TX.
Posted by Raymond G on Sunday, September 28, 2014 11:22 PM

Looking good!  Raymond

On the Bench:

U.S.S. Arizona (Revell)

P-51D Tribute (Revell)

57 Chevy Bel Air


  • Member since
    August 2009
  • From: MOAB, UTAH
Posted by JOE RIX on Monday, September 29, 2014 12:10 AM

Very nice looking office Raymond. Looking forward to the rest of your build.

"Not only do I not know what's going on, I wouldn't know what to do about it if I did". George Carlin

  • Member since
    June 2010
  • From: Rochester, New York USA
Posted by rocker286 on Monday, September 29, 2014 12:29 AM

Excellent detail work! Can't wait to see the rest of the build!

4badges

  • Member since
    December 2002
  • From: Bury St Edmunds, Suffolk, England
Posted by Bish on Monday, September 29, 2014 11:58 AM

Thanks Abe, I've got the weekend edition, so will be watching closely.

I am a Norfolk man and i glory in being so


On the bench: Airfix 1/72nd Harrier GR.3/Fujimi 1/72nd Ju 87D-3

  • Member since
    February 2014
  • From: N. MS
Posted by CN Spots on Monday, September 29, 2014 10:21 PM

Watching this one too.  I have the 110D profipack on the bench right now. It's a great kit but one of the most challenging I've ever worked on.  Looking forward to this!

Nice job on the 'pit btw!

  • Member since
    March 2003
  • From: Western North Carolina
Posted by Tojo72 on Tuesday, September 30, 2014 7:56 AM

Great start on the office

  • Member since
    September 2013
Posted by AdeB on Wednesday, October 1, 2014 6:49 AM

Quick test-fit of fuselage/cockpit and it all goes together very nicely indeed. Just a few extra bits to fit in the rear cockpit position.

  • Member since
    February 2012
  • From: Olmsted Township, Ohio
Posted by lawdog114 on Wednesday, October 1, 2014 7:07 PM

Nice work so far.  I built the C when it first came out.  The fit of the nose is tricky if your closing it up.  The fit of the engine nacelles is horendous too.  Stock up on sandpaper, you'll need itThis guy did a bang up job on his....

http://modelingmadness.com/review/axis/luft/lyle110c.htm

Joe

 "Can you fly this plane and land it?...Surely you can't be serious....I am serious, and don't call me Shirley"


  • Member since
    September 2013
Posted by AdeB on Thursday, October 2, 2014 8:47 AM

Fuselage together. Lots of work in spite of it being a "weekend" kit. Obviously weekends are longer in the Czech Republic.

  • Member since
    December 2002
  • From: Bury St Edmunds, Suffolk, England
Posted by Bish on Thursday, October 2, 2014 11:40 AM

Some nice work there.

I am a Norfolk man and i glory in being so


On the bench: Airfix 1/72nd Harrier GR.3/Fujimi 1/72nd Ju 87D-3

  • Member since
    September 2013
Posted by AdeB on Saturday, October 4, 2014 2:20 AM

Nose on, not a major drama. Just a little filling and sanding.

Also some work on the undercarriage. A little held back as my airbrush is kaput and I am awaiting a new one through the post.

  • Member since
    September 2013
Posted by AdeB on Sunday, October 5, 2014 8:29 AM

Just "fitted" the engine nacelles....wow. Just awful beyond words.

Where's my filler...?  back soon.

  • Member since
    December 2002
  • From: Bury St Edmunds, Suffolk, England
Posted by Bish on Sunday, October 5, 2014 9:14 AM

really, that bad. That's not good.

I am a Norfolk man and i glory in being so


On the bench: Airfix 1/72nd Harrier GR.3/Fujimi 1/72nd Ju 87D-3

  • Member since
    September 2013
Posted by AdeB on Sunday, October 5, 2014 9:50 AM

 yeah...here's some progress on the upper surface. This was the least problematic area.

Still working on the gaps underneath..

  • Member since
    February 2014
  • From: N. MS
Posted by CN Spots on Sunday, October 5, 2014 7:08 PM

They seem to be the Achilles heel of Eduard's 110 kits.  I wish they would have made the seam where the manifolds are.   I spent a week trying to make mine presentable.  The gap on the bottom part of the nacelle was so bad I thought it was deliberate to allow for flap movement.  If you scale it up it comes out to about 8 inches wide on mine!  

On other sites I've seen them use milliput for the bottom gap claiming that regular filler could not span the void.

  • Member since
    March 2010
  • From: MN
Posted by Nathan T on Sunday, October 5, 2014 8:31 PM

A bit of advice too late now but, a trick on the nacelles I found on a French forum, a guy trimmed off some of the leading edge of the wing where the nacelle attaches to, allowing the nacelle to be pushed farther back on the wing, making the gaps not near as wide. You just have to be careful of where you cut so you don't cut into the bottom wheel well where it is visible. I wish I saved the link...


  • Member since
    September 2013
Posted by AdeB on Monday, October 6, 2014 12:45 AM

Yeah, next one I build I shall use Miliput for sure.

  • Member since
    September 2013
Posted by AdeB on Thursday, October 9, 2014 10:30 AM

Finally got some paint on.

  • Member since
    February 2012
  • From: Olmsted Township, Ohio
Posted by lawdog114 on Friday, October 10, 2014 7:07 PM

Nice work so far.  I've heard they fixed the nacelle issues on the G versions.  

Joe

 "Can you fly this plane and land it?...Surely you can't be serious....I am serious, and don't call me Shirley"


  • Member since
    September 2013
Posted by AdeB on Saturday, October 11, 2014 3:54 AM

Main camo on and mottling begun. A couple of little areas where the RLM76 meets the RLM75 need a touch up.

I have a "broken" airbrush that has the tip of the needle accidently snapped off. I discovered that it is now perfect for mottlng - it only allows a little pressure through an gives a nice "splodge"

  • Member since
    September 2013
Posted by AdeB on Saturday, October 11, 2014 9:43 AM

 Tail fins worked on the sprue. Guaranteed they would have broken had I decalled/wethered on the aircraft.

  • Member since
    September 2013
Posted by AdeB on Sunday, October 12, 2014 10:19 AM

 Decals and some weathering under way. On holiday from Tuesday, visiting Ypres and Arnhem so a little break. ahead.

  • Member since
    September 2013
Posted by AdeB on Tuesday, November 4, 2014 9:16 AM

  Back from my European jaunt.

 Just done some dot-filtering - first attempt and rather good i think it has turned out. Obviously still glossed but should look even better once matt coated.

  • Member since
    June 2014
Posted by BrandonK on Tuesday, November 4, 2014 10:10 AM

I really like how this turned out. I need to get brave and go for a kit with the mottled camo but I'm afraid it may be cringe worthy. Great job!

On the bench:

A lot !! And I mean A LOT!!

2024 Kits on deck / in process / completed   

                         14 / 5 / 2  

                              Tongue Tied

JOIN OUR COMMUNITY!

Our community is FREE to join. To participate you must either login or register for an account.

SEARCH FORUMS
FREE NEWSLETTER
By signing up you may also receive reader surveys and occasional special offers. We do not sell, rent or trade our email lists. View our Privacy Policy.