SEARCH FINESCALE.COM

Enter keywords or a search phrase below:

Eduard 1/32 Messerschmitt BF109E-3 - "FINAL REVEAL!" (8.18.15)

7631 views
51 replies
1 rating 2 rating 3 rating 4 rating 5 rating
  • Member since
    April 2015
  • From: New Hampshire, USA
Posted by UKguyInUSA on Saturday, August 15, 2015 3:02 PM

Eduard 1/32 Messerschmitt BF109E-3 "Build Update #4"


Hello Guys,

I've been away taking a few days break with the missus, visiting family in Augusta, Maine and just got home, so, now it's time to play catch up. The following images are where I had got to before we left, but, I didn't have time to post, so here goes....


I started off by masking the central hub of the propeller assembly, then airbrushing RLM 70 Schwarzgrun onto the propellers and the spinner. When dry, I removed the masking and assembled the spinner around the propeller:


Next, I moved onto the canopy and windscreen section. First, I masked the three separate sections, then airbrushed the internal color of RLM 02 Grau. I let that dry, then I airbrushed the RLM 71 Dunkelgrun top-coat onto them. When that had dried, I airbrushed a coat of matt/flat varnish to seal the paint. When the clear coat was touch dry, I carefully removed the masking tape, but, there were a couple of spots where paint peeled that would require some touch-up:


It was now time to give the plane and peripeheral parts a gloss clear coat in preparation for decaling. I allowed that to dry overnight, then started to apply decals. I began by applying the main decals, followed by the smaller stencils, onto the upper and lower wings, the portside fuselage, the starboard side fuselage, the cowlings, the drop tank and lastly, the propeller blades:


When the decals and stencils were completed, I sealed them in with a gloss clear coat and allowed that to dry overnight. I was then ready to move forward with the weathering stage, and first, I applied some delicate chipping with XF-16 Flat Aluminum to the plane, cowling and wheel bay doors. I then removed paint from the propeller assembly to reveal the aluminum paint beneath the topcoat.


After completing the chipping, I then mixed a dark dirt wash using a pea sized amount of black oil paint, a smidgeon of white and odorless mineral spirits, ensuring it was a nice water consistency. This was then brushed liberally over all parts and allowed to dry for 30 minutes. I then removed the excess with Q-Tips/Cotton buds to leave an amount on the surfaces that provided the weathered appearance that I liked:


This was followed by mixing three different color washes for applying oil, dirt and fuel streaks onto everything:


I then applied a mud wash to the main wheels and painted the rear wheel. Everything was then given a final matt/flat clear coat:


When the final matt flat clear coat had dried overnight, I then mixed a wash for applying the exhaust and oil stains with using a black and a tan acrylic wash mixed together, then I scraped the end of a 6B pencil to produce some graphite dust which I used in the mix to simulate soot. This was also used to apply the gun powder residue stains around the two wing mounted machine guns.


Next, I assembled and fitted the wheels onto the plane, followed by the propeller assembly and then the wing mounted machine guns:


Next, I painted the gun-sight and super-glued it into its location:


After fitting the gun-sight, I glued the windscreen into location to protect the gun-sight from accidentally being knocked off. I then assembled the bullet-proof head-rest into the center canopy and glued that in the open position:


Now, I moved onto fitting the smaller fiddly pieces- the pitot tube and the aileron counter-balance weights:


And, finally for this update, I fitted the aerial onto the rear canopy section...


The only thing that I had left to do to complete my build was to add the open canopy tie-cable and antenna cables. I did this using 1.010" EZ-Line fixed with super-glue applied with the tip of a cocktail stick.


So, that's it for this build update! If you'd like to watch my YouTube "Build Update #4" video then here is the link for that:

https://youtu.be/IUE6BTVeqX8


The "Final Reveal" photos will be coming soon!

In the meantime, thanks for following this build, thanks for watching the update videos and thanks for leaving comments, greatly appreciated!


Enjoy the rest of your weekend, happy modeling and have fun! Big Smile Yes

Cheers BeerBeer
Martin

  • Member since
    June 2014
Posted by BrandonK on Tuesday, August 18, 2015 9:39 AM

Wow, it looks fantastic. Your paint and weathering is superb. The details are awesome. Looking forward to the reveal.


BK

On the bench:

A lot !! And I mean A LOT!!

2024 Kits on deck / in process / completed   

                         14 / 5 / 2  

                              Tongue Tied

  • Member since
    April 2015
  • From: New Hampshire, USA
Posted by UKguyInUSA on Tuesday, August 18, 2015 11:22 AM

BrandonK

Wow, it looks fantastic. Your paint and weathering is superb. The details are awesome. Looking forward to the reveal.


BK


Thanks for your kind words Brandon, greatly  appreciated! Smile

I'm about to upload my "Final Reveal" photos, so, should be within the hour!


Cheers Beer Beer

Martin

  • Member since
    April 2015
  • From: New Hampshire, USA
Posted by UKguyInUSA on Tuesday, August 18, 2015 12:09 PM

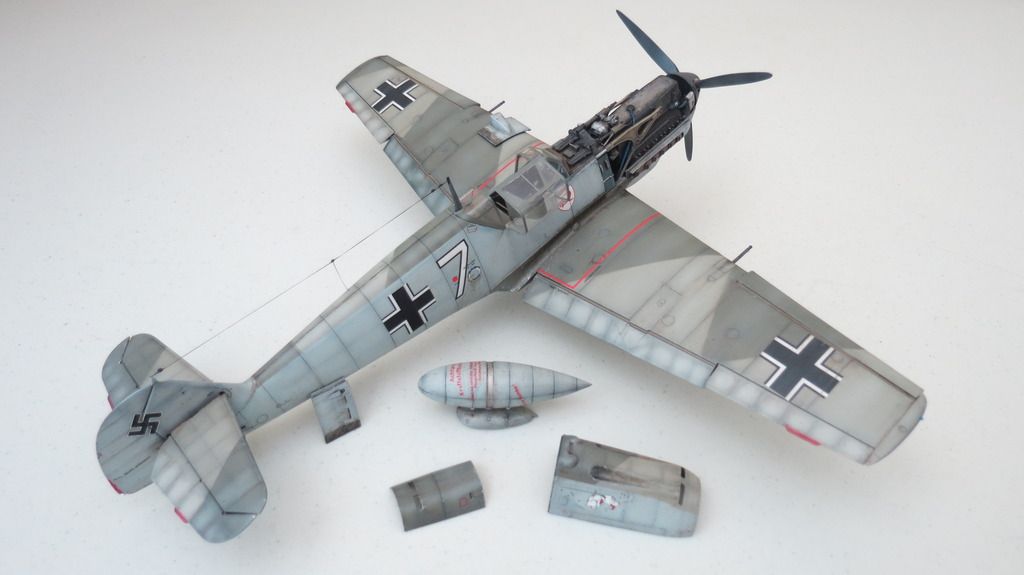
Eduard 1/32 "Weekend Edition" Messerschmitt BF109E-3 "Final Reveal" (8.17.15)

Hello Chaps,

So, she's finally completed and here are my "Final Reveal" photos of her. I hope you like?! :)


If you've followed my build updates for this kit, you'll be aware of the fit issues that were present when trying to assemble the engine, bulkhead and firewall into the space provided, having to file around 2.0mm away on the width and length of the engine assembly and fuselage internal walls combined, along with filing down the length of the internal assembly and its location points within the fuselage to get it to fit. I also had to jack up the engine with spacers to ensure the exhausts stacks lined up with the apertures that they go through, as well as file the exhaust aperture to make them wider and longer due to the exhausts being larger and not going through.

Regarding whether I think this is a VFM kit - "Value For Money" kit, the answer would be an unequivocal and resounding "No"!

I base this on the cost of the kit compared to the newly tooled Revell Germany 1/32 BF109G-10 that I modelled. Although the Revell kit doesn't come with a Daimler-Benz DB601A engine, it does have nice cockpit and external details and goes together extremely well without the need for filler. The Eduard kit is 50% more expensive than the Revell Germany kit and one has to ask oneself..."Do I want to pay 50% more just to include an engine that is problematic to fit?". Also, if you chose not to display the engine with the Eduard kit, then I would say that you'd be wasting your money paying the extra for a kit that includes an engine, for it not to be used...you definitely should choose the Revell kit if you take that option and save yourself $12.00.

The Revell Germany 1/32 BF109G-10 was $23.95 and the Eduard 1/32 BF109E-3 was $35.95.

Regarding providing my scores for the overall quality of engineering, quality of molded product, quality of details included, quality of the instruction manual and the decals and packaging, I score as follows:


Quality of Engineering Fits: 4/10 based on how badly engineered the internal assemblies were when fitting inside the fuselage halves. Filler was required in a few places. The worst gap was at the underside front end of the two fuselage halves. The gap was around 2.0mm, which led me to file down the front exhaust stacks and the inside faces of the fuselage halves where they mated. Without destroying the exhaust stacks, there was still a gap of around 0.75mm that I filled. There were also gaps all around the rear area of the wing assembly where it joins the fuselage on the belly of the plane. I had to fill these areas, too.

Quality of molded product: 9/10- the product is very nicely molded, parts are crisp and clean with just a few spots of flash. No warp was present on any of the parts and ejector pin witness marks were away from visual area. I didn't have any sink marks to contend with and the canopy parts were nice and clear with minimal distortion when looking through. There are finely recessed panel lines and rivet details, although some of the rivet details are too fine for them to show when the plane is given a dirt wash during the finishing stage. A good rivet forming tool would cure that, should you have one and want to attempt improving them.

Quality of details included: 8/10- The included engine, bulkhead and firewall have nice details that look good at the end of the build, but they require a lot of patience to get them to fit. The undercarriage is nicely detailed too and includes brake lines and treaded tyres. The cockpit is very nicely detailed and would e enhanced more with after-market seatbelts and foot pedals, but as always, I build "Out of Box" to establish a fair assessment of what you're getting for you money compared to similar kits.

Quality of the instruction manual: 9/10- I thought it was very easy to follow, but, it would be nice if the painting instructions were in color. They are if you chose to buy the "Profi-Pak" version instead of this "Weekend Edition" version.

Quality of Decals: 8/10- There is only one option for color and markings. The main decals are very good and go down well onto a gloss clear coat in combination with a good decal setting solution, adhering to recesses and surfaces features. However, some of the smaller stencils had a tendency to "Silver" which I hid with weathering and painting ove the silver areas.

Quality of packaging: 9/10- the box is a two part base and lid construction with the base being very sturdy cardboard. I prefer the base and lid style rather than the open end version provided by Revell. Sprues are packaged in clear polythene bags.

Further notes: I wouldn't recommend this kit to a beginner because of the fit issues, it's definitely a kit for the more experienced modeler who has patience to overcome the fit issues.

Did I enjoy the build?- I did up until the fit issues arose, then it was a "Debbie downer" until those were overcome. Then after that, the rest of the build was smooth sailing.

Would I buy this kit again? NO! I'd hope that Revell Germany would Introduce the engine details into their kits for an extra $5.00 which I'd pay willingly, as long as there were no issues. Or, I'd recommend the Trumpeter 1/32 BF109E models that come complete with engine details, a fret of PE and rubber tyres.


If you'd like to see my "Final Reveal" video for this update, here is the link to that:


https://youtu.be/ej54LH-n8iY


Thanks for following along and for your comments, much appreciated!  Smile Yes

Happy modeling and have fun!

Cheers  Beer Beer
Martin

  • Member since
    March 2013
Posted by patrick206 on Tuesday, August 18, 2015 2:32 PM

Martin - This is one beeyutious build, what perfect finishing details. It's just so enjoyable to see the progress from beginning to end. Thanks for sharing, always nice to see your work.

Patrick

  • Member since
    March 2015
  • From: Streetsboro, Ohio
Posted by Toshi on Tuesday, August 18, 2015 5:23 PM

This is one of the most amazing builds I've ever seen.  Such award winning quality work!

Toshi

On The Bench: Revell 1/48 B-25 Mitchell


Married to the most caring, loving, understanding, and beautiful wife in the world.  Mrs. Toshi


  • Member since
    June 2003
  • From: Cavite, Philippines
Posted by allan on Tuesday, August 18, 2015 7:56 PM

Truly. Solid. Build. She's a real beaut!

No bucks, no Buck Rogers

  • Member since
    January 2015
Posted by BrandonD on Wednesday, August 19, 2015 12:00 AM

Well not recommending it aside, you did an AMAZING job on this! I looked at your weathering, and it just makes me wish I had applied it similarly in, well, all my other builds I've done. I think the dirtiness on the bottom looks perfect. I also love the oil staining. I need to get better about focusing on those little details, because they really take this build to the next level.

The -E is my favorite Bf-109 variant, and you've done it proud.

Thanks for sharing it all with us, and thanks for the tips that will hopefully save me some swearing on my -E7.

-BD-

  • Member since
    August 2013
Posted by Jay Jay on Wednesday, August 19, 2015 9:11 AM

Martin,

You're a true professional in every sense of the word, in your modling skills as well as your video's.  Very enjoyable and informative to view and thank you so much for taking the time and effort to explain how it should be done.  Cheers


 I'm finally retired. Now time I got, money I don't.

  • Member since
    February 2006
  • From: Cincinnati Ohio
Posted by DantheMan85 on Wednesday, August 19, 2015 2:18 PM

Your Bf109 turned out great!  Looks like the engine attached better to the fuslage than my 1/32 Cyber Hobby E-7 Trop# 3223.  The placement of the drop tank in the instrutions was pretty vague.  Hoping to pick up one of those Eduard kits, next time I visit my local hobby shop. Cool

On my Work Bench: Tamiya Ford GT 1/24

Up Coming: ?


  • Member since
    February 2012
  • From: Olmsted Township, Ohio
Posted by lawdog114 on Thursday, August 20, 2015 1:36 AM
An entire load of awesome......great tutorial too. Thanks for taking us along.

 "Can you fly this plane and land it?...Surely you can't be serious....I am serious, and don't call me Shirley"


  • Member since
    April 2015
  • From: New Hampshire, USA
Posted by UKguyInUSA on Wednesday, August 26, 2015 10:45 PM

patrick206

Martin - This is one beeyutious build, what perfect finishing details. It's just so enjoyable to see the progress from beginning to end. Thanks for sharing, always nice to see your work.

Patrick


Thanks Patrick, greatly appreciated!


Cheers :)

Martin

  • Member since
    April 2015
  • From: New Hampshire, USA
Posted by UKguyInUSA on Wednesday, August 26, 2015 10:46 PM

Toshi

This is one of the most amazing builds I've ever seen.  Such award winning quality work!

Toshi


Thanks for your very kind comment, Toshi, greatly appreciated!


Cheers,

MartinBig Smile

  • Member since
    April 2015
  • From: New Hampshire, USA
Posted by UKguyInUSA on Wednesday, August 26, 2015 10:47 PM

allan

Truly. Solid. Build. She's a real beaut!


Thanks, Allan, greatly appreciated!


Cheers,

Martin Big Smile

  • Member since
    April 2015
  • From: New Hampshire, USA
Posted by UKguyInUSA on Wednesday, August 26, 2015 10:50 PM

BrandonD

Well not recommending it aside, you did an AMAZING job on this! I looked at your weathering, and it just makes me wish I had applied it similarly in, well, all my other builds I've done. I think the dirtiness on the bottom looks perfect. I also love the oil staining. I need to get better about focusing on those little details, because they really take this build to the next level.

The -E is my favorite Bf-109 variant, and you've done it proud.

Thanks for sharing it all with us, and thanks for the tips that will hopefully save me some swearing on my -E7.

-BD-


Hey Brandon,


Thanks for your kind comment, much appreciated!


I don't think I've ever done a clean build since I started modeling last year, all have been weathered to some extent.


Cheers,

Martin Big Smile

  • Member since
    April 2015
  • From: New Hampshire, USA
Posted by UKguyInUSA on Wednesday, August 26, 2015 10:51 PM

Jay Jay

Martin,

You're a true professional in every sense of the word, in your modling skills as well as your video's.  Very enjoyable and informative to view and thank you so much for taking the time and effort to explain how it should be done.  Cheers


Thanks for your very kind compliment Jay Jay, greatly appreciated, and, you're weclome for the videos, I really enjoy creating and editing them!


Cheers,

Martin Big Smile

  • Member since
    April 2015
  • From: New Hampshire, USA
Posted by UKguyInUSA on Wednesday, August 26, 2015 10:54 PM

DantheMan85

Your Bf109 turned out great!  Looks like the engine attached better to the fuslage than my 1/32 Cyber Hobby E-7 Trop# 3223.  The placement of the drop tank in the instrutions was pretty vague.  Hoping to pick up one of those Eduard kits, next time I visit my local hobby shop. Cool


Thanks Dan, greatly appreciated!


If you followed this build from the beginning, you'll have seen that the engine was a PITA to fit and not a kit I'd recommend for the price that it costs! Go for a different kit that has an engine, not this one.


Cheers,

Martin Big Smile

  • Member since
    April 2015
  • From: New Hampshire, USA
Posted by UKguyInUSA on Wednesday, August 26, 2015 10:55 PM

lawdog114
An entire load of awesome......great tutorial too. Thanks for taking us along.
 

Thanks for your kind comment Lawdog, greatly appreciated!


Cheers,

Martin Big Smile

  • Member since
    November 2013
Posted by Spitfire on Thursday, August 27, 2015 9:00 AM

This piece ought to be in a museum somewhere.  Nice.

  • Member since
    February 2007
  • From: Brunswick, Ohio
Posted by Buckeye on Thursday, August 27, 2015 11:25 AM

Thank you for a very nice and informative WIP.  You did an awesome job on this kit.  Your weathering is just perfect.Bow Down

Mike

  • Member since
    February 2014
  • From: N. MS
Posted by CN Spots on Thursday, August 27, 2015 4:45 PM

Truly incredible piece of art.  Thanks for sharing!

  • Member since
    April 2015
  • From: New Hampshire, USA
Posted by UKguyInUSA on Saturday, January 23, 2016 7:44 PM

Spitfire

This piece ought to be in a museum somewhere.  Nice.


Thank you for your very kind compliment, Spitfire, it's greatly appreciated and please accept my apologies for my very late response o your comment!! Surprise


Cheers Big Smile

Martin

JOIN OUR COMMUNITY!

Our community is FREE to join. To participate you must either login or register for an account.

SEARCH FORUMS
FREE NEWSLETTER
By signing up you may also receive reader surveys and occasional special offers. We do not sell, rent or trade our email lists. View our Privacy Policy.