SEARCH FINESCALE.COM

Enter keywords or a search phrase below:

Revell Pro-Modeler 1/32 Junkers Ju 88A-1 Bomber - "FINAL REVEAL!!" (3.18.16)

7302 views
94 replies
1 rating 2 rating 3 rating 4 rating 5 rating
  • Member since
    April 2015
  • From: New Hampshire, USA
Revell Pro-Modeler 1/32 Junkers Ju 88A-1 Bomber - "FINAL REVEAL!!" (3.18.16)
Posted by UKguyInUSA on Thursday, January 28, 2016 8:52 PM


Hello Chaps,


Since completing my Monogram Pro-Modeler 1/48 scale Heinkel He 111H-22 and enjoying every minute of the build, along with the end result, I wanted to do another German Bomber, either the Ju 88 or the Do17. Very kindly, one of my YouTube viewers sent me this kit- the Revell Pro-Modeler 1/32 Junkers Ju 88A-1 Bomber, for which I was extremely grateful!


So, without further ado, let's get onto the introduction:


The kit comes in a sturdy two piece lid and base box with a 24 page black and white instruction booklet, a decal sheet that offers two sets of markings- one for Geschwaderstab KG 30 and one for a "Battle of Britain" version Kampfgeschwader 54, six bags of sprues; five bags containing a total of 13 grey sprues and one bag containing a single clear sprue making a total of 281 parts.


This kit was originally released as a new tooling in 2008, then again in 2011 with a new box art and last released in 2013 with new box art and some new parts. This kit is the second release of 2011.


The Box Art:


IMG_4480_zpsrkz5znkt.jpg


IMG_4481_zpsfijjw6kk.jpg


IMG_4482_zpsgnrjzfn7.jpg


IMG_4484_zpsrsdbxwsu.jpg


Specification table on the side of the lid:


IMG_4483_zpsrfs47vno.jpg


With the lid removed one can see the contents are contained in a nice sturdy base with overlapping sides:


IMG_4485_zpsvydf5oiz.jpg


The 24 page black and white instruction booklet:


IMG_4487_zpsj9rwtzta.jpg


IMG_4488_zpswmirzlrt.jpg


IMG_4489_zpsca9ejqlo.jpg


IMG_4490_zpsld37b59s.jpg


IMG_4491_zpschcdq6cx.jpg


IMG_4492_zpsr8eeotqh.jpg


IMG_4493_zpsluj0faqm.jpg


IMG_4494_zpshtvftd3o.jpg


IMG_4495_zpsp7rgsgso.jpg


IMG_4496_zpsg8dmjkma.jpg


IMG_4497_zpsf3ihcquz.jpg


IMG_4498_zpszzn7yek8.jpg


The Decal Sheet:


IMG_4486_zpsqhmfwlfd.jpg


The 13 grey sprues:


IMG_4505_zpsdwmpxump.jpg


IMG_4506_zpstdmuud6y.jpg


IMG_4507_zpsqxrzyvkz.jpg


IMG_4508_zpsvtbp8y4f.jpg


IMG_4509_zpsxd2e7n91.jpg


IMG_4510_zpsyh98nvx2.jpg


IMG_4511_zpskhljaofb.jpg


IMG_4512_zpsm8hnzx7h.jpg


IMG_4513_zpsnlvcycse.jpg


IMG_4514_zpsifnpohqg.jpg


IMG_4515_zpsp4yjkppl.jpg


IMG_4516_zpsfyvvflru.jpg


IMG_4517_zpsmjuktzq4.jpg


IMG_4518_zpsm4lpusob.jpg


IMG_4519_zpsxev3fcr8.jpg


IMG_4520_zpszs0mhb8m.jpg


IMG_4521_zpsfikdhkqp.jpg


IMG_4522_zpstmvyqx9f.jpg


IMG_4523_zpsisfp1ei9.jpg


IMG_4524_zpsmr7eml2p.jpg


IMG_4525_zpsjkzhdzwl.jpg


IMG_4526_zpsinidqbh0.jpg


IMG_4527_zpsp4kfkzqb.jpg


IMG_4528_zpsipo4bems.jpg


IMG_4529_zps1qdxmu2b.jpg


IMG_4530_zpsm9ncjs2g.jpg


IMG_4531_zpstqc1pljc.jpg


IMG_4532_zps6zqevofm.jpg


IMG_4533_zpsjjjh6mn9.jpg


IMG_4534_zpsx1ol3wte.jpg


IMG_4535_zpspmnqi1ox.jpg


The one clear sprue:


IMG_4536_zpsufsjf7yd.jpg


IMG_4537_zpsc2veyaug.jpg


IMG_4538_zpssnjuolqv.jpg


IMG_4539_zpsjpnwlame.jpg


IMG_4540_zpsq45nop52.jpg


So, that's the kit, let the build begin!....I have actually begun the build, I started on Monday, but I'm just getting around to posting and starting this build thread.


"Build Update #1 coming very soon!


In the meantime, if you'd like to see my YouTube "Build Introduction" video, then here is the link to that:


https://youtu.be/jXrdga-zYG8


Thanks in advance for reading this thread, leaving any comments and for watching my video, should you decide to do so!


Happy modeling and have fun!


Cheers

Martin


  • Member since
    March 2015
  • From: Streetsboro, Ohio
Posted by Toshi on Thursday, January 28, 2016 9:26 PM

Thank you for the link, I'll definately be following this build.  I'm looking forward to this.

Toshi

On The Bench: Revell 1/48 B-25 Mitchell


Married to the most caring, loving, understanding, and beautiful wife in the world.  Mrs. Toshi


  • Member since
    June 2014
Posted by BrandonK on Thursday, January 28, 2016 9:49 PM

What's the parts count on that kit? Looks like a lot.

BK

On the bench:

A lot !! And I mean A LOT!!

2024 Kits on deck / in process / completed   

                         14 / 5 / 2  

                              Tongue Tied

  • Member since
    February 2011
Posted by OrfyWorfy on Thursday, January 28, 2016 10:24 PM

I will be following this build myself and looking forward to it. The only thing that stops me building one is that I'm a UK guy in the USA myself and will be returning in 6 months after a 10 year stay and already have to many precious models to ship back!

  • Member since
    February 2012
  • From: Olmsted Township, Ohio
Posted by lawdog114 on Friday, January 29, 2016 6:28 PM
Very nice. I look forward to your progress.

 "Can you fly this plane and land it?...Surely you can't be serious....I am serious, and don't call me Shirley"


  • Member since
    April 2015
  • From: New Hampshire, USA
Posted by UKguyInUSA on Saturday, January 30, 2016 11:20 PM

Toshi

Thank you for the link, I'll definately be following this build.  I'm looking forward to this.

Toshi


Thanks Toshi, much appreciated! I hope I can make it worthwhile for you to follow!


Cheers Smile

Martin

  • Member since
    April 2015
  • From: New Hampshire, USA
Posted by UKguyInUSA on Saturday, January 30, 2016 11:23 PM

BrandonK

What's the parts count on that kit? Looks like a lot.

BK


There's 281 parts Brandon, you can see the specifications on the side of the box in one of the box images above.


Cheers Smile

Martin

  • Member since
    April 2015
  • From: New Hampshire, USA
Posted by UKguyInUSA on Saturday, January 30, 2016 11:29 PM

OrfyWorfy

I will be following this build myself and looking forward to it. The only thing that stops me building one is that I'm a UK guy in the USA myself and will be returning in 6 months after a 10 year stay and already have to many precious models to ship back!


Thanks for aking a look Orfy, much appreciated and I'm happy to hear you'll be following the build. My next update will be uploaded within the next 30 minutes. Any reason you're returning to the UK, or was your 10 year stay here a contract that you've now reached the end of?

Eeewww.....I'd be nervous about my models being shipped that distance, I wouldn;t be able to sleep worrying that they were going to get damaged!


I've been here 16 yrs now- November 1999. I lived in Palm Beach, Florida for the first 7 years, then mved north to new Hampshire for business and have been here since. I bloody hate the long winters though and miss the all year round sunshine!

Where in the states do you live? Have you enjoyed your stay, or do you miss the UK?


Cheers Smile

Martin

  • Member since
    April 2015
  • From: New Hampshire, USA
Posted by UKguyInUSA on Saturday, January 30, 2016 11:31 PM

lawdog114
Very nice. I look forward to your progress.


Thanks Lawdog...next update coming in minutes!


Cheers,

Martin Smile

  • Member since
    April 2015
  • From: New Hampshire, USA
Posted by UKguyInUSA on Saturday, January 30, 2016 11:34 PM

Revell Pro-Modeler 1/32 Junkers Ju 88A-1 Bomber- "Build Update #1"


The build began last Monday and the first thing that I did was the ceremonial bathing of the parts, followed by allowing them to air dry:


IMG_4541_zpsyubcgv3x.jpg


After the washing,  the next thing that I tend to do is to glue together as many of the sub-assemblies as possible to eliminate the large number of sprues piled up on the work-bench. I started off by cutting from the sprues all the halves of the ailerons, flaps, horizontal stabilizers and elevators, then glue those together:


IMG_4542_zps3pnfe5oi.jpg


IMG_4543_zpsuncni9bt.jpg


I then got the parts together for assembling the vertical stabilizer, rudder and wing tips and glued them together:


IMG_4567_zps79dv9jqp.jpg


IMG_4568_zpsbzsni91m.jpg


Next, I got together the parts that make up the wings- upper and lower wing halves, the previously assembled wing-tips and the undercarriage mounting structure. I glued, taped and clamped the starboard side first, followed by the portside:


IMG_5061_zpsec9a2m6t.jpg


IMG_5063_zps1tlt27ll.jpg


IMG_5062_zpsfgl5ee0k.jpg


IMG_5065_zps2nxtduak.jpg


When the upper and lower wings were set, I removed the clamps and the tape, then glued the wing-tips on and the undercarriage mounting structure, I then smoothed down all the seams. The wing-tips didn't match very well and there were gaps that will require filling at a later stage:


IMG_5069_zpsemc3no3y.jpg


IMG_5070_zpscfc3a3we.jpg


IMG_5071_zpszgrejrua.jpg


Next, I got the parts together to build up the cockpit rear bulkhead- bulkhead, radio sets, magazine rack and magazines and glued them together:


IMG_5041_zpscdh95pjj.jpg


IMG_5042_zpsyqggisbc.jpg


This was followed by getting together all the parts that make up the starboard side inner wall assembly for the cockpit and then gluing that assembly together:


IMG_5039_zpslhv9mkva.jpg


IMG_5040_zpsd6opzxk2.jpg


...and then all the parts for the Portside inner cockpit wall and console assemblies and gluing those together:


IMG_5051_zpsu18phbzb.jpg


IMG_5052_zpscimdrwa5.jpg


I then got the pieces together for the central dividing wall with the bombadiers floor and bomb aiming sight and glued those together:


IMG_5044_zpsv84qwvmx.jpg


IMG_5045_zpss3xdzz2u.jpg


Next were the parts that assemble to make the cockpit rear floor area, and again, these were glued together to make them ready for priming:


IMG_5049_zpsgsfks1hq.jpg


IMG_5050_zpsyfr41ouh.jpg


Next, I got all the parts together for the three seat assemblies, one being the pilots seat which was also assembled to the floor beneath his seat that carries the foot-pedals and the steering column:


IMG_5046_zpsgtqflwq9.jpg


IMG_5047_zpsnmlx58j2.jpg


IMG_5048_zpsilatziis.jpg


IMG_5053_zpsogsldfp8.jpg


IMG_5054_zps8sp5qnbl.jpg


IMG_5055_zps6bxg9oj1.jpg


IMG_5056_zpso7yp6v1n.jpg


IMG_5057_zpsr7bhiw88.jpg


I then got all the parts for the wheels and undercarriage and assembled those together, leaving the wheels off and putting those onto cocktail sticks ready for priming and painting:


IMG_5038_zpsi2rgbrc3.jpg


IMG_5043_zpspygdi9u8.jpg


IMG_5060_zpsry9v6cu5.jpg


The last of the sub-assemblies was to put the propeller spinners onto cocktail sticks ready for priming, then assemble the spinner back-plates and center hubs for locating the propeller blades onto. The bearing and spindles were also assembled to the back of the spinner back plates:


IMG_5067_zpswj1q679c.jpg


IMG_5068_zpszbozgesg.jpg


Next, I prepared all the sub-assemblies and sprues that were to be primed and took them to the spray-booth:


IMG_5072_zpsqmq8fs3d.jpg


IMG_5074_zpskgvy9faj.jpg


IMG_5075_zpsvrcyq0x6.jpg


IMG_5076_zpse4xb3dhk.jpg


I then airbrushed a black primer onto everything in readiness for painting all internal parts and surfaces:


IMG_5077_zps0fsawp1p.jpg


IMG_5079_zpsiytmship.jpg


When the black primer had dried, I then airbrushed RLM 66 Grey onto the cockpit assemblies and internal surfaces that were to be this color. I then added some white to the RLM 66 to tone it down and then airbrushed some highlights on top:


IMG_5080_zpsdxbzv248.jpg


IMG_5081_zpspt8ioeds.jpg


IMG_5082_zpsz9svna9b.jpg


IMG_5083_zpsz82a1d63.jpg


Next, I airbrushed the light olive onto the parts that required this color and again, I added some white to it to tone it down, then added some highlights:


IMG_5084_zpsine0dcee.jpg


IMG_5085_zpsfwllxp9h.jpg


IMG_5086_zpsi3gjrrg5.jpg


The last items that I painted were the propeller blades and spinner assemblies with silver so that at a later date of this build, I can apply the "Hairspray Chipping" technique to expose some of the silver beneath the top coat colors:


IMG_5089_zps1dzscujg.jpg


IMG_5091_zpskzilmike.jpg


IMG_5092_zpsmcgejzwi.jpg


I had now gone as far as I wanted to for this update, and so, I put everything onto my work-bench to check out how much I had got done and took some photos:


IMG_5093_zpssitkbsm3.jpg


IMG_5094_zpsk74pinp1.jpg


IMG_5095_zpsszw30a6f.jpg


IMG_5096_zpsnjdzfhcu.jpg


Well, that's it for this update. From hereon, I will detail all of the internal parts, gloss clear coat them, weather them, then finish them with a final matt clear coat. I will then assemble the plane, fill and smooth any gaps, clean the plane, then prime and pre-shade ready for moving onto the painting stage.


In the meantime, if you'd like to watch my YouTube Channel "Build Update #1" video for this report, then here is the link for that:  


https://youtu.be/-z3OV-9Bicc


Thanks in advance for looking at this thread, leaving any comments and for watching my video should you decide to do so


Until my next update, happy modeling and have fun!


Tally Ho and Chocks away!


Cheers,

Martin


  • Member since
    February 2012
  • From: Olmsted Township, Ohio
Posted by lawdog114 on Sunday, January 31, 2016 2:47 AM
I like. i just got my hands on the new ICM A-5. I hope to dive into that one soon. Maybe they will also give us an A-1 in 1/48th too. I look forward to your progress here.

 "Can you fly this plane and land it?...Surely you can't be serious....I am serious, and don't call me Shirley"


  • Member since
    December 2002
  • From: Bury St Edmunds, Suffolk, England
Posted by Bish on Sunday, January 31, 2016 3:11 AM

Nice start, lookin forward to seeing more. I have the RoG boxing (minus swastika's of course, didn't realise the Revell kit's over there had them) so will be following along.

I am a Norfolk man and i glory in being so


On the bench: Airfix 1/72nd Harrier GR.3/Fujimi 1/72nd Ju 87D-3

  • Member since
    June 2014
Posted by BrandonK on Sunday, January 31, 2016 11:45 AM

I love to see the parts get color. You feel like you are really cruzin' along at this point. I like what I'm seeing here. NICE>

BK

On the bench:

A lot !! And I mean A LOT!!

2024 Kits on deck / in process / completed   

                         14 / 5 / 2  

                              Tongue Tied

  • Member since
    December 2002
Posted by 7474 on Sunday, January 31, 2016 5:07 PM

Looks great.... I'll be watching this 

  • Member since
    August 2013
Posted by Jay Jay on Monday, February 1, 2016 9:18 AM

I always follow your builds with great interest, and I thank you for the excellent W.I.P's.  You do make things look rather easy . Interesting that you assemble interior parts before base color  painting where I tend to base paint the small  parts before assembly.  I should try it your way since your models come out much better than mine. cheers.


 I'm finally retired. Now time I got, money I don't.

  • Member since
    April 2015
  • From: New Hampshire, USA
Posted by UKguyInUSA on Monday, February 1, 2016 12:18 PM

lawdog114
I like. i just got my hands on the new ICM A-5. I hope to dive into that one soon. Maybe they will also give us an A-1 in 1/48th too. I look forward to your progress here.
 

Thanks mate, much appreciated! Sweet...I've never built an ICM kit, but that one looks like a good kit from the reviews.


I'll be starting the detailing of the interior sub-assemblies and parts soon, then I have to clear coat and weather them, then apply the flat coat. It could be another week before I get another update ready...there's a lot of details to contend with!


Cheers Smile

Martin

  • Member since
    April 2015
  • From: New Hampshire, USA
Posted by UKguyInUSA on Monday, February 1, 2016 12:22 PM

Bish

Nice start, lookin forward to seeing more. I have the RoG boxing (minus swastika's of course, didn't realise the Revell kit's over there had them) so will be following along.


Thanks Bish, much appreciated!

Have fun with your RoG version...I love their newly tooled 1/32 scale kits...I've made a few of them now.

I didn't realize Revell USA had the swastika's in their kits either, until I opened this one. It must just be a ban in Europe and the UK?


Cheers Smile

Martin

  • Member since
    January 2016
  • From: A Galaxy Far, Far Away
Posted by Hunter on Monday, February 1, 2016 12:58 PM

Martin,

Great introduction to your build, and it looks like you are off to a great start of your build. Looking forward to more postings of this build.

Hunter

Hunter 


  • Member since
    December 2002
  • From: Bury St Edmunds, Suffolk, England
Posted by Bish on Monday, February 1, 2016 1:05 PM

UKguyInUSA
 
Bish

Nice start, lookin forward to seeing more. I have the RoG boxing (minus swastika's of course, didn't realise the Revell kit's over there had them) so will be following along.


Thanks Bish, much appreciated!

Have fun with your RoG version...I love their newly tooled 1/32 scale kits...I've made a few of them now.

I didn't realize Revell USA had the swastika's in their kits either, until I opened this one. It must just be a ban in Europe and the UK?


Cheers Smile

Martin


Ye, i have a few as well, yet to build one, but they all look really nice.

Ye, its definatly a Europe thing, well Germany mainly. I just assumed with it being Revell, it would have carried ove rthere. Good to see it hasn't. AM Swatika's are a must here in any scale.

I am a Norfolk man and i glory in being so


On the bench: Airfix 1/72nd Harrier GR.3/Fujimi 1/72nd Ju 87D-3

  • Member since
    April 2015
  • From: New Hampshire, USA
Posted by UKguyInUSA on Wednesday, February 3, 2016 12:32 PM

BrandonK

I love to see the parts get color. You feel like you are really cruzin' along at this point. I like what I'm seeing here. NICE>

BK


I feel the same way...as soon as there is color on the cockpit parts and some of the internal areas of other section, and, I have sub-assemblies built up, I feel I'm aking good headway!


Thanks for taking a look and commenting, much appreciated, Brandon!


Cheers Smile

Martin

  • Member since
    April 2015
  • From: New Hampshire, USA
Posted by UKguyInUSA on Wednesday, February 3, 2016 12:33 PM

7474

Looks great.... I'll be watching this 


Thanks 7474, much appreciated!


Cheers Smile

Martin

  • Member since
    April 2015
  • From: New Hampshire, USA
Posted by UKguyInUSA on Wednesday, February 3, 2016 12:38 PM

Jay Jay

I always follow your builds with great interest, and I thank you for the excellent W.I.P's.  You do make things look rather easy . Interesting that you assemble interior parts before base color  painting where I tend to base paint the small  parts before assembly.  I should try it your way since your models come out much better than mine. cheers.


Hello JayJay,

Thanks for taking a look and your kind comment, much appreciated! Smile


I don;t always assemble interior parts before painting them, and will sometimes paint them individually, then build them up. But, this is such a large kit with a lot of sub-assemblies within the cockpit, that I decided I would build each assembly before painting them to speed things up and so when I detail the dials, levers, handles etc, I can see the overall effect as soon as Ive painted one detail.


Cheers Smile

Martin

  • Member since
    March 2015
  • From: Streetsboro, Ohio
Posted by Toshi on Wednesday, February 3, 2016 3:37 PM

I love the way you've depicted this kit.  A superb job!

Toshi

On The Bench: Revell 1/48 B-25 Mitchell


Married to the most caring, loving, understanding, and beautiful wife in the world.  Mrs. Toshi


  • Member since
    April 2015
  • From: New Hampshire, USA
Posted by UKguyInUSA on Sunday, February 7, 2016 2:00 PM

Hunter

Martin,

Great introduction to your build, and it looks like you are off to a great start of your build. Looking forward to more postings of this build.

Hunter


Thanks Hunter, greatly appreciated! Smile


Cheers,

Martin

  • Member since
    April 2015
  • From: New Hampshire, USA
Posted by UKguyInUSA on Tuesday, February 9, 2016 6:53 PM

Revell Pro-Modeler 1/32 Junkers Ju 88A-1 Bomber "Build Update #2" (2.9.16)


Hello Chaps,


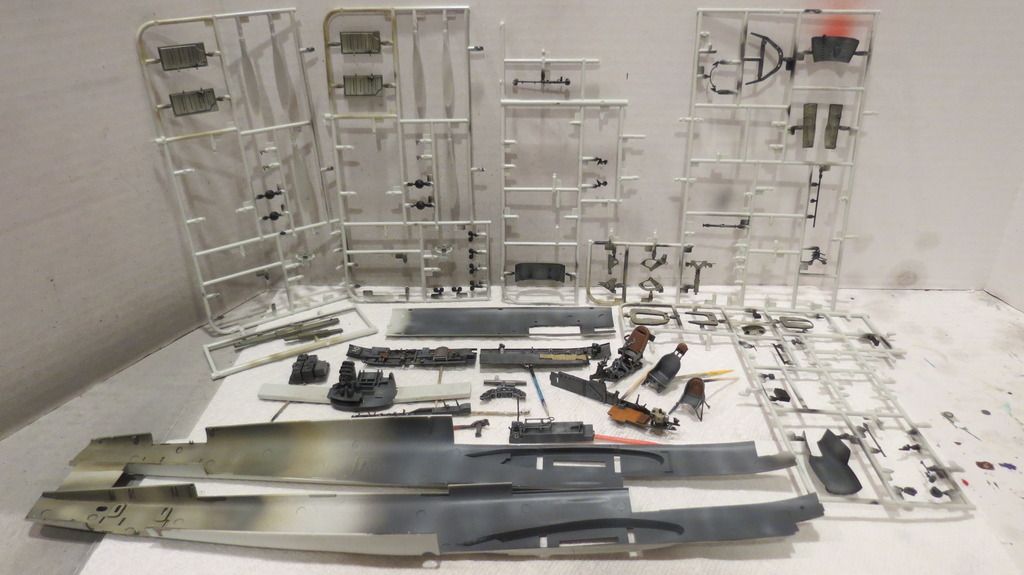
Ten days have passed since my last update and now I have progressed enough to share my second update. In "Build Update #1" I had built all the sub-assemblies of the cockpit, primed and applied base coat colors ready to begin detailing them and then assembling them into the fuselage halves.


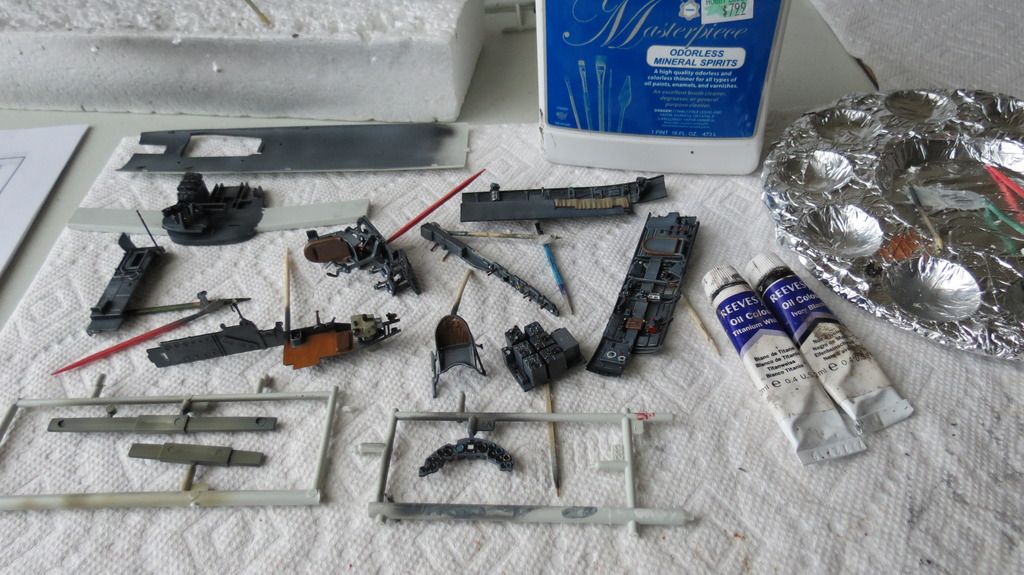
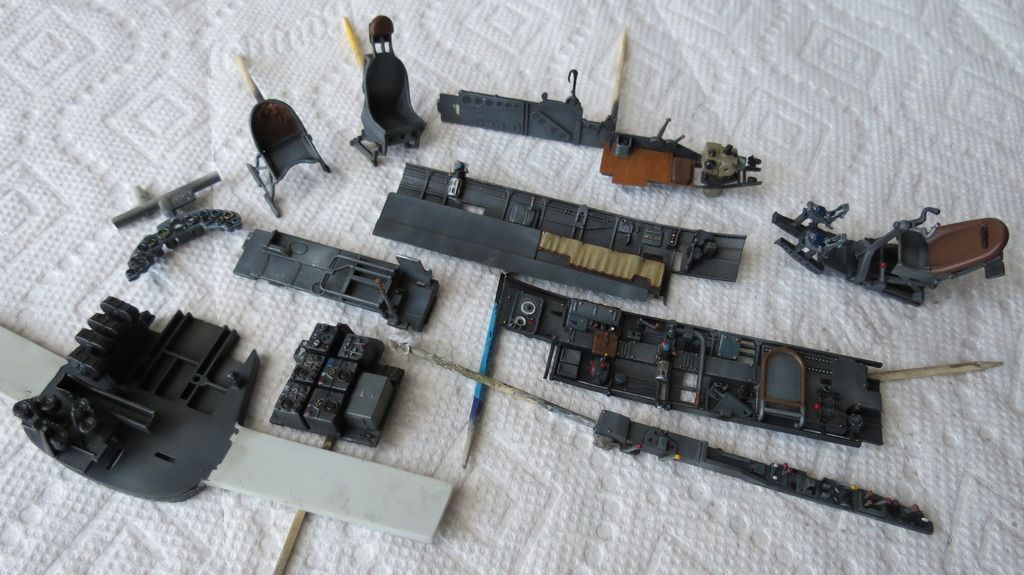
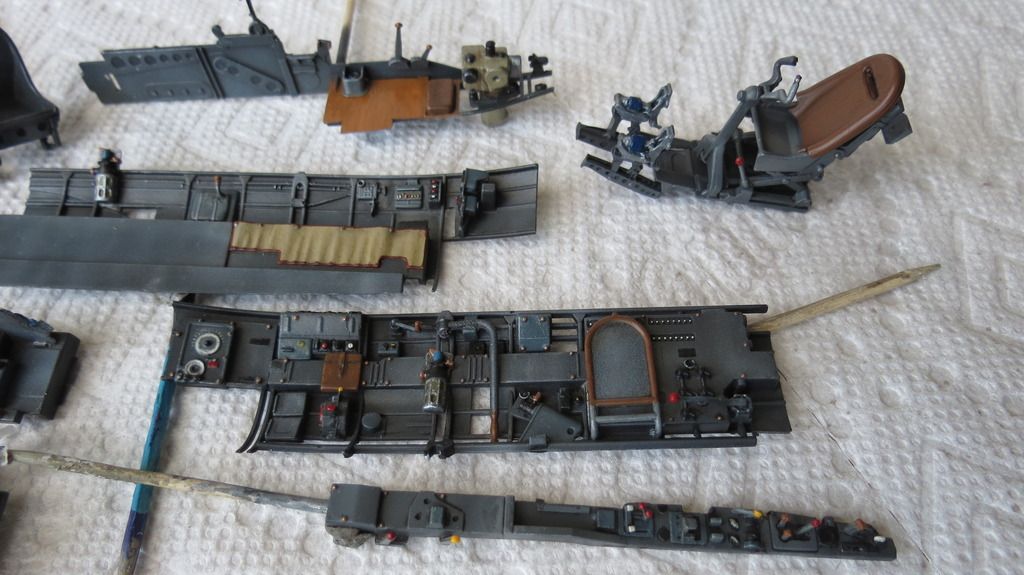
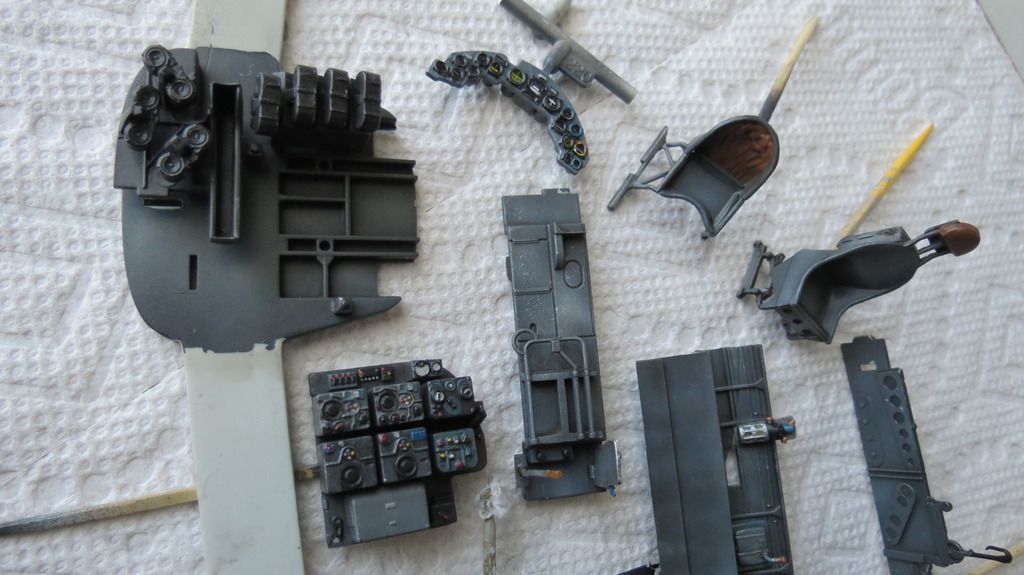
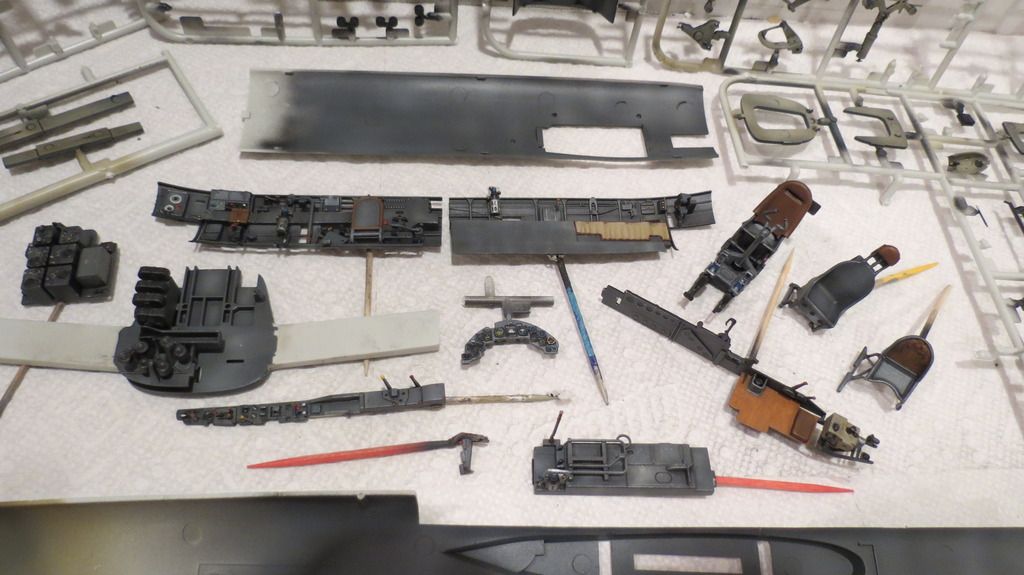
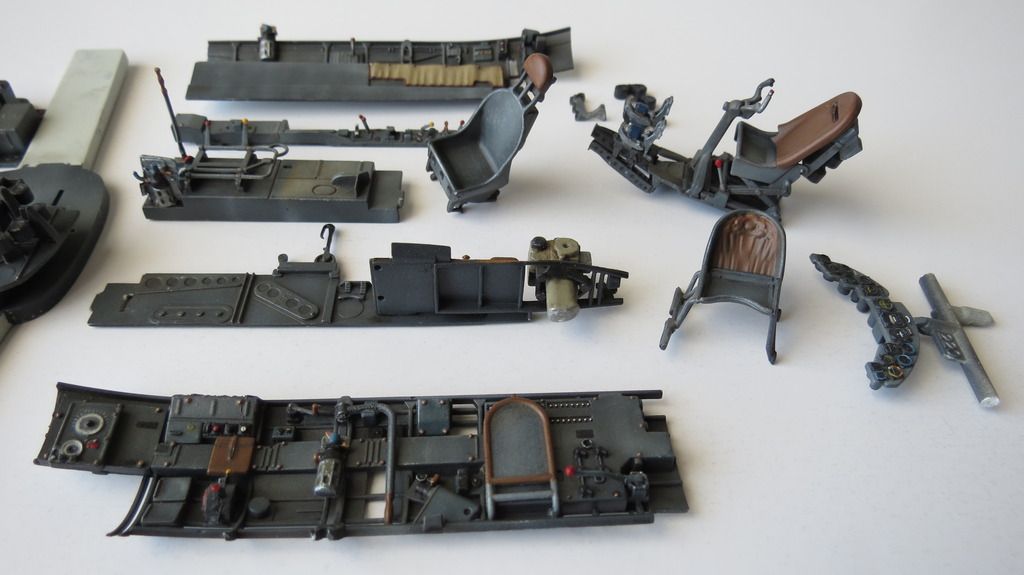
The following three images show all of the sub-assemblies detail painted followed by images of the separate sub-assemblies for closer inspection:


IMG_5157_zpsccqom0zk.jpg


IMG_5158_zpsjvkzzivj.jpg


IMG_5159_zps1vmkooi6.jpg


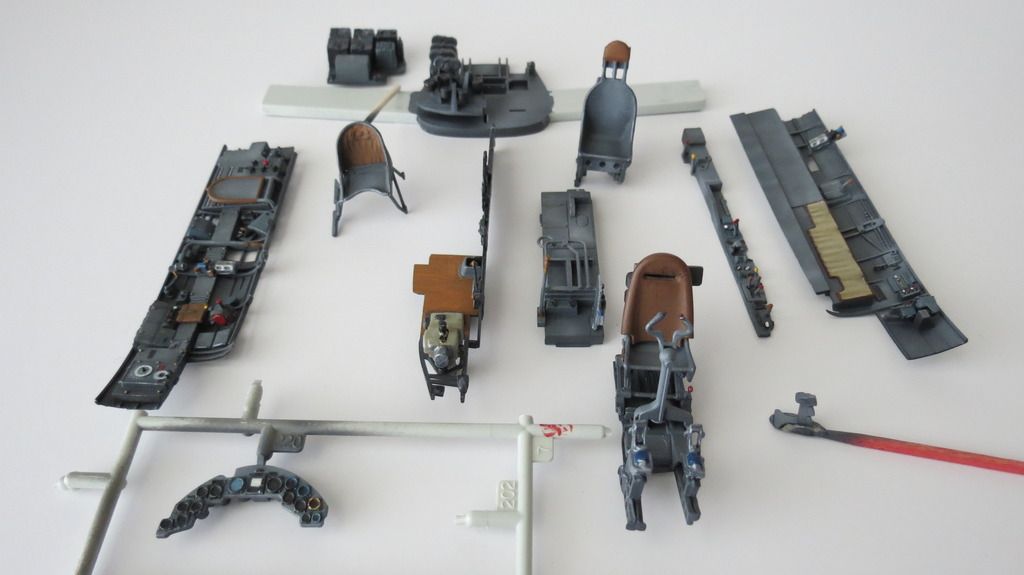
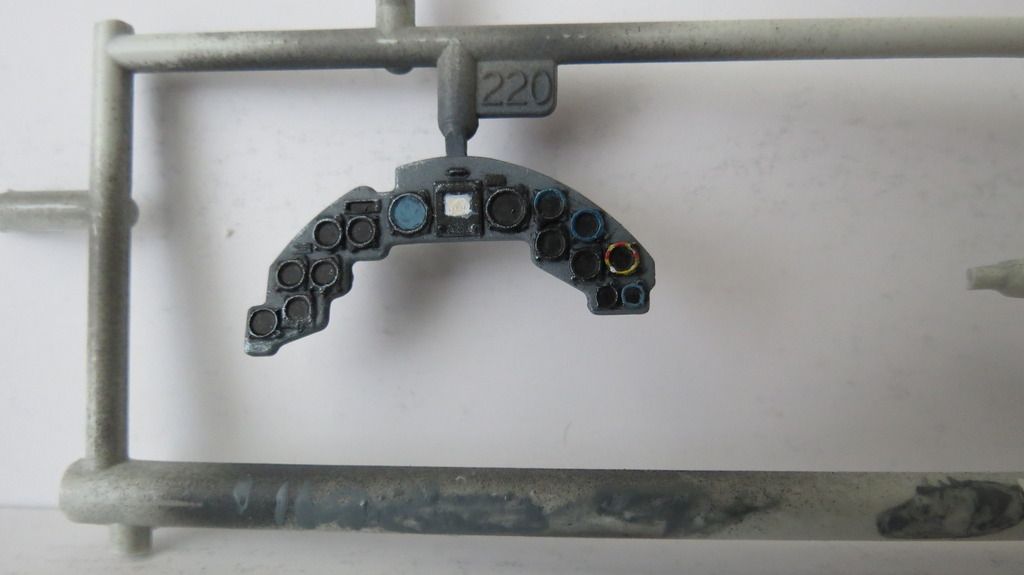
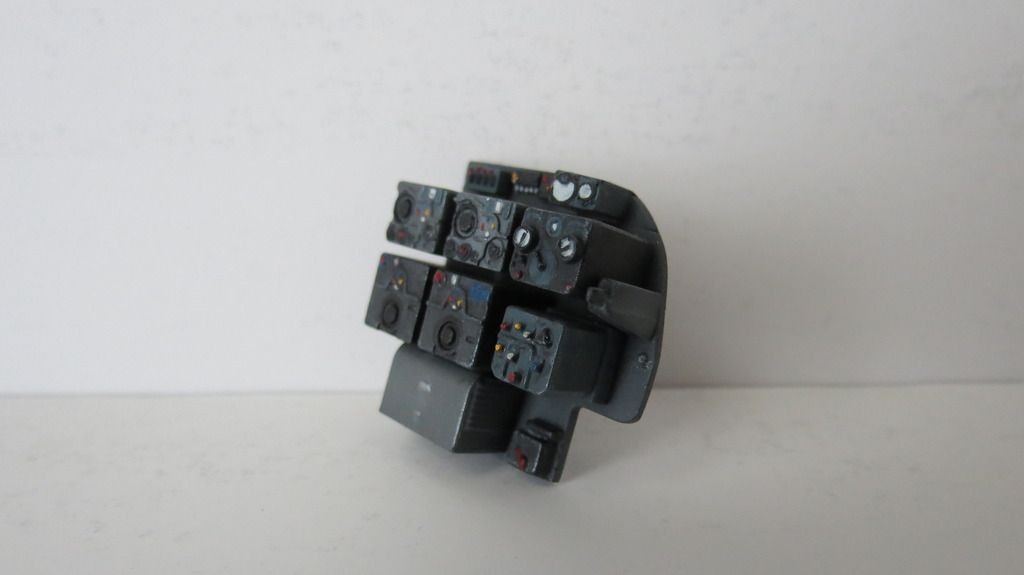
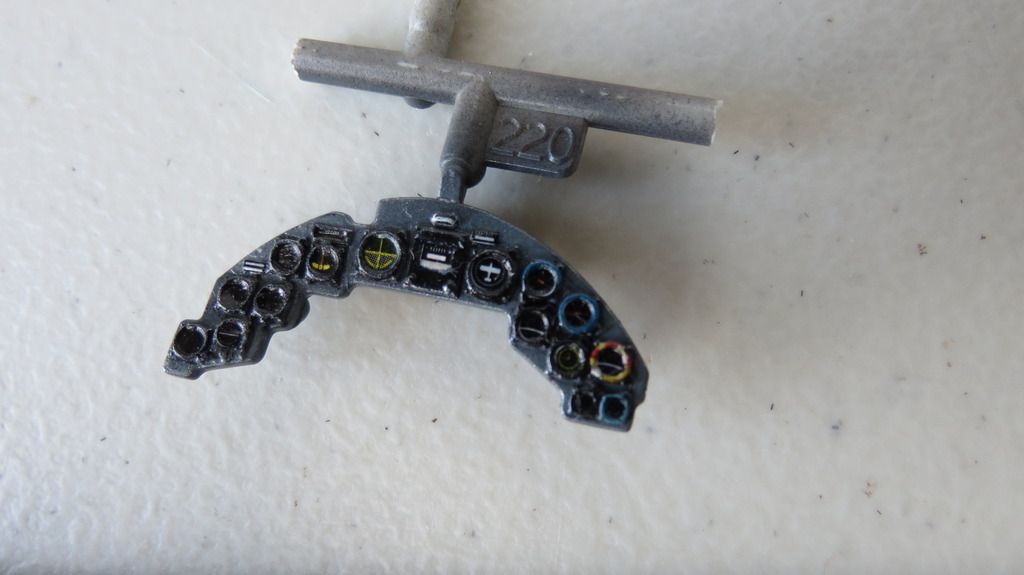
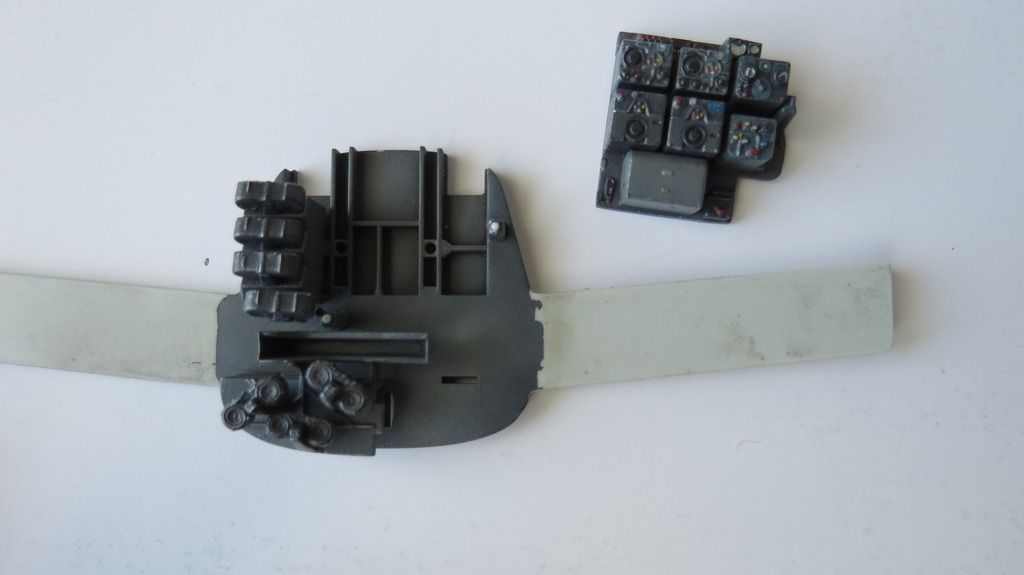
The Instrument Panel:


IMG_5161_zpshevrsalm.jpg


The rear bulkhead with magazines upon racks:


IMG_5164_zpsjnsbytmv.jpg


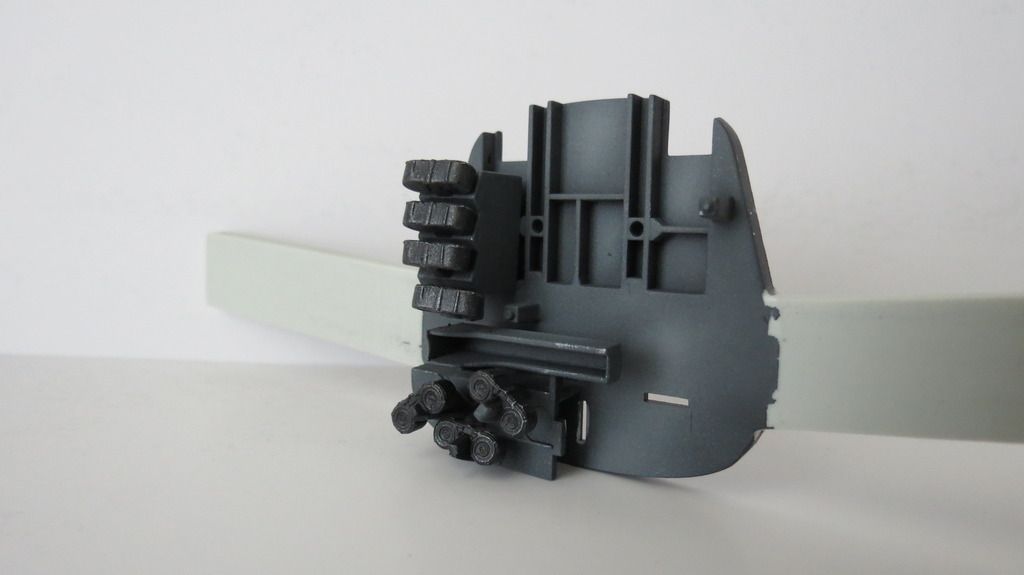
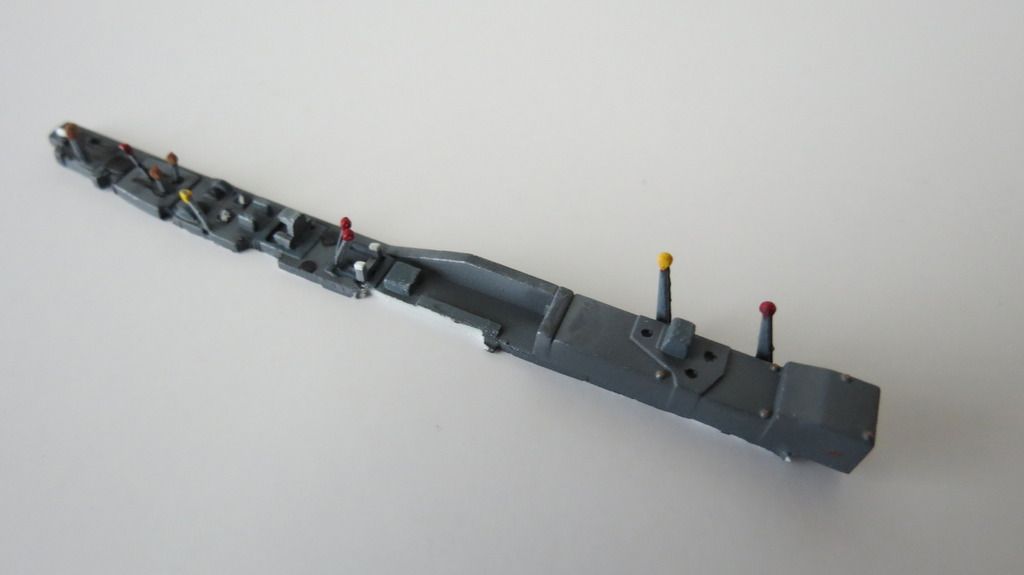
The radio/transmitter panel:


IMG_5166_zpskjdwidlx.jpg


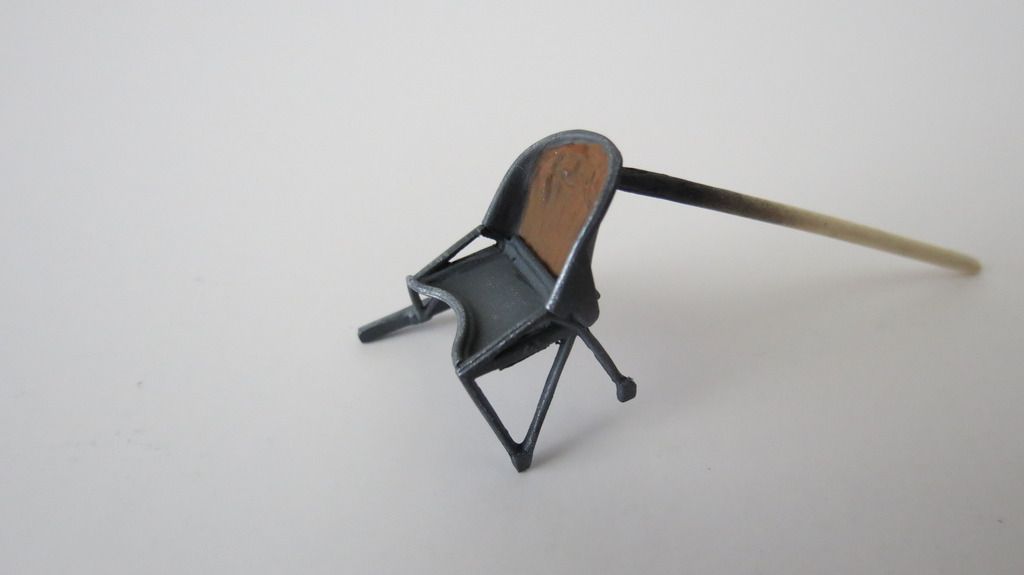
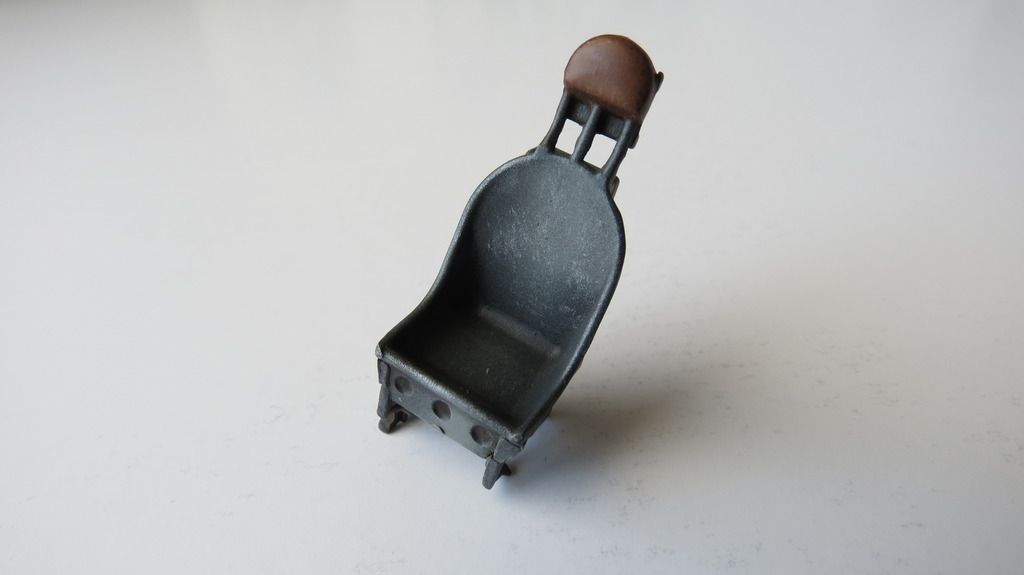
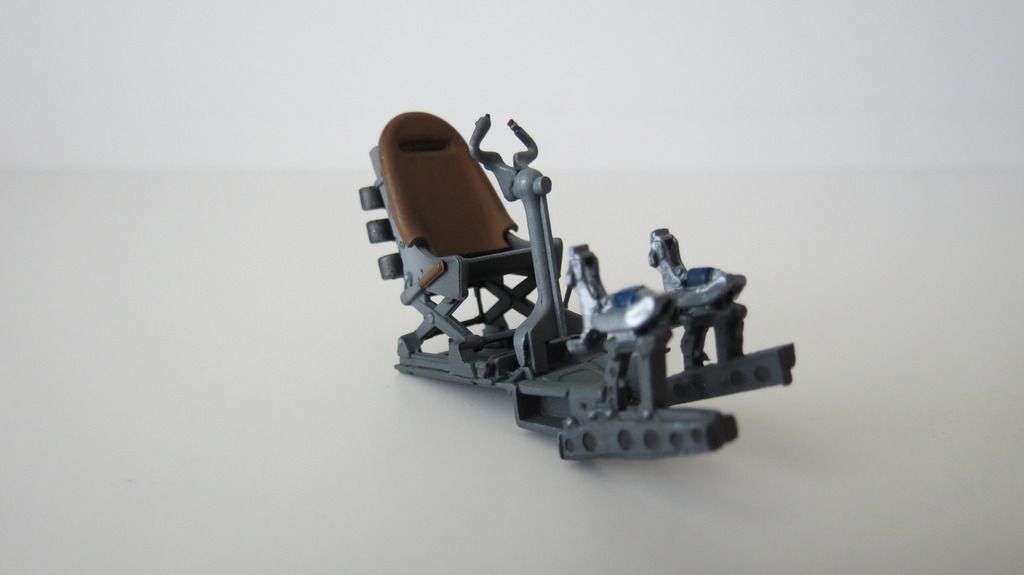
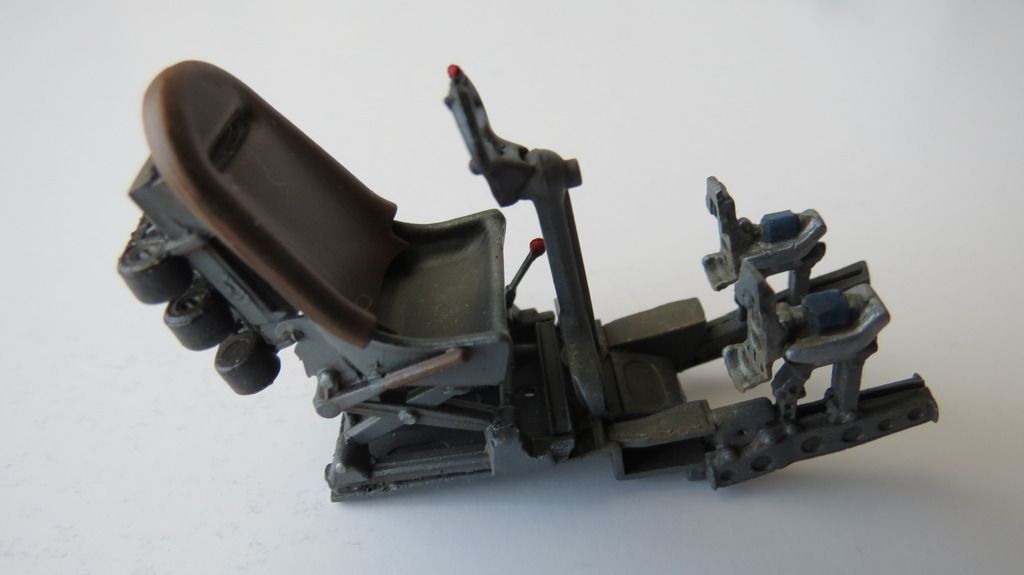
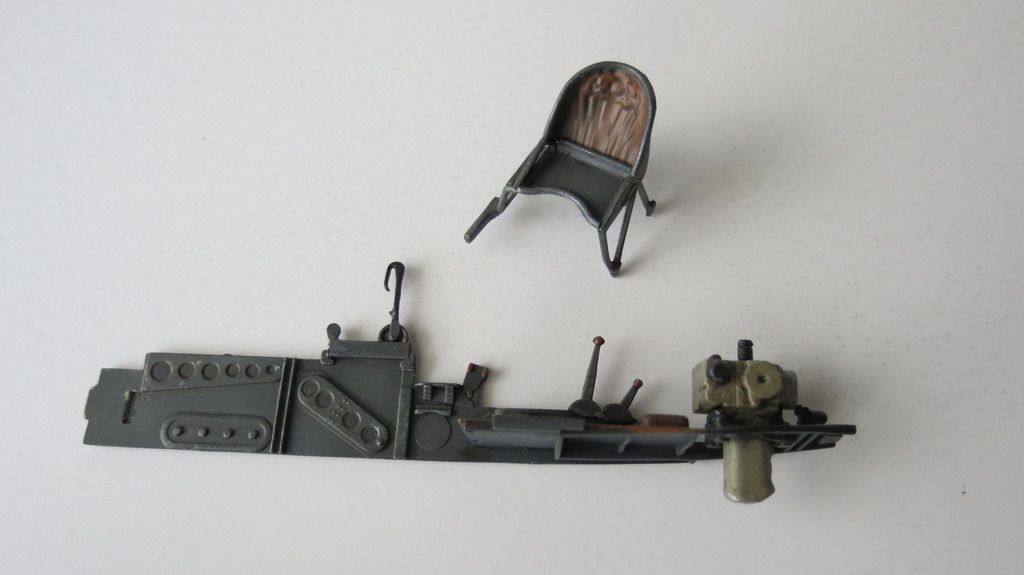
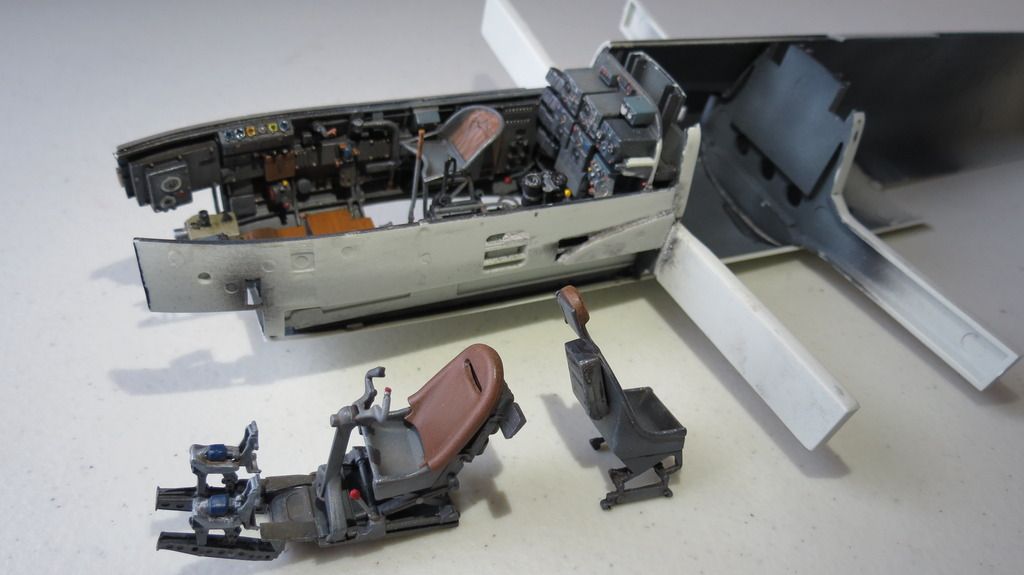
The bombardier/front gunners seat:


IMG_5169_zpssegemuwe.jpg


IMG_5268_zps5cmg1fgk.jpg


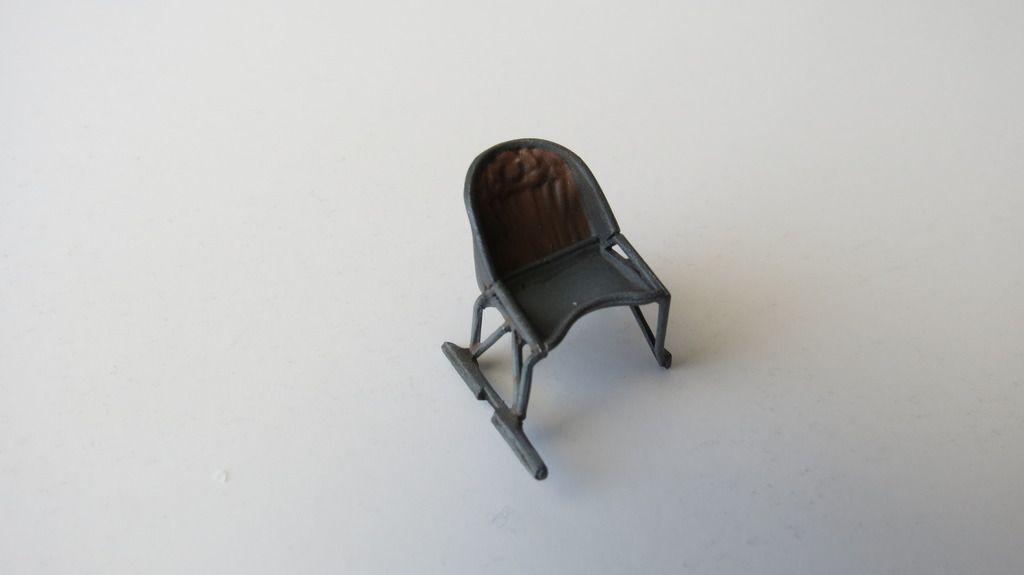
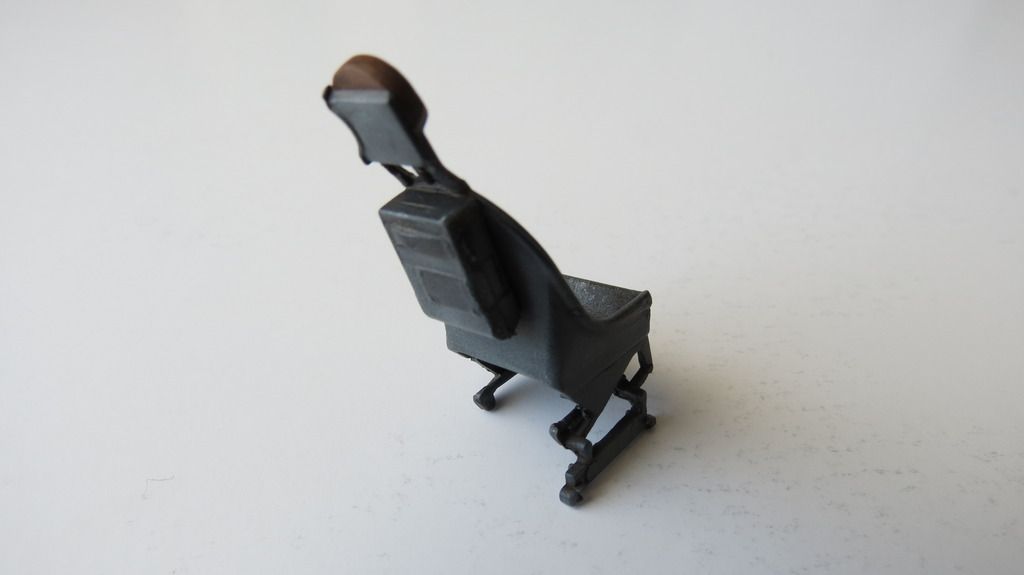
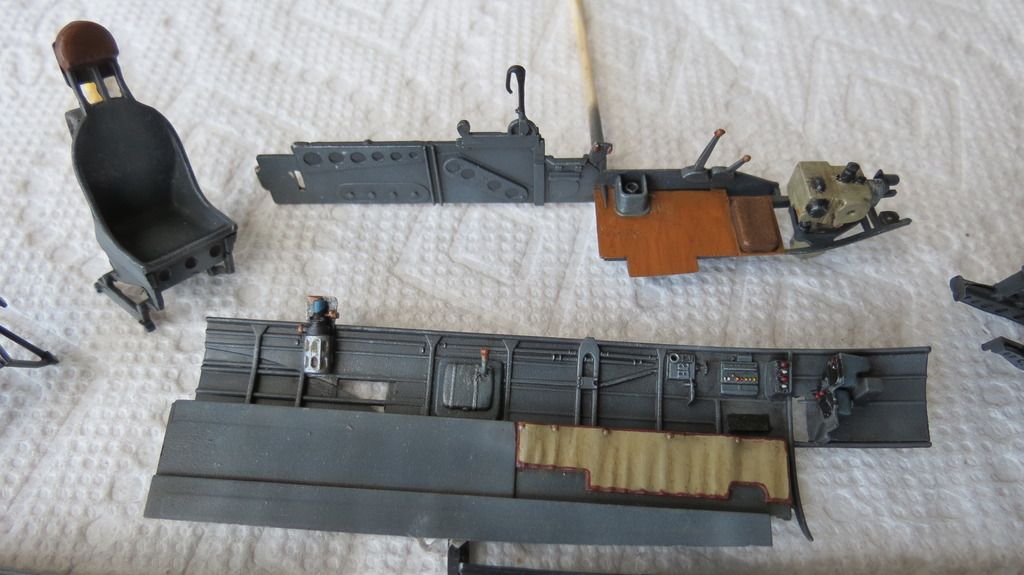
The Radio Operator's seat:
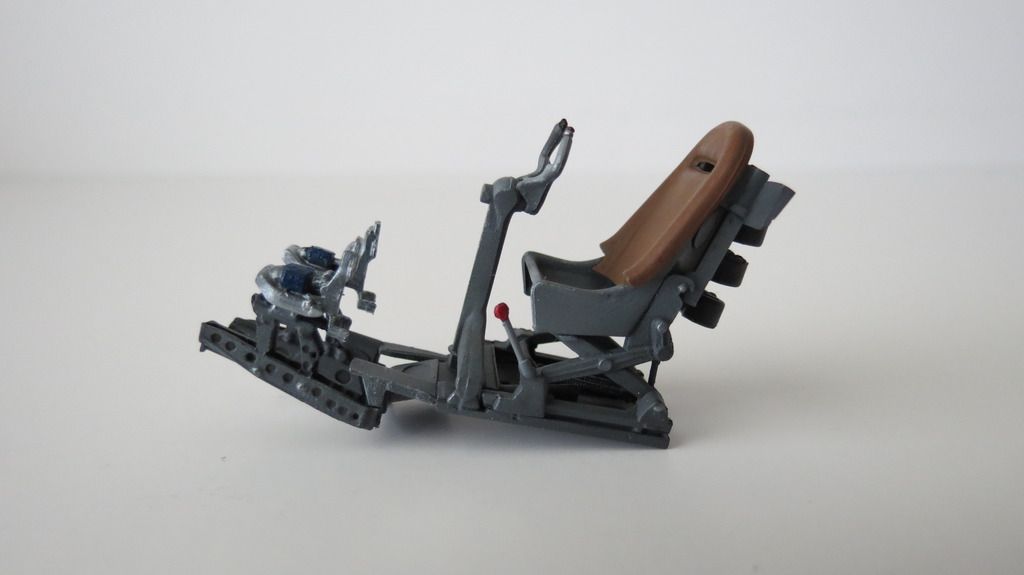
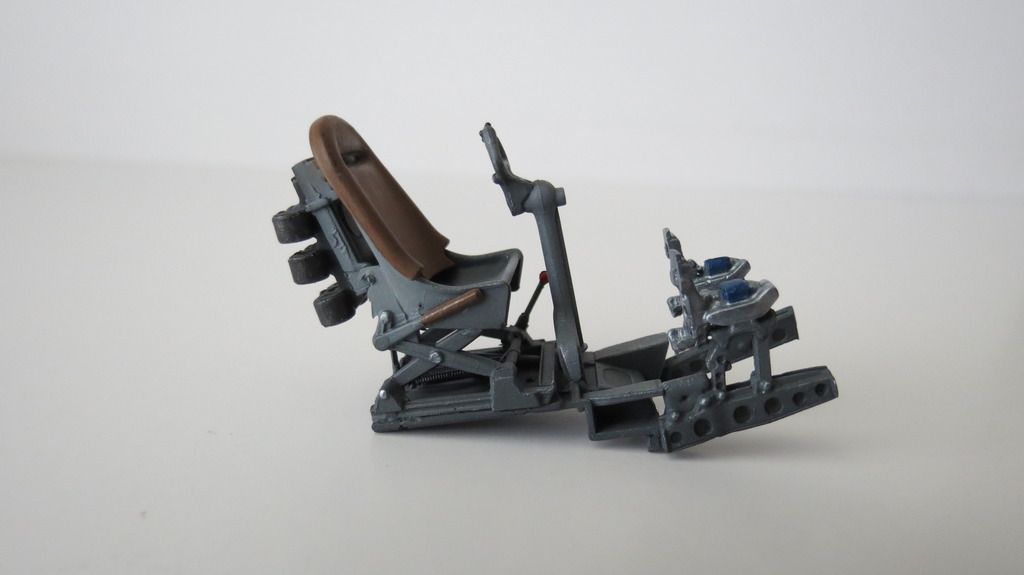
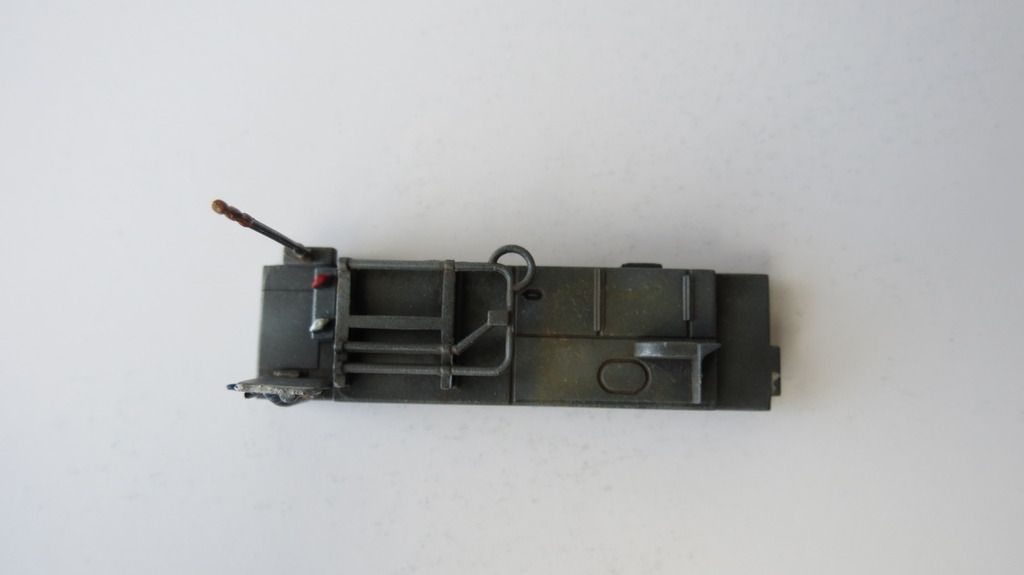
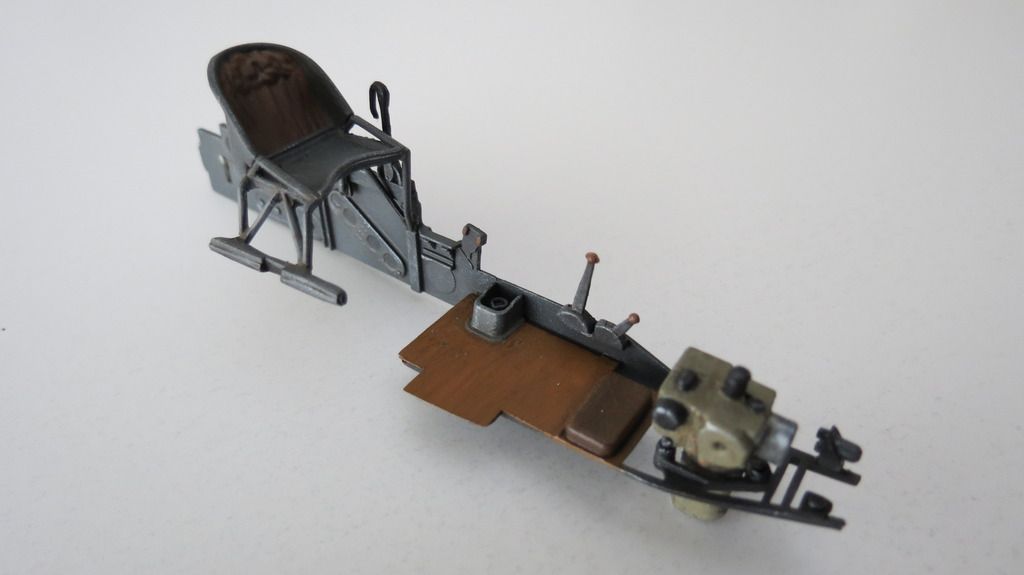


IMG_5269_zpsmscxg1py.jpg


IMG_5270_zpsttk2gn0a.jpg


The Pilot's seat:


IMG_5176_zps4wlgummz.jpg


IMG_5179_zpsjwx3pgvl.jpg


IMG_5180_zpsjwc8ihrw.jpg


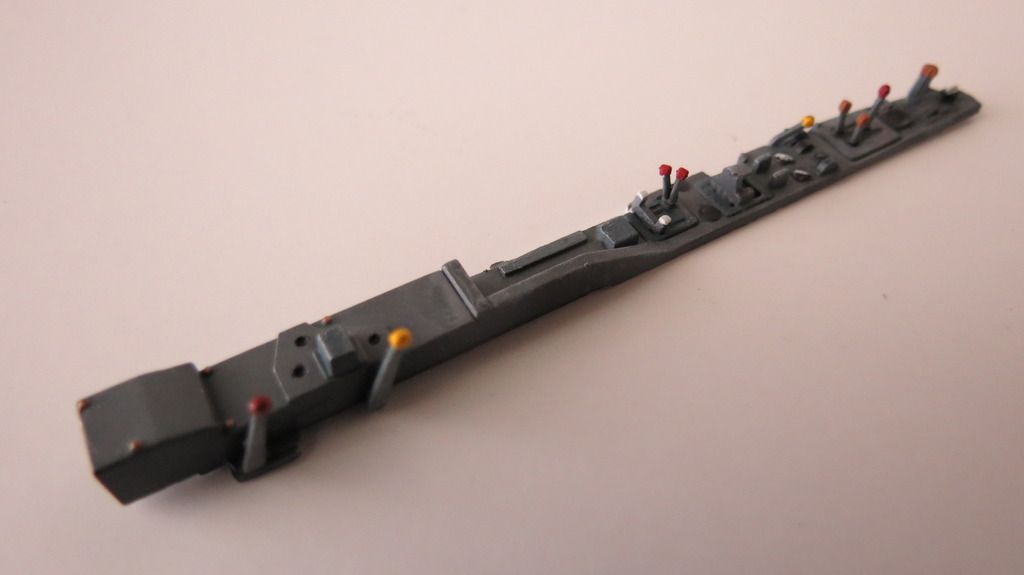
The Portside Console:


IMG_5182_zpskpzpkv2j.jpg


IMG_5183_zpsp1axdsex.jpg


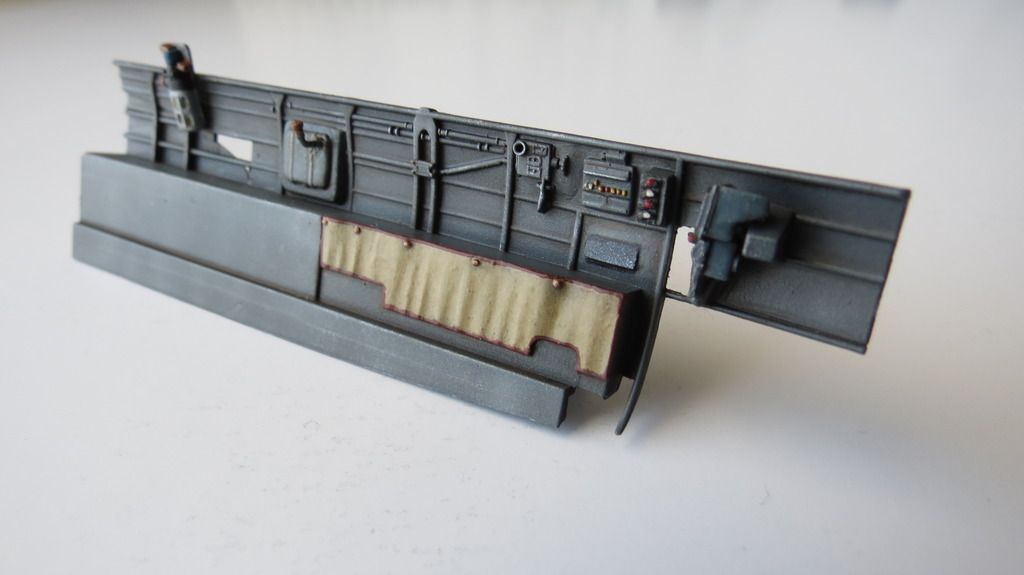
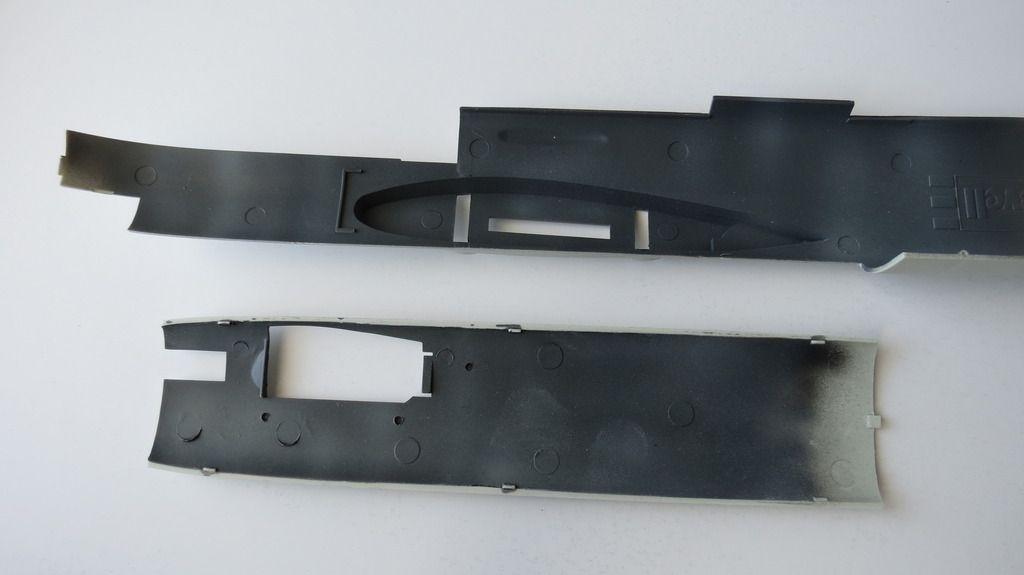
The Portside Inner Wall Assembly:


IMG_5185_zpsdhkcmorm.jpg


IMG_5258_zpsykfo94ze.jpg


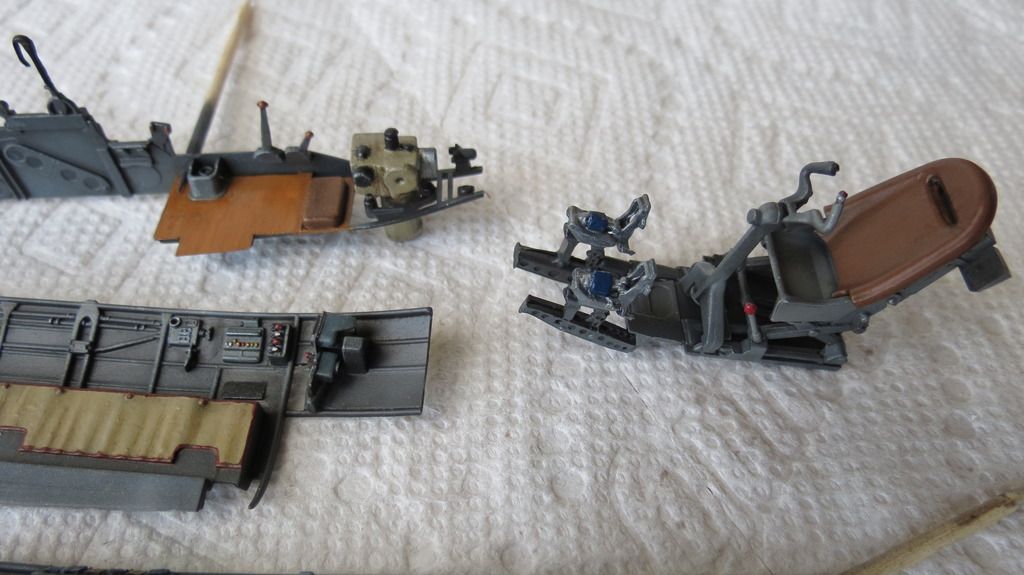
The Center Bulkhead and Bombadier's Floor and Bomb Aiming Device:


IMG_5189_zpsd7h58aeo.jpg


IMG_5192_zps2skx7vmd.jpg


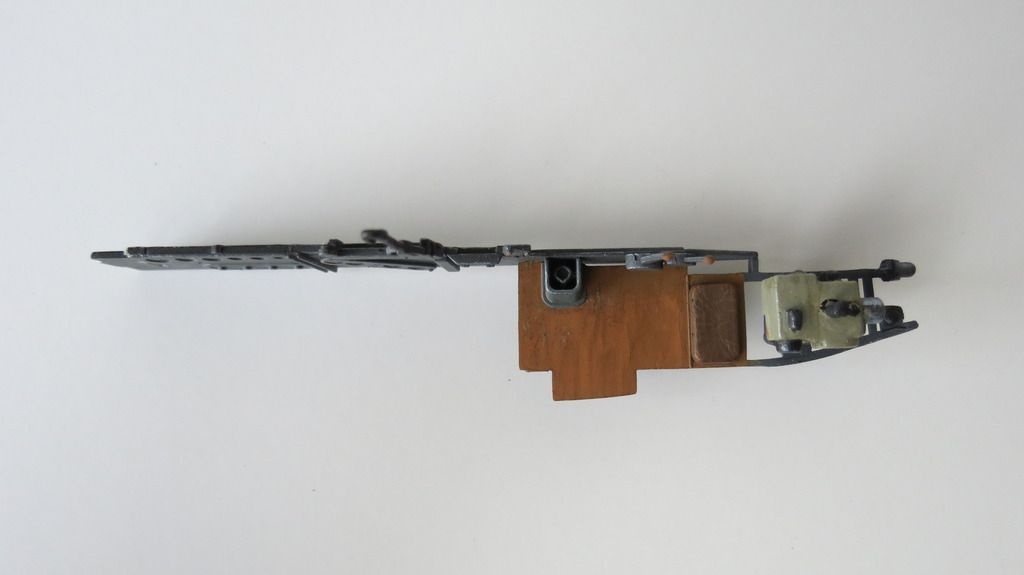
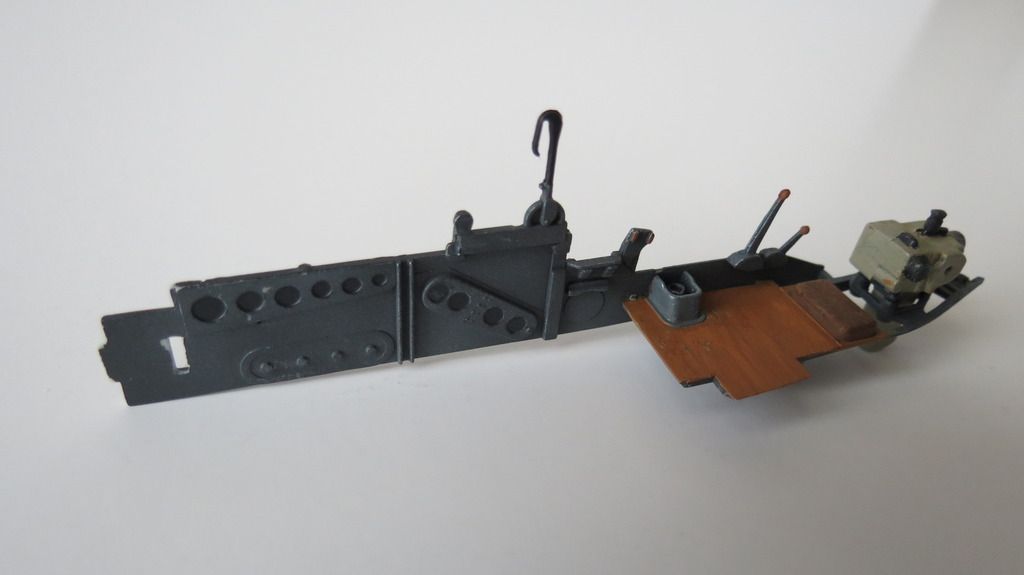
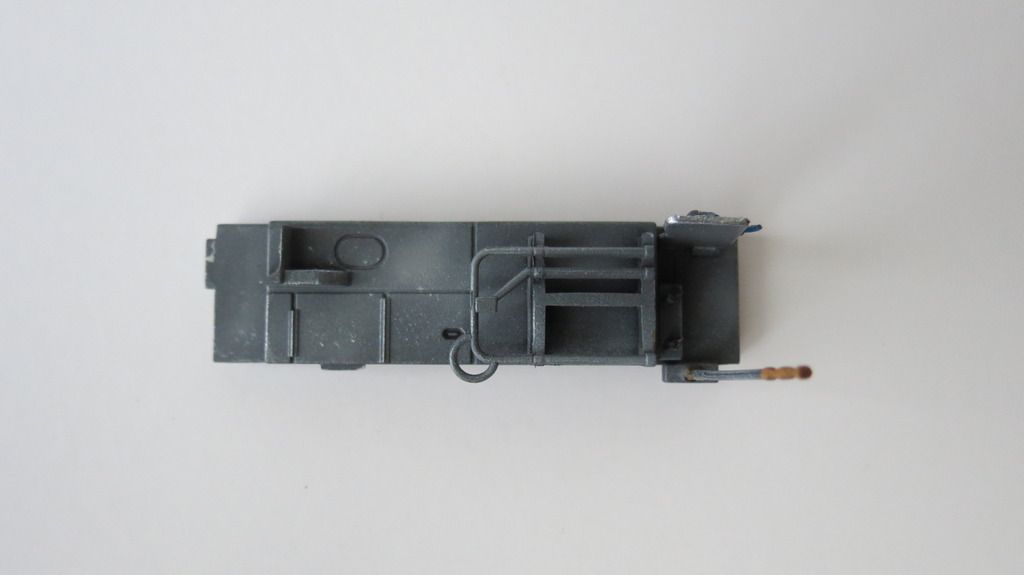
The Radio Operator's Floor Assembly:


IMG_5193_zpsoecqncra.jpg


IMG_5195_zpsvxqjcxud.jpg


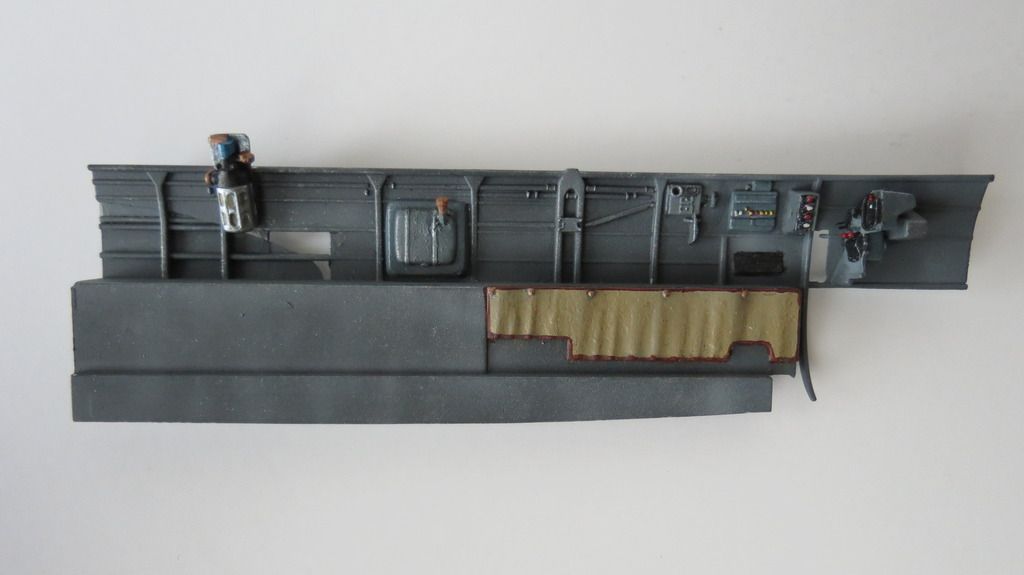
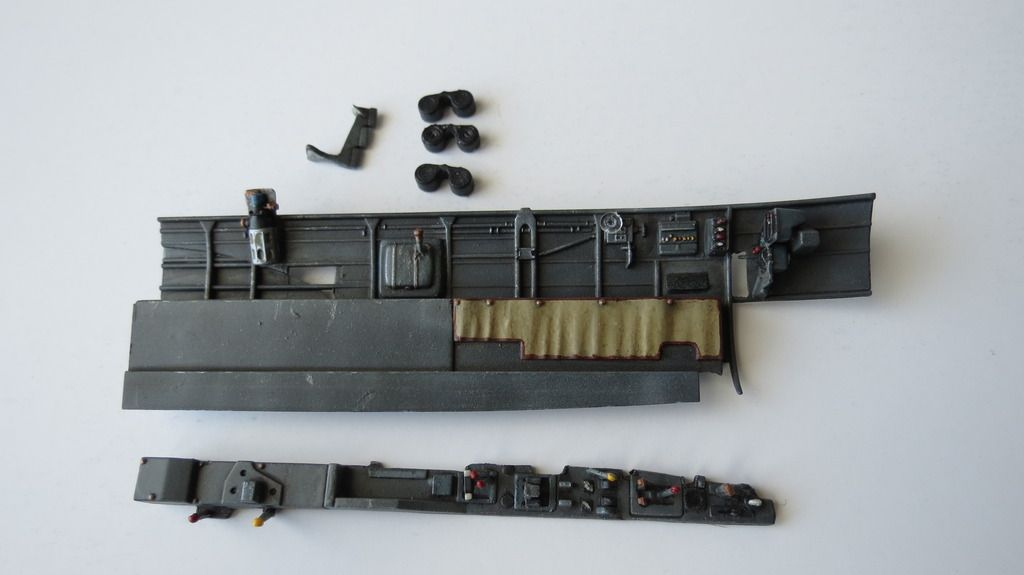
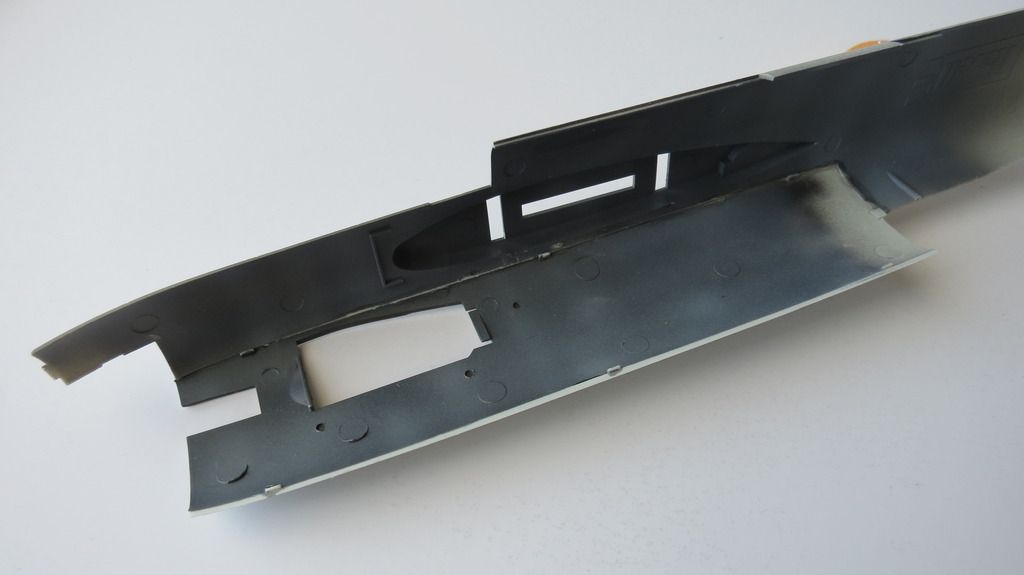
The Starboard Side inner Wall Assembly:


IMG_5200_zpsfnqwj8mc.jpg


IMG_5201_zpskgn1uw0u.jpg


IMG_5202_zpsbs1uen8c.jpg


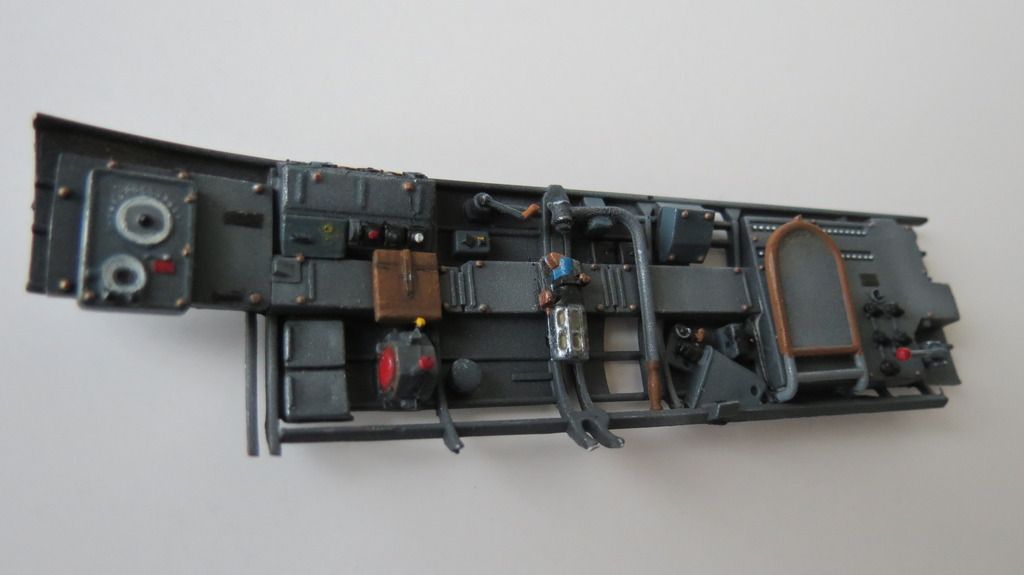
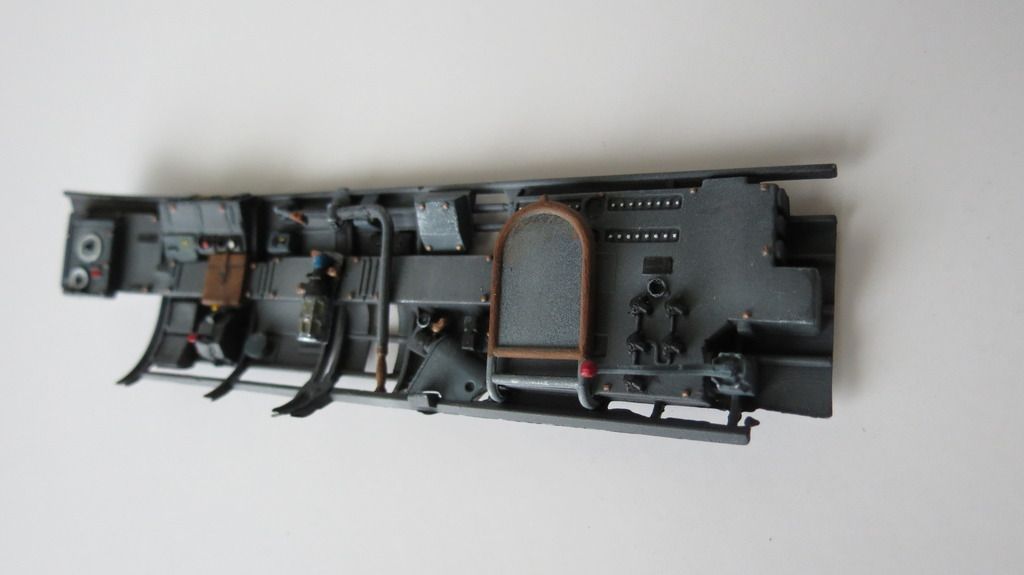
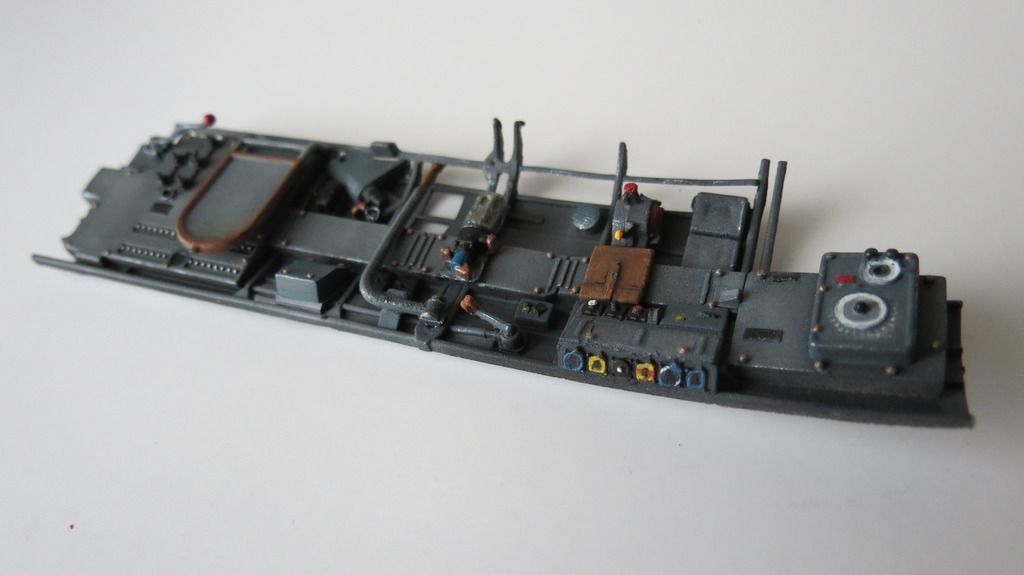
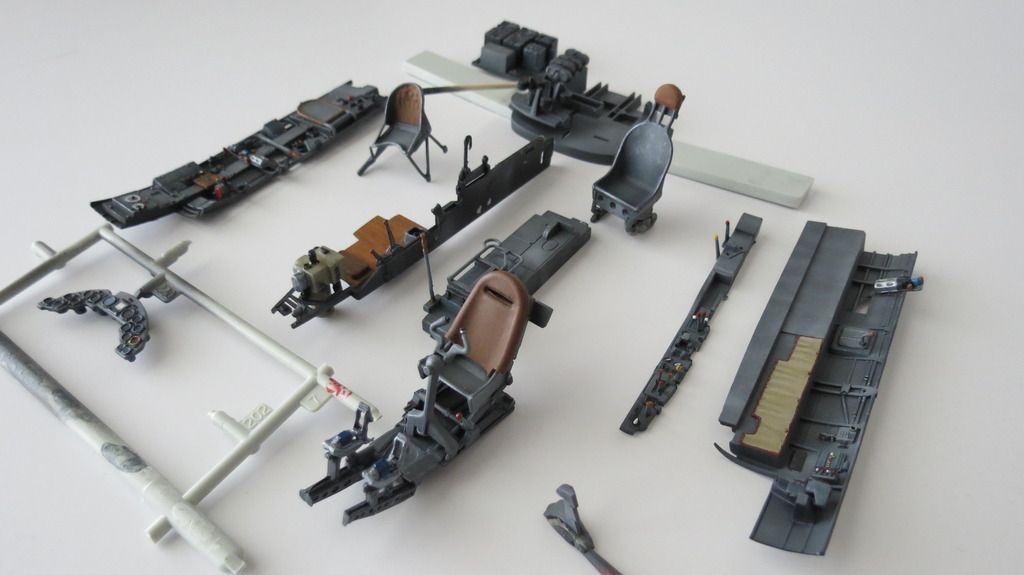
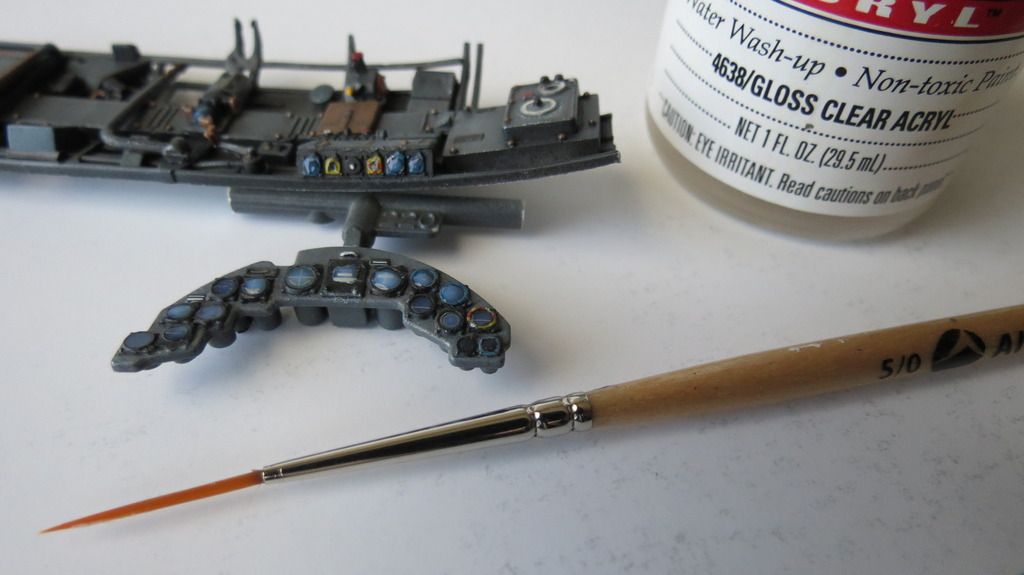
When I had finished detail painting all of the sub-assemblies, I then airbrushed a gloss clear coat onto them in preparation to apply weathering washes and the instrument panel decals:


IMG_5207_zpsp7solr4b.jpg


IMG_5209_zpsgelrwelv.jpg


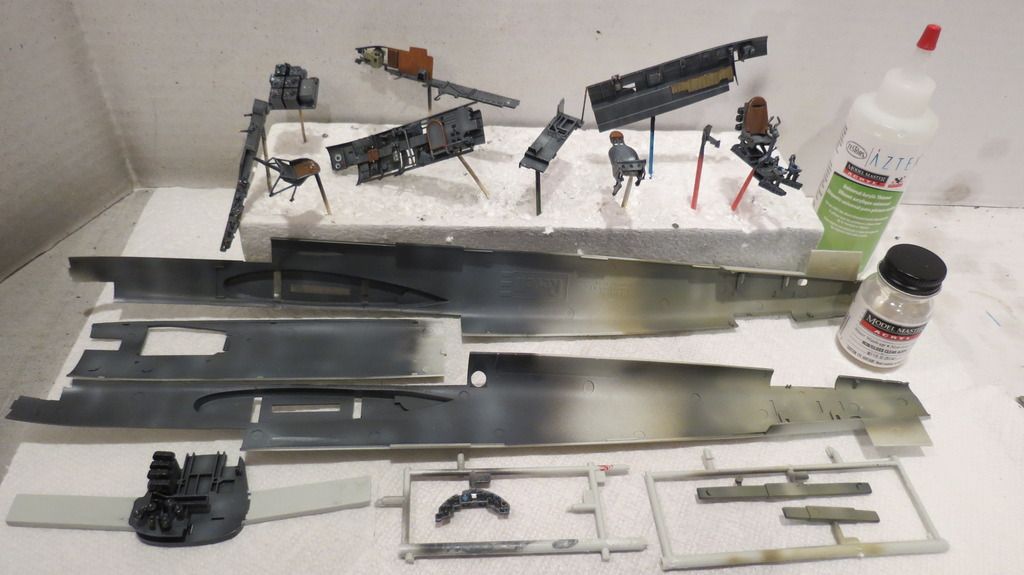
I allowed the gloss clear coat to dry overnight and then, the following day, I mixed a dirt wash with oil paints and odorless mineral spirits and brushed it liberally onto the parts. I allowed this to dry for 30-40 minutes:


IMG_5220_zps2sjr9lb9.jpg


IMG_5222_zpsb1sggsp9.jpg


IMG_5221_zpsnk3qami0.jpg


IMG_5223_zpsoaxmqvzb.jpg


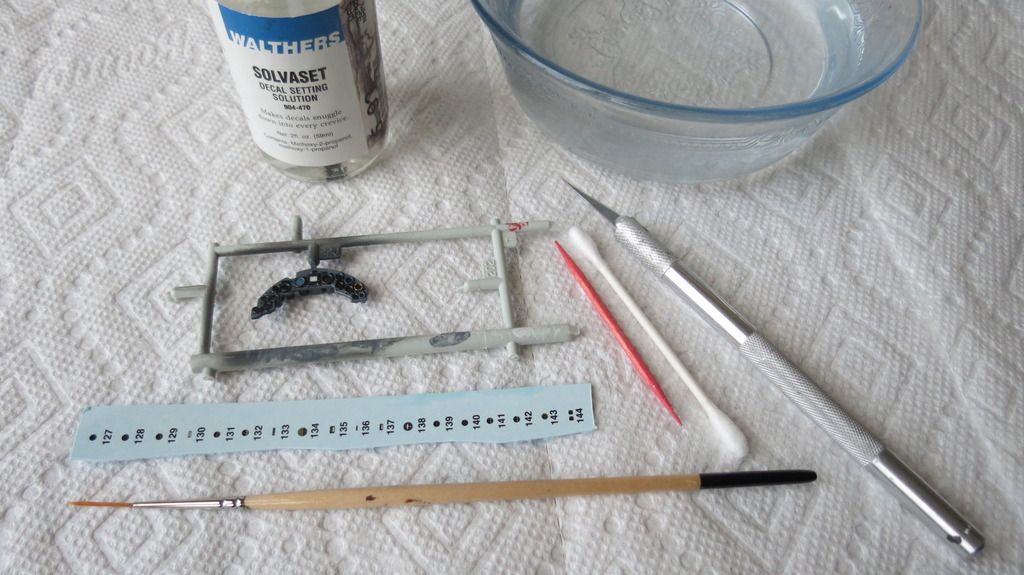
While the dirt wash was drying, I applied the decals onto the instrument panel using Walther's Decal Setting Solution:


IMG_5224_zps3rrijovz.jpg


IMG_5225_zpsq5g2x6wf.jpg


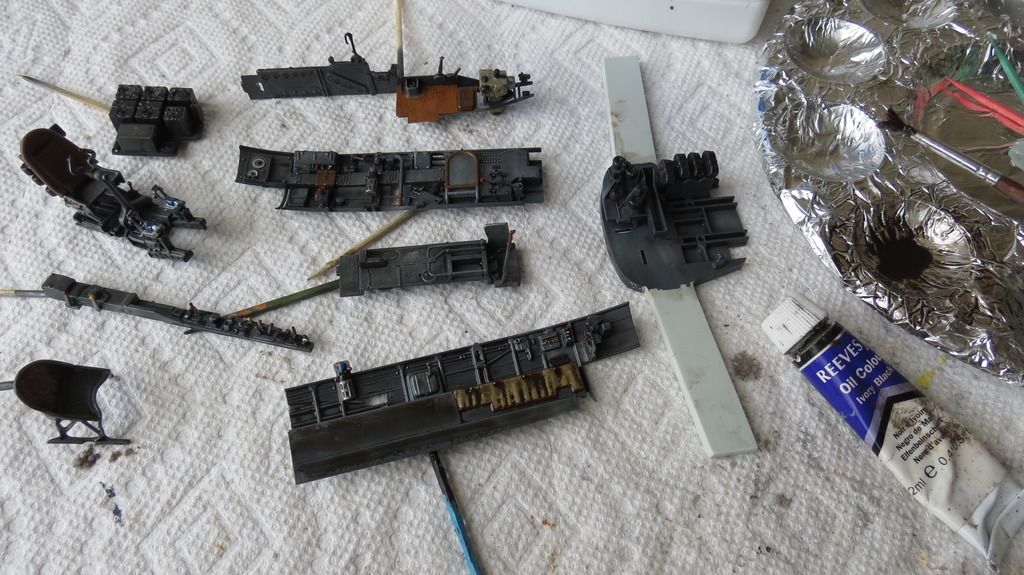
With the decals applied, it was back to the dirt washed parts. Using kitchen roll and Q-Tips, I rubbed the dirt wash off the parts leaving behind a subtle shade of the wash on areas of the assemblies:


IMG_5226_zpsp84ikjap.jpg


IMG_5227_zpsgqepesle.jpg


IMG_5228_zpsim6i0vah.jpg


IMG_5229_zpsucm61tbh.jpg


IMG_5231_zpsejpwdu8i.jpg


After allowing the dirt wash to dry for a few hours, I sealed it in with a final matt clear coat:


IMG_5232_zpsjobukuy8.jpg


IMG_5234_zpsuhabouum.jpg


IMG_5235_zpsiq972gd0.jpg


When the matt clear coat had dried, I then applied gloss clear coat into the dials on the instrument panel and the dials on top of the starboard side control panel. Once it dries it will give the appearance of glass covers:


IMG_5246_zpsptc5iw5g.jpg


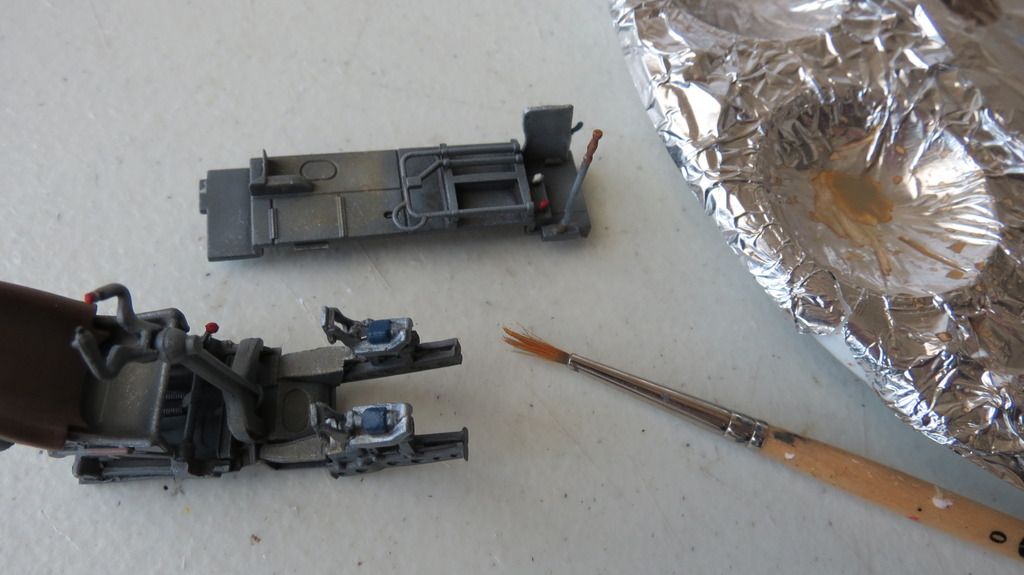
Next, I mixed a mud wash and brushed this onto the Radio Operator's floor and the foot panels beneath the Pilot's seat:


IMG_5239_zpsz9xj9opg.jpg


IMG_5254_zpsfzqxmegb.jpg


IMG_5265_zpsizlcok3u.jpg


IMG_5266_zpsxpogrs88.jpg


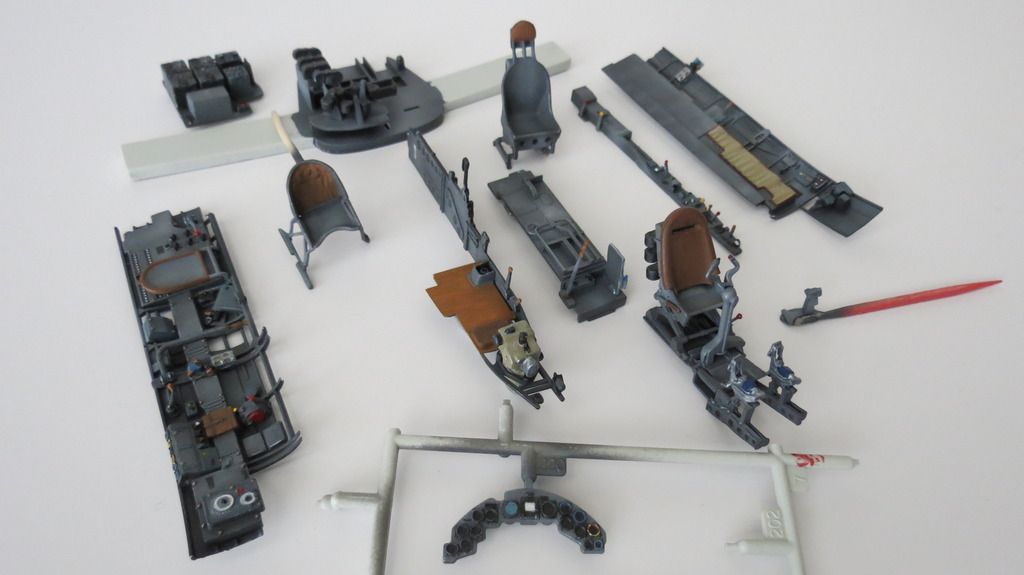
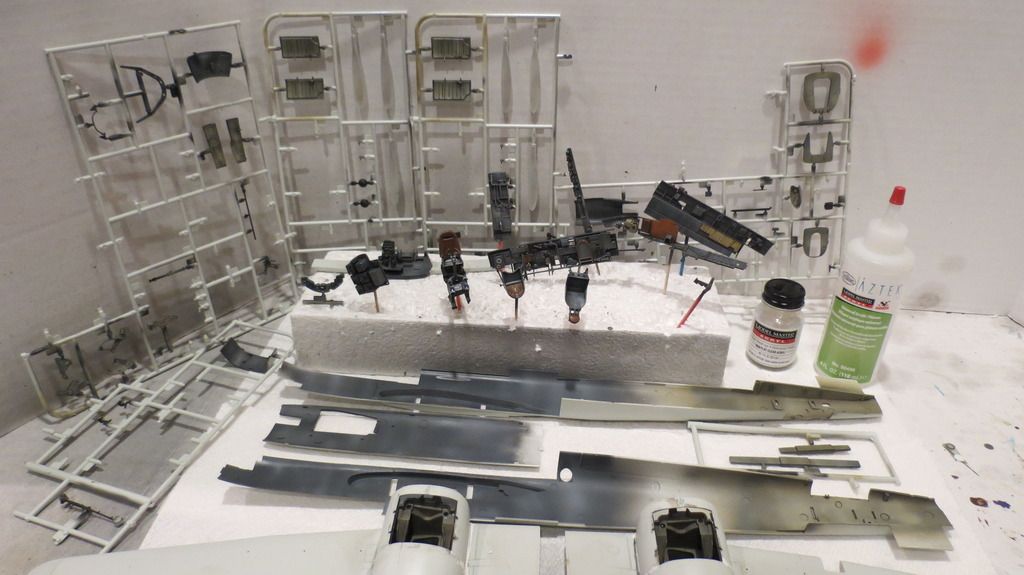
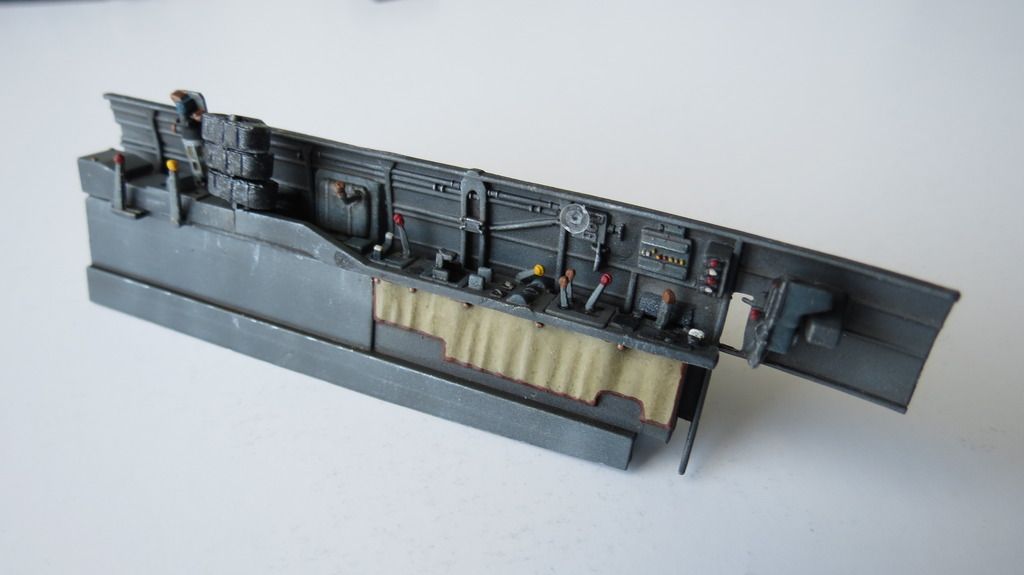
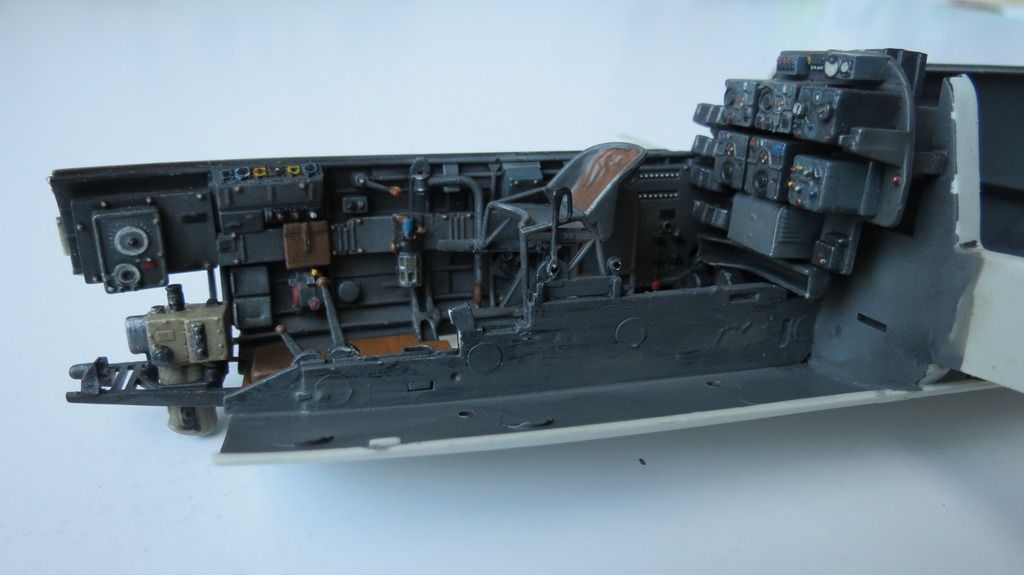
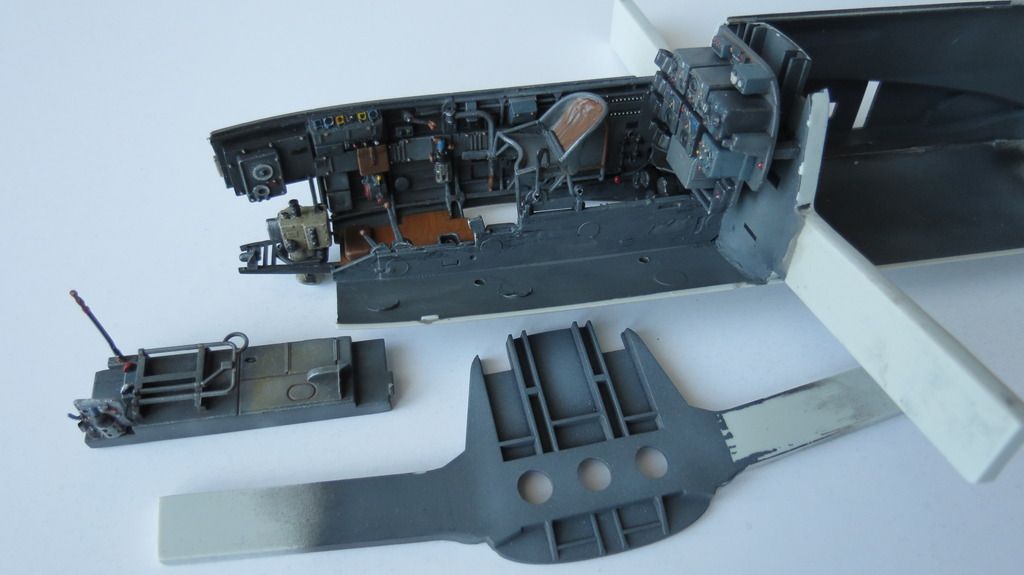
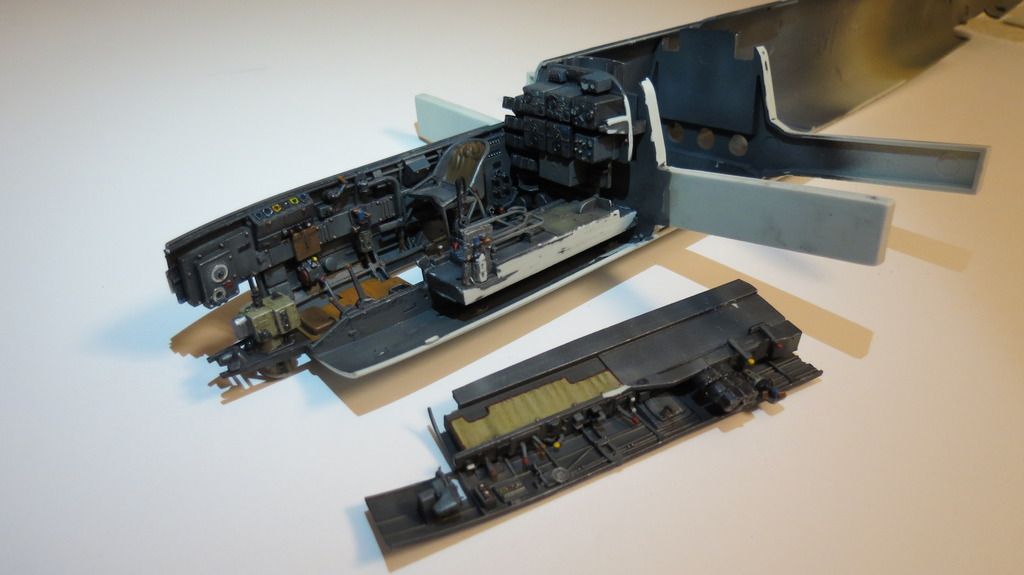
I then laid everything out to see how the sub-assemblies looked before proceeding with assembling them into the fuselage:


IMG_5240_zpsctrrcosd.jpg


IMG_5241_zpsbkhfhaex.jpg


It was now time to assemble everything together into the starboard side fuselage half, but before I did that, I assembled a magazine rack and glued that onto the portside inner wall along with gluing the console to complete the portside inner wall assembly:


IMG_5271_zpsaclzaudi.jpg


IMG_5273_zpsd8rpz87k.jpg


I then assembled the bottom forward fuselage panel onto the starboard side fuselage half:


IMG_5275_zpszlfocwdc.jpg


IMG_5276_zpsqpb39k0s.jpg


Followed by assembling the radio/transmitter panel onto the rear bulkhead:


IMG_5277_zpsm9unxsjn.jpg


IMG_5278_zps88b3epn7.jpg


This assembly was then glued into the starboard side fuselage half:


IMG_5280_zps0u0t58zn.jpg


Next, I glued the bombardier's seat into the central bulkhead and floor assembly and fitted that into the fuselage:


IMG_5288_zpsyfg3id7t.jpg


IMG_5293_zps0fneltgf.jpg


IMG_5300_zpspromzcyh.jpg


I then glued the second bulkhead into the fuselage along with the radio operator's floor assembly:


IMG_5311_zpsufkfotci.jpg


IMG_5312_zpsyieryurm.jpg


Following those items, I then glued the portside inner wall assembly into position:


IMG_5322_zpsdwc3upsc.jpg


IMG_5324_zps7vcefmgl.jpg


IMG_5326_zpsjntd6o7u.jpg


IMG_5332_zps83yci0vl.jpg


IMG_5336_zpsntrkkovz.jpg


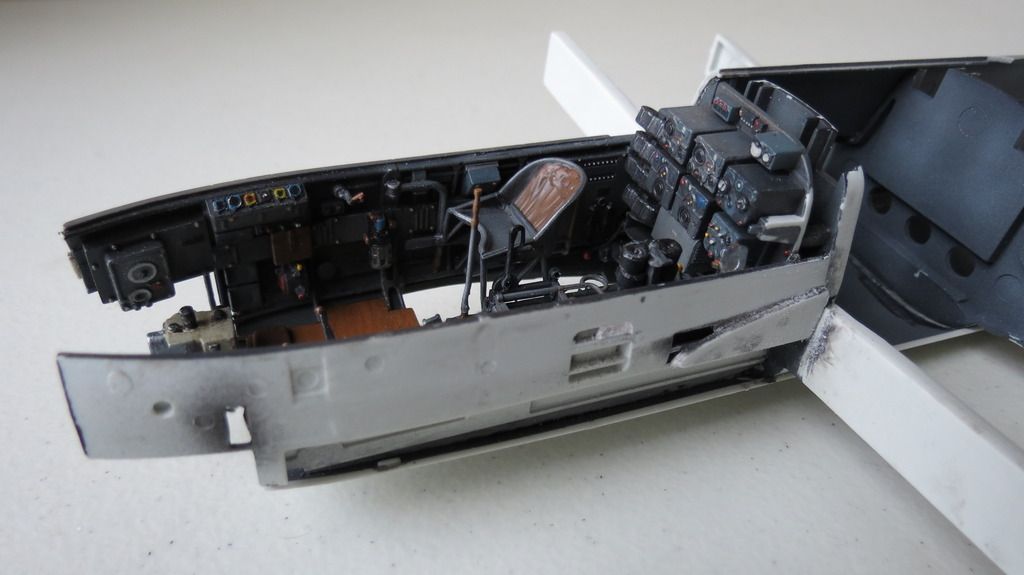
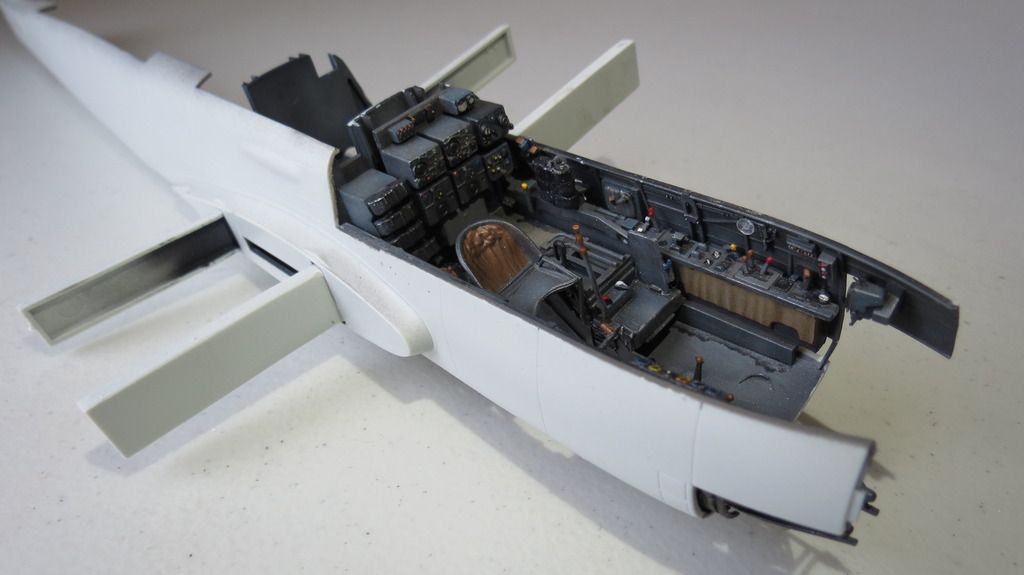
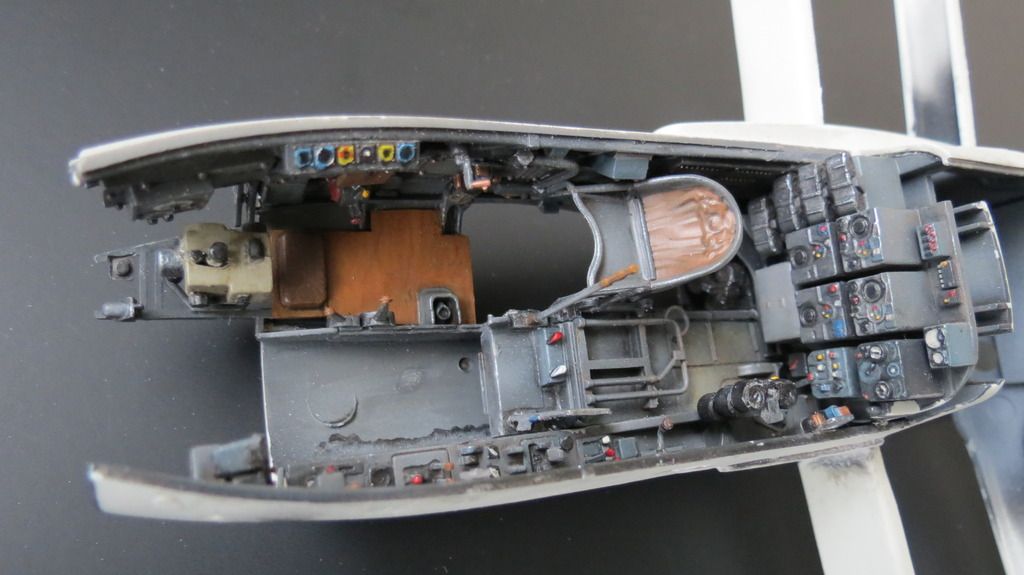
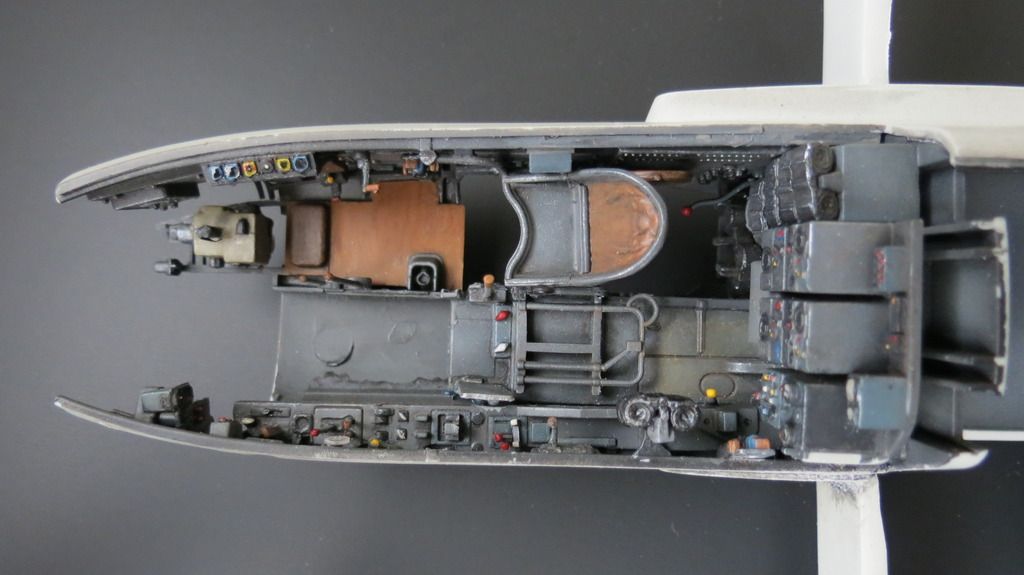
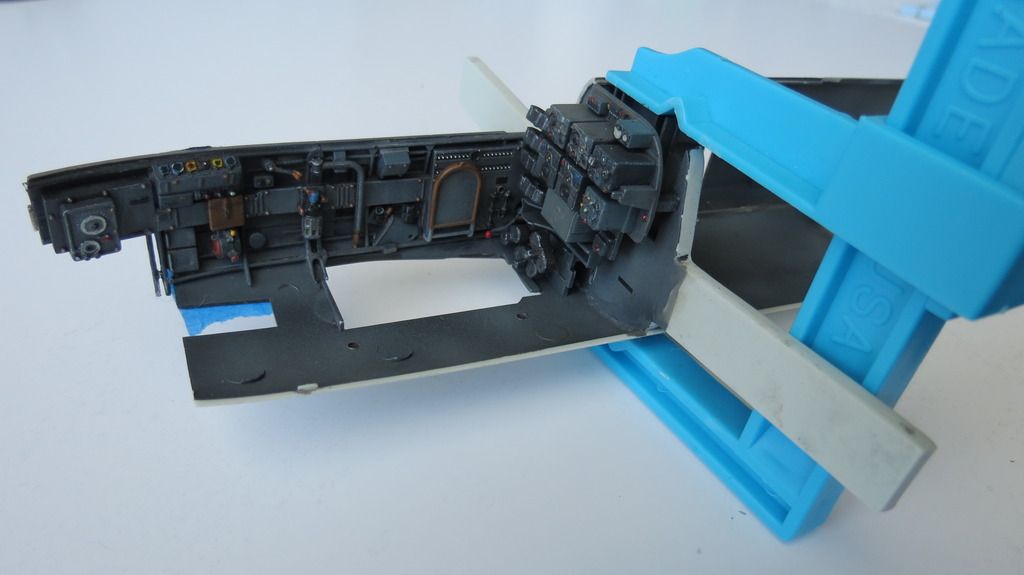
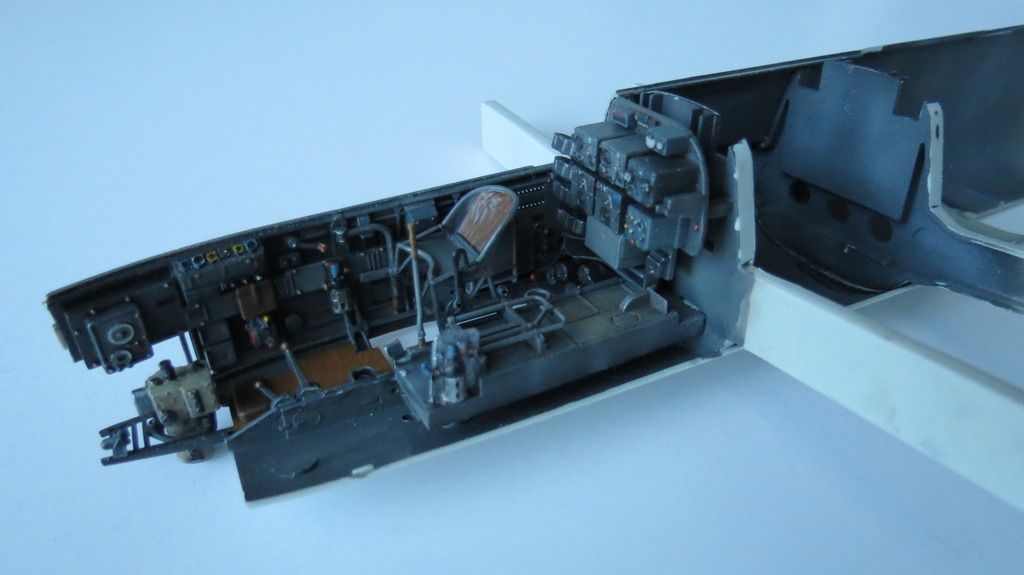
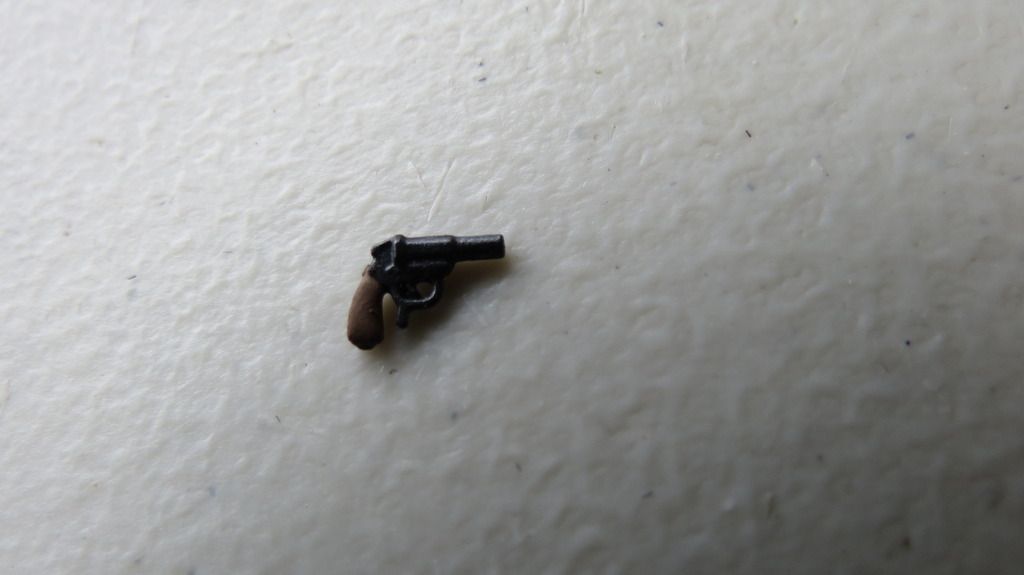
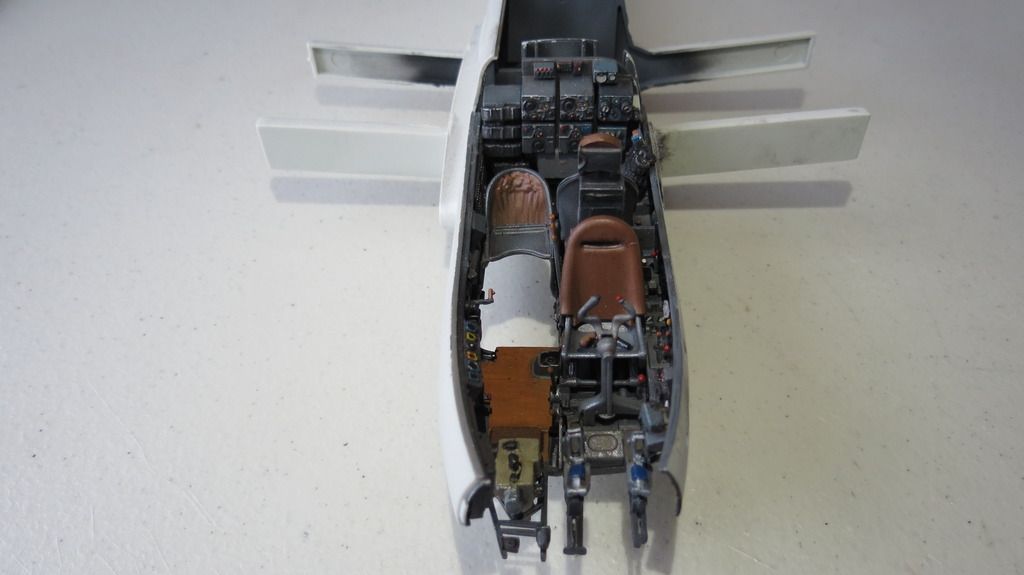
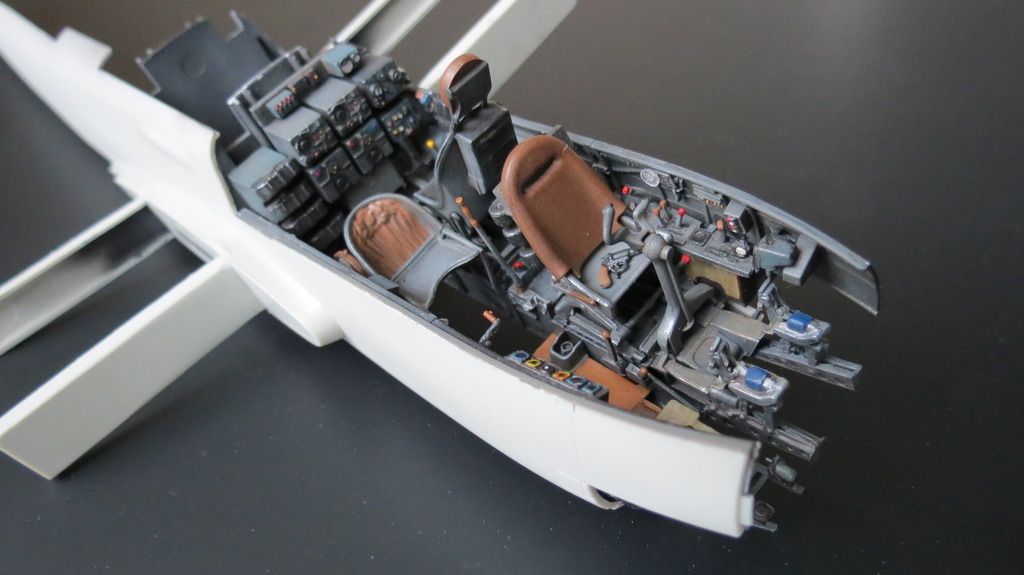
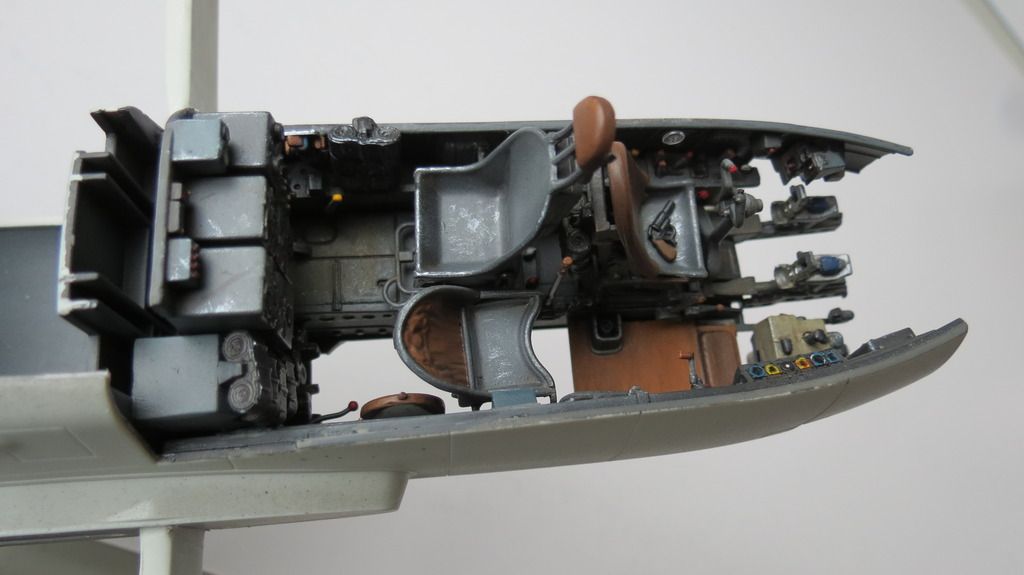
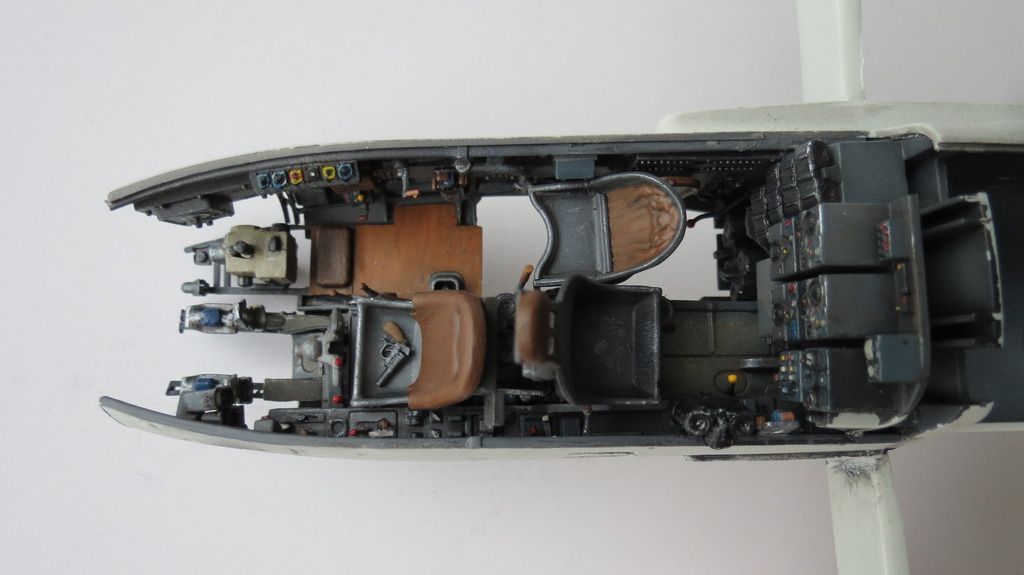
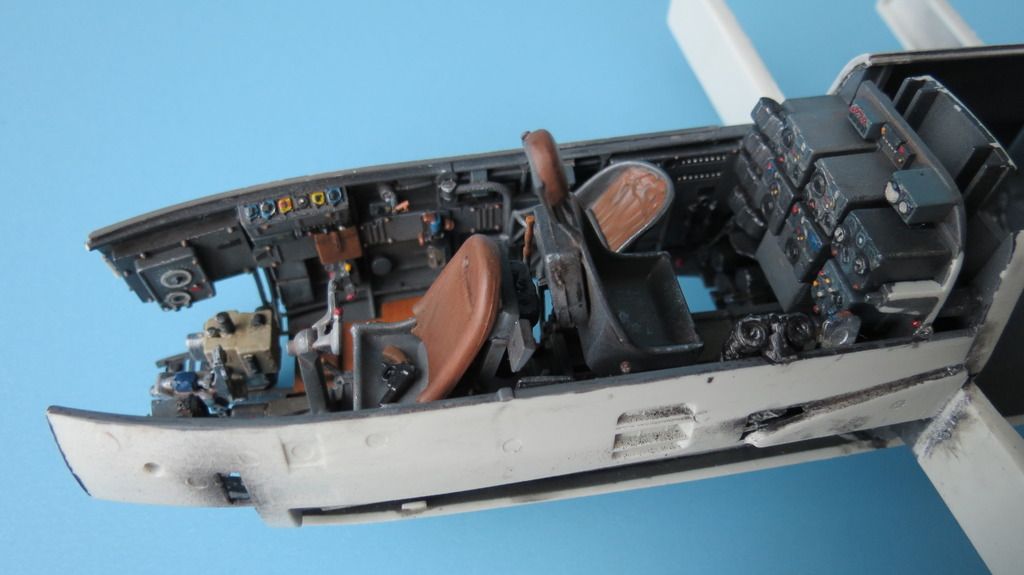
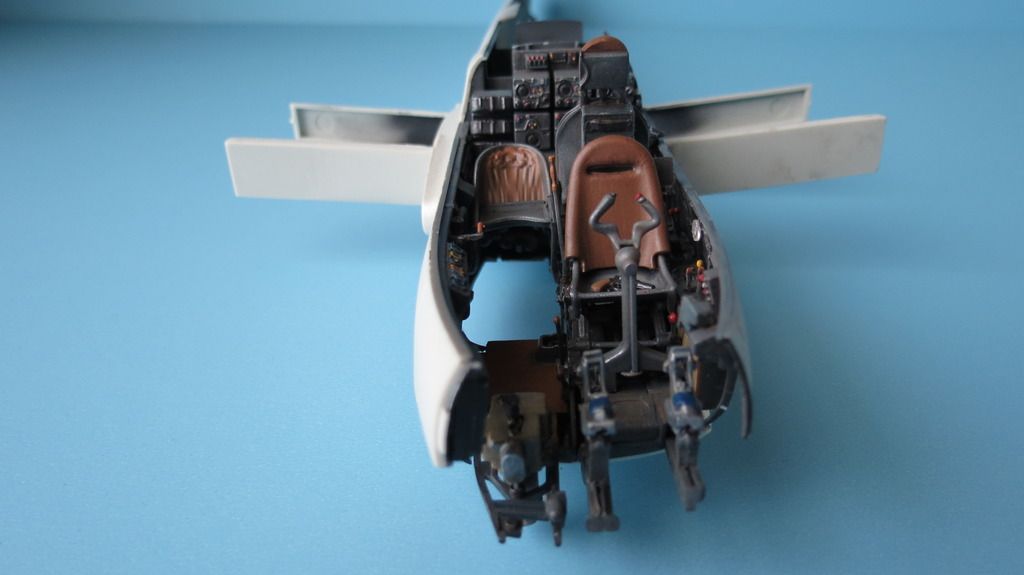
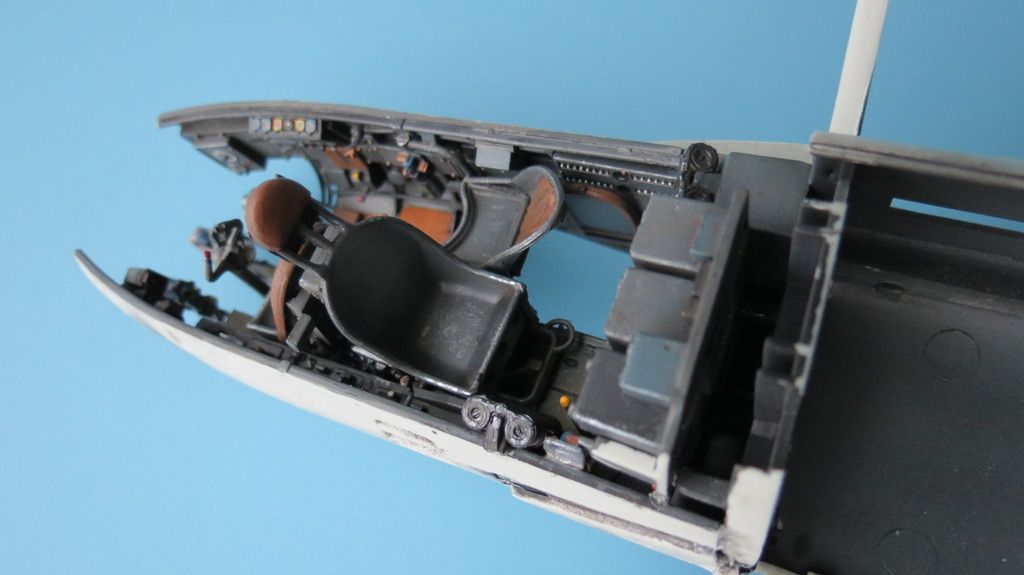
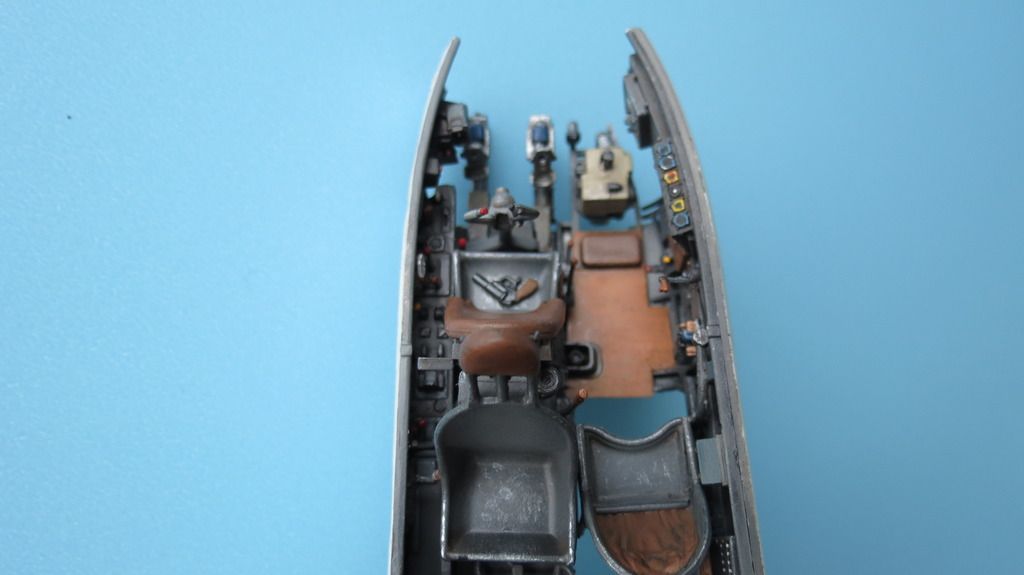
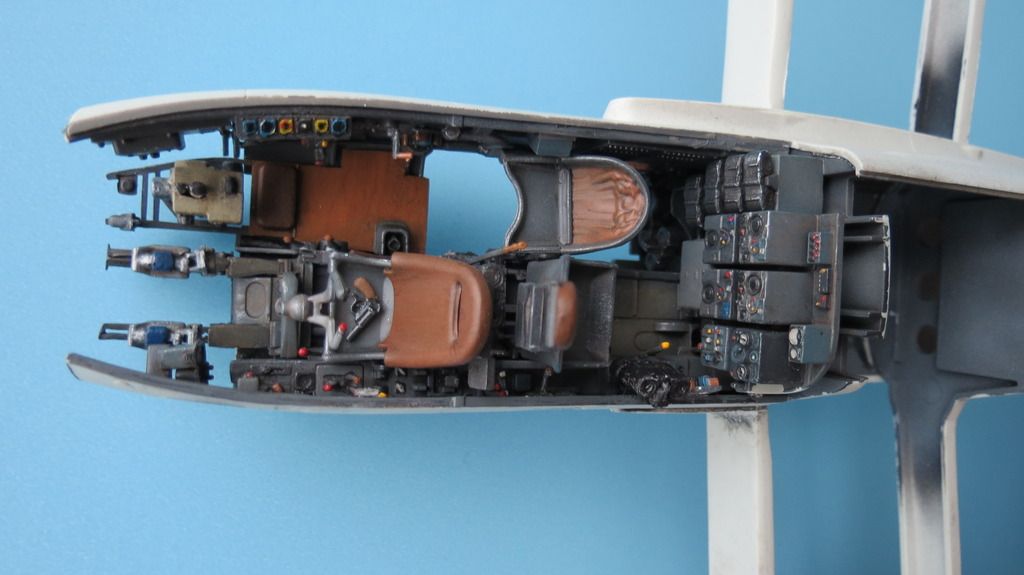
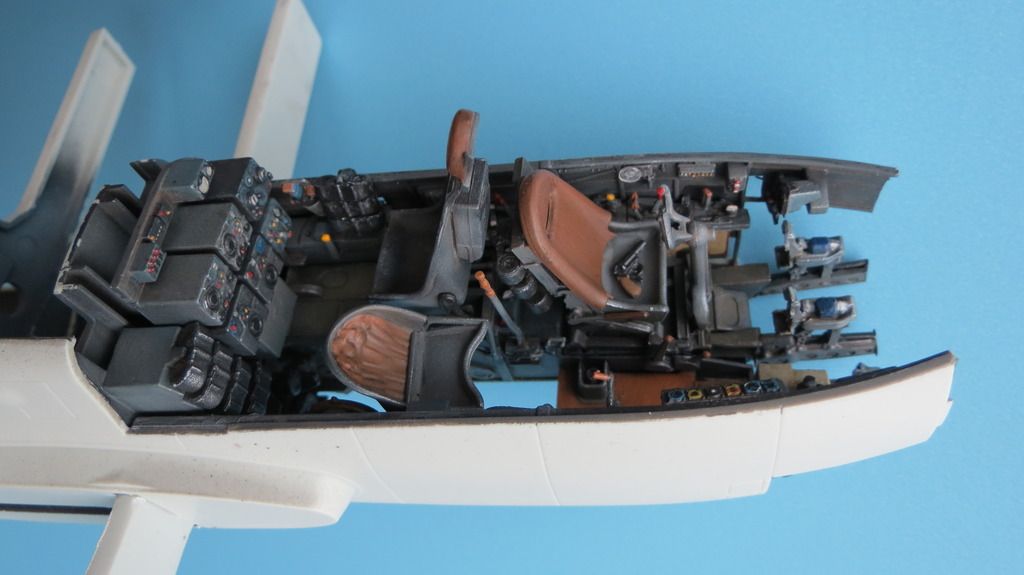
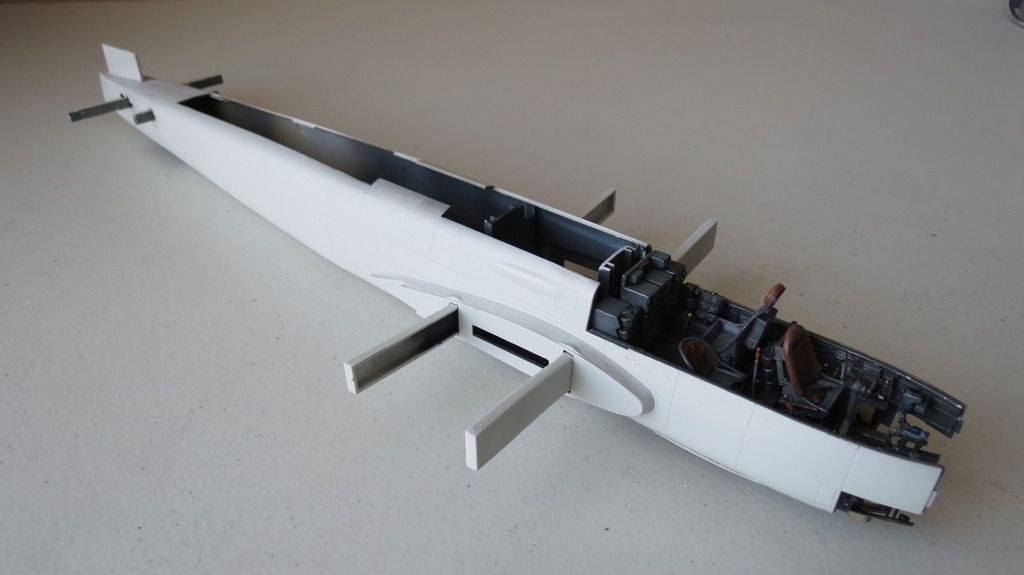
All that was left to complete the cockpit assembly was to fit the radio operator and pilot's seat. But before that was done, there was a small flare gun to paint and glue into the Pilot's seat. With the cockpit complete, I took a set of photographs for prosperity before most of it is hidden behind the canopy sections and upper and lower fuselage sections:


IMG_5342_zpsofhnsjag.jpg


IMG_5330_zpsau6j8axx.jpg


IMG_5348_zpsaaaer0g4.jpg


IMG_5355_zpsuh9fykev.jpg


IMG_5383_zpsq8zospbo.jpg


IMG_5391_zpstwpuleq4.jpg


IMG_5398_zpsjvamwkhq.jpg


IMG_5409_zpsywpnr5xc.jpg


IMG_5410_zpsrhi1h9yn.jpg


IMG_5417_zpstiq7t4xc.jpg


IMG_5418_zps0u4amox4.jpg


IMG_5420_zps3exxq3y8.jpg


IMG_5421_zpslgojzbs6.jpg


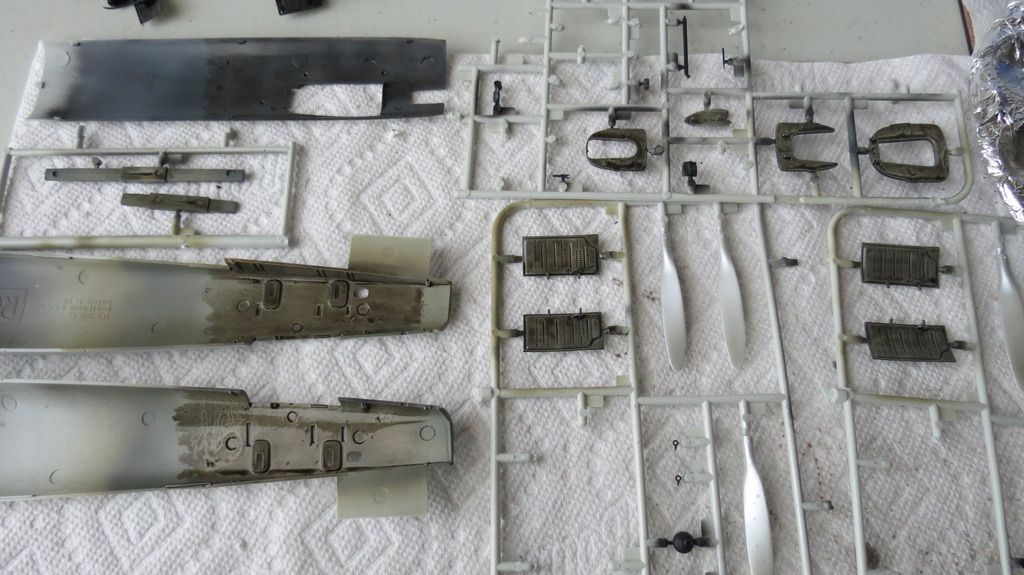
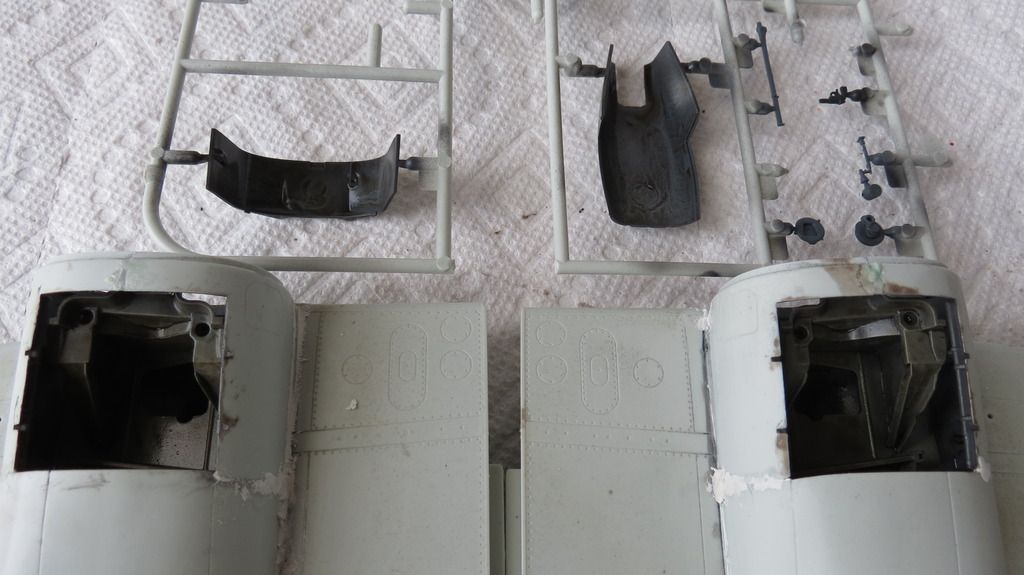
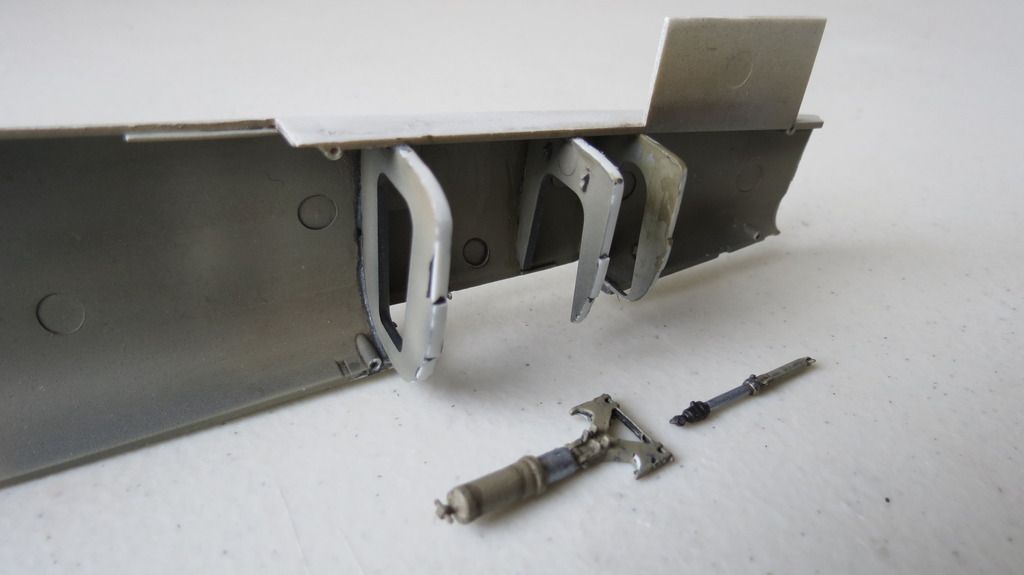
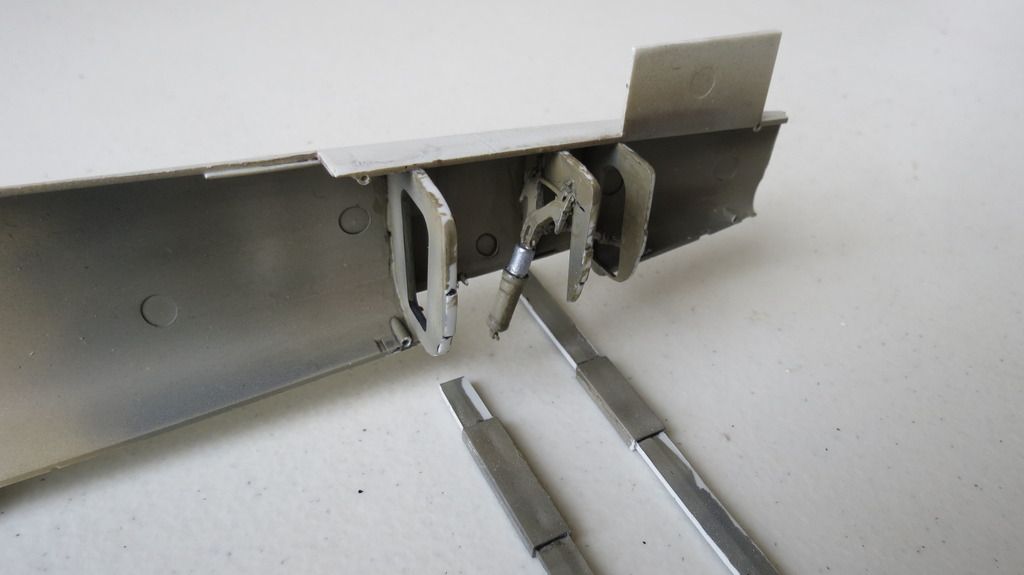
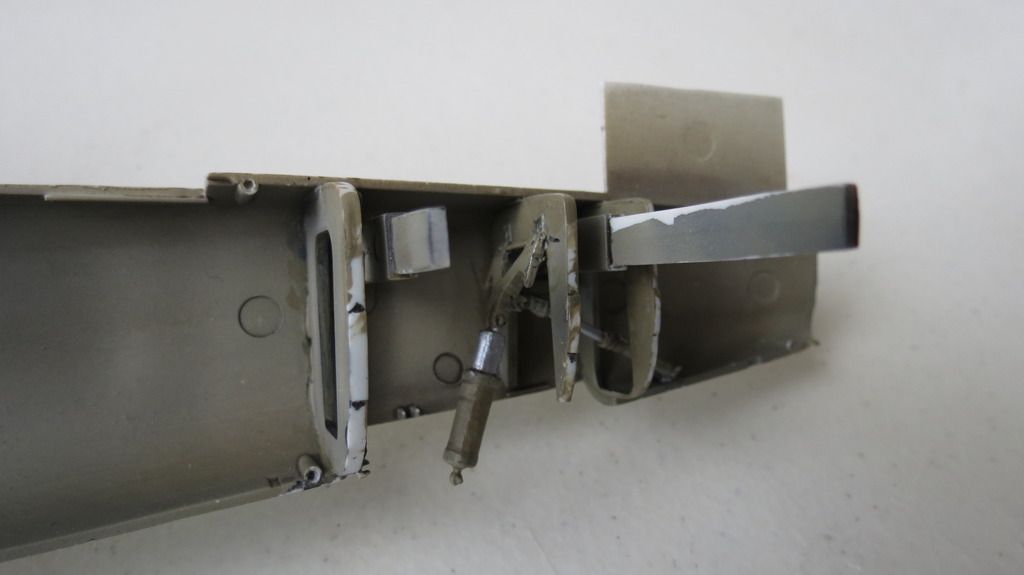
Next, I fitted the three rear wheel well bulkheads, the wheel hydraulic suspension cylinders and the two horizontal braces for locating the horizontal stabilizers onto. I temporarily located the portside fuselage half until all the parts were set solid in their locations:


IMG_5424_zpsqu2va7fz.jpg


IMG_5425_zpsbcrilbmd.jpg


IMG_5426_zpsiyc2yyvg.jpg


IMG_5427_zpsddre1jtv.jpg


IMG_5429_zpszkdgbhqf.jpg


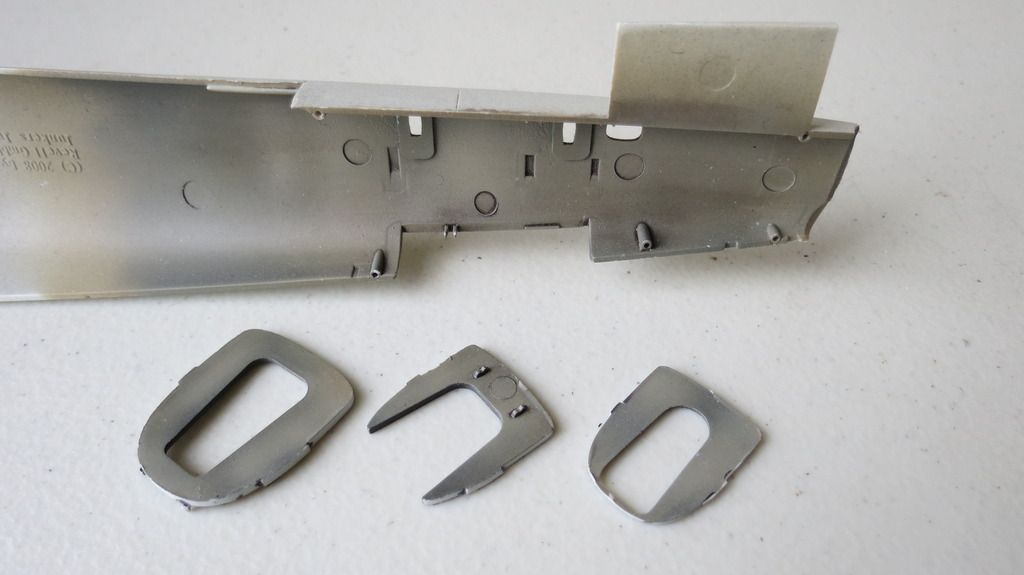
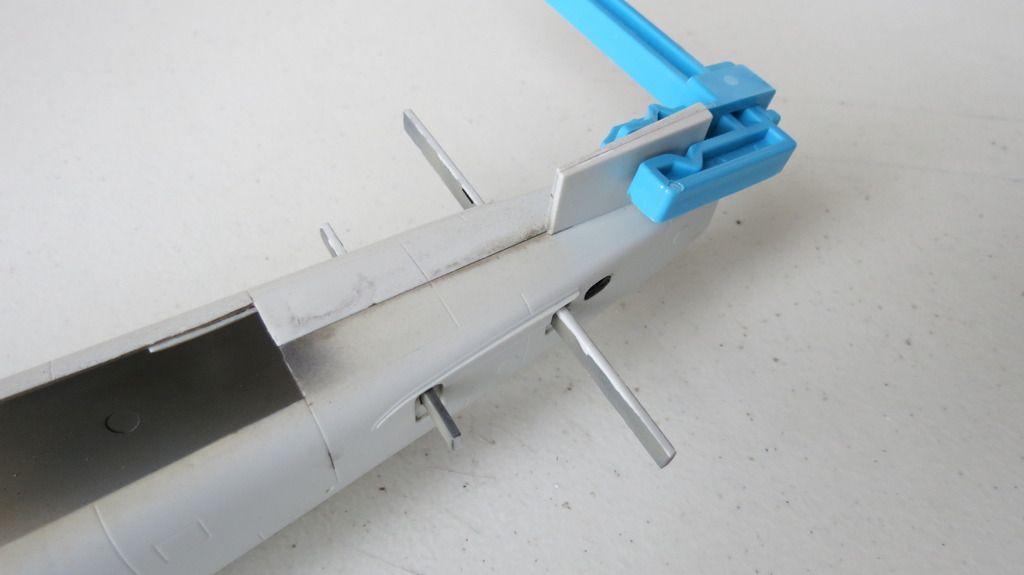
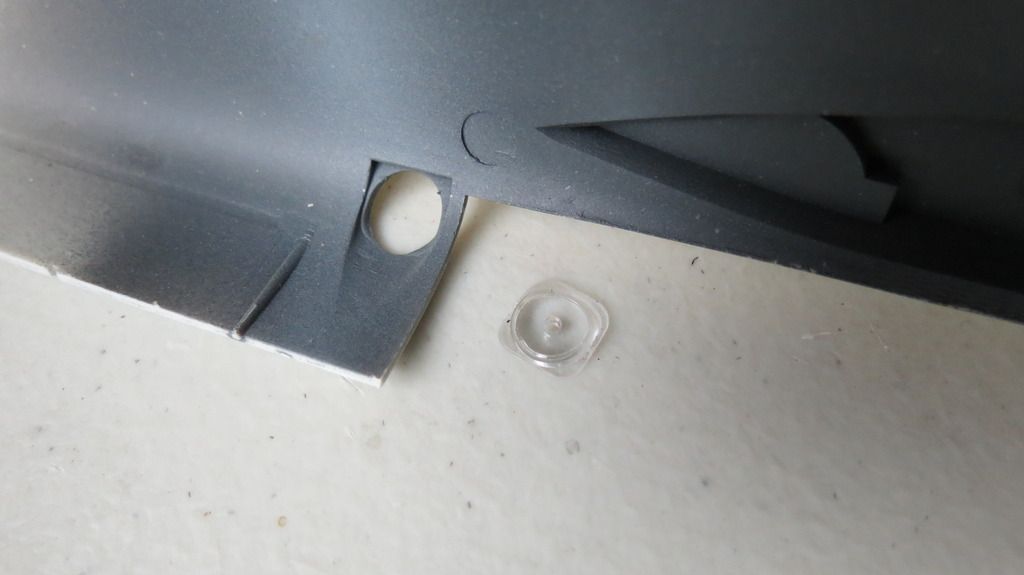
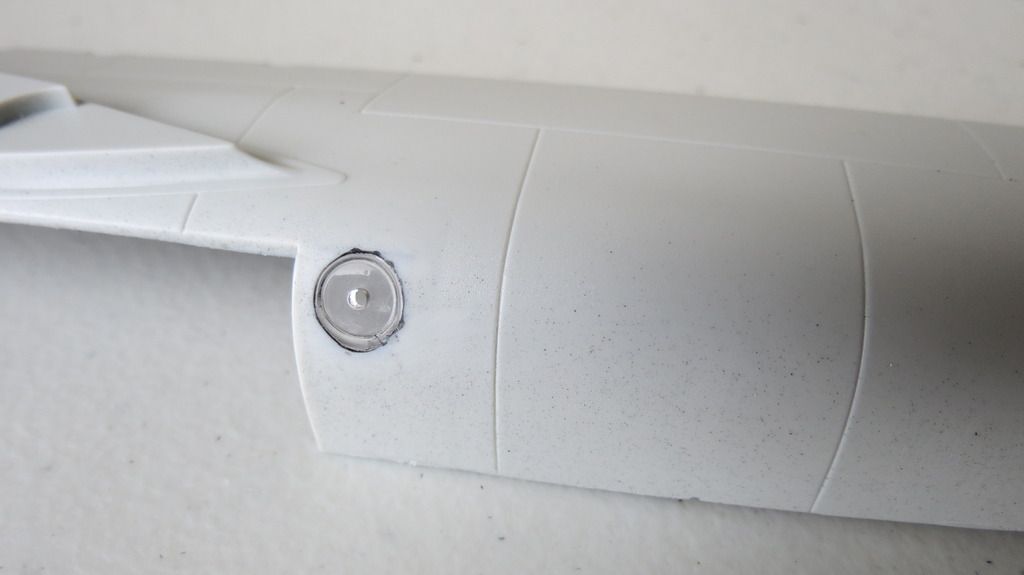
Before gluing the two fuselage halves together, there was a clear lens/window to be glued into the portside fuselage half:


IMG_5430_zpszxng7qpo.jpg


IMG_5431_zpslp0kmwru.jpg


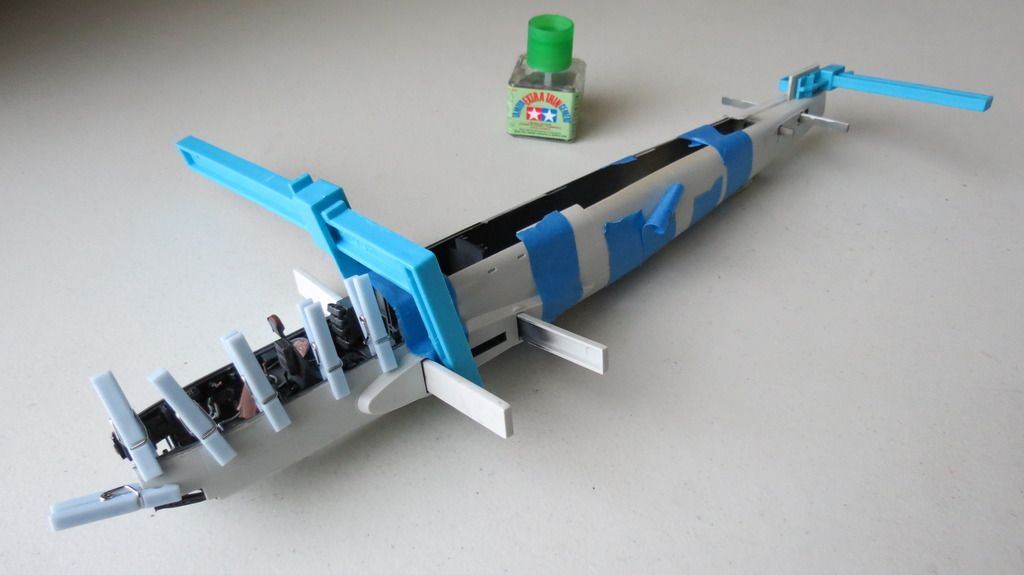
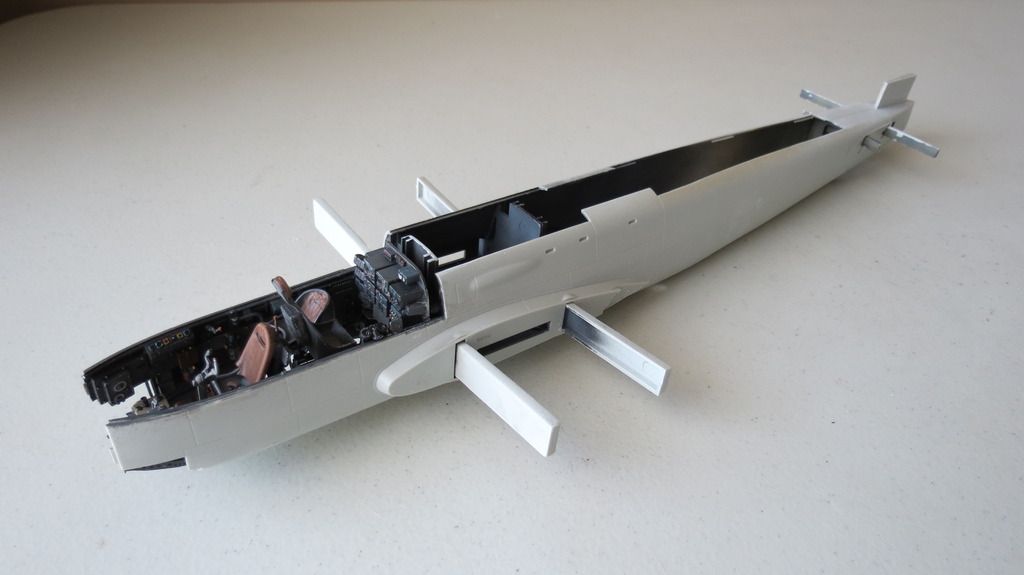
When that window had set solid, I then glued the two fuselage halves together and taped and clamped them until they had set. I then removed the tape and clamps and took a couple of photos:


IMG_5432_zpsslzqtpri.jpg


IMG_5436_zps832awb6q.jpg


IMG_5437%20-%20Copy_zpsttofs3ey.jpg


So, that's it for this update, I hope you like what has been done so far?


Next, I will build up the plane, fill sand and smooth all seams, mask the canopies, wheel wells and radial engine fronts, prime and pre-shade in preparation for moving onto the painting stage.


In the meantime, if you'd like to watch my YouTube Channel "Build Update #2" video, then here is the link to that: https://youtu.be/vd8SPlxe6BM


Thanks in advance for watching this thread, leaving any comments and watching my YouTube video should you choose to do so!


Until my next update, happy modeling and have fun!


Cheers   

Martin


  • Member since
    June 2003
  • From: Cavite, Philippines
Posted by allan on Tuesday, February 9, 2016 8:49 PM

The details on this kit are amazing!  And you put it together really well!


Love the flare gun. :)

No bucks, no Buck Rogers

  • Member since
    June 2014
Posted by BrandonK on Tuesday, February 9, 2016 8:51 PM

BK

On the bench:

A lot !! And I mean A LOT!!

2024 Kits on deck / in process / completed   

                         14 / 5 / 2  

                              Tongue Tied

  • Member since
    February 2012
  • From: Olmsted Township, Ohio
Posted by lawdog114 on Tuesday, February 9, 2016 9:04 PM
Absolutely stunning.

 "Can you fly this plane and land it?...Surely you can't be serious....I am serious, and don't call me Shirley"


  • Member since
    April 2015
  • From: New Hampshire, USA
Posted by UKguyInUSA on Friday, February 12, 2016 8:22 AM

Bish
 
UKguyInUSA
 
Bish

Nice start, lookin forward to seeing more. I have the RoG boxing (minus swastika's of course, didn't realise the Revell kit's over there had them) so will be following along.


Thanks Bish, much appreciated!

Have fun with your RoG version...I love their newly tooled 1/32 scale kits...I've made a few of them now.

I didn't realize Revell USA had the swastika's in their kits either, until I opened this one. It must just be a ban in Europe and the UK?


Cheers Smile

Martin


Ye, i have a few as well, yet to build one, but they all look really nice.

Ye, its definatly a Europe thing, well Germany mainly. I just assumed with it being Revell, it would have carried ove rthere. Good to see it hasn't. AM Swatika's are a must here in any scale.


I bought a sheet of mixed scales and sizes of Swastika in 2014 from Aeromaster for the kits that I have that don't include Swastikas. After all the large 1/32 scale Revell of Germany Luftwaffe kits that I have built now, along with a few 1/48 scale, I'm starting to run low....time to order another set.


Cheers Smile

Martin

  • Member since
    April 2015
  • From: New Hampshire, USA
Posted by UKguyInUSA on Saturday, February 20, 2016 10:38 PM

Toshi

I love the way you've depicted this kit.  A superb job!

Toshi


Thanks Toshi, greatly appreciated mate!


Cheers Smile

Martin

JOIN OUR COMMUNITY!

Our community is FREE to join. To participate you must either login or register for an account.

SEARCH FORUMS
FREE NEWSLETTER
By signing up you may also receive reader surveys and occasional special offers. We do not sell, rent or trade our email lists. View our Privacy Policy.