SEARCH FINESCALE.COM

Enter keywords or a search phrase below:

A Flying Suitcase: 1/72 Handley Page Hampden

5717 views
22 replies
1 rating 2 rating 3 rating 4 rating 5 rating
  • Member since
    June 2010
  • From: Rochester, New York USA
A Flying Suitcase: 1/72 Handley Page Hampden
Posted by rocker286 on Tuesday, July 19, 2016 10:46 PM

I have cabinets down in my man cave where I store my ever-growing stash. One kit in particular has been down there a lonnng time and a few weeks ago I decided it was high time to get this thing started as soon as I was done with my El Camino. Tonight I washed the parts off, and tomorrow I'll start painting!

2016-07-19_11-25-43

4badges

  • Member since
    February 2014
  • From: Cincinnati, OH
Posted by Valkyrie on Tuesday, July 19, 2016 11:15 PM

Rocker, I look forward to your WIP pictures on this Hampton.  I have a number of !/72 WW II British bombers in my stash and am looking forward to building them all!!!  Al

  • Member since
    March 2005
Posted by philo426 on Wednesday, July 20, 2016 8:24 AM

I will be watching this one!I recently made a paperstock Hampden and it was a bit of a nightmare!  

  • Member since
    June 2014
Posted by BrandonK on Wednesday, July 20, 2016 9:40 AM

Well, this is certainly one you don't see everyday. This will be fun to watch.

BK

On the bench:

A lot !! And I mean A LOT!!

2024 Kits on deck / in process / completed   

                         14 / 5 / 2  

                              Tongue Tied

  • Member since
    June 2010
  • From: Rochester, New York USA
Posted by rocker286 on Sunday, July 24, 2016 1:37 PM

Al, Which ones do you have in your stash? I'm looking at buying the Airfix Lancaster B.II eventually. Believe it or not this is the only British bomber in my stash at the moment. I gotta change that!

Philo - That paperstock Hampden looks darn good!

Bradon- That's part of the reason I bought this kit a few years back...Not that I don't love Lancasters and Halifaxes but Hampdens and lesser known/talked about British bombers have always interested me.

I've begun to paint several parts on this kit. Both fuselage halves have been given a coat of RAF interior green. The cockpit floor/bomb bay ceiling have been given a coat of flat black, and the pilot and rear gunner's seats have been added. I'll be giving the fuselage halves antother coat of the interior green because the paint is a bit thin.

2016-07-24_02-00-38

4badges

  • Member since
    June 2010
  • From: Rochester, New York USA
Posted by rocker286 on Friday, July 29, 2016 8:41 PM

Well after movin cabinets down to my man cave on monday, my back decided to throw a mutiny and throw itself out. I've been off from work since Wednesday, and I won't be getting back to work until Monday. These things in life are unfortunate, but hey! I've got ample time to work on that Hampden of mine that's sitting down on my workbench. I've got the interior pretty much together, as well as the dorsal guns and the bombs. The red stripe decals for the bombs went on with no problems, as did the decal for the instrument panel.

I had to take a pin vise to the slot where the navigator/bomb aimer's seat is. I didn't have to drill a whole lot of excess plastic out, I more or less just made the slot wider. This ensured a good fit, and after several times of test-fitting the fuselage halves together, I was satisfied. I may need to sand the edge of the cockpit floor in order to make the halves fit better as well. I'm also going to paint on seatbelts, or scrounge my decal stash for a pair. But enough talk, though. Here are some photos!

2016-07-29_09-22-47

2016-07-29_09-22-30

2016-07-29_09-22-10

4badges

  • Member since
    March 2015
  • From: Streetsboro, Ohio
Posted by Toshi on Saturday, July 30, 2016 6:34 AM

This is looking real good.  I await for your continued WIP's.

Toshi

On The Bench: Revell 1/48 B-25 Mitchell


Married to the most caring, loving, understanding, and beautiful wife in the world.  Mrs. Toshi


  • Member since
    November 2009
  • From: SW Virginia
Posted by Gamera on Saturday, July 30, 2016 8:06 AM

She's coming right along, love the look of the bombs. 

Hope you back feels better soon. 

"I dream in fire but work in clay." -Arthur Machen


  • Member since
    June 2010
  • From: Rochester, New York USA
Posted by rocker286 on Sunday, July 31, 2016 9:34 PM

Thanks Toshi and Gamera, it's amazing what a few days of rest will do! The ultimate test to see if my back is up to the task will be at work tomorrow..and it's a MONDAY of all days...

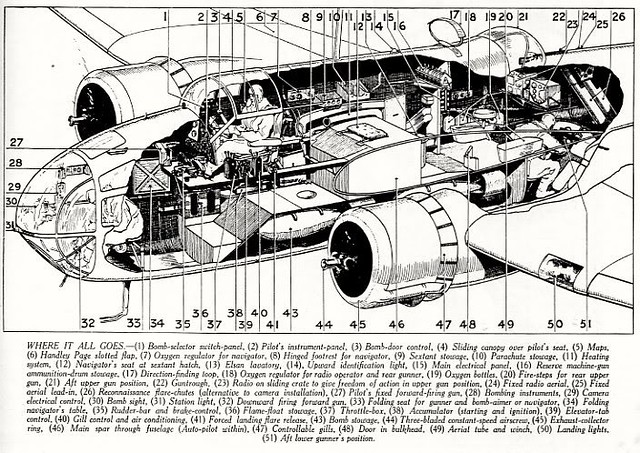
I got a bit more work done on the Hampden tonight. I did a bit of sleuthing, and found a cutaway illustration of the inner workings of a Hampden:


2016-07-31_10-23-55

I realized that I could do a bit of super-detailing if I felt so inclined. And I definitely did. I took an thin piece of sheet styrene that I had laying around and sliced out a piece to replicate an ammo drum rack, and also the navigator/bomb aimer's seat under the sextant hatch.

20160731_210058_001

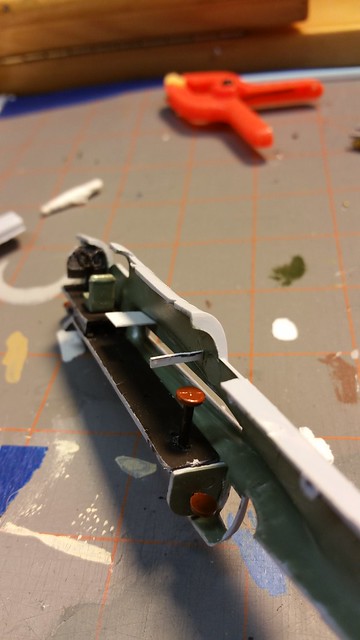
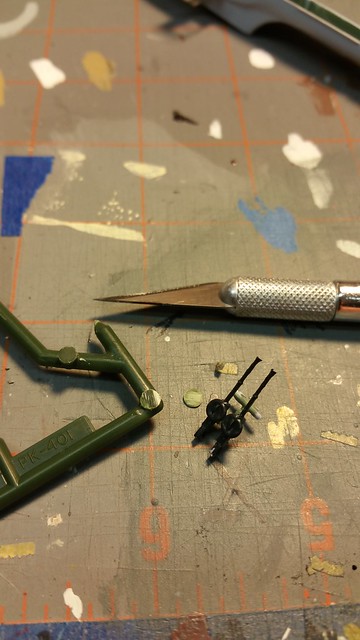
I found an old sprue from the He-115 kit I did a few years back, and realized the injector marks were circular, and pretty much the exact same diameter as the ammo drums on top of the twin Vickers guns. I took an xacto knife and sliced off two of them to use as spare drums to attach to the rack.

20160731_210411


After the glue dried, I painted everything. It'll defintely add a bit of detail to that negative space on the inside!

20160731_214358


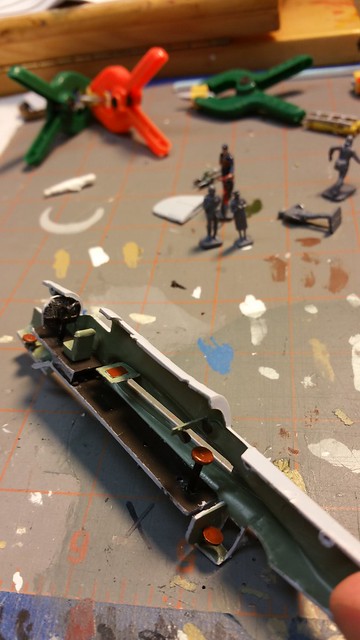
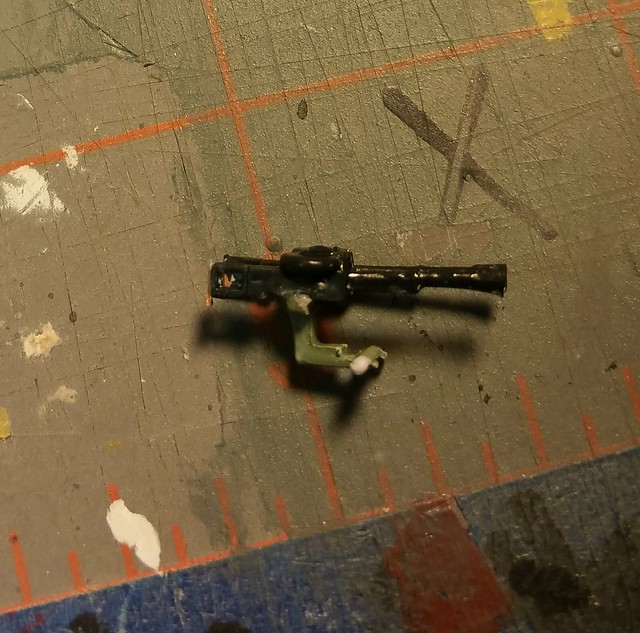
One more thing! In one of my last posts, I took a photo of the dorsal gun mount. It turns out I had the MG's on backwards! If you're planning on building this kit, the directions do a poor job of telling you which way the guns are supposed to be attached. Here's the CORRECT way they are supposed to look:

20160731_214430

4badges

  • Member since
    June 2010
  • From: Rochester, New York USA
Posted by rocker286 on Sunday, August 7, 2016 11:37 AM

More progress on the Hampden! I've got the fuselage halves glued together, and the tail is all set. The fuselage needed a bit of filler to close up some annoying gaps, and I'll have to fill the tail a bit where the rudders are. Other than that, It's been a pretty enjoyable build thus far!

2016-08-05_09-26-59

2016-08-07_12-16-41

4badges

  • Member since
    June 2010
  • From: Rochester, New York USA
Posted by rocker286 on Saturday, August 13, 2016 5:30 PM

Even more progress has been made on my Hampden! I've attached the tail, clear plastic, machine guns and four out of the six bombs into the fuselage. The next step will be to work on the engines and the wings!

2016-08-13_06-12-11

2016-08-13_06-12-24

4badges

  • Member since
    June 2010
  • From: Rochester, New York USA
Posted by rocker286 on Saturday, September 17, 2016 2:12 PM

Well, I fell off the face of the earth again. No worries, I've been happily and unhappily working on this Hampden kit. The toughest feat that I've encountered was the fit of the wings. They just didn't want to connect to the fuselage. At all. Even after I sanded, and sanded, and sanded AND SANDED the joints and slots. Eventually, the leading and trailing edges of the wings lined up with the fuselage, and I used super glue to connect these two areas. After the glue dried, i filled the gigantic gaps with putty, a task I'll still be dealing with when I get home from work tonight. The landing gear didn't give me any issues, although they're a bit complex. I'll be working on the engines next.

2016-09-17_02-55-19

2016-09-17_02-55-52

4badges

  • Member since
    June 2010
  • From: Rochester, New York USA
Posted by rocker286 on Thursday, September 29, 2016 8:46 PM

Well, everything is all set with the air frame, sans the gear bay and bomb bay doors which I'll glue on after the first coat of primer. Liquid mask has already been applied to the clear parts, and I'll be painting over the window frames with RAF interior green before priming the bomber.

2016-09-29_09-24-51

4badges

  • Member since
    November 2003
  • From: Naples, FL
Posted by tempestjohnny on Friday, September 30, 2016 5:46 AM

What gaps. I didn't see any gapsBang Head  Great job on the fix


  • Member since
    June 2010
  • From: Rochester, New York USA
Posted by rocker286 on Monday, October 10, 2016 9:37 PM


Thanks Johnny! I took full advantage of the three day weekend I had and really went to town on my Hampden. I used model master paints, Dark Earth and Dark Green for the top parts of the wings and fuselage. These two paints were a bit thin, as you'll see in the photo below. I had to apply multiple coats to get it looking good. I used flat black for the bottom color.


2016-10-05_08-08-41

The front part of the engine cowlings was painted with testors copper, and the cowl flaps were painted aluminium.


2016-10-10_12-01-28

I applied a gloss coat to the model yesterday, and this evening I applied the decals. Won't be long now until this thing is finished!

2016-10-10_10-07-55

4badges

  • Member since
    November 2003
  • From: Naples, FL
Posted by tempestjohnny on Wednesday, October 12, 2016 5:56 AM
That's gonna be a great addition to the shelf. I remember building a bunch of those old Airfix Matchbox Heller kits when I was a kid


  • Member since
    March 2015
  • From: Streetsboro, Ohio
Posted by Toshi on Wednesday, October 12, 2016 9:54 AM

rocker286, you did a fantastic job on this build.  Absolutely elegant!

Toshi

On The Bench: Revell 1/48 B-25 Mitchell


Married to the most caring, loving, understanding, and beautiful wife in the world.  Mrs. Toshi


  • Member since
    June 2010
  • From: Rochester, New York USA
Posted by rocker286 on Sunday, October 16, 2016 5:41 PM

Thanks you guys! I just finished up the kit today, and man does it look great! I DID however run into a slight snag with the clear parts...apparently I didn't coat the windows with enough liquid mask.. and it was VERY difficult to take off. In the process of removing it, I ended up scraping both the windows and the painted frames. So I had quite a bit of work to do. Luckily I was able to take out most of the scratches with pledge floor polish (future) and I painted over the framework that I had scuffed up. It's no award winner, but I'm happy with the outcome and glad it's done! I gave the underside a wash with a light tan craft acrylic, and the topside with black. Scratches in the paint were created by dry brushing steel colored paint onto the surface of the plane. The exhaust streaks on the underside were created by dry brushing testors "armor sand".  Thanks for all the positive vibes and comments folks!


2016-10-16_04-56-24

2016-10-16_04-57-37

2016-10-16_04-58-16

4badges

  • Member since
    March 2015
  • From: Streetsboro, Ohio
Posted by Toshi on Sunday, October 16, 2016 7:57 PM

Congratulations on a beautiful finish.  You did a great build on such a unique subject!

Toshi

On The Bench: Revell 1/48 B-25 Mitchell


Married to the most caring, loving, understanding, and beautiful wife in the world.  Mrs. Toshi


  • Member since
    December 2002
Posted by Bossman on Monday, October 17, 2016 7:18 PM

Nice job Rocker.  I'll keep an eye out for that kit.  I'm on a "british twins" kick lately.  I also use MM acrylics - and I thin them down.  Usually the first coat looks terrible - but it gets better !  The thinness helps to pretty much eliminate brush strokes if you do it right. Looks like you did it right. Nice job.

Chris

  • Member since
    June 2010
  • From: Rochester, New York USA
Posted by rocker286 on Friday, October 21, 2016 2:18 PM

Thanks Toshi and Bossman! I'm not sure if this kit is in production at the moment but I'm sure it's an easy find on ebay or amazon. Speaking of "British Twins" Bossman, my girlfriend and I visited an antiue shop right around the corner from us a few months back. I found an old MPC 1/72 Wellington there, and of course I had to buy it! I'm a bit  concerned about the age of the decals, but I'll cross that bridge when I get to it! 

4badges

  • Member since
    December 2002
Posted by Bossman on Friday, October 21, 2016 5:31 PM

Hey Rocker,

I was recently at my local club's IPMS show in September and I came across a guy in our club who was selling an old Matchbox Lancaster.  Hmmmmm - I had some degree of self control that day - and I didn't buy it.  But I thought about it for a while.  It's a big kit.  A little too big for me right now.

Chris

  • Member since
    June 2010
  • From: Rochester, New York USA
Posted by rocker286 on Friday, October 21, 2016 7:23 PM

Bossman, your story sounds very familiar- I found an airfix Lancaster B.II at the local IPMS show in my hometown. I had been looking for that specific kit for a few years...and since I don't have any degree of self control whatsoever, I bought it. It was 40% off, in fact! Not sure when I'll build it, but it's in the stash!

4badges

JOIN OUR COMMUNITY!

Our community is FREE to join. To participate you must either login or register for an account.

SEARCH FORUMS
FREE NEWSLETTER
By signing up you may also receive reader surveys and occasional special offers. We do not sell, rent or trade our email lists. View our Privacy Policy.