SEARCH FINESCALE.COM

Enter keywords or a search phrase below:

1:24 Airfix Hawker Typhoon Car Door Version Start-to-Finish Build

8877 views
69 replies
1 rating 2 rating 3 rating 4 rating 5 rating
  • Member since
    March 2012
  • From: Louisville, KY
Posted by Builder 2010 on Tuesday, April 14, 2020 7:01 PM

My treatment of the thick decals did work. Here's the big rondel showing good conformation to the surface texture below.

I applied all the underwing decals with no trouble. Again, lots of setting solution was needed to get the decals to show the underneath details.

I glued on the inner liner to the outer main gear door and touched up the exposed areas with flat aluminum. (no image)

I then started working on the fuselage decals and all hell broke loose. The decals' brittleness reared its ugly head especially on the large lettering that depicted this version. 

The "Xs", "Rs" and "Ps" all cracked and broke in various ways. The Solvaset was probably too strong... at least that's one theory. I will repair with a matching touchup paint.

Then, to make matters worse, I accidentally picked it up and grabbed the X and removed part of it. Didn't realize until I took the picture.

Instead of replacing the entire letter (I did have extras from the other configurations), I just cut a piece of decal to replace the missing leg.

The starboard side had less problems. The R lost it's leg, but I was able to refit it. The arrow points out an interesting detail. This little chunk is part of a long string of text, but the instructions only show the J and a slice of the next letter... an N. It's too show that the invasion stripes were applied over top of existing id numbers. That's conforms to the idea that invasion stripes were put on in the field, long after the aircraft was built. And some were very sloppy, not at all like the perfectly masked version that I did. I'm sure some crews were fastidious and made theirs very neat. Notice too that the tail decals are on.

Last thing I did was use the Eduard fitted masks and masked all the glazing in prep for painting tomorrow.

The lower parts of the car doors gets flat black inside and its part of the camo pattern on the outside. I going to display the model with the door open. There's only a single pin supporting that open door. I'm worried about that. I may have to use a brass wire reinforcement. The canopy framing is very fine and would have been a bear to mask by hand. The mask instrutions call for using liquid mask to fill in the remaining open areas. I tried using it, it didn't wet the surface properly and I wiped it off. I then went back and filled the areas with Tamiya tape. I also taped the backsides of all clear parts. That V-shaped piece is a sort of a roll bar behind the pilot's seat that has litlle windows in it. The Eduare set had masks for this too. Nice!

If you were paying attention you remember when I broke off the top of the seat frame including the armor plate behind the pilot's head. I'm going to drill the frames and install wire to reinforce this so it won't break again. I've had the model upside down a lot lately and if the seat hadn't broken when it did, it would have surely broken now. That roll cage  glues to this seat frame so I'll have to remember to get it done.

I will do that after the main gear is finally installed.

I noticed another very minor mistake. I opened the holes for the external fuel tanks, but then decided to not install them. In fact, I threw the remains of that sprue in the trash. I may fill the holes or just see if anyone ever notices them.

  • Member since
    March 2012
  • From: Louisville, KY
Posted by Builder 2010 on Wednesday, April 15, 2020 6:08 PM

First up: Painted all the glazine and then demasked. The backsides of the doors got flat black. I then turned them over and painted the entire grouping with flat black that would be the interior color of the framing. I then did a color shot with the RAF Deep Green except for 1/3 of the starboard door the Ocean Gray to match the camo at that point. The door will be in the open position so you won't be able to see if the registration is a bit off.

The Eduard masks worked perfectly and the framing is A-1. I am very pleased with it.

I finished up all the little stencils on the fuselage and painted those broken decals. The color was a bit dark and I may go back and fix them. Although, one could image some flight line touch ups that wouldn't be perfect either. I added Tamiya panel line accent Black to all the panels. I added soot (black weathering powder) the gun pay covers, the cartridge exits under the wings, and some exhaust staining. The staining is very hard to see against that dark green. I like a little weathering, but tend to not overdo it. For example, I don't do pre-shading. I dirtied up the wheel wells some more too.

Speaking of wheel wells, I assembled the main doors and their liners, and then dirtied them up a bit too. I added the structs themselves and the wheels. This will have to wait until tomorrow before installation. The struts do not fit tightly to the stubs. I'm going to epoxy them on.

Here's some more images of the weathering and panel work.

After the final decaling, I shot the whole deal with Tamiya clear flat through the airbrush. I find I can control it much better than using Dullcoat from the rattle can.

Before flat spray I had added the open foot steps that a landed plane would have. I painted their exteriors camo color and their interiors flat aluminum.

We're getting really close to the end here. The model could be done by Friday. If not it will be early next week.

  • Member since
    March 2012
  • From: Louisville, KY
Posted by Builder 2010 on Thursday, April 16, 2020 6:41 PM

Long post today... a lot happened.

Up first: putting on the main gear. While one of the build videos I watched claimed that the gear fixture was secure, I was totally unhappy with the structural integrity of the kit's method of gluing on the landing gear. Even with the offset joint, it was basically a plastic-to-plastic joint holding a lot of weight. Therefore; I drilled and pinned the joint, followed by gluing with 30 minute epoxy. I used 3/64" brass rod driiled with a #55 drill.

I located the drill spot with the sharp point from a dividers. I then pilot drilled with a 0.022" drill (it was already chucked in one of my pin vises) and then followed with the main drill. Even so, it started to break out on one side. I compensated by drilled in the opposite direction at about 45 degrees until the hold was re-centering and then finished drilling vertically. It saved the job.

This view shows the pin installed in the hole drilled in the strut. This was the side that started drilling off center.

And here are both sides epoxied and stabilized until it cured. 


After the gear was cured I added the inner gear doors, their actuating cylinders and the locking links for the main gear. This highly detailed part did not impart any structural strength. The attachment point was simply too unsubstantial to add strength.

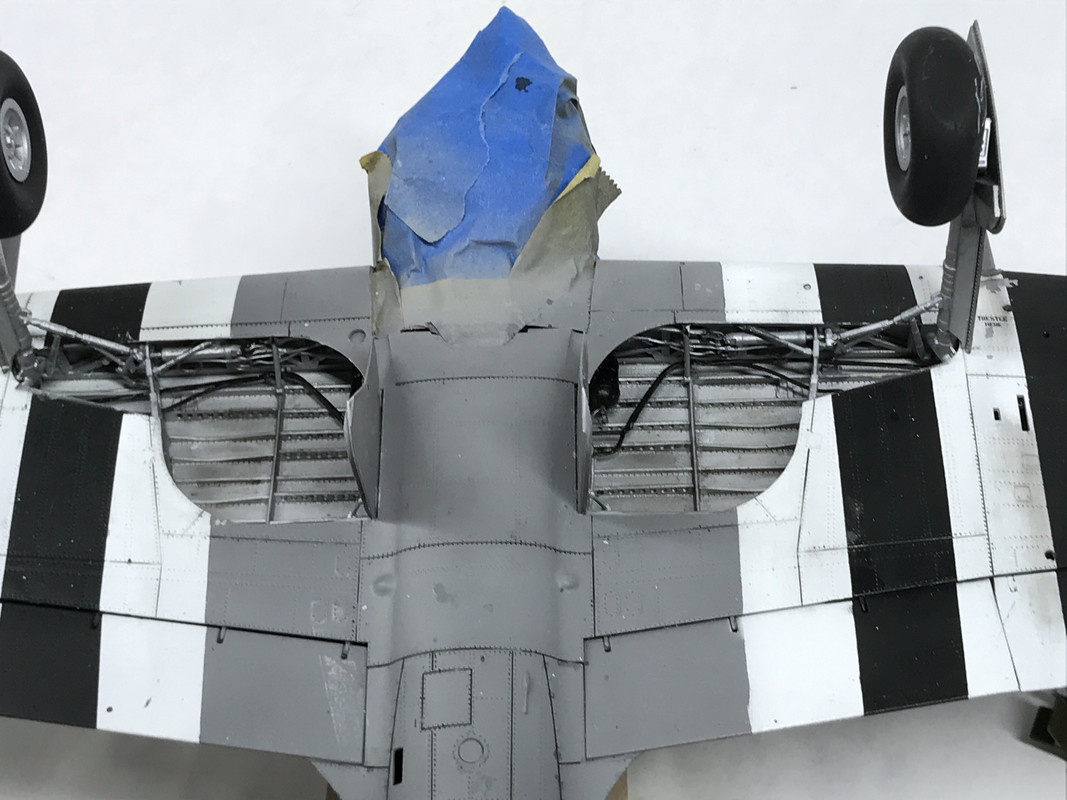
As usual, some of the most insignificant parts cause the most trouble. I had to trim the base of the inner door cylinders to enable them glue without the piston rod bending like a pretzel. I was getting to the point where I was going to make the entire cylinder assemly with brass. Lots of wonderful detail in those wheel wells. If I was a real detail hound I would have run hydraulic lines to those inner door actuators. Overkill! The model has enough problems that it WILL NOT BE A SHOW WINNER, and therefore; doesn't need any more fussing.


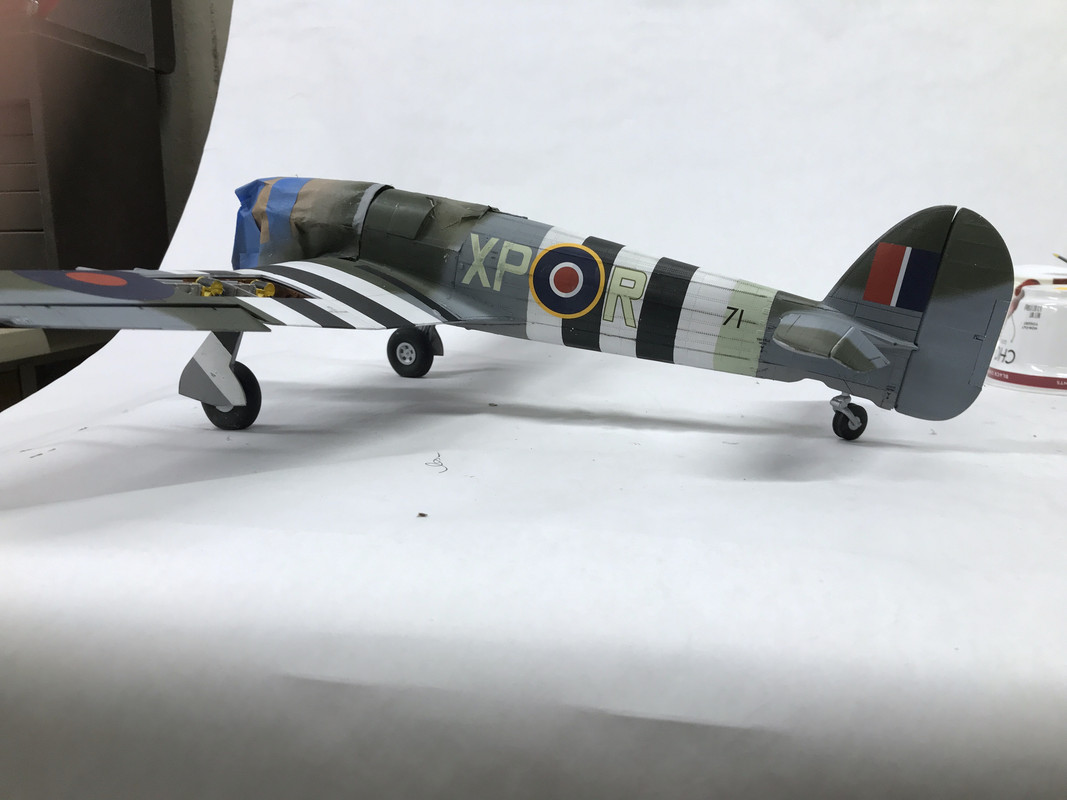
The plane now can sit on its own legs. I also glued in the tailwheel.

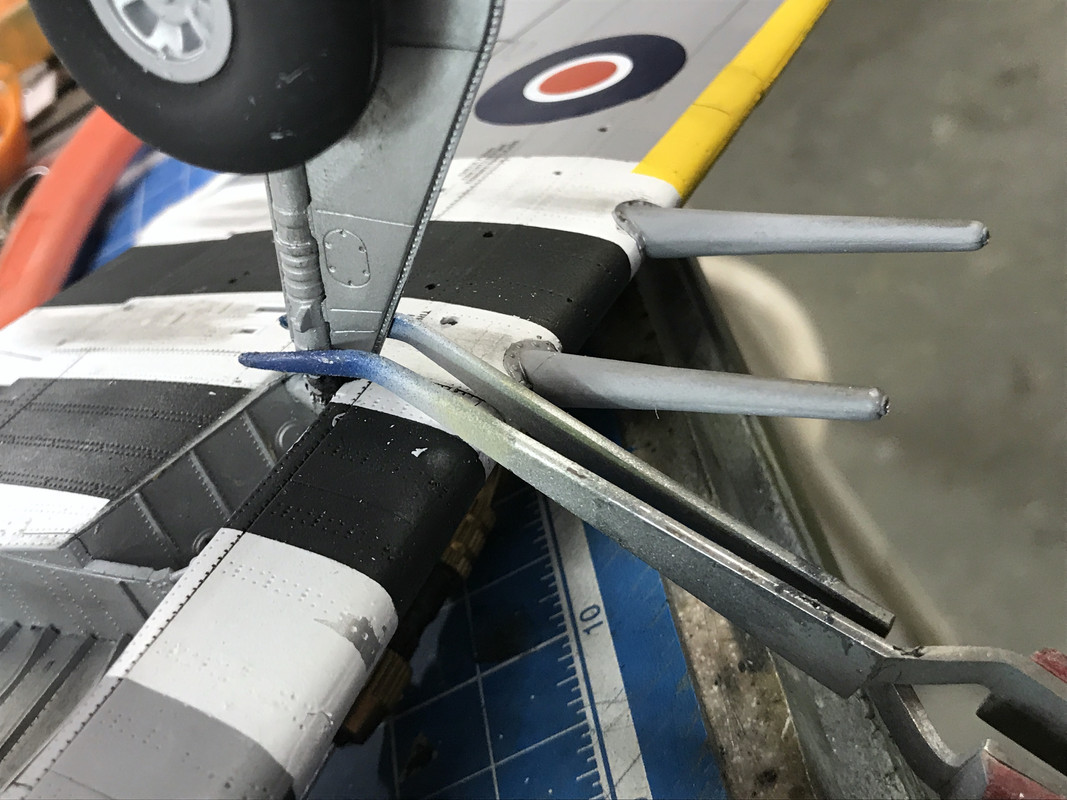
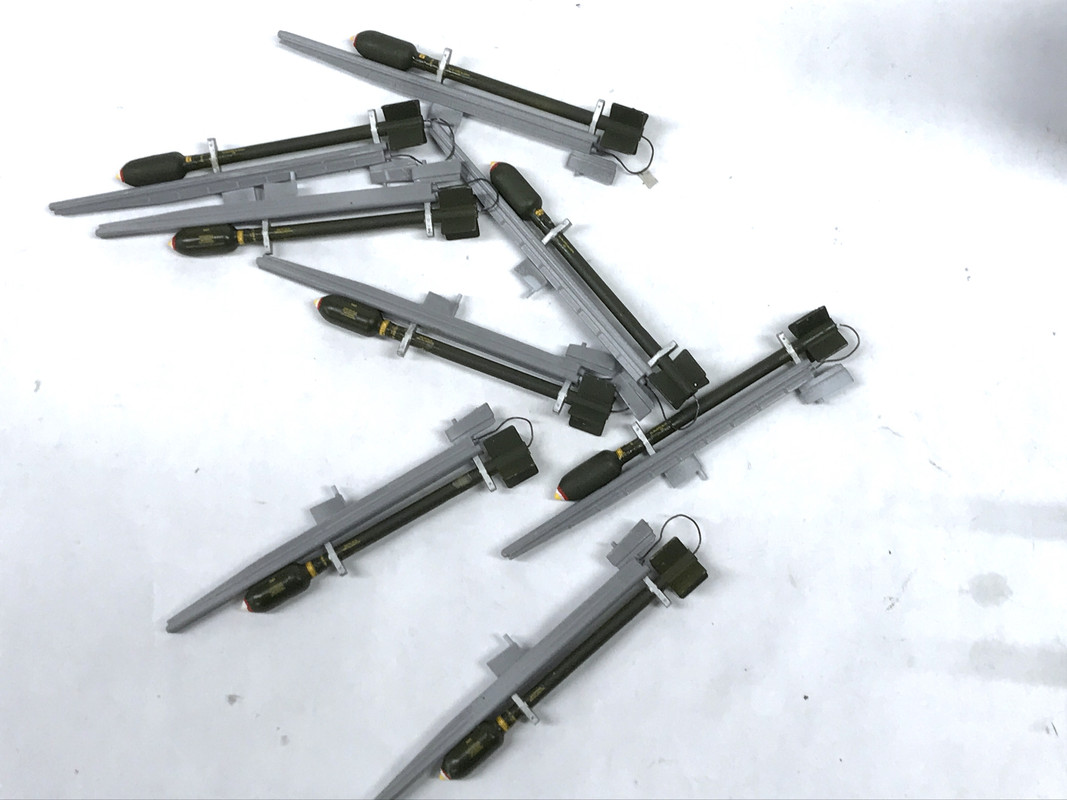
I put some flat clear on the rockets, but it wasn't enough and had to hit it with Dullcoat spray. It basically still wasn't enough, but I had enough. I used some narrow gauge black iron wire to simulate the electricl ignition leads to the rocket motors.

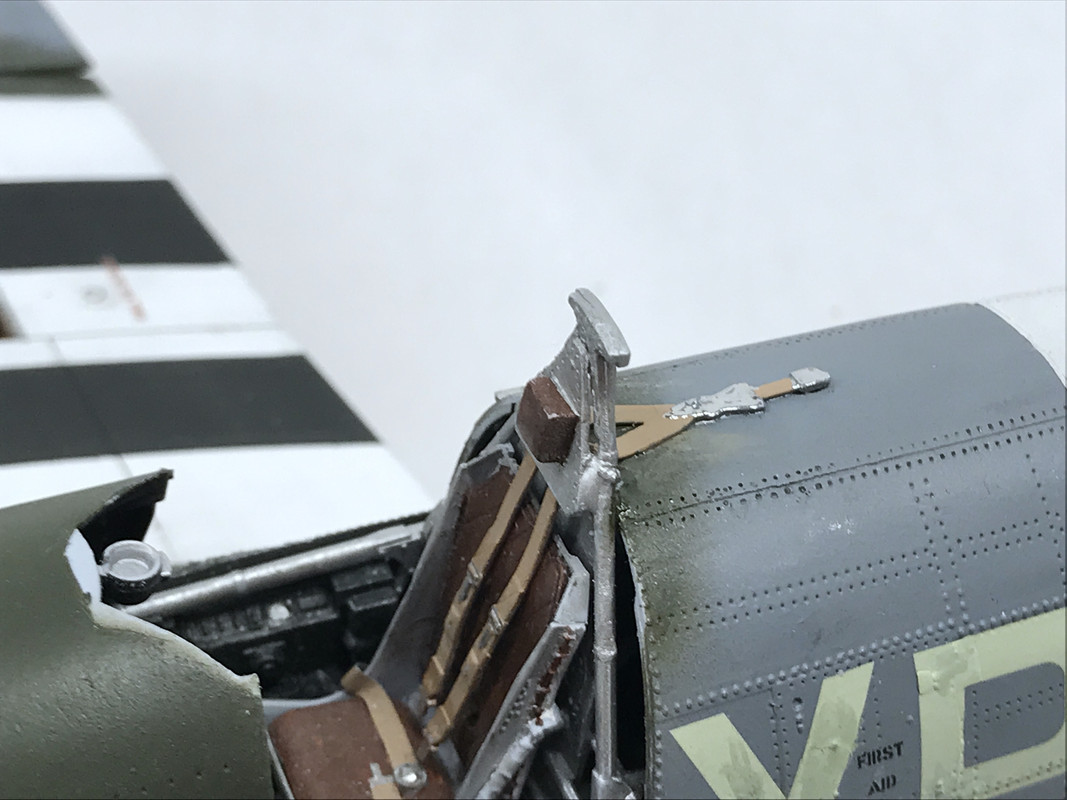
Before I glued these onto the plane, I needed to finally repair the broken roll cage in the cockpit. I was about ready to install the glazing and saw that I hadn't fixed this. Again, I drilled 0.022" for phos-bronze of the same diameter. After installing and using CA, I didn't like how it was holding and added some Bondic UV-Cure filler to strengthen it. It's now strong... not pretty, but strong. Once the glazing is in there's no way to repair this so I wanted it foolproof. It's also another reason the model won't win any rewards. I also paint the upper end of the seat belt harness.

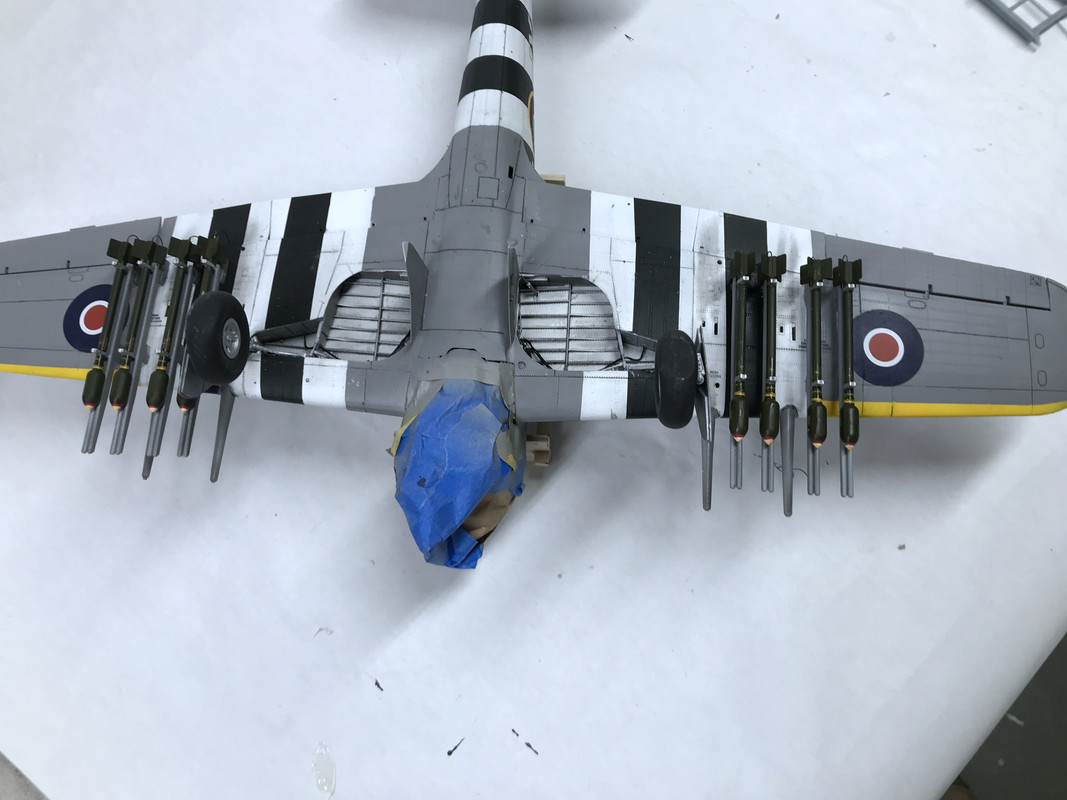
The rocket installation was next. At first I was using liquid cement, but was unhappy how it was curing so I went old school and used Testor's tube cement. This bird now has some talons!
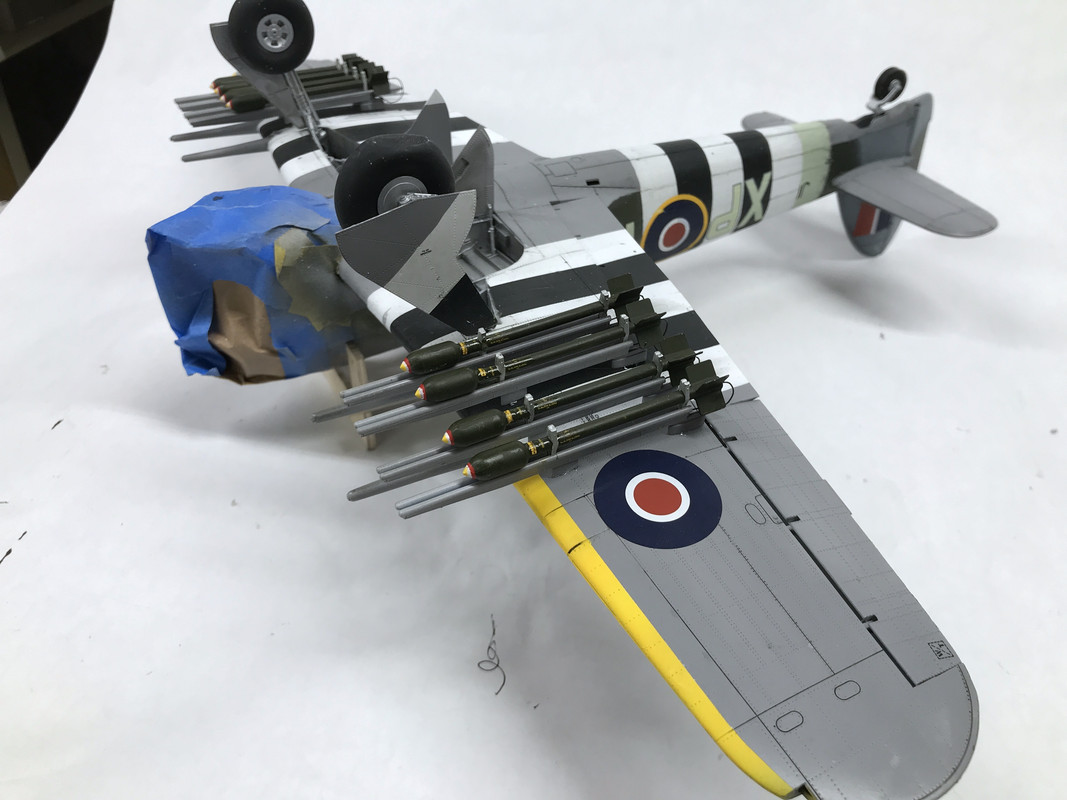
Another view:

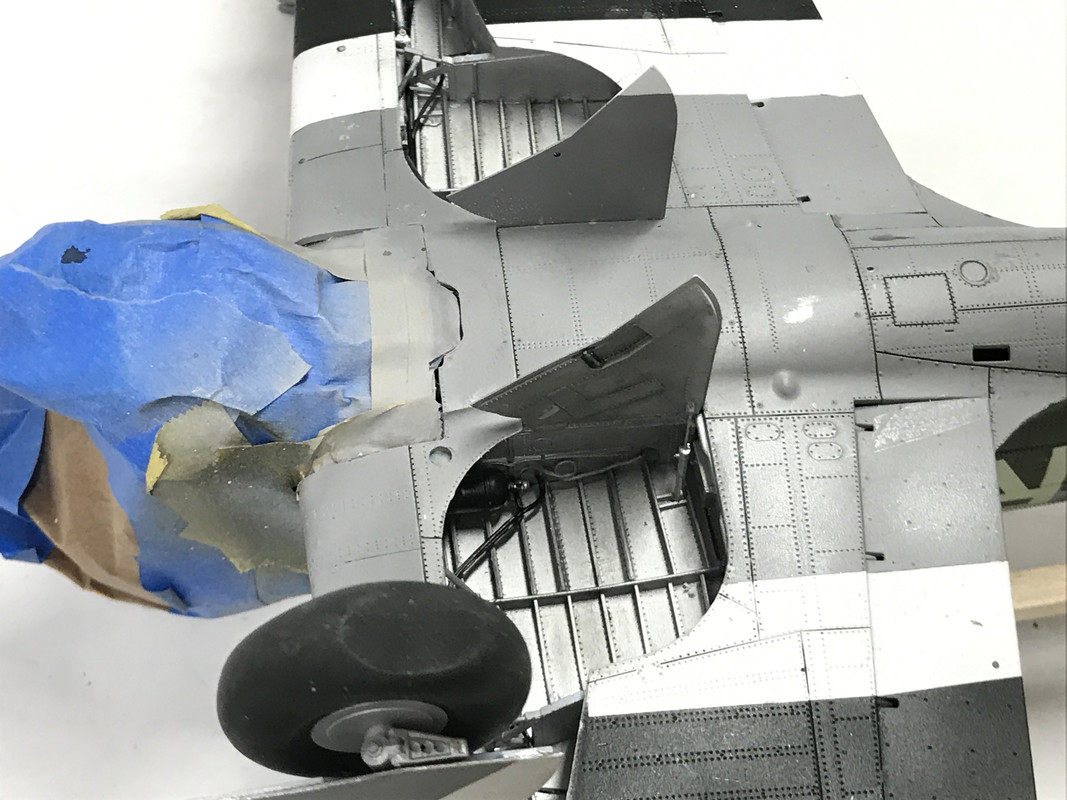
Then I was trying on the glazing to see what, if any, paint touch up would be needed. And I found that I blew it. I had camoed the wrong door! When I was planning the glazing paint, the model was upside down and got me a bit confused. I will now have to remask some of the window on the port side to add the ocean gray. This is the closed door and it will be noticed. Then I have to paint the starboard side all deep green. Then I can install them. It was a real DOH! moment. I also have to do something with those awful decals. I chipped another part of the letter when having the model inverted in my little wooden fixture. The model looks like they replaced the door with a part from the junk yard...

I think it will be finished tomorrow, but we won't know that until I do it. You never know if some other weird stuff will rear its ugly head. Just for fun, I glued together some of the forward skin. I can't make an entire covering since the parts of the fuselage sides that I removed are gone in the trash weeks ago. I'm glad I went with the open front. The skin is quite thick and wouldn't go onto the motor with certain parts in place. If Tamiya had designed, the skin would slip on and off like a fancy evening gown. In their 1/32 Mustang and Mossie, the skins are held with magnets. That could have been done here too especially in 1:24

  • Member since
    March 2012
  • From: Louisville, KY
Posted by Builder 2010 on Friday, April 17, 2020 6:35 PM

The end is near!

Today was a punchlist day. Got almost all of it finished. I hate it when the very last stuff causes troubles. I'm never particularly good with the transparent parts, partially because I'm getting impatient to finish the job and don't take as much care as I should. Then there's stuff that's not in my control. I've complained about this kit's engineering and it reared it's ugly head again. There's a round, finely molded, bar that extends from inside the fuselage next to the door opening on one side, goes into and around the perimeter of the windscreen and ties into the fuze on the other side. The location points are vague at best. I realized that gluing it the fuze first wasn't going to work, so I attempted to glue it into the windscreen. Then it broke in half. Then it didn't glue right. Then one half disappeared on the floor after I tried gluing it in with Bondic. Unfortunately, Bondic doesn't adhere well to styene. That's when I decided the model didn't need that part and glued the windscreen down without it. The part broke WITHOUT my manhandling it.

I did fix those miserable decals. I found another "X" and made a "P" out of an "R". Carefully placement, lots of MicroSet and MicroSol, and leaving it alone and not fussing too much. Whew! In this image you will also see the fixed paint job on that door. I masked it carefully. Shot the gray, then held a curved mask off the surface to clean up the overspray with some more dark green. Painted the opposite side to get rid of the erroneous camo job on that side.

I put on the wing tip lights. I used some real chrome foil first under the lens. I painted the interior of the lenses with the correct color and glued them in with Testor's Canopy Cement. I would recommend that cement since it holds styrene well and cleans up with water. It does not craze the transparent parts.

I put on the armor panel behind the seat and glued down the teardrop portion of the canopy. I finally got that windscreen in and will touch up the dark green around it on Monday. I removed all the masking on the engine and re-glued some of the exhaust stacks that had loosened. I then put on the prop.

All that's left is gluing on the open door and the open top panel. That top panel is going to be very, very delicate. Frankly, I'm not sure how long it's going to stay there. You can see the tiny scale hinges sticking out from it. That's basically the gluing surface. We'll see. I will glue the gun bay doors onto the wing and mount two more tiny aft lights that go right behind the elevators. Then there's an antenna on the bottom and a foot step that extends down from the bottom as well. These too will be very, very easy to break off. And with that... it will be done.

  • Member since
    March 2012
  • From: Louisville, KY
Posted by Builder 2010 on Monday, April 20, 2020 7:08 PM

This bird has flown. Did the last few (and annoying) items including almost destroying the glazing. I was right to be wary of how that went together. The glue surfaces are microscopic and regardless of what cement I was using the joints were hanging by their fingernails... so to speak. And then the armor panel broke loose underneath the teardrop canopy and I had to reinstall it by attempting to run some thin CA into the space without screwing everything up. As a result there's a shiny spot of CA under that canopy, but I did get it stay put while tilting the plane in various angles so it fell into position while the CA was curing. I really didn't want to remove that teardrop. The glazing did get a bit of cement on it, and I sort of corrected it by brushing on some Future to fill the imperfections. And of course, one of the inner doors fell off again. That made at least three times.


Otherwise, it's one heck of a model and not for the faint hearted. The rating on the kit is legit. It's not for beginners.


So he she is in all her glory, ready to kick some Axis butts. Took the pictures with my Canon EOS.


578229


578230578231


578232


The following shot was done with the flash on to show off some of the interior.


578233


578234


This picture was down with focus-stacking software to extend the depth of field over the entire model. As I did before, one of the multiple exposures was done with flash to highlight the cockpit which was otherwise completely in shadow.


578235


So dear followers, this is the last plastic for a while. I have two building projects for the layout. One is a commercial kit and the other will be another 3D printed, laser cut creation of my own design. Stay tuned. Don't know what my next non-railroad project will be, but whatever it is, I'll do a build thread here. So thanks for hanging in there. Stay well, stay safe and stay a safe distance from folks where you don't know their condition.

  • Member since
    June 2014
Posted by BrandonK on Monday, April 20, 2020 7:54 PM

That is an impressive build. Thanks for taking us along. It was fun.

BK

On the bench:

A lot !! And I mean A LOT!!

2024 Kits on deck / in process / completed   

                         14 / 5 / 2  

                              Tongue Tied

  • Member since
    December 2002
  • From: Northern California
Posted by jeaton01 on Monday, April 20, 2020 11:10 PM

Congratulations, man.  That was a lot of work!  Very nice!

John

To see build logs for my models:  http://goldeneramodel.com/mymodels/mymodels.html


  • Member since
    November 2004
Posted by snapdragonxxx on Tuesday, April 21, 2020 5:33 AM

Well done. Thanks to Airfix going with the cheapest materials and manufacturer (somewhere in India) These, and almost all Airfix kits, throw curveballs at the builder.

You would have been better going with paint masks for the insignia, squadron codes etc. Once again the decals are done by the cheapest provider and as you noted are thick and not very flexible.

I have both car door and bubble top in my stash and an abandoned one that threw several curve balls before it took an unscheduled flight across the hobby room. This one taught me much about what to expect from the newer Airfix kits. Superb design and detail let down by cheap materials and manufacture.

If you read the airfix blog about the new Hellcat and you see the test shots that they dealt with, they are of a much superior plastic than what you get.

I would rather pay a slightly higher price to Airfix for their new 1/24 kits for them to use state of the art chinese manufacturers and decent styrene plastic for a better fit and experience than the cheap stuff they are using now. It is ruining the brand.

Murphys law comes in here with Airfix. "Your kit is made by the cheapest going!"

Still, you have done outstanding work with this and I suppose I should dive into mine at some point once I have all the needed extras, Camo masks, Insignia masks, stencils etc.

  • Member since
    March 2012
  • From: Louisville, KY
Posted by Builder 2010 on Tuesday, April 21, 2020 9:11 AM
Thank guys, If you need moral support, I'm always here. Everyone always comments on how "Patient" I must be to do this work. I am not patient. Half the trouble I had with the glazing was not giving it enough time to fully set. But I am obsessively persistent. I don't give up. I never break a model out of frustration. I don't throw tools or anything else across the room. I practice "test pilot problem solving". When you're going down you try a, b, c, d, e, f, g…. until you either pull up or augur in. If I don't get it on the first try, I will surely get it on the fifth. Does that help…?
  • Member since
    February 2005
  • From: Cleveland, OH
Posted by RadMax8 on Monday, April 27, 2020 11:51 AM

Well done, Builder. While I build exclusively in 1/48 (it's a weird thing where I prefer to have everything the same size), this was an enjoyable build to watch come together, your dogged determination to get to the finish line is inspiring, as I keep snapping off pushrods for my 1/48 FW190. Adapt and overcome!

Thnak you for sharing, and for keeping everyone up to date. Even though you didn't get a ton of comments, I think it was due to everyone's mouth hanging open...

JOIN OUR COMMUNITY!

Our community is FREE to join. To participate you must either login or register for an account.

SEARCH FORUMS
FREE NEWSLETTER
By signing up you may also receive reader surveys and occasional special offers. We do not sell, rent or trade our email lists. View our Privacy Policy.