SEARCH FINESCALE.COM

Enter keywords or a search phrase below:

SBD-3 Dauntless WIP (9/4 - Slow but DONE!)

50610 views
88 replies
1 rating 2 rating 3 rating 4 rating 5 rating
  • Member since
    June 2010
  • From: Austin, TX
SBD-3 Dauntless WIP (9/4 - Slow but DONE!)
Posted by DoogsATX on Monday, August 9, 2010 4:05 PM

Hey all - I'm a recent returnee to the hobby. Up until July, I hadn't built regularly in 15 years, and hadn't built anything in more than ten. 

When I was getting the work area up and running, I picked up a cheap Revell SBD Dauntless to tinker with. It was a terrible kit. The cockpit was a mess, the kit didn't even bother with a pilot's seat, just a squarish hint molded to a poorly detailed pilot's backside, the surface detail was way off...I gave it about an hour's worth of actual work before saying screw it and resigning it to the role of paint testbed.

But...I love the Dauntless, and the Revell kit inspired me to build a good one. Well, maybe not good, but as good as I can manage.

Now that I've finished my first real build in a decade, I'm moving on to the next, Accurate Miniatures' SBD-3. Figured I'd share to 1) make everyone else feel better about their models and 2) learn from this amazing community.

Apologies for several of the early pics. I've been getting lazy and reaching for the iPhone for pics.

EDIT - Just looking for the completed build? Here ya go! /forums/p/130477/1332586.aspx#1332586
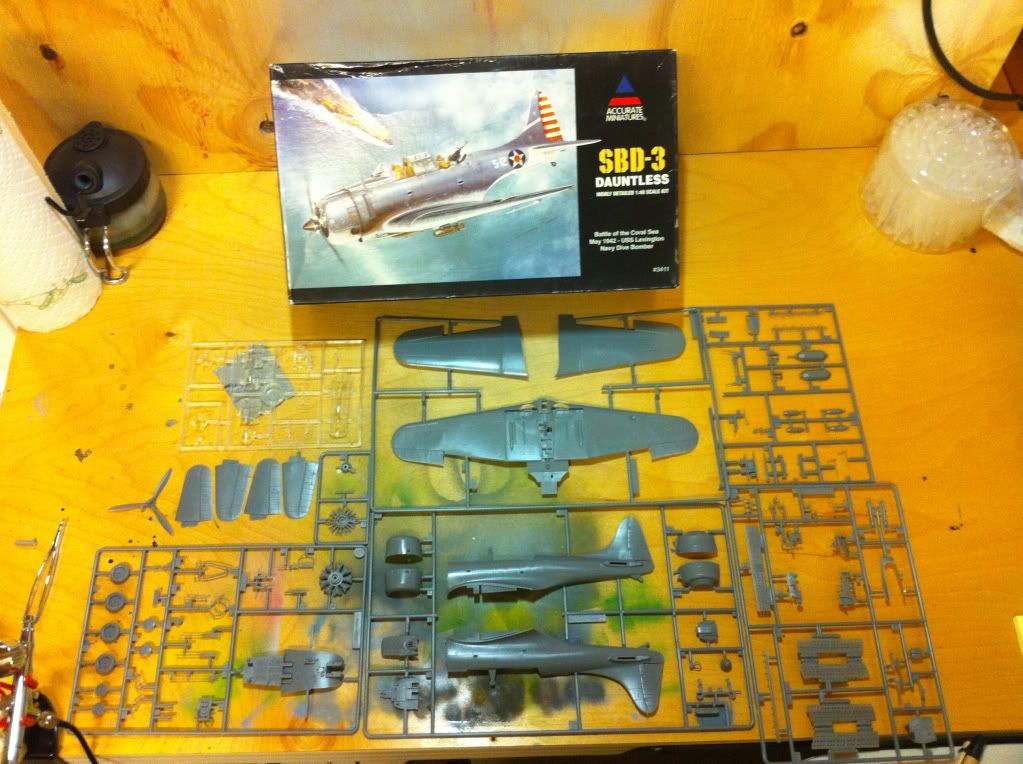
The Kit

I purchased my SBD-3 off ebay. Open box, but sealed sprue trees. At first glance everything looked great, but as I've gotten into the build I've been finding some problems that I'll detail as I go.

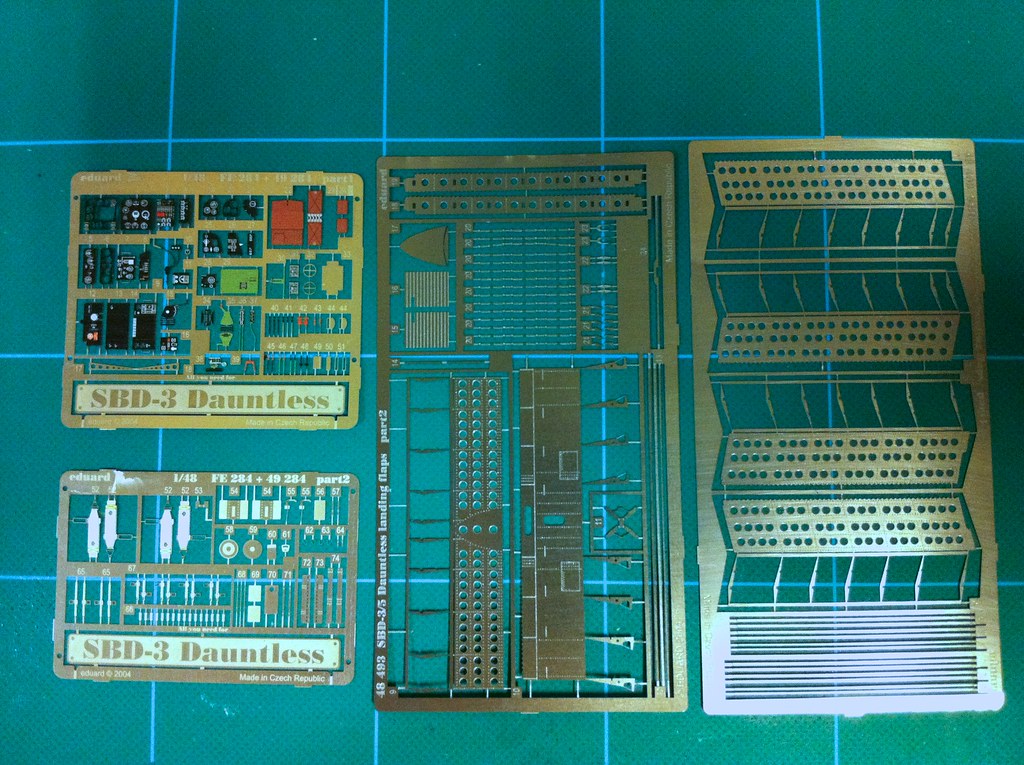
One of the problems was the warped dive flaps. My LHS happened to have a set of Eduard flaps in one of their bins, so I picked those up, as well as an Eduard cockpit detail set (my first and maybe my last) and a canopy mask.

On the Bench: 1/32 Trumpeter P-47 | 1/32 Hasegawa Bf 109G | 1/144 Eduard MiG-21MF x2

On Deck:  1/350 HMS Dreadnought

Blog/Completed Builds: doogsmodels.com


  • Member since
    October 2009
  • From: South Carolina
Posted by jetmodeler on Monday, August 9, 2010 4:11 PM

Can't wait to see the build.


  • Member since
    June 2010
  • From: Austin, TX
Posted by DoogsATX on Monday, August 9, 2010 4:17 PM

Paint

In my past modeling life, I used Model Master enamels exclusively. This time around, I'm still settling on what I want to use. I've had some solid success with Tamiya, but I've decided to give Lifecolor and Vallejo a try this time around, in large part because they both offer FS35189.

While I was at it, I went ahead and ordered some Lifecolor Interior Green. Wow this stuff sprays thin. Not necessarily bad - and in fact I think it'll be awesome with some pre-shading - but it takes some getting used to.

Before I spray the exterior I'm planning to do a paint-off between Lifecolor and Vallejo on the Fail Dauntless...

On the Bench: 1/32 Trumpeter P-47 | 1/32 Hasegawa Bf 109G | 1/144 Eduard MiG-21MF x2

On Deck:  1/350 HMS Dreadnought

Blog/Completed Builds: doogsmodels.com


  • Member since
    October 2004
  • From: Mesa, AZ
Posted by jschlechty on Monday, August 9, 2010 4:25 PM

I kinda went the same route.  Built the Revell one, then wanted to do a real model of the SBD, so I  picked up the Accurate Miniatures SBD-2 and got started on it.  The level of detail compared to the Revell version is unbelievable!  I had a good start going on it, working with reference books to paint the cockpit and all the little control levers AM gives you the correct colors, etc.  Just about got to the point where I was satisfied and getting ready to installit in the aircraft, when one day my wife looks down and says "What is the dog chewing on?"  I got up to see, and as I got closer, got a sick feeling in my stomach.  Yep - it was my SBD cockpit!  Not only was the floor chewed into an unrecognizable shape, but the little control levers that I had so painstakingly painted and detailed were not even there or on the floor around him - he had swallowed them!  That pooch came very close to being sent to doggy heaven that day, but when he looked up at me with his deep, brown eyes like "What did I do?", of course I had to forgive him. . .

Anyway, I ordered a second kit from e-bay, but haven't had the urge to get started on it yet.  I do know one thing - except for the cockpit - I'll have all the spare parts I could need!

  • Member since
    February 2003
  • From: A Spartan in the Wolverine State
Posted by rjkplasticmod on Monday, August 9, 2010 4:29 PM

Looks like you're off & running.  Keep us posted.

Regards,  Rick 

RICK At My Age, I've Seen It All, Done It All, But I Don't Remember It All...
  • Member since
    June 2010
  • From: Austin, TX
Posted by DoogsATX on Monday, August 9, 2010 4:40 PM

The Cockpit

This Dauntless has by far the most bizarrely-engineered cockpit of any model I've ever encountered. It's not necessarily that it's confusing, just that it's so far removed from any other cockpit build I've experienced that I've been feeling like I'm doing it wrong. It's also a nightmare on test-fitting.

I started with the instrument panel. For some reason, AM decided to mold this in clear plastic with some crazy idea of putting gauge decals on the back to show through. Another awesome benefit of molding it in clear plastic is that they made it very brittle, and it came out of the parts bag missing the starboard rudder pedal (which also, by the way, connects it to the cockpit floor). 

I was just starting to glue the PE panels with thinned white glue when mothra attacked and totally threw me off. Nevertheless, it and the other cockpit bits slowly came together. The waggle pump linkage (think that's what it's called...I'm away from the instructions right now) was also damaged so I cut it off. Not sure if I want to both remaking the linkage or just chalk it up to "no one will notice once its closed up".

The PE belts were another bit of fun. Spent a fair amount of time on the buckles and straps, only to have them fly off into the far corners of the garage while attempting to bend the seatbelts to the seats. Next time I'll be going masking tape and maybe adding some PE accents after the fact.

Weathering was hit or miss. I'm trying out ProModeller's Dark Dirt wash. Think I should have glossed the cockpit first, since I'm having trouble removing the excess. After doing a thoroughly decent job on the Mustang, I guess the way the cockpit goes together must be throwing my mind out of whack or something. 

Next up - sealing the fuselage. This will be the first kit I've ever built where the fuselage is sealed before the cockpit's done. 

On the Bench: 1/32 Trumpeter P-47 | 1/32 Hasegawa Bf 109G | 1/144 Eduard MiG-21MF x2

On Deck:  1/350 HMS Dreadnought

Blog/Completed Builds: doogsmodels.com


  • Member since
    June 2010
  • From: Austin, TX
Posted by DoogsATX on Monday, August 9, 2010 4:44 PM

Thanks all! So far it's going well enough. I have this sinking fear that once I go to install the cockpit floor, the pilot's bulkhead is going to throw up fit issues. I appreciate AM's ingenuity here, but really don't like this inability to put things together until it's almost too late to fix any fit issues. 

On the Bench: 1/32 Trumpeter P-47 | 1/32 Hasegawa Bf 109G | 1/144 Eduard MiG-21MF x2

On Deck:  1/350 HMS Dreadnought

Blog/Completed Builds: doogsmodels.com


  • Member since
    June 2010
  • From: Austin, TX
Posted by DoogsATX on Monday, August 9, 2010 4:46 PM

jschlechty

I had a good start going on it, working with reference books to paint the cockpit and all the little control levers AM gives you the correct colors, etc.  Just about got to the point where I was satisfied and getting ready to installit in the aircraft, when one day my wife looks down and says "What is the dog chewing on?"  I got up to see, and as I got closer, got a sick feeling in my stomach.  Yep - it was my SBD cockpit!  Not only was the floor chewed into an unrecognizable shape, but the little control levers that I had so painstakingly painted and detailed were not even there or on the floor around him - he had swallowed them!  

It's a very good thing I build in the garage! Between a very curious toddler (who happens to really like cars and airplanes) and a very curious yellow lab (who will and has eaten wood, plastic, rocks and metal), I don't think any build-in-progress would stand a chance inside!

On the Bench: 1/32 Trumpeter P-47 | 1/32 Hasegawa Bf 109G | 1/144 Eduard MiG-21MF x2

On Deck:  1/350 HMS Dreadnought

Blog/Completed Builds: doogsmodels.com


  • Member since
    December 2009
Posted by ww2psycho on Monday, August 9, 2010 5:05 PM

Very nice work! I've just recently got into Accurate Miniature models as the Hobby Lobby near me had the Tuskegee Airmen mustang on clearance. I like they way everything looks packaged up and the parts look (have not tested yet) like everything should fit together like a Tamiya kit.

Good luck with the build, its coming along very well!

  • Member since
    February 2003
  • From: Saratoga Springs, NY
Posted by Jeeves on Tuesday, August 10, 2010 12:09 AM

Having built a handful of the AM SBDs, I guarantee you are in for a treat.  As a fanatic, the only kit I enjoyed more was the Trumpy 1/32...


That being said-- AM kits are best built as pe the instructions...but a variation here or there can help...AM has a link that I have given below to an online build of the kit that'll help install the cockpit into place like a charm...


http://www.accurate-miniatures.com/builds/sbd/sbdbuild.shtml

Mike
  • Member since
    June 2010
  • From: Austin, TX
Posted by DoogsATX on Tuesday, August 10, 2010 11:20 AM

ww2psycho

I like they way everything looks packaged up and the parts look (have not tested yet) like everything should fit together like a Tamiya kit.

Good luck with the build, its coming along very well!

So far I wouldn't say the fit's quite as good as Tamiya - at least not as good as the -51B I'm coming off of - but I'm still in the early stages of main assembly.

Most of the cockpit went together pretty well, with the exception of the ammo rack on the gunner's rear bulkhead. No matter what I did I couldn't get it to sit flat, but I finally overcame using an overwhelming CA assault. Looks like hell from the bottom, but once the cockpit floor is in place, there's no way anybody will ever see down there anyway.

I also got the fuselage together last night. It didn't just fall together the way Tamiya's Mustang did, and took a bit of "hold here, push here" to get everything to line up, but it was nothing a few strips of tape couldn't handle. I also got to use a Touch-n-Flow for the first time (it finally came!), and wow, what a fantastic little tool. I don't think I'll need to do more than some light sanding and scribing. 

Once the fuselage was together I installed the pilot's bulkhead and seat and tested the fit with the cockpit floor. Everything slid right together, and the enclosed cockpit looks positively brimming with detail! I'm also happy to report that the damaged waggle pump linkage is pretty much impossible to see once everything is closed up. Unfortunately the missing rudder pedal is pretty visible, and I think I may go back and see if I can't sand down the mold seam on the aft stick boot. Need to test fit the aft cockpit deck, gunner's turret ring and radio equipment first, though. For all I know, that's another detail that may end up completely buried.


On the Bench: 1/32 Trumpeter P-47 | 1/32 Hasegawa Bf 109G | 1/144 Eduard MiG-21MF x2

On Deck:  1/350 HMS Dreadnought

Blog/Completed Builds: doogsmodels.com


  • Member since
    June 2010
  • From: Austin, TX
Posted by DoogsATX on Tuesday, August 10, 2010 11:37 AM

Jeeves

That being said-- AM kits are best built as pe the instructions...but a variation here or there can help...AM has a link that I have given below to an online build of the kit that'll help install the cockpit into place like a charm...

http://www.accurate-miniatures.com/builds/sbd/sbdbuild.shtml

Saw that! The thought of painting the wings before the install = OMG! Not brave enough to try that yet...

On the Bench: 1/32 Trumpeter P-47 | 1/32 Hasegawa Bf 109G | 1/144 Eduard MiG-21MF x2

On Deck:  1/350 HMS Dreadnought

Blog/Completed Builds: doogsmodels.com


  • Member since
    June 2010
  • From: Austin, TX
Posted by DoogsATX on Wednesday, August 11, 2010 11:46 AM

Did some paint tests last night on the Fail Dauntless between Vallejo's Dark Blue Grey and Lifecolor's Non-Specular Blue Grey (both FS35189). 

They don't match at all. Not even close.

Not sure if either is a dead ringer for the actual blue grey. The Vallejo is way too dark, and has a very slight green tint in it, but the Lifecolor seems too light to my eye.

I think I may pick up a few different Vallejo colors and see if I can't mix up the color on my own. 

On the Bench: 1/32 Trumpeter P-47 | 1/32 Hasegawa Bf 109G | 1/144 Eduard MiG-21MF x2

On Deck:  1/350 HMS Dreadnought

Blog/Completed Builds: doogsmodels.com


  • Member since
    October 2009
  • From: South Carolina
Posted by jetmodeler on Thursday, August 12, 2010 8:03 AM

If your going to weather it I wouldn't change it.


  • Member since
    June 2010
  • From: Austin, TX
Posted by DoogsATX on Thursday, August 12, 2010 9:57 AM

jetmodeler

If your going to weather it I wouldn't change it.

Wouldn't change what, exactly?

And yes, I'm going to weather the snot out of this poor plane...

On the Bench: 1/32 Trumpeter P-47 | 1/32 Hasegawa Bf 109G | 1/144 Eduard MiG-21MF x2

On Deck:  1/350 HMS Dreadnought

Blog/Completed Builds: doogsmodels.com


  • Member since
    June 2010
  • From: Austin, TX
Posted by DoogsATX on Saturday, August 14, 2010 10:52 AM

After several days experimenting with paint on the one hand and working through the final cockpit bits on the other, I finally made some headway last night.

Managed to get the cockpit assembly completed. I still have some seam work to do on the pilot's bulkhead and some weathering to do on the gunner's deck, but at least it's all together at last. Installing the turret ring was a major PITA of trying to cram a delicate piece up through other delicate pieces, but it finally went in.

I also got most of the engine painted and assembled. I've got a few minor touchups to do on the crankcase and around the wiring, but that's about it.

Looking really forward to moving on to main assembly.

On the Bench: 1/32 Trumpeter P-47 | 1/32 Hasegawa Bf 109G | 1/144 Eduard MiG-21MF x2

On Deck:  1/350 HMS Dreadnought

Blog/Completed Builds: doogsmodels.com


  • Member since
    November 2003
  • From: Exeter, MO
Posted by kustommodeler1 on Saturday, August 14, 2010 3:19 PM

jetmodeler

If your going to weather it I wouldn't change it.


I'm sure he is referring to the Lifecolor's impression of being too light. In real life, the Navy blues oxidized and faded very quickly in sea duty from the harsh salt elements, and weather. So, if you are going to weather it, lighter is betterCool

Darrin

Setting new standards for painfully slow buildsDead

  • Member since
    June 2010
  • From: Austin, TX
Posted by DoogsATX on Sunday, August 15, 2010 2:43 PM

Well, I'm finally gaining some momentum with the Dauntless now that the cockpit assembly is out of the way. It's kind of frustrating that, for the amount of time I spent on it, so few of the details are even visible with the fuselage closed up. Heck, the only Eduard PE bits that are even visible are the pilot and gunner's belts and the main instrument panel...kinda makes the rest of it seem a waste. Oh well...I suppose I'll just chalk that up as a lesson for next time. I imagine it'll come in handy when I get around to the Zvezda Lavochkin La-5 with it's full internal structure.

In other news, the wings went on last night. The attachment wasn't Tamiya smooth, and I'm definitely going to have some filling and standing to do in a few places, but dry fitting with tape and then using the touch-n-flow in small sections got the job done. This is the first kit I've ever used it on, and I already can't imagine how I ever built anything without it!

With the wings on, it's kind of shocking how heavy this model is. Much more so than the Tamiyastang I'm coming off of, or the Fail Dauntless I use as a paint dummy. 

And speaking of the Fail Dauntless, I discovered last night that not only are its panel lines wildly inaccurate, so are it's overall dimensions. Its wingspan is easily 3/4" shorter than the Accurate kit, and the wings themselves much less massive.

On the Bench: 1/32 Trumpeter P-47 | 1/32 Hasegawa Bf 109G | 1/144 Eduard MiG-21MF x2

On Deck:  1/350 HMS Dreadnought

Blog/Completed Builds: doogsmodels.com


  • Member since
    June 2010
  • From: Austin, TX
Posted by DoogsATX on Monday, August 16, 2010 10:23 AM

More progress last night. I'm rapidly closing in on the seam-filling/sanding phase. 

One major complaint I have from working with the cowl pieces is that this kit is just too clever for its own good. Or for my own good, since at least some of the issues almost definitely stemmed from user error.

First, the cowl's three-piece design strikes me as straight up retarded. They could have very easily molded this as a two-piecer, leaving only two perfectly straight lines to sand, fill and what-have-you. It just struck me as pointless. I'm assuming it was designed this way so AM could re-use most of the cowl molds for later Dauntlesses, but ugh.

Second, the gun deck or whatever it's called that extends from the "dash" of the cockpit right up to the engine cowl. This was a joy because it straight up did not fit with my poor, one-rudder-pedal instrument panel. I ended up having to cut the locating slats, trim the top of the instrument panel, and cut out the back of the machine guns to get everything to fit properly. 

Fortunately the stabs and underside hardpoints went on without complaint.

On the Bench: 1/32 Trumpeter P-47 | 1/32 Hasegawa Bf 109G | 1/144 Eduard MiG-21MF x2

On Deck:  1/350 HMS Dreadnought

Blog/Completed Builds: doogsmodels.com


  • Member since
    November 2003
  • From: Exeter, MO
Posted by kustommodeler1 on Tuesday, August 17, 2010 2:48 PM

Looks like it's coming along good, and you're kicking the minor annoyances popping up right square back where they belong.


The engine looking great too!!

Darrin

Setting new standards for painfully slow buildsDead

  • Member since
    June 2010
  • From: Austin, TX
Posted by DoogsATX on Tuesday, August 17, 2010 3:46 PM

kustommodeler1

Looks like it's coming along good, and you're kicking the minor annoyances popping up right square back where they belong.

The engine looking great too!!

I'm trying...and I'm definitely past all the bizarre build engineering now. Well, except for the Eduard PE dive flaps, which I'm sure will be their own brand of fun. Still trying to figure out how I'm going to mask those when the time comes...

Other than that, it's mostly sanding and some seam work here and there, and then I'll be ready to paint it.

Glad you like the engine! I didn't get a good head-on pic of it mounted in the cowl, but it looks awesome. Think I might shoot it with some overall Tamiya smoke to grunge it up a bit, otherwise it might look too clean next to what the rest of the plane's going to look like.


On the Bench: 1/32 Trumpeter P-47 | 1/32 Hasegawa Bf 109G | 1/144 Eduard MiG-21MF x2

On Deck:  1/350 HMS Dreadnought

Blog/Completed Builds: doogsmodels.com


  • Member since
    June 2010
  • From: Austin, TX
Posted by DoogsATX on Friday, August 20, 2010 10:13 AM

Halting progress this week. I ordered some Mr. Surfacer 1200 from Sprue Brothers last weekend, figuring based on past experience it'd arrive around Wednesday. It still hasn't shown, and I can't move forward with priming until it does, so I've been fiddling about with some subassemblies and further adventures in paint mixing.

Canopy masking...

Prop and spinner painted...

Eduard PE dive flaps underway. The detail on these things vs. the warped kit parts is really something to behold. Still trying to figure out how I'll mask them when the time comes, though...

Lastly...playing with paint. I stil l haven't settled on a color I'm happy with. The stab tip is sprayed with straight up Vallejo dark blue grey. The band immediately in from it is a 2:1 mix of dark blue grey and light grey...it's probably the shade I'm happiest with, but I think I need to use a warmer grey to really nail it. 

Hopefully that Mr. Surfacer 1200 shows up today...I'm eager to get on with priming!

On the Bench: 1/32 Trumpeter P-47 | 1/32 Hasegawa Bf 109G | 1/144 Eduard MiG-21MF x2

On Deck:  1/350 HMS Dreadnought

Blog/Completed Builds: doogsmodels.com


  • Member since
    June 2010
  • From: Austin, TX
Posted by DoogsATX on Sunday, August 22, 2010 10:13 AM

Progress!

The Mr. Surfacer 1200 arrived Friday, so I was able to prime that night and pre-shade last night. I started with Vallejo Black but it fought me the whole way. Lots of tip dry and feast or famine spraying. I switched to Tamiya Black thinned with Tamiya Lacquer Thinner and had much better results.

This is my first time pre-shading panel lines, and man, maintaining a straight line can be rough! By the end of the session my right hand was cramped up like nobody's business.

Looking forward to (finally) spraying paint tonight!

On the Bench: 1/32 Trumpeter P-47 | 1/32 Hasegawa Bf 109G | 1/144 Eduard MiG-21MF x2

On Deck:  1/350 HMS Dreadnought

Blog/Completed Builds: doogsmodels.com


  • Member since
    November 2003
  • From: Virginia
Posted by Mike F6F on Sunday, August 22, 2010 10:33 AM

Doogs,

You shouldn't need much masking on the flaps.  The tops are blue gray, the bottoms are light gray and the interior pieces are red.

Paint the insides red first, then paint the outer surfaces.  Just mask the insides so the paint doesn't bleed on flat surfaces.  The exterior colors tended to fill the holes.  The only red that can be seen, if the flaps aren't split, is where the holes don't line up.

Mike


"Grumman on a Navy Airplane is like Sterling on Silver."

  • Member since
    March 2010
  • From: Brisbane
Posted by Julez72 on Monday, August 23, 2010 9:53 AM

Doogs, thats some nice work, very coolYes


  • Member since
    June 2010
  • From: Austin, TX
Posted by DoogsATX on Monday, August 23, 2010 10:05 AM

Mike - thanks for the tip! I'd been planning to paint the red last, since it'll be a lot easier to mask off the flat wing surfaces. I'm still going go to go that route on the plane itself, but I went ahead and painted the flap interiors last night.

Julez - thanks!

On the Bench: 1/32 Trumpeter P-47 | 1/32 Hasegawa Bf 109G | 1/144 Eduard MiG-21MF x2

On Deck:  1/350 HMS Dreadnought

Blog/Completed Builds: doogsmodels.com


  • Member since
    June 2010
  • From: Austin, TX
Posted by DoogsATX on Monday, August 23, 2010 10:52 AM

More adventures last night.

I started out spraying the insides of the dive flaps with Tamiya Flat Red. I'm going to save the red portions of the plane itself until I get the rest of it painted. Lots of straight lines and flat surfaces should make masking a relatively quick process there.

Next up, the underside. After testing a few color mixes and getting annoyed to the point of ditching Vallejo paints over all the spitting and clogging, I found a color mix that worked - 2:1 Medium Sea Grey to Off White - and a thinning solution that worked even better - Future. It laid down smooth and, for lack of a better term, perfect. I'll definitely be thinning Vallejo with Future going forward. 

My only quibble is that I think I managed to obliterate most of the pre-shading. There's definitely a fine line there.

Tonight I'll be spraying the upper surfaces. I think I'll be cutting Vallejo Dark Blue Grey and Intermediate Blue, and mixing in a bit of white as necessary.

On the Bench: 1/32 Trumpeter P-47 | 1/32 Hasegawa Bf 109G | 1/144 Eduard MiG-21MF x2

On Deck:  1/350 HMS Dreadnought

Blog/Completed Builds: doogsmodels.com


  • Member since
    July 2009
Posted by AlterEcho on Monday, August 23, 2010 8:19 PM

Like I said before, thanks for the tip about the "Future". I am also using an Iwata HP-C Plus. So I am sure I will see the same issues as you. Also, you sold me on the Touch-N-Flow so I ordered one from Sprue.

You probably already have one of these, but for PE work I have been using The Small Shop's 5.5" Hold and Fold Workstation. Since I work on a lot of armor (with lots and lots of PE), this thing is a dream. Of course it will not help you with the dreaded seat belts, but for all else its the bee's knees.  :)

  • Member since
    June 2010
  • From: Austin, TX
Posted by DoogsATX on Tuesday, August 24, 2010 10:16 AM

Sprayed the upper surfaces last night, using a three-layer blend I read about here: http://hyperscale.com/features/2002/gekkogc_3.htm. I tried it on the P-51B and ended up overdoing the final blending coat, but since I'm going for an extremely weathered look with this Dauntless, I held back on the last.

Base coat was 50/50 Vallejo Dark Blue Grey and Intermediate Blue, thinned 50% with Future.

Light coat was the base coat lightened with about 50% white. I modified the "spray the center of the panels" guidance a bit, and, in addition, striped the wings, stabs, and upper fueselage in the direction of airflow.

Blend coat was the original base coat mix, but thinned with about 75% Future.

Overall, I'm extremely happy with the way it went down, and especially the fact that the Vallejo's shooting clean enough that I didn't have to mask the soft demarkation between the blue grey and light grey.

Tonight I'm hoping to spray the red bits for the dive flap internals, and mask and paint the no-slip walkways along the wing roots.


On the Bench: 1/32 Trumpeter P-47 | 1/32 Hasegawa Bf 109G | 1/144 Eduard MiG-21MF x2

On Deck:  1/350 HMS Dreadnought

Blog/Completed Builds: doogsmodels.com


  • Member since
    November 2008
  • From: Crawfordsville, Indiana
Posted by Wabashwheels on Tuesday, August 24, 2010 6:23 PM

Doogs, that finish is really shaping up very nicely.  By the way, nice job of walking us through this build.  Thanks,   Rick.


JOIN OUR COMMUNITY!

Our community is FREE to join. To participate you must either login or register for an account.

SEARCH FORUMS
FREE NEWSLETTER
By signing up you may also receive reader surveys and occasional special offers. We do not sell, rent or trade our email lists. View our Privacy Policy.