SEARCH FINESCALE.COM

Enter keywords or a search phrase below:

Finished Hasegawa 1/48 F-14A Jolly Rogers

13722 views
17 replies
1 rating 2 rating 3 rating 4 rating 5 rating
  • Member since
    December 2006
  • From: Phoenix, AZ
Posted by Fly-n-hi on Wednesday, September 8, 2010 11:29 AM

Thanks,

The AIM-54s and their decals came from the Hasegawa weapons set B.  The AIM-7s and their decals came from the weapons set C.  The AIM-9s came from an Academy F-15E but the decals came from the C set.

  • Member since
    March 2003
  • From: El Dorado Hills, CA
Posted by IBuild148 on Tuesday, September 7, 2010 6:56 PM

Fly-n-hi,

Very well done! Yes As for the ordnance...are those the kit decals or Two Bob?

IBuildOne48

Teach modeling to youth!

Scalefinishes.com

http://i712.photobucket.com/albums/ww122/randysmodels/NMF%20Group%20build%20II/Group%20Badge/NMFIIGBbadgesmall.jpg


  • Member since
    February 2003
  • From: Northern Virginia
Posted by hutchdh on Tuesday, September 7, 2010 6:17 PM

Awesome build...I am very impressed...

Hutch

 On the Bench: 1:48 HobbyBoss Ta152-C; 1:48 & 1:72 Hasegawa F-104G NATO Bavaria

In queue: 1:48 Academy F-4B & a TBD Eric Hartmann bird

Recently completed: 1:32 Trumpeter P-51B

  • Member since
    November 2003
  • From: Virginia
Posted by Mike F6F on Tuesday, September 7, 2010 6:01 PM

The movie was filmed in '79.

Some of the birds still had white upper moving surfaces and undersides all white,as does your model, and some were all gray.  VF-84 had begun to use the smaller sized US insignia under the cockpit by that time too, but you don't see any in the film.

I've always liked that period because it offers alots of marking variations.

Mike


"Grumman on a Navy Airplane is like Sterling on Silver."

  • Member since
    January 2007
Posted by Gigatron on Tuesday, September 7, 2010 11:42 AM

I love the subtle weathering on this bird.  I tend to get a bit heavy handed, when it comes to weahtering.  This looks perfect  Yes

-Fred


  • Member since
    December 2006
  • From: Phoenix, AZ
Posted by Fly-n-hi on Monday, September 6, 2010 11:56 PM

Thanks again guys. 

Mike, the Tomcats in The Final Countdown have the all grey paint when looking down at it from above.  When VF-84 first got their Tomcats in 1976/1977 the spoilers, flaps, and stabilators were white on top.  I think they changed over to grey in '78 or '79.  The Final Countdown was filmed in 1980 or 1981 I believe.  The Jolly Roger scheme didn't change.  I could be wrong about all of this so take it with a grain of salt.

The kit was originally an -A.  I don't know why the glove vanes aren't molded in but since they are supposed to be retracted anyway I didn't botter to do anything about it.  Maybe they were molded in and I sanded them out.  I don't remember now.

  • Member since
    October 2009
  • From: Houston, Texas
Posted by Medicman71 on Monday, September 6, 2010 11:10 PM

Looks awsome!! Great job. I got a F-14A that i'm fixing to start, but it's the Revell one so i'm not gonna have all the aftermarket stuff (I wish I could get a cockpit at least). Mine will have VF-1 markings.

Again, great looking 'Cat!!!

Building- (All 1/48) F-14A Tomcat, F-16C Blk 30, He 129


  • Member since
    September 2003
  • From: South Central Wisconsin
Posted by Daywalker on Monday, September 6, 2010 10:45 PM

That is really a beautiful model!  One of the finest Tomcats I have seen to be honest.  Superb weathering, and the glowing slime lights are over the top! Bow Down

Frank 


  • Member since
    November 2003
  • From: Virginia
Posted by Mike F6F on Monday, September 6, 2010 6:29 PM

Fly-n-hi,

Very nice build on your Tomcat.

I'm curious about what you said regarding the markings being too early for The Final Countdown movie appearance. 

While Tomcat markings were changing during the late 70s when the film was made, there were certainly VF-84 F-14s that looked like your model in the film, or am I missing some fine detail?  VF-84 resisted the change for as long as they could.  There are a couple of shots where you can see a Jolly Roger bird in all gull gray.  The Phoenix missile palets are still white so you need to look close, but the wavy line isn't there.  Again, is it something I'm missing?

One other thing.  Was your kit originally for a F-14D?  Your model doesn't show the retractable glove vanes that could extend from the fixed wing glove's leading edge.  Or at least my aging eyes can't see them in your photos.

Good catch on the engine exhausts.  Lots of Tomcat builders don't catch that.  (I notice it because on an A model I built I mixed the open and closed nozzles, but got tham on the wrong sides!)

Mike


"Grumman on a Navy Airplane is like Sterling on Silver."

  • Member since
    October 2009
  • From: South Carolina
Posted by jetmodeler on Monday, September 6, 2010 6:24 PM

Nicely done. Your tomcat looks great.Toast


  • Member since
    December 2006
  • From: Phoenix, AZ
Posted by Fly-n-hi on Monday, September 6, 2010 5:57 PM

Thanks for the comment.

Yes, that is normal exhaust configuration when the engines are shut down.  It has to do with the hydraulic pressure which is dependent on the engines.  The nozzles would be symmetrical if the engines where running and set at the same throttle setting.

  • Member since
    February 2003
  • From: A Spartan in the Wolverine State
Posted by rjkplasticmod on Monday, September 6, 2010 5:49 PM

Great looking Tomcat & in my favorite markings.  Thanks for sharing.

Regards,  Rick

RICK At My Age, I've Seen It All, Done It All, But I Don't Remember It All...
  • Member since
    December 2006
  • From: Phoenix, AZ
Posted by Fly-n-hi on Monday, September 6, 2010 5:49 PM

Thanks guys.  I appreciate the comments.

Butz, I used to be more of an AF guy as well but lately alot of non AF subjects have been catching my eye.  Usually my builds come a a result of a movie or video game.  This Tomcat was inspired by...you guessed it: The Final Countdown, although this is a pre The Final Countdown paint scheme.  I did a Harrier because of True Lies and I did a Superhornet because of a game called Over-G Fighters.

I just built the 1/48 Hasegawa F/A-18F and that thing practically put itself together.  So this kit's fit issues are a bit frustrating.  In addition to the forward fuselage seam and the beavertail seams the hatches that cover the vulcan gun are a pain in the butt.  The fit is terrible and required putty and some styrene to fill them.  I guess this isn't an issue if you are going to pose them open.

The slime lights will glow brightly for about 10 seconds and then stay dim for about 1 to 2 minutes.  They also react to UV light.  The thicker the lights the longer and brighter they will glow...but they do have texture so you can't make them too thick.  They are kinda gimmicky, sure, but the color of the glow-in-the-dark paint is almost an exact match to the real lights.  The decals are way to yellow.  I applied the two slime light decals on the back of the fuselage and applied the Fly-n-hi effect over the yellow part and it looked really good with the black outlines.  I wish I had done that on all the lights.

The weathering was a combination of pre-shading, Pro Modeler wash and pastel chalk.  The model was primed with Tamiya Grey Primer and pre-shaded with Tamiya X-18 Black.  Then I applied the Aqueous Hobby Color H307 over that.  Then I applied Testor's lacquer glosscoat over that.  The lacquer melts the acrylic and blends it together a little bit...but don't spray it on too thick or it will really eat up the acrylic paint.  After I applied the decals and put a satin clear coat on it I washed it with Pro Modeler Dark earth wash.  Then I touched up some spots with chalk.  I didn't want to over do it because this is supposed to be a 1976/1977 version of the plane which still had a relatively new paint job.

I took a few more pics.  I adjusted the intake ramps to accurately reflect their position on the ground with the engines shut down.  The kit has you build them in the supersonic configuration.  Also, I thought that the intakes were pretty easy to make seamless.  I just brushed on several layers of Tamiya X-1 White.

(pics are all in the opening post now thanks to photobucket)

  • Member since
    July 2006
  • From: Philippines
Posted by constructor on Monday, September 6, 2010 5:44 PM

That's a great cat you have there considering the fit problems you encountered. While I'm here, I wuold like to ask, are the exhaust  really like that? I ordered them from Aires and I got one of them  feathered and the other one opened exactly  like what you have. Is this prior to take off?

  • Member since
    March 2003
  • From: Western North Carolina
Posted by Tojo72 on Monday, September 6, 2010 4:02 PM

Beautful job with a difficult kit,looks really great.

  • Member since
    November 2004
  • From: Cat Central, NC
Posted by Bronto on Monday, September 6, 2010 3:44 PM

Outstanding looking!  And once again the slime lights are a unique touch.

  • Member since
    February 2003
  • From: Niagara Falls NY
Posted by Butz on Monday, September 6, 2010 3:28 PM

Howdy,

 First off, your Tomcat kicks some serious butt my friend..!!  I am more into the Air Force a/c but this is one of a few Navy a/c builds that really caught my eye.!! (I do have a soft spot in my heart for the ol Tomcat)

I really like the over all apperarance, the weathering and of course the "Slim" lights.Nice touch btw..  I am glad you touched on all the issue spots because I too have this same exact kit in my stash..!!

 It is interesting that Hasegawa is really well known for their detail but their fit quality on the other hand is so so. It seems like every other kit I have built had some sort of fit issue(s) and others went together well.. This includes their latest releases too.

 I have a few questions for you, when you did your weathering/panel lines, how did you go about doing it? To me at leat it looks like you did a pre shade?

 With the "Fly-n-Hi" effect, how long does the glow n the dark paint last in terms of glow?

 Thank you again for sharing this gem with us!!

Flaps up,

Mike

Rangers Lead The Way

  If you would listen to everybody about the inaccuracies, most of the kits on your shelf would not have been built Too Close For Guns, Switching To Finger

  • Member since
    December 2006
  • From: Phoenix, AZ
Finished Hasegawa 1/48 F-14A Jolly Rogers
Posted by Fly-n-hi on Monday, September 6, 2010 2:00 PM

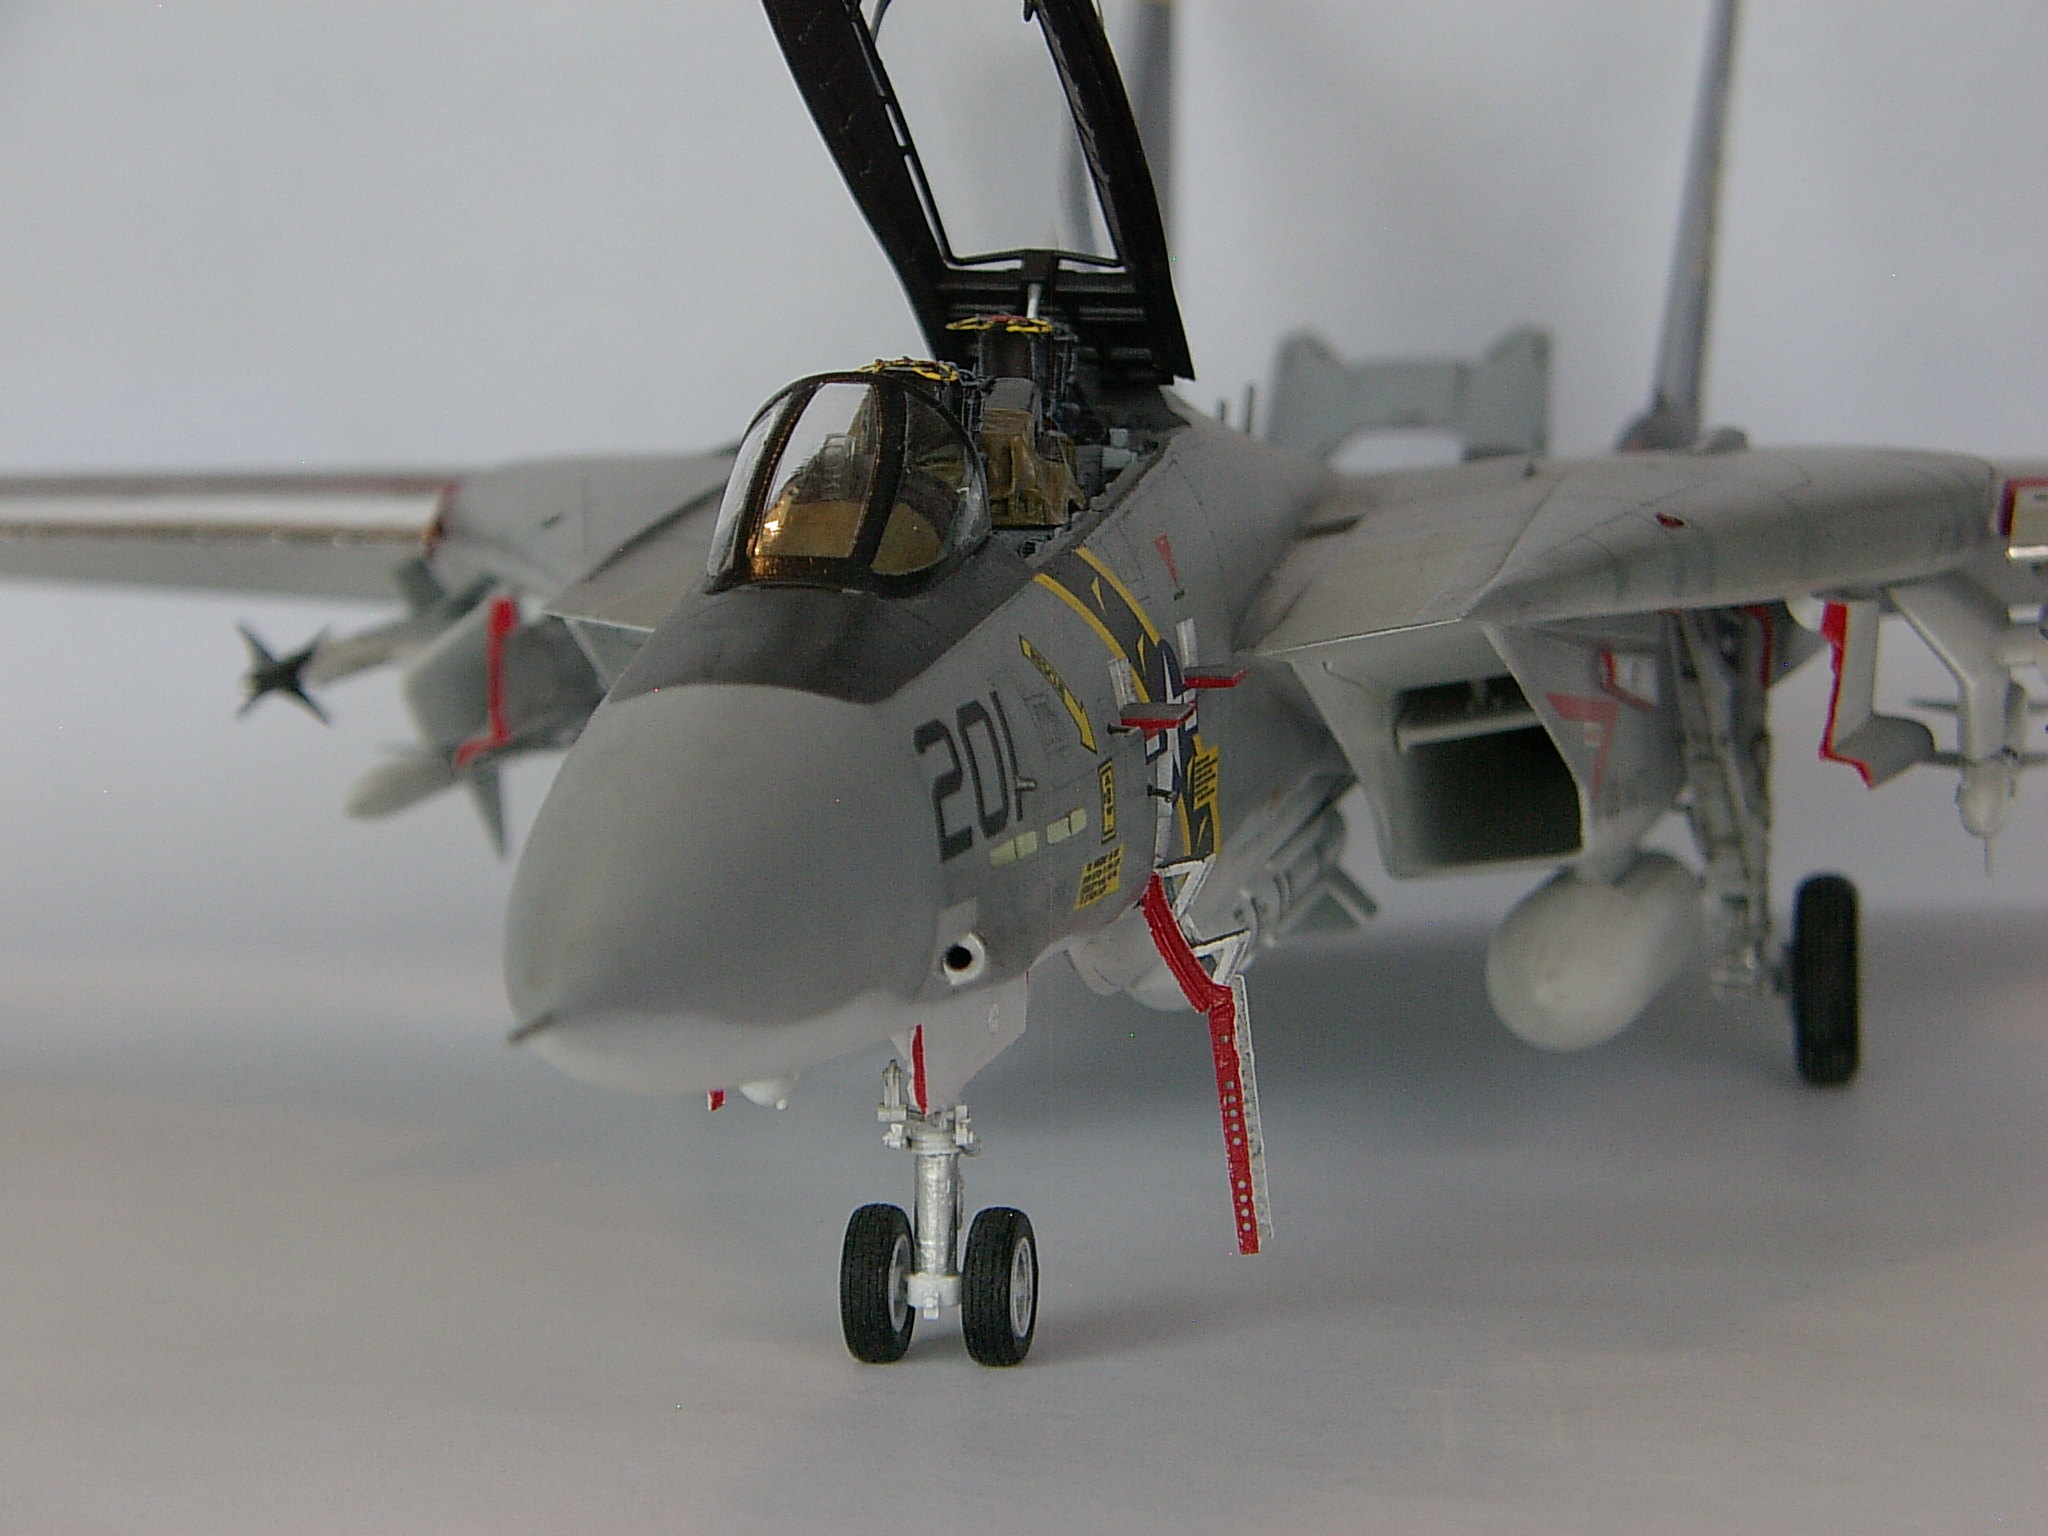
Hi guys,  I just finished this one and I thought I'd share some pics.

This kit represents 3 firsts for me.  It was my first time using a resin AM cockpit, the first time using PE, and the first time using metal foil.  Under the pics I'll post a little review for those of you who are interested.

Hope you enjoy:
Here's the kit: 
Ok, here's my mini review for those of you still here.

This kit had typical Hasegawa detail but it also had atypical Hasegawa fit issues (this was a re-tooled kit, BTW)  Most of the kit went together pretty well but the beavertail was difficult to get just right and so was the forward fuselage seam. The foot prints of the fuselage "bulkheads" didn't match up exactly so there was some sanding that needed to be done.  As for the beaver tail instead of mating the tail together per the instructions I mated each beaver tail half to its respective fuselage part first then glued the two big fuselage parts together.  The engine nacelles went together pretty seamlessly for me.

The windscreen didn't fit at all.  Its footprint was too small and it didn't sit flush on the fuselage.  So I played around with an Italleri F-14 windscreen and it fit almost perfectly so I tossed the Hasegawa windscreen into the spares box.  Plus, the Italleri windscreen has thicker frame detail...which I like because it makes cutting the masking a little easier.

The main landing gear wheel wells were terrible.  First of all they are overly complicated and they are very hard to fit precisely.  The parts that mount against the engine inlet nacelles required some trimming to fit correctly.  I used some thin styrene sheet to fill a couple of gaps that I had on my build.I also used some styrene sheet to get the struts to extend at the correct angle.  You really need to assemble the well "boxes" exactly to avoid some of the issues I had.

The resin cockpit had the standard fit issues.  There are plenty of really good posts detailing those issues so I won't get into it here.

I added the four missing flap hinges under the trailing edge of each wing.  That was very easy to do and took about 10 minutes.


  • The "Fly-n-Hi effect" was the glow in the dark acrylic paint mixed with Future.
  • The AIM-54s and AIM-7s are from the Hasegawa weapons kits and the AIM-9s are from an Academy kit.
  • The leading edges of the slats are metal foil.
  • The VF-84 decals are from the Italleri kit.
  • The resin cockpit is from Aires.
  • The colors were Tamiya X-2 White, X-7 Red, X-18 Semi Gloss Black, and Aqueous Hobby Color H307 Grey.
  • When it was all said and done this kit had 243 parts!
  • I got this kit for $35...Nice!


JOIN OUR COMMUNITY!

Our community is FREE to join. To participate you must either login or register for an account.

SEARCH FORUMS
FREE NEWSLETTER
By signing up you may also receive reader surveys and occasional special offers. We do not sell, rent or trade our email lists. View our Privacy Policy.