SEARCH FINESCALE.COM

Enter keywords or a search phrase below:

B29 Build Progress

53012 views
306 replies
1 rating 2 rating 3 rating 4 rating 5 rating
  • Member since
    August 2013
B29 Build Progress
Posted by RCH73 on Saturday, October 5, 2013 3:40 PM

As some will recall, I began a build of a 1/48th scale B-29 in honor of my old high school science teacher, who was the radar operator on one during WWII.  He flew out of Tinian, in the 9th Bomber Group.  He was in the 1st Squadron, and he flew on two birds:  "God's Will" (Number 2) and "Sweet Sue" (Number 5).  I am going to build the Sweet Sue aircraft as he won a DFC while on a mission in that bird.  Got shot up a bit and downed two Japanese fighters; had to divert to Iwo on that mission.

I am a recent returnee to modeling, having set it aside for many years while I worked on other life projects such as work and some additional schooling.  Managed to get all that wrapped up and thought it would be best to get back to it while I am still able and to give myself a good hobby in the cold winter months!  My last project was an OH58-D Kiowa I built in honor of my son, who was then a Scout pilot in the 10MD, finished in 2003 or so.  I liked how that turned out and after a short visit with my old teacher this past summer I thought I had better get back to the workbench.

Pic below shows the fuselage halves in their plastic bag, to give a good sense for the size of this model.  It is absolutely HUGE!  My first qualms came when I opened the box for the first time and got a little weak-kneed at the sheer size.  My second qualm came when I realized it is al all natural metal finish bird, which is going to be a challenge.

(I will stop here momentarily while I make sure I am posting photos correctly)

  • Member since
    August 2013
Posted by RCH73 on Saturday, October 5, 2013 4:47 PM

  • Member since
    October 2004
  • From: NE Oklahoma
Posted by Allen109 on Sunday, October 6, 2013 3:04 PM

Alclad II may end up being your best friend.

  • Member since
    August 2013
Posted by RCH73 on Sunday, October 6, 2013 5:18 PM

Well, I apoligize for the short delay while I figured out how to post photos (with help from talentless, thanks very much!).

As I was saying, the size of the fuselage is enormous:

farm4.staticflickr.com/.../10086458304_989999c3cc.jpg

IMG_0155

by robertholcomb73, on Flickr
  • Member since
    August 2013
Posted by RCH73 on Sunday, October 6, 2013 5:44 PM


IMG_1418 by robertholcomb73, on Flickr

The shot above shows the cockpit about halfway finished.  I have the seats in, the Norden bombsight and the control columns, but not the instrument panels or flight engineers station. I used a single drop of white glue on the bombsight to simulate glass in the optics; I was very pleased with how that turned out.  As I said in the opening I have been away from modeling for awhile and I am trying to get the rust out!

  • Member since
    August 2013
Posted by RCH73 on Sunday, October 6, 2013 5:50 PM


IMG_1431 by robertholcomb73, on Flickr

The above photo shows the cockpit mostly completed, with the instrument panels and flight engineer station in place.  Revell uses a decal for the instrument panels and the engineers station, so I painted the background flat black, put on the decals and snugged them down tight with some Solvaset.  Worked perfectly and they are very realistic in my view.  I have an excellent reference book of a B-29 walkaround by Savage; it has great interior photos of a rebuilt B-29, which I used as a guide for the various colors in the cockpit. 

  • Member since
    August 2013
Posted by RCH73 on Sunday, October 6, 2013 5:52 PM


IMG_1434 by robertholcomb73, on Flickr

This shot shows the flight engineers station.

  • Member since
    August 2013
Posted by RCH73 on Sunday, October 6, 2013 5:59 PM


photo 3 by robertholcomb73, on Flickr

A view of the radio rack.  It is a shame no one will ever see this once it is sealed up.  I am using the opportunity tp refresh my skills, even it it won't be visible at the end.  Also, because my friend *** Baker would not want it any other way!


photo 3 by robertholcomb73, on Flickr

Her I have started on the fuselage interior.  I did the bomb bay as a steel color (not Alclad, though) since it was not painted in the usual dark green.  I have not yet picked out any of the details on the sides of the fuselage.  Sort of pondering how to paint the long, thin wiring in a light gray.  It is molded onto the side of the fuselage and might be hard to paint. 

  • Member since
    August 2013
Posted by RCH73 on Sunday, October 6, 2013 6:03 PM

Apparently I screwed up the photo and put the radio rack in twice.  Let's try that again:


photo 1 by robertholcomb73, on Flickr

  • Member since
    November 2003
  • From: State of Mississippi. State motto: Virtute et armis (By valor and arms)
Posted by mississippivol on Sunday, October 6, 2013 8:09 PM

Nice work so far!

  • Member since
    February 2012
  • From: Olmsted Township, Ohio
Posted by lawdog114 on Sunday, October 6, 2013 8:17 PM

Very nice.  What did you use for your interior green?  I like it.  Thanks for posting.

Joe

 "Can you fly this plane and land it?...Surely you can't be serious....I am serious, and don't call me Shirley"


  • Member since
    September 2012
  • From: Indianapolis
Posted by Squatch88 on Sunday, October 6, 2013 8:31 PM

nicely done. I love detailing the interior but its always a shame putting the fuselage halves together knowing that work wont be easily visible! can't wait to see more

  • Member since
    June 2003
  • From: Cavite, Philippines
Posted by allan on Sunday, October 6, 2013 8:32 PM

Nice work.  The interior color looks closer to olive drab than green from my screen.

No bucks, no Buck Rogers

  • Member since
    August 2013
Posted by RCH73 on Monday, October 7, 2013 6:29 AM

Thanks.  the interior color is called Dark Green, as per the instructions in the kit.  I know it looks like olive drab in the photos, but it isn't.  I was surprised to see that as well, because in reality is loks more like the zinc chromate aircraft interior color than OD.  This photo might be more accurate (different lighting, perhaps?)

In fact, I notice the differing shades from the piece on the left to the circular bulkhead on the right, but they were both sprayed with the same color moments before. 

cheers, Bob

  • Member since
    June 2013
  • From: Jax, FL
Posted by Viejo on Monday, October 7, 2013 2:46 PM

Excellent work.  I hope mine looks as good when I start on it.

  • Member since
    August 2013
Posted by RCH73 on Monday, October 7, 2013 4:48 PM

Thanks, Viejo.  I think this is the easy part; I am most worried about the fuselage seam, and the natural metal finish.  I think I will use Alclad over a coat of gloss black.  Haven't picked out a shade of Alclad yet, though.  I don't think I mentioned it yet, but this is a straight out of the box build.  I am still thinking about how to display it for my friend.  A wood base with an acrylic cover appeals to me.  Another issue I am thinking over is how to transport it across country to get it to him.  All in good time.

cheers, Bob

  • Member since
    August 2013
Posted by RCH73 on Saturday, October 12, 2013 8:01 AM

Couple more photos of the latest progress.  My son has now inspected the photos, and he suggested that I post these.


image by robertholcomb73, on Flickr


image by robertholcomb73, on Flickr


image by robertholcomb73, on Flickr

  • Member since
    August 2013
Posted by RCH73 on Saturday, October 12, 2013 8:07 AM

Now working on the remainder of the interior.  Bomb bays, and start of the bomb load.  I plan to use the bombs as a place to practice puttying and filing the seams away, so when I do the fuselage I am practiced.

farm9.staticflickr.com/.../10178514755_03eaf8f3d8.jpg

farm6.staticflickr.com/.../10178577586_57047d688c.jpg

image

by robertholcomb73, on Flickr

Those bombs, by the way, are actually olive drab, to compare with the dark green interior.

  • Member since
    August 2013
Posted by RCH73 on Saturday, October 12, 2013 8:09 AM

I try again, to see if they get embedded this time instead of just linked:


image by robertholcomb73, on Flickr


image by robertholcomb73, on Flickr

  • Member since
    December 2002
  • From: Bury St Edmunds, Suffolk, England
Posted by Bish on Saturday, October 12, 2013 1:28 PM

Nice work, be nice to see it later on with something to give us an idea of the size.

I am a Norfolk man and i glory in being so


On the bench: Airfix 1/72nd Harrier GR.3/Fujimi 1/72nd Ju 87D-3

  • Member since
    August 2013
Posted by RCH73 on Saturday, October 12, 2013 4:16 PM

In the picture above, of the fuselage, the large squares on the background mat are 1" square, with the small squares 1/2".  It is a monster.

Cheers, Bob

  • Member since
    June 2013
  • From: Jax, FL
Posted by Viejo on Saturday, October 12, 2013 4:33 PM

That's showing 16" of fuselage.  I bet total is a couple of feet.  And if this is how you do just getting back into it, I can't wait to see the full wind in your sails.....

  • Member since
    August 2013
Posted by RCH73 on Saturday, October 12, 2013 6:59 PM

Thanks, Viejo. That was kind of you.  I hope the fuselage seam and finish work come out ok!  I guess it is about 24" long total.  I'll measure it when I get back home on Monday.  Cheers, Bob

  • Member since
    August 2013
Posted by RCH73 on Wednesday, October 16, 2013 7:06 PM

I got back to work on the model after a few days off to celebrate my son's birthday with he and his family.   I picked up by completing the bomb load (it is 12 bombs, appears to be 500 pounders).  Then I did the central gunner station, where the two spotters sat in plexiglass blisters, and the top gunner who sat in a steamed plywood chair (not steel, like the others) in a blister on the upper fuselage.

The idea of dipping the clear parts into Future floor polish is new to me; it apparently came into vogue after I left the hobby.  I did it for the few clear parts I have installed to date (one small side window and the two blisters on the sides of the fuselage)  I have to say I am impressed with how well that conveys the appearance of glass!


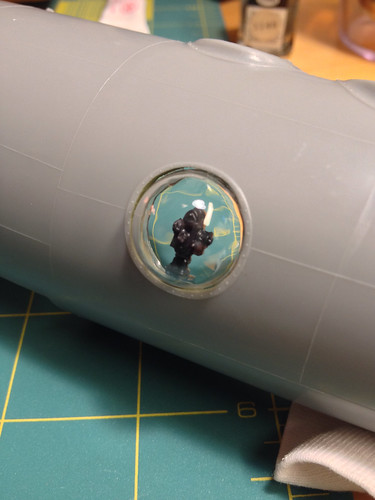
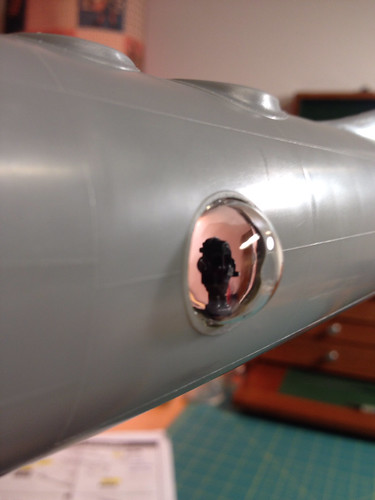
Forgive me for posting so many pictures of it, but I thought it was cool!  I also took a photo of the view from the inside:


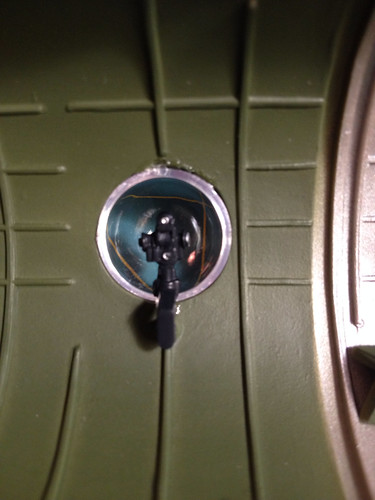
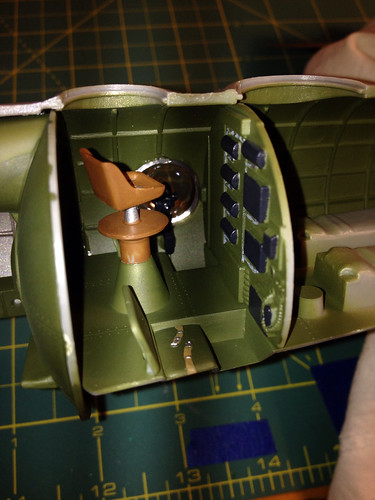
This is what the gunners station looks like:


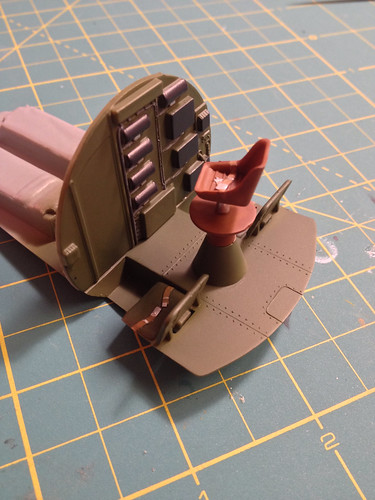
And this is it when installed:


You might notice that I did not paint the bunk beds arrangement that were included in the kit.  This was because they cannot be seen at all when the fuselage halves are joined.  I am surprised they went to the trouble to make them. 

Am off to a lengthy trip as a part of the day job, so won't be able to get back to the build until around Thanksgiving.  More to follow then.

Cheers, Bob

  • Member since
    August 2013
Posted by RCH73 on Wednesday, October 16, 2013 7:15 PM

Oh, and Bish:  it is 24" tip to tail.   I threw in a photo of one-quarter of the bomb load, just for fun.  The bombs are olive drab, in contrast to the dark green of the aircraft interior parts.


  • Member since
    October 2013
Posted by Thomas_M on Thursday, October 17, 2013 9:10 AM

Ah! Monogram´s beautiful B-29! The first topic that caught my attention after getting on here.

Great work so far, congrats!

-------------------------------------------------

Thomas

  • Member since
    March 2009
  • From: Yorkville, IL
Posted by wolfhammer1 on Friday, October 18, 2013 10:13 PM

That is a really nice looking build.  I made one back when I was in high school, and it did not come out anywhere nearly as good.  You have wet my appetite for a big beautiful Monogram bomber in the future.  Thanks.

John

  • Member since
    December 2002
Posted by 7474 on Saturday, October 19, 2013 12:42 PM

Great work.... you'll do that kit justice. I have one that I'm going to someday build as my uncle's B-29

  • Member since
    October 2004
  • From: NE Oklahoma
Posted by Allen109 on Saturday, October 19, 2013 5:37 PM

If any of you are looking to avoid doing the NM on a B-29,a found a set of decals for o.d.,fully armed birds from Illiad Decals.

  • Member since
    October 2004
  • From: NE Oklahoma
Posted by Allen109 on Saturday, October 19, 2013 5:38 PM

Misspelled,it is Iliad Decals.

JOIN OUR COMMUNITY!

Our community is FREE to join. To participate you must either login or register for an account.

SEARCH FORUMS
FREE NEWSLETTER
By signing up you may also receive reader surveys and occasional special offers. We do not sell, rent or trade our email lists. View our Privacy Policy.