SEARCH FINESCALE.COM

Enter keywords or a search phrase below:

Zveszda 1/48 Bf 109F-4 Trop WIP Update 2/22 Complete

11811 views
61 replies
1 rating 2 rating 3 rating 4 rating 5 rating
  • Member since
    April 2005
  • From: Piscataway, NJ!
Zveszda 1/48 Bf 109F-4 Trop WIP Update 2/22 Complete
Posted by wing_nut on Friday, January 31, 2014 1:10 PM

Not sure which is longer. How long it's been since I was a regular poster in this forum or the last time I built a 1/4 scale aircraft. Got a feeling there is a direct correlation there somewhere.

The little 144th F-4 was the germ that caused the fever.  More cowbell won’t help this one but a 1/49 109 will. 

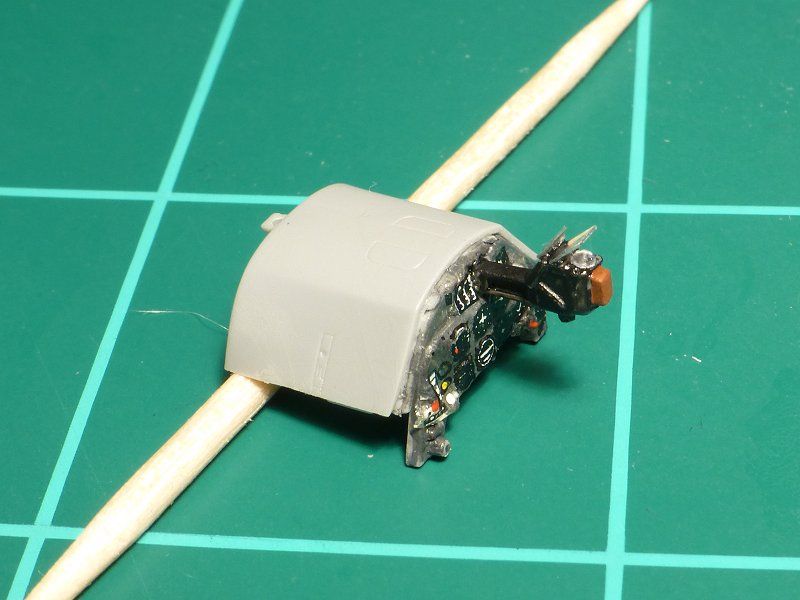
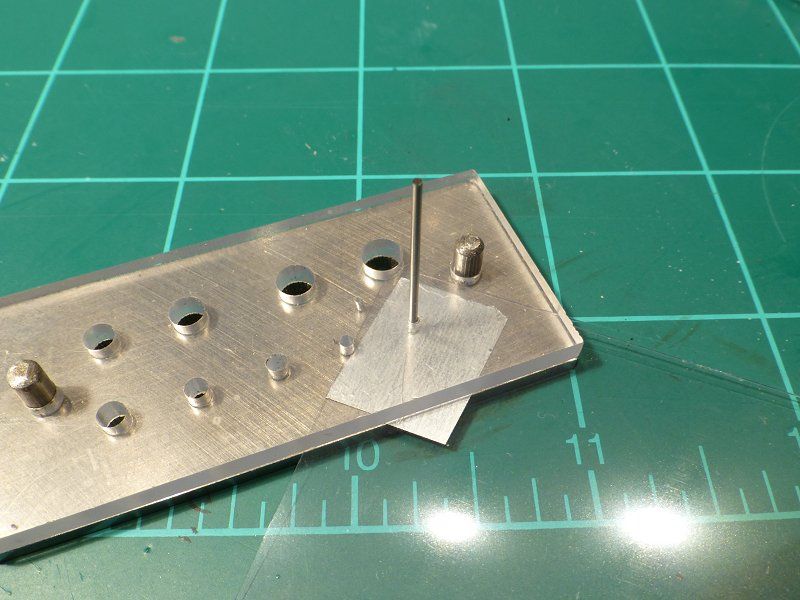
I have to agree with the reviews i read saying one of the few weak points in this kit is the IP.  But I have decided to go with a buttoned up canopy, getting the instrument decal to settle over the IP is too bad looking and will be fine under the glass.  I applied a piece of Bare Metal Foil on a very thin piece of acetate and punched a small circle to represent the lens in the gun sight, then used the same stuff to make the reflectors. 
 

With the IP done and glued into its little section of the cowl, the fuselage halves were joined.  I don't have a photo of the tail but Zvezda went with a 4 piece empennage with the 2 sides and the tail in 2 pieces.  This is usual done for future kits to have different tails.  Fine.  I get it.  But I have yet to have one of these go together without a lot of adjusting to get the best fit you can but then still having some sanding to do to remove a small step or something else.  They also opted to make this fall on one of the very distinctive panel line features on a 109s.  The vertical lines spaced down the length of the fuselage. 

Note the the manufactures that may be reading this...  STOP THAT! Angry  Make the seam in the middle of 2 sections.  Way easier to fill, file and clean up that line and leave the pre-scribed panel line intact.  That was we don't have to try to rescribe that line around the circumference of a tapering fuselage.  And scribing over a glued line is always harder not matter how long it cures. 

PHEW! Sorry for the rant.  But I do feel better now.  :P 

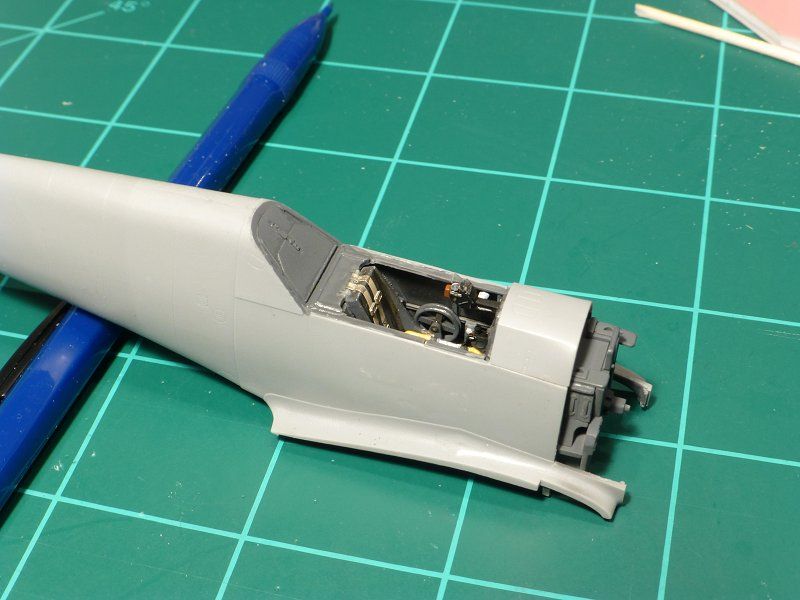
Cockpit pics... PE belts & storage compartment door are from an ancient Eduard set I found at the bottom of a drawer. It pays to be a pack rat.
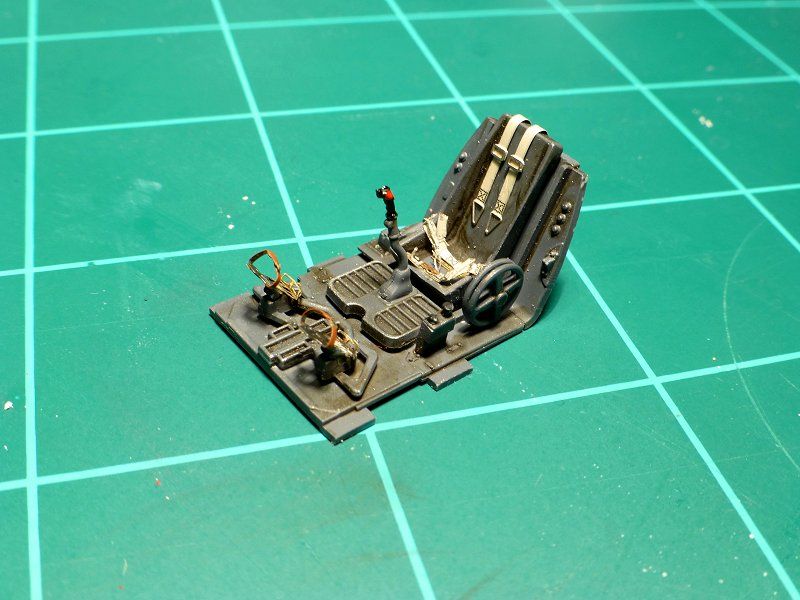
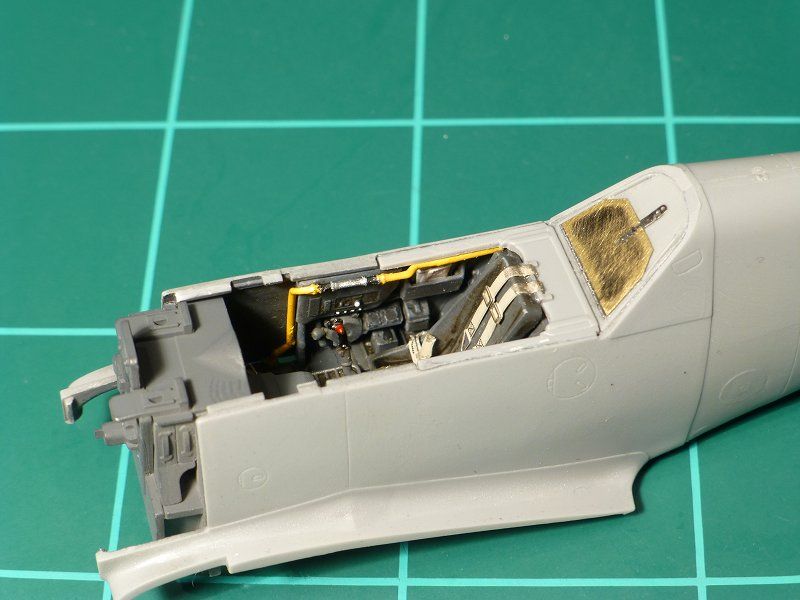


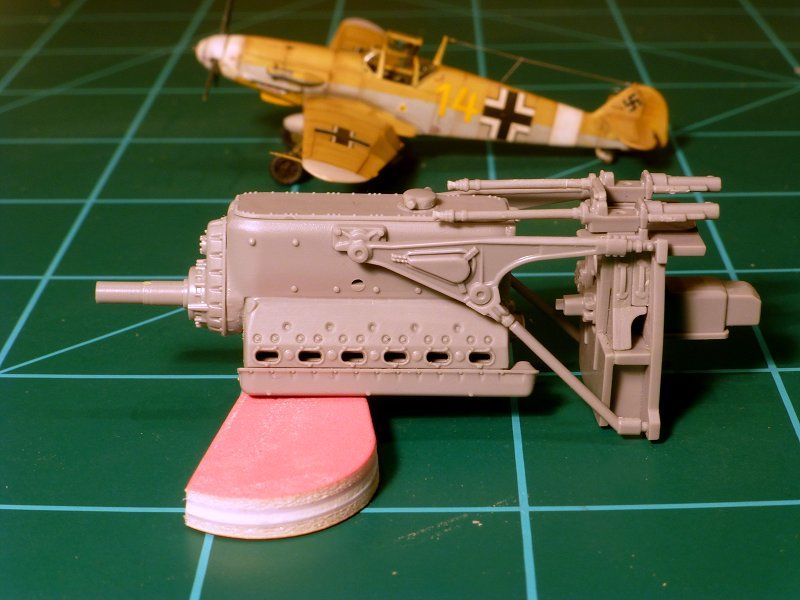
The engine is a real beauty and with some wiring and piping can be a real looker.  But I've decided to go all buttoned up to take atvantage of the gorgeous line of the F series... the best in breed.

And its as big as a whole 109Stick out tongue


Marc  

  • Member since
    December 2006
  • From: N. Georgia
Posted by Jester75 on Friday, January 31, 2014 1:12 PM

Looks like your images got messed up somewhere there Marc! Your pit looks great so far. Its nice to finally see a build log of one of these Zvezda 109's!

Eric


  • Member since
    December 2006
  • From: N. Georgia
Posted by Jester75 on Friday, January 31, 2014 1:13 PM

And there I am looking like a fool, back to normal now!

Eric


  • Member since
    April 2005
  • From: Piscataway, NJ!
Posted by wing_nut on Friday, January 31, 2014 1:18 PM

No Jesterr you're no foolBig Smile  I was fxing while you wree typing.  And thank you

Marc  

  • Member since
    February 2006
  • From: Smithers, BC, Canada
Posted by ruddratt on Friday, January 31, 2014 1:19 PM

Nice to see ya putting the 'wing' back in "wingnut".  Wink   Great stuff as usual Marc!  Yes

Mike

 "We have our own ammunition. It's filled with paint. When we fire it, it makes pretty pictures....scares the hell outta people."


  • Member since
    March 2010
  • From: MN
Posted by Nathan T on Friday, January 31, 2014 2:09 PM

Welcome back to the Aircraft forum Marc! Nice looking panel and gunsight. I believe the seperate tail is to represent the reinforcing plates on some a/c. Have you tried using a good quality razor saw for re-scribing around compound curves? It works way better than a coventional scriber. Nice to see more Zvezda kits being built here. After finishing the La-5, I'm ready for anther one.


  • Member since
    April 2005
  • From: Piscataway, NJ!
Posted by wing_nut on Friday, January 31, 2014 4:13 PM

SadHey Mike! Thanks old bean.  BTW, ya better report in over the Villains & Heroes GB.  I think they think you've been beset on by some evil doer.

Thanks Nathan.  This is why gettin' old sucks.  You're right and I knew that  LOL.  I had looked at the 2 tail and figured that out.  In the hour or so between lookin' and postin'... wait... what...I can't remember what I was about to say

Marc  

  • Member since
    October 2004
  • From: Northern Virginia
Posted by ygmodeler4 on Friday, January 31, 2014 5:39 PM

Looks good so far Marc, can't wait to see more.

-Josiah

  • Member since
    February 2012
  • From: Olmsted Township, Ohio
Posted by lawdog114 on Friday, January 31, 2014 6:21 PM

Nice pit work wing nut....welcome back...

Joe

 "Can you fly this plane and land it?...Surely you can't be serious....I am serious, and don't call me Shirley"


  • Member since
    April 2005
  • From: Piscataway, NJ!
Posted by wing_nut on Saturday, February 1, 2014 8:27 AM

Josiah, Joe... Thanks guys.

Marc  

  • Member since
    November 2003
  • From: Naples, FL
Posted by tempestjohnny on Saturday, February 1, 2014 12:00 PM

Very nice in the pit. John


  • Member since
    April 2005
  • From: Piscataway, NJ!
Posted by wing_nut on Sunday, February 2, 2014 8:37 PM

With my cold today a more or less sat at the bench most of the day.

First thing to do was fill in the wings where the slats go.  Since I am going to have them down, the step at the back edge is way to high.  The trailing edge of the slat itself is just the thickness of the wing skin so in 1/48 that step would be just about invisible.  A little Tamiya putty filled and sanded smooth. The back edge of the slat sanded to a sharp edge.

The basic airframe is pretty much done.  I think I have all my re-scribing done but with double check.  Getting all the engine cowls in place and straight was tedious to say the least.  All just the flat edges of each piece with and sort of guide pins or any other "former" to align on.  I glued a strip of styrene under the main hinge line of the upper cowls some added strength when there were glued together  Before that set those where glued to the front of the aircraft since they set back into a notch on the wing root.  Then the 2 halves of the oil cooler cowl... just behind the prop... which and been glued and and the seam taken care of, was glued to the front of the cowl because of a small tab that make a small section of cowl in front of the exhausts.  Since this was the only way all these could possible go I was hoping that when I got to the last section, the underside cowl, it would just drop in place.  And luckily It darn near did.  Just some minor adjustments needed.

Every controls surface is positionable except for the inner split flaps. They are separate but needed some slight modifications to droop.

Marc  

  • Member since
    December 2002
Posted by 7474 on Sunday, February 2, 2014 10:29 PM

Nice looking 109, you had me at the first photo.

  • Member since
    March 2010
  • From: MN
Posted by Nathan T on Sunday, February 2, 2014 10:35 PM

Cool stuff happening here. I see no steps or poor fitting cowling pieces. I was wondering if the removable cowl panels would be a major pain.


  • Member since
    April 2005
  • From: Piscataway, NJ!
Posted by wing_nut on Monday, February 3, 2014 7:21 AM

Thanks 7474

Thanks Nathan , The nice oft of the cowl parts made it easier than it could have been. I think it would be a chore to make them actually removable.  The build choice is open of closed, the only difference being the detailing inside the cowl pieces.  One of the reviews I read l compared this to putting together the cowl on an Eduard Fw 190 A kit.  Picture an egg shell cut into a few pieces and having to glue it back together.

Marc  

  • Member since
    December 2006
  • From: N. Georgia
Posted by Jester75 on Monday, February 3, 2014 7:37 AM

Nice and  clean Marc!!

Eric


  • Member since
    April 2005
  • From: Piscataway, NJ!
Posted by wing_nut on Monday, February 3, 2014 11:50 AM

Thanks for looking in Eric, and for the comment.

Marc  

  • Member since
    February 2006
  • From: Smithers, BC, Canada
Posted by ruddratt on Tuesday, February 4, 2014 12:59 AM

Hey Marc, after reading about your scribing issues with the fuselage, I found these guys and thought they may be useful to you.  I've already ordered a set for myself.

http://www.ultracast.ca/products/RB_Productions/Tools_Scratch-Building/RB-T037/default.htm

Mike

 "We have our own ammunition. It's filled with paint. When we fire it, it makes pretty pictures....scares the hell outta people."


  • Member since
    April 2005
  • From: Piscataway, NJ!
Posted by wing_nut on Tuesday, February 4, 2014 6:29 AM

Thanks for that link Mike. They look interesting. The curve will have an advantage over the straight blade.

Marc  

  • Member since
    March 2010
  • From: MN
Posted by Nathan T on Tuesday, February 4, 2014 8:29 AM

I second Radu's razor saws!


  • Member since
    April 2005
  • From: Piscataway, NJ!
Posted by wing_nut on Tuesday, February 4, 2014 1:47 PM

Nathan, you've used those RB scribers and like how they work?

Marc  

  • Member since
    March 2010
  • From: MN
Posted by Nathan T on Tuesday, February 4, 2014 1:56 PM

Yes, I have the scribe-R tool that chucks in a exacto handle. It has a small stainless tip on one side, for conventional scribing, and the backside is a curved razor saw with ultra fine teeth. That is perfect for scribing around edges. The link Mike posted will work great for that as well, but they don't have the scribe tip on the end. (edit: looks like it has some sort of tip?)

This is what I have:

www.radubstore.com/index.php

The razor saw can also cut out delicate resin pieces off the pour block, better than using an exacto and watch the part ping into outer space. I just finished a big scribing job on my ICM Yak 9, I can show you some photos where I used the tool.


  • Member since
    February 2006
  • From: Smithers, BC, Canada
Posted by ruddratt on Wednesday, February 5, 2014 1:20 AM

Nathan, I've yet to try any of the RB tools, but having heard nothing but praise for them has prompted me to try 'em out, starting with the scribers, and now very likely on to some of their saws as well.  On the other hand, I have used the RB seat belts for both WWI and WWII subjects and am very impressed with their quality and ease of assembly.  They even have this neat masking jig for painting laminated props, but at $34 I've been a bit hesitant to pull the trigger on that one.

Mike

 "We have our own ammunition. It's filled with paint. When we fire it, it makes pretty pictures....scares the hell outta people."


  • Member since
    February 2011
  • From: Bent River, IA
Posted by Reasoned on Wednesday, February 5, 2014 6:24 AM

Always a sucker for a 109 and have heard the Zveszda is supposed to be a gem (in the stash), looking great Marc.  Have you found it full of fiddly bits?  Sure looks like it in the box.

Science is the pursiut of knowledge, faith is the pursuit of wisdom.  Peace be with you.

On the Tarmac: 1/48 Revell P-38

In the Hanger: A bunch of kits

  • Member since
    April 2005
  • From: Piscataway, NJ!
Posted by wing_nut on Wednesday, February 5, 2014 7:49 AM

Thanks Reasoned.  No, I don't think there is an excessive amount of fiddly bit.  A few parts that could have been 1 piece are 2 but there aren't many that will require the use of tweezers.  Higher part count is due some doubling up of parts when given a choice.  Like 2 different pilot seats, 2 IP’s, 2 different tail sections.  That sort of stuff.  The beautiful engine and firewall has lots of detailing that looks a bit fiddly but isn’t really.

Marc  

  • Member since
    February 2003
  • From: Rothesay, NB Canada
Posted by VanceCrozier on Wednesday, February 5, 2014 8:38 AM

Looking good Marc!

On the bench: Airfix 1/72 Wildcat; Airfix 1/72 Vampire T11; Airfix 1/72 Fouga Magister

  • Member since
    April 2005
  • From: Piscataway, NJ!
Posted by wing_nut on Saturday, February 8, 2014 7:34 AM

Thanks VanceSmile


While looking at pics of other “F” models I came across this product that I am trying out for the 1st time.  GWH makes rivet sets for a number of aircraft.  This is for the Hasegawa 109 but I am hoping it won’t be hard to make it fit if it does not already. 

There is a large sheet with all the rivets of the planes sections printed on what sort of feels like decal paper.  The 1st big difference is the cover film covers the whole sheet.  My 1st thought was it was going to be a real PITA with all the decal edges. Not so.  These are like decals in reverse.  They need to be applied to a primed surface, not bare plastic. 

Cut it out, soak in water, apply with some setting solution, let dry for about an hour.  Sounds like a regular decal.  Here’s the trick.  The “decal film” gets peeled off leaving just the little rivets attached in their perfect pattern.  

The pics will be self explanatory at this point.  The rivets are micro small and you can just feel them when you run your fingers over the surface.  Should look nice under a coat of paint. 

Marc  

  • Member since
    February 2003
  • From: Cameron, Texas
Posted by Texgunner on Saturday, February 8, 2014 7:41 AM

Marc, that's pretty cool!  I might have to give those a try someday.  Thanks!

Gary


"All you mugs need to get busy building, and post pics!"

  • Member since
    March 2012
  • From: Corpus Christi, Tx
Posted by mustang1989 on Saturday, February 8, 2014 7:44 AM

Wow!! Gonna be giving that stuff a try!!


 Forum | Modelers Social Club Forum (proboards.com) 

  • Member since
    April 2005
  • From: Piscataway, NJ!
Posted by wing_nut on Saturday, February 8, 2014 11:37 AM

It's neat stuff. Dunno if it had to do with the pieces being bigger or letting it dry too long... but still less than the 2 hours they suggest...  the film was hard to get off. I had to use some strong tape pressed to  the film. Luckily it did not harm and exposed rivest from adjacent areas.  It took just a few minute to t=do that wing.  Try and do that fast and neat with a rivet wheel.Wink

Marc  

JOIN OUR COMMUNITY!

Our community is FREE to join. To participate you must either login or register for an account.

SEARCH FORUMS
FREE NEWSLETTER
By signing up you may also receive reader surveys and occasional special offers. We do not sell, rent or trade our email lists. View our Privacy Policy.