SEARCH FINESCALE.COM

Enter keywords or a search phrase below:

Revell 1:48 Stearman PT-17 Build

52507 views
90 replies
1 rating 2 rating 3 rating 4 rating 5 rating
  • Member since
    June 2004
  • From: 29° 58' N 95° 21' W
Posted by seasick on Thursday, April 10, 2014 11:08 PM

That's a great build, like things that are not gray all over. Had a brain freeze when I saw PT-17, kept thinking about an ELCO PT boat.  

Chasing the ultimate build.

  • Member since
    December 2009
Posted by ww2psycho on Thursday, April 10, 2014 10:58 PM

Great work! I must ask what are you using for the yellow? I'm doing the all yellow Navy.

  • Member since
    October 2010
  • From: Rockford, IL
Posted by AlanF on Thursday, April 10, 2014 9:16 PM

Thanks for the suggestions for using Mr. Mark Setter and Mr. Mark Softer.  I never heard of that duo. Unfortuantely all the US online stores I checked were out of stock. Sad  It must be popular stuff!  

I think everyone who picked up a kit will be pleased.  I'm probably going to get another to do in the yellow scheme or wait for some after market schemes to appear.

It was pretty nice day so I decided to take my real camera (a Sony NEX-6) and macro lens outside with a white diffusion umbrella to take the pics today instead of using my iPhone. Hope you like them.

The engine is finished, assembled and weathered.  Front...


Rear...  Yeah, I know - injector pin marks but no one is going to see them, so they weren't removed. In fact, all the back detail probably won't be visible. Kind of sad. 

The front engine mounting has also been installed and "worn-in".

So far -- she is looking good.


  • Member since
    December 2006
  • From: Phoenix, AZ
Posted by Fly-n-hi on Thursday, April 10, 2014 8:28 PM

Excellent work so far!  Looks like a cool little kit.

  • Member since
    February 2006
  • From: Smithers, BC, Canada
Posted by ruddratt on Thursday, April 10, 2014 7:43 PM

RadMax8

I would recommend trying to get your hands on Mr. Mark Setter and Mr. Mark Softer. These are pretty aggressive decal solvents that seem to do pretty well with Tamiya's notoriously thick decals.

I was going to mention those decal solutions but Max beat me to it, so I'll second it. I refer to them as my heavy artillery, used for only the most stubborn decals, and they work a treat.

Great work Alan! Yes

Mike

 "We have our own ammunition. It's filled with paint. When we fire it, it makes pretty pictures....scares the hell outta people."


  • Member since
    December 2002
  • From: NYC, USA
Posted by waikong on Thursday, April 10, 2014 4:06 PM

looking very nice, will have to pick this kit up!

My website: http://waihobbies.wkhc.net


  • Member since
    February 2005
  • From: Cleveland, OH
Posted by RadMax8 on Thursday, April 10, 2014 11:54 AM

I would recommend trying to get your hands on Mr. Mark Setter and Mr. Mark Softer. These are pretty aggressive decal solvents that seem to do pretty well with Tamiya's notoriously thick decals.

Your build looks very nice so far, really looking forward to seeing you complete this bird.

  • Member since
    December 2009
Posted by ww2psycho on Thursday, April 10, 2014 9:13 AM

Ok thanks, I didn't think anyone used white plastic anymore so I had to ask.

  • Member since
    November 2009
  • From: Twin Cities of Minnesota
Posted by Don Stauffer on Thursday, April 10, 2014 8:47 AM

ww2psycho

When did this kit first come out?

I'm pretty sure this is NOT a repop, but a new kit, with their new molding technology.

Don Stauffer in Minnesota

  • Member since
    December 2009
Posted by ww2psycho on Wednesday, April 9, 2014 10:46 PM

I picked one up today and already started on it. Just getting parts cut out and some assembly done tonight. I just watched tora tora tora too and the plane in there is from a flying school, not Navy or Army. I plan on doing the all yellow Navy version.

You are doing great work Alan, I'm glad you inspired me to get this plane. I haven't bought a Revell kit in a few years but this one is great for the money.

  • Member since
    September 2013
Posted by blackdog62 on Wednesday, April 9, 2014 10:14 PM

I picked mine up just like 2/3 weeks ago and I posted questions soon as I got home. At that point nobody had posted anything about them. A few days later they was all over the forums. At that point somebody told they had bin out for a month or so. There new

  • Member since
    October 2010
  • From: Rockford, IL
Posted by AlanF on Wednesday, April 9, 2014 9:59 PM

Thanks for all the encouragement everyone!

This is a pretty inexpensive kit. I paid about $14 for it and that's a steal for the detail this kit has.  

Today was a paint and very stubborn decal day. 

First, a lot of small engine parts needed to be painted before assembly.

Then some touchup and blue on the horizontal stabilizers.

Then a decal attempt on the rudder. The kit decals look good but they are way too thick and almost impervious to any kind of setting solution. They just won't conform to the rudder detail and this was after multiple Solvaset applications. This kit cries out for some aftermarket decals. 

The then fuselage top was glued in place and touched up.

That's it so far, but here is an airbrush tip which some of you may know. When you have a lot of colors to go through in a painting session, the best thing to do is use small Aztek color cups.  I have a Grex Tritium TS3 with an Aztek adapter and those 3cc Aztek cups are perfect for small jobs and they make cleanup a snap.

  • Member since
    September 2013
Posted by blackdog62 on Wednesday, April 9, 2014 9:03 PM

I was wondering if anybody has any info on one of these aircraft going from trainer to Spoter say someplace like the Philippines I would like to do mine in more of a war time aircraft scream/camo

  • Member since
    September 2013
Posted by blackdog62 on Wednesday, April 9, 2014 8:51 PM

I like seeing revell putting out a nice new build. But they are famous for that very visible logo patch. It just takes a little sanding but those days of putting out the logo for recognition is long past for revell.

  • Member since
    December 2009
Posted by ww2psycho on Wednesday, April 9, 2014 7:56 PM

When did this kit first come out?

  • Member since
    November 2006
Posted by Bearcat57 on Wednesday, April 9, 2014 2:17 PM
I've been holding off picking this kit up only because I have too many unfinished projects on (and under, and around) the bench, but I don't know how much longer before I cave. I'm busting to build this one.

Thanks for doing this, Alan. I'm checking this thread a couple times a day....can't wait til you get to the rigging. That's my biggest trepidation.
  • Member since
    July 2006
  • From: Clearwater, FL
Posted by Gymbo-59 on Wednesday, April 9, 2014 1:27 PM

To bad she didn't have couple of MG's on the Stearman and lit a few of them up.  lol.  

Great work so far Alan.  I really enjoy watching your progress.

Duct tape is like the force.  It has a dark side & light side and it holds the universe together.

  • Member since
    December 2009
Posted by ww2psycho on Wednesday, April 9, 2014 12:30 PM

I'm going to try to pick one up today. Shouldn't be that long of a build with this kit, maybe I can actually get something done for once.

  • Member since
    November 2008
  • From: Central Florida
Posted by plasticjunkie on Wednesday, April 9, 2014 7:11 AM

Thanks for posting your build! I was wondering if to get this kit and now you have twisted my arm into a further stash addition. Big Smile  The quality looks fantastic and from what I have seen a very low price too. Now if only Hobby Lobby would get this one , along with the 40% coupon should be a fantastic bargain.

She's looking very sweet and will follow your great WIP. Yes

 GIFMaker.org_jy_Ayj_O


Too many models to build, not enough time in a lifetime!!

  • Member since
    February 2006
  • From: Smithers, BC, Canada
Posted by ruddratt on Tuesday, April 8, 2014 11:56 PM

She's lookin' sweet Alan!  Yes  You're making great progress!  Getting really pumped to start mine.

I confess to watching Tora Tora Tora at least twice a year. Love that scene with the Stearman, and the look on her face is priceless!  "I'm taking over, Davey!!"  Love it !!

Mike

 "We have our own ammunition. It's filled with paint. When we fire it, it makes pretty pictures....scares the hell outta people."


  • Member since
    October 2010
  • From: Rockford, IL
Posted by AlanF on Tuesday, April 8, 2014 11:23 PM

Wow, I forgot all about that movie.  Thanks for the reminder.  I'll have to watch it again, it's been a very long time.

Now on to a bit more progress...

ACK!!!!!!! Did they really do this on a visible surface!!!!

I could see putting it on a hidden surface or on a sprue but that placement is really bad. It gives the model a toy appearance. Well, nothing that a little sanding and paint can't fix...

That's it for the progress I made today, beside more applications of Solvaset on the instrument decals!  It doesn't look like much but airbrushing yellow, even over white, is pretty hard. At first I tried a gloss yellow and that gave it a transparent, toy-like paint job, so off it came.  I found the best result was to mist on a flat yellow and then mist on a few light coats of gloss yellow.  The flat also has the advantage of filling in small scratches and imperfections.  A white primer could also have been used but I didn't have any and I didn't want to risk using the grey primer I have.

  • Member since
    December 2009
Posted by ww2psycho on Tuesday, April 8, 2014 11:09 PM

I'm so buying one now!

  • Member since
    November 2006
Posted by Bearcat57 on Tuesday, April 8, 2014 9:44 PM

yes it is

  • Member since
    December 2009
Posted by ww2psycho on Tuesday, April 8, 2014 4:44 PM

Is this the plane in Tora Tora Tora that a girl instructor is teaching someone to fly when the japanese fly by them?

  • Member since
    October 2010
  • From: Rockford, IL
Posted by AlanF on Tuesday, April 8, 2014 12:29 AM

I made a little more progress tonight. I took the suggestions and toned done the internal color a lot.  It's just a bit tinted now with a subtle shading, not that much of it is visible.

I applied the decals to the instrument panel and after a closer look, they aren't that bad after all. Smile However, they are having a very hard time settling down. I hope this isn't a sign of things to come because they appear to be very resistant to MicroSol and Solvaset. Sorry no pics of them as they are under a puddle of Solvaset for the 5th time - ouch.

I also installed the cockpit and frame structures and painted the outside a glossy dark blue. I was sort of torn on the outside blue shade. I looked at a lot of photos and most of the recent paint schemes show a much lighter shade of blue, but some of the older pics did show a dark blue and that's what the instructions call for, so I went with it.

  • Member since
    November 2009
  • From: Twin Cities of Minnesota
Posted by Don Stauffer on Monday, April 7, 2014 8:44 AM

The interior structure is a framework covered by fabric covering.  So most of the sides are the covering, which was a linen or cotton.  But it was covered on the outside with clear dope and then aluminum paint, so that darkens the appearance a bit. A google "image" search yields several cockpit photos that show the fabric.

I had hoped to have my Stearman on the bench by now, but my current project is taking longer than I anticipated.  This thread really has me itching to start, but the other project (a Navy Cruiser) is so close to finish!

Don Stauffer in Minnesota

  • Member since
    October 2010
  • From: Rockford, IL
Posted by AlanF on Monday, April 7, 2014 12:47 AM

Thanks Mike.  It definitely looks to be more white.  I've looked at some others photos and their does seem to be some variability (I've even seen a black interior). However, most of them seem more white with maybe a touch of green or blue to them. That could be the lighting? I'll need to tone it down more than I was originally planning,  The Ultracast Navy instrument decals look interesting.

  • Member since
    February 2006
  • From: Smithers, BC, Canada
Posted by ruddratt on Sunday, April 6, 2014 11:45 PM

Nice progress so far Alan. Yes  I do plan on removing the molded-on belts in favor of some PE ones.  One thing you may want to look at is the interior color you're using. Not sure if a linen color is quite accurate here. I found these pics......

http://www.bigskystearman.com/stearmanforsale.html

Also, I picked these up from Ultracast a while back. Looks like they may come in useful for the IP......

http://www.ultracast.ca/products/Airscale/48-scale/AS48-USN/default.htm

Mike

 "We have our own ammunition. It's filled with paint. When we fire it, it makes pretty pictures....scares the hell outta people."


  • Member since
    October 2010
  • From: Rockford, IL
Posted by AlanF on Sunday, April 6, 2014 11:24 PM

Thanks for the interest in this build.

I managed to get a bit more done on her today.

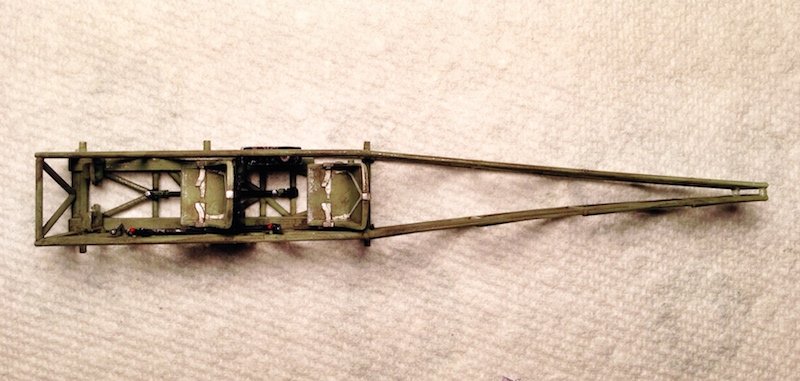
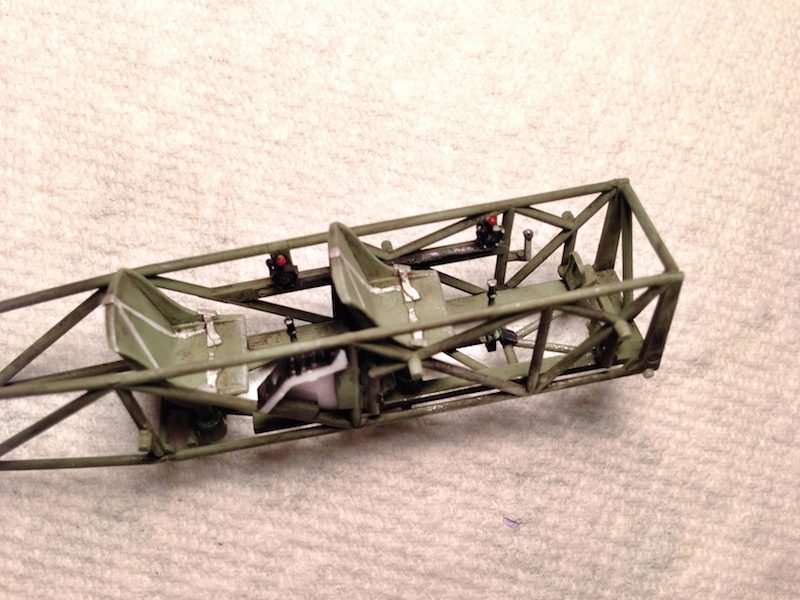
The cockpit area is now assembled, painted and weathered. She really needs some photo-etched seat belts, but I don't think the painted on ones came out all that bad.

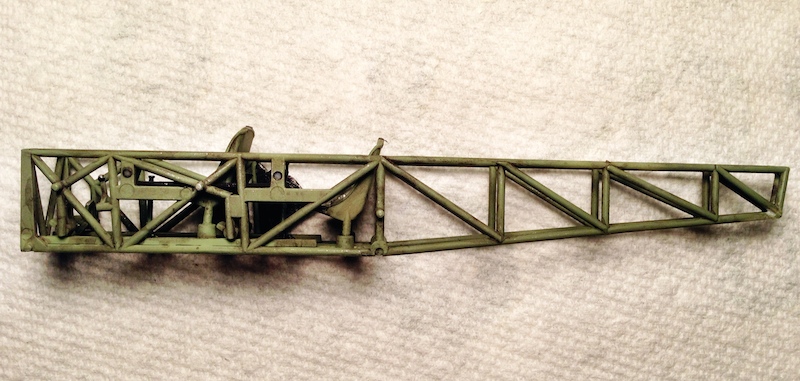
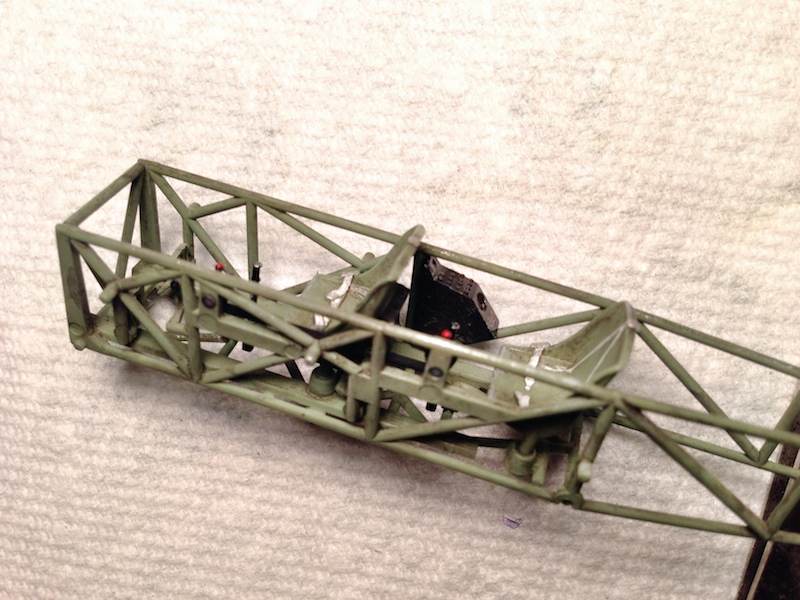
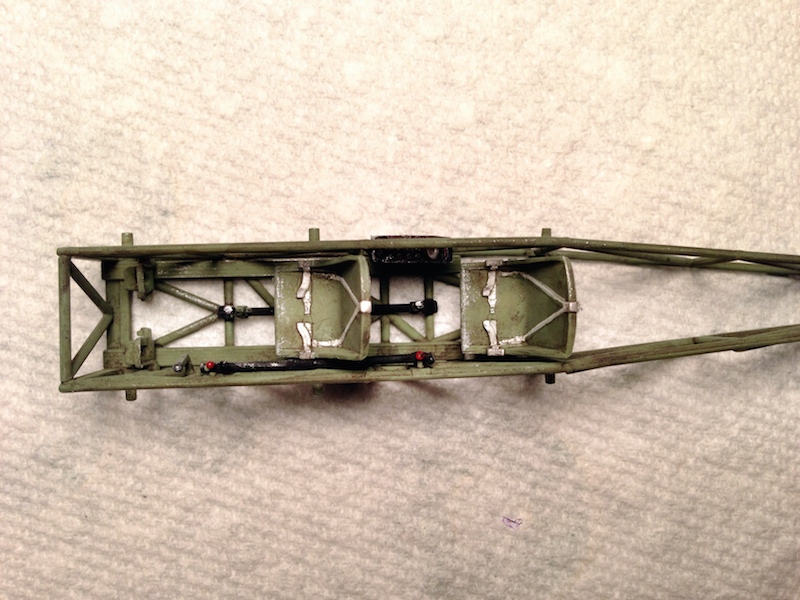
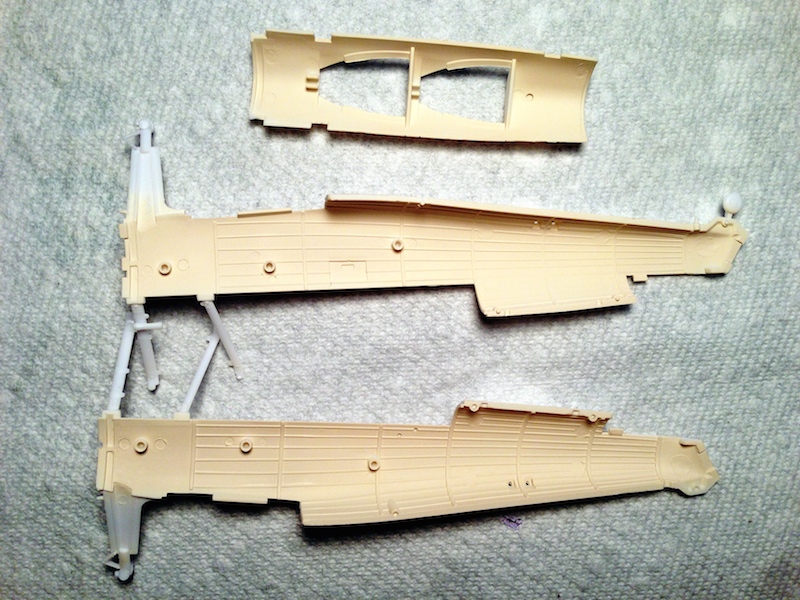
You'll notice some injector pin marks.  I didn't remove them in the cockpit area above or the interior body below because, well, they just aren't going to be seen and removing them would remove some nice surrounding detail.

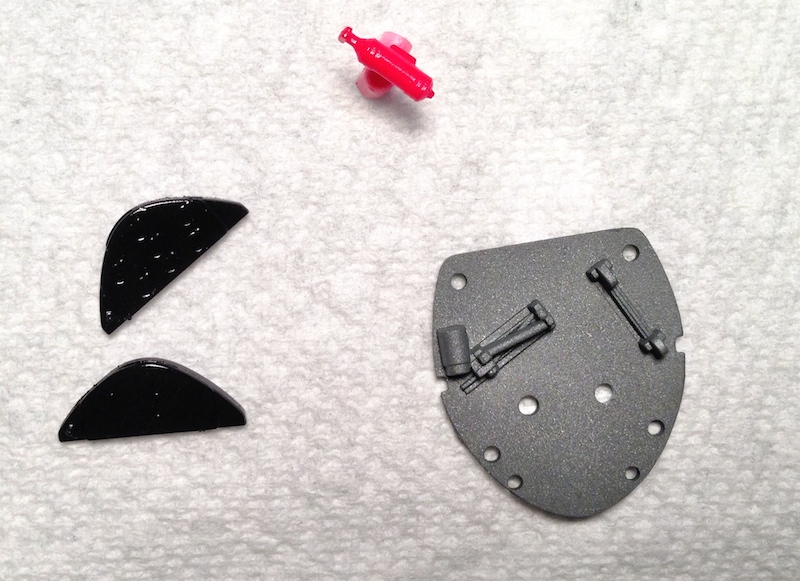
The instrument panels have just round circles for dials and depend on the decals to give instrument details, but the decals are poor in this regard. But there's nothing that can really be done as there isn't anything to dry brush. Too bad.  This is one weakness of the kit.  Hopefully someone will have a nice aftermarket correction to this.  The fire extinguisher is more candy red than it should be, but don't worry, I'll fix that. I think the Firewall came out nice with a custom "steel" mixture.

The interior has nice nice ribbing.  I applied a coat of flat white with a bit of desert yellow mixed in as I was trying for a more yellowed linen affect.  As it is, it's too dark but that was the plan. Really! Call it a kind of preshading. I'm going to mist some flat white over it and then do wash to bring out the details.  

  • Member since
    February 2006
  • From: Smithers, BC, Canada
Posted by ruddratt on Sunday, April 6, 2014 5:13 PM

This is really turning out to be quite the popular kit, with one already completed on these forums, a beaut by jeaton01 (and I love that it's a bipe!). I've got one in my stash as well, so I too will be following your build with interest. Should be diving into mine as soon as my 1/32 Snipe is finished.

Mike

 "We have our own ammunition. It's filled with paint. When we fire it, it makes pretty pictures....scares the hell outta people."


JOIN OUR COMMUNITY!

Our community is FREE to join. To participate you must either login or register for an account.

SEARCH FORUMS
FREE NEWSLETTER
By signing up you may also receive reader surveys and occasional special offers. We do not sell, rent or trade our email lists. View our Privacy Policy.