SEARCH FINESCALE.COM

Enter keywords or a search phrase below:

1:48 Sally B B17G

19693 views
58 replies
1 rating 2 rating 3 rating 4 rating 5 rating
  • Member since
    August 2014
1:48 Sally B B17G
Posted by Richard Spreckley on Sunday, August 10, 2014 5:31 PM

This is my big build of 2014. I have always been a big fan of the last flying Fortress in europe and i have visited her many times at the Imperial War Museum in Duxford England. (All history ane information has been taken from the Sally B preservation Society website)

Businessman and pilot, Ted White brought F-BGSR to Britain via Biggin Hill to the Imperial War Museum Duxford, as N17TE, in March 1975, to begin a new life as Sally B, named after Ted’s long-time companion Elly Sallingboe. Sally B made her debut at the 1975 Biggin Hill Air Fair, flying as the USAAF World War Two Memorial Flight.

Kept in flying condition by volunteers from the newly formed Duxford Aviation Society, the Fortress was painted in the 457th Bomb Group, USAAF 8th Air Force, based at Glatton during the Second World War, but retaining her original serial number 485784.

Sally B continued to be flown at displays as a memorial to the 79,000 US airmen who died fighting in the skies over Europe between 1942 and 1945. In October 1979, a distinguished audience assembled at Duxford to see Colonel John Vanden Heuvel DSC unveil a plaque fitted in Sally B’s radio room, dedicated to the fallen airmen, thus putting an official seal of approval upon the aircraft’s role as a flying memorial. No silent, cold memorial this, but a living tribute to the dead, borne aloft with the thunder or engines into the sky that they knew and loved and in which they fought and died.

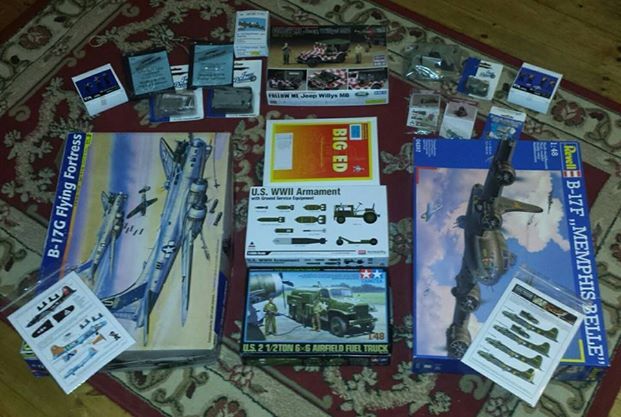
To do this living memorial the the 8th Airforce during WWII I have planned and saved and bought as much detail as I can for the Monogram and Revell 1:48 kits. Using the Revell fuselage for the main build I will have to cut and shut to get Sally B's unique configuration of windows, and guns. The details interior resin set from True detail will be a challenge, along with Eduards Big Ed set. I like a challenge and know that hi sbuild will test my modelling skills to the fore!

Sally B will be set in a diorama on an airbase in the UK sometime in 1944, with the newly released Tamiya refuelling set,  Academy armanent set, Flightpath trolleys and airfield accessories, along with Verlinden resin crew and ground crew it should set the scene nicely.

I realise Sally B never flew in the war, but as a fitting tribute to her main role as being a flying memorial I though this  a fitting setting to put her in.

Sally B has had many schemes over her life and I also wanted to represent this in the model. I have decided to do this by painting the main forward fuselage in olive drab, teh centre section in bare metal and the rear section olive drab with yellow tail. I realise this is a bit unconventional and I have asked the Sally B  preservation society for thier blessing before I start.

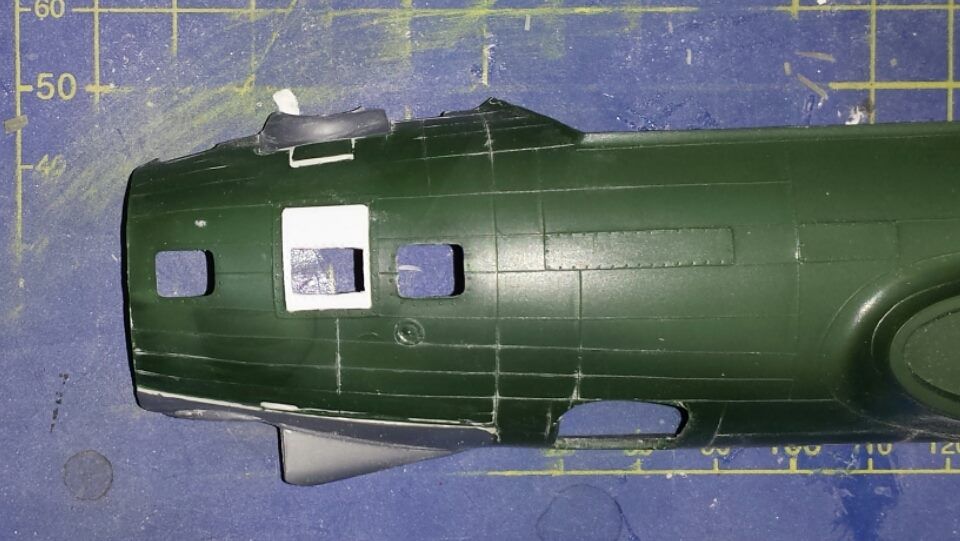
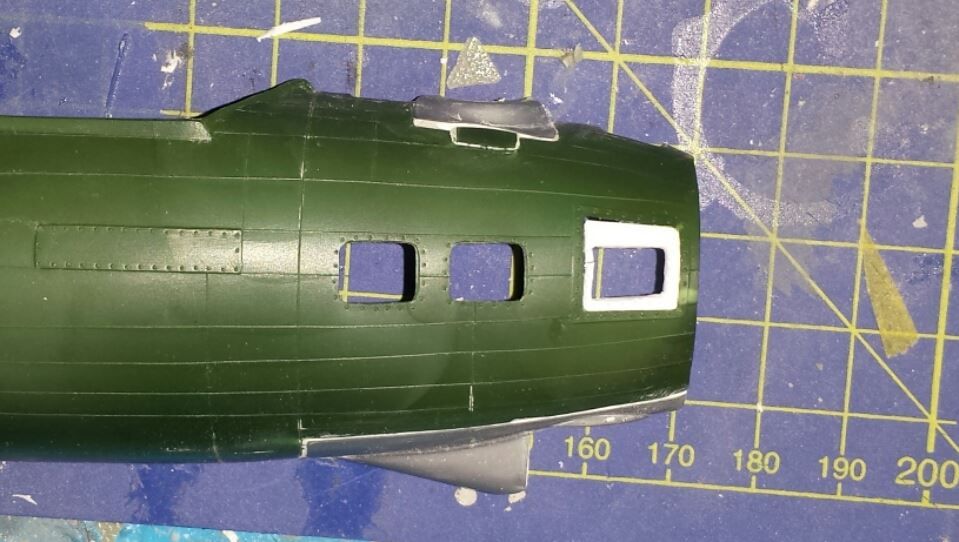
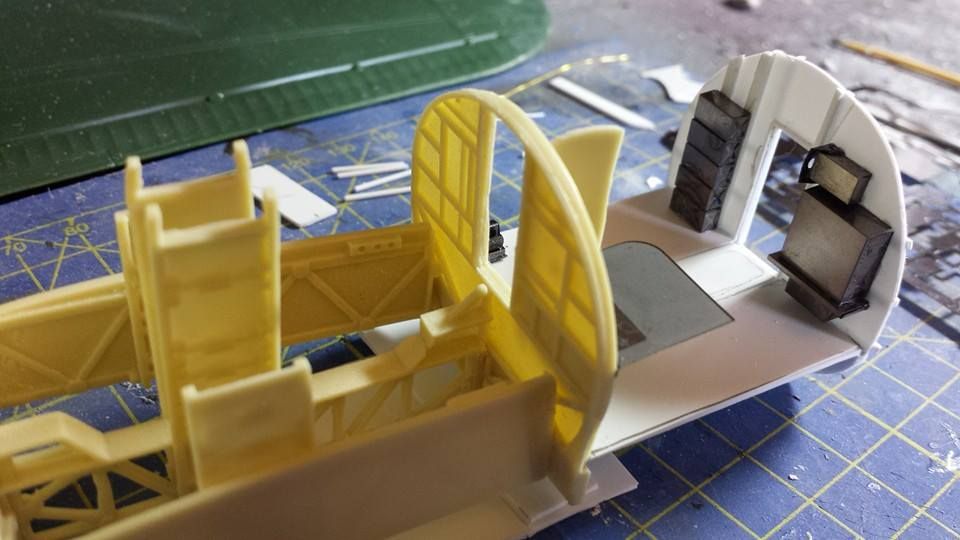
I started with some major rework on the main fuselage.

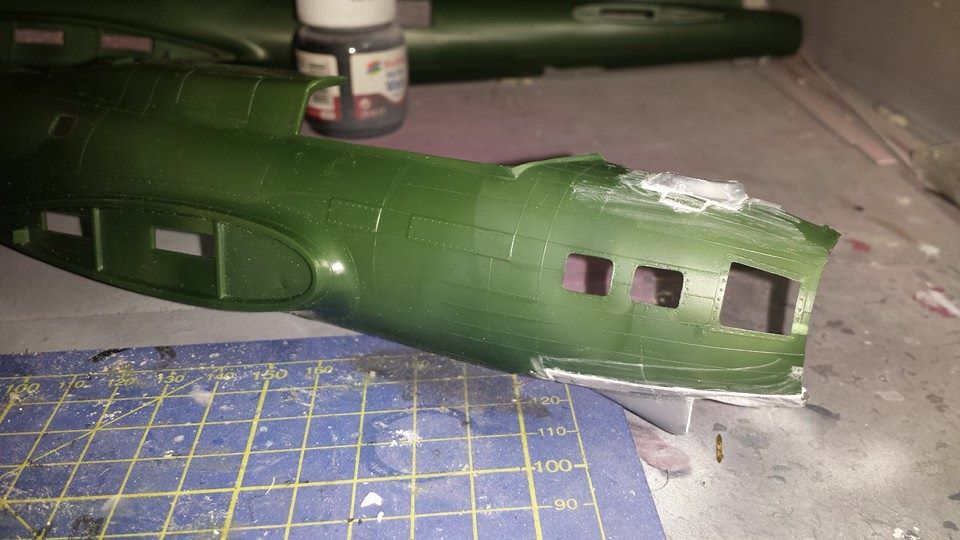
Once I had done this I could then work on the resin interiors.

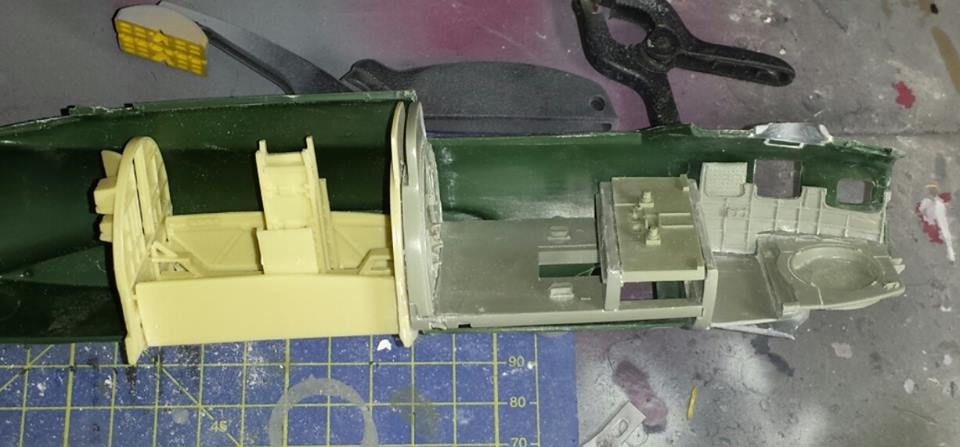
The forward nose window configuration on Sally B is unique and the resin interior needed some serious rework to get right.

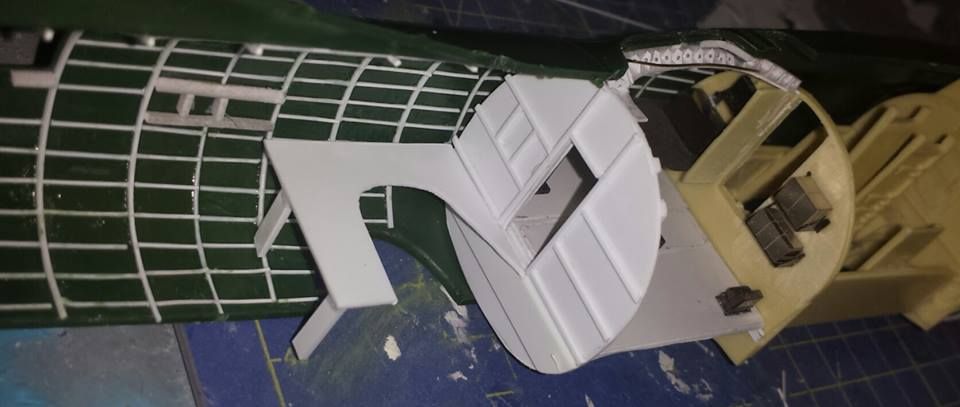
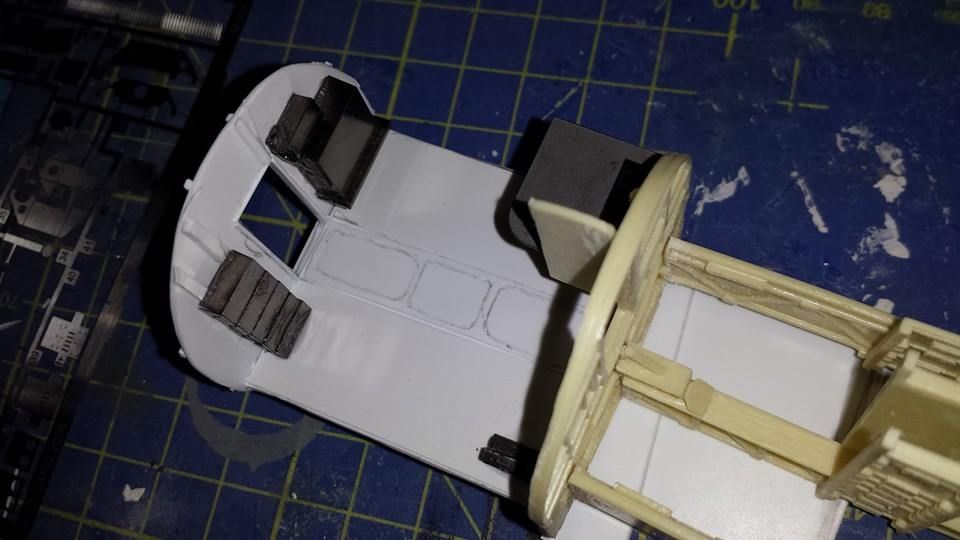
The Big Ed photo etch is superb and Eduard have excelled themselves, to make thing interesting I am alternating between interior and exterior detail.

In 1981, Sally B was introduced to a wider audience through her first TV role as B-17 Ginger Rogers in London Weekend Television’s (LWT) We’ll Meet Again.

By 1982, plans were well underway for the first Great Warbirds Air Display (GWAD) at West Malling when tragedy struck. Ted was killed when his T-6 Harvard, G-ELLY, crashed during an air rally in Malta. Devastated by the disaster, Elly and the team pulled themselves together to hold the air display, and to continue flying Sally B as Ted would have wished. In his memory, Sally B’s starboard inner engine cowling will always carry the same black and yellow chequered markings as his Harvard.

In 1989, a major break-through came with a starring role in the film Memphis Belle. A re-make of William Wyler’s Memphis Belle, the story of the first B-17 to complete twenty-five missions over enemy territory, the film graphically brought to a younger generation the role played by the Flying Fortresses during the Second World War, and the bravery and skill of their crews.

Five airworthy B-17s were collected for the film, two from France, two from the USA and Sally B. Peter Brown, Chief Engineer for Sally B, was asked by the co-producer, Eric Rattray, to be the Aeronautical Consultant for the film, and ensure that all the aircraft were in a serviceable state.

Filming began in June with Sally B as the only one of the B-17s involved fitted with smoke canisters and equipped to fire guns from the rear and ball turrets. As Elly says, “For the crew and team, who worked so hard, preparing Sally B for this massive undertaking it was a very hectic, but immensely satisfying period”. Although Sally B played several different roles, she took the title role for the final, nail-biting sequence when the battle-torn bomber returns home from her final mission.


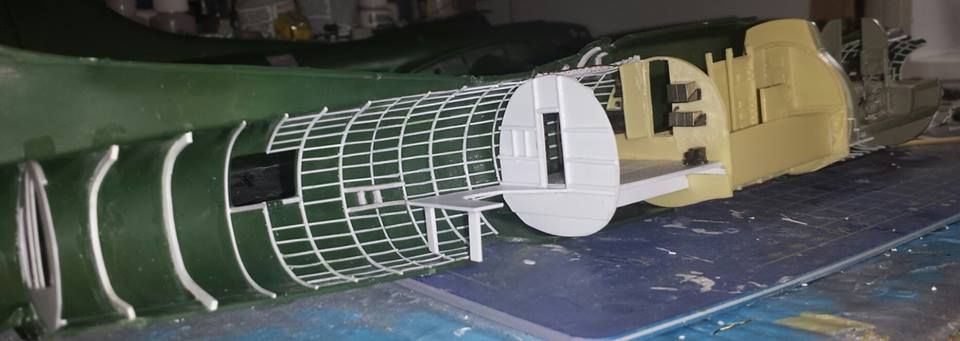
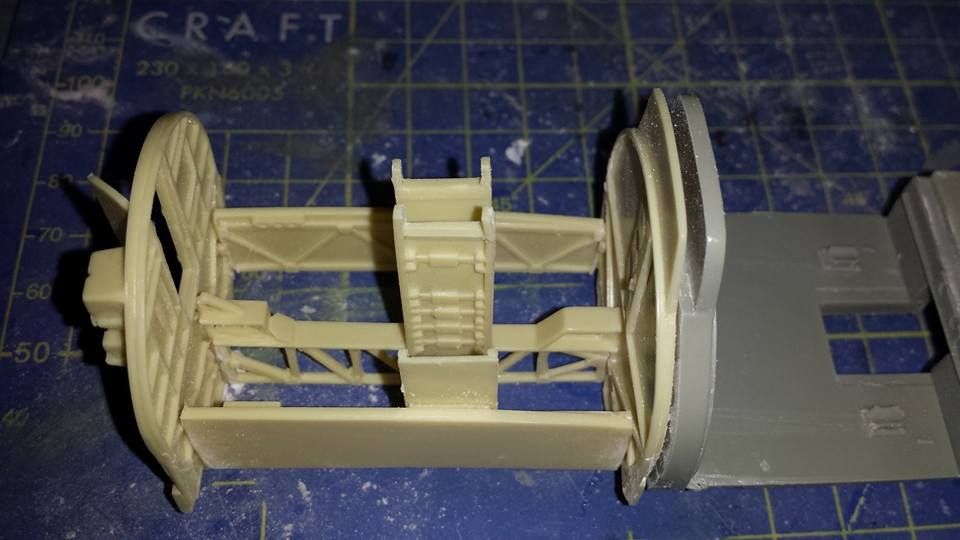
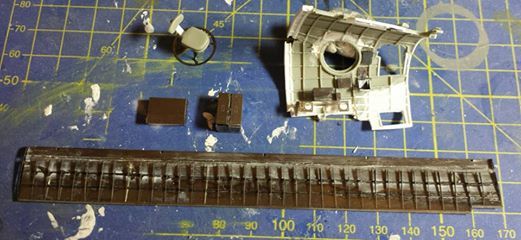
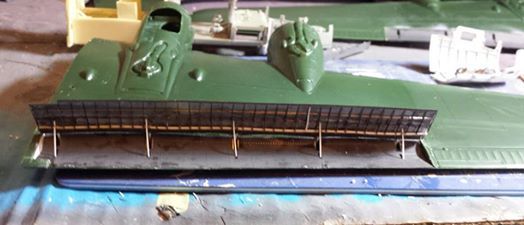
More progress today, scratchbuilding and photoetch in the radio compartment.

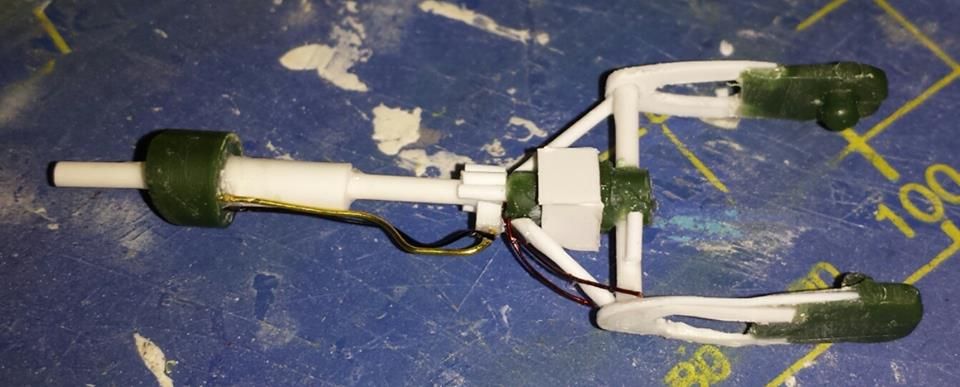
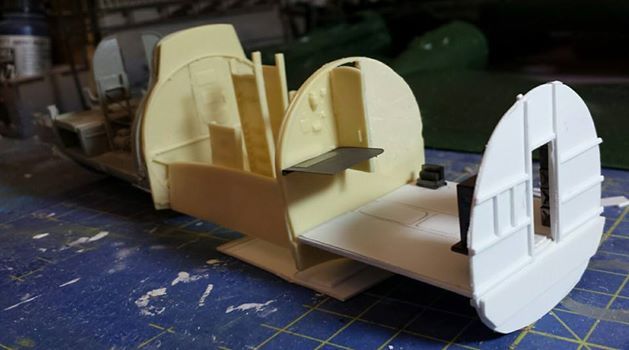
More progress, interior detailing and ball turret mount...

  • Member since
    February 2003
  • From: USA
Posted by woody0369 on Monday, August 11, 2014 10:17 AM

Lookin good so far. Keep posting

  • Member since
    June 2013
Posted by bvallot on Monday, August 11, 2014 4:45 PM

This looks great so far.  I've benched my B-17 for the meanwhile.  I planned on doing a lot of scratching on this one and my skills just weren't quite up to the task at the time and I noticed I started making more problems than I was solving.  This one is turning out nicely so far.  I'll be keeping an eye on this thread.

=]

On the bench:  

Tamiya F4U-1  Kenneth Walsh


  • Member since
    December 2002
  • From: Bury St Edmunds, Suffolk, England
Posted by Bish on Monday, August 11, 2014 4:51 PM

Nice start, going to be watching this. Will you be including the belle nose art on one side of the nose.

I am a Norfolk man and i glory in being so


On the bench: Airfix 1/72nd Harrier GR.3/Fujimi 1/72nd Ju 87D-3

  • Member since
    August 2014
Posted by Richard Spreckley on Monday, August 11, 2014 5:01 PM

Bish. I certainly will courtesy of world decals....

  • Member since
    August 2014
Posted by Richard Spreckley on Monday, August 11, 2014 5:01 PM

Thanks for all the comments

  • Member since
    December 2002
  • From: Bury St Edmunds, Suffolk, England
Posted by Bish on Monday, August 11, 2014 5:03 PM

Nice. You certainly have a lot going into this. I don't think I have seen a model of the Sally B before.

Would I be right in assuming you live pretty close to Duxford.

I am a Norfolk man and i glory in being so


On the bench: Airfix 1/72nd Harrier GR.3/Fujimi 1/72nd Ju 87D-3

  • Member since
    February 2012
  • From: Olmsted Township, Ohio
Posted by lawdog114 on Friday, August 15, 2014 11:00 PM

Very nice work.  It's a darn shame all of that extra detail will be concealed in the end (been there).  Good call on the flaps and bombay which will be readily seen.   I'll be watching this one.  

Joe

 "Can you fly this plane and land it?...Surely you can't be serious....I am serious, and don't call me Shirley"


  • Member since
    August 2009
  • From: MOAB, UTAH
Posted by JOE RIX on Friday, August 15, 2014 11:08 PM

Outstanding work on the detail so far. What an interesting subject and a unique build.

"Not only do I not know what's going on, I wouldn't know what to do about it if I did". George Carlin

  • Member since
    August 2014
Posted by Richard Spreckley on Thursday, October 9, 2014 8:00 AM

Well its been a while since I have posted on here. Slow progress as I discovered a few more areas of detail I wanted to add. Iv started the display base and the resin figures. The figures are from verlinden, I have 8 and wanted them in different pioses, so I have been doing quite alot of cutting and moulding to achive that. I have also nearly completed the internal ribbing....I have also detailed the ball turret to give it a bit more substance for the build...

i1285.photobucket.com/.../b17d_zps386de91a.jpg

i1285.photobucket.com/.../b17ballturret1_zpsd0b507d6.jpg

i1285.photobucket.com/.../b17ballturret2_zps3ab79fda.jpg

i1285.photobucket.com/.../b173_zpsec94d99b.jpg

i1285.photobucket.com/.../b172_zps6c639a99.jpg

i1285.photobucket.com/.../b171_zpsbe035434.jpg

i1285.photobucket.com/.../B17base1_zps56e25e90.jpg

i1285.photobucket.com/.../b17base_zps63f61e9b.jpg

  • Member since
    August 2014
Posted by Richard Spreckley on Thursday, October 9, 2014 8:02 AM

Start again...

More detail added today, I wanted to show the often neglected life raft compartment, so cut out the door and scratch built the interior, I will add a life raft during the build.

  • Member since
    November 2003
  • From: State of Mississippi. State motto: Virtute et armis (By valor and arms)
Posted by mississippivol on Thursday, October 9, 2014 7:56 PM

Whew! That's a lot of work! Good looking progress.

  • Member since
    April 2004
Posted by Jon_a_its on Friday, October 10, 2014 4:17 AM

Nice work, how did you do the case & groundwork

East Mids Model Club 32nd Annual Show 2nd April 2023

 http://www.eastmidsmodelclub.co.uk/

Don't feed the CM!


  • Member since
    August 2014
Posted by Richard Spreckley on Friday, October 10, 2014 4:25 AM

Thanks Jon.

The base was done using a light oak picture frame, the ground itself was foam board with cuts made with a hobby knife, the tarmac/concrete was airbrushed and I used modelling grass for the other bits, it is still work in progress as I am new to dioramas. The acylic top was made by a local firm to me strikingdiplays in West Sussex

  • Member since
    February 2007
  • From: Brunswick, Ohio
Posted by Buckeye on Friday, October 10, 2014 11:24 AM

Wow, excellent work there!

Mike

  • Member since
    February 2012
  • From: Olmsted Township, Ohio
Posted by lawdog114 on Friday, October 10, 2014 6:24 PM

Very cool.  I look forward to the paint.

Joe

 "Can you fly this plane and land it?...Surely you can't be serious....I am serious, and don't call me Shirley"


  • Member since
    August 2014
Posted by Richard Spreckley on Saturday, October 11, 2014 11:14 AM

More detail today, I wanted to show the little known or portrayed life raft stowage compartment, so I have cut out the access door and scratch built the interior, I will add the liferaft at some point.

  • Member since
    August 2014
Posted by Richard Spreckley on Sunday, October 12, 2014 10:52 AM

Decided to tackle the APU and side gunners positions and start the PE detailing.

  • Member since
    December 2002
Posted by 7474 on Sunday, October 12, 2014 9:09 PM

Looking good, I'll be checking back on this

  • Member since
    July 2014
Posted by bobafetthugsme on Monday, October 13, 2014 8:03 AM

Wow, nice work.  Interested in the progress.  I really want to build one now, this past weekend the misses and I visited the MIghty Eighth Air Force Museum in Pooler, GA on our weekend getaway to Savannah.  It was...humbling to say the least.

  • Member since
    October 2004
  • From: NE Oklahoma
Posted by Allen109 on Monday, October 13, 2014 1:20 PM

Very nice. I will be following this.

  • Member since
    August 2014
Posted by Richard Spreckley on Monday, October 13, 2014 2:00 PM

 I thought I would start on the archers rivet transfers, really pleased how it is turning out, and not such a big job really......

  • Member since
    July 2014
Posted by modelcrazy on Monday, October 13, 2014 4:01 PM

YIKES MAN!

You are really going all out on this. Can't wait to see the finished project. All this work has got to worth it.

Steve

Building a kit from your stash is like cutting a head off a Hydra, two more take it's place.


http://www.spamodeler.com/forum/

  • Member since
    August 2014
Posted by Richard Spreckley on Monday, October 27, 2014 4:26 AM

Thanks for all the comments. I have now finished the rivetting on the fuselage and started on the gun turrets, upgrading the rear turret to something that resembles it better than the kit, using paper mache for the canvas and styrene for a bit more detailing, All finished off with the Eduard gun barrels.

  • Member since
    August 2013
Posted by Jay Jay on Tuesday, October 28, 2014 9:33 AM

I have a 1/48  Revell  B-17 in my stash just itching to learn from your posts.  Thank you so much for posting.

BTY, what are " Archer's rivet transfers and where can i get them ?


 I'm finally retired. Now time I got, money I don't.

  • Member since
    August 2014
Posted by Richard Spreckley on Saturday, November 15, 2014 4:14 AM

Hi Jay, you can get them on good old ebay or direct from Archers in the US (just google them). They rae resin 3d water slide decals and are awsome!!!!

  • Member since
    August 2014
Posted by Richard Spreckley on Saturday, November 15, 2014 4:15 AM

Sorry for the lack of updates, I have been doing a few bits, but it didnt really justify an update..but as I have been putting all the individual builds together it is now time to show how it is going.

I decided to open up the tail gunners access ahtch as it seemed a waste to hide all the eduard PE, so a bit more scratch building done, including the shroud for the tail wheel. I have alos added the sides to the bomb bay and started to detail the nose section. I am now at a point where I have added and masked most of the clear parts.

I am getting really excited and spending quite alot of time making sure the fuselage will close up without too many problems, which is proving to be quite a challenge with all the different resin, pe and scratch building parts I have used.

  • Member since
    December 2002
  • From: Bury St Edmunds, Suffolk, England
Posted by Bish on Saturday, November 15, 2014 6:18 AM

Going to be a task by itself painting the inside there Richard. Looking good.

Those rivets sound interesting, might have to check those out.

I am a Norfolk man and i glory in being so


On the bench: Airfix 1/72nd Harrier GR.3/Fujimi 1/72nd Ju 87D-3

  • Member since
    August 2014
Posted by Richard Spreckley on Sunday, November 16, 2014 11:02 AM

I took the plunge and decided to replace the turbo system and exhaust with a resin set I had. I am glad I did, I think the added detail justifies the swearing, cutting and filling, just need to do the other 3 and tidy them up!!

  • Member since
    December 2002
  • From: Bury St Edmunds, Suffolk, England
Posted by Bish on Sunday, November 16, 2014 11:04 AM

Those resin ones defiantly look better, good move.

I am a Norfolk man and i glory in being so


On the bench: Airfix 1/72nd Harrier GR.3/Fujimi 1/72nd Ju 87D-3

JOIN OUR COMMUNITY!

Our community is FREE to join. To participate you must either login or register for an account.

SEARCH FORUMS
FREE NEWSLETTER
By signing up you may also receive reader surveys and occasional special offers. We do not sell, rent or trade our email lists. View our Privacy Policy.