SEARCH FINESCALE.COM

Enter keywords or a search phrase below:

1/350 Scale McDonnell Douglas A-4 Skyhawk

34542 views
62 replies
1 rating 2 rating 3 rating 4 rating 5 rating
  • Member since
    March 2012
Posted by Rdutnell on Saturday, November 27, 2021 4:23 PM

Can you e-mail me at rdutnell@ou.edu?

  • Member since
    November 2021
Posted by Icarus999 on Thursday, November 25, 2021 3:03 AM

I am interested in the 1/350 A-4M /OA-4M and the weapons sets. are you still working on this project?

  • Member since
    March 2012
Posted by Rdutnell on Friday, February 20, 2015 6:05 PM

Hi Jerry,

Regarding your question as to how I could afford an air-wing on a 1/350 carrier with the models at $17, the answer is that I can’t.  Big Smile   The fact is that 3D printing is still fairly expensive, and likely will be for some time to come.  I haven’t even bought all of the planes I’ve made yet.  Sorry, but there is nothing I can do about that.

As for setting it up so that people can pick and choose the parts they like, it is a good idea, and C2D once told me that they were considering doing something like that in the future possibly, but currently they are not set up for that, and I don’t know when that could be, if ever.

As for just purchasing certain items, I think that could be arranged.  C2D does custom orders too.  If you let me know what you want, and how many of them I can let them know and have them give you an estimate of what it would cost. 

AS for the conex cans, I think I have already made some that would work as you can see in the image below of the 1/350 scale USCG Cutter Bertholf I was working on for Admiralty Model Works.  Same thing, let me know how many you need and I’ll contact C2D.

With respect to the tilly crane and other deck vehicles, I have already made a set for Admiralty Model Works, who has them available on their web site at:

 http://www.admiraltymodelworks.com/admiral/component/virtuemart/1-350th-accessories/usn-wwii-deck-vehicles-detail.html?Itemid=0

If you want to contact me directly, my e-mail is rdutnell@ou.edu.

CHEERS!!!

  • Member since
    February 2010
Posted by jgbeas on Friday, February 20, 2015 4:59 PM

With the new 1/350 Intrepid and the promise of several more Viet Nam era carriers I can certainly see a big market for flight deck vehicles, especially the iconic Tilly crane.  I have numerous friends look for the crane in particular.

  • Member since
    February 2010
Posted by jgbeas on Friday, February 20, 2015 4:48 PM

Just found this yesterday and am very interested in several parts.  Did look at C2D and they are showing a price of $17 for what appears to be one bird and all the extras.  My first question is how you could afford an air-wing on a 1/350 carrier.  Is your plan to offer the basic bird and then you can pick and choose what parts you would like to purchase to outfit they planes for the deck as you want it configured?  Also I would like to inquire about just purchasing certain items.  Because I am doing a detailed hanger deck on my Ticonderoga model I want to get dozens of 300 gal drop tanks.  During the cruise we had them stashed everywhere there was space.  Another part I would love to see is the conex cans that jet engines were stored it.  They were also everywhere on the ships such as on the weather decks in the gun tubs and sponsens.  I have some very specific questions and would like to know if there is a way to communicate back and forth with you one to one rather that they forum?

Sincerely

Jerry Beasley

  • Member since
    March 2012
Posted by Rdutnell on Saturday, February 7, 2015 8:56 PM

Update 25

Good Evening Everybody!

I thought I would let you know that there has been a delay in activating the model due to an issue with the canopies.  C2D recently changed how they are printing the clear parts and switched from using the Objet 30Pro (which is what I think they use for the other parts) to a Viper SLA machine.  It clearly prints more clearly. Smile  But not without a cost.  The Viper doesn't have the resolution that the Objet 30Pro has.  It doesn't affect my designs at 1/144 scale, but they are too thin to print at 1/350 scale.  Sad  I asked what the minimum thickness I should shoot for now should be, but I haven't heard back yet.  They may be too thick to do a cockpit, without making the canopy essentially solid, with only space to fit over the seat.

On another note, I asked C2D if they could do a test to see how well the models would scale up from 1/350 to 1/144.  I asked them to do the G-IV, which they did, but they also did the A-4E.  I’m real happy with the results.

The picture below shows the G-IV parts and the frets for the A-4.

The next 2 pictures show the A-4E airframe.

I’ll keep you posted.

  • Member since
    March 2012
Posted by Rdutnell on Sunday, January 18, 2015 8:48 AM

Returning to the payload packages…

I added the WW2 bombs items I had previously made into the mix.  I’m now thinking about three sets, WW2, Cold War, and Modern.  Any suggestions on what else I should include?


  • Member since
    March 2012
Posted by Rdutnell on Sunday, January 18, 2015 6:47 AM

Well Rex,

I had to.  The primary reason I post my WIP’s is to improve my models.   The process of taking screenshots of my CAD build often reveals faults or mistakes in the same way that photographs do on real models, so the process of posting itself is helpful.  But the true benefit often comes from comments I receive from people like you Rex, who see the post and take the time to respond.

It always amazes me how you can look at a model, pictures, a drawing, or a CAD model and not notice some feature, but then when someone points it out to you, you can’t help but see it.  It sticks out like a sore thumb.

When this happens, just like on a real model, the first thing you have to do (after maybe a bad word or two) is look at what it would take to fix it, and figure out if it’s worth the effort or not.  Fortunately, in this case, it was.  Even had it not been, I still appreciate the feedback.

Happy modeling!

  • Member since
    March 2005
  • From: near Nashville, TN
Posted by TarnShip on Saturday, January 17, 2015 9:39 PM

Thank you for taking the minute to look at pics. A lot of people just scream "rivet counter" and don't take the post in the spirit it was intended.

I am glad you found a quick way to fix your rudders.

Rex

almost gone

  • Member since
    March 2012
Posted by Rdutnell on Saturday, January 17, 2015 8:43 PM

Update 25

Hi Yet Again Everybody!

First, thanks again Groot.  I’ll put something on the ship forum, about both the A-4’s and armament, either tonight or tomorrow. Rotorheads are good!  :o)

Better late than never Rex.  I really appreciate the input.  I like to make my models as accurate as possible of course, but I usually don’t know that much about the subject.  It’s easy for me to misinterpret the plans, and then since I’m not always the most observant person, to not notice it in pictures either.  Of course, as soon as I read your post, I looked at my pictures again, and sure enough, I blew it.  The good thing is that it was easy enough to fix.

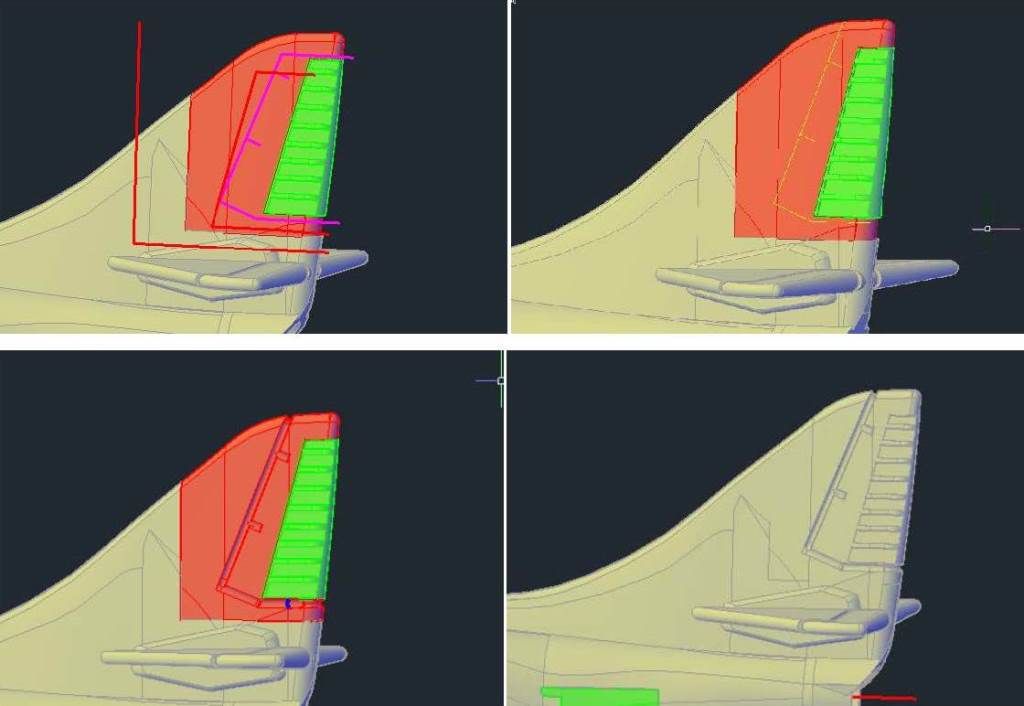
The fix essentially involved making two cuts through the fin (on the A-4E), as shown in the upper right image below.  One cut was made to cut the part to be repaired off, and the other cut was made to isolate the rudder detailing to avoid having to redo it in the repair process.  The upper right image shows the parts created.  The lower image shows the same steps done on an undetailed airframe I had previously saved.

In the upper left image below, you can see the (magenta) lines I previously projected to etch the rudder, having copied the lines from the plans.  The upper right image shows the new projected lines.  Note that it extends to the top.  The lower left image shows it after I etched it, and the lower right image shows it after I rejoined the parts.


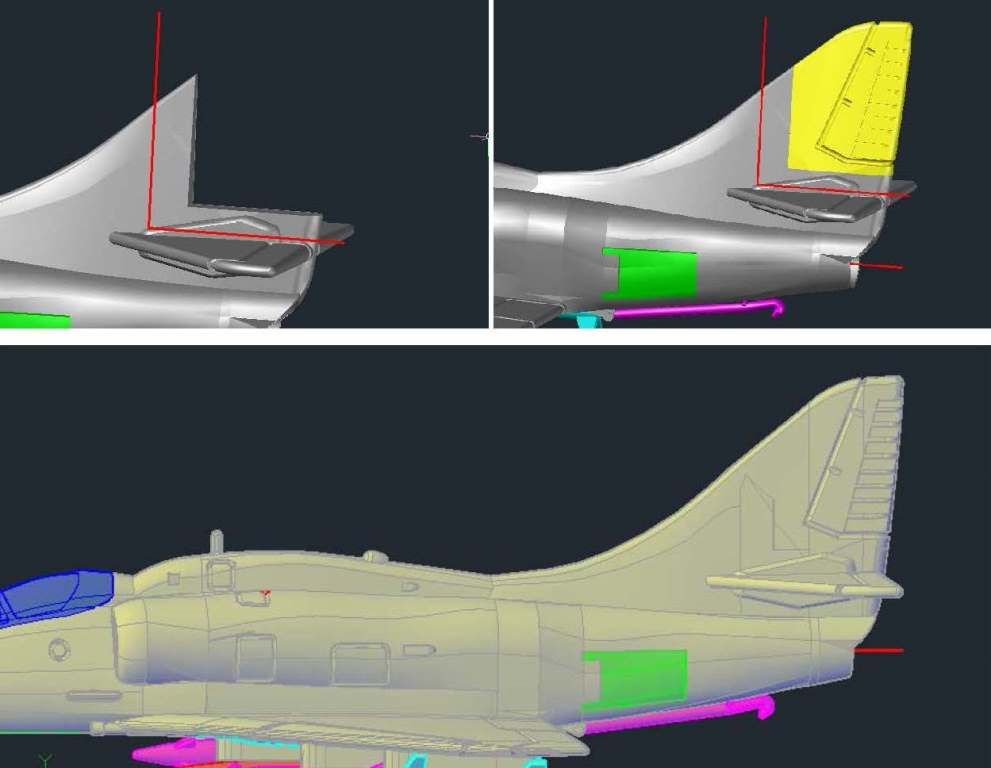
With the A-4E fixed, I next did the A-4F.  To do this I simply sliced the tail using the same polyline as before that I had copied from the A-4E drawing, as shown in the upper right image below.  I then simply copied the repaired section to it as shown in the upper right image below, and joined it to the airframe (lower image).

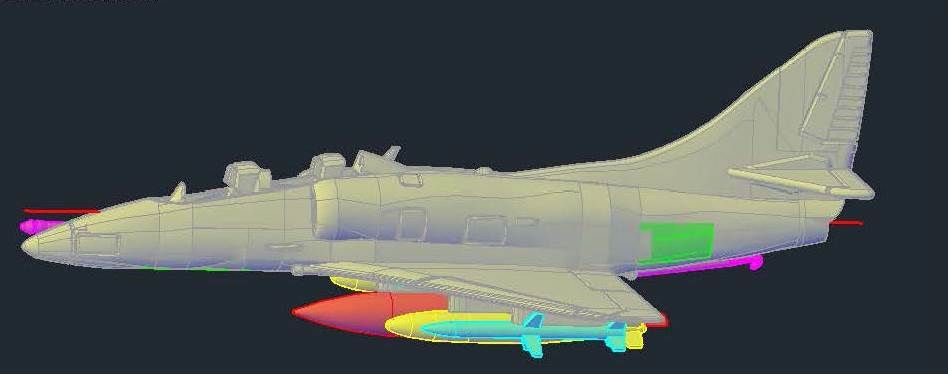
I did the same thing for the A-4F Blue Angel…

…Followed by the TA-4F.

I didn’t have to modify the O-4M or OA-4M because the rudders do not go to the top on them.

I have uploaded the revised files to C2D and notified them of the change.

Thanks again for pointing out my error Rex!

  • Member since
    March 2005
  • From: near Nashville, TN
Posted by TarnShip on Saturday, January 17, 2015 4:04 PM

I wish I had looked in this thread earlier. I didn't, because there are already Resin Skyhawks available from a ship model store in 1/350.

The rudder on a Skyhawk goes all the way to the top, that is NOT a part of the vertical fin up there.

I know this is late.

Rex

almost gone

  • Member since
    June 2013
Posted by RobGroot4 on Saturday, January 17, 2015 3:37 PM

The ship forum here on Finescale.  There are some others out there like The Ship Model Forum and Model Warships as well.  Naturally I only mention the helo stuff as I'm a rotorhead, hence my bias!


By the way, those look awesome!  I have no clue where to figure out what aircraft carried what drop tanks though (sorry).

Groot

"Firing flares while dumping fuel may ruin your day" SH-60B NATOPS

  • Member since
    March 2012
Posted by Rdutnell on Saturday, January 17, 2015 1:30 PM

Hi Again Guys!

I had a good morning making some of the ordnance suggested by Groot.  It was fun, but man, these guys are tiny and will be pushing the limits of what can print, and I’m not so sure the smaller tips will survive handling.  I guess we’ll find out.

Now for a question…  How do you tell the difference between the modern drop tanks and the older ones?

  • Member since
    March 2012
Posted by Rdutnell on Saturday, January 17, 2015 7:22 AM

Thanks for the 2 cents Groot.  I like the idea of multiple kits, although it might be a while before I get to the helo package.  Which ship forum would you suggest?

  • Member since
    June 2013
Posted by RobGroot4 on Friday, January 16, 2015 4:35 PM

I would suggest maybe a cold war (like above with the older drop tanks) and a modern with GBUs of various sizes, JDAMs, AMRAAM (AIM-120), sidewinder and modern drop tanks, heck you could even do a helo package with hellfire racks, helo fuel tanks, and torpedoes.  I would go without the pylon as anyone going to this level of detail will likely have photo etch sets that generally include pylons.  That is just my 2 cents, I would poll the masses in the ship forum.

Groot

"Firing flares while dumping fuel may ruin your day" SH-60B NATOPS

  • Member since
    March 2012
Posted by Rdutnell on Friday, January 16, 2015 9:23 AM

Hi Guys,

I spoke too soon about the WWII deck vehicles.  I got on-line yesterday and discovered that Admiralty Modelworks is selling them.  The bomb carts, bombs and torpedoes aren’t included but all of the vehicles are. 

http://www.admiraltymodelworks.com/admiral/component/virtuemart/1-350th-accessories/usn-wwii-deck-vehicles-detail.html?Itemid=0

 On another note, I copied the various bombs, missiles, pods and tanks from the various models I have made into a single file.  Some had to be scaled down from 1/144 scale.  The image below shows what I have so far.  Some have tabs and or pylons attached.  If I was to make a 1/350 payload package, like Groot  suggested, is there anything else I should add to it?

  • Member since
    March 2012
Posted by Rdutnell on Tuesday, January 13, 2015 8:35 AM

As a matter of fact Groot, I have thought about an ordnance package.  I’m starting to get quite a collection of tanks, bombs and missiles, and will be putting one, or more, of them together at some point in the not too distant future.  In fact, although it won’t help you with your Truman, I have already made a 1/350 scale WWII Carrier Deck Vehicle package that includes bombs and missiles, as well as two versions of Tilly Cranes (boom up and down), two styles of moto-tugs, a jeep and a fork lift, as seen in the image below.  I initially made the models for Pavel Vacata of Admiralty Model Works who, I think, was going to cast them and sell the parts either individually, or as a kit.  Unfortunately, due to unexpected events in his life, many of his plans seem to be put on hold.  I told him I was going to put them on C2D until he got around to making them, unless he objected, and I haven’t heard from him, so I will probably upload it soon. 

But I digress… As for an ordnance package that would work for you, what would you like to see it include?

Another thing is that on my 1/350 scale models, pylons are super tiny, so I make the bomb (or tank) and it’s pylon as one unit, if I don’t attach the pylon to the wing, which for some models I don’t want to do.  For an armament kit, which would you suggest?  Bombs only, bombs with pylons attached, or a combination of both?

  • Member since
    June 2013
Posted by RobGroot4 on Monday, January 12, 2015 4:15 PM

Just a random thought since you've already designed them, have you thought about marketing just the 1/350 ordnance (so that I could throw bombs or missiles on say a 1/350 F-14)?  I'd snatch up a ton for when I finally get around to my 1/350 Truman.  I'd also toss a thread into the model ships section!

Groot

"Firing flares while dumping fuel may ruin your day" SH-60B NATOPS

  • Member since
    March 2012
Posted by Rdutnell on Sunday, December 21, 2014 11:30 AM

Thanks Scott!

Clearly you know much more about it than I do.  I didn’t even know there were other styles.  I got into 3D modeling quite by chance, starting a little over a year ago when I decided to make a model of USS Greenling (SSN-614) for a friend.  My initial intent was to do it in 2-D making a skeleton out of balsa or styrene, but when I saw the plans with the sections and stations, I decided to see if I could make a 3D model of it in AutoCad.  It was a lot of fun and I was pretty proud of it, and when I was showing it off to another friend, he said that he had a 3-D printer and could print it for me.  He did, and my obsession with making models for printing began.

My friend who uses Pro/E for his work tells me that I am doing it the hard way, but it’s the only way I know how to do it.  If I knew an easier way, I would certainly give it a try.

I’m not sure what you mean by “tree layout”.  Are you referring to the part frets?

  • Member since
    December 2003
  • From: 37deg 40.13' N 95deg 29.10'W
Posted by scottrc on Sunday, December 21, 2014 8:28 AM

Hi Russ,

Great tutorial you have done on lofting and vector build modeling with ACAD.  This style is more time consuming but far more accurate.  Looking at your tree layout, I see no issues.  3D printing with styrene is not much different then injection molding with styrene.  You need lots of support.  Again, great job.  Kinda wish I had time to do a plane as well, but since I do this for a living, never seem to have time to fit in a personal project.  

  • Member since
    March 2012
Posted by Rdutnell on Friday, December 19, 2014 4:06 PM

Update 23

Hi guys!

The A-4F Blue Angels has been activated by C2D and is available at:

https://www.click2detail.com/store/p331/Douglas_A-4F_Skyhawk_Blue_Angel_1%2F350_scale.html

The remaining versions should be activated soon.

In the meantime, I made decals for the A-4E, choosing to do VC-1 decals to complete the set.


I also made decals for the OA-4M, based solely on one picture for BuNo 154306.

I have also been provided numerous TA-4F decals that I may redo and make available as well.

CHEERS!!!

  • Member since
    March 2012
Posted by Rdutnell on Sunday, November 30, 2014 9:45 AM

Update 22

Good Morning All! 

You are right Groot.  I might have to consider the ordnance.

I hope everybody had a good Thanksgiving. 

I spent some of it making decals.  I started by adding a decal for the stripes on the tailhook to the decals I had already done, including the A-4E Blue Angel…

…And the last A-4M.

After that I made decals for the TA-4F model.  Well, I actually made them for the TA-4J Skyhawk BuNo 153685 from Fleet Composite Squadron 1 (VC-1) piloted by the squadron`s executive officer.

Then, I made decals for the A-4F.  The decals are actually for A-4E BuNo 150056 from Fleet Composite Squadron 1 (VC-1), but it works, because my A-4F is the same as the A-4E with a hump.

CHEERS!!!

  • Member since
    June 2013
Posted by RobGroot4 on Wednesday, November 26, 2014 5:05 PM

You could make a whole line of 1/350 ordnance alone!  I can't wait to see how these come out!

Groot

"Firing flares while dumping fuel may ruin your day" SH-60B NATOPS

  • Member since
    March 2012
Posted by Rdutnell on Wednesday, November 26, 2014 12:22 PM

Update 21

Good Afternoon Everybody, and thanks again Ron for being the guinea pig on my models.  Smile

Following a suggestion from Ron, I decided to add some Mk 82 500 lb bombs.  I included single bombs, 3-packs and a 6-pack, as seen in the images below.

The image below shows the A-4E with a 6-pack of Mk82’s on the centerline pylon, 300 gallon tanks on the inner wing pylons and single Mk82’s on the outer wing pylons.

I also decided to make a couple of a couple of AGM-65 Maverick missiles because they are seen on the last A-4M, I want to model.

The image below shows the new parts diagram for the A-4E.  The others have been similarly changed.

I also had to change all of the exploded diagrams, as seen below for the TA-4F.

While looking for pix of the last A-4M, I found a drawing that shows the top of the aircraft, revealing some additional features I wanted to include on the decals.  The newly modified sheet is shown below.

Now, to change the text, and upload the modified files to C2D.

CHEERS!!!

  • Member since
    December 2013
Posted by Pelican on Monday, November 24, 2014 6:07 AM

I've built a number of Russell's 3D printed models and find the printed plastic easy to work with, however, it can be brittle so you'll have to be careful when removing items from the frets or trying to reshape pieces.  Some of the antennas will inevitably be removed by mistake... victim of big fingers but don't let that sort of thing deter you.  The biggest frustration I've found with 3D printing is removing the wax residue.  I've used fiberglass brushes from Micro-Mark which seems to work well.

Ron

  • Member since
    March 2012
Posted by Rdutnell on Sunday, November 23, 2014 9:29 PM

Update 20 – 11/23/2014

Hi Everybody!

I had no sooner completed uploading the files to C2D, when I decided to modify the decals to add, what I first thought were white bits, and later learned were actually polished metal (silver), to the leading edges of the wings, fin and stabilizers, as shown in the images below. 

Note that I also redid the airframe, deciding to make the pylon part of the fuel tank since the tanks are seldom seen in pix of the Blue Angels, and I figure most people (like me), won’t include the tank.  In the image below, you can see the attachment points for the tank, as well as a 0.02” diameter hole I drilled in the underside to accommodate a rod for displaying the aircraft in flight.

The final(?) decal sheet for the A-4F Blue Angels are shown below.  In order to print the silver bits correctly, the decals must be printed on an Alps printer.  The color settings for the silver, as found on line, are 159,193,197.

With the decals and modifications to the A-4F Blue Angels completed, I made the decals for the final A-4H.  The image below shows the left side.  Although not shown, the top part of the airframe will be painted blue.

The decal sheet for the A-4H is shown below.

CHEERS!!!

  • Member since
    March 2012
Posted by Rdutnell on Friday, November 21, 2014 7:12 PM

Update 19 – 11/21/2014

Happy Friday Everybody!

Well, I made the decals for the A-4F Blue Angels, using pictures and poor images of other decal sets as a guide.  The images below show the decals I made, starting with top, left side and bottom views…

…Followed by close ups of the side decals.

The image below shows the decal sheet.

While looking at various pix of the Blue Angels, I noticed some differences between them and my models, so after much thought, I decided to make yet another version, the A-4F “Blue Angel”.   I did some dicing and slicing of the airframe, removing some items, including the wing pylons and whatever the protrusion on the nose is, and added the feature on the aft end of the A-4M.  The images below show the completed A-4F “Blue Angel”.


The parts diagram is shown below.  Note that I moved things around a bit.

Here’s the “Exploded” parts diagram.

Since I changed the fret, I decided to be consistent, and I changed the part frets for all of the versions.  Below is the new parts diagram for the A-4E, showing the modified frets.  Everything has been uploaded to C2D, including the decals for the F-4F “Blue Angels”.


CHEERS!!!

  • Member since
    March 2012
Posted by Rdutnell on Thursday, November 20, 2014 7:54 AM

Good Morning All.

I use AutoCad Civil 3D Mikey Gugs95, because that is what I have access to.  My friend says there are better programs to do what I’m doing, but I wouldn’t know.

I have started on the decals and have decided on schemes for 2 of the 5 versions.  The pix below show the schemes I’m going to use for the A-4E, or A4-F (left) and for the A-4M (right).   I haven’t decided on the others.  Anybody have any preferences?

JOIN OUR COMMUNITY!

Our community is FREE to join. To participate you must either login or register for an account.

SEARCH FORUMS
FREE NEWSLETTER
By signing up you may also receive reader surveys and occasional special offers. We do not sell, rent or trade our email lists. View our Privacy Policy.