SEARCH FINESCALE.COM

Enter keywords or a search phrase below:

Ever wonder how much patience you have? (WIP 1:48 Tamiya F4F-4)

4979 views
21 replies
1 rating 2 rating 3 rating 4 rating 5 rating
  • Member since
    June 2013
Posted by RobGroot4 on Saturday, February 21, 2015 2:46 PM

I have to think it's a bad batch, I used some on an F6 that never got finished a while back using just the cheapo hardware store paint thinner and it went down like a dream.  Would some light sanding and a light overcoat help?

Groot

"Firing flares while dumping fuel may ruin your day" SH-60B NATOPS

  • Member since
    January 2015
Posted by BrandonD on Saturday, February 21, 2015 2:37 AM

This thing is driving me nuts. My Model Master intermediate blue refuses to stay thinned and will NOT give me an even coat. It's like oil and water with both Tamiya lacquer thinner and Testors airbrush thinner.

At this point, I am torn between spraying more paint on it or just weathering the crap out of it and hoping that hides the word parts. I don't know if I got a bad batch of paint or what. I didn't have this problem with the Model Master light gray.

So aggravating.

-BD-

  • Member since
    November 2009
  • From: SW Virginia
Posted by Gamera on Thursday, February 19, 2015 8:52 AM

lawdog114

Gamera....sorry about your decal mishap...I've been there many of times...Perhaps you have a ghost?.

Joe  

Actually Joe I think it's a gremlin... I've tried putting out cookies in hopes he'll take them but he seems to like model parts better... 

"I dream in fire but work in clay." -Arthur Machen


  • Member since
    February 2012
  • From: Olmsted Township, Ohio
Posted by lawdog114 on Wednesday, February 18, 2015 7:28 PM

Looks great Brandon.  Those Tamiya "cats are great kits.....and cheap.  I got mine off Ebay for like 15.00.  I think all I did was add an AM decals and a seat to it.  I've seen that base technique but it just seems waste of paint to me.  I still prefer panel line preshading.  To each their own I suppose.

Tex....yours looks fantastic too.  

Gamera....sorry about your decal mishap...I've been there many of times...Perhaps you have a ghost?.

Joe  

 "Can you fly this plane and land it?...Surely you can't be serious....I am serious, and don't call me Shirley"


  • Member since
    February 2003
  • From: Cameron, Texas
Posted by Texgunner on Wednesday, February 18, 2015 12:45 PM

Thank you Gamera!Beer


"All you mugs need to get busy building, and post pics!"

  • Member since
    November 2009
  • From: SW Virginia
Posted by Gamera on Wednesday, February 18, 2015 11:30 AM

Hey looks great Gary, again I love your airport photos, I'd almost swear it was the real thing.

I'm kinda stalled out right now on the Hobbyboss kit I'm doing- there are two small '2's on each side of the cowling and the decals have vanished. Can't find 'em anywhere and I can't find any spares that look close enough. So I'm boxing the thing for now, they'll show up sooner or later- I hope sooner... 

"I dream in fire but work in clay." -Arthur Machen


  • Member since
    February 2007
  • From: Brunswick, Ohio
Posted by Buckeye on Wednesday, February 18, 2015 11:14 AM

Looking good!  I think this kit may be my next build.

Mike

  • Member since
    July 2014
Posted by modelcrazy on Wednesday, February 18, 2015 10:53 AM

Really looks great Brandon,

I've never had any luck with pre-shading, but I will have to try that method on one of my upcoming builds. Probably the Macchi 202.

Steve

Building a kit from your stash is like cutting a head off a Hydra, two more take it's place.


http://www.spamodeler.com/forum/

  • Member since
    May 2014
Posted by SubarooMike on Wednesday, February 18, 2015 10:35 AM

BrandonD

Mike - I'd also love to see a pic of the PE in the cockpit. I pulled the masking off tonight and realized that, yeah, you can actually see more than I was expecting. Glad I painted everything! I cut out my vacu-form canopy, too, and really like the way it sits in the open position compared to the original in the kit.

-BD-

I'll be finished in a little less then a week and I will be getting pictures up!     I used the kits supplied windscreen, but went squadron vacuum formed for the sliding part. The kit supplied canopy just fits pretty bad.  It can really ruin the look of the finished model with how high it sat. 

  • Member since
    March 2003
  • From: Western North Carolina
Posted by Tojo72 on Wednesday, February 18, 2015 8:39 AM

So far do good looks great

  • Member since
    February 2003
  • From: Cameron, Texas
Posted by Texgunner on Wednesday, February 18, 2015 8:34 AM

Beautiful work so far Brandon!  Bow Down  She's gonna be a looker.

Here's my Tamiya Wildcat:

Gary


"All you mugs need to get busy building, and post pics!"

  • Member since
    January 2015
Posted by BrandonD on Wednesday, February 18, 2015 1:36 AM

Oh, and CN Spots - I had the greatest mental image of running around the yard trying to airbrush, haha :)

-BD-

  • Member since
    January 2015
Posted by BrandonD on Wednesday, February 18, 2015 1:35 AM

Thanks for all the kind words.

I masked the bottom and did the intermediate blue tonight. Photos to come when/if she dries. I am not happy with the job on the port wing and hope it looks better in the morning once the paint is dry, otherwise I'll have to re-shoot part of it.

I would love to see the pics of your Tamiya F4F, Mike, and your Hobby Boss kit, Gamera!

I'm going to go for a weathered look on this one, so I tried to leave the sides a shade darker than the top of the fuselage and the wings. Not sure how it will end up, but it's been fun.

Mike - I'd also love to see a pic of the PE in the cockpit. I pulled the masking off tonight and realized that, yeah, you can actually see more than I was expecting. Glad I painted everything! I cut out my vacu-form canopy, too, and really like the way it sits in the open position compared to the original in the kit.

-BD-

  • Member since
    December 2003
  • From: Charleston, SC
Posted by sanderson_91 on Tuesday, February 17, 2015 8:14 PM

Sweet work on your Wildcat!!  Really dig your paint work so far!

Steve


  • Member since
    May 2014
Posted by SubarooMike on Tuesday, February 17, 2015 7:51 PM

I'm on day number 7 of painting my Tam F4F so she is almost finished!   But I decided to load my cockpit up with Eduards photo etched set, and once I inserted the cockpit, I was surprised at how much I could see. I thought it would be all wasted effort but it wasn't!

  • Member since
    February 2015
Posted by GoatPants on Tuesday, February 17, 2015 4:00 PM

Love that shading - great job so far!

  • Member since
    November 2009
  • From: SW Virginia
Posted by Gamera on Tuesday, February 17, 2015 2:18 PM

She looks great so far! I've done some work on the Hobbyboss kit but didn't have the guts to pick out every area like you did!

"I dream in fire but work in clay." -Arthur Machen


  • Member since
    February 2014
  • From: N. MS
Posted by CN Spots on Tuesday, February 17, 2015 11:00 AM

sorry, double post.  Oops

  • Member since
    February 2014
  • From: N. MS
Posted by CN Spots on Tuesday, February 17, 2015 11:00 AM

My pre-shaded  lines look like I held the plane over my head and ran around the yard whilst airbrushing it.    This technique looks a lot more forgiving!  Thanks!

  • Member since
    August 2013
Posted by Jay Jay on Tuesday, February 17, 2015 9:46 AM

Yea, I like your technique of spraying the last coat of thinned base color to avoid "cubism".  Gonna hafta do that on my F6-F.  Thanks for the tip.


 I'm finally retired. Now time I got, money I don't.

  • Member since
    January 2015
Posted by BrandonD on Tuesday, February 17, 2015 1:55 AM

OK, so I was going to do this tomorrow and just go to bed, but the blend coat is easy and quick, and it's my favorite part, so I went ahead and shot it on.

It's MM light gray again, but thinned really heavily with Tamiya lacquer thinner. For some reason, they don't like to mix all that well for me (or I just lack patience), so at one point near the end of the thing I was basically shooting thinner on it and had to reload.

Anyway, I'm happy with it so far. Can't wait to hit the topside tomorrow evening.

-BD-

  • Member since
    January 2015
Ever wonder how much patience you have? (WIP 1:48 Tamiya F4F-4)
Posted by BrandonD on Tuesday, February 17, 2015 1:19 AM

I picked up the 1:48 Tamiya F4F-4 for a pretty good deal and decided to try some new techniques on it. I have to say, this is one of the best kits I have ever seen. It fits amazingly well, and I didn't use a single bit of putty on it so far (and I'm already painting it). However, the Grumman engineers saw fit to put 9,756,334,224,211 rivets on the Wildcat, and Tamiya apparently felt compelled to include all of them.

What that means for me is that my new favorite painting method, which I found on doogsmodels.com, is incredibly tedious (you'll see what I mean in the last photo of this post).

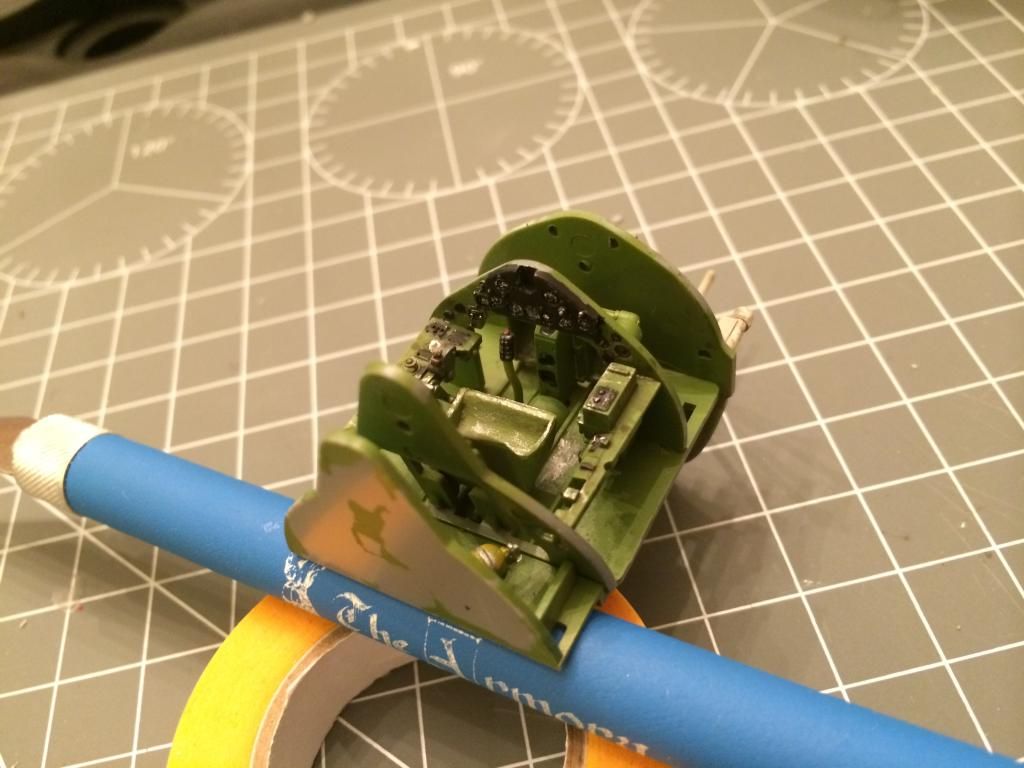
First, the cockpit. Tons of detail here, and it's a shame that the barrel-shaped fuselage allows so little of it to be seen. Oh well, c'est la vie.
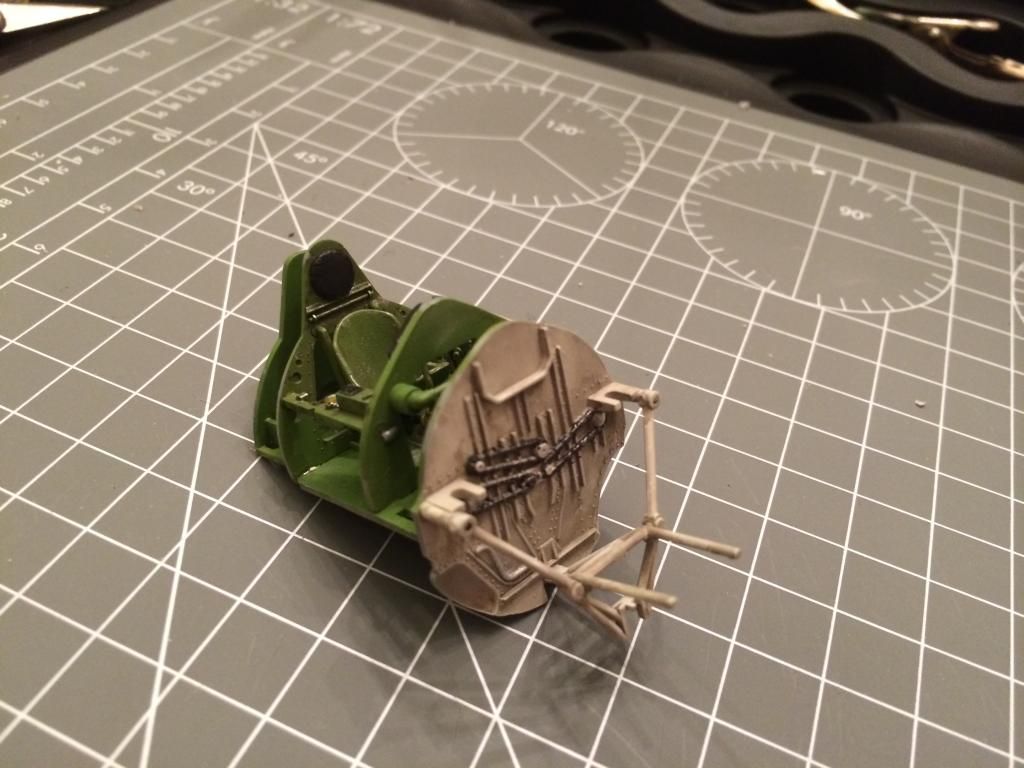
Next up is the wheel well. I haven't stuck my head in a real one, but this seems like a lot of nice detail for something else that's essentially invisible once completed (but GREAT engineering on the landing gear by Tamiya).
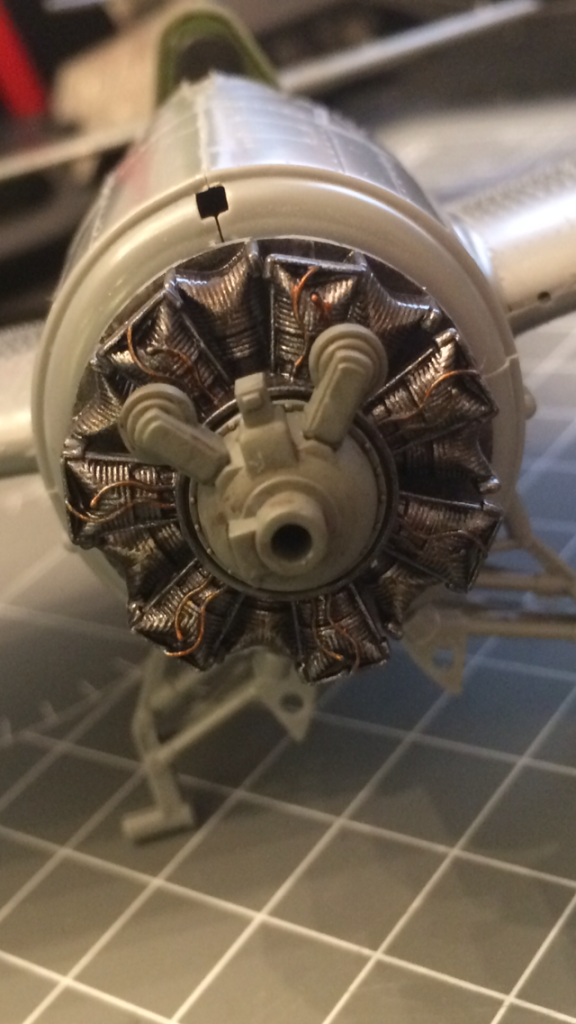
Next up is the engine. Fit was fantastic here as well, and the back of the engine is included, as it sticks into the wheel bay. I didn't stress about detailing the engine, and even though photos I saw showed the wiring to be black, I wanted to pick it out with metallic brown.
Next up came step one of the black basing method - making my Wildcat into a night fighter for a day. It's Tamiya acrylic. Usually I use Tamiya acrylics for everything, but I want to try out salt weathering and have read that this can stain Tamiya paints, so I am using Model Master enamels for the color coats (I figure if my Tamiya acrylics held up under Alclad on another model, MM won't hurt them).
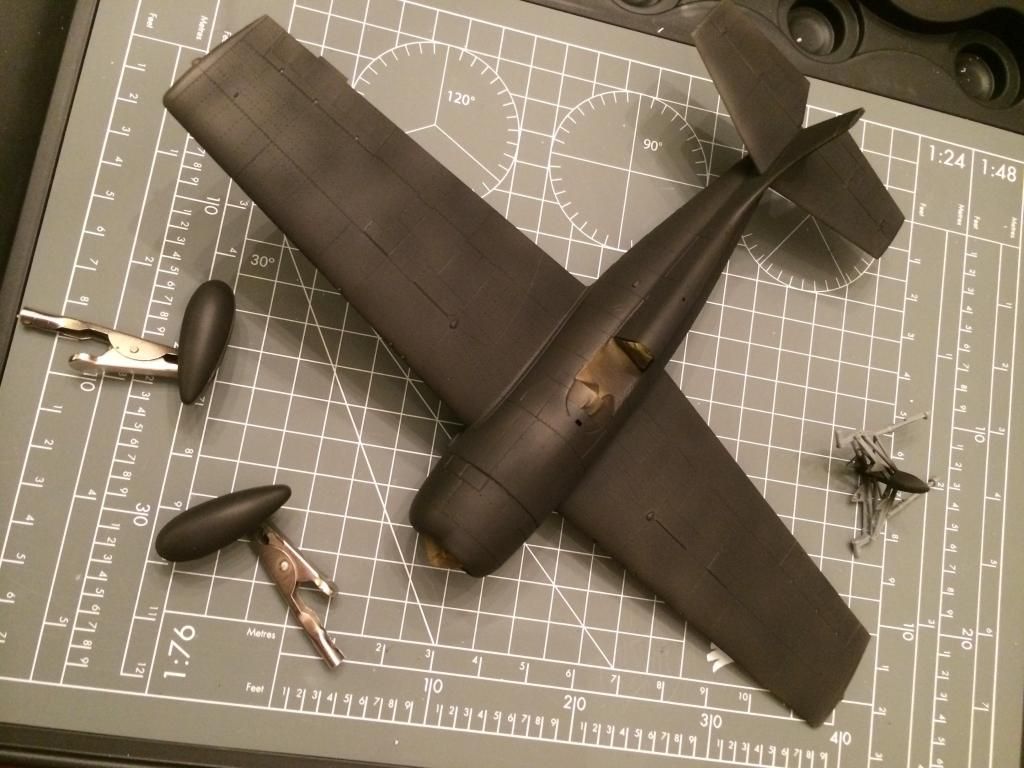
After letting that cure for 36 hours, I went ahead and airbrushed MM light gray on the underside. I let it dry today and just spent the past hour hitting the panel centers with a 50/50 mix of light gray and insignia white.
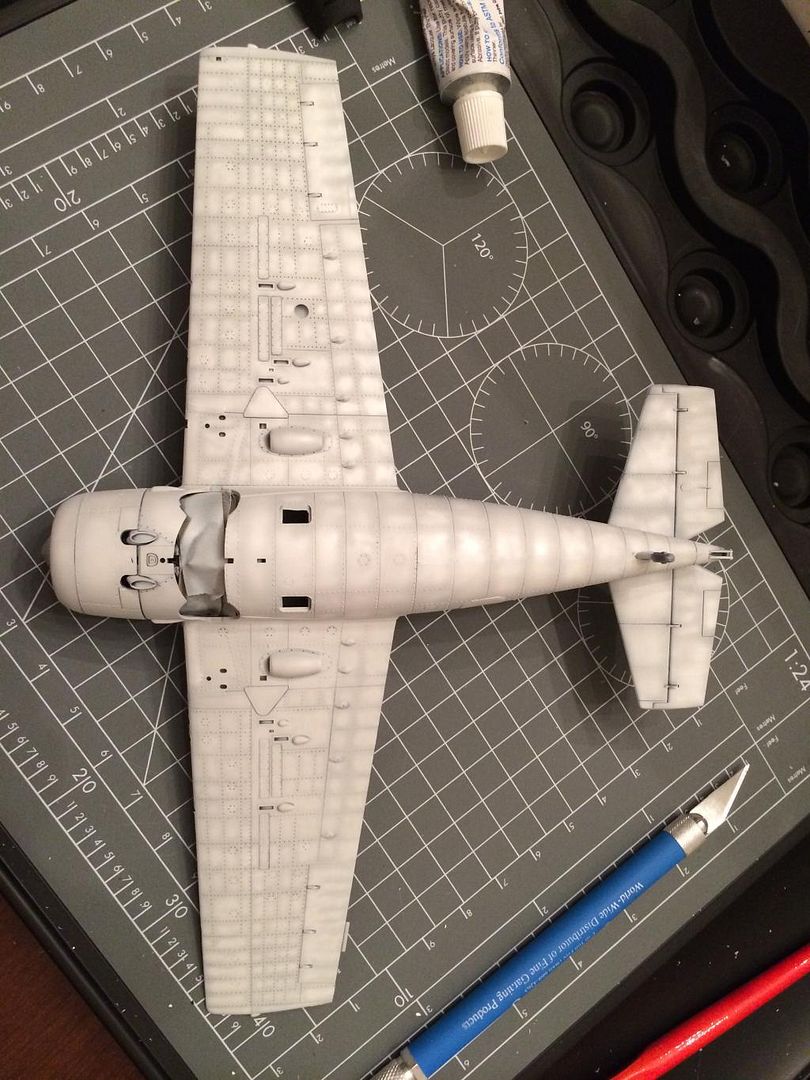
As you can see, there are a lot of little panels on this one (well, not technically panels, but areas bordered by rivets). I set the spraying pressure to about 8 PSI so I could get really close. I have a Badger SOTAR 20/20, and the paint cup is pretty small (I had to refill it a couple of times on the larger spray projects), but the detail ability that allowed me to get in that close on the smaller panels makes it all worth it.

Next step is blending with a highly thinned coat of the original base color so it looks more like an airplane and less like cubism.

-BD-

JOIN OUR COMMUNITY!

Our community is FREE to join. To participate you must either login or register for an account.

SEARCH FORUMS
FREE NEWSLETTER
By signing up you may also receive reader surveys and occasional special offers. We do not sell, rent or trade our email lists. View our Privacy Policy.