SEARCH FINESCALE.COM

Enter keywords or a search phrase below:

1/32 Revell Junkers JU88 A-1 - Work in Progress

10511 views
74 replies
1 rating 2 rating 3 rating 4 rating 5 rating
  • Member since
    June 2003
  • From: Cavite, Philippines
Posted by allan on Thursday, August 18, 2016 12:17 AM

That is one BEAUTIFUL build!  Everything! The plane, the crew. Even the ground work!

No bucks, no Buck Rogers

  • Member since
    January 2015
  • From: Tumwater, WA.
Posted by M. Brindos on Thursday, August 18, 2016 12:09 AM

No joke! This is pure talent. Excellent execution. Your attention to detail is wonderful! You should enter this.

- Mike Brindos "Lost Boy"

  • Member since
    August 2009
  • From: MOAB, UTAH
Posted by JOE RIX on Wednesday, August 17, 2016 9:02 PM

WHOA! Now that is flat impressive. Given the new techniques you tried in addition to trying resin and PE for the first time, I am truly in awe of your skills my friend. I mean, seriously, BRAVO!!! You need to be very proud of the effort you have put forth.

"Not only do I not know what's going on, I wouldn't know what to do about it if I did". George Carlin

  • Member since
    February 2015
  • From: Charlotte, NC
Posted by panzer948 on Wednesday, August 17, 2016 4:15 PM

the doog

It's a real shame and an indictment of the crappy nature of IPMS judging that you didn't at least place in the National with this outstanding dio, Bryan. It's really top-notch.

It was great to meet up there with you too, and see all the talent. :)


Thanks Karl! Let's hit up an AMPS convention next.  I understand there is one coming up in February in ATL!

On the bench: Revell 1/32nd Junkers JU-88 A1

  • Member since
    January 2007
Posted by the doog on Wednesday, August 17, 2016 9:36 AM

It's a real shame and an indictment of the crappy nature of IPMS judging that you didn't at least place in the National with this outstanding dio, Bryan. It's really top-notch.

It was great to meet up there with you too, and see all the talent. :)

  • Member since
    July 2010
Posted by roony on Tuesday, August 16, 2016 10:32 PM

Wow! Love it.


  • Member since
    October 2009
Posted by Ultra on Tuesday, August 16, 2016 10:27 PM

Did you really add grass growing between the cracks on the concrete?!  Just a flipping insanely awesome end result. Really an inspiration to this newbie.  Can't wait to see the next project. 

  • Member since
    January 2015
  • From: Katy, TX
Posted by Aggieman on Tuesday, August 16, 2016 5:52 PM

If you even think you might have been on a wrong track, then I think many of us here, myself included, would get right on that wrong track with you. This is absolutely beautiful work. Your attention to detail is superb - I especially love the drainage ditch dug into the dirt. The figures are top notch and the equipment looks as if it has sat in the elements for too long. And given how much I love Luftwaffe subjects, I am in awe of the work you did just on the 88.

  • Member since
    April 2016
  • From: Parsons Kansas
Posted by Hodakamax on Tuesday, August 16, 2016 4:42 PM

Not only an incredible model build but your presentation and photography are excellent. First class all the way!

Now I'm going to throw rocks at my work or blow them up with fireworks as most early models met their fate in the hands of children. Just kidding, but I see I have a long way to go! LOL!

BTW, first viewing of your thread, read it all in one setting. Keep up the good work!

Max

  • Member since
    February 2015
  • From: Charlotte, NC
Posted by panzer948 on Tuesday, August 16, 2016 4:33 PM

I meant to include a link for all the photos.  The gallery includes all the WIP stuff too.  Probably a lot of similar pics are included which is why I pulled out a few key photos in the above post.

http://mtnislandphotography.zenfolio.com/p919964727


On the bench: Revell 1/32nd Junkers JU-88 A1

  • Member since
    February 2015
  • From: Charlotte, NC
Posted by panzer948 on Tuesday, August 16, 2016 4:22 PM

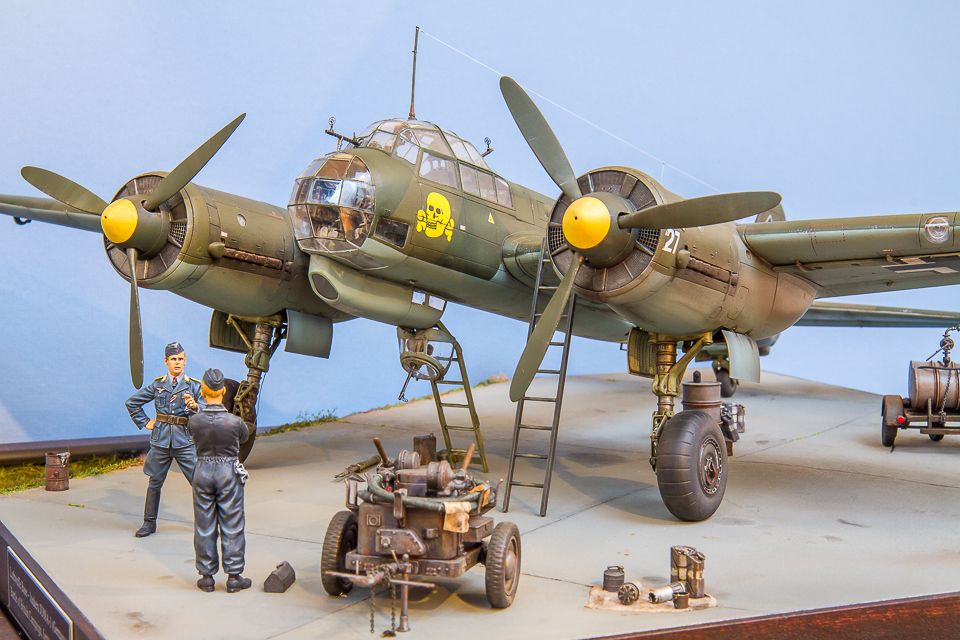
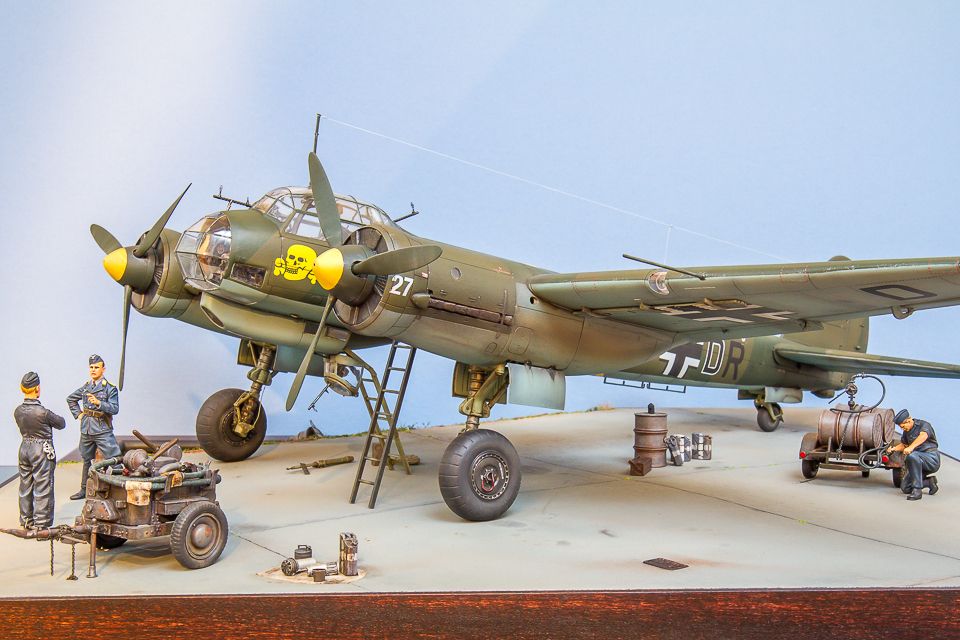
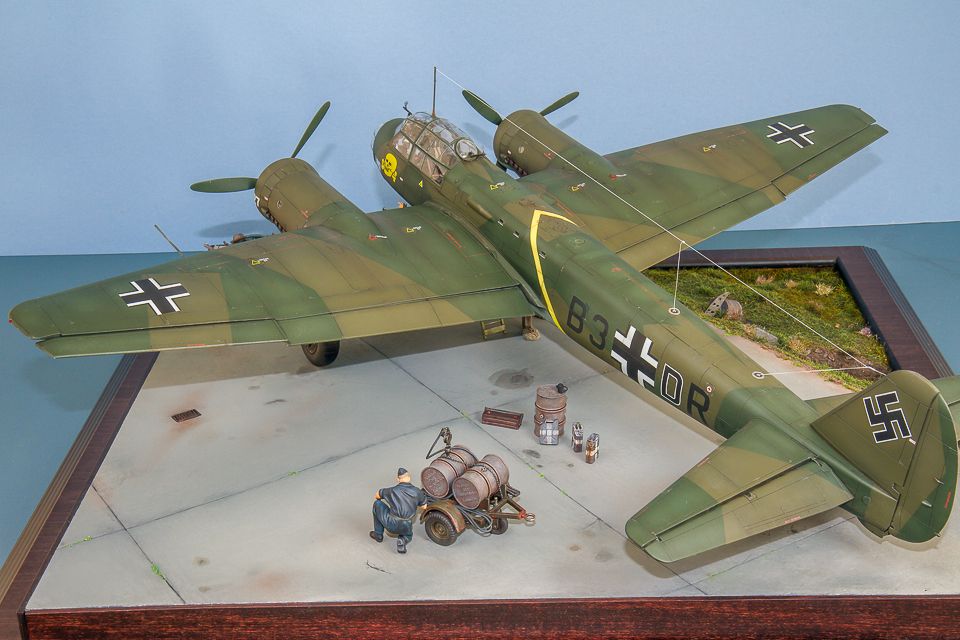
I wanted to give a final update on the WIP and share the completed diorama.  If anyone was at the recent 2016 IPMS National Conference in Columbia, SC you may recognize it. Got to meet the fine folks at FSM along with some model spotting time with "the doog" There were some awesome models and dioramas at the show. I learned a lot just by seeing all the work others had done. Lots of creativity, excellent techniques and original ideas. I am looking forward to the next one.
Have to say I really enjoyed this build. The excellent and detailed Revell kit and the additional supporting diorama elements completed my goal of relearning some of my former techniques... while picking up a few new ones. Choosing these various elements allowed me to try PE and resin kits for the first time, new weathering techniques like the hair spray method, and some new methods to simulate tarmac. 
The following is just a brief summary of the build. More details are included in the prior posts in this thread.
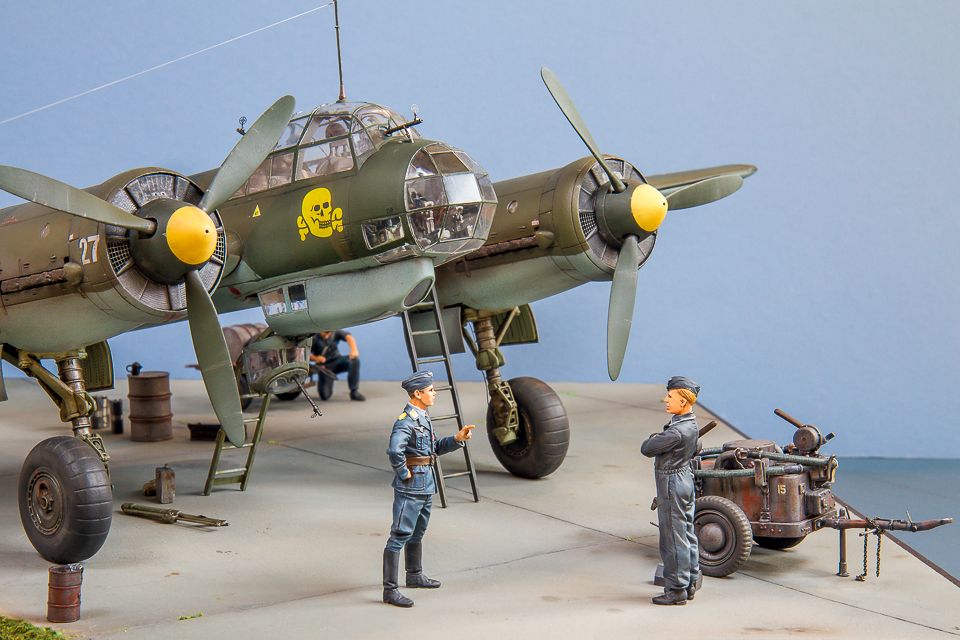
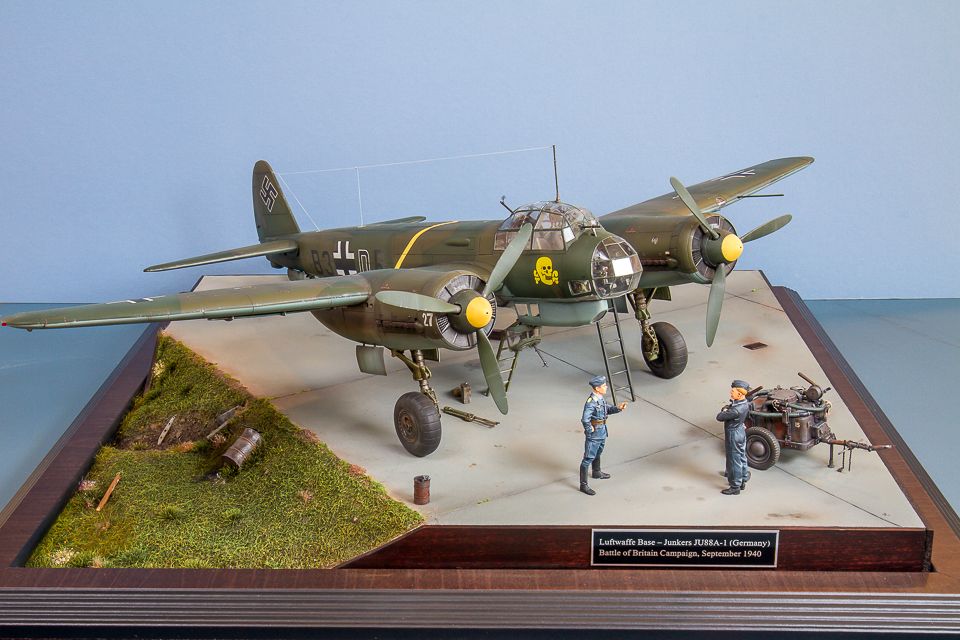
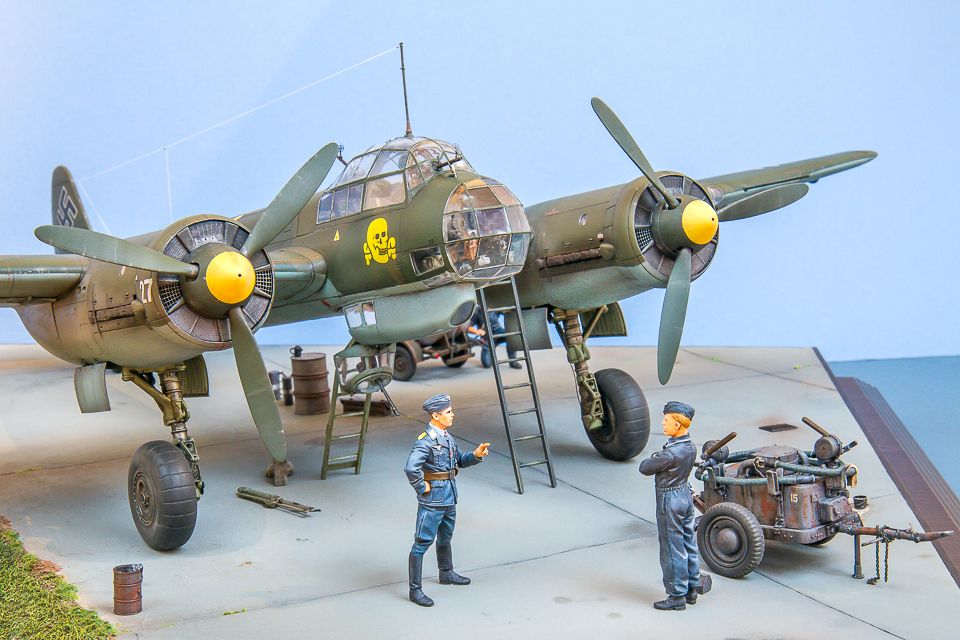
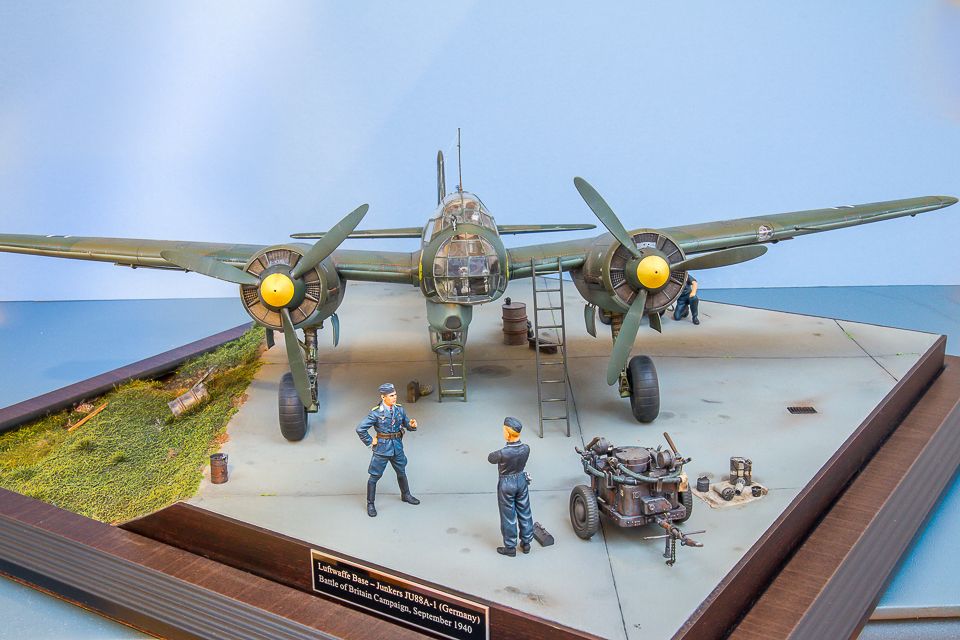
Aircraft:

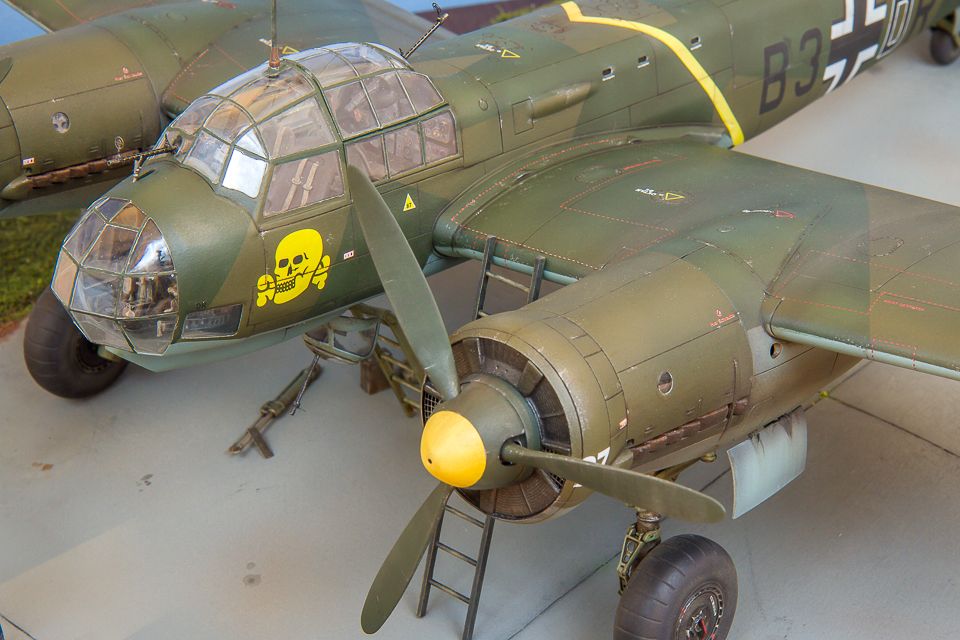
1/32nd Scale Revell Junkers JU88 A-1.

  • CMK Resin Cockpit Seats (Part No. CMQ32105).
  • Eduard PE interior and exterior parts set for 1/32 Revell JU88A-1.
  • Master Models machine brass turned MG barrels and etched sights (top guns only) (Part No. MASAM32013).
  • Camo painted with Tamiya Acrylics & weathered with Mig Ammo Enamels, W&N Oils, Pastels, & Silver Pensicolor Pencil. Testors Dullcoat for final seal.
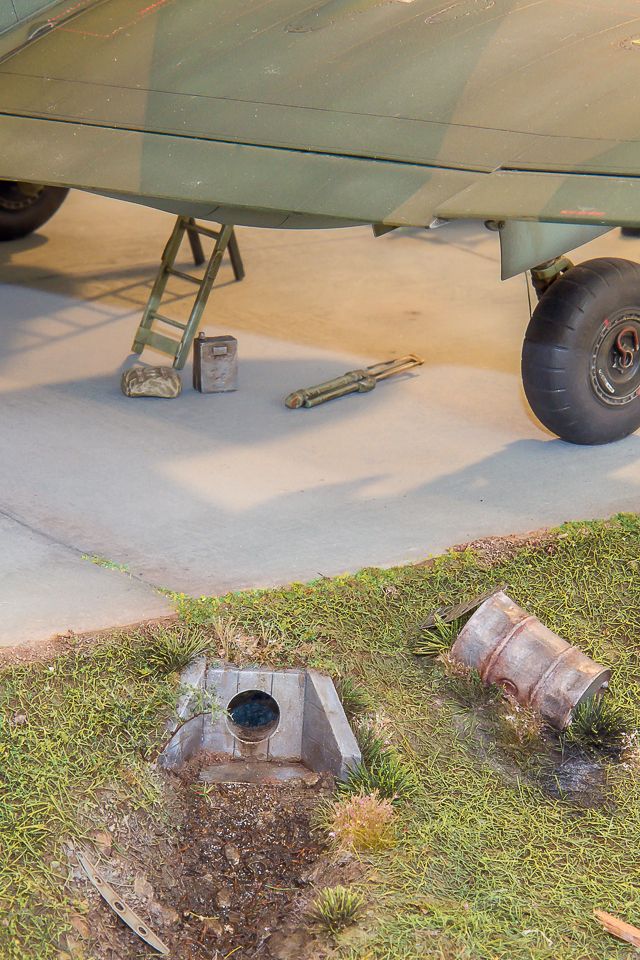
  • Ladder Entering Plane: Scratch Built using Plastruct and Spare PE Parts (based on photos).
  • Antenna: EZ Line with Model Master Clear Parts Cement for Capacitors (painted white).

Support Vehicles:

1/32nd Scale Verlinden Resin Drum Cart

1/32nd Scale Signifier Resin Oil Cart

  • Both resin kits painted with Automotive Rust Colored Primer, AK Interactive Chipping Fluid then Tamiya Base Paints (used Hairspray Method).
  • Above was followed by Rust Colored Mig Pigments & W&N Oils.
  • Fresh Oil Stains were created using a mixture of Tamiya Smoke & Clear Blue.
  • Metallic surfaces is AK Interactive True Metal-Silver.

Figures and Accessories:

Pilot & Lead Groundcrew Member (with arms crossed): Wings Cockpit Resin Figures (highly recommended with excellent detail).

Kneeling Groundcrew Member: Verlinden Luftwaffe Repair Station (Part No. 2774).  This kit also supplied

Accessories: The above kit contained many of the used accessories, along with spare PE Parts, Plastruct Ladder, & Parts Bin

  • Figures were painted using Vallejo Acrylics for Base Coat & Blended with W&N Oils.
  • Accessories were painted using a mixture of MM Enamels and Tamiya Airbrushing. 
  • 5 Gallon Cans were painted similar to the drum and oil carts using the hairspray method. 
  • 55-Gallon Drums used a mixture of Tamiya paints with sponges to dab on random patterns.


Base:

  • Plywood and Picture Frame Built up with Styrofoam followed by Foam Board for Taxiway Area. Elevated areas were boxed in with thin basswood. 
  • Taxiway Area created by spreading out Woodland Scenic Smooth It and painting it with Tamiya Diorama Texture Paint and Airbrushing various shades of Tamiya grays to browns to simulate weathered concrete.
  • Concrete stains created using combination of acrylic, enamel and oil washes.
  • Ground covered areas are celluclay mixed with various grades of sand and static grass. Area was then painted using both Tamiya Acrylics and MM Enamel Paints. 
  • Static Grass dry-brushed with various shades of MM Enamel Green to yellow. Additional vegetation added from Scenic Factory.

Feel free to leave feedback, etc.  This was a catalyst to get me back in so it would be great to know if I am on the right track.  Of course there is always room for improvement and learning other ways to create similar effects.


On the bench: Revell 1/32nd Junkers JU-88 A1

  • Member since
    February 2015
  • From: Charlotte, NC
Posted by panzer948 on Tuesday, June 28, 2016 3:53 PM

rooster513

This is just SO COOL! I can't wait to see it all come together. You should be very proud of the work you're doing!!


Thanks so the positive input/encouragement.  I am slowly but surely trying to wrap her up. I am thinking about taking this to the IPMS National Convention in Columbia this August. This will be my first time. 
Below are a couple of more pics of the dio base basically complete.  I added various bits of new vegetation and dressed up the ditch a bit along with some major cleaning up on the wood frame.  I may do some pastel weathering to the concrete and add some clear acrylic to show some standing water in the ditch… but all in all this is about ready to receive the models.

This week I finally started the figures. Probably have two or three in poses that appear to be discussing some badly needed maintenance.  The JU88 is also nearly done with the addition of the antenna, paint scratches and some pastel weathering remaining.  I am afraid to handle it to much as everytime I do i end up breaking something off. So most of that will be done after I attach it to the base. 


On the bench: Revell 1/32nd Junkers JU-88 A1

  • Member since
    September 2014
Posted by rooster513 on Thursday, June 9, 2016 8:28 AM

This is just SO COOL! I can't wait to see it all come together. You should be very proud of the work you're doing!!

-Andy

  • Member since
    August 2013
Posted by Jay Jay on Thursday, June 9, 2016 8:17 AM

Wow talk about realistic. You certainly have the eye of an artist.Yes


 I'm finally retired. Now time I got, money I don't.

  • Member since
    February 2012
  • From: Olmsted Township, Ohio
Posted by lawdog114 on Wednesday, June 8, 2016 11:36 PM
i find your grass very realistic.....nice job.

 "Can you fly this plane and land it?...Surely you can't be serious....I am serious, and don't call me Shirley"


  • Member since
    February 2015
  • From: Charlotte, NC
Posted by panzer948 on Wednesday, June 8, 2016 1:14 PM

BrandonK

Spectacular work. Very very nice. 


BK


Thanks!  Finally got around to painting some of the groundwork yesterday.  I still need to do a little more blending between the tamarc and ground as well as finish the culvert.  Thinking of adding a little clear acrlic in the ditch area to show some standing water.


On the bench: Revell 1/32nd Junkers JU-88 A1

  • Member since
    June 2014
Posted by BrandonK on Tuesday, June 7, 2016 9:03 AM

Spectacular work. Very very nice. 


BK

On the bench:

A lot !! And I mean A LOT!!

2024 Kits on deck / in process / completed   

                         14 / 5 / 2  

                              Tongue Tied

  • Member since
    February 2015
  • From: Charlotte, NC
Posted by panzer948 on Sunday, June 5, 2016 5:50 PM

lawdog114
Cool! diggin' the sewer. Perhaps I could hire you to fix a retaining wall at my house??


lol, I wish I was good at doing some of those 1:1 scale projects for myslelf!  Wife probably thinks the same...

On the bench: Revell 1/32nd Junkers JU-88 A1

  • Member since
    February 2012
  • From: Olmsted Township, Ohio
Posted by lawdog114 on Saturday, June 4, 2016 1:58 AM
Cool! diggin' the sewer. Perhaps I could hire you to fix a retaining wall at my house??

 "Can you fly this plane and land it?...Surely you can't be serious....I am serious, and don't call me Shirley"


  • Member since
    February 2015
  • From: Charlotte, NC
Posted by panzer948 on Friday, June 3, 2016 10:20 PM
 
Pic of the Smooth It after sanding and of the groundwork after adding the celluclay, static grass and The Scenic's Factory - Spring Tufts grass.  The celluclay was mixed with white glue to better fix the various sand size particles and grass.  But in some cases I brushed on diluted white glue to help hold down everything. I did go back later and reduce the steep drop off from tarmac to ground by adding a bit more celluclay. Next step is to paint
the tarmac and then the groundwork.
 
The above shot is after I cut the lines for the expansion joints and completed most of the painting and weathering to the tarmac (Smooth It).  The expansion joints were cut by lining up a large ruler with a combination of an X-acto knife and scribing tool.  I did a lot of experimenting with painting this surface.  First I used almost an entire bottle of the Tamiya Dio Texture Paint for concrete.  Actually, this is a great product but was really overkill since I was already painting basically a concrete like texture.  I think it would have shined more if you were using just a plain old smooth surface (i.e., like wood, cardboard, plastic, etc.) for concrete.  The other problem is that it is rather thick and not recommended for airbrushes.  Brushing it on also left brush marks, even after 3 coats.   A fourth coat would have probably done the trick but by then I didn't have enough product left and I wanted to try my hand at airbrushing the surface to create some post shading effects.  Thus, I sanded the Tamiya texture paint just enough to remove the high brush marks and used a combination of regular Tamiya acrylic paint to simulate post shading along the expansion joints, different shades of concrete, and some darker brown stains. 
 
 
The phone camera pic above shows the tarmac more or less complete with weathering added using washes from oil paints and Tamiya, especially to help darken the expansion joints and add maintenance stains.  I actually used the airbrush again to tone down some of the staining as I found it rather difficult to control the mineral spirit based washes on the smooth it surface.  Pics also shows the groundcover's main base coat of dark brown using Folk Art Acrylic Paint.  I also used an airbrush to paint the Folk Art paint but had lots of trouble with clogging.  I will probably regulate this brand of paint for hand brushing only for now on.
Next up will be to paint different shades of groundcover, grass, the storm grate, and blend the area between the tarmac and ground cover better.  Feel free to leave any comments/tips.


On the bench: Revell 1/32nd Junkers JU-88 A1

  • Member since
    February 2015
  • From: Charlotte, NC
Posted by panzer948 on Friday, June 3, 2016 10:16 PM
Some updated photos of the dio base progress.
 
Before applying the smooth it, I added putty along the edges and weather stripping from the local hardware store to create the edge between the tarmac and ground cover.  I also measured then hand drew where I thought the concrete expansion joints should go. This was really just to visualize how I thought it should look before actually adding the product.
 
Above, you can also see where I cut out a place to mount the storm grate that I got from a MiniArt Street scene kit.  After gluing it on top of the Styrofoam, I cut out a large chunk beneath it to give the illusion of a large drop into the storm drain system.  I would later paint this gray and fading to black near the bottom.
 This is how the smooth-it looked right after drying and before sanding.  I think I could have done a better job smoothing it out if I had used a larger spatula.  This is a large flat area and a spatula or some other flat surface that could have reached all sides would have allowed me to line it up with the tops of the dio base and rubber weather stripping for more even strokes.  Oh well, just more sanding to do.

 Above I am lining up the storm drain/culvert on the Styrofoam. I added some scrap plastic rod to the back to represent the concrete pipe just inside the opening.  Hopefully this will be convincing after painting.

On the bench: Revell 1/32nd Junkers JU-88 A1

  • Member since
    February 2015
  • From: Charlotte, NC
Posted by panzer948 on Tuesday, May 10, 2016 1:25 PM

After that had set, I was ready to add the interior pieces to support the ground cover.  Because Woodland Scenics “Smooth It” says it should be spread out over a porous surface, I figured the corkboard side of this foam board I recently picked up would make for a good bonding surface.  However, the foam board was not thick enough so I used a large piece of Styrofoam for the bottom. To avoid all that mess with cutting Styrofoam, I picked up one of those Styrofoam heat cutters (U shaped tool below).  This little tool is so versatile and fast. It was totally worth the cost to avoid making all that mess with a saw.  For the foam board, I used a simple hack saw to cut to the desired shape with the cork material facing up.  All were glued together and to wood base using Styrofoam Glue.


Finally, I added bits and pieces of Styrofoam, foam board etc. to create the foundation for the upcoming grass/earth covered slope away from the tarmac (Styrofoam cutter really came in handy here).  The below photo also shows the unpainted culvert (also a Woodland Scenics product) being dry fitted to aid in positioning the channel slopes of the ditch.  This culvert I believe is in HO scale but to me it makes a good sized small 1/32nd scale drain pipe. The hand weight was needed to keep the foam board down while the glue set.
 
 
Not shown in any pics but I did go back and remove the blue painters tape and used a can of Matte Clear Finish for wood to blend in and give a little more protection to the vertical wood strips and frame.
I hope today or tomorrow to try out the Woodland Scenics Smooth It. The narrow gap between the foam board and vertical sides will be where I plan to spread it out using a spatula to smooth it flush with the vertical wooden sides.  I may use some of that rubber/foam weather seal strips people use for doors for the section that will lie adjacent to the earth groundcover and then remove it after it dries.  I have never used Smooth It before or even modeled concrete so open for any tips!  I also want to add the expansion joints while it is still wet; although I have seen some guys cutting lines, cracks etc. after the product dries.  I may try to add a storm drain within the tarmac using one I have from a 1/35th scale Mini Art kit.

On the bench: Revell 1/32nd Junkers JU-88 A1

  • Member since
    February 2015
  • From: Charlotte, NC
Posted by panzer948 on Tuesday, May 10, 2016 12:32 PM

Because the tarmac area will be elevated above the drainage ditch, I had to extend the height of the dio base in most areas.  To do this I purchased some thin wood strips (I believe it was basswood) and cut them to shape using my X-acto knife.  As the pic below shows, I did a bit of dry fitting first using various combinations of Styrofoam and Foam Board to determine how high to make the vertical sides.  I used a knife with a straight edge to ensure it would be as straight as possible (I do not have a good cutting saw).  This worked out okay. However, one size thicker would have been too much for the knife to handle.  New tools are needed for the next one!


I used wood glue to add the vertical wood strips along the interior of the frame.  I then stained them using a wood finish stain using a shade similar to the frame’s color.


On the bench: Revell 1/32nd Junkers JU-88 A1

  • Member since
    February 2015
  • From: Charlotte, NC
Posted by panzer948 on Tuesday, May 10, 2016 12:30 PM

Thanks for all the positive comments!  Here is an update on my progress.  For now I have moved on to building the dio base and will likely just finish the JU88A1 after this is complete (pastel weathering, paint chips, etc.). It has been awhile since I have done a base so was a bit torn on how to proceed.  I knew I wanted to show good symmetry and angles.  Therefore, the first thing I did was draw my ideas out to scale on a large sheet of paper so I could design a concrete surface extending off the wooden base at an angle revealing a grassy lower elevation area with a drainage ditch.  I did a bit of research on what to use for the tarmac in 1/32nd scale, including some posts here on FSM.  I considered things such as hydrocal, plaster of paris, painted sandpaper, etc.  I know I also want to add/show the expansion joints between concrete sections.  In the end, I think I will try Woodland Scenics “Smooth It” to simulate concrete. For the grass/earth covered portion I plan on using a product I have used in the past - celluclay. 
 
The pic below shows my initial planning sheet and a fairly cheap wooden frame I bought at a large chain art and crafts store.  Because my dio will be fairly large, I had to have the frame custom made.  Next time I will likely attempt to build my own frame.  Anyway, the frame came with a wimpy cardboard backing that I knew would not support the weight of all that groundwork so I removed that and nailed/glued a piece plywood beneath the frame.  I then added some painters tape to protect the frame portion and sealed the unpainted plywood with an acrylic based clear finish to make it a bit more waterproof.
 

On the bench: Revell 1/32nd Junkers JU-88 A1

  • Member since
    February 2015
  • From: Charlotte, NC
Posted by panzer948 on Tuesday, May 10, 2016 12:25 PM

UKguyInUSA

Stunning work on those two carts, they look awesome! Smile


Thanks Martin!

On the bench: Revell 1/32nd Junkers JU-88 A1

  • Member since
    April 2015
  • From: New Hampshire, USA
Posted by UKguyInUSA on Thursday, May 5, 2016 10:21 AM

Stunning work on those two carts, they look awesome! Smile

  • Member since
    February 2015
  • From: Charlotte, NC
Posted by panzer948 on Sunday, May 1, 2016 8:28 AM

1943Mike

I found myself staring and staring and staring at your oil cart. I just can't believe how realistic you've made it look!!  Your obvious talent for using all the techniques you've admitted to trying has given your work a museum like quality!!

Thanks for the inspirational (and slightly depressing - makes me want to give up this hobby as I'll never be in the same universe modeling wise as you Crying) WIP.

Mike


Hi Mike, I am not sure how to respond.  Although I will take your message as a very huge compliment, which helps me tremendously since I too am trying to get better.  Believe it or not, I sometimes feel I am (now in my 40s) competing with my former 13-14 year old self.  As a kid, this was my biggest passion as I was never that good in sports. I put a lot of energy into this hobby at a young age and learned a ton from reading books by Paine and Verlinden (no internet back then) and going to the Local Hobby Shop to chat with guys there.  Jumping back into the hobby last year I thought the support groups would have disappeared with those small hobby shops.  Instead it is better in so many ways thanks to websites like this and other model forums, while places like YouTube can give you great how tos and new methods. Finally, the # of available books by so many authors is so much greater now too. The hobby seems so much more international than ever before with the sharing of ideas/methods from Europe, etc. But, working in the hobby now somehow brings me flashbacks to my childhood and memories I thought I had lost. It is a nice deterrent from our day to day responsibility and stress. I am so excited to see how the hobby has grown since the mid 1980s. 


 Back to this oil cart, I did have to go back and do some things twice and even 3 times over to get the look I like (as with the JU88), which is the same thing I use to do as a young modeler. I will never forget telling my Dad around 12 years old that when I grow up I wanted to build models for my job.  He simply said I would never make money at it because it takes me too long.  At the time I didn't like his comment but he was right, it is better as a hobby for me.  Keep up the good work, master the basic steps in washes and dry brushing (even though people have gotten away from drybrushing it still teaches great paint consistency/mixture/thinning), and work up some new techniques here and there and you will improve with each build!


On the bench: Revell 1/32nd Junkers JU-88 A1

  • Member since
    December 2010
  • From: Salem, Oregon
Posted by 1943Mike on Saturday, April 30, 2016 11:37 AM

I found myself staring and staring and staring at your oil cart. I just can't believe how realistic you've made it look!!  Your obvious talent for using all the techniques you've admitted to trying has given your work a museum like quality!!

Thanks for the inspirational (and slightly depressing - makes me want to give up this hobby as I'll never be in the same universe modeling wise as you Crying) WIP.

Mike

Mike

"Le temps est un grand maître, mais malheureusement, il tue tous ses élèves."

Hector Berlioz

  • Member since
    February 2015
  • From: Charlotte, NC
Posted by panzer948 on Saturday, April 30, 2016 10:41 AM

the doog

Bryan, that is some PRO weathering! You got a gorgeous finish on that, looking crusty and well-used! The rust placement and detail painting is top-notch. I can't wait to see you tackle an armor project and see what you do with it! YesSmile


Karl, buckey and Joe. Thanks for the comments. Yeah it was fun to sorta let loose on a couple of small vehicles that were meant to get dirty and beat up. Now I need to tackle those galvanized steel drums to add a little cargo to the drum cart. 

On the bench: Revell 1/32nd Junkers JU-88 A1

JOIN OUR COMMUNITY!

Our community is FREE to join. To participate you must either login or register for an account.

SEARCH FORUMS
FREE NEWSLETTER
By signing up you may also receive reader surveys and occasional special offers. We do not sell, rent or trade our email lists. View our Privacy Policy.