SEARCH FINESCALE.COM

Enter keywords or a search phrase below:

1/24 MPC/Airfix JU 87B Finished

6321 views
91 replies
1 rating 2 rating 3 rating 4 rating 5 rating
  • Member since
    January 2009
  • From: hamburg michigan
Posted by fermis on Saturday, November 26, 2016 11:34 PM

Yes MMM'Hmmmm, yes sir!Bow Down

  • Member since
    December 2002
  • From: Bury St Edmunds, Suffolk, England
Posted by Bish on Sunday, November 27, 2016 2:52 AM

I'm liking this, great work. Ws the yellow fuel pipe part of the kit or did you scratch that.

I am a Norfolk man and i glory in being so


On the bench: Airfix 1/72nd Harrier GR.3/Fujimi 1/72nd Ju 87D-3

  • Member since
    September 2011
Posted by fightnjoe on Thursday, December 1, 2016 4:16 PM

Many thanks for looking in.


The yellow line is just styrene rod with electrical tape for the padding.


Joe

Veterans,

Thank You For Your Sacrifices,

Never To Be Forgotten

Where you can find me:

Workbench on FaceBook  Google Plus  YouTube

  • Member since
    November 2003
  • From: Naples, FL
Posted by tempestjohnny on Thursday, December 1, 2016 6:26 PM
Still have my attention.


  • Member since
    November 2016
Posted by Gerhard on Thursday, December 1, 2016 11:58 PM
Oh my, this is going to be good.
  • Member since
    September 2011
Posted by fightnjoe on Sunday, December 4, 2016 10:51 PM

Thank you both for looking in.  Glad you like it.


Joe

Veterans,

Thank You For Your Sacrifices,

Never To Be Forgotten

Where you can find me:

Workbench on FaceBook  Google Plus  YouTube

  • Member since
    September 2011
Posted by fightnjoe on Tuesday, December 6, 2016 11:33 PM

How about a really quick update on the 1/24 JU-87. Still filling out the detail on the interior, this update shows Hanz and Franz are now occupying the positions that they are required to. There were some minor things like the Morse set that is just too small for me to get a good pic of and a couple of cables. I still need to add more cables and a cross brace. However I am getting anxious to get to painting. I know that the easiest way to do these is to paint the areas that have the cutaway prior to completing the closure of the fuselage. But even with the eagerness to paint I do not wish to run before I walk. I want to make sure all is as complete as I can get it. Thus the documentation of the very minor progress.


I must admit I am finding myself siting and staring at this build. I find myself wondering what Dan would do, how he would approach some of these things. Somewhere in the back of my mind I am sure of one thing. He would encourage to just do it.


All comments, critiques, and criticism are encouraged.


Joe

Veterans,

Thank You For Your Sacrifices,

Never To Be Forgotten

Where you can find me:

Workbench on FaceBook  Google Plus  YouTube

  • Member since
    September 2011
Posted by fightnjoe on Saturday, December 10, 2016 11:06 PM

Today was a productive day.


The day began with the skeleton of two pieces of wing and one tail feather.  It ends with ribs and details.  The ribs are a mixture of .010 x .040, .020 x .020, and .010 x .030 strip.  I began to fabricate the two fuel cells and the inner bulkheads and such.  In the outer wing the shinny round pieces are BB's and the larger blue pieces are craft beads.


Let the ribbing commence.


There they are in all their glory.


I do need to finish up a bit of the detail work but then I can go forward with the firewall and the engine compartment.


All comments, critiques, and criticism are encouraged.


Joe

Veterans,

Thank You For Your Sacrifices,

Never To Be Forgotten

Where you can find me:

Workbench on FaceBook  Google Plus  YouTube

  • Member since
    September 2016
  • From: Albany, New York
Posted by ManCityFan on Wednesday, December 14, 2016 2:36 PM

Excellent work!  Hans and Franz look great!  I am following this with great interest, as I have two 1/24 scale MPC kits in my stash.  Gonna wait until I hopefully develop better skills before I tackle them.  Very bold to open up the bird, but it looks like this was something you were itching to try.  So far, so great!

Dwayne or Dman or just D.  All comments are welcome on my builds. 

  • Member since
    December 2002
  • From: Bury St Edmunds, Suffolk, England
Posted by Bish on Wednesday, December 14, 2016 3:05 PM

Looking impressive there Joe, i like what you are doing to the inside of the wing.

I meant to ask earlier, the yellow fuel line in the pit, is that from the kit or scratched.

I am a Norfolk man and i glory in being so


On the bench: Airfix 1/72nd Harrier GR.3/Fujimi 1/72nd Ju 87D-3

  • Member since
    March 2012
  • From: Corpus Christi, Tx
Posted by mustang1989 on Wednesday, December 14, 2016 4:39 PM

I will never in ten lifetimes do to models what you are doing here Joe. I pride myself on detail but this just goes beyond what I'll do. My hat goes off to you for going that far. hat-tip-smiley-emoticon_zpslabb23ag

The way you build is apart from the norm and I mean that in a very good way.


 Forum | Modelers Social Club Forum (proboards.com) 

  • Member since
    September 2011
Posted by fightnjoe on Thursday, December 22, 2016 3:19 PM
Thank you all for such kindness. My apology for such a late reply. The Yellow line is just styrene rod. There is much lacking in the cockpit area for the kit. Joe

Veterans,

Thank You For Your Sacrifices,

Never To Be Forgotten

Where you can find me:

Workbench on FaceBook  Google Plus  YouTube

  • Member since
    November 2008
  • From: Central Florida
Posted by plasticjunkie on Thursday, December 22, 2016 3:46 PM

Impresive is an understatement. How about fantabulous! My hat is off to you sir, that is a lot of cutting and measuring. Beer

 GIFMaker.org_jy_Ayj_O


Too many models to build, not enough time in a lifetime!!

  • Member since
    December 2002
  • From: Bury St Edmunds, Suffolk, England
Posted by Bish on Thursday, December 22, 2016 4:19 PM

fightnjoe
Thank you all for such kindness. My apology for such a late reply. The Yellow line is just styrene rod. There is much lacking in the cockpit area for the kit. Joe
 

Thanks, you have done that really well. I have not check my instructions that closely. Even without doign what you are, that pipe would be quite visible, so looks like i'll have to add that.

I am a Norfolk man and i glory in being so


On the bench: Airfix 1/72nd Harrier GR.3/Fujimi 1/72nd Ju 87D-3

  • Member since
    September 2011
Posted by fightnjoe on Friday, December 23, 2016 7:38 AM
Plastic many many thanks. Bish it really amazes me as to what detail is left off of so many kits. Some smaller scale have much better detail than some of the larger ones. Joe

Veterans,

Thank You For Your Sacrifices,

Never To Be Forgotten

Where you can find me:

Workbench on FaceBook  Google Plus  YouTube

  • Member since
    December 2002
  • From: Bury St Edmunds, Suffolk, England
Posted by Bish on Friday, December 23, 2016 8:25 AM

fightnjoe
Plastic many many thanks. Bish it really amazes me as to what detail is left off of so many kits. Some smaller scale have much better detail than some of the larger ones. Joe
 

I know what you mean,ofcourse, in Airfix defense, this kit is 40 years old. I am surprised there hasn't been a new one.

I am a Norfolk man and i glory in being so


On the bench: Airfix 1/72nd Harrier GR.3/Fujimi 1/72nd Ju 87D-3

  • Member since
    December 2002
Posted by Bossman on Friday, December 23, 2016 8:36 AM

Stunning work Joe !

Very nice

Chris

  • Member since
    July 2016
  • From: NYC
Posted by Johnny1000 on Saturday, December 24, 2016 12:22 AM

Amazing work.

I just coveted that kit when I was a kid. My local hobby store had one hanging from the ceiling and I would go in sometimes just to admire it. When I finally got ahold of it there were parts or a sprue missing. The shop offered to order a new one, which would take weeks, or trade for the Airfix 1:24 ME109. "Weeks" sounded like "eternity" to me, so I opted for the trade. It was cool, but it just wasn't a JU87.

Looking forward to seeing where you take this.

Cheers

-J

  • Member since
    March 2015
  • From: Streetsboro, Ohio
Posted by Toshi on Saturday, December 24, 2016 2:53 AM

Your Stuka build is nothing short of outstanding and beyond impressive.  Thank you sir for sharing the WIP for FSM Forum members!

Toshi

On The Bench: Revell 1/48 B-25 Mitchell


Married to the most caring, loving, understanding, and beautiful wife in the world.  Mrs. Toshi


  • Member since
    September 2011
Posted by fightnjoe on Tuesday, January 3, 2017 10:29 PM

Bish you are spot on.  It is an older rendition.  Honestly it holds up well for its age.


Many thanks to all for the very kind words.


Joe

Veterans,

Thank You For Your Sacrifices,

Never To Be Forgotten

Where you can find me:

Workbench on FaceBook  Google Plus  YouTube

  • Member since
    September 2011
Posted by fightnjoe on Tuesday, January 3, 2017 10:30 PM

After nearly two weeks of being sick I am able to show a bit of progress.


I began the process of preparing to get some color on the build.  I did this just a bit different than previous builds.  I began with a Gloss Black base.  I then shot Alclad Polished Aluminium.  Mind you this was not done to be a high gloss, mirror finish.  Just a base for the color to come.


Once dry the real colors make their appearance.  RLM 70 and 71 for the upper and RLM 65 for the lower.  I began by taping off the shapes and then shot a lightened version of each of the top colors to get a first color.  I then went back through with thinned coats of the colors to darken up the cammo.  For the lower I shot several layers of thinned color.


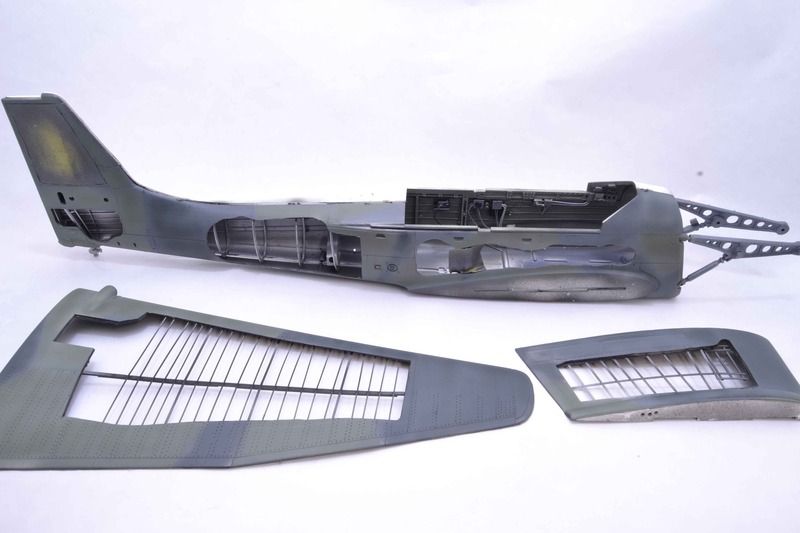
This was done over the cut away sections.  I did this to try to minimize any overspray to the interior.  


I did have a bit of a mishap.  Prior to getting sick I scanned the decal sheet.  My son touched up the image to give the best possible color.  I then printed off the decals on two sheets, my only two sheets, of decal paper.  Once I thought it was dry I sprayed decal bonder.  Once I felt up to doing anything again I checked on the decals and found that they had a reddish tint.  Not sure if the ink had not dried or what happened.  I do need to redo these.


This is good progress and hopefully the momentum can continue for a while.


All comments, critiques, and criticism are encouraged.


Joe

Veterans,

Thank You For Your Sacrifices,

Never To Be Forgotten

Where you can find me:

Workbench on FaceBook  Google Plus  YouTube

  • Member since
    September 2011
Posted by fightnjoe on Sunday, January 8, 2017 6:07 PM

Time for just a very brief update.


Big news as the fuselage is now closed and the inner wing sections are attached.  Not so happy news is the gaps for the fuselage halves and the wing roots were at the very least and eighth of an inch in width.  This thing needed about a third of a container of putty to actually fill them.  That was even after using some styrene to try to fill the gap.  


In the end though the inner wings are on and the fuselage is closed.  I did add the detail to the interior of the cut wing section.  More on that later.


Pictures of the gap and putty show.


I did spend a little time on the engine.  Nothing worthy of pictures yet but soon I hope.


All comments, critiques, and criticism are encouraged.


Joe

Veterans,

Thank You For Your Sacrifices,

Never To Be Forgotten

Where you can find me:

Workbench on FaceBook  Google Plus  YouTube

  • Member since
    September 2011
Posted by fightnjoe on Tuesday, January 17, 2017 7:13 PM

We have progress.


Yes my friends we have progress.  The pictures show the tale.


The fuselage and wings are attached.  The gaps, and there were some interesting gaps, were puttied and then sorted.  The paintwork was then touched up.  While I waited for the putty to dry I spent some time on the landing gear.


And just a bit to prep for the next step.  The engine and the engine compartment.


And that is now ready for my attention.  I have a few things to finish prepping but I am ready to move forward.  


All comments, critiques, and criticism are encouraged.


Joe

Veterans,

Thank You For Your Sacrifices,

Never To Be Forgotten

Where you can find me:

Workbench on FaceBook  Google Plus  YouTube

  • Member since
    August 2013
Posted by Jay Jay on Wednesday, January 18, 2017 8:59 AM

I am so glad that this massive kit has found it's way into your capable hands. It's a real pleasure and a great learning experience to view. TY so much again for posting all this.


 I'm finally retired. Now time I got, money I don't.

  • Member since
    December 2002
  • From: Bury St Edmunds, Suffolk, England
Posted by Bish on Wednesday, January 18, 2017 9:04 AM

Stunning work there, looking forward to seeing more of that engine come together.

I am a Norfolk man and i glory in being so


On the bench: Airfix 1/72nd Harrier GR.3/Fujimi 1/72nd Ju 87D-3

  • Member since
    September 2014
Posted by rooster513 on Wednesday, January 18, 2017 11:32 AM

Really really awesome work Joe! The colors went down really well. Your builds always inspire me to try a little more scratch work on my builds. 

-Andy

  • Member since
    December 2002
  • From: Northern California
Posted by jeaton01 on Wednesday, January 18, 2017 12:49 PM

Great progress, Joe.  Going to be another masterpiece.

John

To see build logs for my models:  http://goldeneramodel.com/mymodels/mymodels.html


  • Member since
    June 2013
Posted by bvallot on Wednesday, January 18, 2017 4:41 PM

Very nice Joe. 2 ft wing span huh!?! Damn. I don't think I'd still be married. =] Looks to be an impressive build. Looking forward.

On the bench:  

Tamiya F4U-1  Kenneth Walsh


  • Member since
    September 2011
Posted by fightnjoe on Thursday, January 19, 2017 1:54 PM
You are all very very kind. I am glad you like her. Joe

Veterans,

Thank You For Your Sacrifices,

Never To Be Forgotten

Where you can find me:

Workbench on FaceBook  Google Plus  YouTube

  • Member since
    September 2011
Posted by fightnjoe on Saturday, January 21, 2017 8:14 PM

Well I have been a bit fortunate in that I have had some quality time at the bench over the last couple of days.  With that how about an update.


The Stuka now has her main legs as well as her engine.  


I did add a few things to the frame and the firewall.  A few things to give the illusion of wires and hoses.  Today was the big day.  It was sink or swim.  Time to see if my homemade decals were up to the game or not.


Honestly they are not very good.  The letters other than the "L" should have been on a clear sheet but I only had the white backing sheet.  Still they should work for my purposes and I should be able to hide the issues caused by my jumping to them too quickly.


Now to let these dry for a day or two.  You see they did not want to lie down without a fight.  One in particular may not even play nice after a generous amount of solvent was applied.  Homemade decals are generally very thin and react well with the surface.  These did not.  


Next up however after they dry is to seal it in with a nice coat of clear and then I can work on weathering the fuselage, engine, and wings. 


All comments, critiques, and criticism are encouraged.


Joe

Veterans,

Thank You For Your Sacrifices,

Never To Be Forgotten

Where you can find me:

Workbench on FaceBook  Google Plus  YouTube

JOIN OUR COMMUNITY!

Our community is FREE to join. To participate you must either login or register for an account.

SEARCH FORUMS
FREE NEWSLETTER
By signing up you may also receive reader surveys and occasional special offers. We do not sell, rent or trade our email lists. View our Privacy Policy.