SEARCH FINESCALE.COM

Enter keywords or a search phrase below:

Accurate Miniatures 1/48 TBM-3 Finished

9561 views
111 replies
1 rating 2 rating 3 rating 4 rating 5 rating
  • Member since
    December 2010
  • From: Salem, Oregon
Accurate Miniatures 1/48 TBM-3 Finished
Posted by 1943Mike on Saturday, April 8, 2017 11:51 AM

OK, here's another attempt at the AM TBM-3. This time I will TAKE MY TIME! Having said that you all should know that my skills will never be very good at this hobby but I sure am grateful for the pleasure it gives me.

Lots of rainy weather up here in the great NW so I've had more time for model building than when the weather turns nice and sunny and I itch for the outdoors. But, like I said, this time I hope to be more patient.

In any case the upcoming spring hiking season is going to draw my attention away from this pastime and my posts may be farther apart than usual for me. That may be a good thing Big Smile. Practice patience, practice patience.

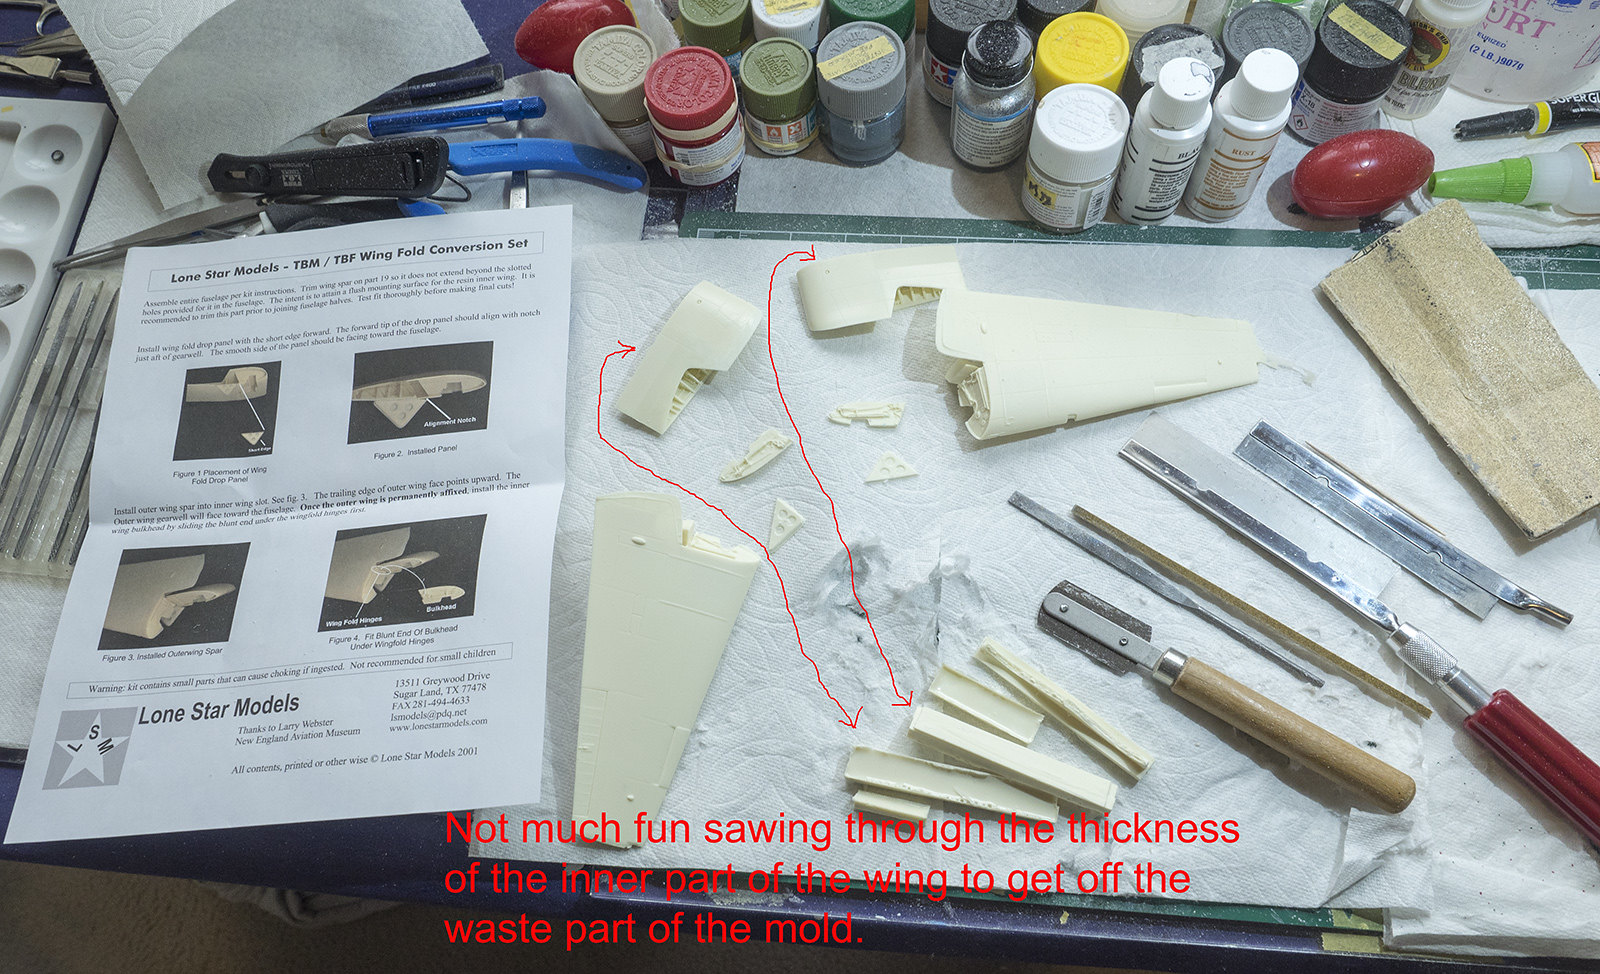
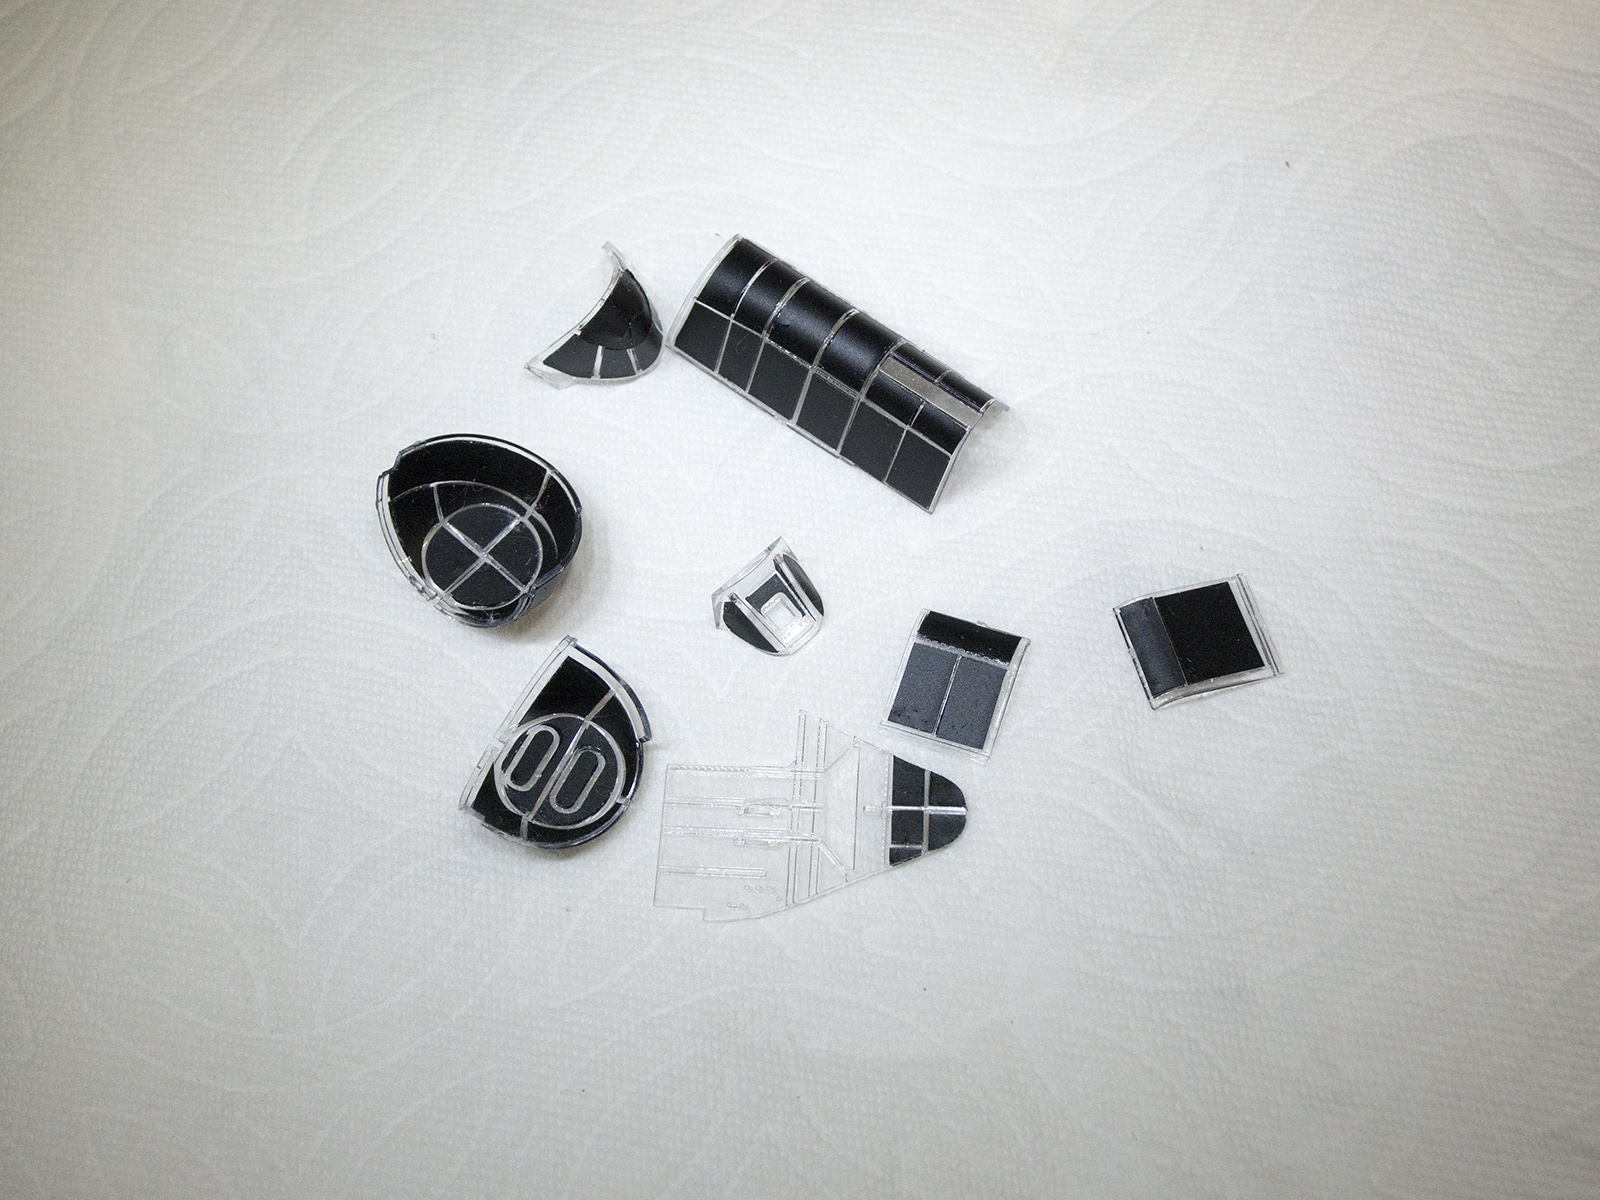
The images I'm posting now show me that I've still got a lot to learn about how A) cutting resin parts from the "block" of resin and, B) taking more time with the masks. However, it is what it is and I'll soldier on. The only problem I had with the wing fold set was that I chipped off a bit on one wing tip that, even after filing and sanding, doesn't look quite right. Live and learn. I did the best I could with the masking (given my patience/skill levels) and am relatively satisfied with the way it turned out - EXCEPT that I should not have masked both inside and outside at the same time! I think I would have been better off doing one or the other first. We'll see.

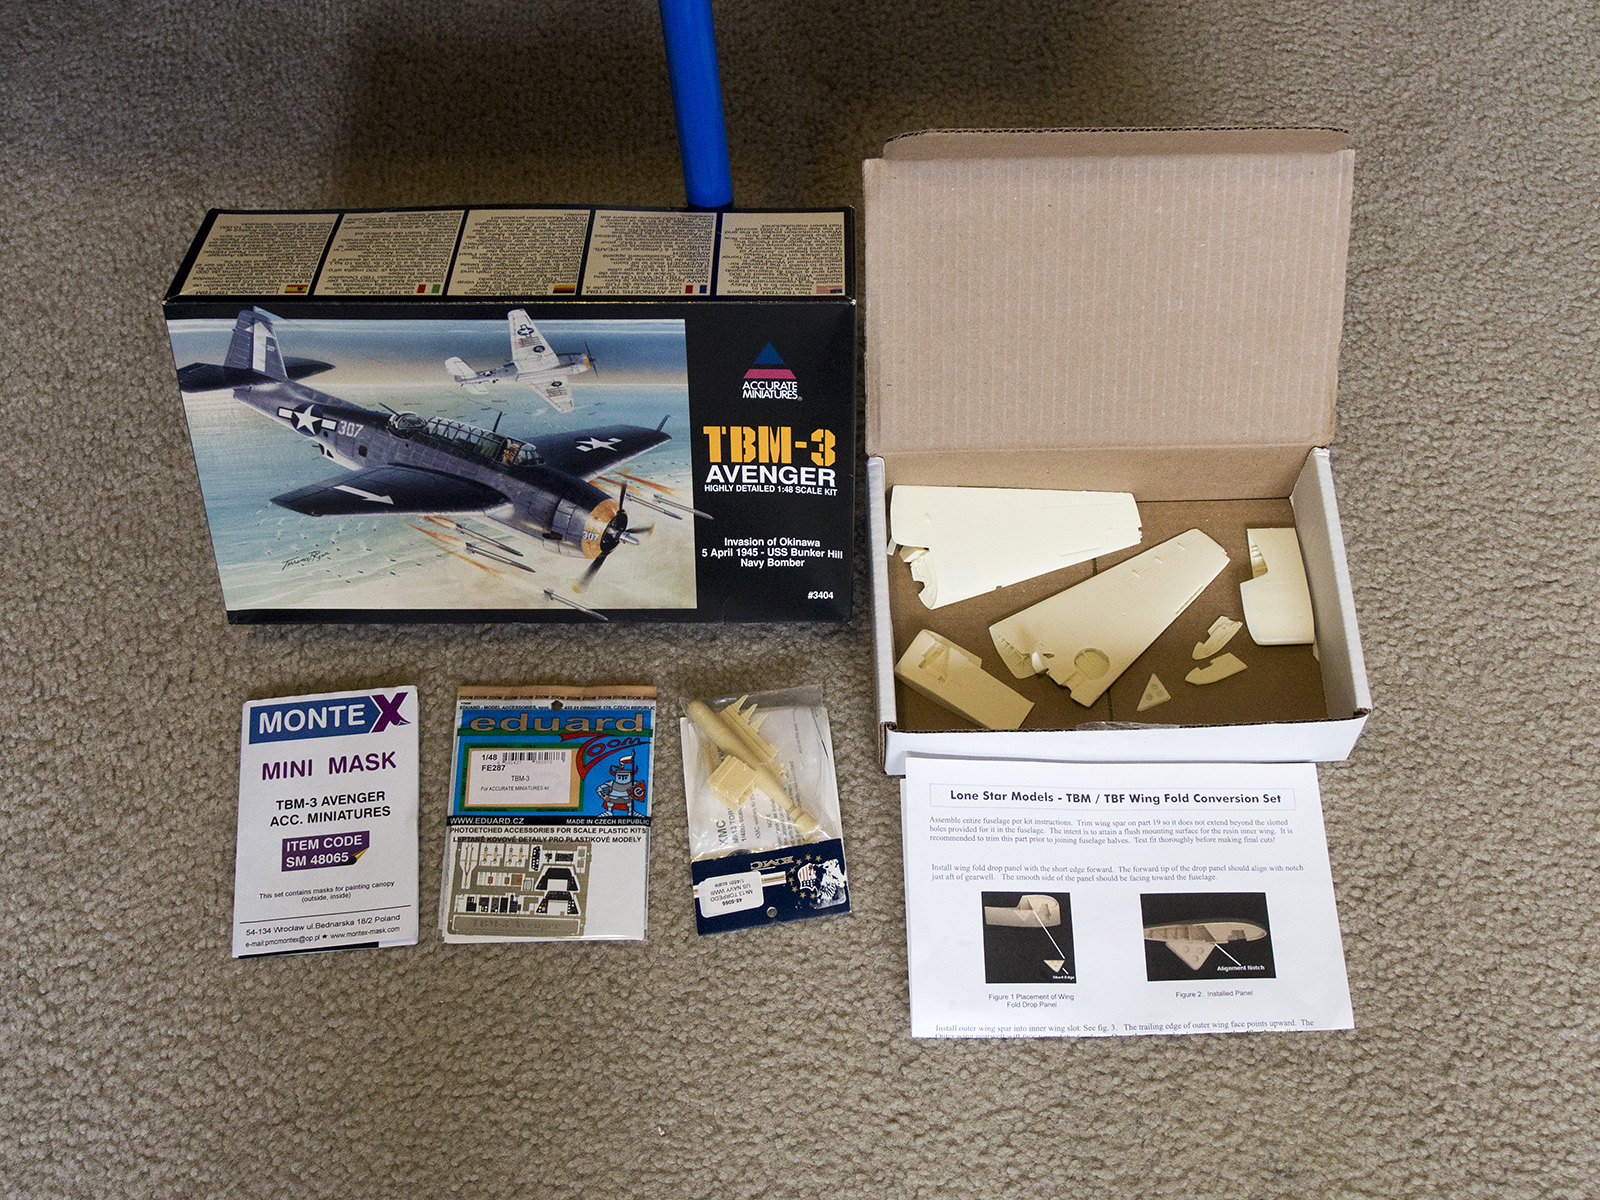
Here's the start of this Avenger:


Mike

"Le temps est un grand maître, mais malheureusement, il tue tous ses élèves."

Hector Berlioz

  • Member since
    January 2015
  • From: Tumwater, WA.
Posted by M. Brindos on Saturday, April 8, 2017 12:02 PM

Um, that masking looks terrific, Mike. 

The rain has been relentless of late. I've been working down in Longview/Kelso an the weather has been bad for weeks. Working outside has been miserable.

What area, may I ask, do you reside in? I have not met but one fellow modeller since I've gotten back into the hobby. We seem to be few and far away in this State lol.

I'd like the opportunity to share my knowledge first hand with someone. :)

- Mike Brindos "Lost Boy"

  • Member since
    December 2010
  • From: Salem, Oregon
Posted by 1943Mike on Saturday, April 8, 2017 2:15 PM

Mike,

I just sent you an email via your public email address.

Mike

"Le temps est un grand maître, mais malheureusement, il tue tous ses élèves."

Hector Berlioz

  • Member since
    January 2015
  • From: Tumwater, WA.
Posted by M. Brindos on Saturday, April 8, 2017 2:20 PM

Cool. I'll check my email.

- Mike Brindos "Lost Boy"

  • Member since
    August 2013
Posted by Jay Jay on Monday, April 10, 2017 8:14 AM

I'm watching with great interest.

i have started the same kit but I wanted to detail up the engine bay, since the kit had a resin engine in the box, but hit a wall due to lack of skills in this area.

Another reason I'm stalled is I have started a new part-time job and am working far too many hours , way more than I expected and it's waring my old but out.


 I'm finally retired. Now time I got, money I don't.

  • Member since
    June 2014
Posted by BrandonK on Monday, April 10, 2017 10:02 AM

I have this kit as well and have considered the wing fold conversion. I will be watching this with great interest.

BK

On the bench:

A lot !! And I mean A LOT!!

2024 Kits on deck / in process / completed   

                         14 / 5 / 2  

                              Tongue Tied

  • Member since
    December 2010
  • From: Salem, Oregon
Posted by 1943Mike on Monday, April 10, 2017 1:02 PM

Jay Jay and BK,

I certainly appreciate you guys following along. You already know my skill level so please don't expect much other than my normal notes along the build where I screwed up and was or was not able to fix.

Yesterday, used PPP (Perfect Plastic Putty) to attempt to fill in some of the major gouges that I created when sawing off the resin parts from the mold "block". (I must mention again what a PITA I find it to get the resin parts cut off properly Embarrassed. Then I attempted to rescribe some lines without much success. The rescribed lines will remain the way I left them since they're under the inboard portion of the wing and won't show in normal viewing. I then proceeded to prime all the resin and styrene parts.

My next problem is the order in which to paint the resin wing folding set. I can't imagine attemping to mask and paint the wings once they're in their folded configuration so I'll paint them before gluing them together.

I guess that's all for now. I'll sign off for the moment with a few shots of what I've just talked about as well as a shot from 9,000' looking down at the valley floor when I was in Death Valley doing some hiking the week before last. It's from the top of Wildrose Peak.


Mike

"Le temps est un grand maître, mais malheureusement, il tue tous ses élèves."

Hector Berlioz

  • Member since
    December 2010
  • From: Salem, Oregon
Posted by 1943Mike on Wednesday, April 12, 2017 12:27 PM

OK, We were NOT amused! (The laughable scribing job Big Smile).

So, for a couple of days I've been trying to get that little area rescribed to my satisfaction. I'm now OK with it although I think with more patience than I'm capable of mustering I might have done a little better. Anyway, I'm at a stage where either I can continue working on the painting/decaling of the folded wings or begin the fuselage. I think I'll now start the fuselage.


Mike

"Le temps est un grand maître, mais malheureusement, il tue tous ses élèves."

Hector Berlioz

  • Member since
    December 2010
  • From: Salem, Oregon
Posted by 1943Mike on Tuesday, April 18, 2017 2:01 PM

I've been lazy lately and haven't done too much with the Avenger. I did get the torpedo and the torpedo loading cart done with a few touch-ups to be done shortly.

I was disappointed with the resin set of the torpedo because one of the four propellers that are in the kit was broken on arrival. One would think that, since only two props are needed, I was OK. Wrong Sad. I broke the other matched prop so now the torpedo does not have counter rotating props. For this model I'm not too concerned. The torpedo will have a stabilizer wood box over its fins and be on the cart to be loaded on board.

I took some artistic liberty with the painting of the torpedo. My research has shown me that the paint jobs on Mk 13 torpedos varied quite a bit. I painted the bulk of the propulsion section dark sea gray and the business end a combo of silver and brass which I will scuff up even more before I'm done with it.

That's all for now.

Mike

"Le temps est un grand maître, mais malheureusement, il tue tous ses élèves."

Hector Berlioz

  • Member since
    March 2015
  • From: Streetsboro, Ohio
Posted by Toshi on Tuesday, April 18, 2017 3:14 PM

Everything is pulling together great.  The torpedo and rack looks fantastic!  Looking forward to more.

Toshi

On The Bench: Revell 1/48 B-25 Mitchell


Married to the most caring, loving, understanding, and beautiful wife in the world.  Mrs. Toshi


  • Member since
    November 2009
  • From: SW Virginia
Posted by Gamera on Wednesday, April 19, 2017 7:33 AM

Yeah she's looking pretty good so far. Good luck with the scribing and resin, I've used a little but never that much. Canopy masking looks perfect! 

"I dream in fire but work in clay." -Arthur Machen


  • Member since
    December 2010
  • From: Salem, Oregon
Posted by 1943Mike on Wednesday, April 19, 2017 12:42 PM

 Toshi and Gamera,

Thanks!

I'm at the exciting stage of my build - waiting for paint to dry Big Smile.

This part always tests the little patience I have.


Mike

"Le temps est un grand maître, mais malheureusement, il tue tous ses élèves."

Hector Berlioz

  • Member since
    December 2010
  • From: Salem, Oregon
Posted by 1943Mike on Saturday, April 22, 2017 12:28 PM

Some work done on the fuselage: Starting to get the cockpit in order - still a long way to go. Have done considerable work (for me) on installing PE. Lots of little fiddly bits to go.

I made a seat cushion from some brass mesh for the pilot. Not sure if they would actually have done this - just something I thought would be OK.

I've noticed lots of areas where I've chipped/scraped off some paint while working on a section or two. That's what close ups do for me - let me see what needs to be touched up or corrected. Here are some progress pictures.

 P.S. Gotta get rid of that flash in the IP Smile

Mike

"Le temps est un grand maître, mais malheureusement, il tue tous ses élèves."

Hector Berlioz

  • Member since
    January 2015
  • From: Tumwater, WA.
Posted by M. Brindos on Saturday, April 22, 2017 1:21 PM

Regardless of the flash, it still looks really good, Mike. You're making great progress.  :)

- Mike Brindos "Lost Boy"

  • Member since
    June 2014
Posted by BrandonK on Saturday, April 22, 2017 1:32 PM

I love what you're doing here. It looks great.

BK

On the bench:

A lot !! And I mean A LOT!!

2024 Kits on deck / in process / completed   

                         14 / 5 / 2  

                              Tongue Tied

  • Member since
    August 2013
Posted by Jay Jay on Sunday, April 23, 2017 8:20 AM

I love what you've done with the Edward Interior PE set. It looks real good and I might have to re-do mine in purchasing a set.


 I'm finally retired. Now time I got, money I don't.

  • Member since
    December 2010
  • From: Salem, Oregon
Posted by 1943Mike on Sunday, April 23, 2017 11:39 AM

Mike, Brandon, and Jay Jay,

Thanks for the encouragement.

Here's a minuscule update with my concerns about the closing up of the fuselage when I get to it.

 P.S. Regarding that bottle/canister that I installed under the pit floor, The Eduard PE has a piece to hold the object but does not supply the canister. One has to make it from scratch. A piece of 2mm styrene rod would have worked but, not having any of that dimension, I cut a piece of 2mm brass rod, filled in the ends with PPP, painted it yellow, and, Voila!

Mike

"Le temps est un grand maître, mais malheureusement, il tue tous ses élèves."

Hector Berlioz

  • Member since
    December 2010
  • From: Salem, Oregon
Posted by 1943Mike on Monday, April 24, 2017 10:39 AM

Hit a speed bump. I removed the masking from my clear canopy and turret parts and was disappointed to find bleeding under the masks, misalignment between the interior and exterior paint jobs. All my fault.

I decided to do all the masking over since I do have an extra set of masks for this aircraft. I stripped the paint and dipped the parts in Future last night. They are now ready for masking. Hopefully I'll be more careful this time by burnishing them well. Also I'm only going to do the outside - both colors - like Builder 2010 did in his 1/32 Avenger build. That way I'm at least assured of no misalignment. Bleeding under the masks is another story.

Here's a shot of where I am now on this kit:

Mike

"Le temps est un grand maître, mais malheureusement, il tue tous ses élèves."

Hector Berlioz

  • Member since
    June 2014
Posted by BrandonK on Monday, April 24, 2017 11:31 AM

Here are some shots of the area you are working on.

Hope you find them useful. Your build is looking very nice.

BK

On the bench:

A lot !! And I mean A LOT!!

2024 Kits on deck / in process / completed   

                         14 / 5 / 2  

                              Tongue Tied

  • Member since
    December 2010
  • From: Salem, Oregon
Posted by 1943Mike on Monday, April 24, 2017 12:13 PM

Thanks Brandon.

They are images that show a great deal of detail in the aft fuselage. I'm happy to see dirty/scratched windows Big Smile. Makes me think that working aircraft of this ilk might not have had pristine glass - makes my smudges on the clear plastic more believable Wink.

Mike

"Le temps est un grand maître, mais malheureusement, il tue tous ses élèves."

Hector Berlioz

  • Member since
    July 2013
Posted by steve5 on Monday, April 24, 2017 9:57 PM

for some-one who say's his skill's aren't that good , that's pretty impressive so far mike .


  • Member since
    November 2003
  • From: Naples, FL
Posted by tempestjohnny on Tuesday, April 25, 2017 5:50 AM
Mike. Your progress on this kit is great. I don't see why you doubt your abilities. Looks great


  • Member since
    December 2010
  • From: Salem, Oregon
Posted by 1943Mike on Tuesday, April 25, 2017 7:59 PM

t-Johnny,

I guess I'm just not all that confident yet in my abilities compared to most of the folks who post on this forum. That's OK though, I thoroughly enjoy building these kits (both ships and aircraft) and feel like I may be learning a little to better my work at this hobby as I stumble along.

OK, I finished remasking as you saw from my last post and gave a try to the method that Builder used in his 1/32 Avenger. Whatever screw ups occured were totally on me. I like this method and will use it on all my canopies, turrets, etc. in the future. Thanks Builder!

Here are a couple of pictures of my almost finished work on the clear parts. I still have some touch up and the forward section of the canopy to work on but they'll be done in a day or two.

Mike

"Le temps est un grand maître, mais malheureusement, il tue tous ses élèves."

Hector Berlioz

  • Member since
    March 2012
  • From: Louisville, KY
Posted by Builder 2010 on Tuesday, April 25, 2017 10:20 PM

Looking really good Mike. Thanks for the acknowledgement. The Accurate Miniatures 1:48 simplifies the canopy build by not having all the separate pieces. I should have not attempted to glue those two rear parts together as Trumpeter showed in the instructions. I should have just let them stay together by being glued to the air frame on their bottoms. Sometimes more pieces is not actually better.

  • Member since
    December 2010
  • From: Salem, Oregon
Posted by 1943Mike on Friday, April 28, 2017 11:55 PM

I'm at a stage where I usually become frustrated. That is closing the fuselage halves. I've dry fit the two halves several times along the build and sanded and filed and popped out a glued in part and repositioned it so the two sections would fit better. Still, I worry. There's one section that I'll have to hold with my fingers (I think I'll wear latex gloves) because it's not going to come together without considerable pressure and none of the clamp, rubber band, or vise implements will work. I'll probably have to hold it together for a couple of minutes -at least. Here's hoping...

Anyway, here are the two fuselage halves ready for mating. BTW, why did I bother to paint the black and white striping on the arrester hook if it's not going to be visible? Such are the questions of a modeler.

Mike

"Le temps est un grand maître, mais malheureusement, il tue tous ses élèves."

Hector Berlioz

  • Member since
    July 2004
  • From: Sonora Desert
Posted by stikpusher on Saturday, April 29, 2017 1:15 AM

Looking good so far. As to why did you paint the tailhook striping? Because it's there of course Wink


F is for FIRE, That burns down the whole town!

U is for URANIUM... BOMBS!

N is for NO SURVIVORS...

       - Plankton

LSM


  • Member since
    February 2012
  • From: Olmsted Township, Ohio
Posted by lawdog114 on Saturday, April 29, 2017 3:11 AM
Thats looking great Mike...

 "Can you fly this plane and land it?...Surely you can't be serious....I am serious, and don't call me Shirley"


  • Member since
    December 2010
  • From: Salem, Oregon
Posted by 1943Mike on Tuesday, May 2, 2017 11:36 AM

About the closing up of the two fuselage halves ... A real PITA! Probably all my fault but I had to use 3 sets of clamps and a rubber band - all at the same time while the glue was drying. That didn't get the top part of the fuselage just behind the pilot's head to close. I had to do that separately after the process I've just described was finished. It required a clothes pin which was just barely holding on - a little vibration and it would have shot up to the ceiling!. Fortunately it seems as if all is well for the moment.

Then there's the story of the turret "guts"... #$%&@!. After gluing the parts together and tearing them apart three times I finally got the unit to fit into the turret canopy. I don't have any idea why it was so much more difficult for me this time than on my last TBM-3 build of a month or so ago - just bad karma I guess Hmm.

Lots more work to do. Looks like the weather up this way is going to be getting better (read Spring like) this week. Probably out hiking rather than working indoors. Next update whenever I can.


Mike

"Le temps est un grand maître, mais malheureusement, il tue tous ses élèves."

Hector Berlioz

  • Member since
    June 2014
Posted by BrandonK on Tuesday, May 2, 2017 12:37 PM

Not sure where exactly you are in the turret process but I have a link here that explains how to install the turret in this kit. Hopefully, you will find it usefull. I love what you're doing, it looks great.

BK


http://web.archive.org/web/20090327114353/http://www.accurate-miniatures.com:80/builds/avenger/avengerturret.shtml

On the bench:

A lot !! And I mean A LOT!!

2024 Kits on deck / in process / completed   

                         14 / 5 / 2  

                              Tongue Tied

  • Member since
    December 2010
  • From: Salem, Oregon
Posted by 1943Mike on Tuesday, May 2, 2017 3:11 PM

Brandon, thanks for the link. However I have already intalled it and taken it out again. It's not that difficult once you get the turret & turret canopy together correctly. I just wanted to make sure that I could install it and I can. Had I left the masking on the turret canopy I probably would have left it in but I'd already taken off the masks so that masking the installed turret would have been a problem for me. Sometimes I wonder if I'll ever learn Big Smile!


Mike

"Le temps est un grand maître, mais malheureusement, il tue tous ses élèves."

Hector Berlioz

JOIN OUR COMMUNITY!

Our community is FREE to join. To participate you must either login or register for an account.

SEARCH FORUMS
FREE NEWSLETTER
By signing up you may also receive reader surveys and occasional special offers. We do not sell, rent or trade our email lists. View our Privacy Policy.