SEARCH FINESCALE.COM

Enter keywords or a search phrase below:

[Yet Another] Tamiya 1:48 F4U-1A WIP

15182 views
150 replies
1 rating 2 rating 3 rating 4 rating 5 rating
  • Member since
    July 2016
  • From: NYC
Posted by Johnny1000 on Wednesday, December 5, 2018 10:12 AM

ta da!

I've got it mostly back together. Following lawdog's sensible advice, I added a bit of styrene strip as a flange to give more surface area to the joint. 

The snapped off forward antenna still isn't on—I'll probably recreate with brass rod, as that's a pretty fragile and exposed item, and it's a bit too thin to get a pin in. Below the cowel, you can see one of the brake lines that fell off. 

cheers

-J

  • Member since
    July 2016
  • From: NYC
Posted by Johnny1000 on Tuesday, December 4, 2018 3:32 PM

Thanks!

I think you've warned about that before, and I thought "I should really deal with that" but then didn't. Lesson learned!

  • Member since
    February 2012
  • From: Olmsted Township, Ohio
Posted by lawdog114 on Tuesday, December 4, 2018 3:27 PM

Yep...lousy design by Tamiya with that weak joint. I ended up reinforcing the inside surface with sheet styrene to give me something to glue too. A lip if you will. They did the same thing on their 1/32 kit too.


That’s looking great Johnny...

 "Can you fly this plane and land it?...Surely you can't be serious....I am serious, and don't call me Shirley"


  • Member since
    July 2016
  • From: NYC
Posted by Johnny1000 on Tuesday, December 4, 2018 2:36 PM

Yikes! That does sound much worse. 

Yes, this is completely repairable. I'm just at that place where I really want to be done and on to the next thing. 

  • Member since
    January 2004
  • From: Brisbane Australia
Posted by ChrisJH666 on Tuesday, December 4, 2018 1:35 PM

Oops. Could have been worse. Had a 1/32 Mk VI Spitfire once. Nearly completed and I was holding it by the wingtip (idiot!) when it snapped of. Very broken Spit whilst I was left holding a wingtip! This looks rather more repairable

In the queue: 1/48 Beech Staggerwing (RAAF), P38 (RAAF), Vultee Vengeance (RAAF), Spitfire Vb (Malta), Spitfire VIII x2 (RAAF), P39 x2 (RAAF), Martin Baltimore (Malta?), Martin Maryland (Malta), Typhoon NF1b, Hellcat x2 (FAA)


Chris

  • Member since
    July 2016
  • From: NYC
Posted by Johnny1000 on Tuesday, December 4, 2018 1:02 PM

Oops. 

Two steps forward... 

  • Member since
    July 2016
  • From: NYC
Posted by Johnny1000 on Saturday, November 10, 2018 11:07 AM

Thanks lawdog! I’m def happy I took the time with that bit.

  • Member since
    February 2012
  • From: Olmsted Township, Ohio
Posted by lawdog114 on Saturday, November 10, 2018 2:43 AM
Beautiful....Love the bomb rack detail..

 "Can you fly this plane and land it?...Surely you can't be serious....I am serious, and don't call me Shirley"


  • Member since
    July 2016
  • From: NYC
Posted by Johnny1000 on Friday, November 9, 2018 2:04 PM

Thanks Scott! That's very nice to hear indeed. 

  • Member since
    December 2003
  • From: 37deg 40.13' N 95deg 29.10'W
Posted by scottrc on Friday, November 9, 2018 8:13 AM

I was impressed with you Wildcat, but with this build, you had really raised the bar.


  • Member since
    July 2016
  • From: NYC
Posted by Johnny1000 on Wednesday, November 7, 2018 10:47 AM

Thanks Mark! That's very kind of you to say. 

  • Member since
    May 2017
  • From: Denver, Colorado
Posted by MrStecks on Wednesday, November 7, 2018 10:24 AM

What a beautiful job you've done with this build.  I'm in awe.  Your attention to detail goes above and beyond.  Bow Down

Cheers,
Mark


On the bench:  Revel 1/48 B-25J Mitchell

In the queue: Tamiya 1/48 F4U-1A Corsair

  • Member since
    July 2016
  • From: NYC
Posted by Johnny1000 on Wednesday, November 7, 2018 8:48 AM

Thanks guys!

  • Member since
    January 2004
  • From: Brisbane Australia
Posted by ChrisJH666 on Wednesday, November 7, 2018 3:08 AM

Nearly there! It's a fabulous model

In the queue: 1/48 Beech Staggerwing (RAAF), P38 (RAAF), Vultee Vengeance (RAAF), Spitfire Vb (Malta), Spitfire VIII x2 (RAAF), P39 x2 (RAAF), Martin Baltimore (Malta?), Martin Maryland (Malta), Typhoon NF1b, Hellcat x2 (FAA)


Chris

Ole
  • Member since
    October 2018
  • From: Central VA
Posted by Ole on Tuesday, November 6, 2018 4:54 PM

That's an amazing amount of details!

  • Member since
    July 2016
  • From: NYC
Posted by Johnny1000 on Tuesday, November 6, 2018 4:45 PM

Bench time has been even more sporadic than usual, so not much procedure this time. I am getting close though.

Re-did the bomb rack support bars with the next size down (.8mm) brass tube. Looks much more the part.

Re-profiled the bomb, which was a bit too round, and then used the PE fins from the Eduard set and added mounting lugs.

Odds and ends... identification lights. Punched holes in Tamiya tape with a MicroMark punch set, then sprayed Tamiya transparent red, green, and orange, followed by a few coats of Aqua Gloss. 

Landing gear on! Bomb and rack on! It's looking kind of like an airplane.

Need to dirty up that propeller a bit.

I tried to do the gun port tape with painted decal stock, but couldn't get it to work. This is Tamiya tape painted a light grey.

That cockpit is looking a little clean. Need to think about how to address that. Also need to get some better oil/fuel staining around the fuel cover.

Yikes! Got to fix that nick on the upper left corner of the vertical stablizer.

The wheel wells are filthy. 


Need to take care of some other odds and ends, but I should be about done soon... The year anniversary of starting this build was Oct 15. 

Thanks for looking. I'd welcome any feedback/critique as I try to land this pup. 

-J


  • Member since
    July 2016
  • From: NYC
Posted by Johnny1000 on Tuesday, October 9, 2018 3:55 PM

The mighty bomb rack!

Tamiya molds the Brewster bomb rack as a single part, with big solid chunks that you embed into the bomb. I’m sure it’s very sturdy. 

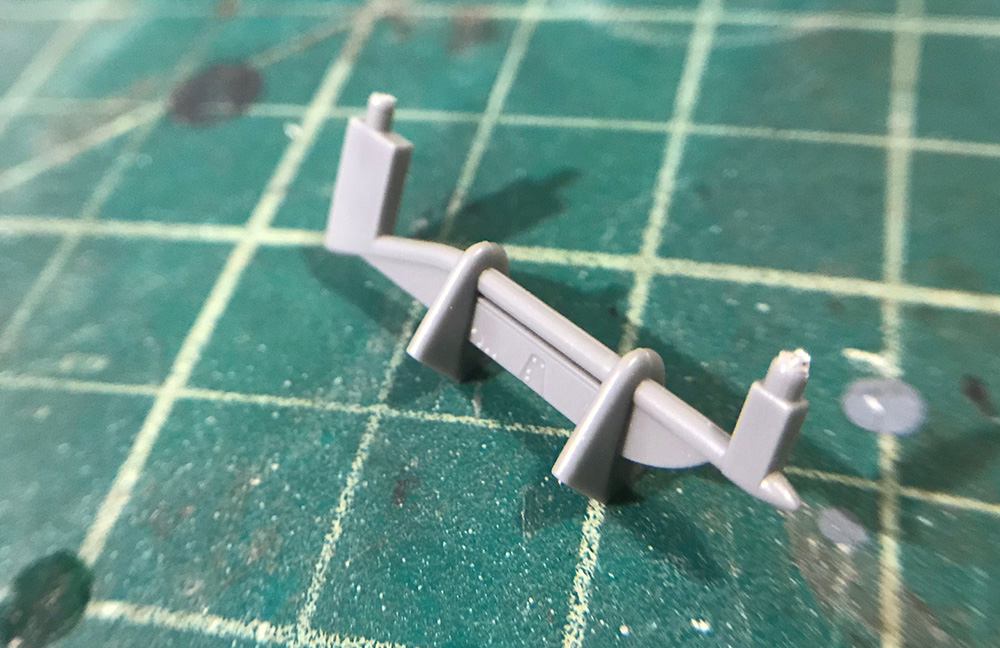
However, it’s not very representational. The rack should feel spindly and crude. There’s a misconception that these were produced in the field by the ground crew, but that’s not the case—they were designed and built by Brewster, who were not exactly known for elegant design (the F2A Buffalo?).

I’m going to cut away the bomb holding chunks and replace with brass tubing.


We need to get a 1mm tube to bend tightly without crimping too much. The first step is to anneal by heating and gradually allowing to cool. 

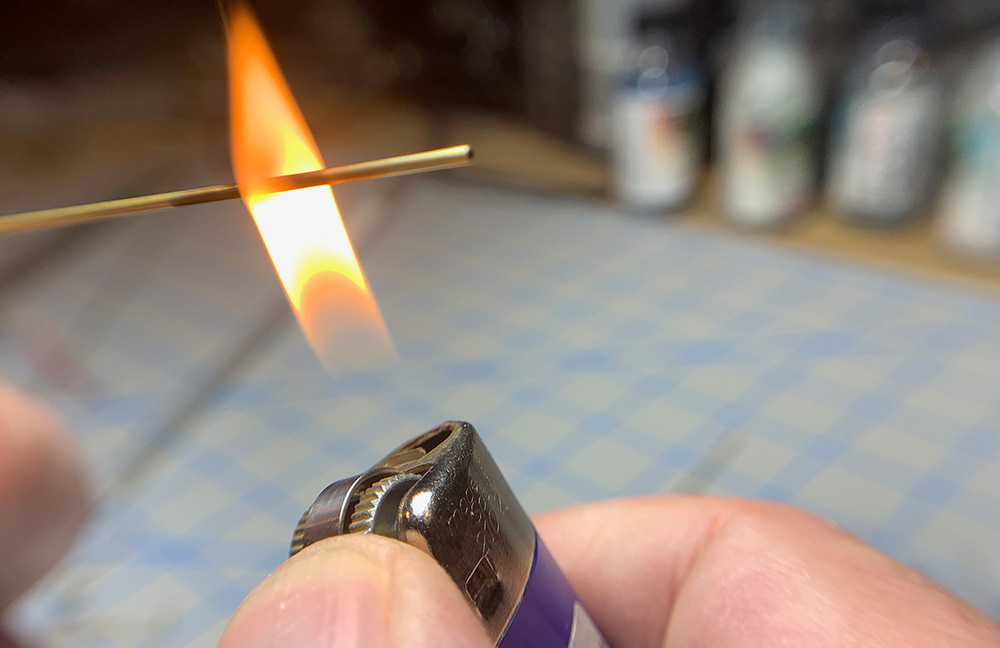
Next, we need something inside the tube (this is called a mandrel in tube bending circles). 0.7mm lead wire will do, plus it’s easy to drill out after the bend. Rolling with the  flat end of tweezers gets it straight.

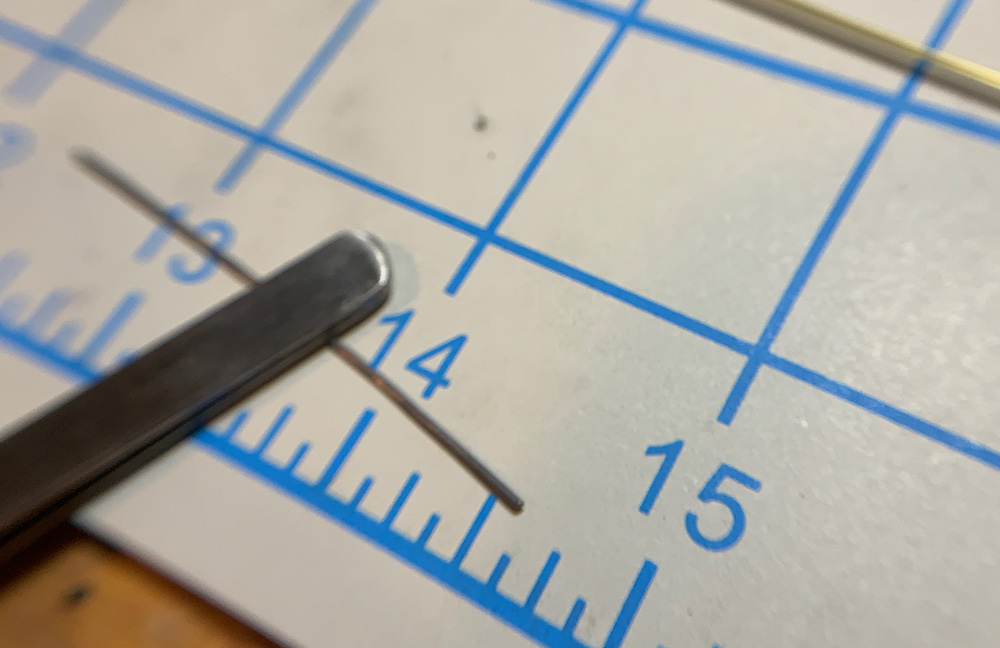
(Bad focus job here, but hey! Someone got a new cutting mat…)


The moment of truth. In the argot of pipe bending, a nail in a piece of scrap 2x4 is our bend die. A pair of 123 blocks are our compression die. You can see the lead wire mandril sticking out of the bent end.

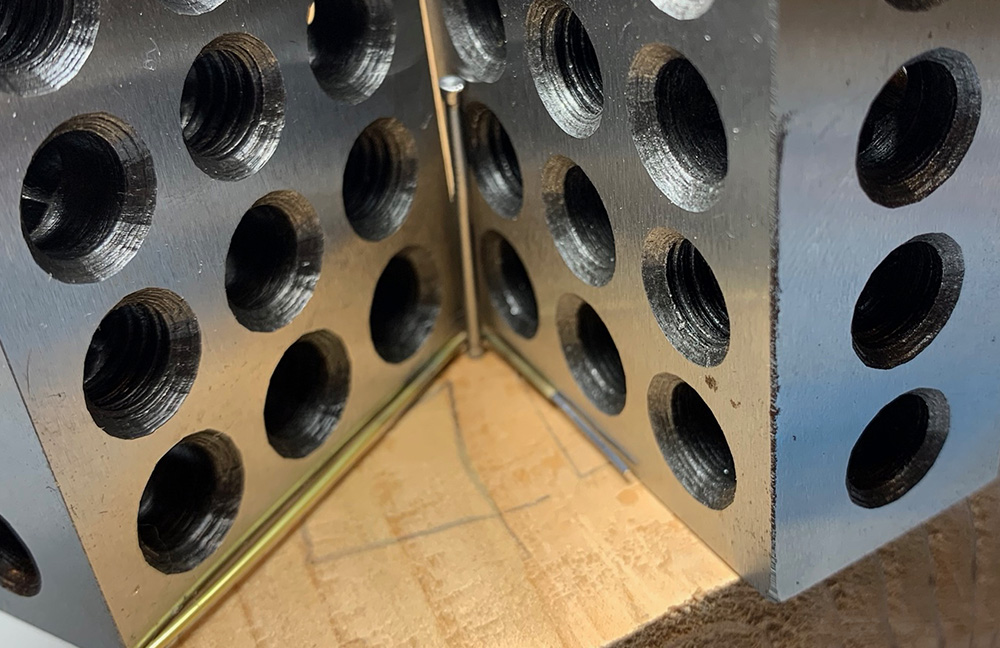
The 123 (1” x 2” x 3”) are nice because they’re heavy and perfectly straight (more or less). I got them for my experiments in machining, but they come in handy for all kinds of things. 


To cut, roll on a smooth surface with a sharp knife. Because I have an odd shape, I have it hanging off the end of my bench.

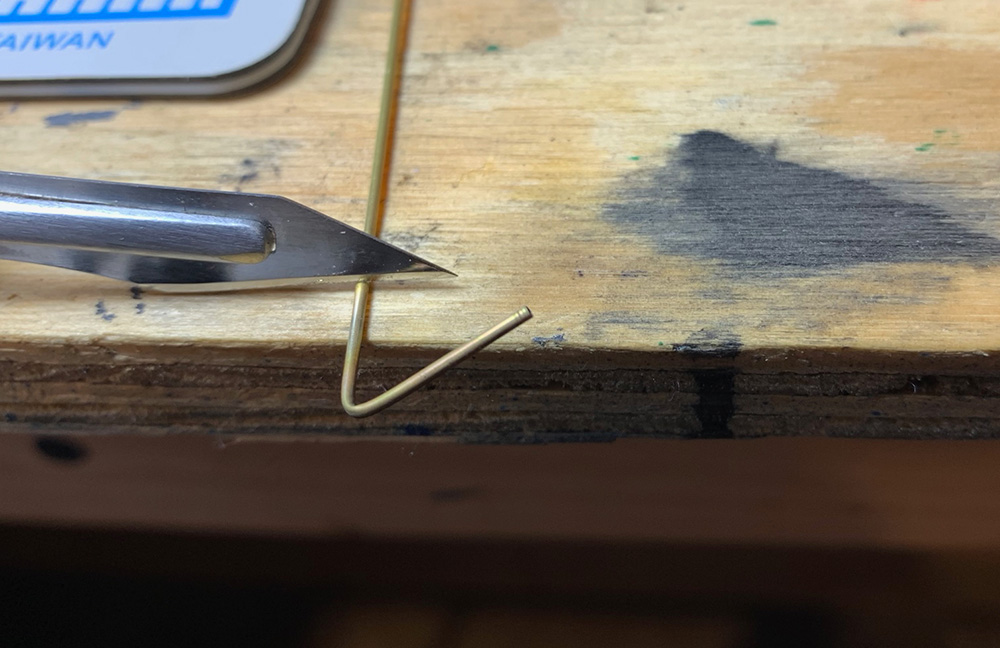
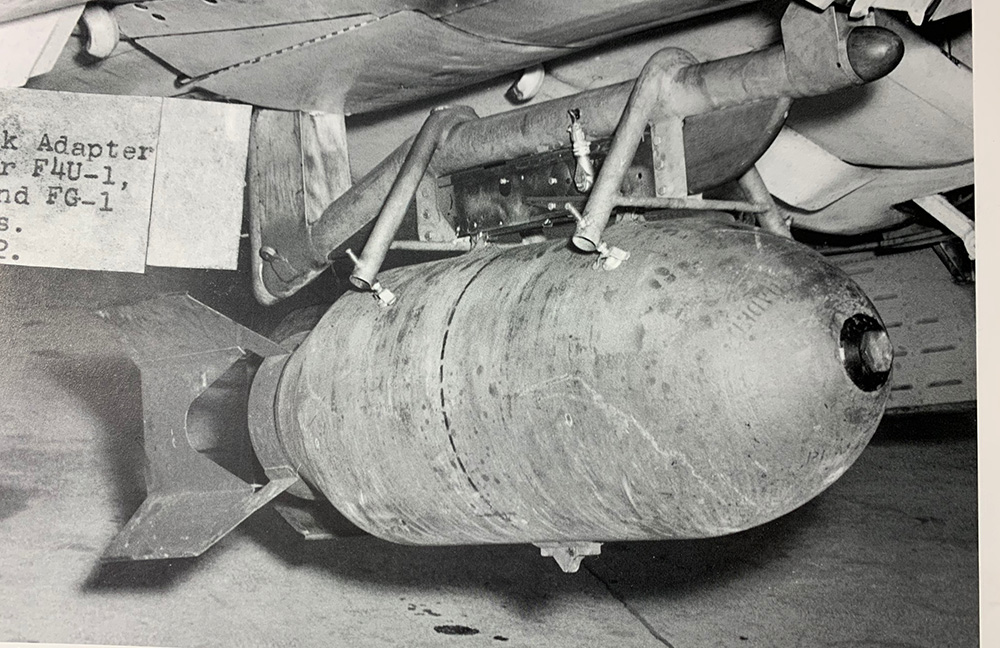
I’m attempting the mounting holes seen in the reference pic. After locating the spot with a pin, drilled out in a drill press with carbide bits. You could probably do it with a hand tool, but this was quick and somewhat precise. 

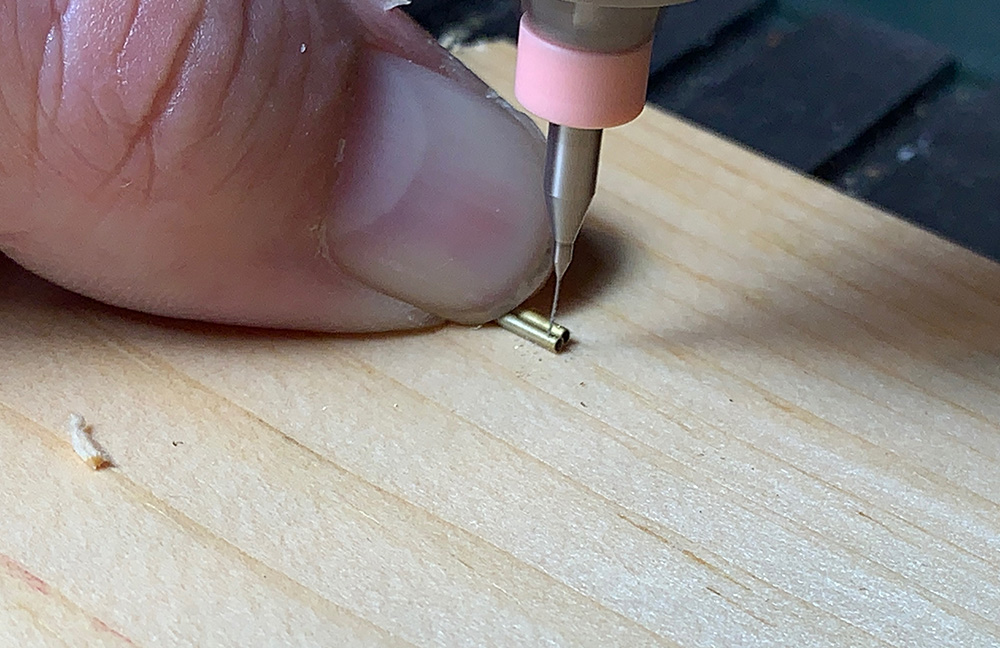
And the bars mounted. These are a lot better than the stock rack, but looking at it here, they’re definitely over-scale. Bother. Not sure if I’m going to redo with a slightly smaller diameter tube, though now I have the procedure down, it shouldn’t be that big of a deal.

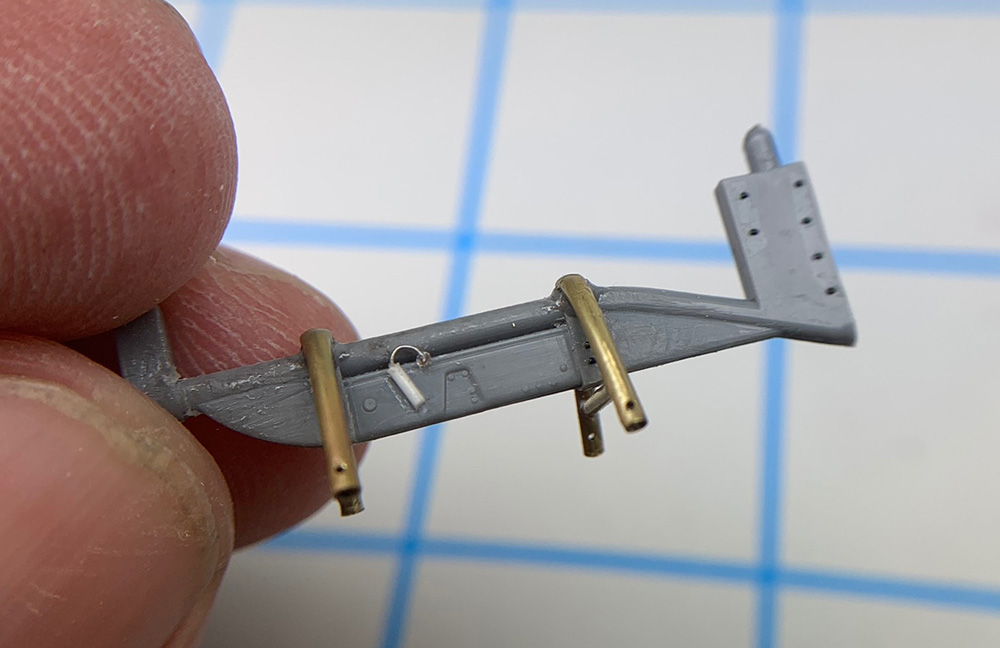
I also added a few details to the main mounting part, including the fuse looking thing and rivets. These were done with Archer resin rivets. After getting a coat of primer on, the carrier film was a bit bunched here and there, so I scraped off and re-did with a beading tool. 

The overscale diameter is bugging me... Will probably go back with the next size down.

Next time: the bomb

Thanks for looking!

  • Member since
    July 2016
  • From: NYC
Posted by Johnny1000 on Friday, September 21, 2018 12:25 PM

Thanks Chris, Joe, and Mike!

Coming from the three of you, especially, means a lot. You've each taught me so much in your own work.

Cheers

-J

  • Member since
    December 2010
  • From: Salem, Oregon
Posted by 1943Mike on Thursday, September 20, 2018 10:43 PM

What ChrisJH666 said +1.

Mike

"Le temps est un grand maître, mais malheureusement, il tue tous ses élèves."

Hector Berlioz

  • Member since
    February 2012
  • From: Olmsted Township, Ohio
Posted by lawdog114 on Thursday, September 20, 2018 4:36 PM
Looking great!

 "Can you fly this plane and land it?...Surely you can't be serious....I am serious, and don't call me Shirley"


  • Member since
    January 2004
  • From: Brisbane Australia
Posted by ChrisJH666 on Thursday, September 20, 2018 2:59 PM

Love that weathered finish! The problem is now you've set such a high benchmark how are us mere mortals ever going to build one of these again? Lol Bow Down

In the queue: 1/48 Beech Staggerwing (RAAF), P38 (RAAF), Vultee Vengeance (RAAF), Spitfire Vb (Malta), Spitfire VIII x2 (RAAF), P39 x2 (RAAF), Martin Baltimore (Malta?), Martin Maryland (Malta), Typhoon NF1b, Hellcat x2 (FAA)


Chris

  • Member since
    July 2016
  • From: NYC
Posted by Johnny1000 on Thursday, September 20, 2018 11:04 AM

Okay, so that was not a fruitful rabbit hole. I’ll spare you the shenanigans, but I finally decided life is short and I kind of want to finish this build before I hit it’s year anniversary in mid-October. I’ve also been traveling a lot for work lately, which makes bench time even more sporadic, so I’ll have to master the fine art of scratch building fabric control surfaces another time.  

I got another copy of the kit and started over with the rudder and elevators. Now that I had more clarity around how to approach this, cleaning these up was pretty painless. Reworking the tab actuators was also straightforward. For the small ones (left top and right bottom) I used PE from the Eduard set. For the large ones (rudder, top right and left bottom) I used thin copper wire with CA to build up the ‘elbow’ and section of the arm that goes into the tab. 

I've got to clean up the bit of 'stair stepping' around the BuNo decal stencil. It's a DIY decal, and is a bit thick. The font is also a bit heavy weight, so I'll probably scrape off and redo.

Oil paint weathering.  I need to get the cockpit area a little filthier to match the rest of the airframe.

Windsor and Newton artist color titanium white with a little mineral spirits to further fade. A little grey and burnt ochre for grime and dirt.

The exhaust stains are interesting. The cooling panel directly aft of the exhausts folds out, creating a little ridge that blocks most of the fuselage, cutting the stain sharply.

The above reference has a lot of grime accumulating on the underside fuselage aft of the window. I may build up a bit more there. I did build up some general filth and spatters. The shell casing ports got a bit of diffuse darkening, which better matches what examples I’ve been able to find than clear streaks. The actual gun ports are going to get ‘taped’ over.

The only real construction project on this left is the bomb and rack. Will be working on that next and then it's on to final touches

Thanks for looking!


  • Member since
    July 2016
  • From: NYC
Posted by Johnny1000 on Friday, August 3, 2018 5:04 PM

I'm committed to my rabbits. Either that, or my rabbits are going to get me committed...

  • Member since
    January 2004
  • From: Brisbane Australia
Posted by ChrisJH666 on Friday, August 3, 2018 4:56 PM

Hmmm. Lot of rabbits down that hole!!

In the queue: 1/48 Beech Staggerwing (RAAF), P38 (RAAF), Vultee Vengeance (RAAF), Spitfire Vb (Malta), Spitfire VIII x2 (RAAF), P39 x2 (RAAF), Martin Baltimore (Malta?), Martin Maryland (Malta), Typhoon NF1b, Hellcat x2 (FAA)


Chris

  • Member since
    July 2016
  • From: NYC
Posted by Johnny1000 on Friday, August 3, 2018 4:52 PM

Rudder on with trim tab, PE actuator (via Eduard), scratch built fairing from .020" rod, and rescribed panel. Also added copper wire for the long trim tab actuators on the elevators, which I had to cut when I removed from the horizontal stablizers. 

Looks okay. But after staring at reference photos for hours, neither the rudders nor elevators look quite right. 

It's hard to see with the black primer, but the ribs look a lot like the molded kit ribs, but not so much like a real Corsair, where they're super thin:

I'm thinking the ribs might be better represented with bits of wire faired in with CA. 

(The problem with references is you can't unsee this stuff.)

Also, the elevators don't quite line up. It's not noticable except from below, but as long as I'm messing with them, the molded actuators are bugging me. On the prototype, they have a really distinctive angle shape:

I rekon fixing the rudder (again) and elevators will make for a fun weekend activity...

Cheers

-J

  • Member since
    July 2016
  • From: NYC
Posted by Johnny1000 on Tuesday, July 31, 2018 4:20 PM

Before we move on, it’s a quick trip back into the rabbit hole! 

Somehow the rudder antenna mast broke off. Rather than craft a new one from styrene (which will just break off again), I decided to machine one from brass (I’m learning how to use a micro lathe, so am always looking for opportunities to play). 

First I turned to the diameter, then filed to shape. (I’m not very proficient with the lathe, so this took a few tries.)

I drilled a hole and CA’d in. Black rubber infused CA from Bob Smith to fair over. This will continue to get refined.


But after all this messing about with the rudder, I’ve lost pretty much all the ribbing detail, and the trim tab actuator is a bit mushy.

Silhouette to the rescue! Kind of. I traced a blue print of the rudder in Illustrator. 


I didn’t want to blow through too much styrene messing about, so cut .015 evergreen sheet bit shallow, but then was able to use the Silhouette cut lines as a guide to cut out with a knife. 

I filed the rudder part smooth, and then glued on the ribbing with Tamiya Extra Thin. Here we are starting to shape the new detail. This got further refined, along with fixing some of the soft lines in the profile (under the lip in front, above the trim tab, and there’s a flat spot behind the mast. 

That’s alls I got. I’m really looking forward to moving on to proper weathering, so hopefully will not let myself get too distracted with these tangents. (There is that bomb rack…) 

Thanks for looking!


-J

  • Member since
    July 2016
  • From: NYC
Posted by Johnny1000 on Wednesday, July 4, 2018 1:35 PM

Ha! I didn't mean to ressurect the Great Panel Line Debate...

My approach here is more about variation, texture, and visual storytelling than highlighting panel lines, per se. But, as a rule, filthy airplanes have more contrasty panel lines than non-filthy ones, and it doesn't get much filthier than an island based aircraft in the PTO. They just shouldn't be filled in uniformly across the whole airframe. 

Happy independence day for the folks in the US! 

-J


  • Member since
    January 2004
  • From: Brisbane Australia
Posted by ChrisJH666 on Tuesday, July 3, 2018 2:47 PM

Looking great. I agree with you about those panel lines. There are too many really great models which, in my opinion, are spoiled by being covered with black panel lines. In reality most panel lines are barely visible from any kind of distance

In the queue: 1/48 Beech Staggerwing (RAAF), P38 (RAAF), Vultee Vengeance (RAAF), Spitfire Vb (Malta), Spitfire VIII x2 (RAAF), P39 x2 (RAAF), Martin Baltimore (Malta?), Martin Maryland (Malta), Typhoon NF1b, Hellcat x2 (FAA)


Chris

  • Member since
    December 2002
  • From: Northern California
Posted by jeaton01 on Monday, July 2, 2018 9:53 PM

The latest models of Silhouette cutters can also cut plastic sheet.

John

To see build logs for my models:  http://goldeneramodel.com/mymodels/mymodels.html


JOIN OUR COMMUNITY!

Our community is FREE to join. To participate you must either login or register for an account.

SEARCH FORUMS
FREE NEWSLETTER
By signing up you may also receive reader surveys and occasional special offers. We do not sell, rent or trade our email lists. View our Privacy Policy.