SEARCH FINESCALE.COM

Enter keywords or a search phrase below:

1/32 Hasegawa KI-43 Build COMPLETED

4269 views
30 replies
1 rating 2 rating 3 rating 4 rating 5 rating
  • Member since
    November 2008
  • From: Central Florida
1/32 Hasegawa KI-43 Build COMPLETED
Posted by plasticjunkie on Wednesday, March 4, 2020 7:21 AM

Doing this one over in the Japanese GB so will post on here for those not following the GB progress.


Don't like surprises but there will be a few with this one. The wings came next and here we go.......why in the heck did Hasegawa do this goofy fit??


The upper wing skins don't match the bottom part along the leading egdges, extending just a hair and the trailing bottom wings have an ugly join line running along the bottom of the flaps and all along the ailerons that are fabric textured. This means lots of filling in with stretched sprue sanding and then re scribing all that fabric texteure on the trailing bottom wing and lots of sanding and re scribing along the wing LE.

I like the display plate Hasegawa included and will look cool done in metalizers and rusted up.


The kit markings I like and hope the decals  are ok and will not fracture in water. I will test one of the ones I won't  be using but if they fracture then some Microsol Superfilm will save them. I can always paint them on but just trying to keep the extra work away. These markings belonged to Sentai Commander Maj. Torashiro Aizawa of the 204th Sentai operating from Akyab air base, Burma. The aircraft is a KI-43 Type II made in 1943 and it had a heavy mottled dark green paint over NMF and undersides were NMF.

The kit color guide call for sollid green upper with chipping but I don't trust the info starting with Hasegawa calling this Hayabusa as a Type 1 which is wrong. This is a type II and can be made into a Type III. The Type I had a different cowl undersides and the VERY prominent long tubular gunsight thru the front windscreen and a two bladed prop. This kit has the Type II Cowl and windscreen with more modern gunsight and three bladed prop.

These Lifelike decals are a great reference source but unfortunately only come in 1/48 scale. The first plane is a Type I, the second one is a Type II and my subject . The differences can be clearly seen.


Upper view showing the heavy mottling and solid black top fuselage stripe.

I will be using my hoarded supply of Floquil Old, Bright and Platinum Silver paints for the NMF of this project. These paints IMO are pretty close to an Alclad finish.

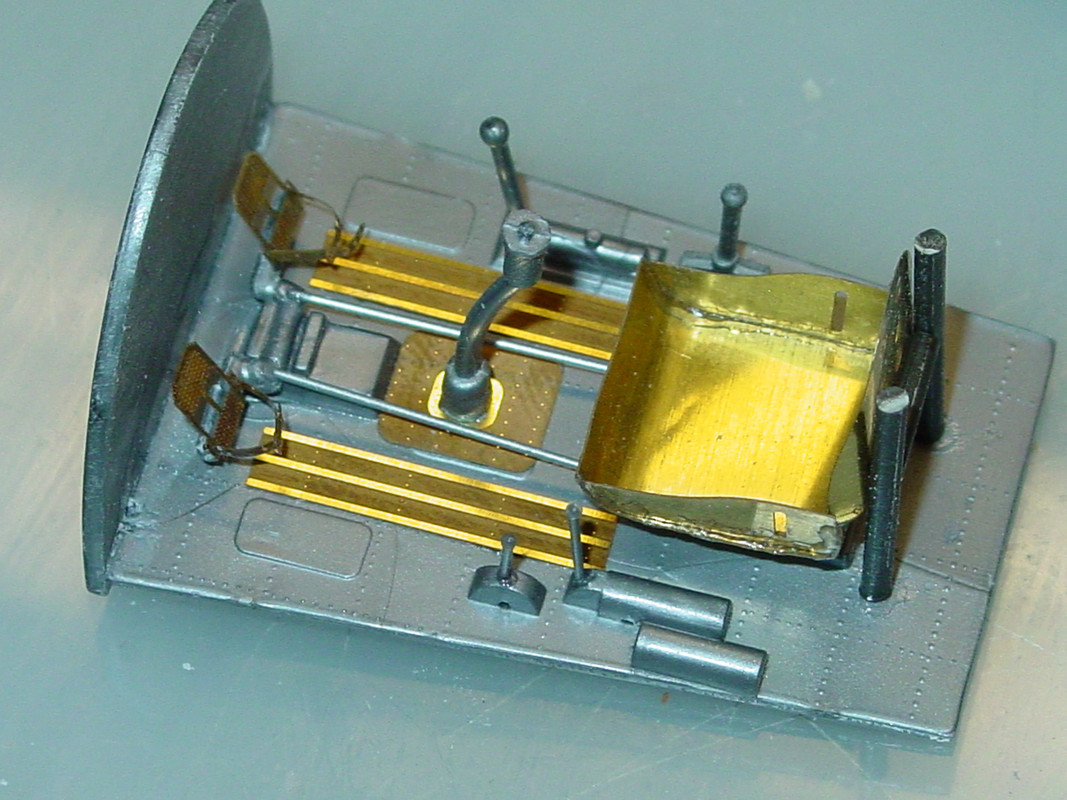
Been working on the Oscar's pit and at 1/32 scale the scratch building is a lot easier than the smaller scales. I stretched some sprue and created the aileron rods for the foot pedals, longer handles for the floor mounted instruments and the seat back turbular piece. The Eduard PE set adds tons of details. After I figure out any more added thingies from my junk pile, the pit will get some Nakajima interior green and then all the wires and plumbing in several colors will be attached to busy things up. The pit will get busier once the paint goes on and finally the seat belts will get attached.

Same for the sides.

 The IP will be next. Need to make a HL run to get some Testors flat black.

The crappy join lines on the bottom rear of the wings were filled in with stretched sprue and Tenax, then sanded. I spent several hours yesterday sanding, filling, checking and sanding. A dark silver grey line can be seen along the seam but there is no trace of a gap. The fabric texture was re scribed along the aileron bottoms.


The front LE section that had the top skin extending out sanded out nice too. It's flush and even now.
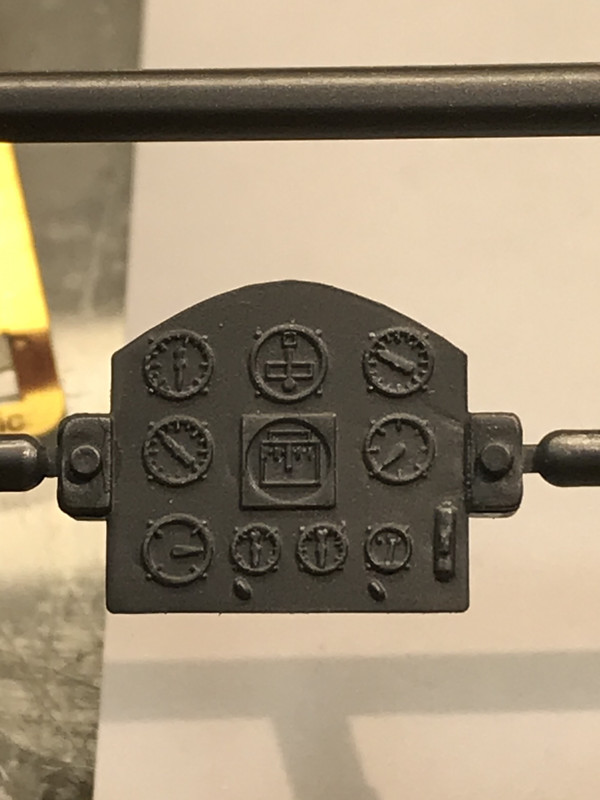
Here's the kit's IP

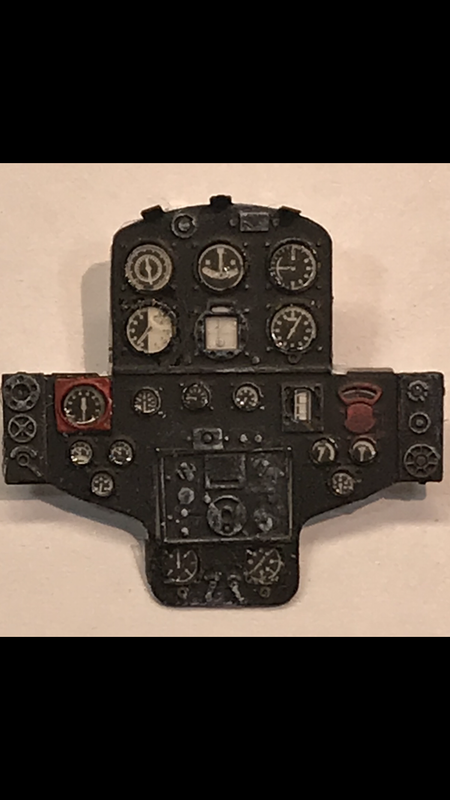
And the completed Eduard IP, what a difference!

Well this Hasegawa kit keeps throwing surprises at me. The engine, exhaust and cowling took several hours of careful fitting, carving and sanding to get a decent fit.

The exhaust pipes were way too thick to begin with extending past the firewall center part so that was sanded off along with removal of some of the center firewall thickness.  Both parts created a large ugly gap between the cowl and the fuselage.

Here are the parts after heavy sanding and removal of the side plastic on the fuselage for the exhaust pipe clearance.

I used my thin razor saw to remove the plastic in between the open cowl flaps. The Eduard pe set includes brass flaps as a wrap around part but they cover up the separation detail so I won't be using them. I have a rule about using pe, just because the pe parts are there doesn't mean I will use ALL of them. I only use them if they give better details than the original plastic parts otherwise they go to the junk pile for future scratch building. 

Here are the parts after sanding and fitting giving 120% better fit.

I also drilled out the nose gun depressions and added some brass pipes for the 12.7 guns.

The radial engine went together without an issue.


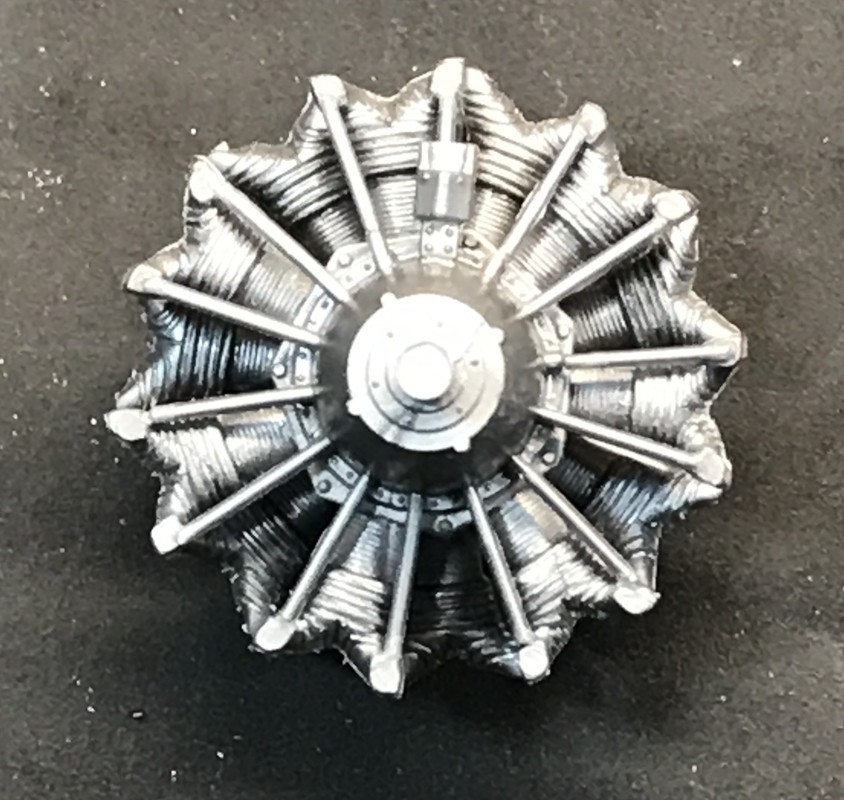
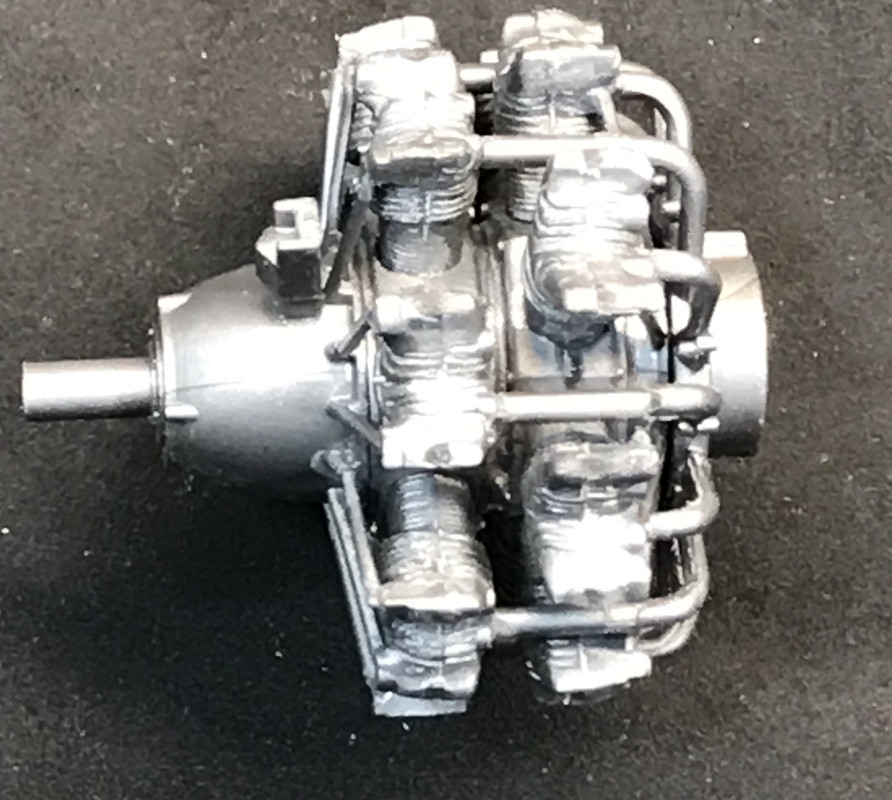
The engine will get painted and dressed up with brass wires from my junk box so that will be coming up soon.

I kept looking at the cowl flaps and noticed something missing and finally the bulb lit up, so the cut outs for both cowl flaps over the exhaust stacks were carefully cut so they can close, another goof by Hasegawa.

Speaking of goofs, no spinner back plate provided by Hasegawa either! I punched one out from those plastic cards that come in the junk mail.


 Plate fitted and will be painted and attached later

main gears OOB

The scissors were thinned a bit and holes drilled. Eduard provides pe parts for this but they look too thin and flimsy. I will add some copper wires for brake lines once mounted.


Now I have to wait for the Nakajima Interior Green paint for the pit to arrive from Scale Hobbyist. I thought I had some but none to be found in my paint stash.

 GIFMaker.org_jy_Ayj_O


Too many models to build, not enough time in a lifetime!!

  • Member since
    February 2012
  • From: Olmsted Township, Ohio
Posted by lawdog114 on Wednesday, March 4, 2020 7:45 AM
Awesome work. Looks like one of their older kits.

 "Can you fly this plane and land it?...Surely you can't be serious....I am serious, and don't call me Shirley"


  • Member since
    November 2008
  • From: Central Florida
Posted by plasticjunkie on Wednesday, March 4, 2020 8:18 AM

lawdog114
Awesome work. Looks like one of their older kits.
 

Thanks dog. You peaked my interest and couldn't find a date anywhere on the box or instructions. A quick search at Scalemates lists my model Kit # JS-089 as "New Tooled" for 1973. Geez that's the year I graduated from High School 47 years ago. Tongue Tied

 GIFMaker.org_jy_Ayj_O


Too many models to build, not enough time in a lifetime!!

  • Member since
    November 2008
  • From: Central Florida
Posted by plasticjunkie on Thursday, March 5, 2020 7:26 PM

Spent most of the day wiring up the Ha115 fourteen cylinder radial engine. It was quite a time consuming task but adds tons of detail.

 GIFMaker.org_jy_Ayj_O


Too many models to build, not enough time in a lifetime!!

  • Member since
    January 2015
  • From: Katy, TX
Posted by Aggieman on Thursday, March 5, 2020 9:33 PM

Great work on the engine.

  • Member since
    November 2008
  • From: Central Florida
Posted by plasticjunkie on Friday, March 6, 2020 6:38 AM

Aggieman

Great work on the engine.


Thanks Aggie. Unfortunately most details will not be seen once the cowl covers them up.

 GIFMaker.org_jy_Ayj_O


Too many models to build, not enough time in a lifetime!!

  • Member since
    June 2014
Posted by BrandonK on Friday, March 6, 2020 9:45 AM

You are certainly giving this kit a lot of love. Very nice work. This will be cool.

BK

On the bench:

A lot !! And I mean A LOT!!

2024 Kits on deck / in process / completed   

                         14 / 5 / 2  

                              Tongue Tied

  • Member since
    November 2008
  • From: Central Florida
Posted by plasticjunkie on Friday, March 6, 2020 7:40 PM

BrandonK

You are certainly giving this kit a lot of love. Very nice work. This will be cool.

BK


Thanks for posting BK. Yes

 GIFMaker.org_jy_Ayj_O


Too many models to build, not enough time in a lifetime!!

  • Member since
    July 2010
  • From: Tempe AZ
Posted by docidle on Friday, March 6, 2020 7:59 PM

PJ,

Everything is looking great so far! Loving your scratch building skills. I’m definitely following this one.

Steve


  • Member since
    November 2008
  • From: Central Florida
Posted by plasticjunkie on Friday, March 6, 2020 10:29 PM

docidle

PJ,

Everything is looking great so far! Loving your scratch building skills. I’m definitely following this one.

Steve


Thanks Steve. More to come .

 GIFMaker.org_jy_Ayj_O


Too many models to build, not enough time in a lifetime!!

  • Member since
    November 2008
  • From: Central Florida
Posted by plasticjunkie on Tuesday, March 10, 2020 6:27 PM

The pit is done.  I was gonna add more wiring but once the fuselage is closed up most of the details including the beautiful IP get hidden so I stopped here.


 GIFMaker.org_jy_Ayj_O


Too many models to build, not enough time in a lifetime!!

  • Member since
    November 2008
  • From: Central Florida
Posted by plasticjunkie on Saturday, March 14, 2020 2:12 PM

I have been plugging away at this model and I must say that I have never had so many issues with a Hasegawa kit as with this one. After many hours of fiddling, sanding and carving the cowl and engine fit properly. I'm pretty happy how things are fitting up front so now I can move to other issues.

The wing to fuselage gap was filled with stretched sprue and melted with Tenax. The bottom fuselage to rear wing join was terrible too requiring stretched sprue as filler and TONS of sanding to get things to line up. An RB Riveter was used to replace all the details lost to the sanding.

I made my own brew of Aotake paint using Tamiya metallic blue and clear green

That radial engine looks perfect in there

I also put together the tanks and both bombs. I will have the wing tanks on the Oscar and thinking of a simple dio setting with both bombs close by as if they were ready to be attached to a plane. The join lines were discolored by the Tenax but the fit is perfectly smooth and solid. Something about old silver plastic that does that.

 GIFMaker.org_jy_Ayj_O


Too many models to build, not enough time in a lifetime!!

  • Member since
    November 2008
  • From: Central Florida
Posted by plasticjunkie on Friday, March 20, 2020 10:12 PM

Ok slight change in plans. I decided to go with a scheme i like better from the 2nd Chutai, 54th Sentai stationed in the Philipines. I did the Jap Army Green mottle scheme and then chipped it. The hinomarus and unit markings will be masked and sprayed since decals are slim pickings in this scale for the Ki43. The black antiglare panel and control surfaces also need to be sprayed.


 GIFMaker.org_jy_Ayj_O


Too many models to build, not enough time in a lifetime!!

  • Member since
    February 2012
  • From: Olmsted Township, Ohio
Posted by lawdog114 on Friday, March 20, 2020 11:38 PM

plasticjunkie


lawdog114
Awesome work. Looks like one of their older kits.


Thanks dog. You peaked my interest and couldn't find a date anywhere on the box or instructions. A quick search at Scalemates lists my model Kit # JS-089 as "New Tooled" for 1973. Geez that's the year I graduated from High School 47 years ago. Tongue Tied


Awesome work! Gonna be a stunner my friend.  1973? Wow....I was darn near still dead. 

 "Can you fly this plane and land it?...Surely you can't be serious....I am serious, and don't call me Shirley"


  • Member since
    April 2015
Posted by Mopar Madness on Friday, March 20, 2020 11:50 PM

No this is what modeling is all about. Taking an old kit and making it look modern!!

Chad

God, Family, Models...

At the plate: 1/48 Airfix Bf109 & 1/35 Tamiya Famo

On deck: Who knows!

  • Member since
    November 2008
  • From: Central Florida
Posted by plasticjunkie on Saturday, March 21, 2020 7:02 AM

Thanks ld. That was my hs graduation year.

 GIFMaker.org_jy_Ayj_O


Too many models to build, not enough time in a lifetime!!

  • Member since
    June 2014
Posted by BrandonK on Saturday, March 21, 2020 10:56 AM

Fantastic work. This is gonna be a stunner.

BK

On the bench:

A lot !! And I mean A LOT!!

2024 Kits on deck / in process / completed   

                         14 / 5 / 2  

                              Tongue Tied

  • Member since
    November 2008
  • From: Central Florida
Posted by plasticjunkie on Saturday, March 21, 2020 4:37 PM

Thanks Chad and BK. Glad to see you guys following my efforts.

 GIFMaker.org_jy_Ayj_O


Too many models to build, not enough time in a lifetime!!

  • Member since
    November 2008
  • From: Central Florida
Posted by plasticjunkie on Tuesday, March 24, 2020 10:25 AM

I've been working on this to keep sane with all that's going on. I really never noticed that the canopy was in the closed position and would further block all my added details in the pit so I did some VERY careful surgery using the UMM saw to slice off the frame.

Surgery was a success!!!

The prop and spinner were painted and chipped

The hinoramus were sprayed 

I did the halo effect around the fuselage hinoramus

The lower surfaces of the ailerons and elevators were sprayed Japanese Army Grey lightened with some white for fading. The tail unit markings still need to be masked and prayed so that will be next.

 GIFMaker.org_jy_Ayj_O


Too many models to build, not enough time in a lifetime!!

  • Member since
    July 2019
Posted by Hoss WA on Tuesday, March 24, 2020 12:08 PM

Wow! Your work is fantastic so far.  Engine, IP, cowling, control surfaces, canopy -- your bold fixes are extremely impressive. Thanks for sharing. Looking forward to the finish. 

  • Member since
    November 2008
  • From: Central Florida
Posted by plasticjunkie on Tuesday, March 24, 2020 5:56 PM

Hoss WA

Wow! Your work is fantastic so far.  Engine, IP, cowling, control surfaces, canopy -- your bold fixes are extremely impressive. Thanks for sharing. Looking forward to the finish. 


Thanks Hoss for following my thread and posting.

 GIFMaker.org_jy_Ayj_O


Too many models to build, not enough time in a lifetime!!

  • Member since
    November 2008
  • From: Central Florida
Posted by plasticjunkie on Friday, March 27, 2020 8:09 PM

Ok so I kept looking at things and something was off while looking at reference photos. I goofed and separated the clear parts but the actul canopy was a one piece long part and not separated from the rear glass as I thought. Well thanks to the thickness of the UMM saw, I was able to rejoin the canopy frames together for a perfect fit. 

All the markings were sprayed and most of the small parts are attached. The next pictures I post will be of the completed plane. 

 GIFMaker.org_jy_Ayj_O


Too many models to build, not enough time in a lifetime!!

  • Member since
    November 2003
  • From: Naples, FL
Posted by tempestjohnny on Saturday, March 28, 2020 5:52 AM
Ernie. This is absolutely fantastic work. Your attention to detail really is making it all stand out


  • Member since
    November 2008
  • From: Central Florida
Posted by plasticjunkie on Saturday, March 28, 2020 9:35 AM

thanks for the kind words TJ.

 GIFMaker.org_jy_Ayj_O


Too many models to build, not enough time in a lifetime!!

  • Member since
    November 2008
  • From: Central Florida
Posted by plasticjunkie on Monday, March 30, 2020 11:06 AM

The Oscar is finally done. Here are what went into the build:

Eduard pe set used for the pit.

Brake lines made from wire. 

Stretched sprue used for landing gear positio indicators.

Copper wire used to wire the radial engine.

Cockpit detail enhanced with scratched built parts made from stretched sprue.

Landing light lens made from stretched sprue, and chrome chip bag punched out disc for the reflector.

Brass tubes used for 12.7 nose guns.

All markings were masked and sprayed, no decals used.

EZ line used for radio wire and stretched plastic hollow QTip handle used for wire insulators.

Paints used were Floquil and MM enamels. Flory dark grime washes used and oil paints for streaks and exhaust staining.


 GIFMaker.org_jy_Ayj_O


Too many models to build, not enough time in a lifetime!!

  • Member since
    July 2019
Posted by Hoss WA on Monday, March 30, 2020 10:52 PM

Outstanding! Great detail and I love the way the paint wear turned out. Congrats!

  • Member since
    April 2003
  • From: USA
Posted by keavdog on Tuesday, March 31, 2020 12:58 AM

Very nice.  Great finish.

Thanks,

John

  • Member since
    November 2008
  • From: Central Florida
Posted by plasticjunkie on Tuesday, March 31, 2020 12:02 PM

Thanks guys!

 GIFMaker.org_jy_Ayj_O


Too many models to build, not enough time in a lifetime!!

  • Member since
    July 2010
  • From: Tempe AZ
Posted by docidle on Tuesday, March 31, 2020 10:51 PM

That is one beautiful airplane ya got there PJ. Well done!

Steve


  • Member since
    February 2012
  • From: Olmsted Township, Ohio
Posted by lawdog114 on Wednesday, April 1, 2020 1:24 AM

Turned out great!

 "Can you fly this plane and land it?...Surely you can't be serious....I am serious, and don't call me Shirley"


JOIN OUR COMMUNITY!

Our community is FREE to join. To participate you must either login or register for an account.

SEARCH FORUMS
FREE NEWSLETTER
By signing up you may also receive reader surveys and occasional special offers. We do not sell, rent or trade our email lists. View our Privacy Policy.