SEARCH FINESCALE.COM

Enter keywords or a search phrase below:

Tamiya 1:48 Birdcage Corsair F4U-1 [Complete]

16801 views
84 replies
1 rating 2 rating 3 rating 4 rating 5 rating
  • Member since
    August 2015
  • From: the redlands Fl
Posted by crown r n7 on Wednesday, July 8, 2020 6:20 AM

That's some fine detail work 


 Nick.

  • Member since
    June 2013
Posted by bvallot on Saturday, July 11, 2020 2:51 PM

Thank you Joe and thank you Crown. =] I hope you can all put up with my strugglebus lighting setup. I didn't quite pull off the best pictures here. Apologies in advance.


Engine Exhausts

I briefly jumped over to address the exhausts situation before getting too far ahead. Early on it was an area of frustration trying to solve the problem of fitting and matching up the engine to the fuselage and do it accurately. Since I wasn't opening up the cowling cover over the exhaust stacks circling around the engine, I settled for something simplier.  What you see below is the arrangment I came up with. I tried my best to limit any modification to Tamiya's well engineered kit so I wouldn't create more problems to navigate down the road.

Pretty simple. I had the aluminum tube already for uses such as this. I used a no. 11 blade to cut the tube at an angle and brought out a small rounded sanding file to thin down the sides and touch up the interior of the exhaust for any knicks or uneven edges. The aluminum tube makes shaping much easier as it's a softer metal. You can get a small set of sanding files with different shapes to accomodate different curves, angles, and whatnot...handy thing to have.

 Untitled by Britt Vallot, on Flickr

 Untitled by Britt Vallot, on Flickr

 Untitled by Britt Vallot, on Flickr

I got these down as thin as I could and glued them in with an epoxy so they wouldn't dare move. =] I'm pretty satisfied with this. I plan to have some sort of cover built out of lead foil to make up the "pocket" they drop down into which is part of the bulkhead around the motor mount ring.

Locking up the Front Office

I've finally gotten this part dressed up and ready. I wanted to include a pic with the primer on as it helps to show some of the detail here without all the white throwing it off.

 Untitled by Britt Vallot, on Flickr

 Untitled by Britt Vallot, on Flickr

And here we are with some paint finally.  Early Corsair cockpits were a very dark color. The factory Erection and Maintenance instructions called for Dull Dark Green (FS 34092). According to IMPS Stockholm, crashed examples may indicate black. It's possible these may have been field repaints during maintenance, but it's not clear. Either way I went with the factory specs as I also wanted a bit of color to break up the different planes and shapes that are already going to be hard to see.

 Untitled by Britt Vallot, on Flickr

 Untitled by Britt Vallot, on Flickr

 Untitled by Britt Vallot, on Flickr

As always, I like to share my paint mixes for anybody using Tamiya paints as there isn't always a better source around for mixing certain colors. I have an app that helps me find a way to arrive at a color without having to eyeball and waste a bunch of paint. 

 Untitled by Britt Vallot, on Flickr

Here are a few ways at putting together a Dull Dark Green. I try to find the easiest way to the color first, but if I don't have the paints necessary then I'll work up some combination with what I do have. The two larger inserts are the two paint mixes I ended up using this time around. The other pink color here represents the Salmon primer that was used on early production Corsairs. Salmon was a tinted chromate primer made by mixing Indian Red pigment with the raw zinc chromate powder. It was also used briefly by the Navy as a color indicator to note surfaces that were double coated surfaces of the primer. The salmon primer color can be accomplished with Tamiya Buff and Red (2:1 respectively) but that doesn't quite get close enough to the FS equivalent. There happens to be two FS shades for this color as there is some discrepancy here as well. I stuck with FS 32356 as it's the lighter of the two color swabs and would be easier to see in dark areas. Vought's early Corsairs called for all interior areas other than the cockpit to be covered with the Salmon primer.

 by Britt Vallot, on Flickr

Again, I apologize for my poor lighting. I broke a lamp and haven't been able to replace it just yet. I did the best I could here. My closer view of the cockpit sidewalls aren't even worth showing as the detail with my iPhone can't show any of this with any real clarity due to low light. Since these pictures were taken I did manage some extra lights but I will have to do better to address my setup.

A view of the tail gear bay with some light weathering.

 Untitled by Britt Vallot, on Flickr

Here is a set of pictures to show some of what's going on here as I piece it all together. I've included some of the necessary plumbing that is visible. I've seen pictures of cockpits that were way more crowded and crammed with cables and cords and some cockpits that were relatively clean. I decided to stop here as at 1:48 it gets real difficult to place every single damn wire or pipe or cable...as I'm writing this...I may still add a few more as I still have the bottom opened up. I know--you don't have to say it.

 Untitled by Britt Vallot, on Flickr

 Untitled by Britt Vallot, on Flickr

 Untitled by Britt Vallot, on Flickr

And here's how dark it gets after we lock all this away forever in obscurity.

 Untitled by Britt Vallot, on Flickr

I am really happy how the throttle quadrant turned out. I am dissappointed that it's too dark to pop better. The fit here throughout was remarkable. I didn't have any trouble whatsoever. Tamiya came up with a fantastic little cockpit here and with a little help it can look even better. None of this is terribly difficult folks. It just requires a bit of patience. You may note a few touch ups here and there through the pictures and as always after zooming in I see little spots I have to go back and fix up. I was a little anxious to get the fuselage halves closed up, but now looking at back through all of this I may show some extra love to a few items I overlooked.  I left off the cover to the folder on the right side of the pilot, a hose popped off the O2 canister, and I may dress up the seat belts just a touch.

Next, I'll be moving on the carburetors and misc internal structures matching up to the fuselage before addressing the landing gear bay.

Thanks for watching. =]


On the bench:  

Tamiya F4U-1  Kenneth Walsh


  • Member since
    March 2012
  • From: Corpus Christi, Tx
Posted by mustang1989 on Sunday, July 12, 2020 7:26 AM

This is just outstanding workmanship going into this bird. I always learn alot from you on your builds Britt. 


 Forum | Modelers Social Club Forum (proboards.com) 

  • Member since
    June 2013
Posted by bvallot on Friday, July 24, 2020 10:41 PM

Thanks mustang1989! Always happy to pay it forward. =]

Carb Intakes

Last time I visited the Corsair I wanted to open up this section to improve the reality of it. It was a little bit crude, but effective. I thinned the back side of the louvers that directed airflow to the carburetor and supercharger and cut into them to allow them to be seen as the vents they are. My first attempt at this years ago left some tiny scratches that are really hard to see, but this time I wanted something cleaner. Also, this route limited how they would be seen as they are curved structures and I was cutting straight into them to open them up. Here's what I decided to do this time around.

 Untitled by Britt Vallot, on Flickr

In the first top left frame you see the original kit piece and one already altered. It was a test piece. I sanded the backing of the louvers with a router to quicken the work and slowed down with a sanding stick once I got close. A no. 11 blade opened all of this up. I next repeated the same for the oil cooler intake as this will be going too. For the Tamiya Corsair, the kit piece really is perfectly fine and quite well depicted for the oil cooler. The Eduard PE detail set just happens to have a beautifully rendered part for this that I can't pass up and wanted to include. Otherwise there's really no need to alter this spot...a little wash will bring the oil cooler just fine. The rest of this starts to speak for itself. I slowly work this area open. The louvers I cut were bent slightly before placing in the intake. These were sanded down thin. Pay attention to their staggered placement and angle them backwards as you move closer to the oil cooler.

 Untitled by Britt Vallot, on Flickr

 Untitled by Britt Vallot, on Flickr

 Untitled by Britt Vallot, on Flickr

The can for the oil cooler was cut from plastic tube. I'll have to double check the size. It was a perfect fit. (7/32" item no. 227)  I'd like to pretend I measured twice and what not but...CoVid...so...I tried what I had and luckily my math was right from way back when I was trying to work it all out. I really didn't want to have to go out all over the place looking for a substitute =P This was dryfitted to ensure propper room for other features coming next as well as kit functions.

 Untitled by Britt Vallot, on Flickr

Another item that can be addressed is the small rib and inboard/outboard wall to the forward part of the landing gear bay. Tamiya has both of these parts as vertical when they should be at an angle. There is nothing in the way of the engineering that would be in the way of this so I'm not sure why it would be molded this way. Possibly just an error. But also an easy fix. The top left frame shows an overlay of where these parts line up. If you pay attention to how the rivets over the top and bottom of the wing over this section appear, then it's easy to see where the actual wall lines up. The yellow highlighted area shows the angled alignment for where they need to be.

 Untitled by Britt Vallot, on Flickr

The highlighted yellow seen here is extra framing that should be deleted. You'll see in the next few pictures where I've corrected it. Sorry for the laziness there. Time is a premium with two toddlers. =] You also see my dryfit testing to check for errors in scale and fit. I decided to leave the outboard wall alone since I'd be covering it up. I wanted it to help stiffen up the wing and figured it wouldn't hurt to leave it.

 Untitled by Britt Vallot, on Flickr

Of course I've now opened this area of the aircraft up to be seen and I'm now obligated to fill it with stuff. The internal structure here for the intake dam is not so difficult to scratch out. Really, you're even getting help from the top and bottom wing so there's even less to build up which cuts down on scale issues from your construction parts. 

There's a circle I've cut out which is the compressor air intake for the air duct that feeds the supercharger. I'm looking to also place some kind of tube that I can elbow off at 45º or so, but it's looking like it won't be necessary as it's pretty dark in there. Go figure. Also present is a bit of framing and the air dam's back wall. If you look aft of the compressor air intake hole you'll note the thin piece of plastic laid behind it. That's the radiator. I've cut small slices into it lightly and will bring this out with a wash after paint. Currently I put a thin coat of the Detailer for the sake of this WIP to show what's going on. The back wall behind all of this is the main wing spar and framing. This was carefully lined up and cut with the adjoining top wing in mind.

 Untitled by Britt Vallot, on Flickr

 Untitled by Britt Vallot, on Flickr

With this section pretty much wrapped up with added scratchwork, I've moved on to the rest of the gearbay. I was hesitant to utilize the PE part here, but I think it'll be worth it. There is a small bit of construction to fill in here that is absent from the kit. I've also gone ahead and added the wingfold connection that has the interior outboard wall of the gearbay. Be sure to add the extending spar the kit provides to support the wings if you're adding this part at this stage. Holes have been predrilled for plumbing. There's a hydraulic unit that controls the landing gear and doors that's decently molded here. My original plans were to gut everything, but this is represented small enough and well enough that I can work with it.


So, that's where I'm at for the moment. Next, I'll include plumbing for the gearbay and a few other extras in the cockpit and exhaust and prime and paint before closing it all away.

Thanks for watching. Questions and comments are always welcomed. =]


On the bench:  

Tamiya F4U-1  Kenneth Walsh


  • Member since
    December 2002
  • From: Northern California
Posted by jeaton01 on Saturday, July 25, 2020 12:15 AM

Nice details, Britt.

John

To see build logs for my models:  http://goldeneramodel.com/mymodels/mymodels.html


  • Member since
    June 2013
Posted by bvallot on Sunday, July 26, 2020 6:36 PM

Thanks John. I'd say this is the fun part, but really every part is the fun part.  =]

On the bench:  

Tamiya F4U-1  Kenneth Walsh


  • Member since
    May 2013
  • From: Indiana, USA
Posted by Greg on Sunday, July 26, 2020 7:19 PM

Good Lord, man....

Hadn't even recovered from that cockpit and you go throwing custom oil coolers and what-not around. Wink

Amazing stuff.


  • Member since
    June 2013
Posted by bvallot on Thursday, July 30, 2020 10:26 PM

Greg, I've been waiting years to make those custom oil coolers and intakes. It felt good. Side note--it took about an hour for each of those. Of course it never quite seems that long when you're face down in the middle of it. You're hilarious too by the way. I do appreciate it!!

Keep bringing the sunshine cause I just ran into a small fit issue I've no doubt is self-inflicted. But that's for later. I might be able to wrangle it in.


Wrapping up the Wheel bay

I made a game day decision on leaving the kit parts alone that include the hydraulics controls for the wheel bay doors and working mechanisms for the landing gear. I'm quite happy with the results. I think next time though I may go ahead and remove the pistons that work the doors for more ease of shoving all this plumbing in there. Leaving it alone required me to cut and paste more than I first planned to do. But c'est la vie. It's in there. I'm happy. Here it is.

 Untitled by Britt Vallot, on Flickr

I did make use of one PE part just for the sake of having one extra different diameter set of cables running through here. I was going to pull some sprue real fine, but the PE creates a consistent size without having to make multiple pulls and it's already cut to fit. It's not bad.

 Untitled by Britt Vallot, on Flickr

A coat of primer, and then a coat of primer. =P I sprayed the Salmon color down first as this would have been the practice for early Birdcage Corsairs. The gear bay would have been finished in the lower surface color of ANA 620 Non Specular Light Gray. After the Salmon color went on, I came back over it with a quick spray of my wife's hairspray before laying down the Light Gray as I plan to chip away a bit to weather this gear bay properly. 

 Untitled by Britt Vallot, on Flickr

Here I softened this area with a brush loaded with water and allowed it sit a moment. I chipped away here with a toothpick until I was satisfied with the look. I didn't want anything over done. The toothpick allows you to work a very tiny area at a time without scratching into the plastic. 

 Untitled by Britt Vallot, on Flickr

 Untitled by Britt Vallot, on Flickr

There are a few extra pieces here I wanted to include to help dress this part up and help it come to life. The kit doesn't include these. It's not terribly hard to come up with but it will take some trimming and matching. 

 Untitled by Britt Vallot, on Flickr

Oil coolers and intakes finding their new homes.

 Untitled by Britt Vallot, on Flickr

And viola.

I'm happy to finally tackle this part, but honestly quite happy to be past it too. I'm very anxious to marry this fuselage to the wings so I can get on all the sanding and fine tuning that comes next. 

On the bench:  

Tamiya F4U-1  Kenneth Walsh


  • Member since
    February 2012
  • From: Olmsted Township, Ohio
Posted by lawdog114 on Friday, July 31, 2020 12:49 AM

You are the scratch-building king Britt.  The best I've ever seen.  That ain't no BS.  I look forward to the rest.

 "Can you fly this plane and land it?...Surely you can't be serious....I am serious, and don't call me Shirley"


  • Member since
    June 2013
Posted by bvallot on Friday, July 31, 2020 9:07 PM

Thank you Joe. Coming from you that's saying a lot. Very much appreciated. 

On the bench:  

Tamiya F4U-1  Kenneth Walsh


  • Member since
    January 2015
  • From: Katy, TX
Posted by Aggieman on Saturday, August 1, 2020 11:28 AM

This is a tutorial on scratch-building.

Simply awesome work on what I suspect is a very good kit right out of the box (I have this kit in my stash but I've built a couple of Tamiya's later variant Corsairs, among the best kits I've ever had the pleasure of building).

  • Member since
    June 2018
  • From: Ohio (USA)
Posted by DRUMS01 on Saturday, August 1, 2020 11:42 AM

It is really enjoyable watching your work progress. Thanks for sharing this with us. 

Ben

"Everyones the normal until you get to know them" (Unknown)

LAST COMPLETED:

1/35 Churchill Mk IV AVRE with bridge - DONE

NEXT PROJECT:

1/35 CH-54A Tarhe Helicopter


  • Member since
    June 2013
Posted by bvallot on Monday, August 17, 2020 11:01 AM

Thanks Ben! Very much appreciated. 

Aggieman, thanks you and you sir are quite the prolific modeler. I was peeking through some of that last night and still didn't get to the 2nd part. It became bedtime for my son, so it was lights out. I hope to get through the rest tonight. You must have a big house! =]


Wrapping up loose ends


I was able to manage a few extras inside the cockpit without disturbing the work already done. I added the cover to the folder on the pilot's right and placed a few extra pieces of plumbing for the controls on the left. Some photos make this area look some what straightforward and simple and others look like an overcomplicated mess. I believe what I may be seeing in some of these messier photos are lines that no longer work or go anywhere but are left in place and other newer lines are built in around them. I see this busier trend on pics of planes that are refurbished. May be something to that. If anybody has some input here, I would more than love to hear from you. =]

 Untitled by Britt Vallot, on Flickr

Exhausts

Quick series of pics of what's going on here. I'll add some extra weathering later on during painting. The solution I settled on here amounted to the use of some lead foil that I cut and bent into shape to make up the under side of the engine firewall that fits around the engine mounting ring. I selected a piece of plain lead foil that was sturdy. I get these from wine bottles. Any time I see a matt black lead foil top or something that stands out as usable for scratchbuilding then I'll save it for later. In this case, I was drawn to this piece because it was thicker and sturdier. It also had a shiny and a dull side which I liked. That's often the case with the way these things get rolled out and made. Anyhow, I needed the dull side here and settled for keeping this all one piece. I didn't want separate components moving and shifting around during my fitting to the bottom fuselage/wing part. It took some thoughtful geometry to fit around the exhaust opening for the bottom, but it wasn't too bad. Here's how I ended up.

 Untitled by Britt Vallot, on Flickr

 Untitled by Britt Vallot, on Flickr

 Untitled by Britt Vallot, on Flickr

You can see where the lead foil peeks through around the forward exhaust stack. I'll be glueing this down with CA to keep it flush. I left it out to let the shape be noticed for the sake of the picture. 

Very happy with this. Down the road a ways I'll be dressing this up just a bit more.

Married!

It's beginning to look a lot more like a Corsair. =] Don't pay any attention to the holes I filled around the engine firewall. I was previously planning on something different with the exhaust but later found it wouldn't work out. I also created a small issue with the top and bottom of the cowl marrying up. This is the third Tamiya Corsair I've built so far and I've never had this issue or seen anyone else with it. I'm mostly certain it's due to the exhaust stacks being a bit too close to the edge. Easy fix for the future. And still easily fixed here. A little CA goes a long way to even up those gaps. A coat of primer will show this better later.

 Untitled by Britt Vallot, on Flickr

 Untitled by Britt Vallot, on Flickr

Possibly too difficult to see here, but after sanding down the seams to bring everything together, I went back to put down the actual panel lines that exist right here for the inboard part of the wing. I'll call this out better in the next set of pictures I do after a primer is down. You should be able to make out where I cut back into the leading edge of the wing with my exacto blade. The panels do not match up seamless across edge. They should appear broken up. If any judge wants to pull out his flashlight and give you grief about your seams, tell him where he can put that light. These lines belong here.

One thing I started working on was adding some extras for the surface of my Corsair. I originally wanted a fairly weathered plane and I thought I could help add to the effect with some stressed skin around the ribbing of the fuselage. I went about this a little differently this time. I used my round metal file to make rounded lines along the ribbing of the aircraft. I penciled these out and slowly started to sand into the plastic. I followed weathering patterns of Corsairs in the PTO. I didn't want anything wild. Just enough to make a subtle difference and help with weathering that comes after paint.

 Untitled by Britt Vallot, on Flickr

You may have also noticed that I couldn't help myself and went and took off the rudder. Thought about it before and then moved on...and then had to see the small horizontal gap that's very often seen under the mass balance and base of the rudder. So...yeah. Absolutely not necessary, but I'm often after very meticulous details to further help convince the eye that this is a 1:1 aircraft. So anyway! Easy to see what's going on. Removing this part had me dress up the back end of the vert stab. None of that will be seen really but I needed something there other than a gap. I addressed the trim tab by removing it and cutting off the kit part. This spot is not too bad but the elevator trim tab actuators could be replaced for a more believable appearance. I'll be dealing with those later. The trim tab rod is from pulled sprue. A small thin plastic tab makes the joint from the trim tab rod to the trim tab itself and all of this is glued together with Tamiya Extra Thin Cement. Easy.

 Untitled by Britt Vallot, on Flickr

 Untitled by Britt Vallot, on Flickr

This wraps up all the major construction for this build. A few odds and ends to fix up with the wings and elevators and then moving on to Prime and Paint. =]

All comments and questions are welcomed. I try not to over-explain things these days, but if there is something I didn't spell out enough, then don't be shy. Thanks for watching.

On the bench:  

Tamiya F4U-1  Kenneth Walsh


  • Member since
    February 2012
  • From: Olmsted Township, Ohio
Posted by lawdog114 on Monday, August 17, 2020 5:38 PM

Exhausts are beautiful. Again, your scaratchbuilding skills are quite impressive. 

 "Can you fly this plane and land it?...Surely you can't be serious....I am serious, and don't call me Shirley"


  • Member since
    November 2003
  • From: Naples, FL
Posted by tempestjohnny on Monday, August 17, 2020 7:10 PM

lawdog114

Exhausts are beautiful. Again, your scaratchbuilding skills are quite impressive. 


Ditto


  • Member since
    June 2013
Posted by bvallot on Sunday, October 11, 2020 10:37 PM

Thanks Joe and TJ. Always appreciated. Sorry I've been away for so long. It's hard out here for a working dad. Let's get in to it. =]


Winging it

Here's a brief little walk into some extra love for the Corsair wings. Any chance to add a little extra depth to an element of interest and I'll jump all over it. For the MG barrels of the Corsair it's an easy addition. Everything here is pretty self explanatory. I used aluminum tube for the barrel tubes that the 50 cals slid into. These fit onto a thick plastic base that I steadied with another piece that I sanded into ribbing to provide extra strength for the wing. The next step with fitting these folding wing parts together can sometimes be a bit cumbersome if you're not careful so I provided a little extra engineering here. Plus, I'll be riveting next as well, so I won't want to deform the wing while pressing into it.

 Untitled by Britt Vallot, on Flickr

And the marriage went well with out too much trouble. There's always some kind of hitch  (sorry I've been pun crazy lately). When bonding together the wing halves, one spot got a little too hot and needed a little extra piece of scratch plastic to fill -- noted in white. Also added the small glass window for the gun camera seen just inboard of the 50s. It's masked currently so it's hard to see. A thin slice out of the clear sprue and a little careful whittling is all it takes to fit it in there.

 Untitled by Britt Vallot, on Flickr

 Untitled by Britt Vallot, on Flickr

It's Riveting.

Finally getting somewhere. I've got the primer on here. It's Alclad Grey microprimer. Been pretty happy with it. Here's a few pics showing some of the surface detail that's now better visible.

 Untitled by Britt Vallot, on Flickr

 Untitled by Britt Vallot, on Flickr

You may note a small square I've notched out just inboard of the 50s on the port wing. I've been unable to locate it's name or purpose, but I've seen it shown on Birdcages on the BuNos during Walsh's Corsair that I'm building. All I did was cut it out the square (before mating the wings) and place it on the under side and represent what I was seeing. Nothing fancy. Anybody got a bead on this particular part...let me know =].

 Untitled by Britt Vallot, on Flickr

 Untitled by Britt Vallot, on Flickr

 Untitled by Britt Vallot, on Flickr

The trim tab actuators have been removed and replaced with pulled sprue. THINLY pulled sprue. It's the little things. Trim tabs repositioned in a way I've seen commonly positioned in parked Corsairs.

 Untitled by Britt Vallot, on Flickr

 Untitled by Britt Vallot, on Flickr

 Untitled by Britt Vallot, on Flickr


The Other Primer

Modeling a PTO Corsair I of course was ready to jump into weathering the absolute dog sh!t out of this one, but one of the main photos I'm referencing for my build reveals a relatively clean and new Birdcage that Walsh had at the time. The other series of pictures I have leave a lot to guess about the actually paint scheme of the Corsair he's flying. These planes got so worn and grimey that's it's nearly impossible to tell with black and white photos. I think I may settle for something more lightly worn. 

Here's the beginning of the chipping process. I start by adding an aluminum color to make up the actual skin of the aircraft. Alclad Aluminum is my go to. After this I pass a coat of my wife's hairspray over the sections I plan to weather. Next, is the yellow zinc chromate primer color. Once it's dried, I pass a brush I've loaded with water across the surface and then slowly pick away at the parts I plan to leave showing through with aluminum. I'm not looking for much weathering here so I'm being very conservative.

 Untitled by Britt Vallot, on Flickr

 Untitled by Britt Vallot, on Flickr

 Untitled by Britt Vallot, on Flickr

I'll actually use these photos to look back over where the aluminum is later on once this is covered up. I want only very little of the aluminum and zinc chromate yellow showing through the Blue-grey upper wing surface. Each step gets sealed with a flat coat. Aluminum - flat, hairspray - zinc yellow chromate - water/chip - flat, next coats of paint....

Moving on.

Paint!

Finally, the fun stuff. I've moved away from working the panel lines with preshading for black basing. Both certainly have their place. I've become a bigger fan for the control it offers in the subtle mottling and weathering that occurs within the paint. It can also allow for a nicer foundation in later weathering. I never start with actual black. Since I'm working with a Blue-grey upper surface and light grey lower surface, I'm painting a very, very dark Sea Blue. This provides the darker modulations that will be seen in later coats. The next step it mottling in a very light blue over the top of the wings and an even lighter blue (practically white) over the fabric doped sections on the outboard wings. The lower surface inboard wings and fuselage gets a very, very light grey that's also almost white. Here's some of that now.

 Untitled by Britt Vallot, on Flickr

 Untitled by Britt Vallot, on Flickr

 Untitled by Britt Vallot, on Flickr

Taped off the strip for the walkway notification. The darker blue will work better here than straight black as well since this wing will be some what weathered.

 Untitled by Britt Vallot, on Flickr

 Untitled by Britt Vallot, on Flickr

 Untitled by Britt Vallot, on Flickr

 Untitled by Britt Vallot, on Flickr

 Untitled by Britt Vallot, on Flickr

 Untitled by Britt Vallot, on Flickr

 Untitled by Britt Vallot, on Flickr

 Untitled by Britt Vallot, on Flickr

You'll note I left the rudder incomplete. Nothing special about it. Just ran out of time. My sweet little girl came looking for me and needed my attention and it was rather late in the day if I recall so it was time to stop. 

Before moving on to the blend coat, I have to address the windscreen. I spent a little time today fooling with that. First came the bullet proof glass.

Not too hard to scratch out. I had a plan to put a thin strip on top of my side pieces to elbow them and 45 the corners so they met nice and pretty at the top. Sounds a little extra but it's really no different than anything else you'd be doing by scratching it. The results are worth it. Creates a little bit more depth behind your set up and it's miles ahead of the thick plastic piece you have to shove in there that the kit provides on certain variants. Blah. Here's what I did.

Measured the dimesions of the Squadron windscreen's front flat window pane. I say measured...eyeballed it. I trimmed a small section of the "glass" from a thin sheet of clear plastic sheet. Great stuff. Checked my math. =] Then, used the dimesions of the "glass" to make the border it will sit in. Tamiya ETC to glue it up and then a few swipes of primer and Tamiya NATO Black and a Semi Gloss coat to seal it. Then, once that's dried I very thinnly apply some white glue and drop in the "glass." Not much to it. I will admit that the final cut was the second attempt. =P the first one was just a bit too big. lol

Another thing of interest that can be seen are the small rivets that appear on the dash. I had a clever idea to take a small dab of CA glue and place the very tip of my exacto blade into and make very tiny dabs along the surface of the dash where these rivets are found. They shrink up a little and make tiny hard raised rivets that will catch the light and even make a bit of shadow. Just enough. Quite pleased with it and wanted to share. Unfortunately, it looks as though most of this will go unseen once the windscreen is attached. C'est la vie.

 by Britt Vallot, on Flickr

 Untitled by Britt Vallot, on Flickr

 by Britt Vallot, on Flickr

 Untitled by Britt Vallot, on Flickr

And that's a wrap for now. I've got the windscreen cut up...repaired....and the inner lead foil strips laid inside the framing. Next will be masking and primer and then fixing it to the fuselage so I can blend in whatever lip I may need to level out. Then PAINT. =]

Any questions or troubleshooting about the chipping process, or painting, or anything...hit me.

Happy Monday guys. Carpe diem.  =]


On the bench:  

Tamiya F4U-1  Kenneth Walsh


  • Member since
    April 2003
  • From: USA
Posted by keavdog on Sunday, October 11, 2020 10:53 PM

Fantastic.  I really appreciate your detailed writeups, not to mention some serious skills!  Thanks for sharing. 

Thanks,

John

  • Member since
    December 2018
Posted by Tosh on Monday, October 12, 2020 6:33 AM

This caused me to get a out of body experience!  Fantastic!

Your friend's, Toshi & Ezra

Reside in Streetsboro, Ohio


  • Member since
    June 2013
Posted by bvallot on Friday, October 23, 2020 2:46 PM

Thank you John. And you're welcome. I'm glad to know it's of some use. These WIPs are getting tricky to make time for. I'm happy to pay it forward.

Toshi, I am always happy to see you busy on the forum. You've become quite the prodigous modeler. You're lucky to have someone who lets you get away with that! =P

On the bench:  

Tamiya F4U-1  Kenneth Walsh


  • Member since
    December 2018
Posted by Tosh on Friday, October 23, 2020 3:00 PM

bvallot

Thank you John. And you're welcome. I'm glad to know it's of some use. These WIPs are getting tricky to make time for. I'm happy to pay it forward.

Toshi, I am always happy to see you busy on the forum. You've become quite the prodigous modeler. You're lucky to have someone who lets you get away with that! =P


As always, I'm only a student to you all.  I'm most honored and humbled.

Your friend's, Toshi & Ezra


Reside in Streetsboro, Ohio


  • Member since
    June 2013
Posted by bvallot on Friday, February 19, 2021 11:41 PM

Back again from a long hiatus. That's how it goes. =/

I recognized there were a couple of features I left out which are kind of incidental but I still wanted to acknowledge them as I feel it's a small thing that can lead to bigger thinking and I want to pay it forward always. That's the point of a Work In Progress.

When working out of black basing for a paint scheme, I believe it can be advantageous to use very dark colors that are not literally black. What we're trying to achieve is a contrast between light and dark colors so as to add some depth at what is occurring on the surface of the paint (i.e. joints, weathering, dirt, grime, oil slick, etc). Painting in black on a canvas for a landscape or what-have-you largely just isn't done. A darker shade of a particular color might be used but not literally black. A shaded grassy scene in the park will certainly have lighter and darker greens that may get warm with yellows or cooler with blues, but often not darkened so heavily with black. I'm bringing that same mindset over to modeling with black basing. The blue-grey scheme on top has a Sea Blue color which is very dark and will contrast very well with the lighter blues represented annnnd will also share some blue components to tie it together a little better. The same is going on for the bottom of this Corsair. A very Dark Grey is applied to the bottom. Together these colors give some separation from a cooler impression to the top coat and a warmer impression to the bottom. Unfortunately, I failed to get a picture of this transition. Here is the best I could find.

 Untitled by Britt Vallot, on Flickr

If you follow along the middle of the fuselage, you can make out the transition of the darker colors. Big takeaway here is having a dark enough color to make the contrast between the light and dark colors in the scheme. Darker paint schemes present a different challange that I can discuss in another post.

[edit: I did find one example I can share. You'll note here on the cowling where this is represented well. The darker Sea Blue on top and the Dark Grey below is a subtle difference but enough to help push our different color schemes in the right direction.]

 2021-02-21 16:31:33 by Britt Vallot, on Flickr

Paint 2.0

Finally getting to the fun stuff where all that hard work comes to life. I start from the bottom up where I can blend top/bottom colors without ugly transitions. The blend coat is put down in thin coats so as not to lose the the subtly of what's underneath. I mixed up an batch of ANA 602 Sky Gray with amazingly an almost 1:1 ratio of Tamiya Flat Black and Flat White.

 Untitled by Britt Vallot, on Flickr

Surprised how easy it was to get that gray without more troubleshooting. A brief comment on that though. When mixing paints like this, start with your light color and add a bit of the darker color to it even when you have a ratio in mind. Darker pigments tend to take over more quickly. =]

 Untitled by Britt Vallot, on Flickr

Very happy with the results. The top coat required a bit more focus as I have a few spots where different weathering patterns are occurring. I'll elaborate a little as I go, but if anyone wants to hear more about a certain area just speak up in the thread. To maintain control throughout the painting of the top USN Blue-grey (FS 35189) I'm using Tamiya XF82 which is practically dead on for Blue-grey. This way when I need to go a little lighter or darker due to fading/weathering...I'm working from the same base color. Normally, with all the mixing I do at different intervals it can be hard to consistently mix the exact same color when needed. XF82 is a winner! Light coats blend this marbling nicely.

 Untitled by Britt Vallot, on Flickr

 Untitled by Britt Vallot, on Flickr

 Untitled by Britt Vallot, on Flickr

 Untitled by Britt Vallot, on Flickr

 Untitled by Britt Vallot, on Flickr

 Untitled by Britt Vallot, on Flickr

 Untitled by Britt Vallot, on Flickr

 Untitled by Britt Vallot, on Flickr

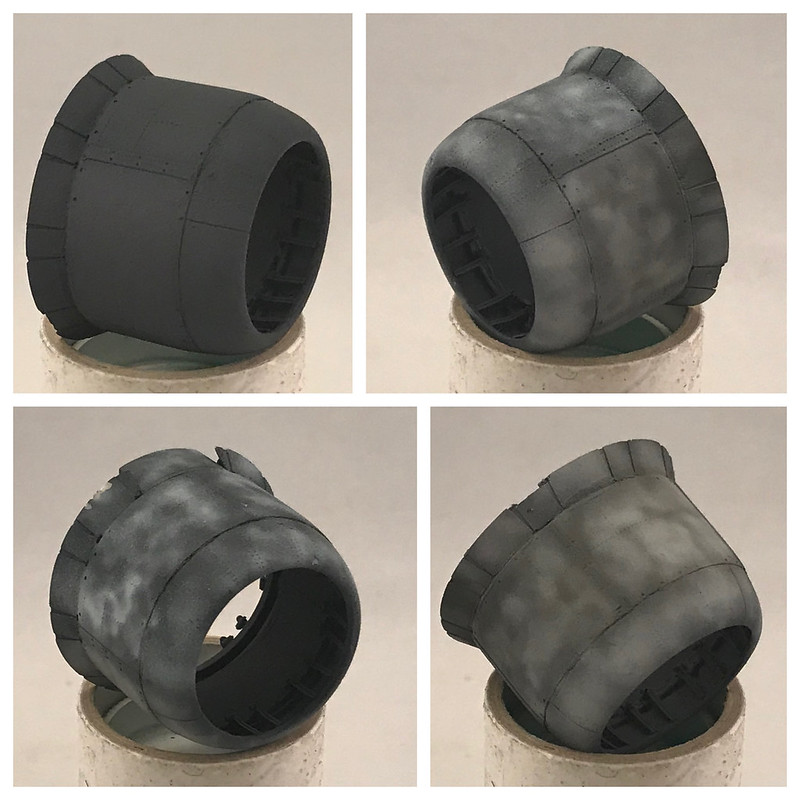
Turning my attention to the cowl. This engine cowl got beefed up with the Vector set and a few addtions with some scratchbuilding to help bring it together. This part sort of speaks for itself.

 Untitled by Britt Vallot, on Flickr

 Untitled by Britt Vallot, on Flickr

 Untitled by Britt Vallot, on Flickr

 Untitled by Britt Vallot, on Flickr

 Untitled by Britt Vallot, on Flickr

Under the weather

How timely right? No apologies for the dad jokes. 

Here I'm using the hairspray method which works beautifully no matter what the scheme. With this top coat of Blue-grey on, I load up a brush of water and make passes over the top of the wing here to soften the paint. I use a toothpick to slowly remove the paint along rivets and panel lines in a pattern that is commonly seen among Pacific Corsairs. A toothpick can be more discriminating than a small brush or another such tool and won't scratch up the surface. If you recall, I already had some of this worked out with the zinc chromate and aluminium skin. So really I just need to reveal it. On the starboard side I ran into a bit of trouble that I'm blaming on the hairspray. Get the cheap stuff. Cheaper the better! I managed to save it though by adding back some aluminum with a watercolor pencil and sponged in the zinc chromate where I needed it. Voila, crisis averted.....and here's the rest of that.

 Untitled by Britt Vallot, on Flickr

 Untitled by Britt Vallot, on Flickr

 Untitled by Britt Vallot, on Flickr

 Untitled by Britt Vallot, on Flickr

I kept this moderate as the picture of Kenneth Walsh's White 13 seems to be a new issue Birdcage Corsair with an updated insignia. I am still trying to find if VMF 124 used all six position points with added bars or just four. Either way the photo reveals a relatively clean and newer Corsair. I am keeping the real dirty Corsair for another time.

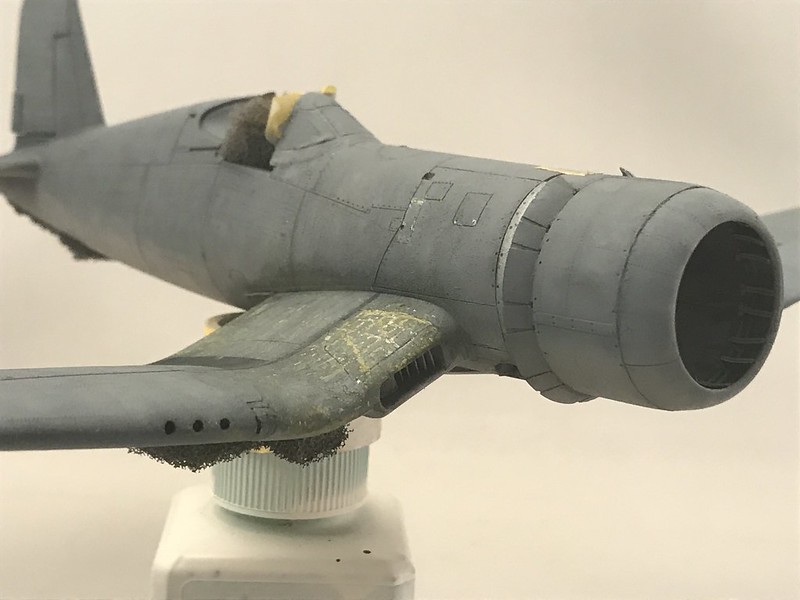
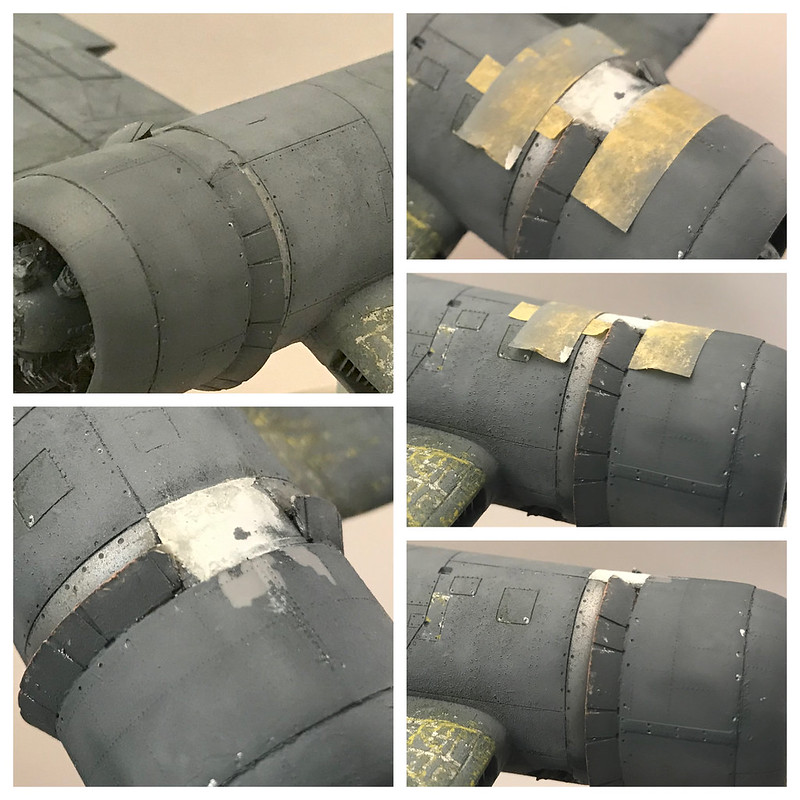
I also got around to getting the Pratt & Whitney mounted. It's epoxied in place to keep it from ever moving ever. At all. I'll leave it at that. I attached the cowl and glued it in place with Tamiya ETC. While drying I found a funny spot wouldn't settle down which left a step that I couldn't live with. I taped the boundaries off and brought out the putty to level things off. Here's that.

 Untitled by Britt Vallot, on Flickr

 Untitled by Britt Vallot, on Flickr

What's cute here is how I put the tape back on for the sake of the photo and that's of course when the tape pulled the paint off...=] ...the obstacle is the way. We've got this.

 Untitled by Britt Vallot, on Flickr

 Untitled by Britt Vallot, on Flickr

 Untitled by Britt Vallot, on Flickr

Saved.

Moving on to some additional weathering before calling this part done. I have a very specific photo of the tape that was used to seal the seams around the fuel tank within the forward fuselage in front of the cockpit. It can be seen in the photo that tape which has been removed has left a darker (more original) color paint than that of the somewhat faded paint all around it. I masked out the white parts and lightly sprayed them on a little at a time. The darker color was similarly masked out and followed up with a slightly darkened XF82.I dampened the tip of a toothpick to pick away at some of the white tape parts to show wear in places I selected which also helps to show individual strips they would have pulled for coverage.

 Untitled by Britt Vallot, on Flickr

 Untitled by Britt Vallot, on Flickr

 Untitled by Britt Vallot, on Flickr

 Untitled by Britt Vallot, on Flickr

 Untitled by Britt Vallot, on Flickr

 Untitled by Britt Vallot, on Flickr

That's where it sits for now. I'm very eager to get to the insignia and number, but I'm trying to be patient about how many to do. I've seen a few instances where both have been utilized. So if this were a newer issue Corsair, I'm wondering if they would've kept with the six position arrangement or possibly updated the wings. I'll have to make a decision some kind of way. 

Hope this can be of some use. Always happy to answer questions. Comments are always appreciated. Critizism serves to make us better ;]  Hit me. =]

Hope y'all are staying warm out there. Be safe.

On the bench:  

Tamiya F4U-1  Kenneth Walsh


  • Member since
    June 2013
Posted by bvallot on Tuesday, March 9, 2021 12:02 PM

Lucky 13 is hitting all Stars AND Bars

I was able to move on to the numbers and insignia over the past couple of weeks. I still haven't decided whether to make all six postion points or settle for what I've seen represented elsewhere with just the four. I think for now I'll keep the four and will add the other two should I come across evidence that suggests the VMF 124 had them.

Simple mask and paint here.

 Untitled by Britt Vallot, on Flickr

Before starting I did manage to clean up my transition line and make it a little tighter. Photo evidence of this plane does show that this line was fairly tight despite a lot of effort to sand and blend the paint down so as to diminish this line during production. Some of this sanding hastened the chipping and wearing of the paint along the leading edge of the wings.

 Untitled by Britt Vallot, on Flickr

 Untitled by Britt Vallot, on Flickr

 Untitled by Britt Vallot, on Flickr

One of the reasons I chose this version of Ken Walsh's corsair is due to the field added bars to the insignia. In all my builds of PTO aircraft, I've tried to capture a little something from each period during the war where we see the evolution of how the US modified its markings. Here I used some Montex mask bar bits to piece this together. Easy enough right. =]

 Untitled by Britt Vallot, on Flickr

 Untitled by Britt Vallot, on Flickr

You'll notice the red fuel cap just within the border of the blue field on the insignia. This is to the wing fuel tank which was deleted shortly after in later BuNo's. These tanks would often leak which is why you often see tape applied here as well to seal them up.

 Untitled by Britt Vallot, on Flickr

 Untitled by Britt Vallot, on Flickr

 Untitled by Britt Vallot, on Flickr

 Untitled by Britt Vallot, on Flickr

 Untitled by Britt Vallot, on Flickr

That's all for now folks. =]

On the bench:  

Tamiya F4U-1  Kenneth Walsh


  • Member since
    March 2012
  • From: Corpus Christi, Tx
Posted by mustang1989 on Tuesday, March 9, 2021 12:27 PM

I can never get over your paint work. WOW!!!!!!!


 Forum | Modelers Social Club Forum (proboards.com) 

  • Member since
    January 2015
  • From: Katy, TX
Posted by Aggieman on Tuesday, March 9, 2021 12:29 PM

Your work on the Corsair is simply astounding!  

I built the 1/32 kit of this bird from Tamiya last December, so much of what you have added to the 1/48 is included in that bigger kit, but it is hard to tell that your work did not originate with Tamiya's kit.  And your paint job just screams "I need a break from all this sun and salt and wind".

  • Member since
    June 2013
Posted by bvallot on Thursday, March 11, 2021 9:30 PM

Thanks for the high praise Joe. =] I'm always concerned that if I don't get far enough up front on the painting... will my weathering skills be enough to get me across the finish line..?....  I need to come stop by the automotive sector to see what else you've been up to when you're not moonlighting as an aircraft guy. ;)


 Aggieman, that's always the goal! Thanks for the kind words.  That Tamiya 1:32 is a beauty. I have referenced it for a few items that I wanted to double check for little ins and outs. They did a great job. The rivets on that thing...!

On the bench:  

Tamiya F4U-1  Kenneth Walsh


  • Member since
    December 2020
  • From: Kansas
Posted by DM1975 on Friday, March 12, 2021 3:33 PM

Wow!!! How motivating?!?! I'm building Tamiya's F4U-1A right now and this has really inspired me to go further with it than just a stock build. Amazing!

  • Member since
    May 2004
  • From: Land of Lakes
Posted by cbaltrin on Friday, March 12, 2021 3:36 PM

What he said! Can't wait to see finished product!

Aggieman
Your work on the Corsair is simply astounding!  

On the Bench: Too Much

  • Member since
    January 2020
  • From: Maryland
Posted by wpwar11 on Friday, March 12, 2021 4:52 PM

Damn fine work.  Bravo.

  • Member since
    June 2013
Posted by bvallot on Thursday, March 18, 2021 12:46 PM

Much appreciated DM1975. =] I believe the whole point of this forum is to share thoughts and ideas so that each of us grow our craft and improve. Much of what you see here I've picked up from other modelers on the Finescale and over time I've done what I could to add to it. So I'm happy to light your fire! Most of the big work is done now for this Corsair, but I still have a few tricks to drop. I hope I don't let you down.

cbaltrin, wpwar11 thank you very much! I'm working as quick as I can to get this one off my bench. I have a lot to pick up and organize. =]

On the bench:  

Tamiya F4U-1  Kenneth Walsh


  • Member since
    June 2013
Posted by bvallot on Thursday, March 18, 2021 1:34 PM

delete post

On the bench:  

Tamiya F4U-1  Kenneth Walsh


JOIN OUR COMMUNITY!

Our community is FREE to join. To participate you must either login or register for an account.

SEARCH FORUMS
FREE NEWSLETTER
By signing up you may also receive reader surveys and occasional special offers. We do not sell, rent or trade our email lists. View our Privacy Policy.