SEARCH FINESCALE.COM

Enter keywords or a search phrase below:

MPM 1/48 Heinkel He 177A-5 Greif - Complete

7945 views
37 replies
1 rating 2 rating 3 rating 4 rating 5 rating
  • Member since
    January 2015
  • From: Katy, TX
Posted by Aggieman on Thursday, October 15, 2020 7:48 PM

Mopar Madness

You made some really good time on this one. I had a couple of these in the stash including one with British markings, maybe one day I'll get another one and give it a go. These limited run kits are always so hit and miss but it looks like you tackled it and conquered it.


Thank you Chad!  I actually expected this one to take longer than it did as I expected to run into problems related to the hit and miss you refer to for kits like this one.

  • Member since
    April 2015
Posted by Mopar Madness on Thursday, October 15, 2020 1:50 PM

You made some really good time on this one. I had a couple of these in the stash including one with British markings, maybe one day I'll get another one and give it a go. These limited run kits are always so hit and miss but it looks like you tackled it and conquered it.

Chad

God, Family, Models...

At the plate: 1/48 Airfix Bf109 & 1/35 Tamiya Famo

On deck: Who knows!

  • Member since
    January 2015
  • From: Katy, TX
Posted by Aggieman on Thursday, October 15, 2020 10:15 AM

jeaton01

Well, it's somewhat appropriate that it is an imperfect kit of an imperfect airplane, Stephen.  It looks pretty good in the pictures.

Those were probably Propagteam decals.  I'm not sure I've ever got that brand to work, I usually bin them at the outset now.


Thank you, John, for your kind words.

I looked into buying after-market decals or a Montex Mask for this kit, but given my employment situation, that's just not really an option.

  • Member since
    December 2002
  • From: Northern California
Posted by jeaton01 on Wednesday, October 14, 2020 5:26 PM

Well, it's somewhat appropriate that it is an imperfect kit of an imperfect airplane, Stephen.  It looks pretty good in the pictures.

Those were probably Propagteam decals.  I'm not sure I've ever got that brand to work, I usually bin them at the outset now.

John

To see build logs for my models:  http://goldeneramodel.com/mymodels/mymodels.html


  • Member since
    January 2015
  • From: Katy, TX
Posted by Aggieman on Wednesday, October 14, 2020 10:11 AM

tempestjohnny

After following this build. And seeing the issues you had. I would call this finish a win. Is it a contest winner? No. But it still looks good.  

and I like you said you now have a German heavy bomber in 48th on display


I agree with all of that.

I think it was a difficult effort that was worth it just to have this bomber on display near my Allied heavies.  I first got interested in this bomber just from a quick view of what appears to have been 177s attacking a department store in Stalingrad in the movie Enemy at the Gates.  Later, there was a sequence involving a crashing 177 in the movie Allied.  So, there is a bit of knowledge of the existence of this big bomber in the popular media, and it really is a good-looking warbird.

  • Member since
    November 2003
  • From: Naples, FL
Posted by tempestjohnny on Wednesday, October 14, 2020 5:46 AM

After following this build. And seeing the issues you had. I would call this finish a win. Is it a contest winner? No. But it still looks good.  

and I like you said you now have a German heavy bomber in 48th on display


  • Member since
    January 2015
  • From: Katy, TX
Posted by Aggieman on Monday, October 12, 2020 10:23 AM

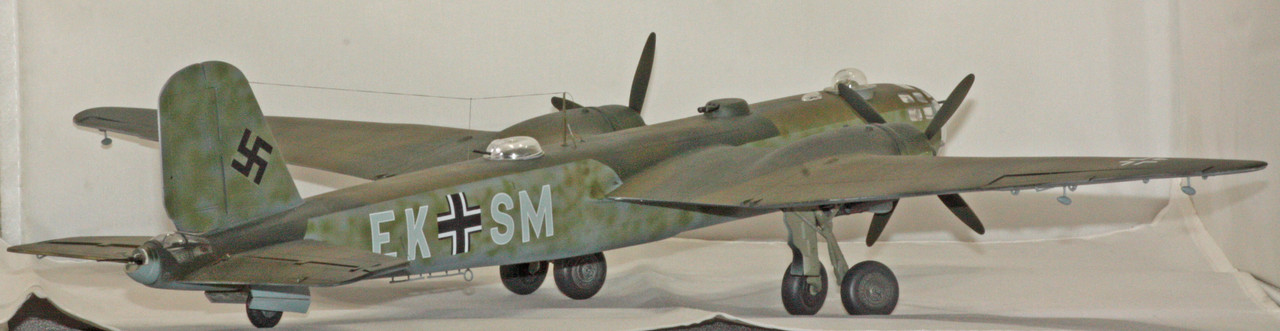
I'm calling the Greif done.

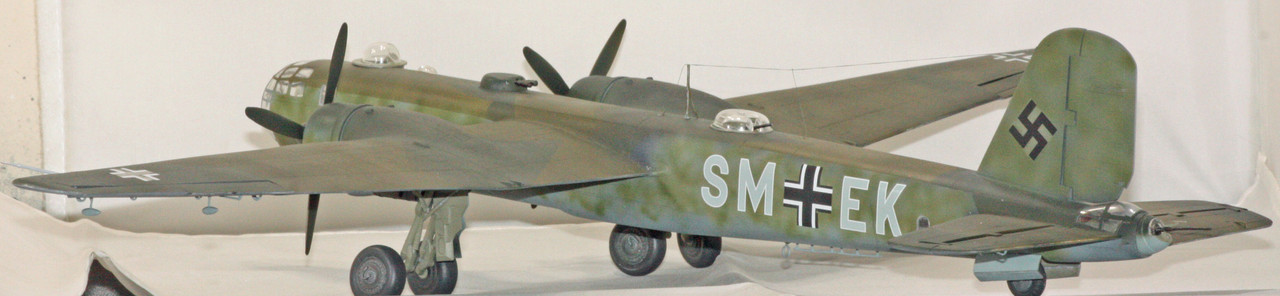
The old decals did not stand up well to the chemical compound we call water.  I found more recent decals from the Hobby Boss Bv 141 and was able to pick out a couple of Balkenkreuzs from that sheet (I had used a Montex Mask for the markings on that build). I ended up using the white Balkenkreuzs for the upper wings that came on the MPM sheet, but that didn't match the markings guide.  The MPM sheet contained a broken-in-half swastika that I could not get down properly, so I went back to my spares box for a sheet of various sized swastikas that I bought way back in the 90s, and these worked just fine.

I opted against doing any of the stencils and wing walk markings after my first attempt somehow one of the wing walks managed to adhere to my finger rather than the kit without my noticing it ... by this time I was ready to just walk away from the whole thing.  Instead, I settled down and decided my Greif didn't need any of those markings, as it already is somewhat of a fictitious build anyway.

The decal issue really ticked me off.  Along with all the other issues this kit has (most of which I was able to deal with to a barely satisfactory level, at least), the decal issue was the final straw.  How hard is it to get this right?  That soured me on the entire build, and I just decided to go ahead and put the finishing touches on it.

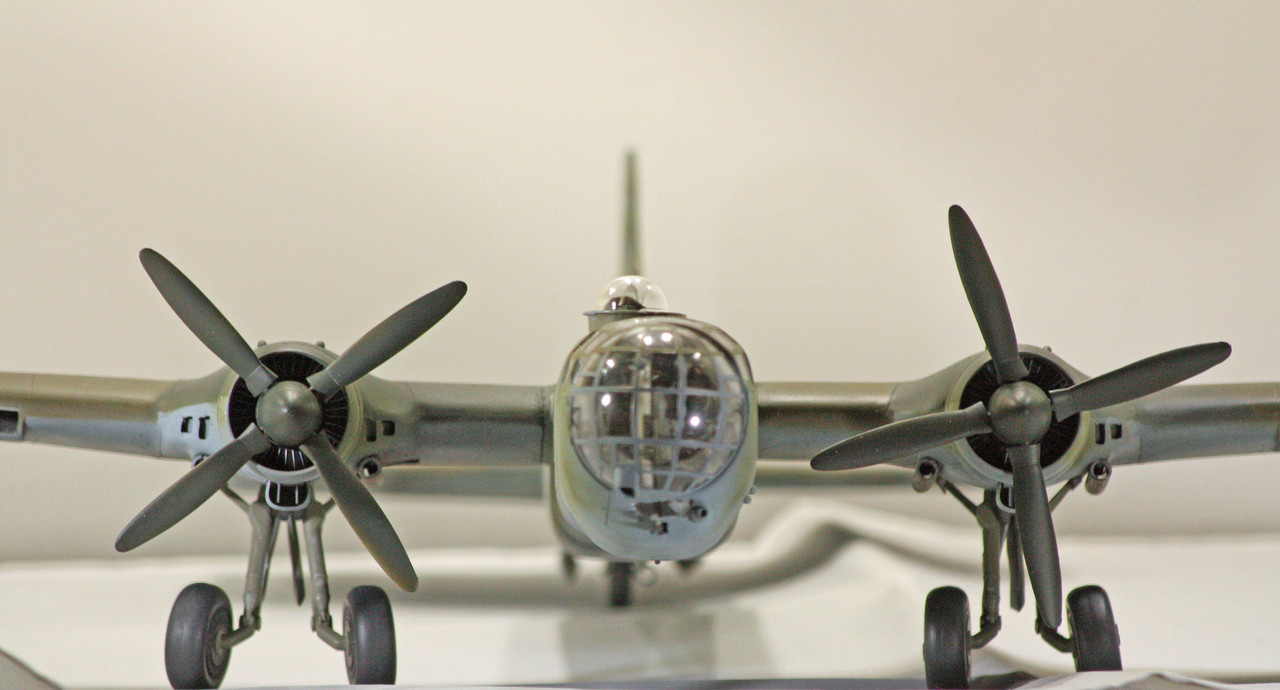
A couple of self-inflicted issues that I noticed:  when I removed the masking from the canopy, I found a swoosh of glue stain on one of the window interiors.  No idea how that got there, and short of ripping the canopy off, buying an aftermarket one and re-doing, there's nothing I can do about it.  Also, the instructions were often unclear on how certain parts were to go together.  Take, for instance, the complicated landing gear struts.  Each strut is comprised of 4 pieces.  The primary strut part does include some raised detail that I took as to where to install the part to which the tire attaches, but apparently I placed that wrong on the outboard starboard strut.  The tire is flayed out at such an angle that it would never function as intended.  Of course, by the time I noticed, the strut was already affixed into position in the wheel well.  I could have made an attempt at fixing it, but my thought process, clouded as it was by the decal issue, was that if I damaged the strut in such a way so as to make repair unlikely, I'd be faced with the prospect of an unfinishable model, or one that I would HULK SMASH.  I decided to leave everything as is.

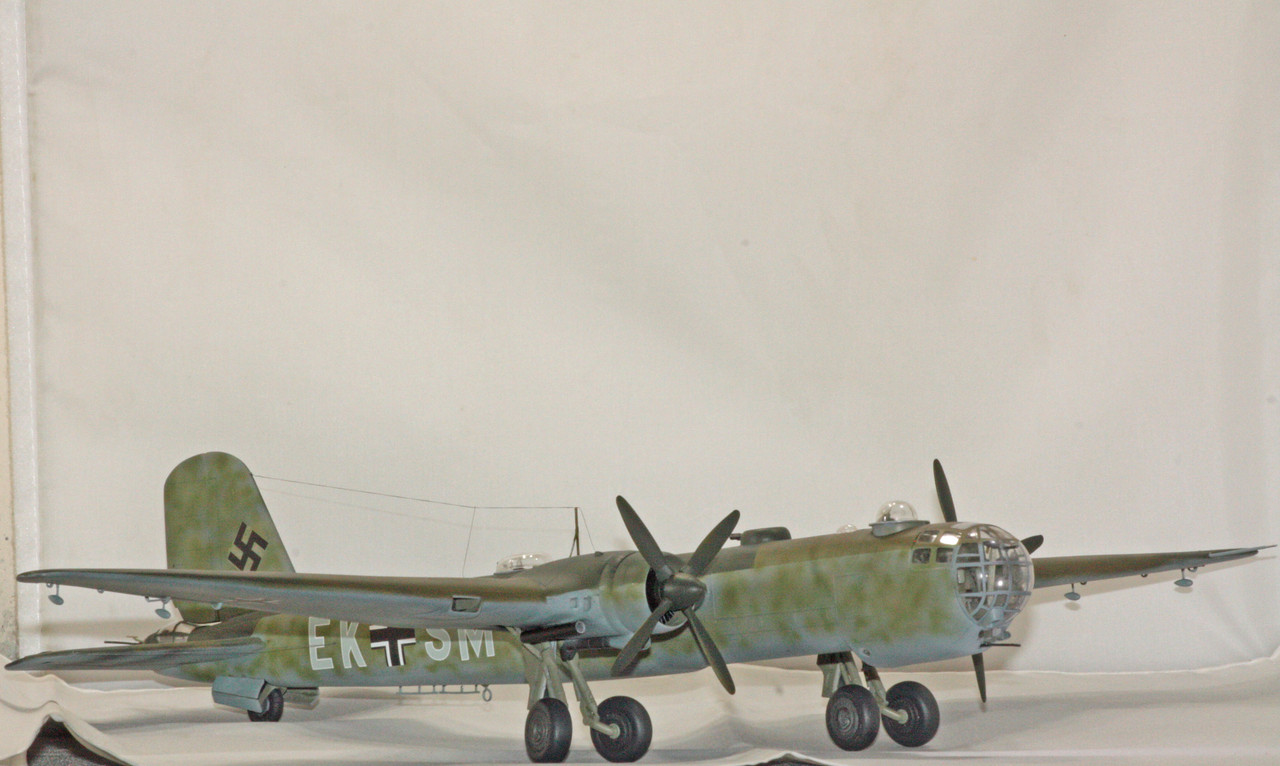
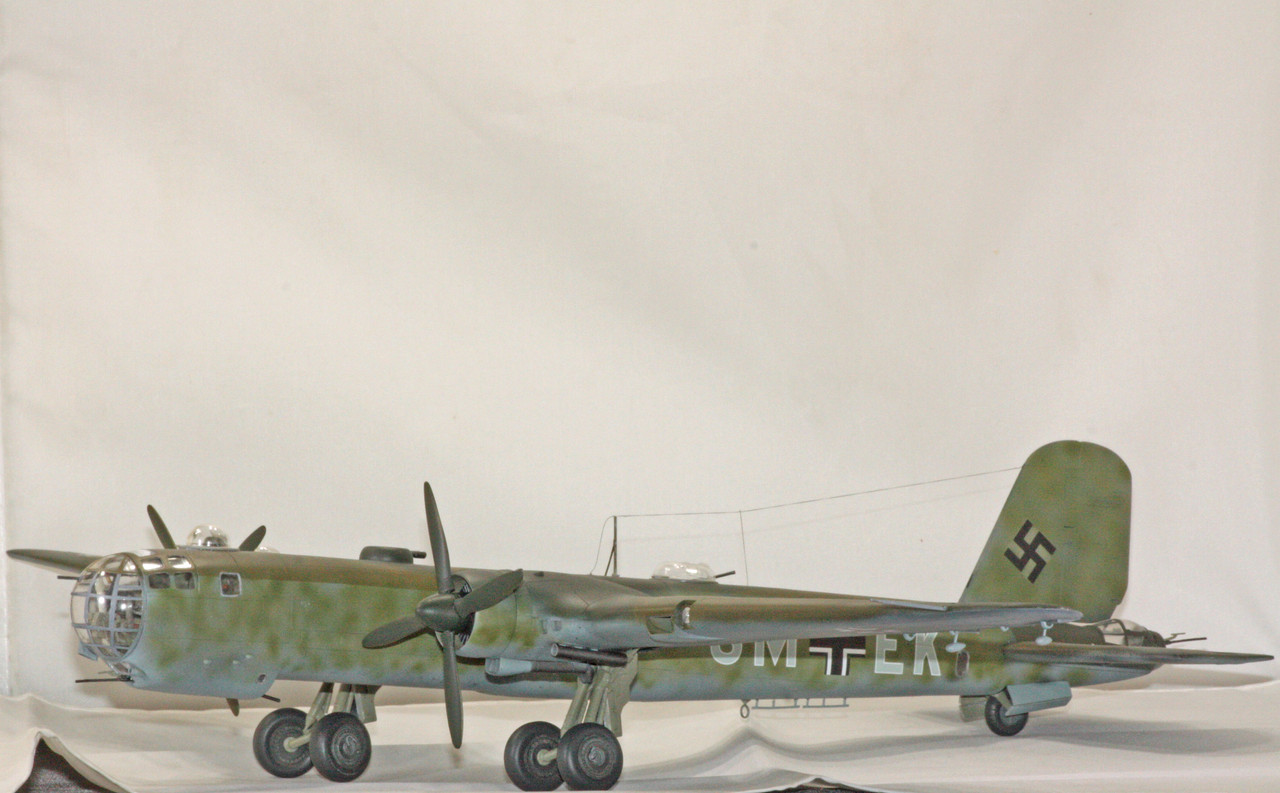
I doubt that I'll ever build another MPM kit given my experience with this one.  But I'm glad to have a 48th scale build of Nazi Germany's one fully operational heavy bomber. The Greif sizes out equivalent to the Monogram B-17, to give you an idea of how big this kit is.  She was too big to fit into my photo booth, so I had to set up the studio a little differently than normal to be able to take pictures that don't include the wall behind my work bench.

I'm going to take a week off from the bench, but I do still plan to build at least 3 more kits this year, starting with Trumpeter's 1/32 F6F-3 Hellcat.


  • Member since
    January 2015
  • From: Katy, TX
Posted by Aggieman on Monday, October 12, 2020 10:02 AM

keavdog

Looking sharp


Thanks John!

  • Member since
    January 2015
  • From: Katy, TX
Posted by Aggieman on Monday, October 12, 2020 10:01 AM

Tosh

Wow, mottle looks awesome!

Your friend's, Toshi & Ezra


Thank you Toshi & Ezra!

  • Member since
    April 2003
  • From: USA
Posted by keavdog on Sunday, October 11, 2020 7:11 PM

Looking sharp

Thanks,

John

  • Member since
    December 2018
Posted by Tosh on Sunday, October 11, 2020 7:07 PM

Wow, mottle looks awesome!

Your friend's, Toshi & Ezra

Reside in Streetsboro, Ohio


  • Member since
    January 2015
  • From: Katy, TX
Posted by Aggieman on Sunday, October 11, 2020 8:40 AM

Mopar Madness

You're making some good time on this one!


Thanks Chad!

  • Member since
    January 2015
  • From: Katy, TX
Posted by Aggieman on Sunday, October 11, 2020 8:40 AM

Real G


Mopar Madness

You're making some good time on this one!


Agreed.  I was about to comment “Good Grief Wink you are making rapid progress on a donkey of a kit!”


Thanks Real G!

  • Member since
    January 2015
  • From: Katy, TX
Posted by Aggieman on Sunday, October 11, 2020 8:39 AM

Bish

Thats a lovely looking bild. Great job fixing those issues.


Thank you Bish!

  • Member since
    January 2015
  • From: Katy, TX
Posted by Aggieman on Sunday, October 11, 2020 8:39 AM

tempestjohnny
Looks like quite the beast. You have definitely conquered a tough kit
 

Thanks Johnny!

  • Member since
    January 2015
  • From: Katy, TX
Posted by Aggieman on Sunday, October 11, 2020 8:38 AM

Hoss WA

Looking great!  I really like the paintwork and nice job on the construction. 


Thank you Hoss!

  • Member since
    January 2015
  • From: Katy, TX
Posted by Aggieman on Sunday, October 11, 2020 8:38 AM

Well, that figures.  I was going to start putting the decals onto this big bird this morning, but the decal sheet does not actually include the markings for the Greif that I'm building. As in, no Balkenkreuzs, no squad markings, no serial numbers, none of that.

Seriously, is there zero quality control at MPM?

Additionally, the decal sheet does not seem to have a complete set of markings for the alternate bomber that one can build with this particular kit.

I went through my spares box of old decals and Montex Masks and was surprised to find that I have very few spare Nazi decals.  I do have just enough for this build, but they come from a Tamiya Fw190 that I built in 1997, and a Monogram Pro-Modeler Ju88 that I built in 2006.  The Balkenkreuzs for the wings will be a bit undersized for this big bomber.  The kit does have some squad markings not intended for either of these builds, EK SM; I will use these as they are initials for both myself and my paternal grandfather.  I've used many Montex Masks for Luftwaffe builds, but apparently was unable to get the masks for the Balkenkreuzs off those builds in such a way as to allow for re-usability.

So my Greif is going to be a fictional bomber.

  • Member since
    July 2019
Posted by Hoss WA on Sunday, October 11, 2020 8:09 AM

Looking great!  I really like the paintwork and nice job on the construction. 

  • Member since
    November 2003
  • From: Naples, FL
Posted by tempestjohnny on Sunday, October 11, 2020 6:10 AM
Looks like quite the beast. You have definitely conquered a tough kit


  • Member since
    December 2002
  • From: Bury St Edmunds, Suffolk, England
Posted by Bish on Sunday, October 11, 2020 5:35 AM

Thats a lovely looking bild. Great job fixing those issues.

I am a Norfolk man and i glory in being so


On the bench: Airfix 1/72nd Harrier GR.3/Fujimi 1/72nd Ju 87D-3

  • Member since
    May 2011
  • From: Honolulu, Hawaii
Posted by Real G on Saturday, October 10, 2020 8:44 PM

Mopar Madness

You're making some good time on this one!


Agreed.  I was about to comment “Good Grief Wink you are making rapid progress on a donkey of a kit!”

“Ya ya ya, unicorn papoi!”

  • Member since
    January 2015
  • From: Katy, TX
Posted by Aggieman on Saturday, October 10, 2020 7:45 PM

Today's progress was pretty good, once I actually got to the bench.  I spent the first 10 hours in a training class (missing entirely today's University of Florida - Texas A&M University football game).  I have the entire airframe painted, with today starting by masking for the splinter scheme then putting down the RLM 70.  No issues with any of this, although looking at the pictures makes me think I may need to go back on some of the RLM 71 on the starboard wing near the aileron.  I didn't notice anything amiss in that area while I was spraying a gloss clear coat.  I'll double check tomorrow.

  • Member since
    April 2015
Posted by Mopar Madness on Saturday, October 10, 2020 9:41 AM

You're making some good time on this one!

Chad

God, Family, Models...

At the plate: 1/48 Airfix Bf109 & 1/35 Tamiya Famo

On deck: Who knows!

  • Member since
    November 2003
  • From: Naples, FL
Posted by tempestjohnny on Saturday, October 10, 2020 5:49 AM
Coming along very nice. I like you're idea of doing the mottling before the main topside colors


  • Member since
    January 2015
  • From: Katy, TX
Posted by Aggieman on Friday, October 9, 2020 12:53 PM

More progress - I have the mottling completed and now curing up under a coat of flat clear.  I followed the plan I laid out above, starting with RLM 02.  I didn't think it shows up too well atop the RLM 65.  

I went with RLM 62, which is a lighter green than what I will be using for the top side splintering.  I splotched the RLM 62 randomly until I felt like I had a decent coverage while still allowing the underlying RLM 65 to show through as well.  I dialed the compressor back to roughly 8 PSI for this painting.

After the clear coat is fully dry, I will start masking for a hard-edge along the spine of the fuselage.  Not sure if I'll actually get to the painting today.


  • Member since
    January 2015
  • From: Katy, TX
Posted by Aggieman on Friday, October 9, 2020 8:14 AM

I've moved on to the painting stage.  Yesterday, I started painting by putting down a coat of Grey Stynylrez primer, and after that dried sufficiently, I did my first attempt at black basing.  I didn't look at any tutorials on this procedure, I just emulated what I've seen online from modelers who have done this.  Thus, I'm not sure that I really did it correctly, so we'll have to see how this impacts the camouflage painting to come.  I anticipate that the top side splinter scheme will largely cover the black basing, but the underside and fuselage sides should be a bit more revealing ...

This morning, my first session at the bench was to do the underside painting.  I am not doing the bomber featured on the box top, which is a light grey top side with violet mottling, and black underside surfaces. I am doing a Griffon with light blue underside and fuselage sides, with the standard dark green + black green splinter scheme on the top side.  Mottling will be done all along the fuselage sides and rudder with a green and and a grey.

My paint this morning came from the Vallejo set "Luftwaffe Colors Pre-War to 1941" - RLM 65 light blue.

Next up is to do the mottling, which will first be RLM 02 followed by one of the greens from that Vallejo set, either RLM 71 (which is what the painting diagram calls for) or RLM 62, which I think would provide a bit of distinction between the mottled green and the green of the splinter scheme.  I haven't decided which way I'm going to go just yet.

  • Member since
    January 2015
  • From: Katy, TX
Posted by Aggieman on Friday, October 9, 2020 8:04 AM

BrandonK

Modeler... "I love building challenging kits."

Model company... "Hold my beer."

Looks like this is one of those "thank God it's finally done" kits. With all that work involved it will be one of those kits that you just can't get rid of due to all the effort it took to complete. Very nice work saving it thus far.

BK


Thanks Brandon!

This kit definitely has some of the same quirks that you'll find in typical short-run kits, but in looking back on what I have done thus far, I'm actually surprised that I have been able to wrangle this turkey into decent shape.  Yeah, there have been some bumps in the road, but I've seen far, far worse than this one.

I've seen a few examples of this kit built up superbly.  The kit is a decent canvas to go nuts with the detailing.  One guy opened up the bomb bay and scratched out the bay. There are detail sets available to open up the engine access panels to show off the unique engines the Greif carried.  So the kit can be built up to high standards.  The only thing to determine now is, can I produce a similar OOB build?

  • Member since
    June 2014
Posted by BrandonK on Thursday, October 8, 2020 9:51 AM

Modeler... "I love building challenging kits."

Model company... "Hold my beer."

Looks like this is one of those "thank God it's finally done" kits. With all that work involved it will be one of those kits that you just can't get rid of due to all the effort it took to complete. Very nice work saving it thus far.

BK

On the bench:

A lot !! And I mean A LOT!!

2024 Kits on deck / in process / completed   

                         14 / 5 / 2  

                              Tongue Tied

  • Member since
    January 2015
  • From: Katy, TX
Posted by Aggieman on Thursday, October 8, 2020 9:44 AM

Moving right along ...  Both wings and stabilizers are in place and I have filled the seams. Fit wasn't terrible in these areas as the curves of the wings lined up with the fillets pretty well.  The gaps were easily filled with Perfect Plastic Putty.

I have begun installing the engines by attaching the base to which the cowlings connect.

I added the rudder, a very tight fit, and the ailerons, one of which was a too tight fit that actually broke the surrounding plastic of the wing tip.  I sanded the aileron down a bit, repaired the crack in the wing plastic, and was able to fit the aileron in without any further problems.

I have a good bit of sanding ahead of me with the progressively finer sanding pads to try to knock down all these scratches along the fuselage seams.  Then on to a prime coat.  I am going to do something I've never done with this build, which is to do a "black base" coat.  If I understand the process, I will cover the entire airframe in splotchy black that will result in, hopefully, a paint job that will appear well worn.

JOIN OUR COMMUNITY!

Our community is FREE to join. To participate you must either login or register for an account.

SEARCH FORUMS
FREE NEWSLETTER
By signing up you may also receive reader surveys and occasional special offers. We do not sell, rent or trade our email lists. View our Privacy Policy.