SEARCH FINESCALE.COM

Enter keywords or a search phrase below:

The Official F-4 Phantom II Group Build 2011

617583 views
2992 replies
1 rating 2 rating 3 rating 4 rating 5 rating
  • Member since
    February 2003
  • From: Panama City, Florida, Hurricane Alley
Posted by berny13 on Thursday, June 9, 2011 8:42 PM

Rich, your package was dropped off at the post office today.  I sent you the correct AN/ALQ-87(V)2 and AN/ALQ-101(V)1 ECM pods.  Paint the -87 pod gloss white.  Our unit had an ID number on the nose such as A042.  The numbers were the last two numbers of the pod serial number with a zero added just in front.  Our -87 pods had the A prefix. 

The -101 pod was all gloss white with gloss black radomes.  There was a forward radome and an aft radome.  The small gondola was also gloss black.  Some pods had an ID number which carried a B prefix and the last two numbers of the serial number with a zero added in front.  The ID will look like B028.  Some pods carried no ID numbers at all and the early pods did not have the markings usually found on later pods. 

Berny

 Phormer Phantom Phixer

On the bench

TF-102A Delta Dagger, 32nd FIS, 54-1370, 1/48 scale. Monogram Pro Modeler with C&H conversion.  

Revell F-4E Phantom II 33rd TFW, 58th TFS, 69-260, 1/32 scale. 

Tamiya F-4D Phantom II, 13th TFS, 66-8711, 1/32 scale.  F-4 Phantom Group Build. 


  • Member since
    November 2010
  • From: Lafayette, Indiana
Posted by Son Of Medicine Man on Thursday, June 9, 2011 8:48 PM

berny13

 Son Of Medicine Man:

 berny13:

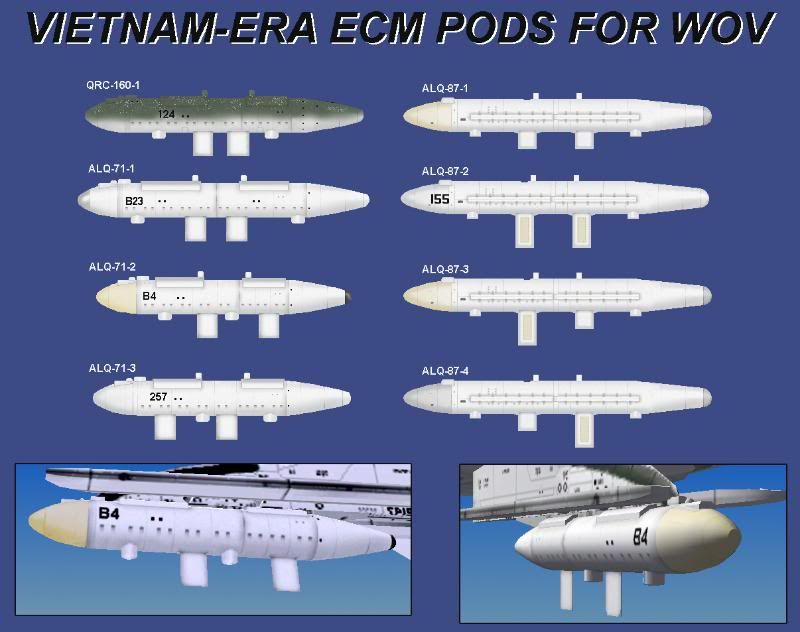
Here is how the two pods will look.  The top picture is of the AN/ALQ-87 ECM pods and the second is the AN/ALQ101 ECM pod.


http://i22.photobucket.com/albums/b309/berny13/7212-1219846994-ecm_pods.jpg

http://i22.photobucket.com/albums/b309/berny13/ALQ-101-6.jpg

http://i22.photobucket.com/albums/b309/berny13/ALQ101.jpg


Hi Berny,

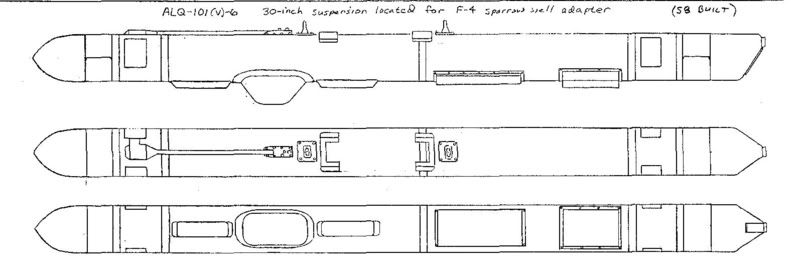
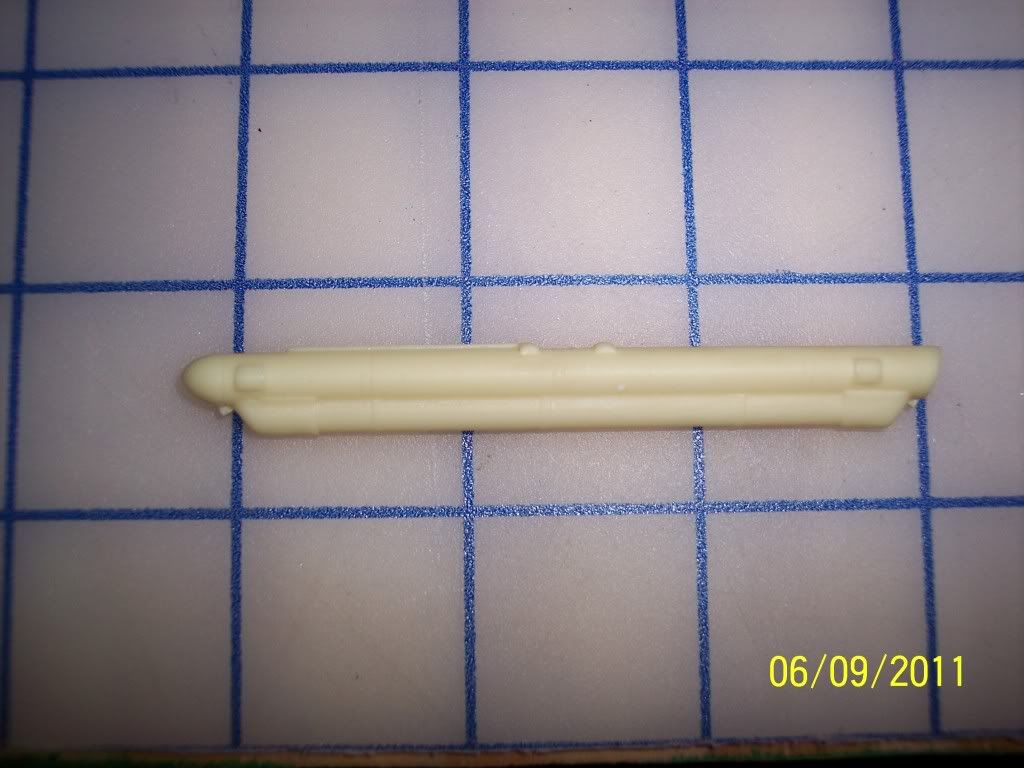
I had already ordered the AN/ALQ-101 pod from Flightpath (David J. Parkins) when you posted this.  But there was no real way of knowing what version I was going to receive since there were no pictures on his website.  It finally arrived today and here is what it looks like:

http://i1143.photobucket.com/albums/n625/Fooser_Ken/100_4516.jpg


After seeing your reply to Rich about the version I know that this is a newer version than what you used.  In fact from what information I could find, I am assuming that the AN/ALQ-101 you were using at the time in Vietnam was a prototype.

Anyway, you had offered to send me the correct one.  I know you sent one to Rich so I don't know if that offer is still good.  Anyway, if it is, I would appreciate it.

Ken


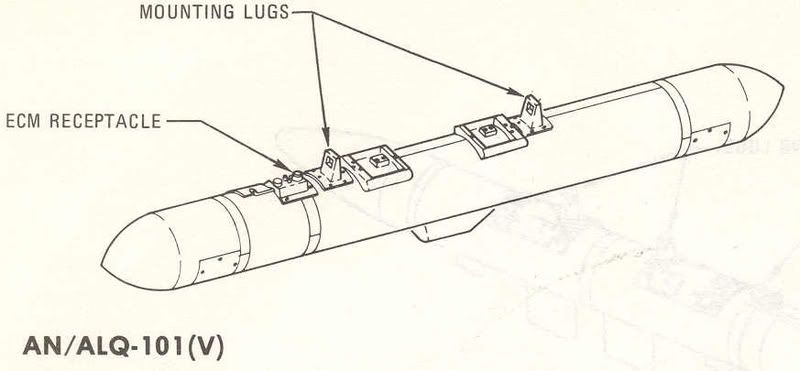
This is the type you need.  The AN/ALQ-101 ECM pod was just entering the Air Force inventory.  They were not a prototype but the first generation ALQ-101 pods put in production.  Later ALQ-101 pods were improved by adding more receivers, transmitters and processors which resulted in the pod growing in size and having more gondolas added.

A lot of talking heads and experts will tell you the AN/ALQ-119 ECM pod is an AN/ALQ-101 ECM pod with additional space in a larger gondola.  The truth is the AN/ALQ-101 ECM pod was air cooled with air ducts added on later versions.  The AN/ALQ-119 ECM pod was a complete redesigned pod which was much larger, lighter, and was cooled by freon gas.  There were four radaiators built on the side with two having the intake facing forward and the two back ones had the discharge facing aft.  The AN/ALQ-101 pod was a deception pod and the AN/ALQ-119 pod was a programmable noise and deception pod able to operate in both the training mode and combat mode with just a flip of a switch.

Give me a couple of days to get the pod packaged up and in the mail.    


http://i22.photobucket.com/albums/b309/berny13/IMG_0046.jpg

Thank you Berny for the background.  I really enjoy learning about the F-4 and what you shared tonight just shows how much information I haven't yet learned.  I would really like the opportunity to spend a day with you with an F-4 so you could go over all the aspects of it.  I would have to video tape it so I could listen to again later because I know there would be no way I could absorb it all at once!

And thank you for offering that AN/ALQ-101 ECM pod to me, I really appreciate it!

Ken

  • Member since
    August 2009
  • From: Toledo Area OH
Posted by Sparrowhyperion on Thursday, June 9, 2011 8:53 PM


Thanks Berny!  I got the wing assembly done last night so I will probably attach the wings module to the fuselage tonight.  I had to hand cut a big chunk out of the inside fuselage bottom because of the length of the Aires Exhausts.  They came out great.  I did an aging effect using a base coat of MM Jet exhaust and a very strong black wash with MM acrylics in dark gray and black.  Inside the last stage turbine which is somewhat visible, is done in a similar manner but with steel washed titanium base coat and a light black wash over that.  It looks really good in my humble opinion.

I am still debating whether or not to do a full Diorama with crew and all, but I don't have the correct figures and honestly, my Diorama skills are not all that great.  Maybe I can talk Dom into doing that part if we can get together the resources.  That image of you and the crew that I saw a while back would be really useful. lol

Don't worry, I am not trying to embarass you, If I was trying to do that, I would do the figure painting myself LMAO.

Rich


berny13

Rich, your package was dropped off at the post office today.  I sent you the correct AN/ALQ-87(V)2 and AN/ALQ-101(V)1 ECM pods.  Paint the -87 pod gloss white.  Our unit had an ID number on the nose such as A042.  The numbers were the last two numbers of the pod serial number with a zero added just in front.  Our -87 pods had the A prefix. 

The -101 pod was all gloss white with gloss black radomes.  There was a forward radome and an aft radome.  The small gondola was also gloss black.  Some pods had an ID number which carried a B prefix and the last two numbers of the serial number with a zero added in front.  The ID will look like B028.  Some pods carried no ID numbers at all and the early pods did not have the markings usually found on later pods. 

In the Hangar: 1/48 Hobby Boss F/A-18D RAAF Hornet,

On the Tarmac:  F4U-1D RNZAF Corsair 1/48 Scale.

  • Member since
    November 2010
  • From: Lafayette, Indiana
Posted by Son Of Medicine Man on Thursday, June 9, 2011 9:00 PM

Hi Everyone!

I made a little progress on the cockpit tonight.  I kept getting interrupted so I did not get as much done as I had hoped.  Here is what it looks like tonight:


Ken

  • Member since
    November 2010
  • From: Lafayette, Indiana
Posted by Son Of Medicine Man on Thursday, June 9, 2011 9:06 PM

Hi Berny,

I have another question for you.  Looking at the picture of my ejection seats made me think of it.  How do you make the seat belts?  I still have the picture you posted a while back depicting how they should look, but I can't figure out what the best way to reproduce them would be.

Ken

  • Member since
    August 2009
  • From: Toledo Area OH
Posted by Sparrowhyperion on Thursday, June 9, 2011 9:14 PM

If I can't get PE lately, I have just been using Masking tape folded over, or tin foil.  The buckles are the tricky part.  I find it is possible, with enough patience. to scratch cut some from left over PE tree material.


Son Of Medicine Man

Hi Berny,

I have another question for you.  Looking at the picture of my ejection seats made me think of it.  How do you make the seat belts?  I still have the picture you posted a while back depicting how they should look, but I can't figure out what the best way to reproduce them would be.

Ken

In the Hangar: 1/48 Hobby Boss F/A-18D RAAF Hornet,

On the Tarmac:  F4U-1D RNZAF Corsair 1/48 Scale.

  • Member since
    February 2003
  • From: Between LA and OC, SoCal
Posted by oortiz10 on Thursday, June 9, 2011 9:21 PM

OK.  Next time I say something crazy, like, "I'm going to rescribe and rivet the whole thing..."

Slap me.


-O


-It's Omar, but they call me "O".

  • Member since
    November 2010
  • From: Lafayette, Indiana
Posted by Son Of Medicine Man on Thursday, June 9, 2011 9:38 PM

oortiz10

OK.  Next time I say something crazy, like, "I'm going to rescribe and rivet the whole thing..."

Slap me.


-O


Hi O,

It has been a while since we have heard from you.  Do you have any pictures?

Ken

  • Member since
    February 2003
  • From: Between LA and OC, SoCal
Posted by oortiz10 on Thursday, June 9, 2011 10:01 PM

Hey Ken,

I don't have any right now, but I might be able to shoot a couple.  Stepping away, posting some pix, and getting some feedback might recharge my batteries.

-O


-It's Omar, but they call me "O".

  • Member since
    February 2003
  • From: Between LA and OC, SoCal
Posted by oortiz10 on Thursday, June 9, 2011 11:55 PM

OK Phantom fans,

I know I haven't been around in a while and since Ken called me out, I figured I should show that I am mashing plastic.  Slowly, yes, but I am getting some work done. 

Here are a couple of shots of some progress.  I’ve finished scribing the fuselage and I’ve started the riveting.  I’ve got the tail and the exhaust areas done, and I don’t think it looks half bad… 


I’ve started on the forward part of the fuse too…


Here’s a shot of an intake.  I’m pretty happy with the way their joints came out.  You can see the where I’ve filled some preliminary riveting with Mr. Surfacer.  I wasn’t totally happy with the way that area was turning out, so I’ve filled it and I’m gonna re-rivet later.


Anyway, that’s where I’m at.  I still have a looong way to go.  I haven’t even touched the wings or the pylons yet.  And there’s that pile of resin I’m supposed to hang on this bad boy…

So, drop your two cents into the bucket.  I’d love to hear your feedback!

Cheers!

-O


-It's Omar, but they call me "O".

  • Member since
    June 2009
Posted by jimbot58 on Friday, June 10, 2011 2:52 AM

Hey gang! Lots of work happening here with you guys! I am even making a bit of progress! I am trying to make seat belts with masking tape and with mid-fifty-ish eyes and hands that don't seem as nimble as they once were, this 1/72nd scale gets to be a challenge!

So far:

This is as close as I can get with my little camera and get anything in focus. As to the color, a search online showed me anything from gray to many different greens to one example that was a tan color. I figured that belts must have to be replaced from time to time? Maybe that could explain the varied colors I saw? I like the idea of using some scrap PE for buckles though the scale is going to be a PIA!

Maybe it won't matter as you won't see much of it:

I just am not happy with that gap between the center canopy part and the fuselage. Not sure I can fill it without creating bigger problems at this late stage...

Anyway, the Geasel's finally getting some legs to stand on:

I notice an error in Hasegawa's scale construction here: there is no way those gear bays are deep enough to fit those wide tires and gear!

Oops! Pay no attention to the cockpit assembly going on in the left side of a couple of the photos! I told you I am not going to work on that F-105G!

Well, maybe just a little.....

*******

On my workbench now:


Fujimi F-4K Phantom "Yellow Bird" and Zvezda Su-27SM Flanker


  • Member since
    April 2005
Posted by Thunderbolt379 on Friday, June 10, 2011 3:16 AM

Looking great, jimbot! I've done tape belts here and there and they add just enough visual information for the eye to accept the situation, but splotches of paint as buckles don't really do the deed, and PE is still largely baffling to me...

For myself, I'm production-lining 24 missiles, a dozen each of Sparrows and rattlers, as a mini-project to get me away from cockpits and seats for a bit. I've discovered I hate cockpits probably more than anything else at this point, and I am real tired of MB 7s... (While pulling out a couple of TDs for the big -J anyway!) I'm cleaning up mold lines and sprue gates, and drilling out all exhausts. I'm half way through this phase, then it's over to the AB to get them into white (I'll do the big -J's intake interiors in the same session), then do the seekers, accent recessed lines, add decal stripes and finally clearcoat them.

In the same timeframe I would hope to get some seats into the Fujimi -J and get the canopy on and masked. That leaves me nine AB load-ups to finish the bird... Six load-ups to do the Fujimi -K (once that cockpit is ready to be buried under a closed hood).

Cheers, M/TB379

http://worldinminiature.blogspot.com/

  • Member since
    November 2010
  • From: Lafayette, Indiana
Posted by Son Of Medicine Man on Friday, June 10, 2011 5:54 AM

Hi O,

I think you are doing a phabulous job! (Pun intended!)  Looks very nice!  Yes

Ken

  • Member since
    November 2010
  • From: Lafayette, Indiana
Posted by Son Of Medicine Man on Friday, June 10, 2011 5:59 AM

Hi Jim,

Lookin' good!  Especially for 1/72 scale!  Mine is in 1/48 and it is still a challenge.

Ken

  • Member since
    February 2010
  • From: Ontario, Canada
Posted by Bockscar on Friday, June 10, 2011 11:00 AM

A quick update:

My niece was just accepted into an aeronautical engineering program, I think all of  those model kits and a visit to Dayton helped! I might have to send her a kit to celebrate!, last one she'll build for a few years....Big Smile

  • Member since
    August 2009
  • From: Toledo Area OH
Posted by Sparrowhyperion on Friday, June 10, 2011 11:03 AM

That's great Dom!  Make sure to tell her we need her to break the light speed barrier and solve the mystery of anti-gravity propulsion.  Failing that, tell her to ust design some really cool planes. :)

Rich


Bockscar

A quick update:

My niece was just accepted into an aeronautical engineering program, I think all of  those model kits and a visit to Dayton helped! I might have to send her a kit to celebrate!, last one she'll build for a few years....Big Smile

In the Hangar: 1/48 Hobby Boss F/A-18D RAAF Hornet,

On the Tarmac:  F4U-1D RNZAF Corsair 1/48 Scale.

  • Member since
    August 2009
  • From: Toledo Area OH
Posted by Sparrowhyperion on Friday, June 10, 2011 2:05 PM

Berny.  Could you give me those FS numbers for the SEA Camo again?  I can't find the post that had them, and I need to pick up some more.


Thanks

Rich

In the Hangar: 1/48 Hobby Boss F/A-18D RAAF Hornet,

On the Tarmac:  F4U-1D RNZAF Corsair 1/48 Scale.

  • Member since
    February 2003
  • From: Between LA and OC, SoCal
Posted by oortiz10 on Friday, June 10, 2011 2:16 PM

Rich,

I know I'm not Berny, but I hope you'll still accept my answer...Stick out tongue

The colors are:

Tan: 30219

Green: 34079

Green: 34102

Grey: 36622

Here's a drawing and paint chart:  http://www.cybermodeler.com/aircraft/f-4/f-4_profile02.shtml

Hope this helps!

Cheers!

-O


-It's Omar, but they call me "O".

  • Member since
    February 2010
  • From: Ontario, Canada
Posted by Bockscar on Friday, June 10, 2011 3:04 PM

Oortiz:

Magniphicent!

http://i232.photobucket.com/albums/ee129/oortiz10/DSC07447.jpg

You got patience, or good eyes, or both!Yes

  • Member since
    February 2010
  • From: Ontario, Canada
Posted by Bockscar on Friday, June 10, 2011 3:05 PM

Jim;

That looks Phab!

http://img691.imageshack.us/img691/1482/0610110113.jpg

  • Member since
    August 2009
  • From: Toledo Area OH
Posted by Sparrowhyperion on Friday, June 10, 2011 3:11 PM

Thanks!


oortiz10

Rich,

I know I'm not Berny, but I hope you'll still accept my answer...Stick out tongue

The colors are:

Tan: 30219

Green: 34079

Green: 34102

Grey: 36622

Here's a drawing and paint chart:  http://www.cybermodeler.com/aircraft/f-4/f-4_profile02.shtml

Hope this helps!

Cheers!

-O


In the Hangar: 1/48 Hobby Boss F/A-18D RAAF Hornet,

On the Tarmac:  F4U-1D RNZAF Corsair 1/48 Scale.

  • Member since
    February 2010
  • From: Ontario, Canada
Posted by Bockscar on Friday, June 10, 2011 4:06 PM

Rich;

Try to get in sone R&R this weekend, maybe take up a hobby?....LOL.....great work man......

  • Member since
    August 2009
  • From: Toledo Area OH
Posted by Sparrowhyperion on Friday, June 10, 2011 4:16 PM

Well.  It's starting to look like a Phantom. :)  I assembled the main fuselge and wing sub assemblies today.  There is one thing Hasegawa could do to vastly improve the aft end of this bird.  They need to put one or two guide pins and holes where the wings and top fuselage meet, outboard just behing the wings on the fuselage where the engines are put in.  That section never properly lines up without either using CA or holding the pieces together correctly until the regular polystyrene cement dries.  I ended up using CA.  I got a tiny bit of snding to do in those locations now, but just a couple of minutes worth to smooth them down again.  Here are some images.


You can sort of see what I mean in a few of these.

Not too bad.  Better than my FGR.2 anyways.  Next up, tail stabilators, then we do a few detail bits and then primary paint.  Comments always welcome.  I will post more as she progresses.

(P.S.) Note the tire bulges on the top of the wing.  I had to sand those down quite a bit.  They looked like big lego blocks...  Oh yeh.  Does anyone have any spare snapped off metal or plastic Pitot tubes the right size for this bird?  I stink at sprue stretching and I can't find anything here that will work.

Rich

In the Hangar: 1/48 Hobby Boss F/A-18D RAAF Hornet,

On the Tarmac:  F4U-1D RNZAF Corsair 1/48 Scale.

  • Member since
    February 2010
  • From: Ontario, Canada
Posted by Bockscar on Friday, June 10, 2011 4:23 PM

Rich:

It may be lense, but the nose looks a bit cambered to the aircraft's starboard, not a crit, probably just the camera or lighting/shading:

http://i77.photobucket.com/albums/j75/sparrownightmare/Berny%2069260%20build/BernyF4E69-260WIP24.jpg

Hey, love that F-86 in the background, hey, I've never seen a jar-fulla-j'dams before!...lol...Wink

  • Member since
    January 2009
  • From: San Antonio
Posted by paintsniffer on Friday, June 10, 2011 4:35 PM

I don't generally play in group builds (but I read them), but I build a ton of F-4s it seems, and I just rolled out an F-4J loaded with walleyes. I loaded what I thought looked like a walleye datalink pod. reading through I think I may have simply painted one of those early ALQ-101s after faulty research.


Anyone have an actual photo of a walleye datalink pod?

Excuse me.. Is that an Uzi?

  • Member since
    August 2009
  • From: Toledo Area OH
Posted by Sparrowhyperion on Friday, June 10, 2011 4:38 PM

It's because the nose cone didn't fit snugly and it was slightly shifted to starboard.  I have some finish sanding to do to get it smoothed out, along with a couple of other spots. 

Rich


Bockscar

Rich:

It may be lense, but the nose looks a bit cambered to the aircraft's starboard, not a crit, probably just the camera or lighting/shading:

http://i77.photobucket.com/albums/j75/sparrownightmare/Berny%2069260%20build/BernyF4E69-260WIP24.jpg

Hey, love that F-86 in the background, hey, I've never seen a jar-fulla-j'dams before!...lol...Wink

In the Hangar: 1/48 Hobby Boss F/A-18D RAAF Hornet,

On the Tarmac:  F4U-1D RNZAF Corsair 1/48 Scale.

  • Member since
    February 2010
  • From: Ontario, Canada
Posted by Bockscar on Friday, June 10, 2011 4:44 PM

Oh yeah, now I see the 'mine shaft gap', ....lol.....symmetry freak, you know....lol......

  • Member since
    February 2010
  • From: Ontario, Canada
Posted by Bockscar on Friday, June 10, 2011 4:49 PM

paintsniffer

I don't generally play in group builds (but I read them), but I build a ton of F-4s it seems, and I just rolled out an F-4J loaded with walleyes. I loaded what I thought looked like a walleye datalink pod. reading through I think I may have simply painted one of those early ALQ-101s after faulty research.


Anyone have an actual photo of a walleye datalink pod?

Hey 'Sniff, gotta picture to post, would luv to C that!!!

  • Member since
    March 2005
  • From: near Nashville, TN
Posted by TarnShip on Friday, June 10, 2011 6:06 PM

here's some from the web,,,much faster than me trying to remember where I saw the couple of photos I know I have

http://www.ordnance.org/walleye.htm

http://www.designation-systems.net/dusrm/m-62.html

http://vnfawing.com/forum/viewtopic.php?p=2325&sid=148ef4727af8540cdeb42fe5ad811393

that last one has a data link pic, and a good view of the Walleye I and II on the same aircraft,,,,,bonus is a China Lake photo with an F-4B in the background

Rex

almost gone

  • Member since
    February 2010
  • From: Ontario, Canada
Posted by Bockscar on Friday, June 10, 2011 6:15 PM

TarnShip

here's some from the web,,,much faster than me trying to remember where I saw the couple of photos I know I have

http://www.ordnance.org/walleye.htm

http://www.designation-systems.net/dusrm/m-62.html

http://vnfawing.com/forum/viewtopic.php?p=2325&sid=148ef4727af8540cdeb42fe5ad811393

that last one has a data link pic, and a good view of the Walleye I and II on the same aircraft,,,,,bonus is a China Lake photo with an F-4B in the background

Rex

Rex;

Thought you had a photo-static memory...

errhhhh...photo-matic memory....

errhhh...photo-phantic....yeah....phantic.....memory.....lol...

thanks for the links......gosh Rex....forgot what 'Tarn' mean't......lol....Wink

JOIN OUR COMMUNITY!

Our community is FREE to join. To participate you must either login or register for an account.

SEARCH FORUMS
FREE NEWSLETTER
By signing up you may also receive reader surveys and occasional special offers. We do not sell, rent or trade our email lists. View our Privacy Policy.