SEARCH FINESCALE.COM

Enter keywords or a search phrase below:

Fw 190 Butcher Bird 2013 (extended to June 2014) Group Build

564290 views
5865 replies
1 rating 2 rating 3 rating 4 rating 5 rating
  • Member since
    April 2005
Posted by Thunderbolt379 on Sunday, August 31, 2014 2:35 AM

Progress on the 152: the decals are complete and the oil streaking is done. I ended up using most of the kit stencilling, other than a couple of pieces that failed to grab and were replaced from the AM sheet. The Aeromaster sheet provided the insignia and swastikas. The white open crosses looked like an invitation to serious silvering, so I used 2000-grit paper to mill the surface of the clear coat -- it sure felt smoother! But as the decals dried some silvering came up anyway, and the ***-and-re-wet technique made about as little difference as ever. Well, I've seen worse and I can live with it, but the idea of masking the open crosses is getting very attractive.

Here's the sheet I used:

I raided Black 5, cutting the fuselage crosses free of the conjoined chevrons/arrows.

The oil wash technique worked just as well over the clear, so no problem there. I dirtied it up a bit anywhere it looked possible fluids might migrate to the exterior.

The green 1s are placed where the kit instructions said to put them, and they were on before I looked at other images -- they're about a scale foot too far forward. GRRRR. I have seen Green 1 depicted without the wing walkway stripes, so to simplify matters I left them off.

I'll paint the trim tabs red on all tail surfaces, as the decals are far too large to fit.

Targets for tomorrow: inspect overall, make any touch ups or adjustments, seal the decals, then get the landing gear assembled and installed. After that, add the prop and the various antennas, and brush paint small details. I'll see what I can get done, there's not far to go now.

Cheers, Mike/TB379

http://worldinminiature.blogspot.com/

  • Member since
    March 2012
  • From: Corpus Christi, Tx
Posted by mustang1989 on Sunday, August 31, 2014 7:17 AM

This looks top notch! Decals and weathering bring out good paint jobs really well and this one here is a good example Mike. Really sweet looking crate man.


 Forum | Modelers Social Club Forum (proboards.com) 

  • Member since
    April 2013
Posted by SchattenSpartan on Sunday, August 31, 2014 8:25 AM

Your 152 looks great, Mike! I love the weathering! Same story with the A-8, that's a top-notch paint job you got going there. I hope the new decals work out for you, I'll get them posted next week (most likely on Thursday).

I still didn't have time to write the update, but I'll post it as soon as I have the time to do so.

  • Member since
    May 2013
  • From: Indiana, USA
Posted by Greg on Sunday, August 31, 2014 2:52 PM

Those are both looking great, Mike. Top-shelf work all-round.

Sorry I've not been keeping up on your progress, was gone for a week with little free time.

  • Member since
    April 2005
Posted by Thunderbolt379 on Sunday, August 31, 2014 5:58 PM

Thanks, Mustang, SS and Greg -- it's great when folks as talented as I know you all are appreciate one's work! We all tend to be our own hardest critics and I see the shortcomings in my work -- I was feeling this one was not one of my best, but your appreciation makes me think that by the time she's done all the elements will have come together for a pleasing, convincing whole!

I'll do everything I can today -- sealing the decals should be the last spray work. I'm considering leaving the white crosses unsealed so I can potentially remove them and replace with stencilled crosses in future -- just a possibility.

Hopefully there'll be pics tonight,

Cheers, Mike/TB379

http://worldinminiature.blogspot.com/

  • Member since
    May 2013
  • From: Indiana, USA
Posted by Greg on Sunday, August 31, 2014 6:05 PM

Thunderbolt379

by the time she's done all the elements will have come together for a pleasing, convincing whole!

Ah, no worries, Mike. That'll be the case and for sure all you guys that actually know what you are doing are indeed your own harshest critics!

As a born-again newbie, I've been amazed at how these come together at the end. It's been an amazing 18 months for me to watch over and over here.

Even my own, 2 builds out of 3 so far since return from hiatus finished up better than I expected. And as Nicholson said in Mars Attacks, two out of three ain't bad. :)

  • Member since
    April 2005
Posted by Thunderbolt379 on Monday, September 1, 2014 8:47 AM

No worries, Greg --and thanks again!

Well, today was very busy with house cleaning so I didn't get done all I wanted to. I sealed the decals (including the upper white crosses) and gear bay doors, painted the trim tabs and running lights, and futured the latter; assembled and fitted the tailwheel, and painted some components of the main gear. Nothing worth a photo, I'm afraid.

Tomorrow will be another busy day cleaning in the morning, then going out to teach afternoon and evening, so I could be looking at the day after for finishing this bird.

With the canopy fitting so poorly I was thinking of trying to ease the mechanism back open, the poor fit will then be less obvious, and it'll show off the etched harness. However I have as yet no idea how to do a slack antenna wire. If I can open the canopy I might leave off the wire until I have more idea of how to go about it.

M/TB379

http://worldinminiature.blogspot.com/

  • Member since
    May 2013
  • From: Indiana, USA
Posted by Greg on Monday, September 1, 2014 11:09 AM

I haven't done a slack antenna wire yet, Mike. Will be interested to see how you go about it.

I just found pics of a museum bird, good pics of the slack wire about half way down the page. (Hope it is ok to link to this)

  • Member since
    October 2008
  • From: Georgia
Posted by Rigidrider on Monday, September 1, 2014 4:17 PM

Excellent job Mike! The accents and highlites of the weathering are from my opinion spot on! Im not a huge Ta152 fan, but seeing yours and the others that were built here make me want to do one some day.

Again, Nice work!

Doug

When Life Hands You A Bucket Of Lemons...

Make Lemonade!

Then Sell It Back At $2 Bucks A Glass...

  • Member since
    April 2013
Posted by SchattenSpartan on Tuesday, September 2, 2014 2:37 PM

Looks like today was the last stressful day for me for a while, so I'm going to write that update untill tomorrow evening and post it. Hopefully I'll be able to get all the wing seams cleaned up properly in the next couple of days. There's still plenty of fine-tuning and a bit of filling needed, especially on the Eduard kits.

Then I'm going to concentrate on getting the Hasegawa and Tamiya 190s completely built up and ready for some paint while I play the waiting game (reason for that is below).

I ordered a lot of stuff at SprueBrothers a while ago (they had all the stuff I need available at the same time). The box with all the goodies arrived already and I got a notice to pick it up at my local post office. And that's where those damn morons messed up: There is no Censored box at the post office! It's just not there! And nobody knows where it landed! I complained about this incident and they are trying to find the packet now. Apperently it was deposited at a post office somewhere in Austria. I don't wanna tell you guys right away what's inside that box (it's a secret Wink), but I need some of those items to continue work on my Eduard 190s. I got another small order coming in from Canada (Ultracast to be exact) with a few more bits and pieces. I'm not going all in on those 190s, but I do want my fair share of AM for each of them... Those "few bits and pieces" add up when you're building 9 of them at the same time though... Embarrassed

  • Member since
    May 2013
  • From: Indiana, USA
Posted by Greg on Tuesday, September 2, 2014 8:49 PM

Clemens, I'm surprised an Austrian would lose anything! Y'all seem to organised and efficient.

I'm sure your stuff will show up.

  • Member since
    March 2012
  • From: Corpus Christi, Tx
Posted by mustang1989 on Wednesday, September 3, 2014 5:18 AM

Hang in there Clemens. Jeez!


 Forum | Modelers Social Club Forum (proboards.com) 

  • Member since
    May 2013
  • From: Indiana, USA
Posted by Greg on Wednesday, September 3, 2014 2:27 PM

mustang1989

Hang in there Clemens. Jeez!

I gotta second that.

  • Member since
    April 2013
Posted by SchattenSpartan on Wednesday, September 3, 2014 2:40 PM

Thanks guys, I really hope they figure out what went wrong. The stuff in that box wasn't cheap...

I'm going to take the pictures for the update now and it should be up a bit later tonight.

  • Member since
    October 2008
  • From: Georgia
Posted by Rigidrider on Wednesday, September 3, 2014 4:04 PM

And that's where those damn morons messed up: There is no box at the post office! It's just not there! And nobody knows where it landed! I complained about this incident and they are trying to find the packet now. Apperently it was deposited at a post office somewhere in Austria.

Clemens...

NICEEEEE...

I watched a package come across country with the tracking no. and it arrived in Atlanta... then it started to move again... almost all the way back where it came from, finally got here after about 3 weeks... Just... Well Damn!!!

When Life Hands You A Bucket Of Lemons...

Make Lemonade!

Then Sell It Back At $2 Bucks A Glass...

  • Member since
    August 2009
  • From: MOAB, UTAH
Posted by JOE RIX on Wednesday, September 3, 2014 5:02 PM

Oh Man that bites, Clemens. But, Joe is right when he advises you to hang there. Have some faith and I'm sure it will turn up. By all means I do hope they are right when they said it was delivered somewhere in Austria and they didn't mean Australia.

"Not only do I not know what's going on, I wouldn't know what to do about it if I did". George Carlin

  • Member since
    April 2013
Posted by SchattenSpartan on Wednesday, September 3, 2014 5:07 PM

Doug, the same thing happened to me with another package this year. I ordered some stuff (including 2 190s) directly at Eduard's store and the post office sent the box back right after recieving it. The adress on the box was correct. Eduard took care of that problem though so it eventually arrived here...

  • Member since
    April 2013
Posted by SchattenSpartan on Wednesday, September 3, 2014 5:37 PM

Well I guess it's update time!

I started off by spraying everything flat black to provide a base for the RLM 02. The black paint eliminated the problem of having those white shims in the gear bays after fixing the steps in the eduard kits. It also served as a nice, dark primer that created shadows in all the hard to reach recesses of the rather complex gear bays. Then I sprayed the gear bays with Gunze's RLM 02 in several light coats untill I was happy with the overall coverage. Some touch-ups where pure black paint was still visible were needed, but nothing special. That Gunze color is really good BTW. I like to spray my paints very thin (usually 2 parts paint and 3-4 parts thinner, depending on what I want to do) and only spray very light coats, but it still covered very well and I was basically done after 3 coats of paint. That's the best coverage I had so far with such a light color.

The engines' "bulkheads" (they are just mounting plates and non-existant on the real 190s) were sprayed flat black too and masked, then I painted the engines "Steel Red". All the pipes were brush-painted using a 1:1 mix of Tamiya's "Flat Aluminum" and "Titanium Gold" (I wanted to give them a slight gold sheen and I think it worked out) The thicker pipe at the bottom of the engine was painted with pure Aluminum to add a bit of variety.

The leather gun sleeves of the Hasegawa gear bays are brush-painted with Red Brown (Tamiya as well) and the engines and gear bays got a black-brown oil wash. I wanted to get a greasy look on the engines so I used a rather thick wash for them, I think it worked out quite nicely.

There are only 3 engines! One disappeared! Surprise More on that later... Wink

The Engine pics were taken with my new D5300 (first tme using it for model photography). It does a way better job at taking high-contrast pics. It's really hard to get nice close-up shots with that large 18-105mm lens though... What do you guys think? Yay or nay?

From left to right, top to bottom: F-8, A-5, D-9, D-9 weekend, D-13, D-11. The Tamiya kit as well as the Eduard A-8s are not in this pic because the Tamiya and one of the Eduards needs repainting in the gear bays. The other one is still waiting for some PE before I can paint her.

Some close-up pics:

Hasegawa A-5:

Hasegawa F-8:

Eduard D-9/D-11/D-13:

Eduard D-9 weekend:

This one's the reason why I only used 3 out of 4 engines. I remember reading somewhere that some earlier Doras had gear bay covers similar to the A-series 190s. Eduard provides this part in their kits but marks it as "not for use", so I decided to model my Weekend Edition with the cover in place (I don't want all of them to look the same down there Big Smile).

Well that's all for today folks, I hope you like it!

Cheers, Clemens

  • Member since
    April 2005
Posted by Thunderbolt379 on Thursday, September 4, 2014 1:43 AM

SS -- you should be licensed as a Focke-Wulf assembly plant! This is the most concerted production line modelling I think I've ever seen, and to such excellent standard too! This will be a magnificent schwarm -- how about a flightline or hanger diorama to display them all???

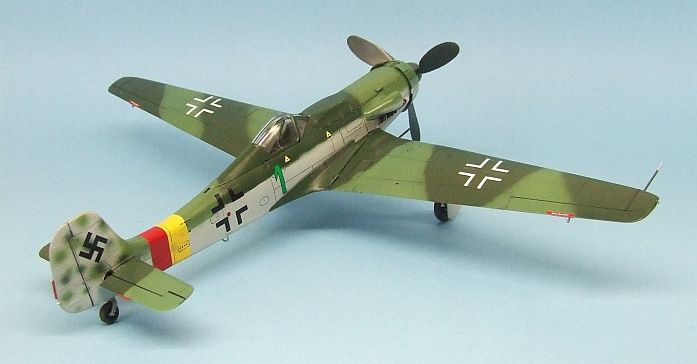
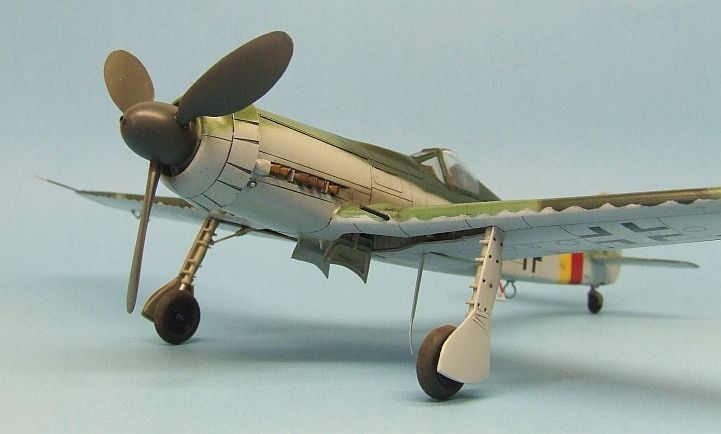
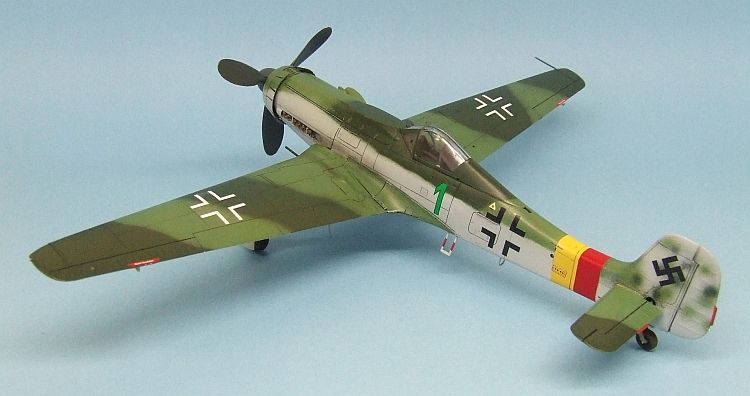
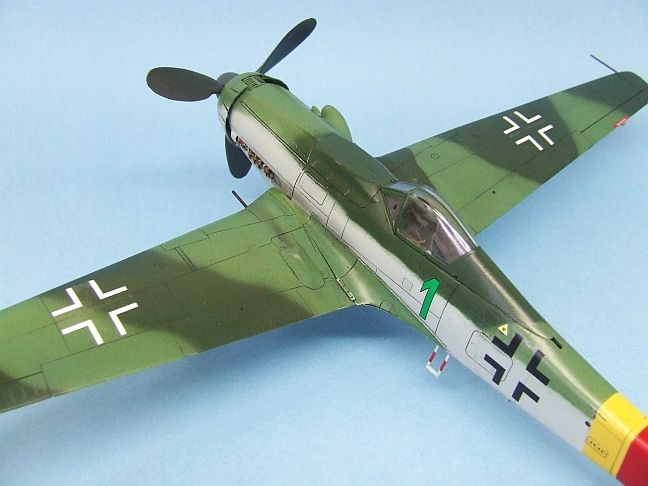
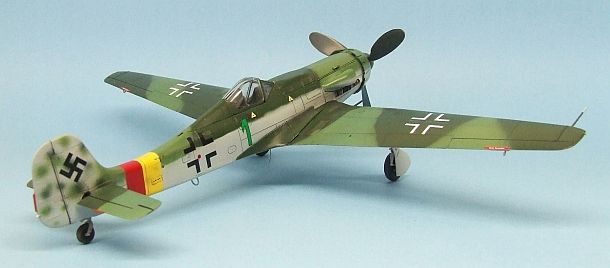
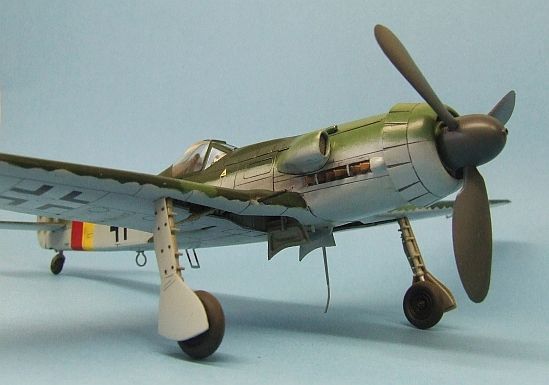
I'm calling the Ta-152 done. It's been an education building a state-of-the-art kit from 25 years ago because Trimaster, for all the praise they have had over the years, and their near legendary status, had to start somewhere, and this kit was in many ways a let-down. I certainly hope Hobby Boss do the H-series planes as well as the -C series, because they will be a breeze to build in comparison to this one, which in essence fought me to the end, with dodgy decals, sloppy fit, vague instructions and so forth. There are a number of parts missing because either there are no locators for them or the instructions do not make positioning clear, or the part was simply impossible to remove from the sprue without breaking it. One of the main gear actuators went that way. There is a  missing antenna under the fuselage, because there was no locator hole for it, nor did the plans mention to drill one at a time when it would have been practical. Lining up the main gear was a case of superglue and prayer, and the main shocks were moulded in the fully open position, giving the plane a serious nose-up stance -- however if the shocks had been moulded to represent weight, the moraine antenna would not have cleared the ground!

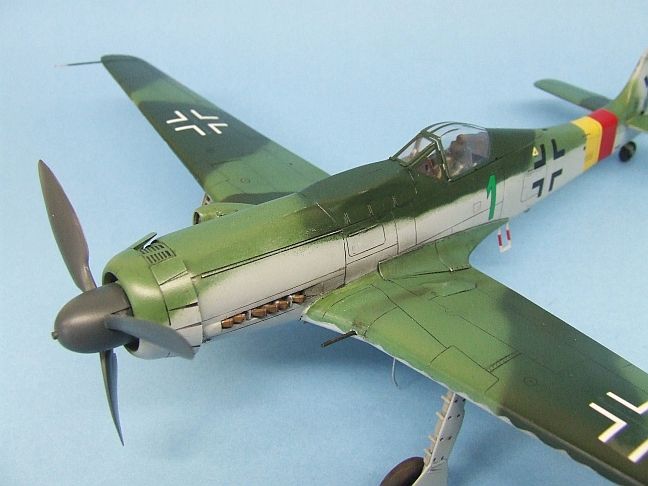
I decided it was finished today, I had no more time to invest in this project -- I skipped wash detailing the main gear and door interiors, which perhaps I should not have... I also skipped the loading decals for the outside of the doors, because I've seen Green 1 depicted without them, or with the loading data for the Dora-9, and Italeri have provided a visibly different decal, which is too large for the area! I also skipped the antenna wire, if one day I'm feeling masochistic I'll go back and rig one! The canopy, although a poor fit, does not want to budge, so I'll leave it where it is.

I was restrained with pigment work and metal dry brushing, so the plane is represented not long after work-up. Without further ado, here's the pics:

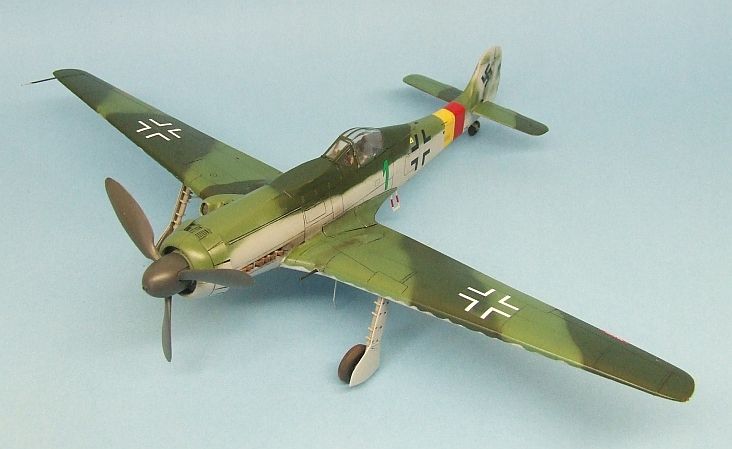
Not completed to the degree I might have liked, but I know when a kit fights and to what extent it's worth engaging in battle -- and while this one would not get by a judge's eye, it looks pretty good in the display case if I say so myself. I hope you like it, and all comments are welcome.

Now, with SS building a squadron more, the least I can do is complete the Hobby Boss D-9 in Rudel's markings, and maybe even throw in a 1:72 Academy A-5 I started way back for Reich Defenders III -- nit necessarily officially! I'll get the A-8 to the finish post as the decal issues are solved -- hopefully soon!

Cheers, Mike/TB379


http://worldinminiature.blogspot.com/

  • Member since
    March 2012
  • From: Corpus Christi, Tx
Posted by mustang1989 on Thursday, September 4, 2014 3:04 AM

What a job from a kit that gave you so many problems! I had serrious issues with my Eduard A8/R2 initially because of warping issues and know what you are talking about when you say a "kit that fought you the whole way". This one seems like it threw you more curve balls than mine did though. Way to go Mike. Looks like you pulled this one off pal. Let me know which one you want to see in the finished builds section of the intro post.

Looking forward to seeing your D-9 next.


 Forum | Modelers Social Club Forum (proboards.com) 

  • Member since
    March 2012
  • From: Corpus Christi, Tx
Posted by mustang1989 on Thursday, September 4, 2014 3:06 AM

Clemens you are definitely a man on fire! The photos looks great and the progress is simply awesome. I don't know how  one can build that many models at one time and not say one curse word. .....................................or did you already?


 Forum | Modelers Social Club Forum (proboards.com) 

  • Member since
    April 2005
Posted by Thunderbolt379 on Thursday, September 4, 2014 7:41 AM

Thanks, Mustang, and thanks for running such a fantastic GB! It's great to be part of it and to have the chance to work with such a great bunch of talented craftsmen.

How about the second pic from the top? That one shows off the paintwork nicely and is a pleasing angle.

I'll make a start on the D-9 tomorrow, beginning with masking in prep for the canopy interior colour and the preshade.

Cheers, Mike/TB379

http://worldinminiature.blogspot.com/

  • Member since
    May 2013
  • From: Indiana, USA
Posted by Greg on Thursday, September 4, 2014 10:13 AM

Mike, your 152 looks great. It's hard to believe by the finished product that she gave you so much trouble.

Hat's off for persistence and a job well done. Be watching for the D-9.

  • Member since
    October 2008
  • From: Georgia
Posted by Rigidrider on Thursday, September 4, 2014 10:15 AM

Outstanding finish Mike! Bravo!

When Life Hands You A Bucket Of Lemons...

Make Lemonade!

Then Sell It Back At $2 Bucks A Glass...

  • Member since
    May 2013
  • From: Indiana, USA
Posted by Greg on Thursday, September 4, 2014 10:21 AM

Clemens, finally some pics! Engines and gear bays look great indeed.

Pics look good, you are learning the Nikon quickly. You'll just have to figure out how close the Nikor 18-105 will focus (I don't have that one so all I can go by is the specs). Resolution and image quality from the D5300 is pretty good, you've probably all ready found that you can get away with cropping tighter than you used to. Some playing around will let you know how far you can go.

You might try shooting close-ups at around 85-90mm. The lens will be a bit sharper there than at full 105mm zoom. That said, they look fine as is.

  • Member since
    October 2008
  • From: Georgia
Posted by Rigidrider on Thursday, September 4, 2014 10:39 AM

You know, Photographic mag has a forum to discuss such things, this is Fine Scale model forum. (LOLOL) Greg... sorry, JUST KIDDING! Lolol... I m realy glad someone here understands camera issues, I sure dont. LOL... I wish I had a better knowledge about such things, but my Nikon doesnt have interchangable lens like the Richo I have but the Richo is SLR. Film shooter. Again Greg... just kidding!

When Life Hands You A Bucket Of Lemons...

Make Lemonade!

Then Sell It Back At $2 Bucks A Glass...

  • Member since
    May 2013
  • From: Indiana, USA
Posted by Greg on Thursday, September 4, 2014 11:20 AM

Rigidrider

You know, Photographic mag has a forum to discuss such things, this is Fine Scale model forum. (LOLOL) Greg... sorry, JUST KIDDING! Lolol... I m realy glad someone here understands camera issues, I sure dont. LOL... I wish I had a better knowledge about such things, but my Nikon doesnt have interchangable lens like the Richo I have but the Richo is SLR. Film shooter. Again Greg... just kidding!

Yep, I got carried away, Doug. Smile Someone starts talking camera stuff and I have a hard time keeping my mouth shut. Wink

  • Member since
    April 2013
Posted by SchattenSpartan on Thursday, September 4, 2014 1:21 PM

Thanks, guys!

Mike, your 152 looks magnificent! I like the clean look you went with!

Greg: I actually took all the "close-up" pics from at least 50cm away and simply zoomed in on the photo afterwards. I got 24 megapixels to work with so I might as well use them... Wink I'm only taking pictures with al lthe pre-configured modes of my camera ATM because I still have to figure out all the stuff I can adjust in manual mode.

Joe: No curses were yelled at the assembly line yet, but I'm pretty sure I'm gonna get my fair share of problems once I start joining the fuselages with the wings...

  • Member since
    April 2013
Posted by SchattenSpartan on Thursday, September 4, 2014 2:56 PM

I need some help with my Eduard A-8...

I'm using the Eduard PE set to dress up the gun bays, gear bays and engine, but It requires some slight modifications to the base kit:

I have to cut out the cooling flaps behind the engine so I can add the PE and I simply have no clue how to do this properly. They are way too small for my saws...

Any advice would be a great help...

  • Member since
    May 2013
  • From: Indiana, USA
Posted by Greg on Thursday, September 4, 2014 4:33 PM

Clemens, I just glued mine on without cutting out below (never thought of it to be honest). I think you saw a pic early August.

If you cut out those two that are together, not sure how you will glue the middle one?

Were it me, probably drill holes, then clean up with a #5 blade and a jewelers file. Pretty small area to work, for sure.

Be curious to hear what the real answer is, now that I've spouted off. :)

JOIN OUR COMMUNITY!

Our community is FREE to join. To participate you must either login or register for an account.

SEARCH FORUMS
FREE NEWSLETTER
By signing up you may also receive reader surveys and occasional special offers. We do not sell, rent or trade our email lists. View our Privacy Policy.