SEARCH FINESCALE.COM

Enter keywords or a search phrase below:

The 2014 Automotive Group Build

62966 views
717 replies
1 rating 2 rating 3 rating 4 rating 5 rating
  • Member since
    December 2013
Posted by CodyJ on Thursday, November 6, 2014 6:46 PM

Thanks Misty!

Well tis FINISHED!   Here is a list of the Mods made..

Duel Truck Modification List

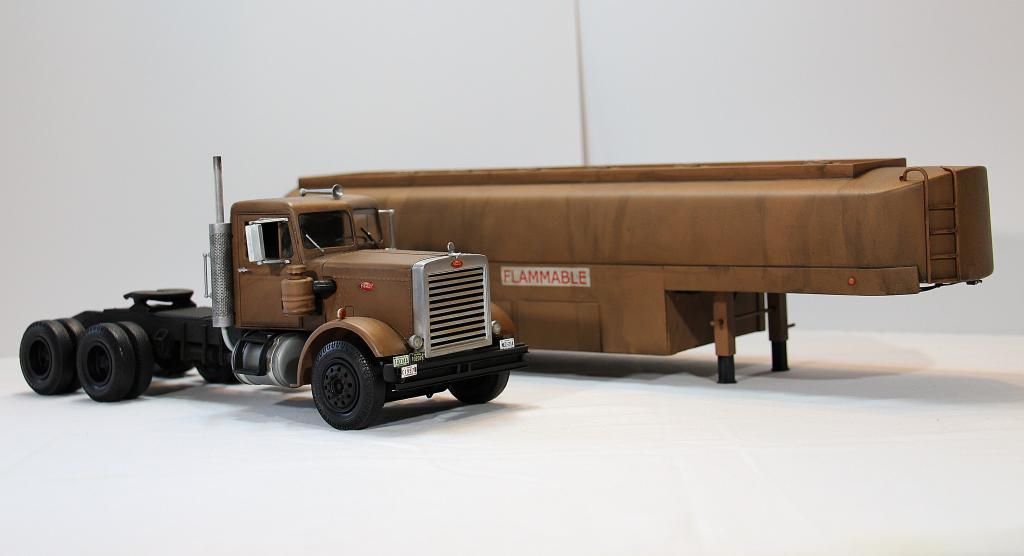
Semi Used: AMT 1/25 Peterbilt 359 "California Hauler"

Trailer Used:  Italeri 1/24 Jumbo Tank Trailer


Modifications to Semi Tractor:
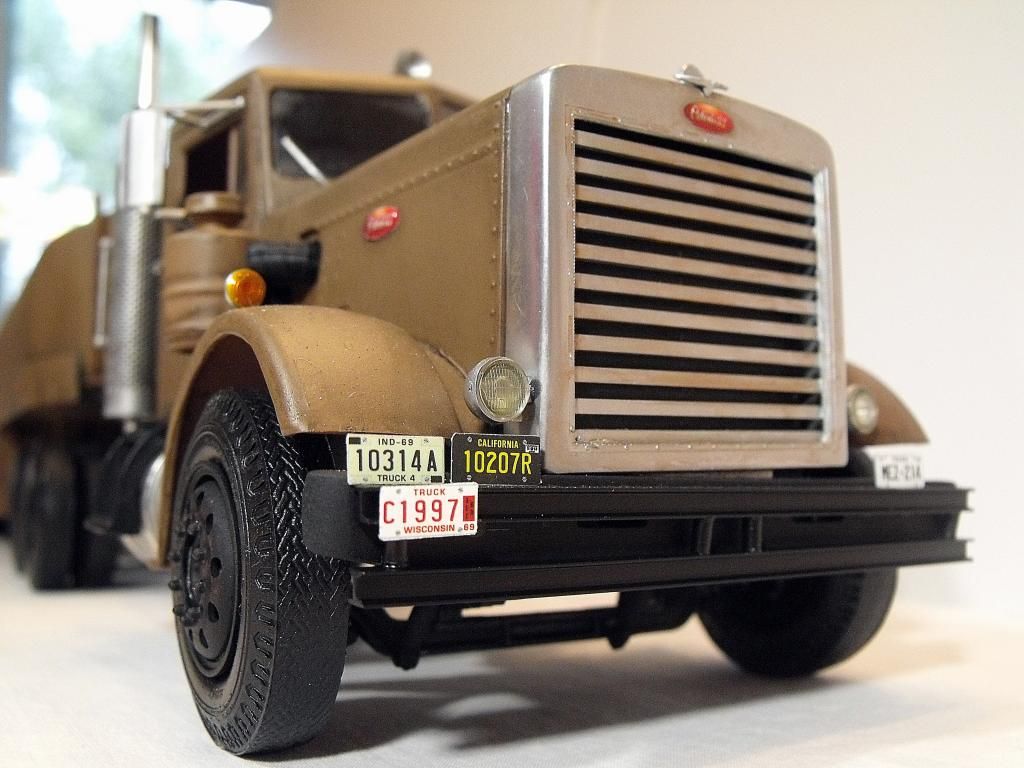
-Scratch Built Grill

-Front Suspension Lowered

-Resin Cast Rear Wheels

-Italeri Exhaust w/ Aluminum Tube Tip

-Scratch Built Exhaust piping made from Soft Brass

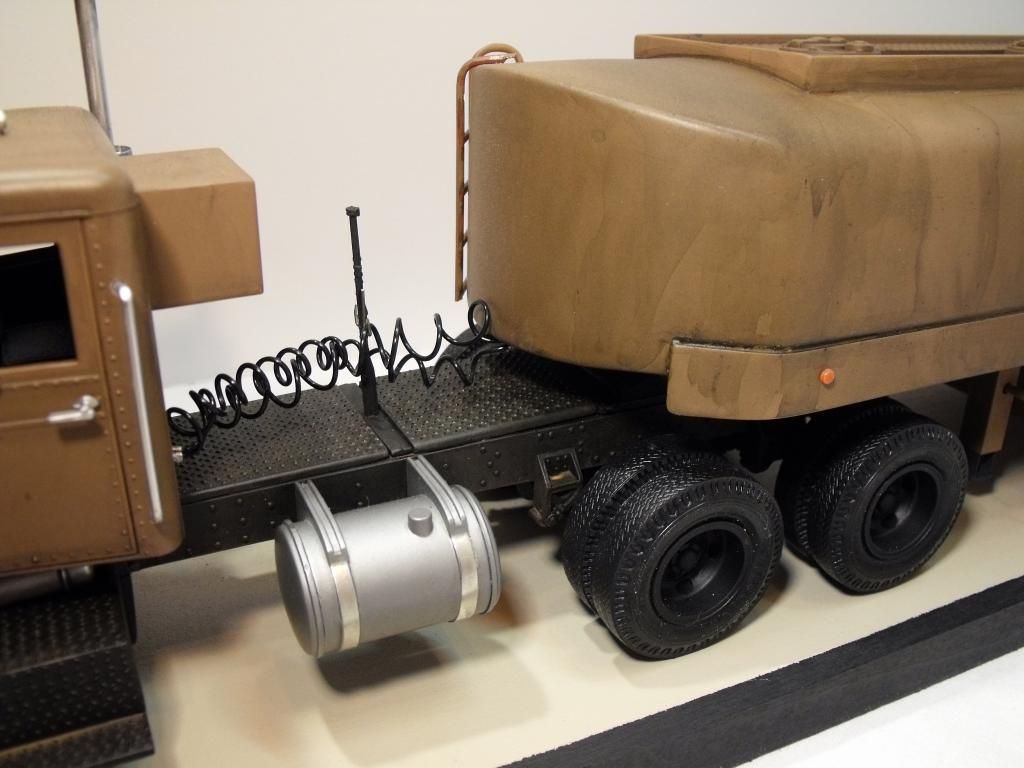
-Scratch Built "Swamp Cooler" Box on rear of the Cab

-Custom Horn

-Most Chrome Parts Dechromed to match Weathered Finish

-Hood Mirror Added

-Scratch Built thin License plates with Decals

-Cab Handle made from Aluminum tube stock

-Washes and Weathering applied

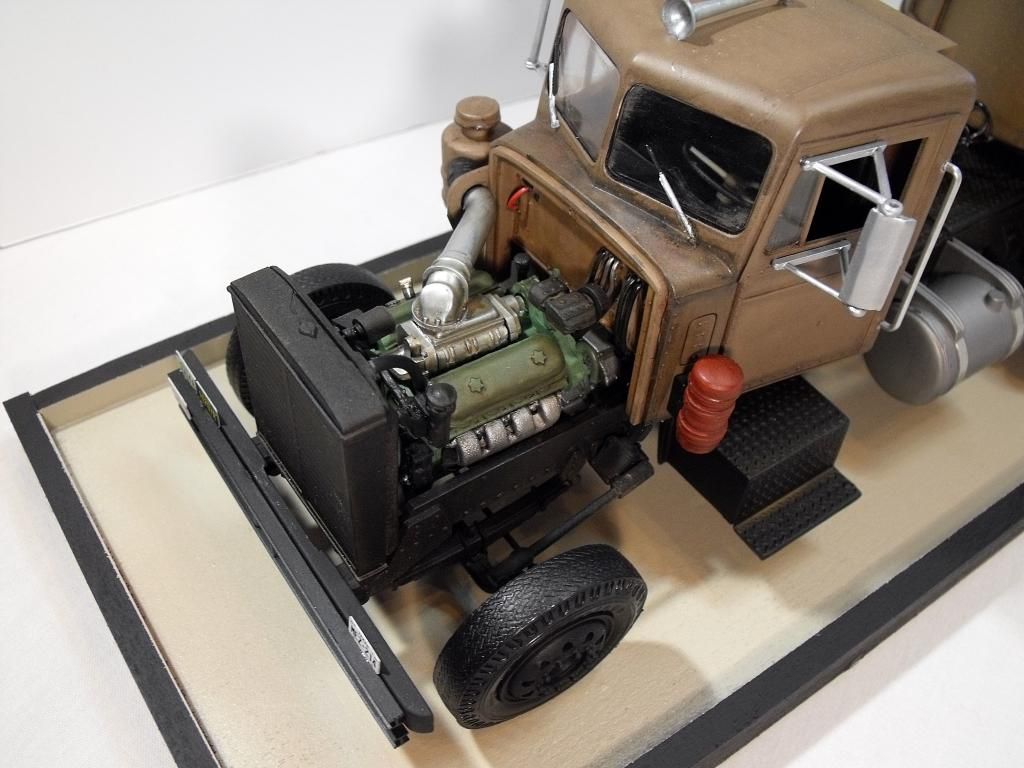
-Hoses and Tubing added under the hood

-Iron "I" Beam Bumper built from stock styrene

-Airlines made from Plastic leather cord

-Airline hook ups made with aluminum tubing and styrene plates


Modifications to Trailer:

-Bottom Half scratch built

-Front half curvature to match movie truck

-Skirting added and built from stock styrene

-Trailer Doors and Bottom Built from scratch Styrene

-Custom Tail lights

-Custom Rear Bumper

-Ladder added to front

-Scratch Built Suspension

-Front trailer Stands scratch built and function in 2 positions (Down and Up)

-Airlines and Hookups scratchbuilt

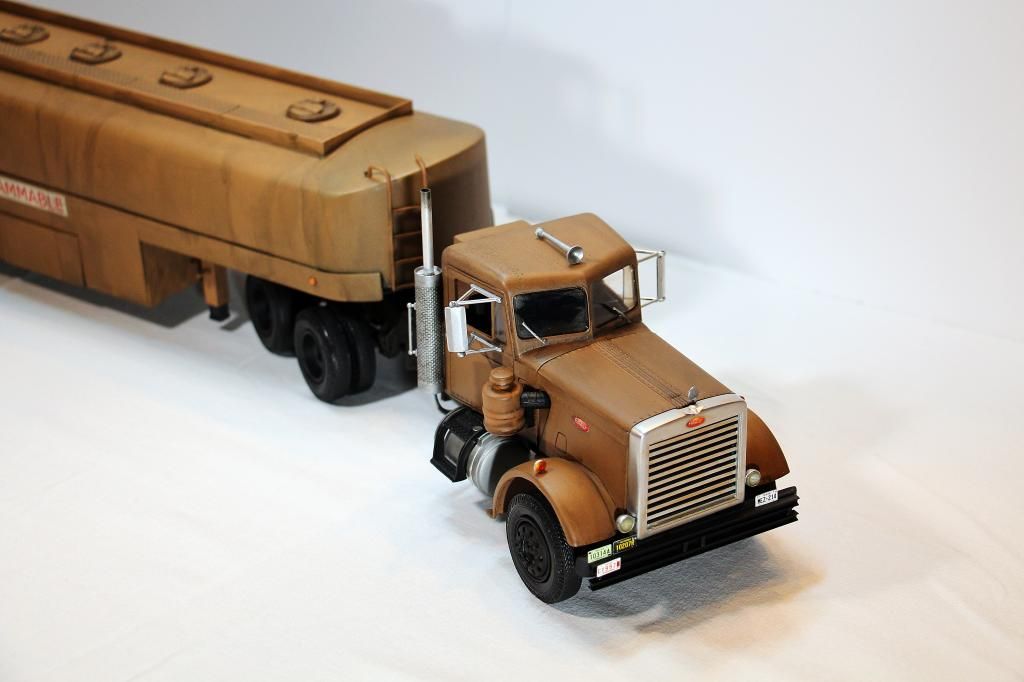
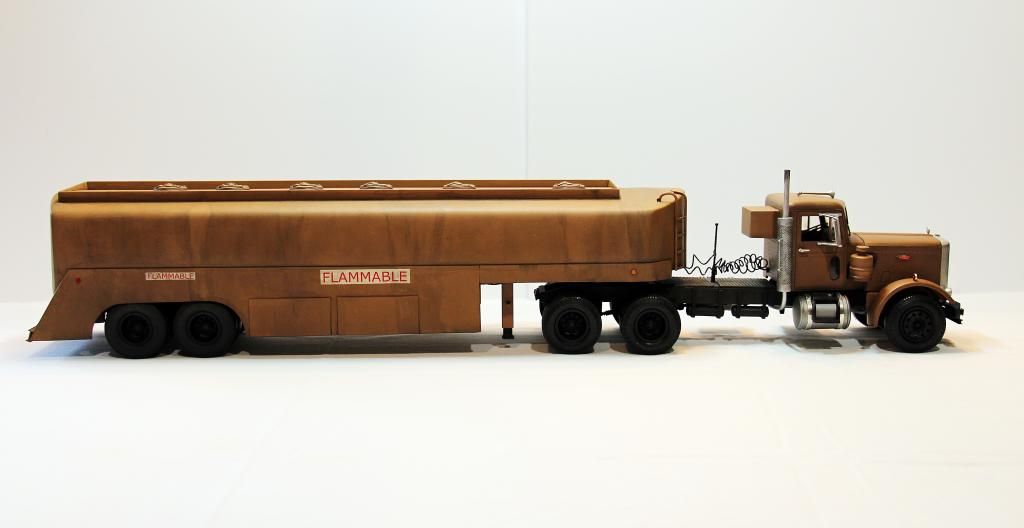
Here are the Finished Pics

  • Member since
    December 2013
Posted by CodyJ on Thursday, November 6, 2014 7:33 PM

So here we begin a new build.  Its the 1949 Mercury Wagon.  Looks fun!  The 49 ford shares the color I will be using.  Its called Berwick Green.  

  • Member since
    May 2005
Posted by pyrman64 on Sunday, November 9, 2014 4:09 AM

Sorry for the delay, but life has hindered my progress on numerous GBs. Sad

Here's a few pics of the almost completed interior for the Dodge Caravan taxi....

 thanks for looking.

Tags: Taxi , Caravan , Dodge

Greg H

"There is many a boy here today who looks on war as all glory, but, boys, it is all hell." Gen. Wm T. Sherman (11 April 1880, Columbus, Ohio)

  • Member since
    May 2005
Posted by pyrman64 on Sunday, November 9, 2014 4:29 AM

Cody: great job on the Duel Peterbilt conversion!

Greg H

"There is many a boy here today who looks on war as all glory, but, boys, it is all hell." Gen. Wm T. Sherman (11 April 1880, Columbus, Ohio)

  • Member since
    September 2013
Posted by Raven728 on Sunday, November 9, 2014 7:34 PM

Cody, awesome job on the duel truck! One of my favorite movies as a kid. I'm not into trucks at all, but I really enjoyed watching your build progress. Thanks for the instruction and entertainment.

- Steve

  • Member since
    December 2013
Posted by CodyJ on Sunday, November 9, 2014 11:39 PM

Thanks Greg and Raven!  

Nice unusual subject Greg.  Is it the "Cash Cab"?!?!  That was a funny game show but the questions were ridiculous hard!  Nonetheless nice interior!

  • Member since
    April 2014
  • From: Australia
Posted by lostagain on Monday, November 10, 2014 6:11 AM

Great build Cody, very ah ... unsettling as it took me back to seeing the movie.

Is that a soccer taxi or the yellow cab type?

The lotus has taken a long time to get to the painting stage. The seam lines and ejector marks took ages to see off, and a few primer coats. 

Now onto the painting - started on the suspension, seating and the aluminium parts of the body. Next trying to get a good finish on the colour.

Like to try something new each build, this time I am using acrylic paint with Mr Colour Levelling thinner for the body colour after reading good tales - what could possibly go wrong?

  • Member since
    January 2014
Posted by Seabe on Monday, November 10, 2014 9:16 PM

Okay, I'm back from the (nearly literally) dead. Not recovered and settled enough yet to start building, but great to see you guys weren't slacking off! Hope to get back to progressing here soon, maybe even tonight.

Cody, that is an absolute great job you did on the truck! Great mods and superb and subtle weathering touches!

  • Member since
    February 2005
  • From: Proctor. MN
Posted by 65ss on Tuesday, November 11, 2014 12:42 PM

Cody that truck is awesome! I've never seen the movie, but just looking at that build I think I'm going to have to Netflix it!

Greg, looks good so far!

Dale

  • Member since
    April 2014
  • From: Australia
Posted by lostagain on Wednesday, November 12, 2014 4:28 AM

Ok, tried the acrylic/Mr colour levelling thinner mix.

Worked really well. Apart from the fuzz on the first white coat. Next white coat had buckles on the back...

Cleared up the fuzz and sanded off a bit of orange peel (still showing from the primer). Did another white coat, never managed as good a gloss as I did this time.

Next for the colour coat - lemon yellow Tamiya acrylic with levelling thinner. Went on well, but not as good as the Gunze white, think it was a bit heavy. But thought I had done a great job. 

Once it had dried I could see the variation in the colour depth - for a moment thought I was going to get away with just the one coat. But have to go back for another coat or two.

  • Member since
    March 2011
Posted by ewheeler454 on Tuesday, November 18, 2014 8:07 PM

Hey all,

I am back in the US and get back to playing hehehe.

Cody,

That is some amazing work! I also like your choice for your next project.

Lostagain,

Really diggin the yellow. It is a hard color to get even.  :)

Hope to et some work done on the Buick later this week.

L8TR,

Eric

  • Member since
    March 2011
Posted by ewheeler454 on Monday, November 24, 2014 8:07 PM

Hidey ho!

I was able to get some done on the Buick and the "51 Chevy this weekend.

Here's the rear bumper with the taillights. I also filled in around the Buick letters. The flash makes it look bright but it's actually black when you look at it.

I got the manifolds and exhaust pipes drilled and pinned before I installed the exhaust. Makes it a lot easier to line the stuff up later. I do them all this way now (Thanks again Rommelkiste).

Installed the exhaust and suspension. Also drilled out the rear pipes to make them look better.

Started on the interior.

Most of the engine is done. I already have the plug wire holes drilled out. I also have the pins glued in for the exhaust manifolds.

I'll post the 51 Chevy stuff in a different post.

L8TR,

Eric

  • Member since
    March 2011
Posted by ewheeler454 on Monday, November 24, 2014 8:22 PM

Here's the beginning of the '51.

This one is going to be a custom. I removed all the side trim, and the badges from the hood and trunk. I spent almost 2 hours sanding all the stuff off and removing the flash and mold lines. I also scribed out around the doors, roof /windshield molding and trunk. I still need to fill in around the rear fender wells. I also started on the engine and rear end, and started stripping the chrome. I also found some large baby moon rims for it on EBAY hehehehe.

The scratch has on the side has been filled and sanded. :)

L8TR,

Eric

  • Member since
    January 2012
  • From: Hatfield
Posted by Misty on Wednesday, November 26, 2014 5:12 PM

just seen the finished pics of your rig, Cody, wow its excellent! can imagine it kicking up dust on the freeways.

  • Member since
    March 2011
Posted by ewheeler454 on Saturday, November 29, 2014 10:57 PM

Here's some updates on the Buick and 51 Chevy.

I got the decals on, and started running the wires for the engine. Just need to make the boots. Most of the Interior is done. Hopefully it'll be warm enough to spray the final clear coat tomorrow.

Also got the 51 primered.

L8TR,

Eric

And the 51.

  • Member since
    March 2012
  • From: Corpus Christi, Tx
Posted by mustang1989 on Monday, December 1, 2014 7:51 AM

Hey guys I know I'm coming in on the tail end of this thing but I'm in the process of re-building a 1970 Dodge Challenger. I should be able to finish this bad boy before the end date.

Some of you may have seen this in the Automotive Section but I figured I'd turn it from WIP to a GB build.

This is where I started last month.


and this is where I began work.

I will post all my work up to the point I'm at right now (which is the replacement engine build up) if that's ok with the host and the group. 


 Forum | Modelers Social Club Forum (proboards.com) 

  • Member since
    March 2011
Posted by ewheeler454 on Saturday, December 6, 2014 11:02 PM

Hey Mustang,

That's an interesting project and I'm curious about it turns out. I've seen quite a few built cars on Ebay going a lot cheaper than the new kit and have thought about trying to do a restoration on one just see how much trouble it would be.

Here's some progress I've made on the Buick. I'm hoping to finish it this weekend.

I got all the chrome trim done and the glass installed. Also got the holes drilled for the side mirrors.

Here's a shot of the chrome around the fender wells and side markers.

Wheels and tires are done. Even addd the Buick logos hehehehe.

Interior is done.

 Yea! All 4 wheels touch the ground hehehehe.

This was an experiment. I made the plug boots out of .032 solder and it looks like it works well. It's slightly larger than the wire and looks pretty good. Just need to finish the rest up. Now I know it works I'll make a jig to make them better and faster for the next build.

Here's a shot of the test fit to make sure everything is lining up. This kit has been a fun build as everything fit without a lot of headaches.

L8TR,

Eric

  • Member since
    December 2013
Posted by CodyJ on Sunday, December 7, 2014 12:15 AM

Thats a Tasty Buick Eric!

I will try to slip in one more here.  It is a 1949 Mercury Wagon.  I don't have much done but the color selection (Original Factory Berwick Green) and the Engine.  I drilled out the Distributor and heads for the plug wires to fit in.  

  • Member since
    March 2012
  • From: Corpus Christi, Tx
Posted by mustang1989 on Sunday, December 7, 2014 5:48 AM

I was starting to get a little concerned when I hadn't heard anything for a couple of weeks there and now things are lookin' up.  Ok I'll take it that I'm in. I'll start posting pics shortly here fellas..........Cool


 Forum | Modelers Social Club Forum (proboards.com) 

  • Member since
    March 2012
  • From: Corpus Christi, Tx
Posted by mustang1989 on Sunday, December 7, 2014 5:50 AM

That body looks great Eric!!!!

Thanks for the info on the paint and that engine looks friggin cool Cody!


 Forum | Modelers Social Club Forum (proboards.com) 

  • Member since
    March 2011
Posted by ewheeler454 on Sunday, December 7, 2014 9:26 AM

Thanks.

Cody, I agree with Mustang on the engine. It looks sharp.

Mustang, until you mentioned it, I didn't realize the GP is almost over hehehehe. I hope Tony starts another one so I can over the builds I didn't get too hehehehe. Look forward to seeing your  progress shots.

L8TR,

Eric

  • Member since
    April 2014
  • From: Australia
Posted by lostagain on Sunday, December 7, 2014 4:34 PM

Mustang,

Interesting rebuild - saw how it has grown as a project over in Autos, coming along really well.

Eric, you seem to be flying through - my first car build in a long time has been so slow.

Cody, great looking engine there.

Which brings me to a question - what are you guys using to wire up the engines? I have drilled out the distributor and motor but am not sure what to use. 

Eric, I saw your tutorial using vinyl tube, is that specialist stuff? Only stuff I currently have is fuse wire, guitar strings or EZ line, all of which need to be painted, not nearly as good a look as you guys are getting.

And if it is not specialist, where could I get something similar? Electrical suppliers?

So the Lotus at the moment has got to the suspension on:

and the motor waiting for me to wire it up:

Thanks for the advice.

  • Member since
    March 2011
Posted by ewheeler454 on Sunday, December 7, 2014 5:02 PM

Hi lostagain.

To be honest, I got tired of sticking tiny drill bits in my fingers trying to drill the distributors so I order them pre-wired from Morgan Automotive Detail. Of all the ones I've seen out there, they look the best to me. The Lotus is lookin' sharp. :)

L8TR,

Eric

  • Member since
    March 2011
Posted by ewheeler454 on Sunday, December 7, 2014 9:02 PM

Ok,

Here's the completed photo for the Buick GSX. Since I don't have enough time to finish the 51 Chevy due to stuff I'm waiting on (flame masks for the ghost flames), I'm going to do a Lindberg 37 Ford.I should be able to finish it by the end of the month.

L8TR,

Eric

  • Member since
    December 2013
Posted by CodyJ on Monday, December 8, 2014 12:49 AM

I haven't used the prewired distributors before.  The ones from "Parts by Parks" look very unrealistic, I do know that.  For the wires I used around 30 gauge wire.  You can buy it in different colors.  Found some at radio shack but not much in color variety of course.

Nice finished Buick Eric!

  • Member since
    March 2012
  • From: Corpus Christi, Tx
Posted by mustang1989 on Monday, December 8, 2014 6:26 AM

ewheeler:I'll be checking those pics out when I get home. Something about this computer here at work won't let me view yours. Lookin' forward to it though.

lostagain:Thanks for the comments man. That's a unique color for that engine of yours and looks great.

I'm hoping to be able to finish by the end of the year as I have another build starting up on the 1st of Jan. I've got just as much pressure on myself to finish this thing up as I do to meet the deadline of this GB.lol


 Forum | Modelers Social Club Forum (proboards.com) 

  • Member since
    March 2012
  • From: Corpus Christi, Tx
Posted by mustang1989 on Monday, December 8, 2014 11:35 AM

Ok lets start from the beginning:

To start with I want to take this build in this direction:

and here's where I start just prior to really getting into the sanding to remove the gloss clear and decals.

The decals were just way to wrinkled. At 14 years old, this build was a major breakthrough for me because it was the best paint finish I had ever achieved on a car model. Somehow it just all worked out and the gloss was just as Purdy as could be! The major drawback was that the decals had wrinkled.............BAD.

  This all stayed the same throughout the years. After being given to my brother around 5 years ago and then my visit to his home and seeing the car with 2lbs. of dust on it and broken into pieces, I took it back and repaired it and there it has sat since Christmas of 2011 with hood with no intake on it , missing rear spoiler and missing miscellaneous parts here and there. This gap in building time that I would have had from mid November to the end of December would have been void so I decided to slot this one in. I bought a replacement kit for this around 10 months ago and am finally getting around to this. 

Sanding continued:

until the decals and gloss coat were off:

 Not pictured here was the sanding of the deck lid, lower panels and roof just to take the gloss off uniformly.

Anyways I pressed onward in using finer grit pads from 3200 grit to 1200 grit to get this result:


 Forum | Modelers Social Club Forum (proboards.com) 

  • Member since
    March 2012
  • From: Corpus Christi, Tx
Posted by mustang1989 on Monday, December 8, 2014 3:27 PM

After the four day period I yanked it out of the case and gave it a look over. That's when I found the discrepancies of the speck in the drivers door and the paint run. Overall it look ok though.


I put the body aside for a little while while I was obtaining information on just how to straighten the rough spots out and make this thing look ok.

  I started work on an engine for this thing. To start with, here's the original engine with chrome valve covers and chrome silver exhausts, oil pan and complete transmission. Hey, chrome was great at 14!

 With that....................................we're startin' over!

In a few photos from now you'll see where I managed to seat the intake manifold a little better in the valley. Then there's the nasty azz seam going down the middle of the engine oil pan. Good ol' Monogram!


 Forum | Modelers Social Club Forum (proboards.com) 

  • Member since
    September 2013
Posted by Raven728 on Monday, December 8, 2014 7:04 PM

Great paint jobs, Eric & Stang.

- Steve

  • Member since
    January 2014
Posted by Seabe on Monday, December 8, 2014 9:45 PM

Great to see some progress! Good going, guys...

I have only just re-started again after a hectic time. All I've done thusfar is finish up the seatbelts and add to the Jordan. With the Brabham some side skirts have just been added, glue literrally still drying. And what's kept me busy was hollowing out a helmet to use with this. Not my forte, so hope the end result looks acceptable. (No, I tend not to like driver figures, but I do like helmets... go figure!)

JOIN OUR COMMUNITY!

Our community is FREE to join. To participate you must either login or register for an account.

SEARCH FORUMS
FREE NEWSLETTER
By signing up you may also receive reader surveys and occasional special offers. We do not sell, rent or trade our email lists. View our Privacy Policy.