SEARCH FINESCALE.COM

Enter keywords or a search phrase below:

PACIFIC CARRIER AVIATION GROUP BUILD

90289 views
1294 replies
1 rating 2 rating 3 rating 4 rating 5 rating
  • Member since
    February 2014
  • From: Michigan
Posted by silentbob33 on Friday, October 31, 2014 8:09 PM

Looks like you've done a lot of great work Joe!

On my bench: Academy 1/35 UH-60L Black Hawk

  • Member since
    March 2012
  • From: Corpus Christi, Tx
Posted by mustang1989 on Saturday, November 1, 2014 7:52 AM

Bakster: Thanks dude! Good thing that it's not a real plane given the disaster that this thing has been to build. I have to say that I like the challenge though (if we didn't like doing this stuff we wouldn't be here! lol )

flyerduke: I'll definitely feel a sense of accomplishment that's for sure. As for the pitot tube. I always go paralell to the fuselage. It may or may not be right but the angle of being with the wingline always looked awkward to me.

checkmateking:  Man, thanks. I'm tryin'

silentbob: Lemme tell you, I have words for this kit that I cannot say here. I saw some poor old guy yesterday at Hobby Lobby and he picked up this kit and was looking at it. I just couldn't restrain myself from sayin, "Look dude, you dont wanna do that............really". After I described some of the hell I was going through with mine,  he put it back at which point I directed him to a Tamiya version that he could buy online. In short, "Fellow modeler friends don't let fellow modeler friends buy Revell Corsairs!"

   And aside from all that stuff I have my latest screw up..........................er update. You know sometimes us as modelers get tunnel vision in the fact that we pay way to close of attention to the kit instructions and put our total trust in them. Wow, did I ever get a slap in the face, or should I say I slapped myself in the face. I'll explain:

  Does anybody see the problem with the instruction sheet here?

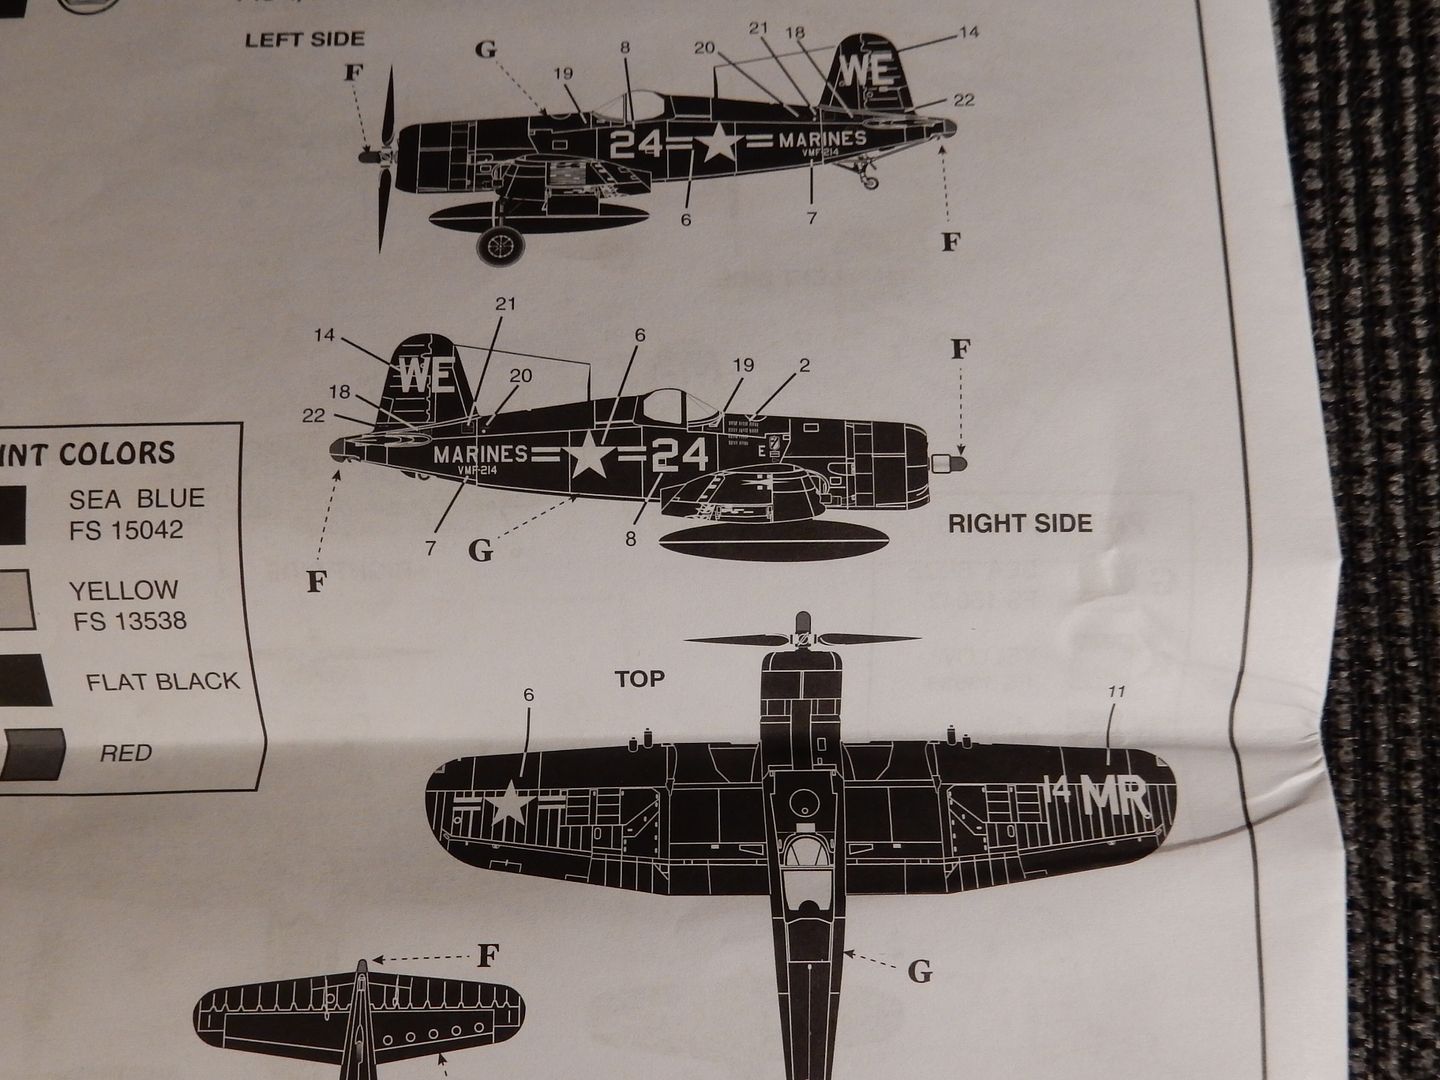
 If you don't see it , don't feel bad. It took me looking at the decal sheet stripped of most of the decals to see the one left over that belonged on this bird. Look at the number / squadron identifier on the right wing and look at the fuselage. 14 MR does not coincide with the 24 WE that is all over the SIDES!!!! You gotta be kiddin' me............! 

   I tried a couple of times to strip the decal off of the wing and chickened out. I've simply done way too much work to this thing to go backwards here. I painted over it and will gloss again to apply  the correct decal (24 WE) circled in red in the background below. The decal lays perfectly over the other one. I only hope this is my last hiccup!


 Forum | Modelers Social Club Forum (proboards.com) 

  • Member since
    August 2009
  • From: MOAB, UTAH
Posted by JOE RIX on Saturday, November 1, 2014 8:50 AM

Joe, Regardless, You need to pat yourself on the back for the fabulous progress you have made. Trust me Joe, building an excellent fitting 1/72 airplane is a cake walk compared to building an atrociously molded kit such as yours. So, needless to say, I absolutely admire your persistence and skill. As for the decal incident. well, that is something I certainly would have done myself. So, don't beat yourself up too much. Sounds as though you made a nice recovery. Your doing awesome Joe. Don't let this critter beat you down now.

"Not only do I not know what's going on, I wouldn't know what to do about it if I did". George Carlin

  • Member since
    December 2012
Posted by flyerduke on Saturday, November 1, 2014 9:30 AM

Joe, I got a little chuckle out of the decal error.  By no means is it a slight against you.  It's a laugh at Revell.  I missed it it before you told us what the issue was.  This really goes to show how far kit design and manufacturing has come along over the years.  You've done all modelers proud with your Corsair build.

Also, thanks for the info on the pitot tube.  Unfortunately, I just glued it on square to the wing about an hour ago.  Oh well, my build is far from perfect.  Gonna primer the plane this morning.

  • Member since
    March 2012
  • From: Corpus Christi, Tx
Posted by mustang1989 on Saturday, November 1, 2014 9:57 AM

Joe Rix and flyerduke: Thanks you guys for your confindence in my abilities.

BTW flyerduke as an additional laugh, the instruction sheet copyright is 2011 and the decal sheet is copyrighted in 2007. What does that tell you???


 Forum | Modelers Social Club Forum (proboards.com) 

  • Member since
    December 2012
Posted by flyerduke on Saturday, November 1, 2014 2:00 PM

I found a little time to work on the Hellcat.  Gettin' it ready for priming which I will do shortly.


  • Member since
    March 2012
  • From: Corpus Christi, Tx
Posted by mustang1989 on Saturday, November 1, 2014 7:33 PM

That thing looks Eduard through and through. I just got mine in a few days ago and was noticing the hub and tires being separate pieces. That's a great idea!! Cant wait to see the paint start flying on this thing duke!!Yes


 Forum | Modelers Social Club Forum (proboards.com) 

  • Member since
    August 2009
  • From: MOAB, UTAH
Posted by JOE RIX on Saturday, November 1, 2014 9:14 PM

All Right flyerduke! Great to see you have made some sweet progress on your Hellcat. And very fine looking progress it is. Man, you can just see why the Eduard Hellcat in heralded as the most accurate there is.

As for progress on my Hellcat I met with a slight issue. One that I actually felt was there. While masking the underside I removed a small sponge that I had stuffed in the oil cooler as a mask. I had hand painted part of the interior of the cooler prior and when I removed the sponge it  became glaring that the white I had painted on the underside was not enough and thus was actually a light gray. Thus, I had to remove the masking that I had put on so far and respray a few more coats of white on. It looks all good now. Back to masking.

"Not only do I not know what's going on, I wouldn't know what to do about it if I did". George Carlin

  • Member since
    December 2012
Posted by flyerduke on Saturday, November 1, 2014 11:07 PM

Hey guys, thanks for the words of encouragement.  I primered the plane with Ta miya fine surfacer (spray can).  Doesn't work real well when it comes to gettin' in the wheel wells.  Shouldn't take much when spraying the insignia white.  Still waiting for my Mr. Color Navy Blue and Inter. Blue to arrive from China (ebay).  During my paint drying spells, I started on my 1/72 Trumpeter F-107.  Looks like an easy build, but not much detail.

JR- I hand painted the oil cooler intakes white before hand.  Then stuffed tissue in the center intake.  Hope I don't have any issues later on.

Craig

  • Member since
    March 2012
  • From: Corpus Christi, Tx
Posted by mustang1989 on Sunday, November 2, 2014 5:16 AM

Looking good flyer!  There's just something about seeing a model in primer that looks cool. To me it signals the beginning of endless possibilites. I'm getting to where I actually enjoy painting and watching others paint their builds as it's a learning experience. So with that , I'm watching......................


 Forum | Modelers Social Club Forum (proboards.com) 

  • Member since
    March 2012
  • From: Corpus Christi, Tx
Posted by mustang1989 on Sunday, November 2, 2014 7:07 AM

 Good mornin' everybody! Well I've put the final push forward for the weekend here. Hopefully I get some decent time in through the week coming up to get the finishing touches put on this bad boy. I got the gear doors all ready for the black primer. On these old Mongram/ Revell builds I do something alot of us more experienced guys don't do. You remember those stupid part numbers that Monogram used to put right in the MIDDLE of the part? You know, the one that you have to friggin sand off every time? I tend to leave stuff like that on as well as the copyright lettering thats right in the centerline on the bottom of the wings on this build. Call it nostalgic reasoning I guess. I built my Monogram Dauntless and installed the bomb release lever (which shows on the bottom of the fuselage-you could actuate it with your finger and it would drop the bomb) for the same reasons. It makes for good conversation when showing the build. The part numbers here are on the inside so I don't have much beef with leaving them there. I guess you could call it Monograms signature and reminds me of when I was a kid building these kinds of kits.

Ok here's the before and after pics of the clear flat. I mix a little 70% ISO and a couple of drops of light grey to my upper surface flat coats to give it a true flat and sunbleached effect.

Before flat:

After flat: (and lets not forget the wing number decal repair...Sheesh!   )

Before flat:

After flat:

Still have the bottom flat clear without the grey added to apply and all the last minute stuff like canopy pieces, prop, landing gear, arresting hook , pitot tube, gun barrels and aerial antenna. I almost forgot: the installation of the folded wing as well. Looks like we're on the home stretch here.............


 Forum | Modelers Social Club Forum (proboards.com) 

  • Member since
    August 2009
  • From: MOAB, UTAH
Posted by JOE RIX on Sunday, November 2, 2014 9:38 AM

Excellent repair job on the decal and paint Joe. Looks like there was never a problem. The ISO/Gray treatment looks good so far.

"Not only do I not know what's going on, I wouldn't know what to do about it if I did". George Carlin

  • Member since
    December 2012
Posted by flyerduke on Sunday, November 2, 2014 11:52 AM

I decided to take a page out of JR's play book.  I used a black Faber-Castell XS artist pen to go over the panel lines.  What a pain in the ass.  I still think I may pre-shade the panel lines with the airbrush.  I noticed in the pics I missed a couple spots.  Sorry about the grainy photos.  I'm no photographer.  Hopefully the exterior paints arrive next week.  I'll work on the prop, landing gear and doors in the meantime.  I've never pre-shaded before.  I hope I don't screw it up.

Craig

  • Member since
    August 2009
  • From: MOAB, UTAH
Posted by JOE RIX on Sunday, November 2, 2014 12:16 PM

Ooooh! That came out nice. I'll have to remember that there Faber-Castell artist pencil. Produces a much darker effect. Sorry flyerduke but, did I fail to mention that tracing panel lines is tedious and mind numbing? Given that I had to add more coats of white my efforts were for not. Note to self: Use Tamiya white primer when needing to spray white paint.

"Not only do I not know what's going on, I wouldn't know what to do about it if I did". George Carlin

  • Member since
    July 2014
  • From: Franklin Wi
Posted by Bakster on Sunday, November 2, 2014 12:52 PM

Craig--  that looks tedious.  You did an awesome job with it.    I don't think I have seen this done before until Joe and you.  I am really interested so see how this translates in the final build for you guys.  I can't wait!

Mustang--It is looking great.  I still want to climb in and take it for a spin.  Stick out tongue  BTW--that was a cool story. You saved that guy from one big headache!  

  • Member since
    January 2011
  • From: Commonwealth of Virginia
Posted by Tal Afar Dave on Sunday, November 2, 2014 7:44 PM

Mustang,

I actually caught the mistake on the decal placement guide, but then second guessed myself....

'Surely, Monogram/Revell wouldn't have created such a blatant mistake on their decals and instructions????"  Wow......what a crazy oversight on their part........you have done an amazing job with this Corsair......when ever I summons the courage to attempt my build, I will use your notes as a guide.....and a steady stream of deliciously cold and golden beverages!!!!

TAD

2022 New Year's Resolution:  Enter 1 group build and COMPLETE a build this year!!  Why Photobucket did you rob me of my one Group Build Badge???  Must be part of the strong anti-Monogram cartel!!!

 ]

  • Member since
    March 2012
  • From: Corpus Christi, Tx
Posted by mustang1989 on Sunday, November 2, 2014 7:47 PM

Joe Rix:Man thanks for your good word buddy......er is it Reverend? lol

Bakster:Thanks dude. Yeah we gotta look out for the fellow brutha's you know.

flyerduke:Dude there aint nuthin' wrong with that. The end result through the paint is what really counts. First off, what scheme are you going with?


 Forum | Modelers Social Club Forum (proboards.com) 

  • Member since
    December 2012
Posted by flyerduke on Sunday, November 2, 2014 8:11 PM

Joe - I'm doing the VF-6 three color scheme.  I should be getting the Navy Blue, Inter. Blue, and white in next week.  The panel lines should show through the white and hopefully the Inter. blue.  I don't think I'm going to pre-shade with the airbrush.  I'd like to see how the pen shaded panel lines hold up.

encrypted-tbn2.gstatic.com/images

  • Member since
    March 2012
  • From: Corpus Christi, Tx
Posted by mustang1989 on Sunday, November 2, 2014 8:38 PM

Dave:I appreciate you confidence in me because I have been second guessing that all the way through this build. I'll be looking foward to seeing that build of yours whenever you start it. PM me when you start it if it's not going to be going on in this GB. I've actually been slave driving myself on this to get through in another week with MORE than enough time to have this thing completed for my mentor/ friend before Christmas.  I have an Italeri 1/24 scale Willys Jeep that I have to get done for another friend before ChristmasIIII Then its off to the 109 GB that kicks off in January and I'll be building two planes for that one!

flyerduke:The lines should hold up good through the intermediate blue and the white. Don't be disappointed if they don't show through the dark blue. Mine didn't. Sad.  But hey cheer up, that's part of what washes are for.Big Smile

BTW that's a cool scheme. Gotta love those tri-color schemes. They can be a beeyatch to get right but they sure look purdy when they're done. I'll be watchin' this one....................


 Forum | Modelers Social Club Forum (proboards.com) 

  • Member since
    September 2003
  • From: AandF in the Badger State
Posted by checkmateking02 on Sunday, November 2, 2014 9:16 PM

Nice recovery with the Corsair markings, mustang.  It's looking great.

So is the Hellcat, Craig.  Looking forward to seeing how this technique works out.


  • Member since
    March 2012
  • From: Corpus Christi, Tx
Posted by mustang1989 on Monday, November 3, 2014 5:22 AM

Thanks checkmateking. I managed to shoot the black on the insides of all the landing gear doors and dry overnight. This morning I got up and was able to shoot the zinc chromate on the inside of all the doors and the blue on the outsides. Next I'll be working on getting some legs on this thing and installing these doors after a nice coat of gloss on the very front main gear doors, decals and then a flat over all the doors. Managed to steal a couple of parts from another kit for the wheel/ tire assys. Look familiar flyerduke? (don't worry I have another profipack on the way). I just couldn't leave the main wheels the way they were from the kit (pictured below next to the Eduard pieces). They looked like oversized tire inner tubes!!

Here she is as of now:


 Forum | Modelers Social Club Forum (proboards.com) 

  • Member since
    September 2003
  • From: AandF in the Badger State
Posted by checkmateking02 on Monday, November 3, 2014 3:56 PM

You achieved a very nice-looking paint finish on that, mustang, and the markings blend in perfectly.  Well done!


  • Member since
    March 2012
  • From: Corpus Christi, Tx
Posted by mustang1989 on Monday, November 3, 2014 4:43 PM

Man thanks checkmateking! I'm actually starting to "like" how this build is turning out so far. I'm  thinking that I'll actually be proud to give this to my good buddy Pat for a Christmas present. Well........it at least LOOKS like a Corsair. lol


 Forum | Modelers Social Club Forum (proboards.com) 

  • Member since
    August 2009
  • From: MOAB, UTAH
Posted by JOE RIX on Monday, November 3, 2014 6:23 PM

mustang1989
Joe Rix:Man thanks for your good word buddy......er is it Reverend? lol

Hmm...The Reverend has been rather quiet lately. That might be because there has been no signs of anyone committing any styrene heresy lately. Say like, someone building an ill fitting model and getting fed up and threatening to toss it the trash. Yet, it seems that such individuals have resisted committing such blasphemous acts and have thusly not flamed The Reverend into necessary sermon. Mind you, He is always on watch.

"Not only do I not know what's going on, I wouldn't know what to do about it if I did". George Carlin

  • Member since
    March 2012
  • From: Corpus Christi, Tx
Posted by mustang1989 on Monday, November 3, 2014 8:59 PM

I'll keep that in mind buddy.  Wink

And thanks for the other book pal. You're a saint!


 Forum | Modelers Social Club Forum (proboards.com) 

  • Member since
    April 2013
Posted by SchattenSpartan on Tuesday, November 4, 2014 4:03 PM

Joe: Damn, now that's simply perfect! You really managed to make an absolute beauty out of that oldill-fitting Monogram kit! Doesn't the Hellcat Profipack come with some extra resin wheels?

Craig: Those panel lines look really nice! I'd be tempted to just leave it like that without any additional paint on top...

  • Member since
    March 2012
  • From: Corpus Christi, Tx
Posted by mustang1989 on Tuesday, November 4, 2014 4:09 PM

SchattenSpartan
Doesn't the Hellcat Profipack come with some extra resin wheels?

Yeah it does but the tread aint smooth like for carrier decks. Its got the cross hatch tread pattern.


 Forum | Modelers Social Club Forum (proboards.com) 

  • Member since
    August 2009
  • From: MOAB, UTAH
Posted by JOE RIX on Tuesday, November 4, 2014 7:26 PM

Ah Joe, my dear friend, not all carrier aircraft tires were smooth tread. In fact I actually have a tougher time finding photos of smooth tires in my reference books and on the net.

I really like this photo:

And this is the type of tire I will be using on my Hellcat:

"Not only do I not know what's going on, I wouldn't know what to do about it if I did". George Carlin

  • Member since
    July 2014
  • From: Franklin Wi
Posted by Bakster on Tuesday, November 4, 2014 8:22 PM

Hey everyone.  It's been a bit since I posted an update.  So I thought I'd at least post this. Not much to show really but I thought something is better than nothing.  See below.  The engine is not up to the standards as you guys are able to do but for my first whack at it...I am happy with it.  

It is really funny you are talking about tires.  I chose the crosshatch pattern for my TBM.  I did so not for any other reason but because I liked them better.  The kit came with both styles.   I just painted them up this week.

Below:  In case you are wondering where the shaft is, the front portion of the engine is not glued down yet.  

  • Member since
    September 2003
  • From: AandF in the Badger State
Posted by checkmateking02 on Tuesday, November 4, 2014 11:14 PM

Nice start, Bakster.  Especially good metallic look to the engine.


JOIN OUR COMMUNITY!

Our community is FREE to join. To participate you must either login or register for an account.

SEARCH FORUMS
FREE NEWSLETTER
By signing up you may also receive reader surveys and occasional special offers. We do not sell, rent or trade our email lists. View our Privacy Policy.