SEARCH FINESCALE.COM

Enter keywords or a search phrase below:

100th Anniversary of WWI GB

75497 views
879 replies
1 rating 2 rating 3 rating 4 rating 5 rating
  • Member since
    April 2006
  • From: ON, Canada
Posted by jgeratic on Monday, July 13, 2015 2:00 PM

Bish

Jack, I take it you mean future as in the floor polish. Its a nice result, going to have to remember that one.

Exactly that, liquid floor polish that is popularly used by us modelers as a gloss protective coat.

----------------------------

Marcus, looks to be a solid ship build despite the problems this ICM kit has.  Looking forward to the weathering and finale.

----------------------------

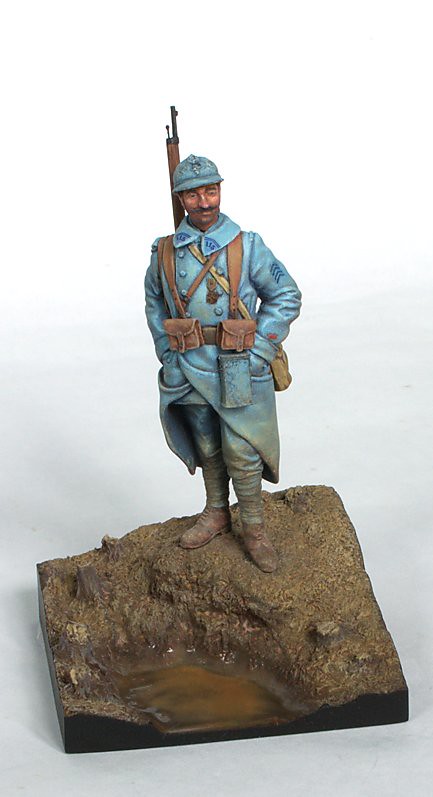
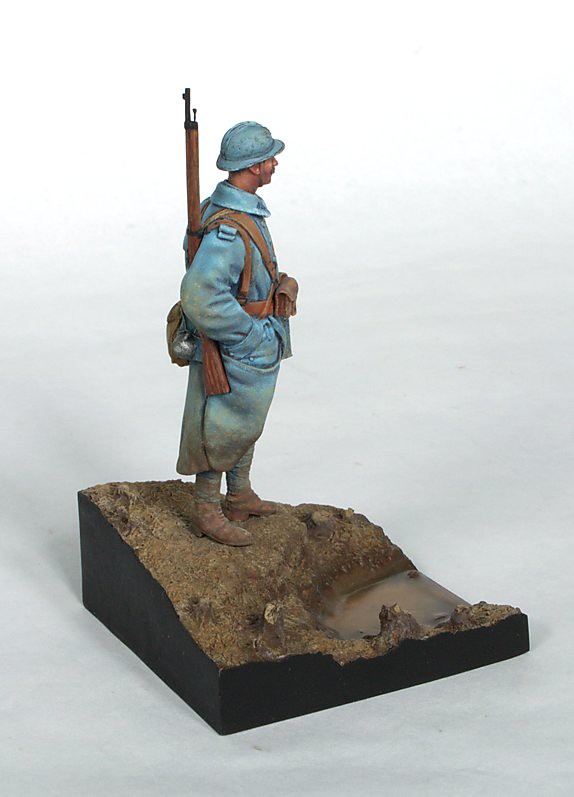
My figure is done, but I had to force myself to devote the time - for me, summer is kind of an off season to be at the work bench.

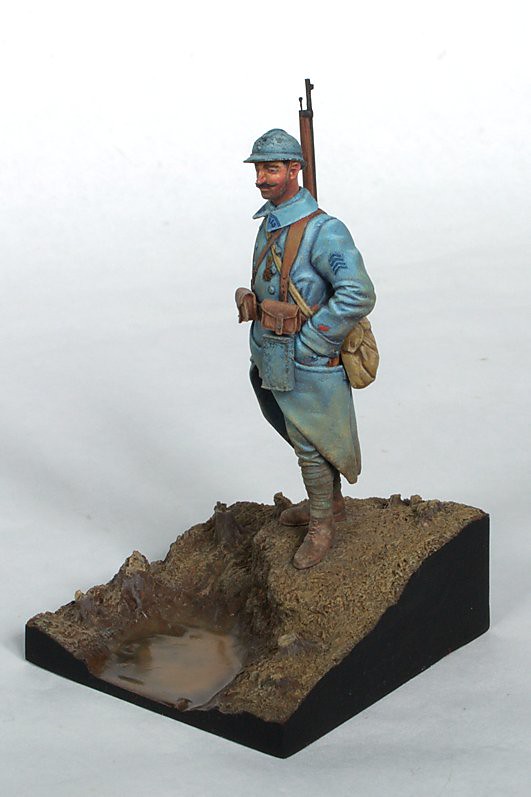
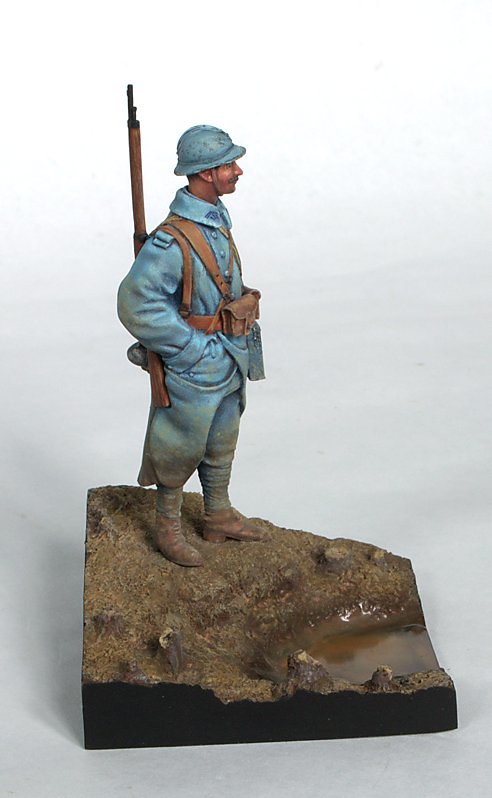
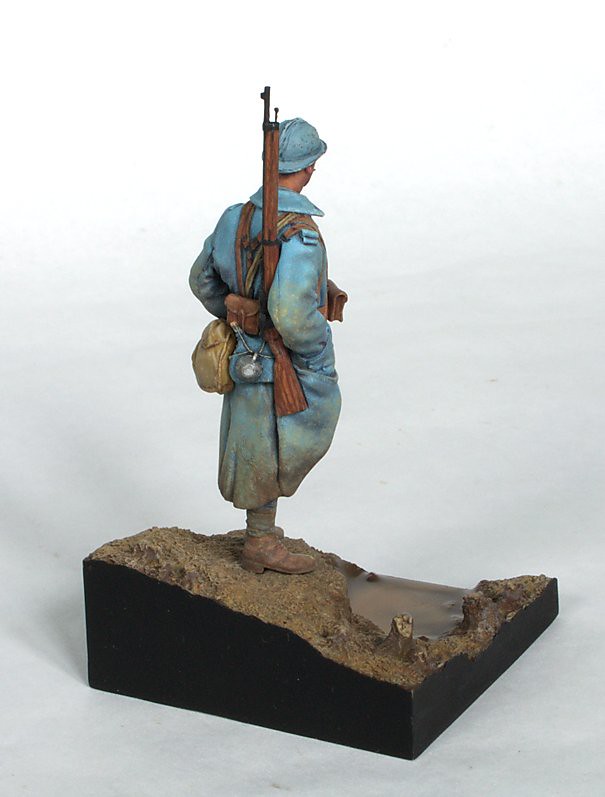
Anyhow, from what I gather on my study on insignia, this is a French Infantryman of the 115th regiment.  The single red strip on the lower arm denotes the rank of a private 1st Class. 

The blue chevrons on the upper arm represent years of service.  The top one is for one year, while the remainder are six months each, for a total of 2.5 years.  The collar tabs are the final type introduced January 10th, 1917.

regards,

Jack

  • Member since
    September 2013
  • From: San Antonio, Texas
Posted by Marcus McBean on Monday, July 13, 2015 2:25 PM

You really do good work.  He looks like he walked a ton of miles thru the mud.

Did the French get rid of the red liner of their coats?  I seem to remember seeing pictures and news reels of them marching and they seem to had a lot red on their uniforms. Maybe that was at the start of the war and they realize that they made easy targets and made changes?

Marcus

  • Member since
    April 2006
  • From: ON, Canada
Posted by jgeratic on Monday, July 13, 2015 5:56 PM

Thanks Marcus.

I'm not sure about the liner of the coats, but the French soldier did start the war wearing red trousers, red topped kepi.  and dark blue greatcoat.

regards,

Jack

  • Member since
    December 2002
  • From: Bury St Edmunds, Suffolk, England
Posted by Bish on Friday, July 17, 2015 1:44 AM

That is lovely work as always there Jack, your figures are just stunning always.

I am a Norfolk man and i glory in being so


On the bench: Airfix 1/72nd Harrier GR.3/Fujimi 1/72nd Ju 87D-3

  • Member since
    December 2003
  • From: 37deg 40.13' N 95deg 29.10'W
Posted by scottrc on Friday, July 17, 2015 8:57 AM

Yes, I agree, wonderful work Jack!

  • Member since
    December 2003
  • From: 37deg 40.13' N 95deg 29.10'W
Posted by scottrc on Thursday, July 30, 2015 8:13 AM

Here is my latest update on the Albatross.  It have been quite a challenge for me since it is my first WW1 plane since the Snoopy Sopwith Camel I built back in the 70s.  I have to say, I really like these 1/32 scale WW1 kits and look forward to building the SE5 I have.  I made a lot of mistakes but am learning a lot. 

  • Member since
    April 2010
Posted by Theuns on Thursday, September 3, 2015 11:08 PM

I am sorry to report I have binned the revel fokker D-7, it is just not worth my time and effort anymore, I have rather started on a 1/48 eduard Neuport 11 and from what I see it looks way better.


Theuns

  • Member since
    April 2010
Posted by Theuns on Sunday, September 6, 2015 10:40 AM

Not sure if this GB is still going so I will just post.

Eduard 1/48 Neuport 11 weekend.

I just added the lightning holes to the seat, made a seatpad from bluetack, added belts aswell as the fuse cross bracing and rudder/elevator controll cables from sprue.

Most of it I recon will be lost when fuse is closed up :-(


Theuns

  • Member since
    December 2002
  • From: Bury St Edmunds, Suffolk, England
Posted by Bish on Sunday, September 6, 2015 10:42 AM
Nice work on the pit there. I decided to go ahead with my build as well, despite this GB being rather quiet. been working on it here and there over the last couple of weeks and will have some pics soon.

I am a Norfolk man and i glory in being so


On the bench: Airfix 1/72nd Harrier GR.3/Fujimi 1/72nd Ju 87D-3

  • Member since
    December 2002
  • From: Northern California
Posted by jeaton01 on Sunday, September 6, 2015 1:17 PM

Looks nice, Theuns.   Must be something in the air, I am working on the Hobbycraft 1/32 Nie. 17 to which I have added the Master Casters interior set.  Painting the interior bits today, maybe some pictures tomorrow.

John

To see build logs for my models:  http://goldeneramodel.com/mymodels/mymodels.html


  • Member since
    December 2002
  • From: Northern California
Posted by jeaton01 on Sunday, September 6, 2015 11:39 PM

I have the interior resin set painted and together.  It is not up to WNW standards but I think the set adds a lot to the Hobbycraft kit.  The instructions could be better but I found enough info on the web to get "close enuf", (I hope Stephen Lawson doesn't read this).  I also enlarged the cockpit opening on the back side to make it more round, it looked odd to me.

John

To see build logs for my models:  http://goldeneramodel.com/mymodels/mymodels.html


  • Member since
    December 2003
  • From: 37deg 40.13' N 95deg 29.10'W
Posted by scottrc on Tuesday, September 8, 2015 2:37 PM

Hey Thuens,


I am also still pluggin along with my Albatross and hope I would be done soon.  This GB is open for a few more months.


Scott

  • Member since
    August 2007
  • From: back country of SO-CAL, at the birth place of Naval Aviation
Posted by DUSTER on Wednesday, September 9, 2015 2:30 PM

You guys are doing  great. those models look like primer stuff.

Sob  ; had to set a side my Talkom St Chermond. I got my self into a "death sprial" trying to add detail to the interior and not knowing where to stop- the old "well if I just.... then I could...". Was just too much effort. I'll get back to it though 'cause I realy like the model


Steve

Building the perfect model---just not quite yet  Confused

  • Member since
    December 2002
  • From: Northern California
Posted by jeaton01 on Sunday, September 13, 2015 9:21 PM

More progress on my HC 1/32 Nie17.  The cabane struts and landing gear are on and so far everything looks pretty square.  All the holes needed for rigging have been drilled.  I added some ribbing to the cowl of the example I am building, Billy Bishop's airplane, and a tube like gun sight made from stretched sprue and small plastic rod.  I wish I could learn how to stretch that stuff better!

Also, there is a picture of my work area.  I've done a bunch of reorganizing lately so right now you can actually see the bench, I hope I can keep it that way.  It can explode into disorder pretty rapidly because I also build R/C airplanes in my workshop, on another table.  Stuff just seems to migrate, though, and I end up with plastic models on the R/C bench and R/C stuff on the plastic model bench.  Paints are always a problem, I now have them all in the drawers of roll-around tool chests and tool chests on top of them.  We'll see how that lasts, but so far I can still find the paint I'm looking for and it is not eating up workspace on the bench like it used to.   My workbench for plastic is a plywood bench with ceiling tiles on top, painted white, and there is 1/4 inch glass on top of that which makes for easy clean up with a razor blade, windex, and thinner. 


John

To see build logs for my models:  http://goldeneramodel.com/mymodels/mymodels.html


  • Member since
    December 2003
  • From: 37deg 40.13' N 95deg 29.10'W
Posted by scottrc on Wednesday, September 16, 2015 9:26 AM

Coming along nice John, and the workbench looks good too. 

My update is that I still have not touched the Albertross in over a month.  I think I am afraid to finish the rigging.  I have rigged numerous tall ship models yet for some reason this bi plane is taunting me.

  • Member since
    August 2007
  • From: back country of SO-CAL, at the birth place of Naval Aviation
Posted by DUSTER on Friday, September 18, 2015 7:25 PM

John  Good looking model. 

I'm jealous of your bench and work area; ‘course if I got rid of just a ¼  of the extraneous junk,

I could see the top…. Of the last model I was working on.    Sigh


Steve

Building the perfect model---just not quite yet  Confused

  • Member since
    December 2002
  • From: Northern California
Posted by jeaton01 on Sunday, September 20, 2015 5:26 PM

Thanks, Steve and Scott.  Slowly progressing now, did a little rigging, installed the uper wing, and put a gloss coat on today.  Too lazy to take a picture.

John

To see build logs for my models:  http://goldeneramodel.com/mymodels/mymodels.html


  • Member since
    December 2002
  • From: Northern California
Posted by jeaton01 on Wednesday, September 23, 2015 8:20 PM

All done.  I replaced the kit intake tubes with aluminum tubing.  The rigging is E Z Line.  The kit decals were useable but a bit translucent in some spots, mostly white.  I mounted the engine on a brass tube so I could position it a bit more forward in the cowl.  For a biplane this one is on the simpler end of the spectrum but due to approximate fits on the cabanes and landing gear it has its interesting areas.  It does look pretty well aligned to my eye.  Not sure how I managed that but I will accept the result ;D.

John

To see build logs for my models:  http://goldeneramodel.com/mymodels/mymodels.html


  • Member since
    April 2006
  • From: ON, Canada
Posted by jgeratic on Wednesday, September 23, 2015 10:13 PM

John, sweet looking bipe you got there! Yes

I like that very much.

regards,

Jack

  • Member since
    December 2003
  • From: 37deg 40.13' N 95deg 29.10'W
Posted by scottrc on Thursday, September 24, 2015 10:42 AM

Looks great John.

  • Member since
    December 2002
  • From: Northern California
Posted by jeaton01 on Friday, September 25, 2015 12:08 AM

Thanks, Jack and Scott.Smile

John

To see build logs for my models:  http://goldeneramodel.com/mymodels/mymodels.html


  • Member since
    December 2002
  • From: Bury St Edmunds, Suffolk, England
Posted by Bish on Thursday, October 1, 2015 1:48 PM

I did promse a few weeks ago that i would post some pics, but unfortunatly i got side tracked. I have become a bit disillusioned with this builds for a few reasons and did considr just ditching it. But i have decided to just get it built with no fancy weathering, just a nice little kit thats a bit different from my norm.

So, enough excuses, this is the kit.

And this is were i was a few weeks ago. I did the interior wood with Tamiya XF-60 and then oils. I went over that with Tamiya clear Orange. I have read about that final bit but never used it. With hindsight, i should have thinend it and maybe addd a drop od clear yellow. But its in the inside an dits one lesson learnt for next time.

Then the fuselage was joined, the lwer wing put on and i started the painting.

And those were the last pics i took a few weeks back. Should have some more son and hope to wrap this up ASAP.


I am a Norfolk man and i glory in being so


On the bench: Airfix 1/72nd Harrier GR.3/Fujimi 1/72nd Ju 87D-3

  • Member since
    September 2011
  • From: Milaca, Minnesota
Posted by falconmod on Friday, October 2, 2015 8:39 AM

Bish,

  Don't give up.  I built this exact same kit last year and i got a silver at Nordiccon's show last oct.  it's a great kit.

On the Bench: 1/72 Ki-67, 1/48 T-38

1/144 AC-130, 1/72 AV-8A Harrier

  • Member since
    December 2002
  • From: Bury St Edmunds, Suffolk, England
Posted by Bish on Sunday, October 4, 2015 5:26 AM
Thanks Falcon, and no, I ain't giving up. Just want to get it done soon as best I can. My heart is not really in this one. I have the wings together, just need to get the rigging done.

I am a Norfolk man and i glory in being so


On the bench: Airfix 1/72nd Harrier GR.3/Fujimi 1/72nd Ju 87D-3

  • Member since
    December 2003
  • From: 37deg 40.13' N 95deg 29.10'W
Posted by scottrc on Thursday, October 8, 2015 11:11 AM

Good to see another Albatross Bish.  I attempted to rig mine and found it nearly impossible and almost wrecked the entire model.  I needed to thread the lines out of the fuselage BEFORE I joined the fueslage together. Oh well, I learned a lesson on these Roden kits.  Anyway, I'm going to skip the rigging on this model and doing the finishing touches and will hopfully start decals this weekend.  Pictures to come this weekend.

Scott

  • Member since
    December 2002
  • From: Bury St Edmunds, Suffolk, England
Posted by Bish on Thursday, October 8, 2015 11:21 AM
LOL, cheers Scort, I am hoping to get to rigging mine this weekend. Just the bit of confidence I need. I had thought about skipping it, but figured I should give it a go.

I am a Norfolk man and i glory in being so


On the bench: Airfix 1/72nd Harrier GR.3/Fujimi 1/72nd Ju 87D-3

  • Member since
    August 2007
  • From: back country of SO-CAL, at the birth place of Naval Aviation
Posted by DUSTER on Sunday, October 11, 2015 4:11 PM

So, Bish, in spite of the good looking progress on your build; You still consider this model to be "an albatross around your neck".............  Boy, I crack me up!

Cheers and all

Steve

Building the perfect model---just not quite yet  Confused

  • Member since
    December 2003
  • From: 37deg 40.13' N 95deg 29.10'W
Posted by scottrc on Sunday, October 18, 2015 10:34 AM

I put a few finishing touches on the Albatross this last week.

 " target="">

  • Member since
    December 2003
  • From: 37deg 40.13' N 95deg 29.10'W
Posted by scottrc on Sunday, October 18, 2015 10:43 AM

And now, as of today, I am done.  I have to say, this Roden 1/32 kit started out as an easy kit then turned into the spawn of frustration when I found out it was practicaly brain surgury to try to rig it with the stock struts and cubanes.

On my next kit, which is a SE5 in the stash, I plan to pre-install the lines out of the fuselage before sealing it up and also substitute the struts with hardwood and wire.  It should make the build and the durability of the finished model much better.  This current model, a good sneeze could blow the wing off.  The plastic struts are that fragile.  

I have a number of other interests at present so I will put this project on the dislay shelf.

This GB has been a lot of fun and look forward to another one in the future.

Scott


  • Member since
    December 2002
  • From: Northern California
Posted by jeaton01 on Sunday, October 18, 2015 2:22 PM

I hate it when the struts are too flimsy.  I do always gett the rigging near complete before installing the upper wing.

John

To see build logs for my models:  http://goldeneramodel.com/mymodels/mymodels.html


JOIN OUR COMMUNITY!

Our community is FREE to join. To participate you must either login or register for an account.

SEARCH FORUMS
FREE NEWSLETTER
By signing up you may also receive reader surveys and occasional special offers. We do not sell, rent or trade our email lists. View our Privacy Policy.