SEARCH FINESCALE.COM

Enter keywords or a search phrase below:

FineScale Modeler Orphaned Armor Group Build 2014

91632 views
1167 replies
1 rating 2 rating 3 rating 4 rating 5 rating
  • Member since
    January 2013
Posted by jibber on Tuesday, October 21, 2014 8:38 AM

Tim thats perfect, Terry

  • Member since
    September 2006
  • From: Dripping Springs, TX, USA
Posted by RBaer on Tuesday, October 21, 2014 10:45 AM

I think I'm ready to prime, with the exception of finishing the tow cable,  replacing the driver's periscope guard which has gone MIA sometime recently, and maybe fixing a texture blob under the left smoke dischargers....

Anybody see anything I'm missing, sing out....

Main radio antenna and mount will be installed after paint, but since I had to run a cable to the second, IDF-specific unit, I went ahead and mounted it now, hope I can get everything done w/o knocking it off.

Apprentice rivet counter.

  • Member since
    April 2013
Posted by SchattenSpartan on Tuesday, October 21, 2014 11:22 AM

I think it's about time I get my butt in gear and start on that Sherman. My LHS has a lot of trouble getting those Tasca goodies and the Friul tracks I need for it, but I think I can start work on the hull in the meantime. If they still don't manage to get my stuff untill December I'll just have to order it elsewhere (at a way higher price)

  • Member since
    April 2013
Posted by SchattenSpartan on Tuesday, October 21, 2014 11:23 AM

The Sherman looks very nice, RBaer!

  • Member since
    November 2009
  • From: SW Virginia
Posted by Gamera on Tuesday, October 21, 2014 12:43 PM

She looks perfect to me RBaer.

So you attach the tools, storage, etc before you paint? I normally leave them off but have had issues with glue spots before. Do you think it's better to add them before the main paint?

"I dream in fire but work in clay." -Arthur Machen


  • Member since
    January 2013
Posted by jibber on Tuesday, October 21, 2014 1:51 PM

RBaer its coming along great. I like the last camera angle, sometimes we forget about the lower hull.  

  • Member since
    September 2006
  • From: Dripping Springs, TX, USA
Posted by RBaer on Tuesday, October 21, 2014 2:06 PM

Thanks, guys.  There's a lot of detail behind the average Sherman,  and a good opportunity to crate a mess on an otherwise "clean" model.

I have always attached the tools before painting, worst case I have to do a little touch-up to the base coat but it makes it easier for me to do whatever kind of clamps I need without worrying about messing up the tools and the surrounding color. If need be, a little bit of paper slid under the tool I'm painting makes a fine mask.

Apprentice rivet counter.

  • Member since
    November 2009
  • From: SW Virginia
Posted by Gamera on Tuesday, October 21, 2014 9:53 PM

Thanks for the tip there, I might just have to try cementing the darn things on before painting too, at least it should make it harder to lose them!

"I dream in fire but work in clay." -Arthur Machen


  • Member since
    March 2013
  • From: Puebla, Mexico
Posted by garzonh on Wednesday, October 22, 2014 9:54 AM

Rbaer, that Sherman is gonna look perfect with all the tools and stowage. Nice....

  • Member since
    September 2006
  • From: Dripping Springs, TX, USA
Posted by RBaer on Wednesday, October 22, 2014 5:28 PM

garzohn, thanks.

Primer, yay!

Apprentice rivet counter.

  • Member since
    January 2013
Posted by jibber on Wednesday, October 22, 2014 8:45 PM

Now its movin along, primer is always a good sign.

  • Member since
    September 2006
  • From: Dripping Springs, TX, USA
Posted by RBaer on Thursday, October 23, 2014 3:45 PM

Primer is finer!

Apprentice rivet counter.

  • Member since
    April 2003
Posted by shivinigh on Friday, October 24, 2014 5:26 AM

RBaer that sherman is coming along great. I like the cast look on the turret. Can't wait to see some colour on it.


  • Member since
    November 2009
  • From: SW Virginia
Posted by Gamera on Friday, October 24, 2014 9:44 AM

Yeah, looks good, all ready for paint!

"I dream in fire but work in clay." -Arthur Machen


  • Member since
    September 2006
  • From: Dripping Springs, TX, USA
Posted by RBaer on Friday, October 24, 2014 11:56 AM

Thanks guys. I shot color this morning but had to get to work before I got pics,  I'll get some up soon.  

Apprentice rivet counter.

  • Member since
    March 2013
  • From: Puebla, Mexico
Posted by garzonh on Friday, October 24, 2014 3:01 PM

yeeeeeiiii primer!

Now the fun starts.

At least for me, the bes part is the painting, detailing, weathering.... I've spent too much time  on PE.

My next 3 builts will all be SOO.

Good work on the primer...looking good

  • Member since
    October 2011
  • From: Lake Villa, Illinois
Posted by Chuck Davis on Sunday, October 26, 2014 9:09 PM

HEY!  Time to bump this back onto page 1.

Jack – WOW!  That’s some cool detail in that tiny little thing.  And the driver looks awesome…and very businesslike.

Rbaer – love seeing the primer!  Can’t wait for the paint…

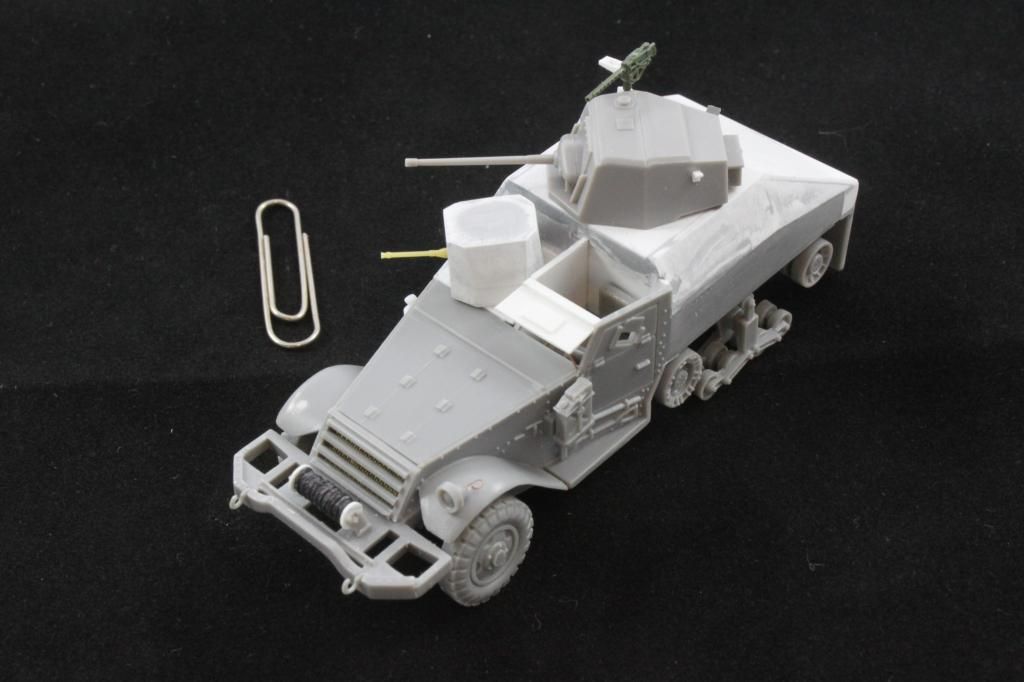
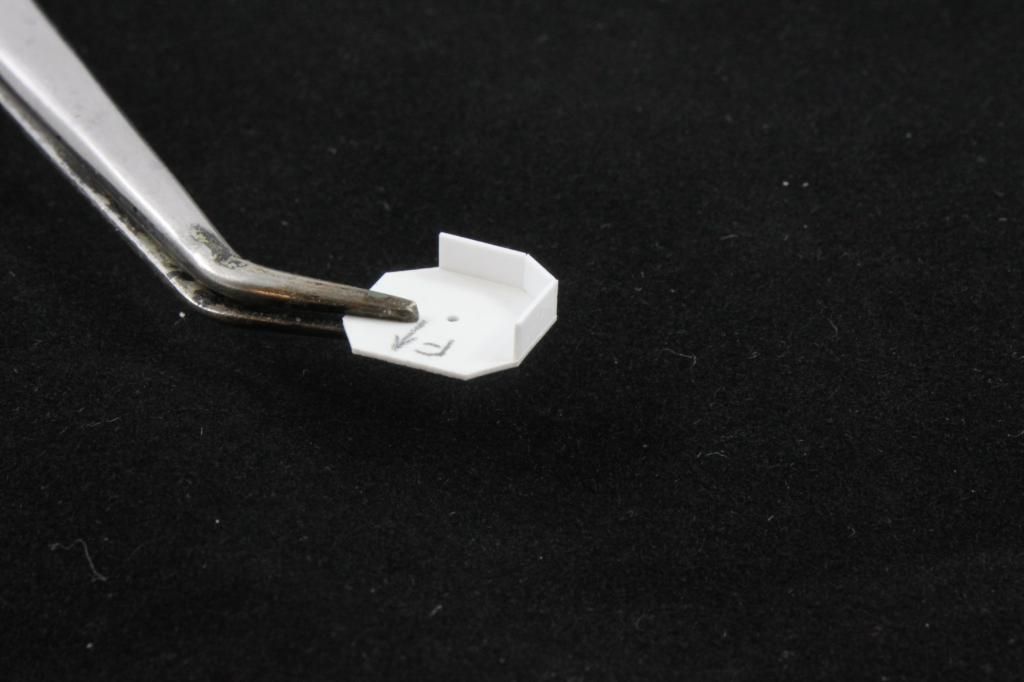
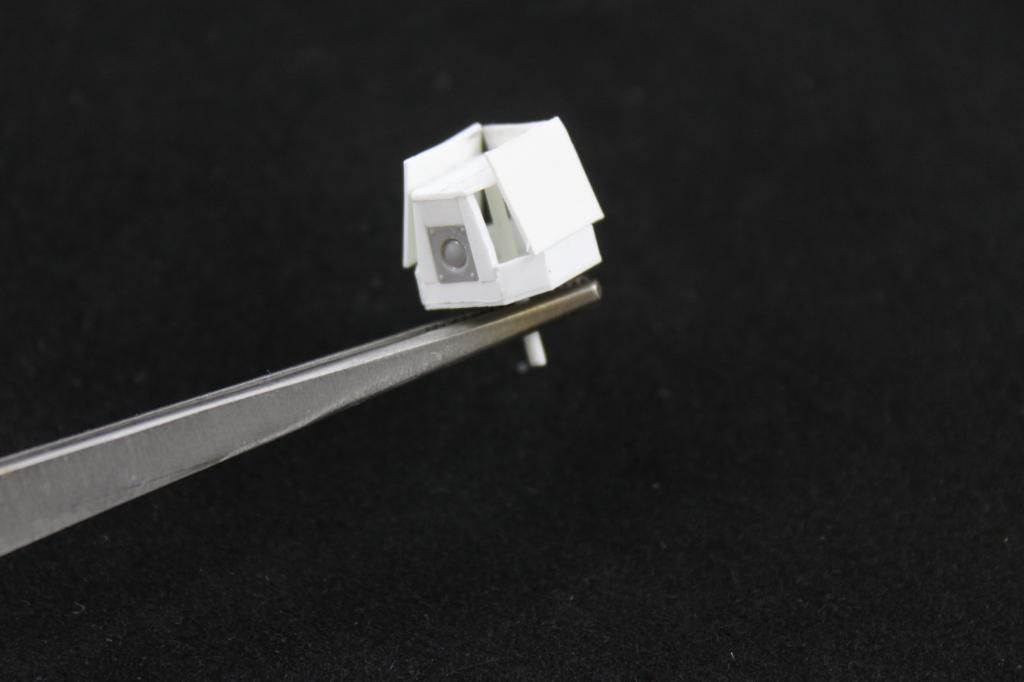
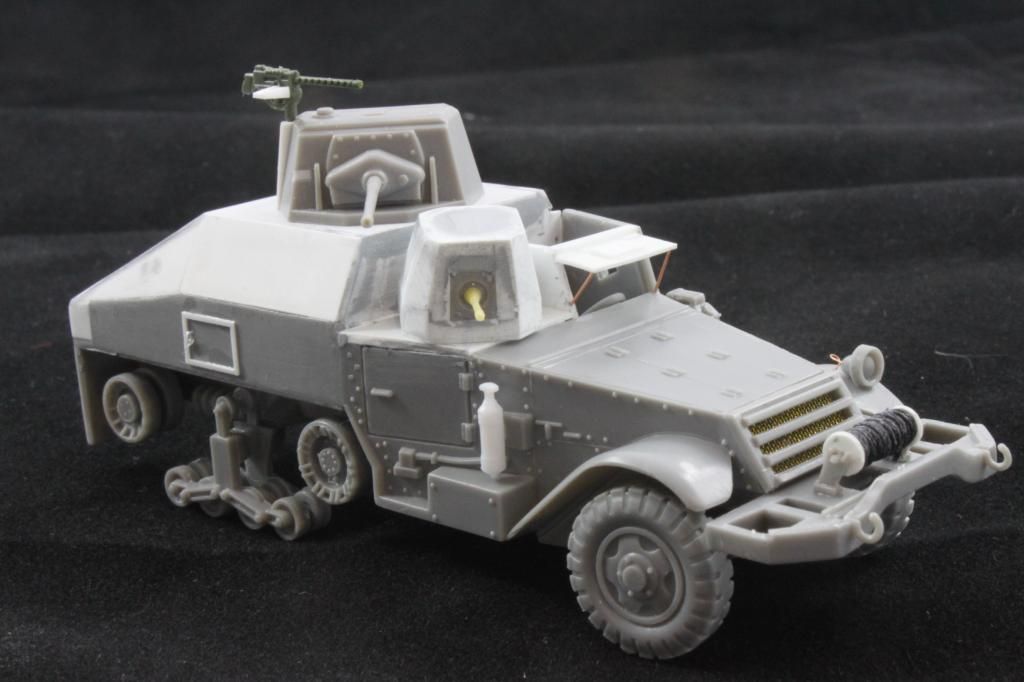
 OK – halftrack update time.  I added the rear deck, and made the MG34 turret.  The top and bottom were cut from sheet stock following the top view plans I have.  Then the base of the turret was made from strip styrene, since I can’t cut stuff straight Embarrassed , followed by cutting and trimming the sides.  The corners were last.

I replaced the molded on winch with a section of rod stock, two punched discs, and a couple of Grandt Line bolts.  I also added a wire running to the one mounted headlight.  A leftover fire extinguisher from my 1/48 Revell PT-17 Stearman was hung as well.  The .30 cal is from an Academy halftrack kit, with an ammo tray from channel stock.

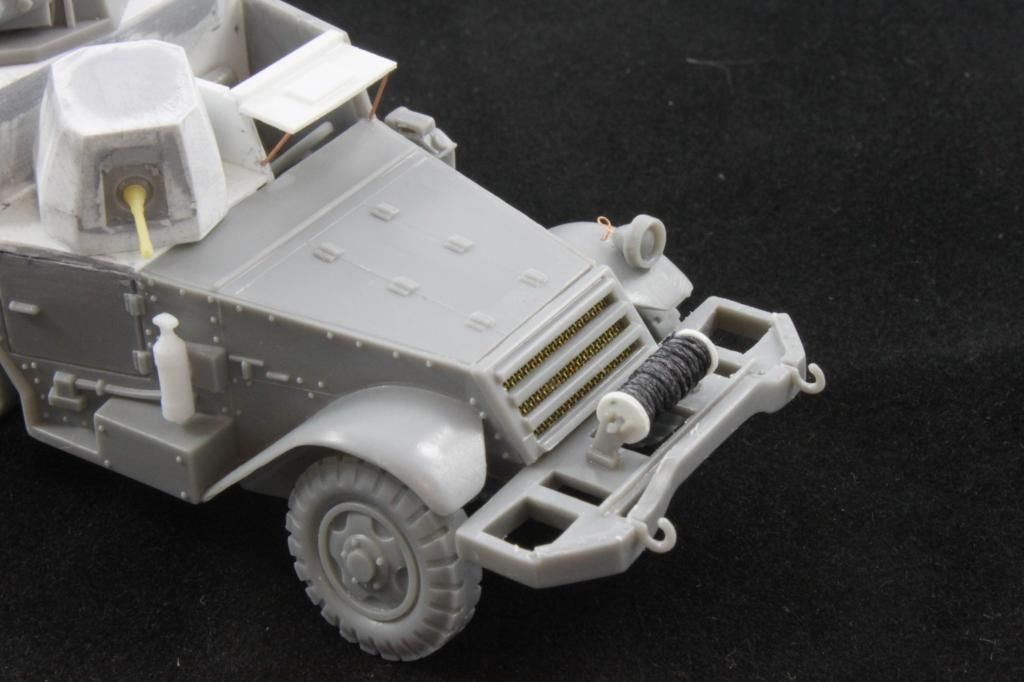
And there she stands – ready for primer.  I can’t believe it!  But now, guys, I need HELP!  What do you all recommend for finishing materials and techniques for the old-fashioned vinyl rubber band tracks this kit has?  I look forward to learning from those in the know…

And finally, since I started this build with a paperclip, I’ll end the build stage with one too.  Have a great week everyone!

Chuck Davis

  • Member since
    December 2002
  • From: Northern California
Posted by jeaton01 on Monday, October 27, 2014 12:00 AM

Chuck, My Bandai T-34 has rubber tracks too and they don't look so easy to work with.  I can't find any aftermarket 1/48 T-34 tracks, so I ordered a HobbyBoss T-34 just to use the tracks even though the tracks are said not to be the best in it.  At least they are link and length.

Nice scratch building on the turret!

This is the first tank I have ever built, other than a Tamiya 1/35 M48 Patton I started with a grandson some years ago (and is only partly assembled still!!)  Ben!!!  I have done a lot of head scratching just to figure out what version the Bandai kit represents, I at this point I think it is a mid year 1942 T34-76.  Which is OK for me because I have references saying the POA had two of these in Prague.  Yippee!  By an odd coincidence one of my friends just purchased an M74 tank retriever, the 35 ton one, not the model, and I have been crawling over it and doing some research on it some lately.  It needs to be running for this year's Christmas Parade.  I am all of a sudden being surrounded by tanks.  

I have done a lot of the basic construction and have to say Bandai did some good work.  The fit is very good and there certainly is some nice detail.  There are a few ejector pin marks in inconvenient places, and there was a very large Bandai logo on the hull bottomside I filed off and sanded smooth, but very very little flash anywhere,  I think I am ready to start painting now.  Here is what it looks like without paint.

II feel like I must have messed up somewhere, the construction/painting sequence is so different from airplanes.

John

To see build logs for my models:  http://goldeneramodel.com/mymodels/mymodels.html


  • Member since
    November 2009
  • From: SW Virginia
Posted by Gamera on Monday, October 27, 2014 8:49 AM

Chuck: This is insane, I wish my eyesight and hand-eye coordination was that good!

John: Looks good! They are a nice change from aircraft, no clear parts to mask and you can assemble and paint most of the kit as a unit.

Here are the much delayed photos from me. Sorry about the glare, I'd just put the decals on and then the gloss coat for washes, applied the pin wash Saturday and now need to figure out where I'm going from here: 

"I dream in fire but work in clay." -Arthur Machen


  • Member since
    March 2013
  • From: Puebla, Mexico
Posted by garzonh on Monday, October 27, 2014 8:58 AM

Wow Chuck, that looks pretty nice. The build is clean and smooth, I even have trouble building and gluing in 1/35 cant see how I could do it in 1/48.

I´m also struggling with my tracks now In getting them the right color. I painted them all in rust. but doesn't looks realistic so I have to start all over again.

Have a great weekend you too!

  • Member since
    March 2013
  • From: Puebla, Mexico
Posted by garzonh on Monday, October 27, 2014 9:14 AM

Hi John,

Nice to do something outside of comfort zone.

Armor is very forgiving, any bad construction, missing pieces, bad painting you can cover with  battle damage, weathering or mud.

Some of us like to assemble everything and then paint, others build sub-assemblies, paint them and glue, others even paint parts in the sprue and then glue them.

Yours is looking very good!, assembly and parts are well done. Remember to prime it, before adding the final colors.

  • Member since
    March 2013
  • From: Puebla, Mexico
Posted by garzonh on Monday, October 27, 2014 9:24 AM

Gamera

Nice built!, I like the color and that cammo line.

Is this a 1/48 or 1/72.?

  • Member since
    November 2009
  • From: SW Virginia
Posted by Gamera on Monday, October 27, 2014 9:33 AM

Hey Garzonh thanks! And believe it or not she's 1/35th- never really thought until I built this how tiny the T-26 was, I'm building a figure to stand beside her to indicate how small the tank is. She's slightly smaller even than an M3/M5 Stuart.

BTW On rubber tracks I give them a primer coat of 'rubber bumper paint' you can find in spray can at an auto parts store. As described it's for the rubber type parts on auto bumpers so it can flex without flaking off. Course you'll want to wash the parts before hand thoroughly with dish washing detergent to make sure all grease and oil is gone first. Then paint them a dark grey and add a dirt coloured wash or two. I'm still trying to get things right here myself though it's just my two cents and not a rock hard rule.

"I dream in fire but work in clay." -Arthur Machen


  • Member since
    September 2006
  • From: Dripping Springs, TX, USA
Posted by RBaer on Monday, October 27, 2014 10:33 AM

Excellent work going on here, on some nifty subjects.

Chuck, that's some teeny scratching there, looks good.

G, nice paint, coming along well.

I had a paint session, got my color shot, glossed the areas to get decals and applied them, then glossed over them and after drying, an overall flat coat. I'm now ready to weather and detail paint.

Decals are from a Bison M-50 sheet, period correct and it had what little I needed, that I can see on the pic I have.

Pics:

Apprentice rivet counter.

  • Member since
    November 2009
  • From: SW Virginia
Posted by Gamera on Monday, October 27, 2014 12:57 PM

RBaer: Very cool though a Sherman looks odd to me in something other than OD green!!!

"I dream in fire but work in clay." -Arthur Machen


  • Member since
    December 2002
  • From: Bury St Edmunds, Suffolk, England
Posted by Bish on Monday, October 27, 2014 1:05 PM

Chuck, real nice, lovely work on that little turret.

John, nice start on the T-34.

Gamera, that's looking very nice, love the scheme.

RB, great to see the paint on.

Great work guys, really nice to see all these builds coming along.

I am a Norfolk man and i glory in being so


On the bench: Airfix 1/72nd Harrier GR.3/Fujimi 1/72nd Ju 87D-3

  • Member since
    March 2013
  • From: Puebla, Mexico
Posted by garzonh on Monday, October 27, 2014 2:35 PM

RBaer

Starting to look so good, paint looks nice and evenly layered. Color came out right...mine came out too dark. All the work on the turret makes it look real, nice casting.

So, will you be doing just some dust weathering, or heavy mud?

Good progress sir.

  • Member since
    September 2006
  • From: Dripping Springs, TX, USA
Posted by RBaer on Tuesday, October 28, 2014 11:03 AM

Thanks, all.

Garzohn, dust only, it'll be displayed on a base to give the idea of Old Jerusalem.

Apprentice rivet counter.

  • Member since
    March 2013
  • From: Puebla, Mexico
Posted by garzonh on Wednesday, October 29, 2014 7:29 PM

Hi guys!

Small update, still working on getting the tracks with right colors, since it will have oil washes it will take days between colors to let it dry.

in the meantime, lot of work done on my "orphaned" Hummel, abused and not maintained for obvious reasons.

a small teaser of where Im at...

cheers!

  • Member since
    January 2013
Posted by jibber on Wednesday, October 29, 2014 9:12 PM

That Hummel is getting beat up real nice.

Chuck some nice scratch work on that little guy and the details were well thought out.

RBaer I just knew that casting and prep you did would paint up real nice.

Gamera almost there, cool camo.

JOIN OUR COMMUNITY!

Our community is FREE to join. To participate you must either login or register for an account.

SEARCH FORUMS
FREE NEWSLETTER
By signing up you may also receive reader surveys and occasional special offers. We do not sell, rent or trade our email lists. View our Privacy Policy.