SEARCH FINESCALE.COM

Enter keywords or a search phrase below:

World at War 1939-1940 Group Build

65497 views
1023 replies
1 rating 2 rating 3 rating 4 rating 5 rating
  • Member since
    December 2002
  • From: Bury St Edmunds, Suffolk, England
Posted by Bish on Friday, September 18, 2015 11:36 AM
Nice to se you still plugging away at this Dan, its looking good.

I am a Norfolk man and i glory in being so


On the bench: Airfix 1/72nd Harrier GR.3/Fujimi 1/72nd Ju 87D-3

  • Member since
    February 2006
  • From: Cincinnati Ohio
Posted by DantheMan85 on Wednesday, September 30, 2015 2:22 PM


Thanks Bish. One of the side window panels had held up construction, the part was to long for my future bath so half of it would be sticking out. After removing the future and getting it down to bare plastic, I airbrushed on a light coat of future. The clear plastic does not look perfect, but it looks a lot better than what it did before. Monday I glued up the to half's, then yesterday I glued the the dividers to the inside of the fuselage. Today I sanded and filled in gaps. Old Iron Annie is starting to take shape now.  Did not do much detail painting inside, it will be all covered up.


On my Work Bench: Tamiya Ford GT 1/24

Up Coming: ?


  • Member since
    December 2002
  • From: Bury St Edmunds, Suffolk, England
Posted by Bish on Wednesday, September 30, 2015 3:11 PM
I have had the same problem, I really need a bigger tube to keep my future in. She is looking really nice.

I am a Norfolk man and i glory in being so


On the bench: Airfix 1/72nd Harrier GR.3/Fujimi 1/72nd Ju 87D-3

  • Member since
    September 2003
  • From: AandF in the Badger State
Posted by checkmateking02 on Wednesday, September 30, 2015 3:26 PM
Very nicely detailed interior! It's all coming together very well.


  • Member since
    February 2006
  • From: Cincinnati Ohio
Posted by DantheMan85 on Saturday, October 3, 2015 10:04 AM

Thanks Bish, yeah this is the first model I've come across where the clear plastic didn't fit in the future bath.  That future is not easy getting off.

Thanks Checkmateking02.  This model has a lot of detail inside.  If you have the time to paint the hole interior and fully detail it, with either Fallschirmjager's or beds with wounded.  The size of the kit really allows you to go all out, but I will save that for another Ju 52 model.  Been wanting that Pro Modeler Ju 52/3m number 85-5944 for awhile now. Smile

Was looking to see where the remaning Ju 52's are at, and saw that the USAF Museum in Dayton, Ohio has one but it's currently in storage.  Here's a picture of when it sat outside, judgeing by the B-1A in the back ground I'd say around the late 80's to early 90's time frame.

On my Work Bench: Tamiya Ford GT 1/24

Up Coming: ?


  • Member since
    September 2003
  • From: AandF in the Badger State
Posted by checkmateking02 on Saturday, October 3, 2015 6:00 PM
Always wanted to visit the Air Force museum in Dayton. I'll have to add it to the bucket list.


  • Member since
    December 2002
  • From: Bury St Edmunds, Suffolk, England
Posted by Bish on Sunday, October 4, 2015 1:49 AM
That's a nice pic there Dan. I believe the US also has one of the air worthy Ju 52, based out of Virginia beach.

I am a Norfolk man and i glory in being so


On the bench: Airfix 1/72nd Harrier GR.3/Fujimi 1/72nd Ju 87D-3

  • Member since
    February 2006
  • From: Cincinnati Ohio
Posted by DantheMan85 on Saturday, October 24, 2015 6:59 PM


Checkmateking02: The Air Force Museum is well worth a visit, the place is huge. Free parking and free admission.


Bish: Wish I could see there Ju52 in person, I just grabbed that photo off google Wink. Yeah I believe the one your talking about is at the Air and Space Museum, two Ju52's appear in the 2008 movie Valkyrie.


Well I'm making some progress, glued on the right wing tonight.  Using testor bottles along with balsa wood as shims, to keep the fuselage level. And two tall bottles to hold the wing straight.


On my Work Bench: Tamiya Ford GT 1/24

Up Coming: ?


  • Member since
    December 2002
  • From: Bury St Edmunds, Suffolk, England
Posted by Bish on Sunday, October 25, 2015 1:12 AM

That's some set up Dan, looks like its working though. Might be a bit tricky to do with the other wing though. Wink

I am a Norfolk man and i glory in being so


On the bench: Airfix 1/72nd Harrier GR.3/Fujimi 1/72nd Ju 87D-3

  • Member since
    February 2006
  • From: Cincinnati Ohio
Posted by DantheMan85 on Sunday, October 25, 2015 9:18 AM


Thanks Bish, at first I was going to glue on both wings but decided to just stick with the right wing. Yeah it will be tricky gluing on the left wing. Think I use my testor bottles to hold and support the other wing. Can't wait to paint the camouflage scheme.


On my Work Bench: Tamiya Ford GT 1/24

Up Coming: ?


  • Member since
    December 2002
  • From: Bury St Edmunds, Suffolk, England
Posted by Bish on Sunday, October 25, 2015 12:49 PM
I'll be looking forward to that as well Dan.

I am a Norfolk man and i glory in being so


On the bench: Airfix 1/72nd Harrier GR.3/Fujimi 1/72nd Ju 87D-3

  • Member since
    September 2003
  • From: AandF in the Badger State
Posted by checkmateking02 on Sunday, October 25, 2015 3:16 PM
Whatever works, Dan! Right now I've got USS Shangri La sitting under three coffee cups, holding the flight deck in place while the glue sets. When you get to the point you're at now, you know you're making progress.


  • Member since
    September 2003
  • From: AandF in the Badger State
Posted by checkmateking02 on Sunday, October 25, 2015 3:17 PM
When I do larger aircraft like this, I brace it in a cushion chair, then set up the second wing at the right angle. It's worked--as long as the cats don't find it over night.


  • Member since
    February 2006
  • From: Cincinnati Ohio
Posted by DantheMan85 on Monday, October 26, 2015 6:34 PM

Was thinking about making a holder out of balsa wood to hold the aircraft at a right angle, but I think I'll stick with using testor bottles.

On my Work Bench: Tamiya Ford GT 1/24

Up Coming: ?


  • Member since
    September 2003
  • From: AandF in the Badger State
Posted by checkmateking02 on Monday, October 26, 2015 7:17 PM
Nicely done, Dan. Looks like everything's lined up, and it's looking good.


  • Member since
    May 2011
  • From: Illinois
Posted by armor86 on Monday, October 26, 2015 10:51 PM

Well ... I'm back on board after having to sell and buy a new home. Moving with packing and unpacking and then getting everything set up in my new hobby room. Now just need to get started again on the project and back into building. Wife could nolonger handle all the stairs and needed a single floor house. Good news I got a bigger Model/Hobby room in the basement. Signed up for building German Field Kitchen (Gulaschkanone). Have two Tamiya kits (German Field Kitchen) with figure and two horses and Field Kitchen Scenery with four figures.

Starting Kits

start

parts

period photo


Armor 86 - Dan

badges


Dan

  • Member since
    December 2002
  • From: Bury St Edmunds, Suffolk, England
Posted by Bish on Tuesday, October 27, 2015 1:46 AM
Dan, great to see the wings on and those bottles seem to have worked a treat. She is looking good. Nice to see you back armor. I have one of those kitchens, the one without the horses, which I plan on putting in a dio with a StuG. Will be keen to see how it turns out.

I am a Norfolk man and i glory in being so


On the bench: Airfix 1/72nd Harrier GR.3/Fujimi 1/72nd Ju 87D-3

  • Member since
    September 2003
  • From: AandF in the Badger State
Posted by checkmateking02 on Tuesday, October 27, 2015 4:06 PM
Shaping up nicely, Armor/Dan. Looking forward to seeing what you serve up!


  • Member since
    January 2008
  • From: Limoges
Posted by Rob.H on Sunday, November 1, 2015 7:15 PM

Hi all.


Looking at the calendar I see I need to get to work if I am to get my Sd.Kfz 232 built by year end.  With that in mind I've started work, but I've hit a snag and hope someone here can help me out.  I decided to update my vintage kit with Eduards photoetch set. The trouble is with the PE hinges.  I've shaved off the blocky styrene hinges but I am not entirely sure how to apply the PE hinges.  If I fold them into a z shape they wind up wider than the doors they are to be fitted to.  As this is only my third time working with PE on a kit I am uncertain how to proceed, or have I botched the kit already?

on the bench: Moebius Battlestar Galactica, Tamiya 1/35 M13/40

 photo PacificCarrierBuild2014small_zps595053a9.jpg

  • Member since
    September 2003
  • From: AandF in the Badger State
Posted by checkmateking02 on Monday, November 2, 2015 9:58 PM
I'm having trouble visualizing this. Can you post any photos to help show the issue?


  • Member since
    April 2014
  • From: Australia
Posted by lostagain on Wednesday, November 4, 2015 6:29 AM

Hello CMK,

I am in for this GB, as I will soon be done with the Airliner GB.

My model is the Mirage 7TP Polish tank in 1/35.

  • Member since
    December 2002
  • From: Bury St Edmunds, Suffolk, England
Posted by Bish on Wednesday, November 4, 2015 12:34 PM
Rob, I assume you are using Eduard set 35323. I have had a look at the instructions on line and am not sure which hinges you are referring to. I can see there are a number of doors that need the hinges replacing, but I can't see any that need to be bent.

I am a Norfolk man and i glory in being so


On the bench: Airfix 1/72nd Harrier GR.3/Fujimi 1/72nd Ju 87D-3

  • Member since
    January 2008
  • From: Limoges
Posted by Rob.H on Wednesday, November 4, 2015 6:24 PM

Thanks guys.


You're right Checkmate, pictures would help.  I'll post a couple this weekend.


Bish that is the PE set in question.  The problem is the doors are not flush with the body, there is a "step" where the doors meet the body.  But the hinges are flat on the PE fret, so they need to be bent to mate with the door and body surfaces.


Again, I'll get some pics to help with the issue... 

on the bench: Moebius Battlestar Galactica, Tamiya 1/35 M13/40

 photo PacificCarrierBuild2014small_zps595053a9.jpg

  • Member since
    September 2003
  • From: AandF in the Badger State
Posted by checkmateking02 on Thursday, November 5, 2015 6:12 PM

Sounds great, lostagain.  Looks like the kit has a lot of parts to it.  I look forward to seeing how things progress.


  • Member since
    September 2003
  • From: AandF in the Badger State
Posted by checkmateking02 on Thursday, November 5, 2015 6:16 PM

Bish knows a lot about PE and vehicles, Rob, so once you post photos, he'll probably have a few thoughts.

Are the doors supposed to be flush with the body, and the "step" is a result of inadequate kit engineering, molding, or something?  I haven't done any vehicles in decades, so I don't have much knowledge in this area.


  • Member since
    January 2008
  • From: Limoges
Posted by Rob.H on Saturday, November 7, 2015 8:50 AM

OK, here are some pics!

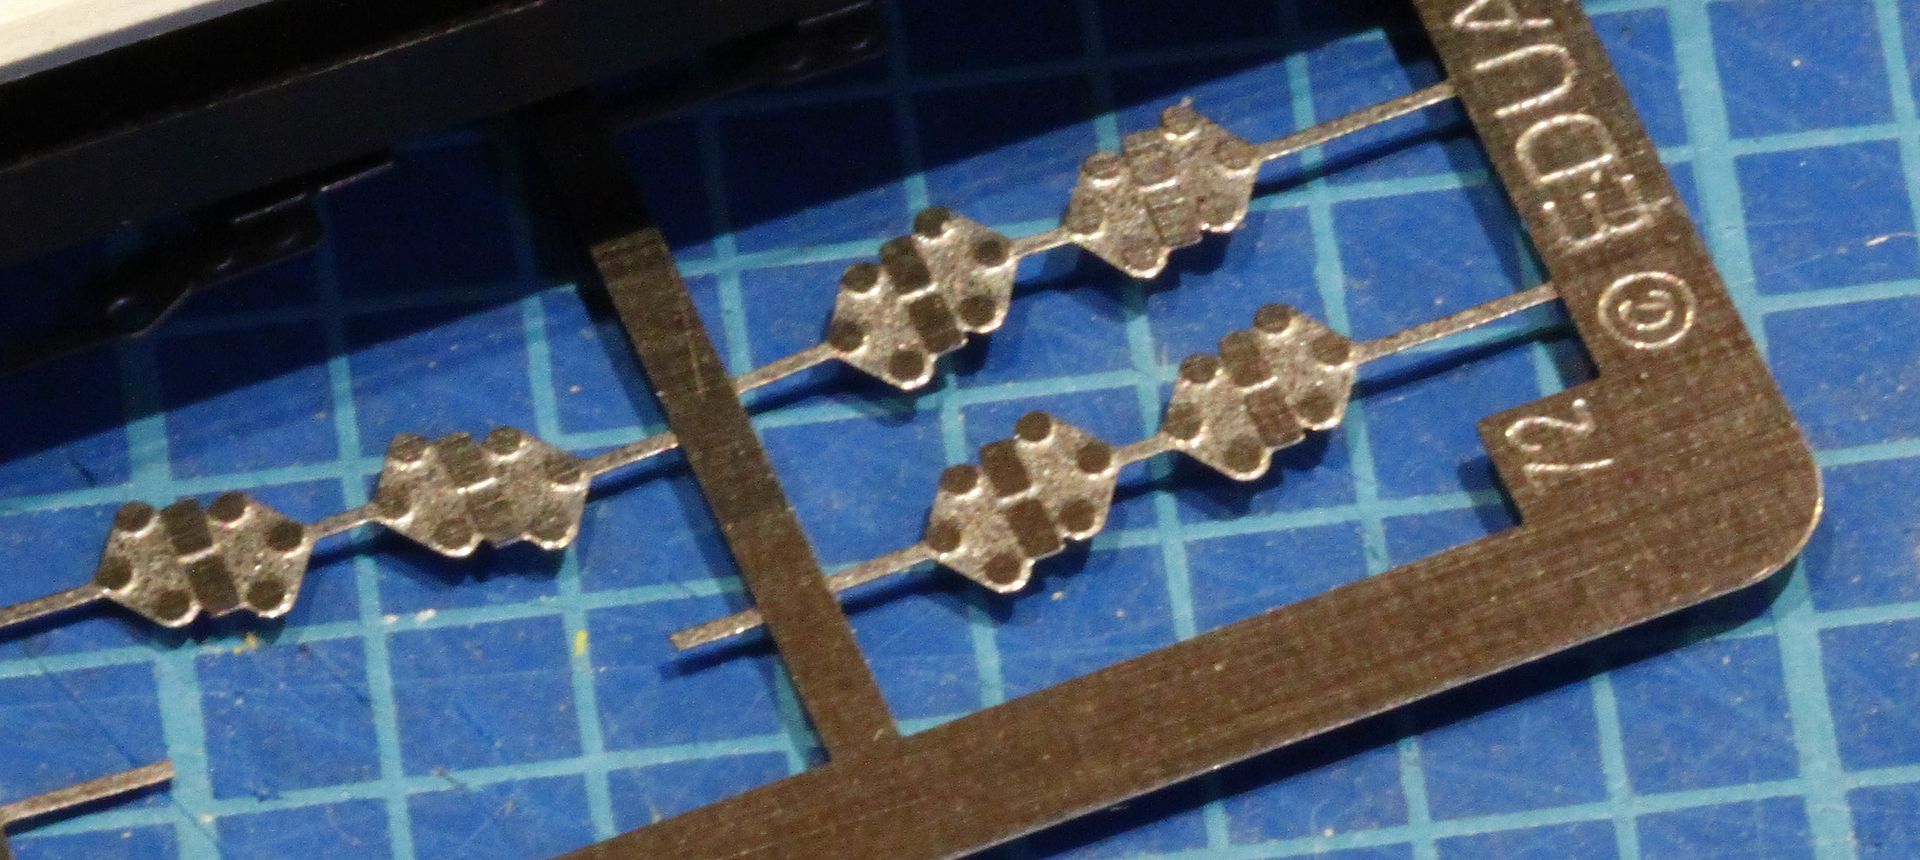
This is what the PE hinges look like on the fret.


PE hinges

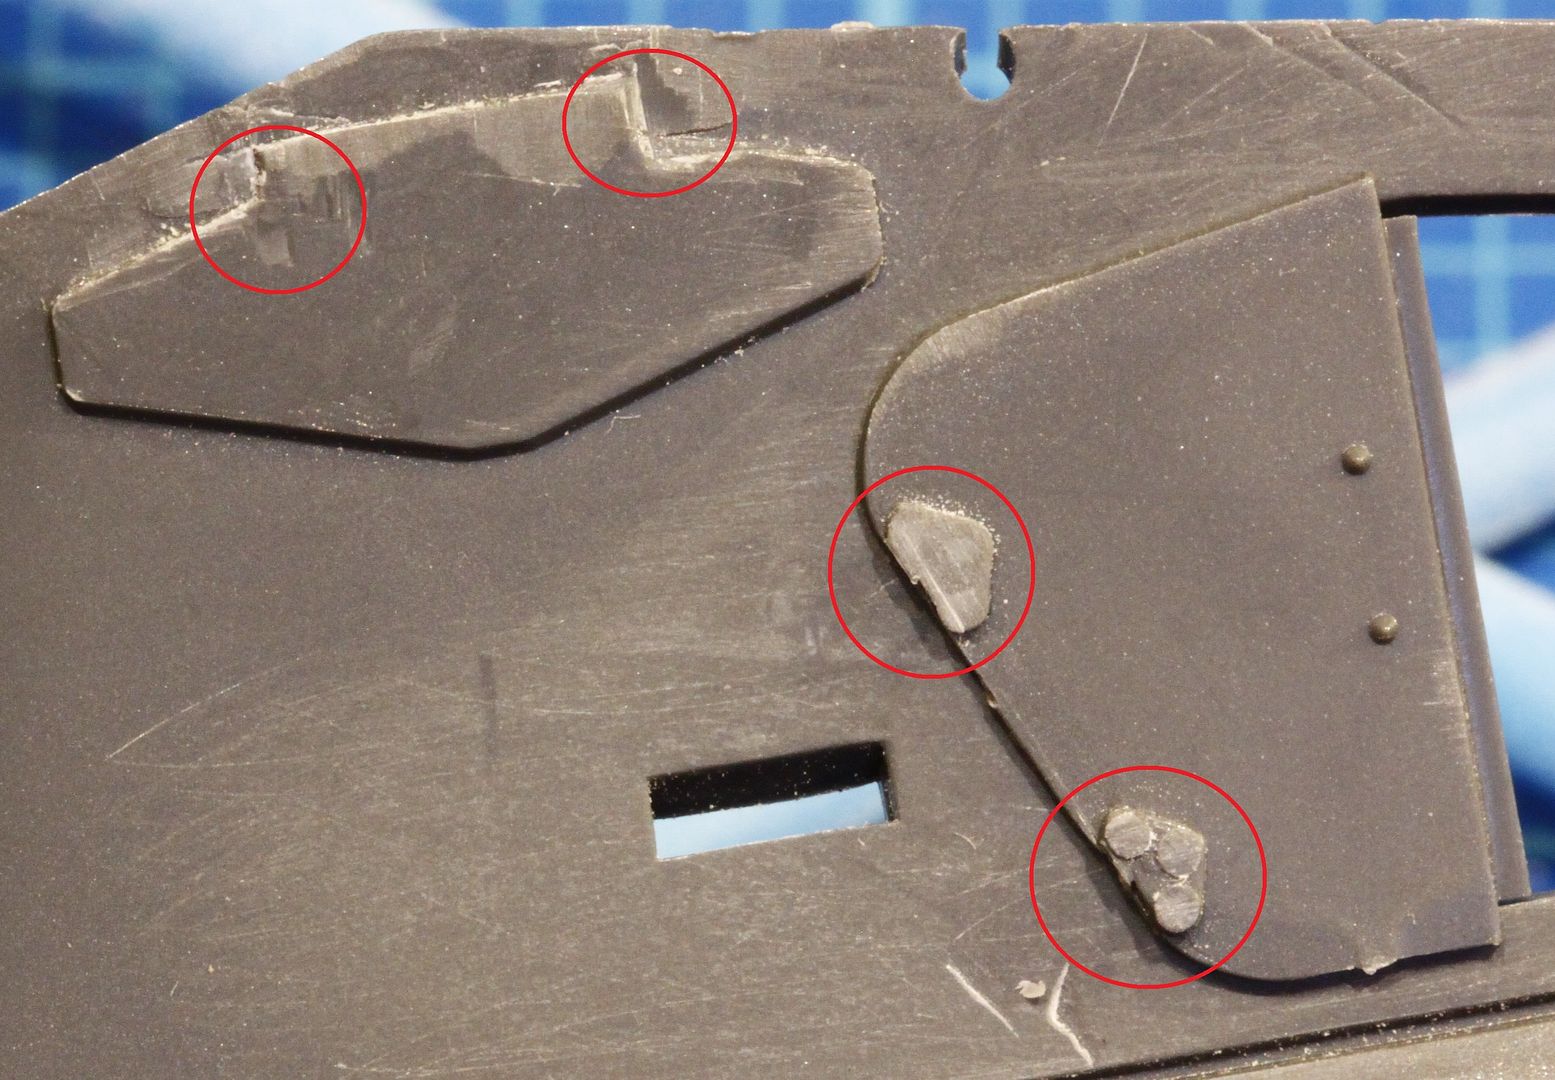
Here is a shot of two of the hatches on the side of the kit.  I've removed the hinges as best I could in one area, but I am still working on the door.

The circles show where the hinges are going.

Side doors

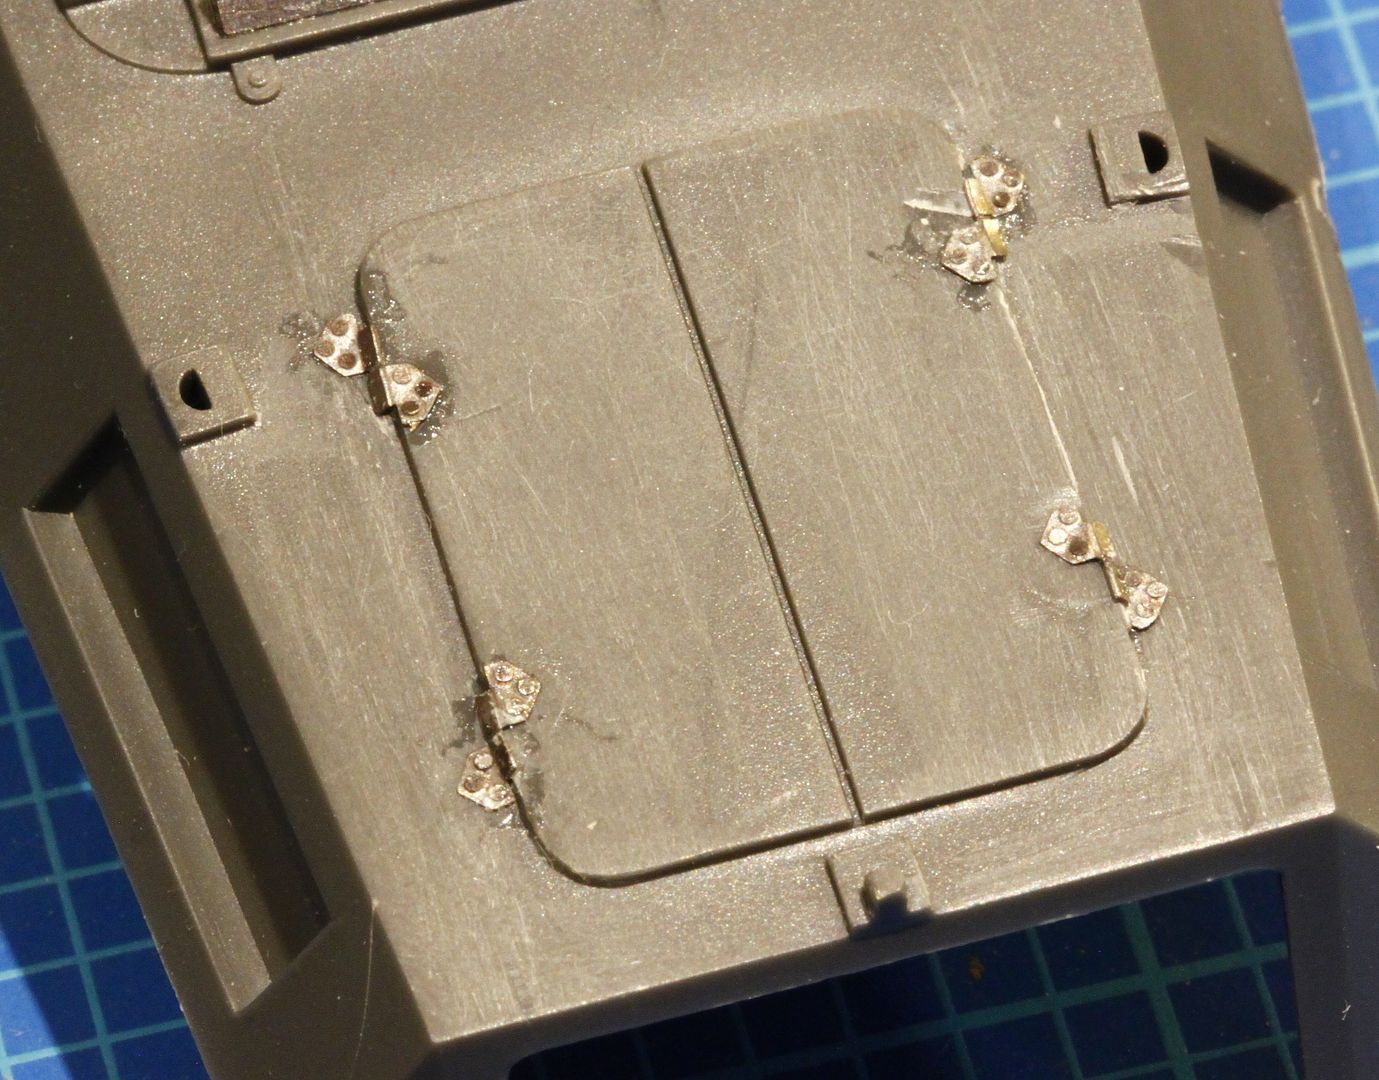
And here is a shot of the hatches on the rear door where I already tried placing a set.  Pardon the nasty CA work, but the little buggers were really starting to try my patience.

As you can see, I folded then to accomodate the raised height of the door, but the folded shape doesn't align well, hence my reason for wondering what I am doing wrong here.

Rear deck

on the bench: Moebius Battlestar Galactica, Tamiya 1/35 M13/40

 photo PacificCarrierBuild2014small_zps595053a9.jpg

  • Member since
    December 2002
  • From: Bury St Edmunds, Suffolk, England
Posted by Bish on Saturday, November 7, 2015 9:22 AM

Got ur. I did think that a bit odd when I looked at the instructions. I could not understand why there was no fold symbol. All the hinges i have done were on doors that were flush. Thats was my first thought, that perhaps the kit was wrong. But i found a pic and those bits you have folded flat should be rounded. Looks like an error in the Eduard instructions as i have seen them tell the builder to round them for track guard hinges. This is the best pic i can find and you should be able to zoom in on the hinge.

The error is not yours, its Eduards. What i would do is use a piece of styrene rod, drilled out if you can, and place it between the two hinge halves. On the ones you have fitted, if you can, cut away the piece in between. For the ones you have not fitted, i would cut them in two, attach and then add the rod. Much easier than trying to make the midle part of the hinge round.

I am a Norfolk man and i glory in being so


On the bench: Airfix 1/72nd Harrier GR.3/Fujimi 1/72nd Ju 87D-3

  • Member since
    January 2008
  • From: Limoges
Posted by Rob.H on Saturday, November 7, 2015 9:37 AM

Ah!  Thanks for the suggestion Bish.  That will take a bit more effort, but will certainly be better in the long run.  It is probably going to be better to remove the ones I have fitted, clean up the styrene and then cut and reattach them. 

Also, might it be easier to simply drill a small bit out on each end of the styrene and then use a black wash to suggest they are hollow rather then than try to drill out the entire length?

Fortunately the other part of the PE kit seem to be going on much better than the hinges...

on the bench: Moebius Battlestar Galactica, Tamiya 1/35 M13/40

 photo PacificCarrierBuild2014small_zps595053a9.jpg

  • Member since
    September 2003
  • From: AandF in the Badger State
Posted by checkmateking02 on Saturday, November 7, 2015 10:45 AM
The joys of PE. Hope this will work out for you, Rob. Thanks for suggesting the cure, Bish.


  • Member since
    April 2006
  • From: ON, Canada
Posted by jgeratic on Saturday, November 7, 2015 12:09 PM

Bish has got the best fix here.  I think this an example where PE fails to capture the scale, as those hinges do look heavy duty on the real vehicle. 

You could beef then up, but it would be more work.  Use just half the hinge (instead of folding), and back it up with some thin sheet plastic, and then cut/sand to the shape of the PE hinge.

Looking at the museum photo, the hinge plate itself looks to be as thick as the door, while the hinge (the section being replaced with rod) is almost double.

regards,

Jack

JOIN OUR COMMUNITY!

Our community is FREE to join. To participate you must either login or register for an account.

SEARCH FORUMS
FREE NEWSLETTER
By signing up you may also receive reader surveys and occasional special offers. We do not sell, rent or trade our email lists. View our Privacy Policy.