SEARCH FINESCALE.COM

Enter keywords or a search phrase below:

Aces Group Build

28034 views
266 replies
1 rating 2 rating 3 rating 4 rating 5 rating
  • Member since
    September 2003
  • From: AandF in the Badger State
Posted by checkmateking02 on Saturday, August 1, 2015 10:15 AM

I think the third one from the bottom would do.  Here it is again:


  • Member since
    October 2009
  • From: Oil City, PA
Posted by greentracker98 on Saturday, August 1, 2015 6:49 PM

I was leaning toward that one too. Again, That's some great work The figure looks right at home on the wing

A.K.A. Ken                Making Modeling Great Again

  • Member since
    September 2003
  • From: AandF in the Badger State
Posted by checkmateking02 on Saturday, August 1, 2015 8:07 PM

Thanks, Ken!


  • Member since
    May 2013
  • From: From the Mit, but live in Mason, O high ho
Posted by hogfanfs on Saturday, August 1, 2015 8:49 PM

Checkmate,

That is one beautiful Spit! Great job!

 Bruce


 On the bench:  1/48 Eduard MiG-21MF

                        1/35 Takom Merkava Mk.I


  • Member since
    September 2003
  • From: AandF in the Badger State
Posted by checkmateking02 on Saturday, August 1, 2015 10:18 PM

Thanks, Bruce!


  • Member since
    March 2007
  • From: NJ
Posted by JMart on Sunday, August 16, 2015 7:48 AM
Well, catch up time after being away for a couple weeks…
Been working on various subassemblies, will post some pics on my next update. Most of my “modelling time” has been in setting up my new workshop area.
The Hasegawa P-51Ds are not too bad, not quite Tamiya quality (fit, details) but much better than the old Revell/Monogram kits.


Checkmate  – Congrats on the finish; that is a great Spit! Love the figure too.


  • Member since
    September 2003
  • From: AandF in the Badger State
Posted by checkmateking02 on Sunday, August 16, 2015 4:42 PM

Thanks, JM!


  • Member since
    July 2014
Posted by modelcrazy on Monday, August 17, 2015 12:13 AM

Check,

I love it, I love the way your pilot is so casual.

Ken,


Man with my move, I have way over extended myself on GB's. I'm afraid I can only commit to build Richthofen's DR1 before the end of this. Sorry, but I do plan on completing it. If I'm lucky, I'll get Moonbeam McSwine completed for your GB and mine.

Steve

Steve

Building a kit from your stash is like cutting a head off a Hydra, two more take it's place.


http://www.spamodeler.com/forum/

  • Member since
    September 2003
  • From: AandF in the Badger State
Posted by checkmateking02 on Monday, August 17, 2015 7:15 PM

modelcrazy

Check,

I love it, I love the way your pilot is so casual.

Steve

 
Thanks, Steve.  I think he's so non-chalant because he could still enjoy his cigarette in those days.


  • Member since
    October 2009
  • From: Oil City, PA
Posted by greentracker98 on Thursday, September 3, 2015 6:36 PM

modelcrazy


Ken,


Man with my move, I have way over extended myself on GB's. I'm afraid I can only commit to build Richthofen's DR1 before the end of this. Sorry, but I do plan on completing it. If I'm lucky, I'll get Moonbeam McSwine completed for your GB and mine.

Steve


Not a problem. I'm not all that worried about it. Take your time. I was cut some slack on the 1944 GB with my B 24, so, I can do the same here

Sorry, I didn't see your post til now

A.K.A. Ken                Making Modeling Great Again

  • Member since
    July 2014
Posted by modelcrazy on Monday, September 7, 2015 11:22 PM
Ken,
I’m starting Manfred’s Fokker Tri, and although it’s in a new Revell kit, it is an old mold with some flashing. I will be painting it in his famous red rather the pre-red 3 tone green of Jasta 11.


Steve

Steve

Building a kit from your stash is like cutting a head off a Hydra, two more take it's place.


http://www.spamodeler.com/forum/

  • Member since
    January 2015
Posted by BrandonD on Saturday, September 12, 2015 12:04 AM

Hi all,

I'm back into this group build now (finally) with my Tamiya 1/48 P-51 Mustang. This will be built and marked as Capt. John Meyer's Petie 2nd in 1944.

This will be my first real stab at a natural metal finish, which is why I've put it off until now. But there's no time like the present, so...

I got the Eduard cockpit detail set for $5, so I went ahead and added that in. The green is matched with Gunze paints, but I don't have those, so I painted around the details by brush with Model Master acrylic.

The Eduard set isn't earth-shattering, but it is an upgrade, and for $5, I think it was worth it.

At this point, I still need to do some touching up, some washes and get a flat clear on it to hide the shiny bits, but I should close the fuselage soon.

Not pictured is the guns I drilled out and replaced with Albion Alloys tubing. I'm not sure that did much more than if I had just drilled them out, but we will see.

-BD-

  • Member since
    October 2009
  • From: Oil City, PA
Posted by greentracker98 on Saturday, September 12, 2015 3:48 PM

Great job Brandon D Glad your back

Model Crazy - Looks like a great kit. I've been thinking WW1 lateley myself. Mine will be a bi-plame though. not sure which one right now

A.K.A. Ken                Making Modeling Great Again

  • Member since
    July 2014
Posted by modelcrazy on Thursday, October 1, 2015 8:31 PM

Here's the progress on my Fokker. The cockpit and motor complete. Next will be puttin it together.


Steve

Building a kit from your stash is like cutting a head off a Hydra, two more take it's place.


http://www.spamodeler.com/forum/

  • Member since
    October 2009
  • From: Oil City, PA
Posted by greentracker98 on Friday, October 2, 2015 2:03 AM

Looks good MC. That detail is great. Is it AM?

A.K.A. Ken                Making Modeling Great Again

  • Member since
    July 2014
Posted by modelcrazy on Friday, October 2, 2015 11:07 AM

Thanks Ken,

Yes, there is some general interior PE from Tom's Modelworks. I also have WW1 German guns for toms's as well. Now that I'm done with the interior, I can get on with the fun partStick out tongue

Steve

Building a kit from your stash is like cutting a head off a Hydra, two more take it's place.


http://www.spamodeler.com/forum/

  • Member since
    October 2009
  • From: Oil City, PA
Posted by greentracker98 on Friday, October 2, 2015 12:36 PM

modelcrazy

Thanks Ken,

Yes, there is some general interior PE from Tom's Modelworks. I also have WW1 German guns for toms's as well. Now that I'm done with the interior, I can get on with the fun partStick out tongue


I don't know "Tom's Modelworks" I'm going to have to take a look at that.

A.K.A. Ken                Making Modeling Great Again

  • Member since
    July 2014
Posted by modelcrazy on Friday, October 2, 2015 12:47 PM

Yeah,

Try this,
http://www.tomsmodelworks.com/catalog/index.php

Steve

Building a kit from your stash is like cutting a head off a Hydra, two more take it's place.


http://www.spamodeler.com/forum/

  • Member since
    October 2009
  • From: Oil City, PA
Posted by greentracker98 on Saturday, October 3, 2015 2:46 PM

modelcrazy

Yeah,

Try this,
http://www.tomsmodelworks.com/catalog/index.php


Thanks MC

A.K.A. Ken                Making Modeling Great Again

  • Member since
    April 2014
  • From: Australia
Posted by lostagain on Saturday, October 3, 2015 9:47 PM

Okay, I have been quiet, but keeping an eye on the GB. Concentrating on getting the Airliner done first.

MC, great work with an old mould. Really like the motor and propellor.

Brandon D, the cockpit has been lifted well by the ed detail set - $5 well spent, I would say.

CMK, The Spitfire has come out really nicely - looks like a great little kit. And the pilot has come out really well.

I have been working on some of the figures for my Ace's vignette - they are modified 1/48 tamiya figures. I have been painting the uniforms, so far I have avoided the faces until I get my confidence up.

I think I need to stop taking such close up photos - all the mistakes look so much more obvious like this...

  • Member since
    July 2014
Posted by modelcrazy on Sunday, October 4, 2015 10:12 PM

A little more done on the Fokker.

Steve

Building a kit from your stash is like cutting a head off a Hydra, two more take it's place.


http://www.spamodeler.com/forum/

  • Member since
    January 2015
Posted by BrandonD on Wednesday, October 14, 2015 12:36 AM

I've been pretty busy lately, and I've been a little scattered on my builds, but this actually marks one year since returning to this hobby, and I am having more fun than ever.

One of the things that kept me busy was work, but others were play, including the opportunity to meet legendary ace Bud Anderson. He's well in his 90s and is totally with it mentally. He's funny, kind and a great guy to talk to. I picked up his memoir and had him sign it. It was a great day.

As for my P-51, I didn't tell him I am not building Old Crow (I believe Eduard is releasing a 1/48 P-51 family, and I plan to make one of his planes out of that kit). Here is my progress on Col. John Meyer's Petie 2nd.

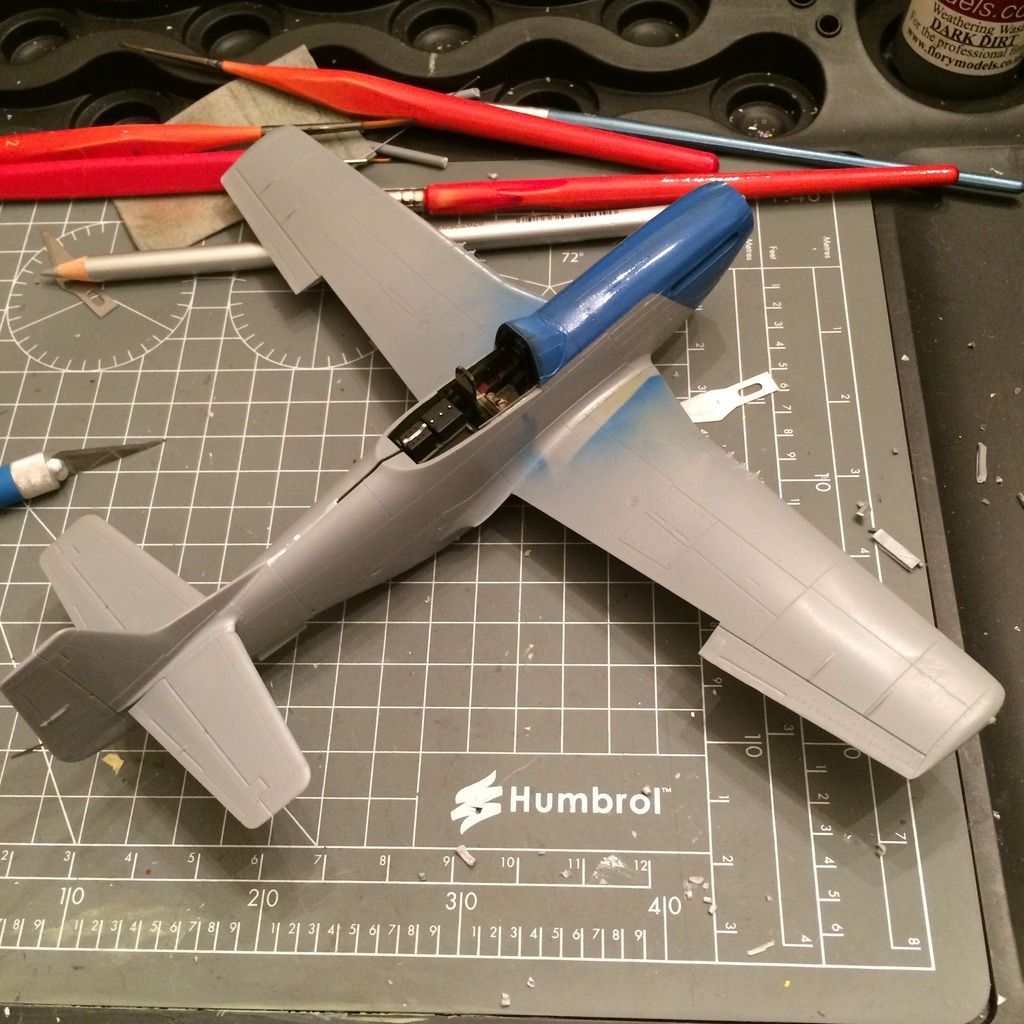
I am building it with the 1/48 Tamiya kit, and at last update, I had the cockpit mostly done. Here it is together with the cowling painted Humbrol French Blue enamel over a Tamiya flat black preshade.

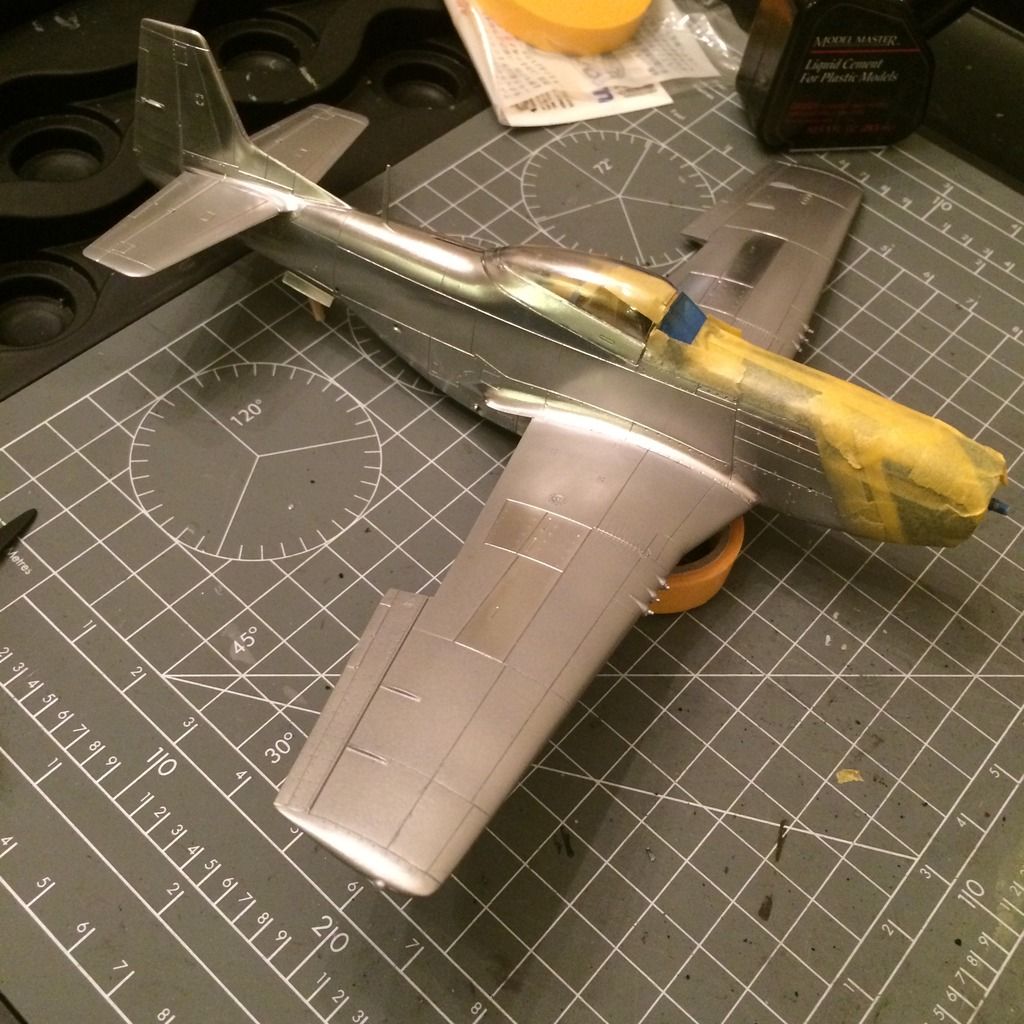
Here are some progress pics as I played with Alclad. I first sprayed Alclad Aqua Gloss on the whole model. As an acrylic, if left with enough time to dry, it doesn't melt under the Alclad lacquer paints like their black base does for some (I have had decent results with the black base, but wanted to try aqua gloss).

I sprayed the wings Alclad Duraluminum, and then coated it with Aqua Gloss, masked the wings and rudder, leaving the gun access panels uncovered, and then sprayed airframe aluminum. Once that was done, I coated with aqua gloss and sprayed magnesium on the piece behind the exhaust, then sprayed a couple panels with polished aluminum.

I will say that I am not 100 percent thrilled with the panel variation, as it looks too stark to me for this plane. (Not to mention the airframe aluminum is probably tooshiny for Petie 2nd). I do have some techniqes I want to practice with this now that I know I can work with a clear coat as a base for the shiny lacquers.

With the decals, I am tired of being burned by thick Tamiya decals, and this isn't one of their kits that comes with nice ones, so I bought the Eagle Strike set for P-51Ds. It's printed by Cartograf, and the decals went down flawlessly.

A note on applying decals over Alclad: I previously painted a plane polished aluminum over the alclad black base and liked it. Alclad says you can put decals down right over the metals, which is true. However, when I clear-coated with Alclad Klear Kote, it changed the color of the metal, but the original color was still visible under the carrier film. It wasn't silvering, but it wasn't good.

This time around, I clear coated the whole thing with aqua gloss, applied decals, and clear coated again with aqua gloss. Despite the sheer number of coats on the model (There are 6 coats on the gun bay doors), they are thin enough that panel line washes still work great).

TL;DR - Clear coat it before the decals, then clear coat it again.

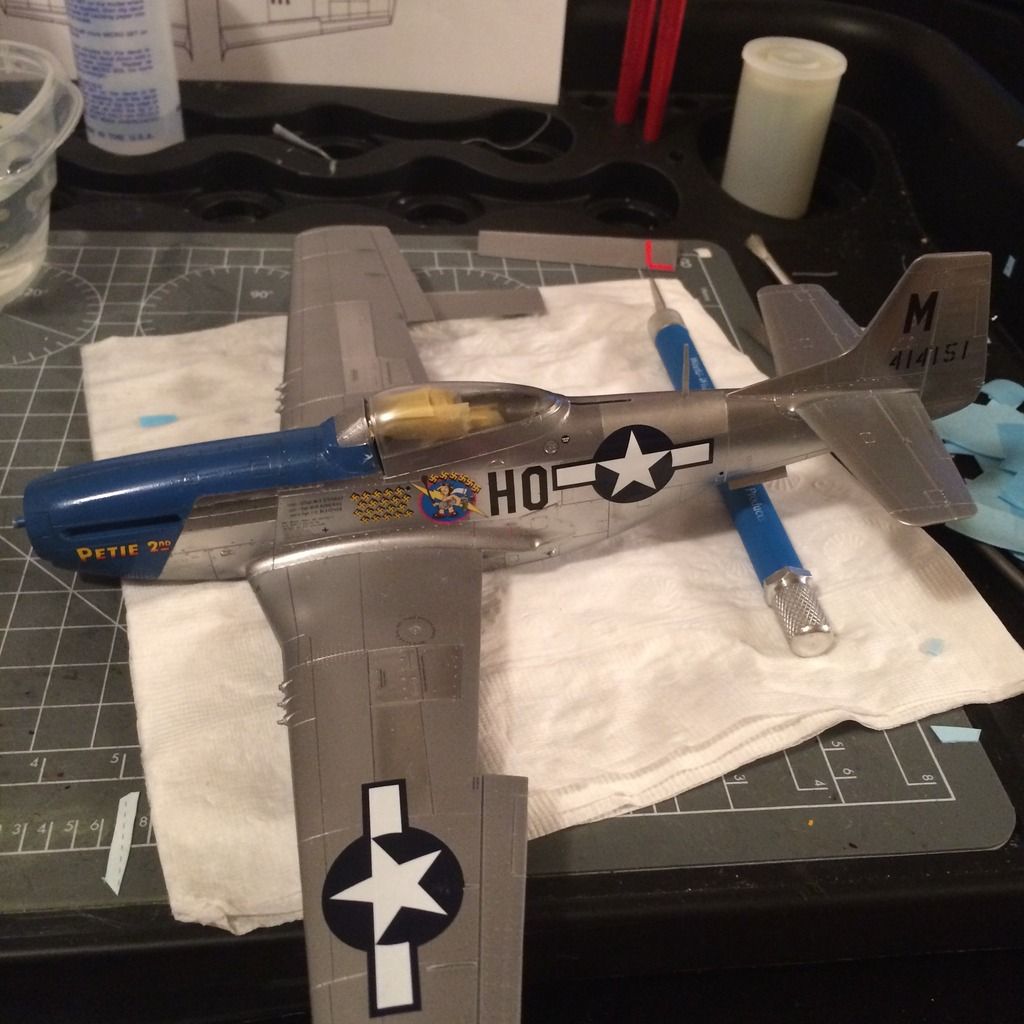
I have since applied a Flory grime panel line wash. It's a brownish color and doesn't show too much contrast, but I am going for subtlety on it here. I plan to do some minor weathering on it before finishing it.

Sory for the long post. I guess it's been a while since I did any work on this one. Thanks for reading (or at least looking at the pics).

-BD-

  • Member since
    July 2014
Posted by modelcrazy on Thursday, October 15, 2015 10:16 AM

Very little to update on this, as most of us, I have been busy with life.
Here is what I have so far. I attached the wings and filled some gaps. Next is the undercarriage and a few other fiddly things. I'm working on the guns separately.


Steve

Steve

Building a kit from your stash is like cutting a head off a Hydra, two more take it's place.


http://www.spamodeler.com/forum/

  • Member since
    January 2015
Posted by BrandonD on Friday, October 16, 2015 1:48 AM

Looking good, Modelcrazy. I bet you can't wait to get primer and/or paint on that so you can stop being blinded at the bench :)

-BD-

  • Member since
    June 2014
Posted by BrandonK on Friday, October 16, 2015 9:24 AM

BrandonD, that blue nose looks great. I built a -C blue nose Hell-er Bust using French blue also. I think it is spot on. Great work with the Alclads. I too am still trying to find that "just right" look with different colors, techniques.

Steve, the tri-plane is looking great. I always loved how it looked. Are you doing the Baron with it?

BK

On the bench:

A lot !! And I mean A LOT!!

2024 Kits on deck / in process / completed   

                         14 / 5 / 2  

                              Tongue Tied

  • Member since
    July 2014
Posted by modelcrazy on Friday, October 16, 2015 10:12 AM

BrandonK
Steve, the tri-plane is looking great. I always loved how it looked. Are you doing the Baron with it?

Yes, the kit comes with the Baron.

Steve

Building a kit from your stash is like cutting a head off a Hydra, two more take it's place.


http://www.spamodeler.com/forum/

  • Member since
    July 2014
Posted by modelcrazy on Sunday, October 18, 2015 10:10 PM

Here's the progress tonight. I was gone the Tacoma and returned late last night so I didn't get much done. Anyway it is ready for painting.

I will be painting it in Jasta 11 1917 colors.


Steve

Building a kit from your stash is like cutting a head off a Hydra, two more take it's place.


http://www.spamodeler.com/forum/

  • Member since
    June 2014
Posted by BrandonK on Monday, October 19, 2015 9:14 AM

Man with all those wings in the way, it's gonna be a real fun time painting. Tongue Tied

BK

On the bench:

A lot !! And I mean A LOT!!

2024 Kits on deck / in process / completed   

                         14 / 5 / 2  

                              Tongue Tied

  • Member since
    January 2015
Posted by BrandonD on Wednesday, October 21, 2015 1:17 AM

Yeah I have to echo BrandonK's comments. I'll be interested to see how you tackle this, as I've got a 1/48 Eduard version, and I have no idea how to paint it.

-BD-

  • Member since
    January 2015
Posted by BrandonD on Wednesday, October 21, 2015 1:21 AM

A quick update on me 1/48 Tamiya P-51D:

I got the legs on, and I got decals on the prop. As it sits right now, it just needs a few things - mounting the canopy, painting the guns, mounting the landing light, mounting the antenna and pitot tube, painting the exhaust pipes, painting streaks for the exhaust, painting the streak for the oil overflow, streaking around the fuel caps, chiping on the prop and probably some gunsmoke stains. Still seems like a lot, actually.

So that's it as it sits now. And Col. Meyer needs to get into the paint shop next.

-BD-

JOIN OUR COMMUNITY!

Our community is FREE to join. To participate you must either login or register for an account.

SEARCH FORUMS
FREE NEWSLETTER
By signing up you may also receive reader surveys and occasional special offers. We do not sell, rent or trade our email lists. View our Privacy Policy.