SEARCH FINESCALE.COM

Enter keywords or a search phrase below:

The 2015 /16 Red Hot and Rollin Automotive Group Build--Ended

120350 views
2225 replies
1 rating 2 rating 3 rating 4 rating 5 rating
  • Member since
    March 2012
  • From: Corpus Christi, Tx
Posted by mustang1989 on Tuesday, August 2, 2016 8:52 PM

Seabe: You're really rockin' with that engine detail. Nice metallic color usage as well.

Dan: I hate to hear about that decal cracking on you. Hope you get it to "behave". I am looking forward to the body color and the continued engine detailing.


 Forum | Modelers Social Club Forum (proboards.com) 

  • Member since
    March 2006
Posted by simpilot34 on Wednesday, August 3, 2016 4:59 AM

Loving the work here guys!!! Well done everyone!!

Still trying to complete my floater project before I commit here.

Dan actually had an almost similar decal situation with my E7K, mainly due to the age of the kit, well actually had some shattering. I coated the remaining decals with some Micro liquid decal film, couple of coats that leveled out beautifully. Application was then straightforward. Set and sol worked as normal with out the decals falling apart.

Cheers, Lt. Cmdr. Richie "To be prepared for war, is one of the most effectual means of preserving the peace."-George Washington
  • Member since
    January 2014
Posted by Seabe on Wednesday, August 3, 2016 11:06 AM

All I got done in the mean time was to install the engine onto the floor, no biggy. 

And got out the next 43rd scale victim. It will be Olivier Panis' car he drove to his only victory in Monaco 96 in the rain. A previous generation model of Tameo, so that complex rear wing is a bit daunting, plus during cleanup of the body I saw the masses of holes to be drilled for attachments. This may be more of a challenge that I hoped for! But this is what the car is supposed to look like - here he is stopping at the unique Monaco parc ferme having done a lap with the French flag.

  • Member since
    January 2015
Posted by MOPAR - D on Friday, August 5, 2016 9:41 PM

Thanks for the comments and recomendations. 

Decided to try using some chrome powder for the door handles and window cranks and wired up the slant. 

Step 1


Step 2

  • Member since
    March 2006
Posted by simpilot34 on Saturday, August 6, 2016 9:30 PM

Great work Mopar!!!

Cheers, Lt. Cmdr. Richie "To be prepared for war, is one of the most effectual means of preserving the peace."-George Washington
  • Member since
    January 2015
Posted by MOPAR - D on Sunday, August 7, 2016 1:15 PM

Thanks simpilot34

Sprayed the first coat of yellow on and wet sanded it for the second coat finished detailing the slant 6 with wires and a fuel line. Started on the chassis with the front and rear suspensions also painted the black in the front grill. 

The front end will come down to make it sit level. 

  • Member since
    January 2015
Posted by taaron76 on Sunday, August 7, 2016 2:01 PM

Hi guys!  Sorry I haven't been on here much to post, but I am tracking the status of everyone's builds.  I've been on the road a lot over the past few months, followed by the '66 build.  I am hoping to get some bench time in the winter when things slow down.

Here is what I am working on, if you are intersted.

Tim


  • Member since
    January 2015
Posted by MOPAR - D on Sunday, August 7, 2016 5:36 PM

Second try at adding some texture to the seats with these decals. I sprayed some Testors decal sealer on the decals before putting them in the water and no problems with the. Decals cracking this time. 

  • Member since
    January 2015
Posted by MOPAR - D on Sunday, August 7, 2016 9:39 PM

Tim nice project you have going on. 

  • Member since
    August 2015
  • From: the redlands Fl
Posted by crown r n7 on Monday, August 8, 2016 9:32 AM

looking good with that interior


 Nick.

  • Member since
    February 2013
  • From: Podunkville, USA
Posted by rommelkiste on Monday, August 8, 2016 10:21 AM

Now thats a right fine looking Mill you are building there Tarron!  Um.......you did hang the plug wires just for a show pic, right?  LOL!    Nice ride, you're gonna have some fun when its finished.   Just curious, whats the final gear??

Nothing ever fits……..and when it does, its the wrong scale.

To make mistakes is human.  To blame it on someone else shows management potential. 


  • Member since
    January 2015
Posted by taaron76 on Monday, August 8, 2016 11:52 AM

The plug wires were just for the pics, but that is how they will be installed.  The only reason I have to take them out is to install the headers.  Its too tight to try and intall it with the hearders on, otherwise I would.  Thanks!

Tim

  • Member since
    March 2012
  • From: Corpus Christi, Tx
Posted by mustang1989 on Monday, August 8, 2016 4:22 PM

simpilot: The lights still on bud. Yes

Seabe: Man these 43rd scale builds are your specialty. I'm really looking forward to seeing what you'll do with this one.

Dan: Simply beautiful work on those interior trim panels, chassis and the engine. Seats turned out fabulous this time around and you gave that car a great stance as well.

Tim: Man is it great to have you back in here!! Will be checking out your project when I get home where I can view the blocked images here at work. Looking forward to seeing your beautiful paint jobs again.

Everybody: In the interim , I did some more work on the master cylinder and brake lines today. Still gotta form and install the vacuum hose for the power brake booster but here's today's progress.


 Forum | Modelers Social Club Forum (proboards.com) 

  • Member since
    January 2015
Posted by MOPAR - D on Tuesday, August 9, 2016 5:54 AM

Looking good Joe. 

  • Member since
    March 2012
  • From: Corpus Christi, Tx
Posted by mustang1989 on Tuesday, August 9, 2016 7:16 AM

Thanks Dan. I got the TV glued down to the table yesterday but had some difficulty in getting the body to fit right on the chassis due to not positioning the TV in the right spot on the table. This morning I was able to remove the TV and reposition it on the table to allow the body to sit properly onto the rolling chassis. Looks like everything is fitting the way it's supposed to now.


 Forum | Modelers Social Club Forum (proboards.com) 

  • Member since
    August 2015
  • From: the redlands Fl
Posted by crown r n7 on Tuesday, August 9, 2016 8:59 AM

That's sharp especially the master cylinder (Felix the cat) lol it's difficult to bench the cars but I'm trying to start up some plane kits for two gb's


 Nick.

  • Member since
    January 2015
Posted by MOPAR - D on Saturday, August 13, 2016 2:55 PM

More work on the chassis finishing up the exhaust and added shocks, on the interior I had to add the 3 speed shifter on the column remembering this is a plane Jane no option car I need to fill in the hole in the floor still, little moe detail in the engine compartment added master brake cylinder and windshield washer motor I modified the one in the kit that looks like a horn. Sprayed a 2nd coat on the body that needs a lot of sanding to smooth out the finish. 

  • Member since
    January 2014
Posted by Seabe on Sunday, August 14, 2016 12:11 AM

That interior looks real good, Mopar-D!

Had an out-of-town trail run race, plus weather is rather miserable now. So no progress on the Ligier, since spraying the body will have to wait. But did manage to get the pipes done and installed. Tried something different on the pipes, hmmm... it's okay. Not over the moon with the result, but okay. Rear end basically done and on to front suspension. And then the dreaded body - well, masking the body! 

Some pics of the engine area.

  • Member since
    March 2012
  • From: Corpus Christi, Tx
Posted by mustang1989 on Wednesday, August 31, 2016 4:23 PM

Dan: She's lookin sharp man! It's kind of cool to see something bone stock being built from the 60's.

Seabe: Wow! Look at all that engine detail. Wowzers!!! Keep up the good work bud.

Sorry I've been away from the GB scene for a while fellas. Had alot to do and feel like I'm going under some times.


 Forum | Modelers Social Club Forum (proboards.com) 

  • Member since
    January 2014
Posted by Seabe on Friday, September 2, 2016 9:54 PM

Urgh, been learning some lessons in the dark art of masking this week. Part 2 hopefully this weekend. And what is worse - not much guidelines for masking a quite complex (on places) decal scheme's border. 

So now onto getting rid of some micro bubbles before stage two of masking - the reverse mask! Where some white sections clearly have to be redone. You can see where this is heading... Bang Head

If I haven't said it before - I never liked masking! 

  • Member since
    March 2012
  • From: Corpus Christi, Tx
Posted by mustang1989 on Wednesday, September 7, 2016 5:21 AM

I hear you on that Seabe. I'm never sure what my results are going to turn out like. lol

Looking forward to the progress.


 Forum | Modelers Social Club Forum (proboards.com) 

  • Member since
    March 2012
  • From: Corpus Christi, Tx
Posted by mustang1989 on Thursday, September 8, 2016 8:54 PM

It looks as though I'm about done with this build but there's still some ways to go. I'd say I still have about a month left here.

Image


 Forum | Modelers Social Club Forum (proboards.com) 

  • Member since
    March 2012
  • From: Corpus Christi, Tx
Posted by mustang1989 on Friday, September 9, 2016 6:01 AM

There are some areas that I need to touch up on this thing as far as the body goes but I'm at the point to where some of it I'm almost afraid to do anything with. At this stage things can get very unforgiving for me and it's either don't do anything about it or take the chance to correct it and risk starting all over again with the body. After what I've been through with this thing, starting over with the body would result in at least a 2 month set back and another set of decals that I'd have to get printed and shipped to me.

Anyways here's what's left out of that list I had a couple of pages back. I'm almost there...........

1. Rearview Mirror and “Tree”
2. Install Rear Bumper
3. Install Radiator Hoses and clamps
4. Install Body Onto Chassis
5. Install Door Handles
6. Gloss Coat Hood Assembly
7. Install filler placard for area below rear door


 Forum | Modelers Social Club Forum (proboards.com) 

  • Member since
    January 2015
Posted by MOPAR - D on Friday, September 9, 2016 7:17 AM

Looking great Joe! 

Im still working on my body to get it ready for another coat of paint. Progress will be delayed until I'm back from vacation. 

  • Member since
    March 2012
  • From: Corpus Christi, Tx
Posted by mustang1989 on Monday, September 12, 2016 7:39 AM

Lookin' forward to it Dan! Hope you have a fun and safe vacation.


 Forum | Modelers Social Club Forum (proboards.com) 

  • Member since
    March 2012
  • From: Corpus Christi, Tx
Posted by mustang1989 on Monday, September 19, 2016 8:32 AM

Well folks, I ended up finally finishing this thing. To go back to when I was a kid I was drawn to the Revell Street Demons line-up and ended up buying them all. I only built three of them back then and this was one of them. It's funny how when the hobby follows us into adulthood we see how much we either overlooked or just how bad the kits were back then. But hey, we were having fun back then right? lol . I took this project on in January of this year and although this kit does suck, I've had a great amount of fun with it and learning opportunities left and right over the course of the last 8-1/2 months. Although I was drawn to this car as a kid (and still am), as an adult I didn't care for the gasser stance for a "street" car and wanted something a little more jazzed up and to have some fun with it. Sooooooo, I created a dropped down party mobile. I mean .............with all that room in the back the possibilities were endless. I started out with my eyes being a lot bigger than 1.) my ability and 2.) what there was room for back there. Over the course of the build while my vision/ goal was always the same, I had to modify the ideas somewhat and my abilities got a tune up but I'm very happy with the end result.
I won't go over every detail of the build but I will say that there were 7 different kits and a lot of aftermarket involved in its making. What really blew me away was the fact that there weren't any headlight bezels/ buckets (and there still aren't to this day with the latest release of this kit!!!  ) and the hood hinge cut outs at the back of the engine compartment just make you want to slap the original kit engineers.
I'd like to thank all of you guys in this Group Build who commented/ encouraged me throughout this creation. You guys are da bomb. :bow:

The kit:
Image

Glamour shots:
Image

Image

Image

Image

Image

Image

Image

Image

Image

Image

Image

and then there's what's inside:

Image

Image


 Forum | Modelers Social Club Forum (proboards.com) 

  • Member since
    January 2014
Posted by Seabe on Monday, September 19, 2016 11:47 AM

Awesome Mustang! I loved what you did to the interior from the beginning! Really liked those detail. And the gloss you got o this thing is super. 

Starting to sort out my paint/masking mishap. Ran my marathon yesterday, so with recovery week coming up, I'm hoping to show some progress soon... if my secret misstress Sleep does not lure me away! 

  • Member since
    May 2009
  • From: Poland
Posted by Pawel on Monday, September 19, 2016 3:50 PM

Hello Joe!

That Chevy is really beutiful! Nice work on the chassis and on all those little details you have put there!

I for myself had a really long break from my bus, but picket up the work again some time ago and I have another update for you. I have also started a separate thread for the bus here:

http://cs.finescale.com/fsm/modeling_subjects/f/4/t/172395.aspx

And here's the update:

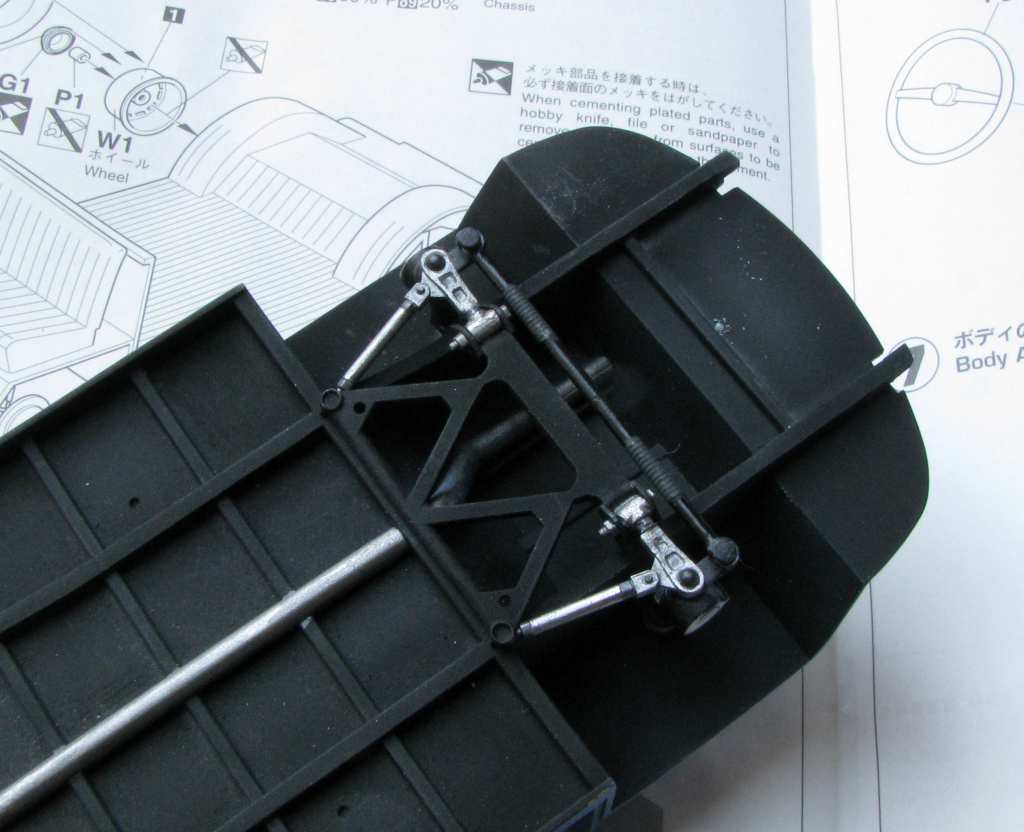
I have finally completed the front suspension - I had to build the horizontal arms from scratch. I painted them babies using Mr. Hobby metalizers:

I have also strted to work on the interior - it's pretty bare in the Hasegawa model, only has the shifter stick, so I have scratchbuilt the pedals, together with a moon-style gas pedal, and an emergency brake handle:

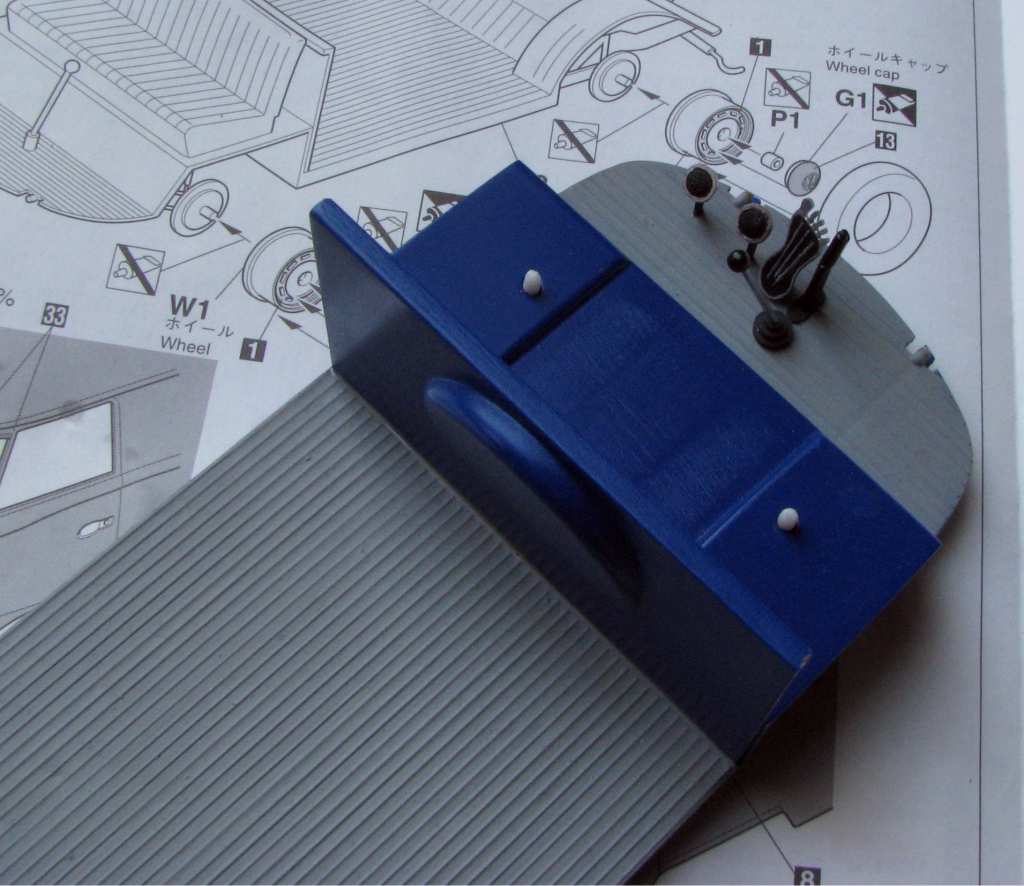
The rear deck is also painted:

The blue paint will also be the exterior colour.

By the way, can somebody help me? I'm painting the body using Motip car paint from a spray can. I had some minor scratches on the roof from sanding, so I have put a coat of grey primer on the roof and it kinda increased the scratches. So I have sanded it and recoated, maybe three times now and the scratches keep coming back after the paint dries... How can I help that?

Thanks for reading and have a nice day

Paweł

All comments and critique welcomed. Thanks for your honest opinions!

www.vietnam.net.pl

  • Member since
    March 2012
  • From: Corpus Christi, Tx
Posted by mustang1989 on Monday, September 19, 2016 6:23 PM

That looks really good so far Pawel and I'm glad you're back in here building this jewel.  As for the scratches.............if you don't already have the sanding kit then try to get a fine sanding kit that's got sanding pads that range from 3200 grit all the way up to 12000 grit. Start with the 3200 and walk up through the grit ranges-4000, 6000, 8000 and finally 12000. Get the plastic as shiny as you can stand it and THEN prime it. I have a few scratches myself but I'm finding that the smoother I've got the molded plastic , the smoother my priming and thus the smoother my paint job. Let me know if this helped you any.

Here's the kit that I'm talking about BTW:


 Forum | Modelers Social Club Forum (proboards.com) 

  • Member since
    January 2014
Posted by Seabe on Monday, September 19, 2016 10:11 PM

Pawel, I agree with what Mustang has said. To add - grey primer does exactly that for some reason - it accentuates flaws. So the trick many guys do is go grey primer, to see the flaws, smooth out. Grey primer again to make sure there's no remaining (or new!) flaws, then only white.

Disclaimer - I am not one of them, seems a bit over the top to me.

JOIN OUR COMMUNITY!

Our community is FREE to join. To participate you must either login or register for an account.

SEARCH FORUMS
FREE NEWSLETTER
By signing up you may also receive reader surveys and occasional special offers. We do not sell, rent or trade our email lists. View our Privacy Policy.