SEARCH FINESCALE.COM

Enter keywords or a search phrase below:

Going Big GB

34213 views
551 replies
1 rating 2 rating 3 rating 4 rating 5 rating
  • Member since
    January 2014
  • From: Nampa, Idaho
Posted by jelliott523 on Wednesday, January 27, 2016 12:14 PM

As always Steve, she looks GREAT! I'm always excited to see your finished projects and the bases that you create along with them!Yes

On the Bench:  Lots of unfinished projects!  Smile

  • Member since
    April 2010
Posted by Theuns on Thursday, January 28, 2016 8:42 AM

Front page udated :-)

Any one of you guys interested in a natural metal finish GB please go look at the "Metal masters" GB starting 1 Feb.

Theuns

  • Member since
    January 2014
  • From: Toronto
Posted by Rob S. on Friday, January 29, 2016 8:33 PM

Someday I'll get the 'energy' back to get onto my build...I just can't seem to get back at it Embarrassed I dunno what it is about these WNW models...they demand SO much that I can't seem to get into them. I've built several models since I started the Hansa and she still sits at the same phase as I left it. Anyway, after this 1/72 build I've got going I'm going to endeavour to get back at this!

______________________________________________________________________________


On the Bench: Nothing on the go ATM

  • Member since
    April 2010
Posted by Theuns on Friday, January 29, 2016 10:03 PM

I hear you Rob, I also have a wnw se5 waiting to be built but it looks so good in the box I keep convincing myself I am not yet good enough to build it !

As for the "long term builds" I am busy with the 1/32 Tam P-51, I see all these nice builds of them on the forum and expect myne to just fal together in a week like the other Tam kits but allas.

Every time I think I make progress there is something else to add before the cockpit area is completed. It is not a difficult kit....there is just so much of it.

I have found thet when I cet into a slump building-wize I hall out a simple quick build and finnish that just to get the sence of "I completed a model" back.


Good luck with the build


Theuns

  • Member since
    January 2014
  • From: Toronto
Posted by Rob S. on Friday, January 29, 2016 11:01 PM

Thanks for that Theuns!

______________________________________________________________________________


On the Bench: Nothing on the go ATM

  • Member since
    January 2014
  • From: Toronto
Posted by Rob S. on Tuesday, February 9, 2016 3:43 PM

Well, I dusted off the box and layed the parts out on my bench.....now....get at it!!

______________________________________________________________________________


On the Bench: Nothing on the go ATM

  • Member since
    July 2014
Posted by modelcrazy on Tuesday, February 9, 2016 4:22 PM
Hey Rob, buddy! Long time no see. I know exactly what you’re saying. I have tossed 2 kits because I was just not into them anymore. But your WNW kit is way too expensive to do that to. You'll get back into it, moving totally messing you up.

Steve

Building a kit from your stash is like cutting a head off a Hydra, two more take it's place.


http://www.spamodeler.com/forum/

  • Member since
    January 2014
  • From: Toronto
Posted by Rob S. on Tuesday, February 9, 2016 8:22 PM

I'm back in the mode now...it's a daunting kit for sure! Yes, too expensive to not build...Smile

______________________________________________________________________________


On the Bench: Nothing on the go ATM

  • Member since
    January 2014
  • From: Toronto
Posted by Rob S. on Wednesday, February 10, 2016 8:22 PM

Well, for those who remember, I started the cockpit of the W.12 'WAY' back, actually, before I moved to Ottawa, so, EXACTLY 1 year ago tomorrow. Yup, my last work posted on here was 11 Feb 15...what a coincidence. Anyway, I'm back to this monumental build and I spent the evening on the intrument panel and engine mount. I did the same pencil crayon plywood technique with clear orange and then subdued a bit with brown. The instruments are ringed with silver and brass. There's detail on the backside as well, BUT, as I'm doing the dual Spandau version, the ammo boxes covered up all the effort I made back there. I got a pic before I covered it up. Here's my evening's work:

______________________________________________________________________________


On the Bench: Nothing on the go ATM

  • Member since
    July 2014
Posted by modelcrazy on Wednesday, February 10, 2016 9:13 PM

Wow one year!  Time flies. I see your back with a vengeance my friend. 

Steve

Building a kit from your stash is like cutting a head off a Hydra, two more take it's place.


http://www.spamodeler.com/forum/

  • Member since
    January 2014
  • From: Toronto
Posted by Rob S. on Thursday, February 11, 2016 5:08 AM

Thanks Steve. Once  I get the engine done and fuselage sealed, she's as good as done. She's mostly a massive decal and uni-coloured, so, she won't take long. 

______________________________________________________________________________


On the Bench: Nothing on the go ATM

  • Member since
    January 2014
  • From: Toronto
Posted by Rob S. on Thursday, February 11, 2016 5:16 PM

Now, I'm off. The fuselage is sealed. Got the engine done. Came home early from work and got tons done. 

So, there it is. About 40 hours of work to close up the fuselage with a half dollar sized hole to see through!! Man, THIS is why I can do a dozen 1/72 planes in the same time as ONE WNW. They ARE awesome though!! More to come....

______________________________________________________________________________


On the Bench: Nothing on the go ATM

  • Member since
    July 2014
Posted by modelcrazy on Thursday, February 11, 2016 7:40 PM

That's some amazing looking work Rob.

Steve

Building a kit from your stash is like cutting a head off a Hydra, two more take it's place.


http://www.spamodeler.com/forum/

  • Member since
    January 2014
  • From: Toronto
Posted by Rob S. on Thursday, February 11, 2016 9:18 PM

Thanks Steve...the sanding on this beast is gonna take all wknd!


______________________________________________________________________________


On the Bench: Nothing on the go ATM

  • Member since
    July 2014
Posted by modelcrazy on Thursday, February 11, 2016 10:16 PM

I'm excited to see you finish this Rob. The rigging is going to look awesome. Do you know what your going to use for the rigging? 

Steve

Building a kit from your stash is like cutting a head off a Hydra, two more take it's place.


http://www.spamodeler.com/forum/

  • Member since
    April 2010
Posted by Theuns on Thursday, February 11, 2016 10:19 PM

Please explainf to me (in simple terms ;-)   how you do your "wood work" 

I need to start on my Wnw se5 at some stage but my lack of skills in this dept has kept me back ...


Thanx


Theuns

  • Member since
    January 2014
  • From: Toronto
Posted by Rob S. on Friday, February 12, 2016 6:02 AM

Theuns...Check page 6. I did a plywood tutorial there last year. There's two parts, one at the beginning of the page then another, more detailed bit, lower down. You'll recognize it when you see it, but, LOL, it's been awhile!!

Steve..I am getting off easy with rigging. This plane only has an X at the end of each wing between the uprights. I will be using Gaspatch turnbuckle and EZ Line


______________________________________________________________________________


On the Bench: Nothing on the go ATM

  • Member since
    January 2014
  • From: Toronto
Posted by Rob S. on Friday, February 12, 2016 9:44 PM

Spent my evening sanding! LOTS of joints to sand, all super flat surfaces too, just to make it that much more challenging. Done though, I'm going to complete the entire fuselage, me thinks, prior to installing the wings (despite the instructions). I did that for my Roland build and I had way more control over the final dual wing install. Makes me wish, now, that I would have taken the mono-wing version (W.29). 

______________________________________________________________________________


On the Bench: Nothing on the go ATM

  • Member since
    January 2014
  • From: Toronto
Posted by Rob S. on Saturday, February 13, 2016 9:17 PM

Didn't get too much done today. I did, however get the cooling jacket on one Spandau done.

And, here's why. The kit does come with molded versions, but, the ones with the brass jacket just pop, BUT, you only get one chance to get it right!!

______________________________________________________________________________


On the Bench: Nothing on the go ATM

  • Member since
    April 2010
Posted by Theuns on Saturday, February 13, 2016 10:30 PM

Big improvement!

  • Member since
    July 2014
Posted by modelcrazy on Saturday, February 13, 2016 10:59 PM
Nice work Rob, whenever I try to bend PE into something round it comes out crooked with square sides, no matter what I use to bend it.

Steve

Building a kit from your stash is like cutting a head off a Hydra, two more take it's place.


http://www.spamodeler.com/forum/

  • Member since
    January 2014
  • From: Toronto
Posted by Rob S. on Sunday, February 14, 2016 7:33 AM

Steve, you know what I used to bend this jacket? The molded Spandau...it is the exact size and shape of what you are trying to bend. 

______________________________________________________________________________


On the Bench: Nothing on the go ATM

  • Member since
    January 2014
  • From: Toronto
Posted by Rob S. on Sunday, February 14, 2016 9:15 PM

Both Spandaus mounted on the sides of the fuselage. Engine cowling, rad and tail planes installed. Also got the bottom observer windows masked. Getting some progress. I'm leaving for a few days of skiing, so, I'll start some painting of the fuselage when I return on Wednesday. 


______________________________________________________________________________


On the Bench: Nothing on the go ATM

  • Member since
    July 2014
Posted by modelcrazy on Sunday, February 14, 2016 11:03 PM

Looks great Rob. Have a safe ski trip. 

Steve

Building a kit from your stash is like cutting a head off a Hydra, two more take it's place.


http://www.spamodeler.com/forum/

  • Member since
    January 2014
  • From: Toronto
Posted by Rob S. on Tuesday, February 16, 2016 9:01 PM

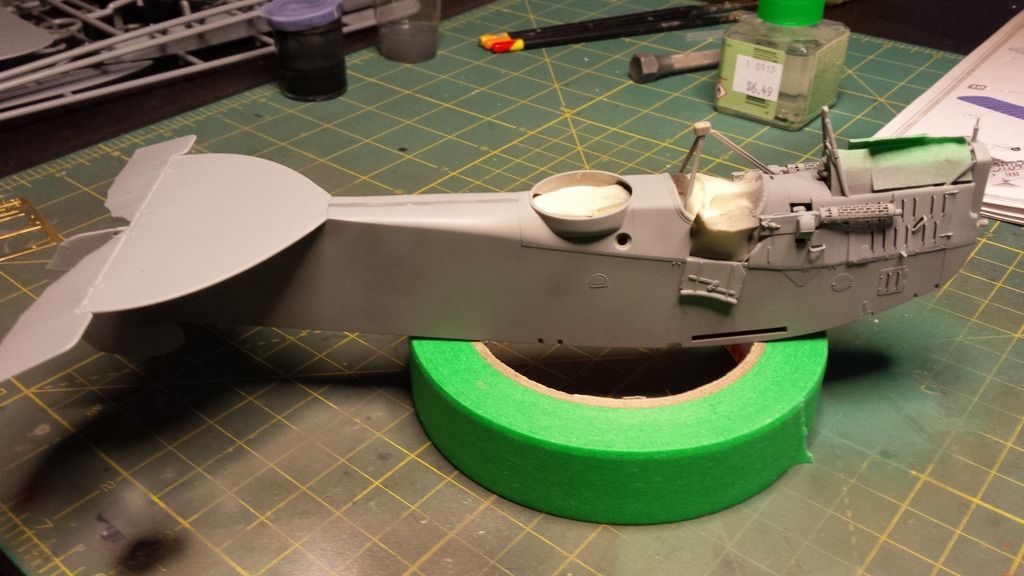
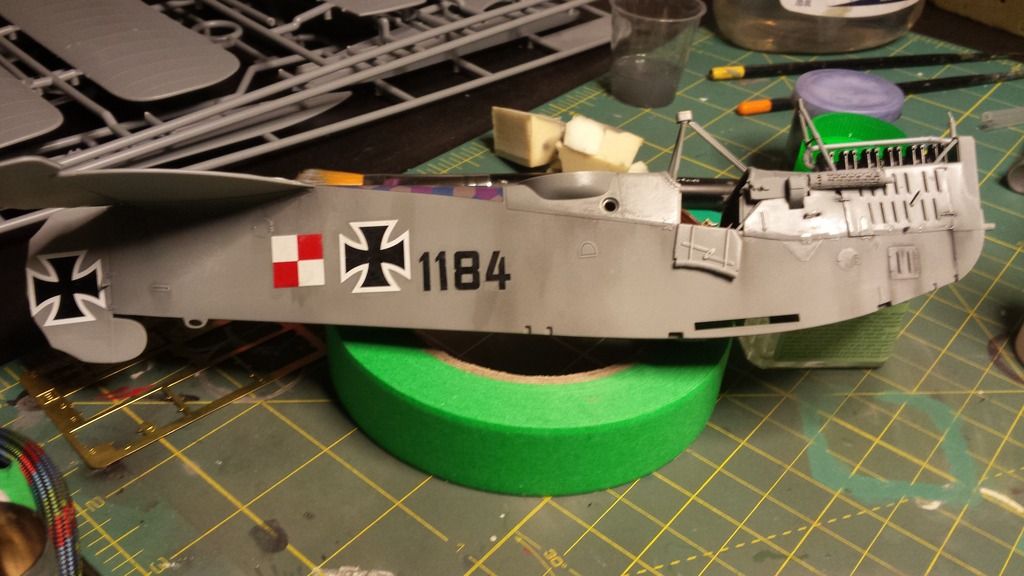
I'm back. Ski trip was a bust...rain!! Then massive snow storm hit while on the drive back...oh, well, we had a good go last night. Anyway, I've been back at the HB. Interestingly, Tamiya XF83 is the EXACT colour of the plastic, so, you can't tell I laid down several coats. You can tell it's painted by the guns (they are no longer brass Stick out tongue).


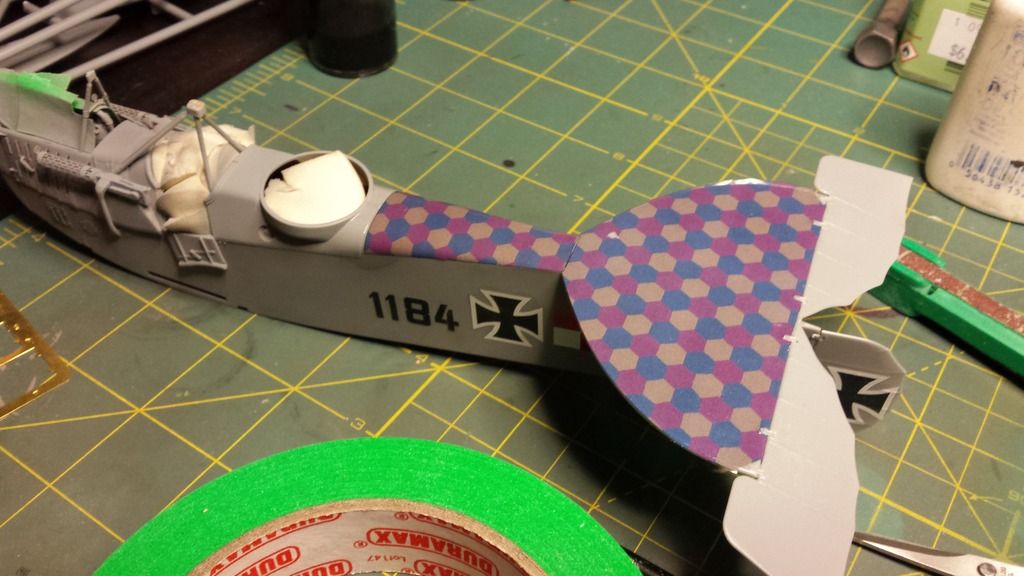
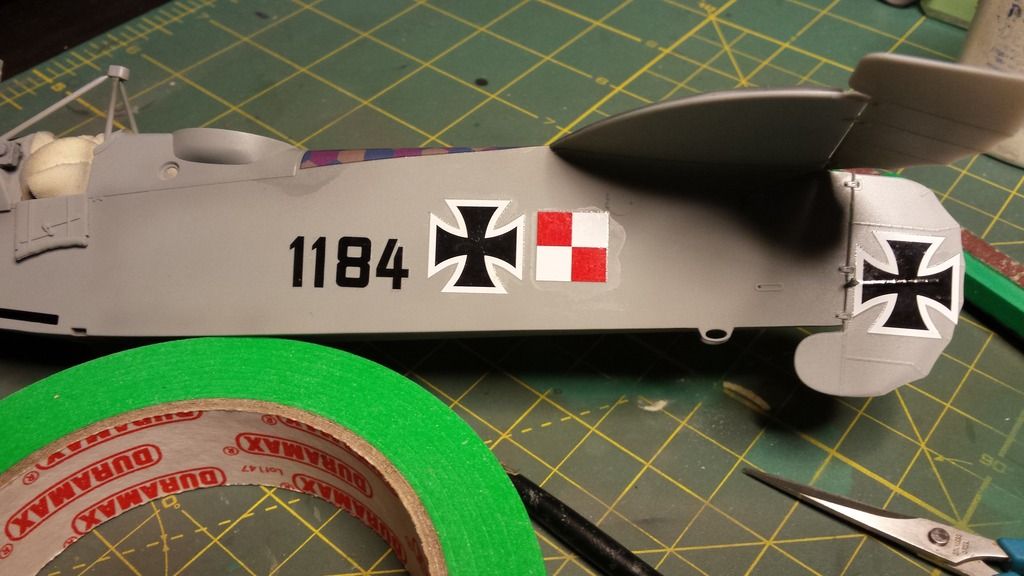
Got all the fuselage decals on. Had to set them with future. Anyway, went well. The rear tail plane is massive and took a huge decal:


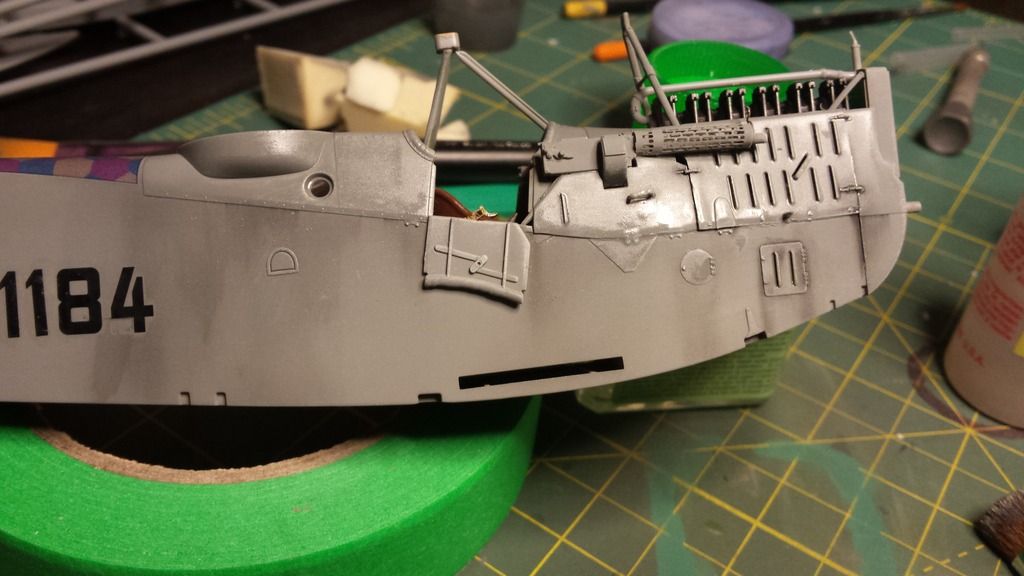
Some light artist oils provided some delineation of the mono colour and also some staining. Also, the fuselage is plywood with metal top, so, I kept the plywood sides matt and the top I brush applied future to give it some slight sheet (metal look):

______________________________________________________________________________


On the Bench: Nothing on the go ATM

  • Member since
    July 2014
Posted by modelcrazy on Tuesday, February 16, 2016 9:55 PM

That is looking amazing Rob. Sorry about the ski trip, kinda work here in Boise as well. We'll warm for February at least. 

Steve

Building a kit from your stash is like cutting a head off a Hydra, two more take it's place.


http://www.spamodeler.com/forum/

  • Member since
    January 2014
  • From: Toronto
Posted by Rob S. on Wednesday, February 17, 2016 5:54 AM

Thanks Steve...I'd like to have this plane done by next weekend or so...we'll see. The upper wings are all decal, so, no painting..I may be able to get 'er done.

______________________________________________________________________________


On the Bench: Nothing on the go ATM

  • Member since
    January 2014
  • From: Toronto
Posted by Rob S. on Wednesday, February 17, 2016 8:20 PM

The massive decals on the wings are going to take quite a while to set. I'm not doing anymore tonight while they set up. Most of the fuselage is now done.


______________________________________________________________________________


On the Bench: Nothing on the go ATM

  • Member since
    July 2014
Posted by modelcrazy on Wednesday, February 17, 2016 9:35 PM
It couldn’t have been fun sitting behind the exhaust like that. Those are some big decals, looking good my friend. Yes

Steve

Building a kit from your stash is like cutting a head off a Hydra, two more take it's place.


http://www.spamodeler.com/forum/

  • Member since
    January 2014
  • From: Toronto
Posted by Rob S. on Thursday, February 18, 2016 7:08 AM

DISASTER...the decals did not set and crumbled!! I'm offline on this build Angry

I'm going to have to source AM decals to finish it off...not happy. I did the exact same thing as my Roland and this time it did not work..don't know why...

______________________________________________________________________________


On the Bench: Nothing on the go ATM

JOIN OUR COMMUNITY!

Our community is FREE to join. To participate you must either login or register for an account.

SEARCH FORUMS
FREE NEWSLETTER
By signing up you may also receive reader surveys and occasional special offers. We do not sell, rent or trade our email lists. View our Privacy Policy.