SEARCH FINESCALE.COM

Enter keywords or a search phrase below:

Mustang Build

80026 views
1582 replies
1 rating 2 rating 3 rating 4 rating 5 rating
  • Member since
    December 2013
Posted by CodyJ on Monday, October 5, 2015 6:57 PM

Sounds Great Larry!  Great work my friend!

  • Member since
    September 2014
Posted by rooster513 on Tuesday, October 6, 2015 6:47 AM

Great build Larry! Nice work with the paint and the setup for pictures you use always looks so cool!

-Andy

  • Member since
    July 2013
Posted by lzdaily@comcast.net on Tuesday, October 6, 2015 7:07 PM

Thanks for the kind words, CodyJ and Andy. Much appreciated.

Here's the completed build. I did add the drop tanks. Part of what I'm doing with my Mustang series is trying to show the different variations that occurred in the Mustang line. I added this build to the list because I realized that none of my planned aircraft included the Malcolm canopy. I painted these drop tanks Neutral Gray because my previous build used "plain metal" and my understanding is that both were used. Anyway, it's been a fun build.

Best to all,
Larry


  • Member since
    September 2014
Posted by rooster513 on Wednesday, October 7, 2015 6:51 AM

Sounds like a great idea Larry! You'll have to post some pics when you get your Mustang series done. It'd be cool to see all the variations lined up together! On to the next!Big Smile

-Andy

  • Member since
    October 2013
Posted by infofrog on Wednesday, October 7, 2015 7:04 PM

Can I stil ljion the Mustang build ?

Here is my start build log

http://cs.finescale.com/fsm/modeling_subjects/f/2/t/168137.aspx


Thanks

Rick

  • Member since
    July 2014
Posted by modelcrazy on Wednesday, October 7, 2015 9:25 PM

lzdaily@comcast.net
show the different variations that occurred in the Mustang line

Well then, I guess I can put you down for a P-51 A and B Wink. Seriously, great job on your Stangs. Great addition to the wall.

Infofrog,

We would be glad to welcome you to our merry mob of Mustang misfits. That looks like it will be a great kit. I'll put you down on the roster.


Steve

Steve

Building a kit from your stash is like cutting a head off a Hydra, two more take it's place.


http://www.spamodeler.com/forum/

  • Member since
    July 2013
Posted by lzdaily@comcast.net on Thursday, October 8, 2015 5:35 AM

modelcrazy
Well then, I guess I can put you down for a P-51 A and B Wink. Seriously, great job on your Stangs. Great addition to the wall.

Steve, I've already built an A-36, a P-51, and a P-51A before I joined the Group Build. You can see those at my Mustang Project page at http://www.larryzdaily.net/mustangs.html

If it's OK, I would like to continue with an Accurate Miniatures P-51B.

Best to all,
Larry

  • Member since
    July 2014
Posted by modelcrazy on Thursday, October 8, 2015 8:27 AM

lzdaily@comcast.net
If it's OK, I would like to continue with an Accurate Miniatures P-51B.


Of course it would be OK. I'll put you down. Looking at your link, it looks like you also have 2 D's and a K coming up....Cool!

Steve

Building a kit from your stash is like cutting a head off a Hydra, two more take it's place.


http://www.spamodeler.com/forum/

  • Member since
    September 2011
Posted by fightnjoe on Thursday, October 8, 2015 10:20 PM

Ten steps backwards and then one forward.  

Had some big issues trying to get this mocked up for pictures this time.  Something was wrong.  I had a hard time putting my finger on it.  After much frustration and in a fit of anger I removed all the parts (not so gently) and then got down to the basics.  After some study I noticed the firewall was glued off kilter.  i separated and then reglued and what do you know it seemed to work.  

So after the big mess I again used white glue to mock up what little progress I have.  

The sidewalls of the fuselage are coming together.  This was the original progress I wanted to show.  The radio equipment and fuel tank still seem off to me.  A couple of pictures just to show the rework.  I did take the opportunity to rework the seat as well.

...
...

Now make no mistake I have more work to do on the pit.  I also have an alternative to the copper wire that I tried to use.  But I really believe that this time I can progress without the setback.

All comments, critiques, and criticism are encouraged.


Joe

Veterans,

Thank You For Your Sacrifices,

Never To Be Forgotten

Where you can find me:

Workbench on FaceBook  Google Plus  YouTube

  • Member since
    July 2013
Posted by lzdaily@comcast.net on Saturday, October 10, 2015 7:11 PM

All, I've been fooling around trying to get some different photos of my F-6B while I try to figure out how to fit the Aires P-51B cockpit set (meant for the Tamiya kit) into my AM P-51B. Here's the new photo. I think this one might look good in the gallery, Cody.

Best to all,
Larry

  • Member since
    December 2013
Posted by CodyJ on Sunday, October 11, 2015 6:51 PM

lzdaily@comcast.net

All, I've been fooling around trying to get some different photos of my F-6B while I try to figure out how to fit the Aires P-51B cockpit set (meant for the Tamiya kit) into my AM P-51B. Here's the new photo. I think this one might look good in the gallery, Cody.

Best to all,
Larry


Super Larry!  That photo looks fantastic!!!   Very Clean build and a great background to boot!   Excellent work my friend!!! :)  Will post your photo in the gallery right away!

  • Member since
    July 2013
Posted by lzdaily@comcast.net on Monday, October 12, 2015 5:19 AM

CodyJ

Super Larry!  That photo looks fantastic!!!   Very Clean build and a great background to boot!   Excellent work my friend!!! :)  Will post your photo in the gallery right away!

Thanks for the kind words, Cody.

  • Member since
    July 2014
Posted by modelcrazy on Monday, October 12, 2015 8:59 AM
Joe, the pit is looking great Yes Have you considered using solder for your tubing?

Steve

Building a kit from your stash is like cutting a head off a Hydra, two more take it's place.


http://www.spamodeler.com/forum/

  • Member since
    October 2013
Posted by infofrog on Monday, October 12, 2015 10:43 AM

This is my first plane bluid . I have ? 

what alclad colors do I need for the aluminum color ? 

I have reg. Aluminum color . Is this the only color I need ?

thanks 

rick the 

  • Member since
    July 2014
Posted by modelcrazy on Monday, October 12, 2015 2:51 PM

infofrog
This is my first plane bluid . I have ?  what alclad colors do I need for the aluminum color ?  I have reg. Aluminum color . Is this the only color I need ?


The Aluminum is fine for a service aircraft or even DurAluminum, they weren't supper shinny like the airshow birds. One thing though, the wings and horizontal tail surfaces were "puttied, sanded, and then painted with an Aluminum Dope", the control surfaces were fabric, so you can paint them accordantly. I've heard that floquil old silver is a good match for the Aluminum Dope although I don't have any myself. I'm going to try the simi matt aluminum for my wings, hopefully that will work out well.
Maybe one for the other guys have some other suggestions.

Steve


Steve

Building a kit from your stash is like cutting a head off a Hydra, two more take it's place.


http://www.spamodeler.com/forum/

  • Member since
    October 2013
Posted by infofrog on Monday, October 12, 2015 3:02 PM

Thanks 

rick 

  • Member since
    October 2013
Posted by infofrog on Monday, October 12, 2015 5:30 PM

Thank again

Rick

  • Member since
    September 2011
Posted by fightnjoe on Monday, October 12, 2015 8:36 PM

modelcrazy
Joe, the pit is looking great Yes Have you considered using solder for your tubing?


MC I have yes but the only solder I have is much too big.  I do have an alternate plan though.  BTW just noticed where you are from.  Not too far South of me buddy.  In the grand scheme of things we could be considered neighbors.


Joe

Veterans,

Thank You For Your Sacrifices,

Never To Be Forgotten

Where you can find me:

Workbench on FaceBook  Google Plus  YouTube

  • Member since
    July 2014
Posted by modelcrazy on Tuesday, October 13, 2015 7:58 AM

fightnjoe
 BTW just noticed where you are from.  Not too far South of me buddy.  In the grand scheme of things we could be considered neighbors.

Where are you at?

Steve

Building a kit from your stash is like cutting a head off a Hydra, two more take it's place.


http://www.spamodeler.com/forum/

  • Member since
    April 2010
Posted by Theuns on Tuesday, October 13, 2015 10:14 AM

Seat chipped with hairspray tecnique, engine basically done, cockpit floor done, can't see it in the pic but the black floorboards have been "chaffed" down to raw wood infront of the rudder pedals.
Firewall and oil tank weathered with oil wash to make the detail "pop" a little

Image

Theuns

  • Member since
    July 2014
Posted by modelcrazy on Tuesday, October 13, 2015 10:21 AM

That looks sweet.  How much detail are you going to put on the engine? 

Steve

Building a kit from your stash is like cutting a head off a Hydra, two more take it's place.


http://www.spamodeler.com/forum/

  • Member since
    April 2010
Posted by Theuns on Tuesday, October 13, 2015 10:56 AM
All of it ;-) Theuns
  • Member since
    July 2014
Posted by modelcrazy on Tuesday, October 13, 2015 11:02 AM

Sweet! Oil lines, plug wires, do you have an example where you work?

Steve

Building a kit from your stash is like cutting a head off a Hydra, two more take it's place.


http://www.spamodeler.com/forum/

  • Member since
    April 2010
Posted by Theuns on Tuesday, October 13, 2015 11:14 AM
There is still some duckting/hoses to go on after it goes onto the mounds. No in my workplace we have no mustprangs but allot of T-6's. Theuns
  • Member since
    September 2003
  • From: Northern hemisphere - most of the time-
Posted by blkhwkmatt on Tuesday, October 13, 2015 2:17 PM

Theuns,

That is looking great.  Cant wait to see what the completed pit will look like.  keep up the great work.

Quidquid latine dictum sit, altum videtur!!! - Anything said in Latin sounds profound!


  • Member since
    September 2011
Posted by fightnjoe on Tuesday, October 13, 2015 10:23 PM

modelcrazy


fightnjoe
 BTW just noticed where you are from.  Not too far South of me buddy.  In the grand scheme of things we could be considered neighbors.


Where are you at?


I am in the Notheastern corner of Washington.  I have a sister living in Nampa.  


Joe

Veterans,

Thank You For Your Sacrifices,

Never To Be Forgotten

Where you can find me:

Workbench on FaceBook  Google Plus  YouTube

  • Member since
    April 2010
Posted by Theuns on Tuesday, October 13, 2015 10:56 PM
I was told the seat weathering is to heavy so I will have to repaint it and weather more lightly. Theuns
  • Member since
    January 2015
Posted by BrandonD on Wednesday, October 14, 2015 12:18 AM

Larry - Great job! I think you nailed the weathering on that, and I like it with the tanks.

Joe - It's fascinating to watch your work come together. I have always been intrigued by cutaways ever since the box art on old Monogram kits like the He-111 showed the sides cut away, and you do a great job.

Theuns - I really like the progress so far. It's headed in a great direction.

-BD-

  • Member since
    January 2015
Posted by BrandonD on Wednesday, October 14, 2015 12:35 AM

I've been pretty busy lately, and I've been a little scattered on my builds, but this actually marks one year since returning to this hobby, and I am having more fun than ever.

One of the things that kept me busy was work, but others were play, including the opportunity to meet legendary ace Bud Anderson. He's well in his 90s and is totally with it mentally. He's funny, kind and a great guy to talk to. I picked up his memoir and had him sign it. It was a great day.

As for my P-51, I didn't tell him I am not building Old Crow (I believe Eduard is releasing a 1/48 P-51 family, and I plan to make one of his planes out of that kit). Here is my progress on Col. John Meyer's Petie 2nd.

I am building it with the 1/48 Tamiya kit, and at last update, I had the cockpit mostly done. Here it is together with the cowling painted Humbrol French Blue enamel over a Tamiya flat black preshade.
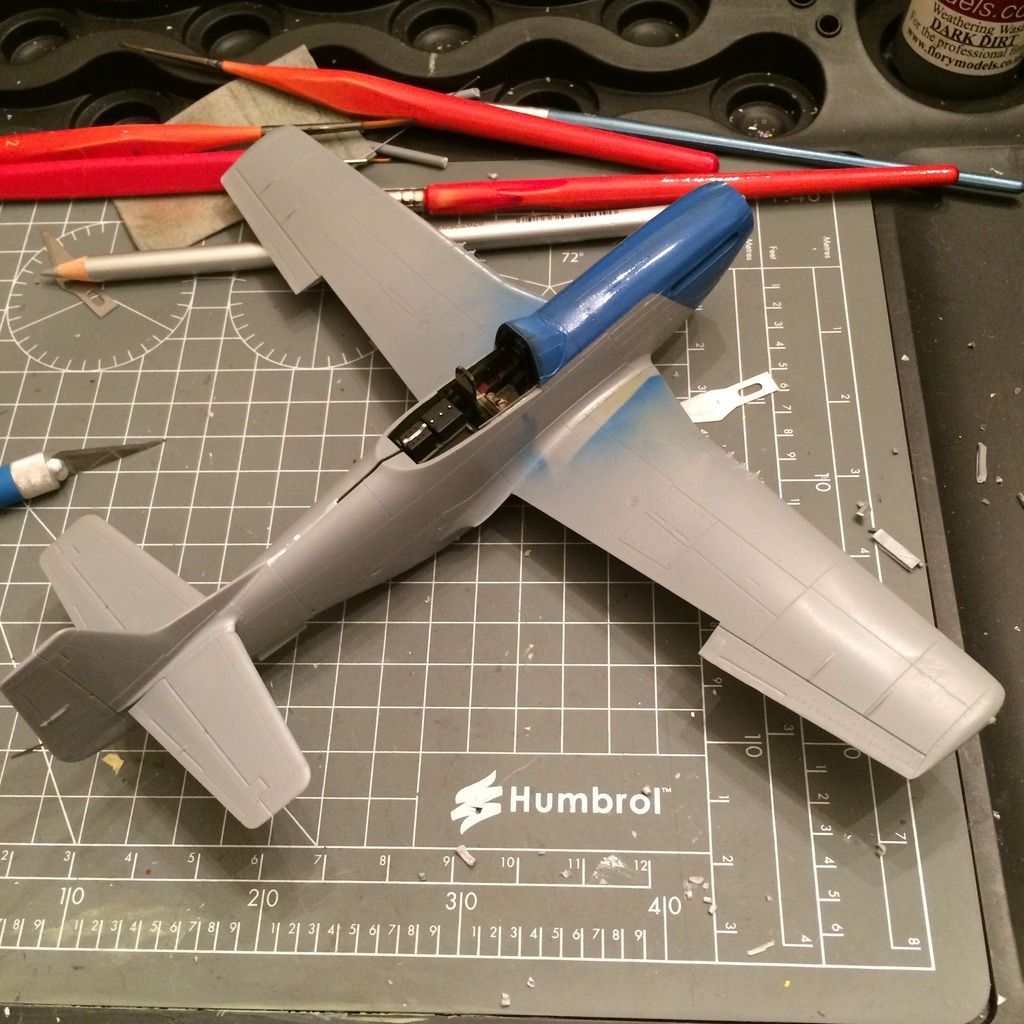
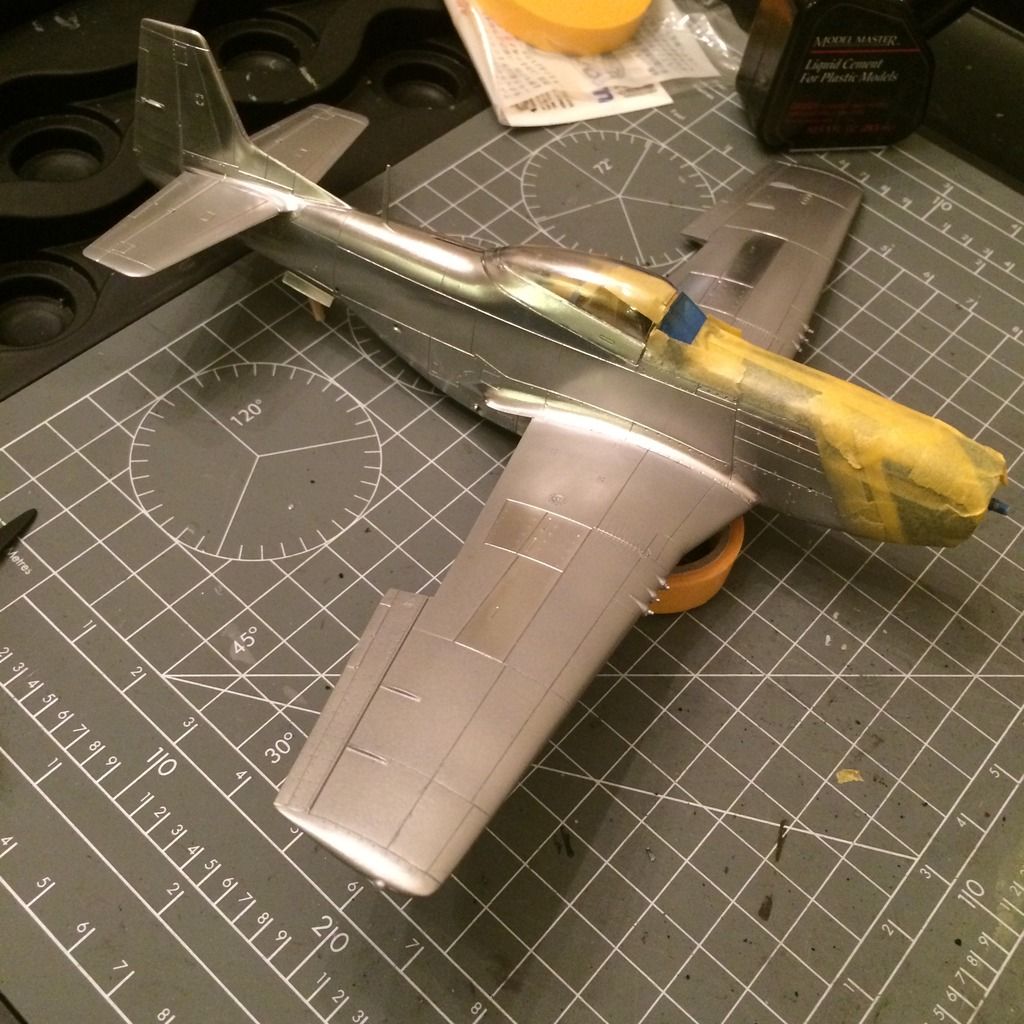
Here are some progress pics as I played with Alclad. I first sprayed Alclad Aqua Gloss on the whole model. As an acrylic, if left with enough time to dry, it doesn't melt under the Alclad lacquer paints like their black base does for some (I have had decent results with the black base, but wanted to try aqua gloss).

I sprayed the wings Alclad Duraluminum, and then coated it with Aqua Gloss, masked the wings and rudder, leaving the gun access panels uncovered, and then sprayed airframe aluminum. Once that was done, I coated with aqua gloss and sprayed magnesium on the piece behind the exhaust, then sprayed a couple panels with polished aluminum.

I will say that I am not 100 percent thrilled with the panel variation, as it looks too stark to me for this plane. (Not to mention the airframe aluminum is probably tooshiny for Petie 2nd). I do have some techniqes I want to practice with this now that I know I can work with a clear coat as a base for the shiny lacquers.
With the decals, I am tired of being burned by thick Tamiya decals, and this isn't one of their kits that comes with nice ones, so I bought the Eagle Strike set for P-51Ds. It's printed by Cartograf, and the decals went down flawlessly.

A note on applying decals over Alclad: I previously painted a plane polished aluminum over the alclad black base and liked it. Alclad says you can put decals down right over the metals, which is true. However, when I clear-coated with Alclad Klear Kote, it changed the color of the metal, but the original color was still visible under the carrier film. It wasn't silvering, but it wasn't good.

This time around, I clear coated the whole thing with aqua gloss, applied decals, and clear coated again with aqua gloss. Despite the sheer number of coats on the model (There are 6 coats on the gun bay doors), they are thin enough that panel line washes still work great).

TL;DR - Clear coat it before the decals, then clear coat it again.
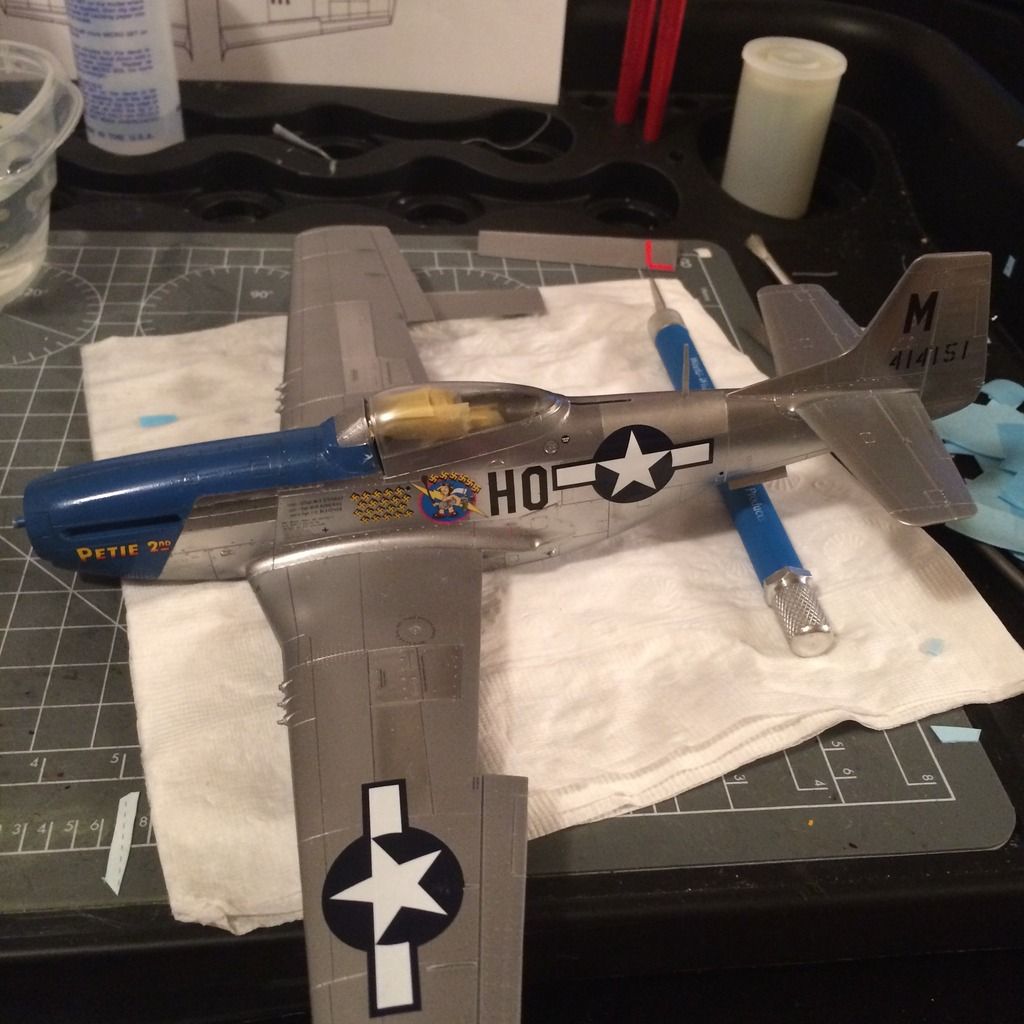
I have since applied a Flory grime panel line wash. It's a brownish color and doesn't show too much contrast, but I am going for subtlety on it here. I plan to do some minor weathering on it before finishing it.

Sory for the long post. I guess it's been a while since I did any work on this one. Thanks for reading (or at least looking at the pics).

-BD-

  • Member since
    September 2014
Posted by rooster513 on Wednesday, October 14, 2015 6:37 AM

Looks fantastic BD! Looking forward to seeing it all finished!

-Andy

JOIN OUR COMMUNITY!

Our community is FREE to join. To participate you must either login or register for an account.

SEARCH FORUMS
FREE NEWSLETTER
By signing up you may also receive reader surveys and occasional special offers. We do not sell, rent or trade our email lists. View our Privacy Policy.