SEARCH FINESCALE.COM

Enter keywords or a search phrase below:

Mustang Build

80032 views
1582 replies
1 rating 2 rating 3 rating 4 rating 5 rating
  • Member since
    June 2010
Posted by 5-high on Monday, February 8, 2016 4:33 PM

 hi guys 

temp looking good , that blue is nice Yes.

thanks modelcrazy ,bvallot,s right i did go over board a bit , thats ok though , after i decal it i,ll tone everything down by shading and weathering it . the one thing i did forget was to pre shade . thats why i ran the silver in the key panel lines , that all will disapear once i start shading . starting this new technique one,s bound to over do it ,,,ah ah lolWhistling

trying out new stuff and technique,s . after 41 years off and on .im still learning new way,s of this wonderfull hobby.Big Smile

5-high 

  • Member since
    June 2013
Posted by bvallot on Tuesday, February 9, 2016 10:37 PM

Yeah, no sweat!  I try something new each build.  Keeps it exciting. =]  Preshading is certainly a working method, but I've been finding it's not the only way to go about it.  So if you haven't done it by now, there's still plenty of things to do.  Some postshading can fix up whatever you have in mind.  If you had any specific questions, just ask.

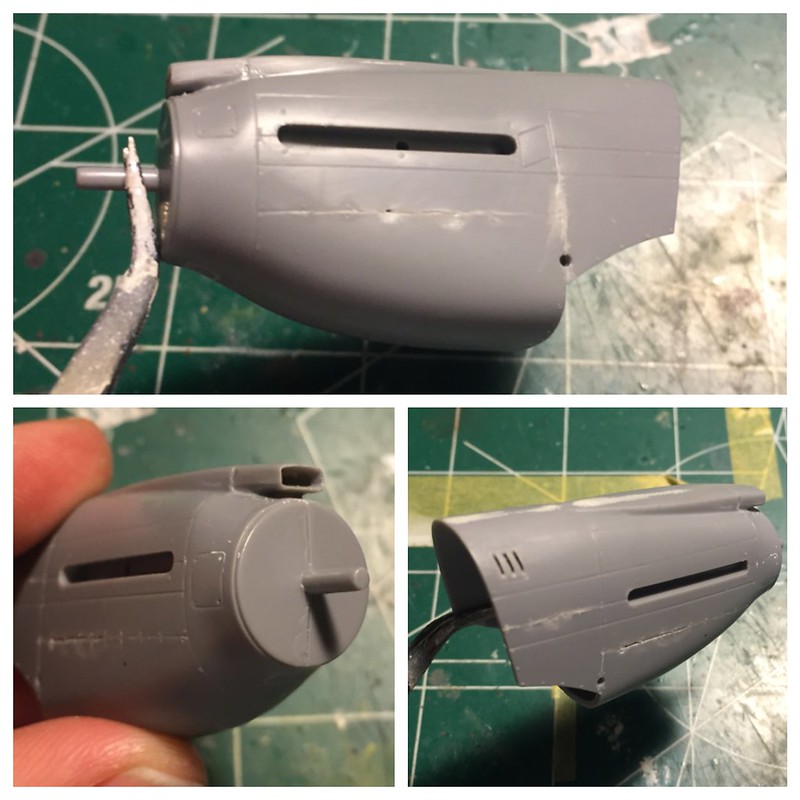
Speaking of new...I'm finally beginning my build and I'm starting off a little different.  I'm first building the AccuMin P-51A with JJ England.  This time around I'm sanding the inside wall of the cowling paper thin so I can try to replicate what you see with the cowling pieces bending and warping after being replaced so many times.  With a new blade, I'm cutting very carefully into a couple of spots as seen in reference photos.  I'll have to go back and tweak this a little but I feel pretty good about it.  What you see now is just getting started.  I'll show what I've fixed up after.  I've also opened up the vent on the right cowl and thinned the intake for the carb to bring it closer to scale.

 Untitled by Britt Vallot, on Flickr

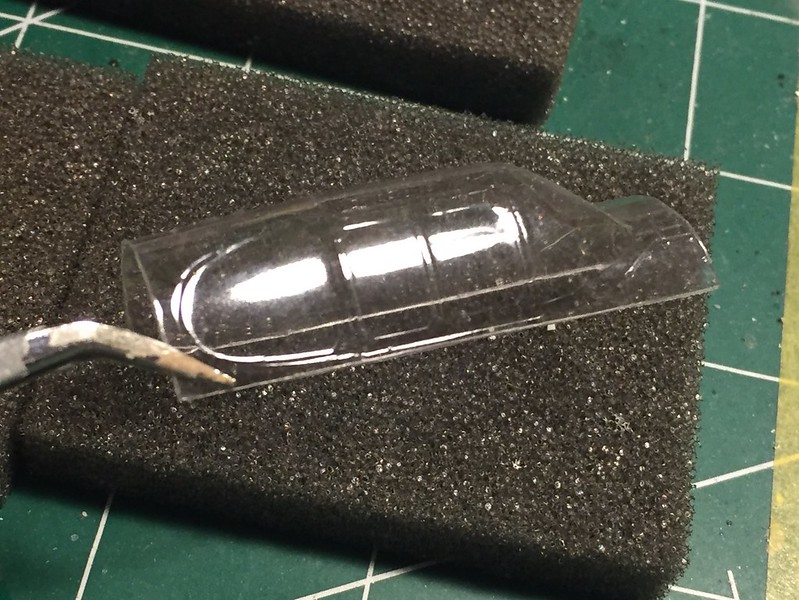
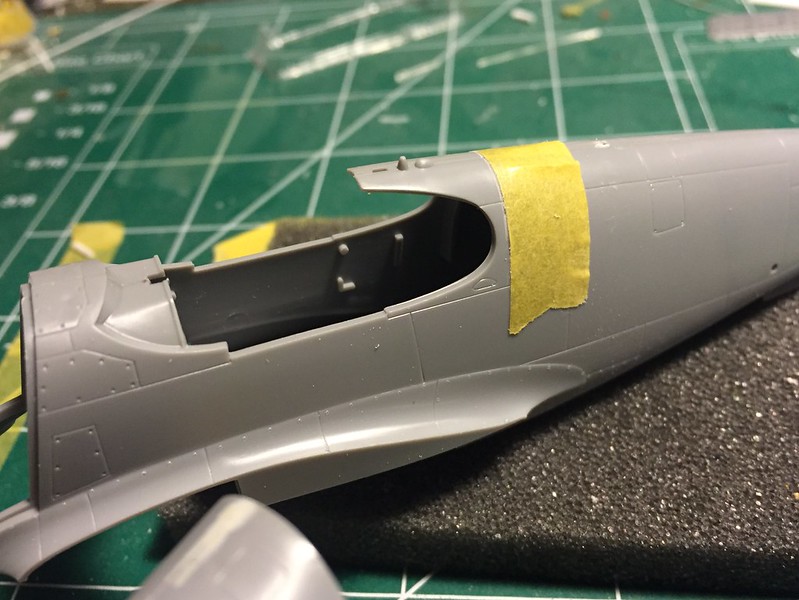
Dropping a Squadron canopy in on this one doesn't seem as easy as just "dropping it in."  Releasing it from the mold wasn't too bad.  I am getting a little better at this.  It shouldn't be rushed, but somehow I always do.  This time was nearly perfect.  I used the canopy over the top of the fuselage to make a mark for where I'll need to cut.  This was taped off and marked with my new blade.  I hope to not remove too much from the kit, but any fit issues with be filled with plastic strip. Fingers crossed. =] Still trying to figure out whether or not I want to open up the canopy.

 Untitled by Britt Vallot, on Flickr

 Untitled by Britt Vallot, on Flickr

 Untitled by Britt Vallot, on Flickr

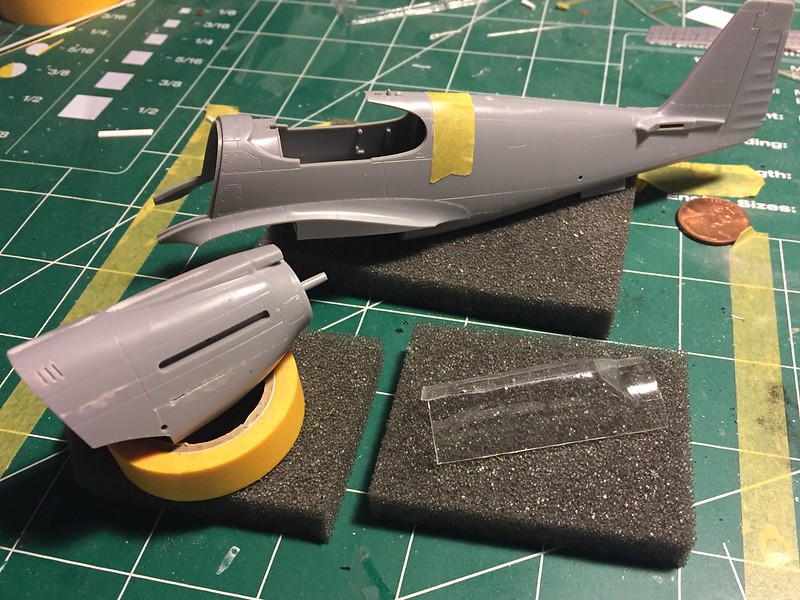
That's all for now.  Soon to be scratching out the cockpit controls and radio equipment.

On the bench:  

Tamiya F4U-1  Kenneth Walsh


  • Member since
    June 2010
Posted by 5-high on Wednesday, February 10, 2016 12:24 AM

Nicely done with the intake and vents. .you got your work cut out for ya . (Pardon the pun )Wink....it'll be interesting to see the final product . Me I'm waiting for the clear to cure. . (About 48 hours will do )..before I start to decaling and shading down the chipping. .I'm thinking of useing smoke for shading . PK and G codes that trumpeter printed out are a funny color ..I may have to apply them and seal,m up ..mask the letters and paint the proper sky ( tamiya ) then seal again .

5-high 

  • Member since
    January 2003
  • From: Chantilly, Virginia
Posted by CNicoll on Wednesday, February 10, 2016 6:55 PM

Wow looking good gents!  Love the blue nose Pete, and the Mustang III is always a fav. And the Mustang A looks like a great start.  What is really interesting is the wide range of aircraft we have right here.  Would love to see them on the same table.

I was also thinking the chipping might be a bit heavy, but as you pointed out, with the rest of what is going to be done it will probably get toned down.  Plus, it just matters if you like it or not!

Taking a break for a bit, then back to the Mustang!

Chris


On the bench:  Academy 1/72 B-17G 'Blue Hen Chick';  1/48 Tamiya Mustang III; Kitty Hawk 1/32 P-39. 

Completed:  1/48 Tamiya P-51D Mustang - 'Show Bird', 1/32 Dragon P-51D  Flying Tigers 'What if'; 1/32 Tamiya P-51D Big Beautiful Doll

Group build:1/48 Tamiya Mustang III; 1/48 Tamiya P-51D Show Bird

  • Member since
    June 2013
Posted by bvallot on Thursday, February 11, 2016 10:32 PM

Just a quick post to tie up the side walls to this -A.  On the left side with the trim/throttle/mixture controls, I removed the kit part of the control's box and traced out it's shape to make it a little thicker.  The kit part doesn't have it stand out quite enough on it's own. The trim controls were cut off and sanded down and fashioned out of plastic rod cut thin.  Glued this down with Tamiya ETC and I came back after they set up on the box and cut notches into the rim with a new blade.  For the right side, I cut most of this out and fashioned the radio equipment out of the Squadron Walkthrough.  From left to right is the Aircraft Electrical Box, Receiver Controls, Transmitter Controls, Radio detonator Box, Power Supply Box, and Switch Box.

 Untitled by Britt Vallot, on Flickr

It'll be a few days before I can get back to this.

On the bench:  

Tamiya F4U-1  Kenneth Walsh


  • Member since
    July 2014
Posted by modelcrazy on Friday, February 12, 2016 7:21 AM

That's alot of work that will help it stand out. Smile

Steve

Building a kit from your stash is like cutting a head off a Hydra, two more take it's place.


http://www.spamodeler.com/forum/

  • Member since
    June 2013
Posted by bvallot on Friday, February 12, 2016 3:39 PM

Thanks Steve.  Yeah, unfortunately you can't see some of the things going on here as well as you will once it's painted.  That glare is a bit bright.  I wasn't too worried about it.  I just wanted to get a few shots off before getting to bed.  =]  I'll set up a before and after. 

On the bench:  

Tamiya F4U-1  Kenneth Walsh


  • Member since
    June 2010
Posted by 5-high on Sunday, February 14, 2016 2:29 PM

Finally getting in some bench time .

Sat down and thought I'll put the rims and tires on .....then descovered I have painted the rims backwards Bang Head.

So now I'm decanting AS-12 bare metal silver. Oh well Confused...plan on decaling and pre shading ..pin wash ...I'm also thinking of trying to apply a filter technique. But that's after I seal everything up .

Will post pic.s .

P.s is it me or is it too quiet here on the GB Confused

5-high 

  • Member since
    November 2003
  • From: Naples, FL
Posted by tempestjohnny on Sunday, February 14, 2016 4:22 PM

Was able to get some paint on the Stangs.  British Dark Green


  • Member since
    November 2003
  • From: Naples, FL
Posted by tempestjohnny on Sunday, February 14, 2016 4:25 PM

While I was waiting for the paint to dry. I grabbed my Twin Mustang and figured I'd give it start.  Got quite a bit done. Not a bad kit for an oldie


  • Member since
    August 2014
  • From: Willamette Valley, Oregon
Posted by goldhammer on Sunday, February 14, 2016 5:53 PM

Got a little more done on Miss "A".  The pit is virtually done, but very simply, as would befit a racer.  Got to detail paint a couple of spots.  Fitting the coolers and radiators on one side, then have to paint the insides.  Then I can button up the fuselage, and start on the wings.  Got a bunch of holes to fill, and remove the gun nubs, and do the wing clip and metal tips, as the kit will also do a Korean vintage "K".  Will get a pic or two up on the gallery on PB before and after I button up the fuselage.


Planning on painting the major colors on her, and just using the stars and lettering, stencils, etc. from the decal sheet.

  • Member since
    June 2010
Posted by 5-high on Sunday, February 14, 2016 6:47 PM

Temp..those mustangs are looking cool ..thay look like there in close formation. 

That 82 is going to be sweet. 

Gold can't wait to see the pictures Eats

5-high 

  • Member since
    July 2014
Posted by modelcrazy on Sunday, February 14, 2016 6:49 PM

5,

Yeah sometimes all the GB's slow down some. I have noticed that only about 50% or less of the members who sign up actually start anything, let alone finish.

Tempestjohnny

There are few twins on here, yours will be another nice addition.

GH,

Did I tell you that Miss America was my younegt daughters plane? I have a picture somewhere of her sitting in the office in the pit area at the Reno Air Races. She was around 12 to 14 if memory serves, almost 20 years ago.

tempestjohnny

Steve

Building a kit from your stash is like cutting a head off a Hydra, two more take it's place.


http://www.spamodeler.com/forum/

  • Member since
    June 2013
Posted by bvallot on Monday, February 15, 2016 12:10 AM

Glad to see some paint down TempestJohnny!  Won't be long now.

On the bench:  

Tamiya F4U-1  Kenneth Walsh


  • Member since
    August 2014
  • From: Willamette Valley, Oregon
Posted by goldhammer on Monday, February 15, 2016 8:00 AM

Yes, you did, and I saw a pic of her with it (on the wing IIRC),  you put up either here or sent when we were talking about the cockpit colors.  It may end up being sent to you when done, since I don't have anywhere to put it.

Last time I was at reno was in either 69 or 70.


I know what you mean on the GB's.  I signed up for the Going Big and Berney and never got a start on the RF4 for either.

  • Member since
    July 2014
Posted by modelcrazy on Monday, February 15, 2016 9:57 AM

Oh yeah the wing, that was it. A lot of things have happened in the last year. 

Steve

Building a kit from your stash is like cutting a head off a Hydra, two more take it's place.


http://www.spamodeler.com/forum/

  • Member since
    June 2010
Posted by 5-high on Monday, February 15, 2016 9:43 PM

hello guys 

im at the stage where im ready to do that dot filftering i was thinking of doing .

bvallot im not sure of the colors that i should use , ive been looking on youtube , but all i see is the application to tank models ,,question ???...is it the same technique??. which colors do i use for the camo pattern. black ,white, maybe tan . any suggestions will be of great help

5

  • Member since
    June 2013
Posted by bvallot on Tuesday, February 16, 2016 12:05 AM

5, Remind me again what you're speaking about.  i apologize if you've already made mention of it.  These last few days have had me run into the ground a bit.


I haven't had much time except 30 min here and there at night, but here's what I have going on with the radio receivers on the bottom shelf.

 Untitled by Britt Vallot, on Flickr

Just a bit of scratch building.  There's some tweaking to do and prime/paint ought to make this come to life. =]

Not much going on here yet, but I thought I'd share anyhow.

On the bench:  

Tamiya F4U-1  Kenneth Walsh


  • Member since
    June 2010
Posted by 5-high on Tuesday, February 16, 2016 12:18 AM

Nicely done bvallot. .it look alot better than the kit part Yes

About my chipping . I've decaled her and now I'm thinking of useing the dot filter method. This will be a first for me and I'm not sure which colors to use .I've used liquid mask to redo the chipping at the wing roots .thinking about using the filter to tone down the rest ..wings ..and fuselage. .any ideas 

5-high 

  • Member since
    June 2013
Posted by bvallot on Tuesday, February 16, 2016 2:37 PM

Well 5, I've personally never used it myself before.  I've got a Gulf War tank that may get a taste of it.  I can tell you a few things that may help you make some decisions.

1. Color. Your mileage can vary here.  It all depends on what your goal is.  If you're adding weathering/snow/mud/dust what have you, then your colors will ultimately depend on the theatre the subject operated in. If you're only covering up with the same color scheme that the subject is painted then I would stick to colors closely matching it. To begin any of this requires a gloss coat.  Since you're painting over a two color (camo) surface this part may take some experimenting and some consideration.  I would pick you about 4 maybe 5 colors to pull this off.  Windsor & Newton is a common brand name that can be found at Hobby Lobby anywhere.  Most names of oil paints are pretty common, but as far as speaking about colors I wanted to provide a benchmark so you can reference specifically the colors I'm speaking about.

--Wings: The overall color for the wings can be a little lighter as this would've received more sunlight and faded slightly more than the rest of the plane.  For aircraft in the ETO, I wouldn't overdo this. Europe's latitude is much higher than what the fighting in the Pacific saw, so the overcast weather and lower percentage of direct light is not beating up the paint as badly. For this area, go with a Chromium Green Oxide or something close to an Olive Green.  This will keep you in the range of where you need to be and will help in your weathering of the aircraft. For the blue, I'd start with a Prussian Blue/Burnt Umber/any kind of White. You could also go with Davy's Gray if you are looking to save on costs of paints.  Mix this in very small batches...you won't need a lot.  Start with the blue and add some of the umber color to it until you find that the blue is a muted color more like what you have already painted. Take this newly mixed blue (be sure you have about a finger nail sized swab of paint) and add it to your white/gray paint.  Darker colors always over power lighter colors like white.  So it's best to add dark to light and continue to add until you've found what you're looking for.  That's a handy tip to keep in mind. =] For colors 3 and 4, the Burnt Umber will help to bring some dirtier, grime color and darken this scheme and the Davy's Gray would end up being better than just stark white, but it would be good to test this first.  So you have your blue, green and dark and light colors selected.  Don't be afraid to add a bit more dots of your lighter color on the wings.  Oil pigments hold color very well so you may not need a lot of dots.  I've never done this myself yet but if you space them out well enough on a practice piece, you'll be able to better guess how many dots it'll take.  Your brush strokes should go from front to back.

--Fuselage:  All the same from above still applies except you could probably back off on the lighter colors and the angle of your brushstrokes ought to be straight down based on your plane setting on a flat surface.  In other words, if your plane were in flight the brush stroke would appear more at a 5 o'clock or 7 o'clock angle depending on your vantage point.  

I hope all of that was clear and concise enough to follow.  If you have any other questions, please ask.  I'm quite interested in how it'll come out. 

Good luck. =]

On the bench:  

Tamiya F4U-1  Kenneth Walsh


  • Member since
    December 2015
Posted by Kyuzo on Wednesday, February 17, 2016 6:38 PM

Hey guys what's up? I just thought I would stop in and say hi everyone. My model building is almost come to a halt as a result of the weather. I can't paint as much as I was because I can't open windows for ventilation. So I've been trying to do it  sparingly. Also I have a critical question. I believe I mentioned it before but it may have going overlooked unintentionally. If  possible I need someone to tell me what scale aircraft would I look for the decals from if I were looking for decals to use on a 1/25th scale car? 

  • Member since
    July 2014
Posted by modelcrazy on Wednesday, February 17, 2016 7:37 PM

Kyuzo
what scale aircraft would I look for the decals from if I were looking for decals to use on a 1/25th scale car? 

1/32 may work for you. What are you looking for? Stars and Bars, checker board?

Steve

Building a kit from your stash is like cutting a head off a Hydra, two more take it's place.


http://www.spamodeler.com/forum/

  • Member since
    June 2010
Posted by 5-high on Wednesday, February 17, 2016 8:19 PM

Dito .that's what I,d use.

  • Member since
    January 2015
Posted by BrandonD on Wednesday, February 17, 2016 9:01 PM

Kyuzo - that depends, I guess. Given how much larger aircraft are than cars, if you want it to be proportional, you might want to consider 1/48.

I have some decals in various scales, and some 1/25 cars I haven't built. I'll mock up a few tonight and post the pics, but yeah, are we talking stars and bars or nose art or something else? No way a 1/32 nose art piece will fit on a fender in 1/25, but it would probably work on a hood. I'll dig up what I've got.

-BD-

  • Member since
    January 2015
Posted by BrandonD on Thursday, February 18, 2016 12:42 AM

Ok, so this is what I could come up with. I have a bunch of random decals, but these I can at least tell you what kits they are from. Personally, depending on what you want to do, I would go with national insignia in 1/48 or maybe even 1/72. 1/32 appears too large. And the nose art off 1/48 bombers looks pretty appropriately proportioned.

The model is a 1/25 Revell 65 GT350.

In the pic above, you can see the 1/48 national markings out of a Tamiya P-51D kit. The roundel on the right is a 1/32 decal out of a Monogram Dauntless (it's the same size as the US national insignia.

Nose art reference from a 1/48 Monogram A-26 Invader.

National insignia from a Monogram 1/48 P-38.

Reference for artwork and fuselage insignia off a 1/72 Airfix P-51D.

Size reference for wing insignia off the same 1/72 Airfix P-51D

I hope this helps. As for the decals, if you live in somewhere that isn't prohibitively expensive to mail them to (I'm in California), I am happy to send you the Tamiya national insignia or some of the others. I may need the P-38 markings for another kit I just bought, but most of them are extras. Let me know 

-BD-

  • Member since
    December 2015
Posted by Kyuzo on Thursday, February 18, 2016 3:52 AM

Thanx Brandon & Steve. Those pics are a massive help Brandon. Thanx a bunch dude. Now I just have to go grab some decals.  OFF TO EBAY!!! 

  • Member since
    January 2015
Posted by Radial9 on Saturday, February 20, 2016 10:54 AM

FINALLY found some time to get the P51 primed and painted. My third model in 40 years and my first Aclad.


  • Member since
    June 2013
Posted by bvallot on Saturday, February 20, 2016 1:44 PM

Not a bad start Radial9. I think you'll find that you're going to love this stuff. =] 

On the bench:  

Tamiya F4U-1  Kenneth Walsh


  • Member since
    July 2013
Posted by lzdaily@comcast.net on Saturday, February 20, 2016 1:55 PM

Great start of the paint, Radial9.

Larry

  • Member since
    June 2013
Posted by bvallot on Saturday, February 20, 2016 2:37 PM

Here's just a short post on the radio equipment for the P-51A.  I managed to get this all sorted out last night, but it'll be a few days before I can get this closed up.  I decided I couldn't live without mocking up the radiator as well for these mustangs.  So, I need to get that whipped up as well as the tail wheel.  I caught a small error in scratching out the bottom shelf receivers.  I sawed off the bottom half and fixed them up...simple. The lower shelf is in place and I went ahead and scratched the Dynamotor coder from some sprue and created its place on the shelf.  All of this has a coat of primer on it and has been painted.  All I really need is to complete the wiring and IP for the most part and then put a flat coat to seal and the cockpit will pretty much wrapped up. =]  Very rewarding to tackle this section like this. 

 Untitled by Britt Vallot, on Flickr

On the bench:  

Tamiya F4U-1  Kenneth Walsh


JOIN OUR COMMUNITY!

Our community is FREE to join. To participate you must either login or register for an account.

SEARCH FORUMS
FREE NEWSLETTER
By signing up you may also receive reader surveys and occasional special offers. We do not sell, rent or trade our email lists. View our Privacy Policy.