SEARCH FINESCALE.COM

Enter keywords or a search phrase below:

Mustang Build

80045 views
1582 replies
1 rating 2 rating 3 rating 4 rating 5 rating
  • Member since
    August 2014
  • From: Willamette Valley, Oregon
Posted by goldhammer on Tuesday, July 26, 2016 8:53 AM

Mine was completed and sent on MC for his Daughter, so if you want to add it as completed, great, if not no biggie.

Thanks to you two for hosting, was a fun build for me.  Got to watch some great work done by others as well.

  • Member since
    June 2013
Posted by bvallot on Thursday, July 28, 2016 12:07 PM

No worries Cody.  I'm starting to have doubts about finishing my builds now. Not enough time in the day especially with a 2 month old. I'm starting to get fussed at by the wife for spending all day in the garage... =[ I haven't quite managed to be where I wanted. I missed a whole day basically having to be daddy and hubby, but it's not such a bad gig to have =]. Here's what I managed so far.

I got everything primed and before I could finish my poor little compressor crapped out on me. He needed to take a break! Eventually wrapped it up. I put a base coat of Duraluminum on the -A to use as a chipping surface for later. I focused much of the time painting the F-6D. What I like about it is even though it's a bit time consuming, once I'm done with a section...it's done for the most part. Any addtional weathering will be based on the theatre of operations. One thing that's worth mentioning is I preshaded certain panel lines and riveted sections with Alclad's Magnesium. This allows me a bit of depth with the Aluminums that go on top and gives the surface a bit more character with more control. The double action airbrush is the key to that though. 

I do apologize about the pics. They are very rushed and I honestly searched for the best light to show what your eyes are really seeing as best as I could.

 Untitled by Britt Vallot, on Flickr

The cowling was preshaded some as described above and painted with White Aluminum. The panel along the exhaust stack was done almost entirely with the Magnesium. I find it does a great job of representing this part.

The rest sort of speaks for itself. I paint the panels individually by taping them off with Tamiya tape. I hear of others having a lot of trouble with this and I can never understand why. My tape does get low tack very quickly as I tear off many strands and put then on the mat or cardboard, etc and reuse them. That may have something to do with it. I will say that my paint goes down in thin coats and is dry immediately after. No kidding...immediately. Just tossing that out there for folks. I hope it helps solve the Alclad mystery. 

The rest of the plane is painted in Aluminum along the cockpit and Polished Aluminum as we move aft. The wings are Duraluminum with Magnesium within the ammo/gun bays. I always come back and clean up whatever overdoing it happens while using the Magnesium with whatever color is dominant. When the panels are taped off, you won't notice how much is going down. Tip...it never takes much for a subtle difference. =] I did  not have the luck I thought I'd have with the Airframe Aluminum over the grey primer. It didn't bond with the plastic at all hardly. So for the tail part that shines bright in all the pics I referenced I went back with the Gloss Black and put down the Polished Aluminum instead as I didn't want something that shined too much. The Airframe Aluminum is way to bright and pretty for what was seen in the PTO.

A little walkaround.

 Untitled by Britt Vallot, on Flickr

 Untitled by Britt Vallot, on Flickr

 Untitled by Britt Vallot, on Flickr

 Untitled by Britt Vallot, on Flickr

 Untitled by Britt Vallot, on Flickr

 Untitled by Britt Vallot, on Flickr

 Untitled by Britt Vallot, on Flickr

 Untitled by Britt Vallot, on Flickr

That's where I'm at for now. I need to tidy up the gear bay, assemble the prop, and paint the insignia and anti-glare strip.  Aaaaaaannnnd still paint the -A.  I'm skeptical about the finish.

On the bench:  

Tamiya F4U-1  Kenneth Walsh


  • Member since
    June 2013
Posted by bvallot on Thursday, July 28, 2016 12:10 PM

And by the way...those peppercorn cashews are amazing! Get some! =D 

On the bench:  

Tamiya F4U-1  Kenneth Walsh


  • Member since
    July 2014
Posted by modelcrazy on Thursday, July 28, 2016 4:15 PM

I really like the color variation Britt. 

Steve

Building a kit from your stash is like cutting a head off a Hydra, two more take it's place.


http://www.spamodeler.com/forum/

  • Member since
    June 2013
Posted by bvallot on Saturday, July 30, 2016 11:59 PM

deleted.

On the bench:  

Tamiya F4U-1  Kenneth Walsh


  • Member since
    June 2013
Posted by bvallot on Sunday, July 31, 2016 12:03 AM

Thanks! One more quick update before tomorrow. I'm about to drop everything in order to rush this -A paint job. I think I can do it. I might have to skip cutting the grass though...lol =D

Here's a couple of things I've been doing with the time I've got in between being Daddy.

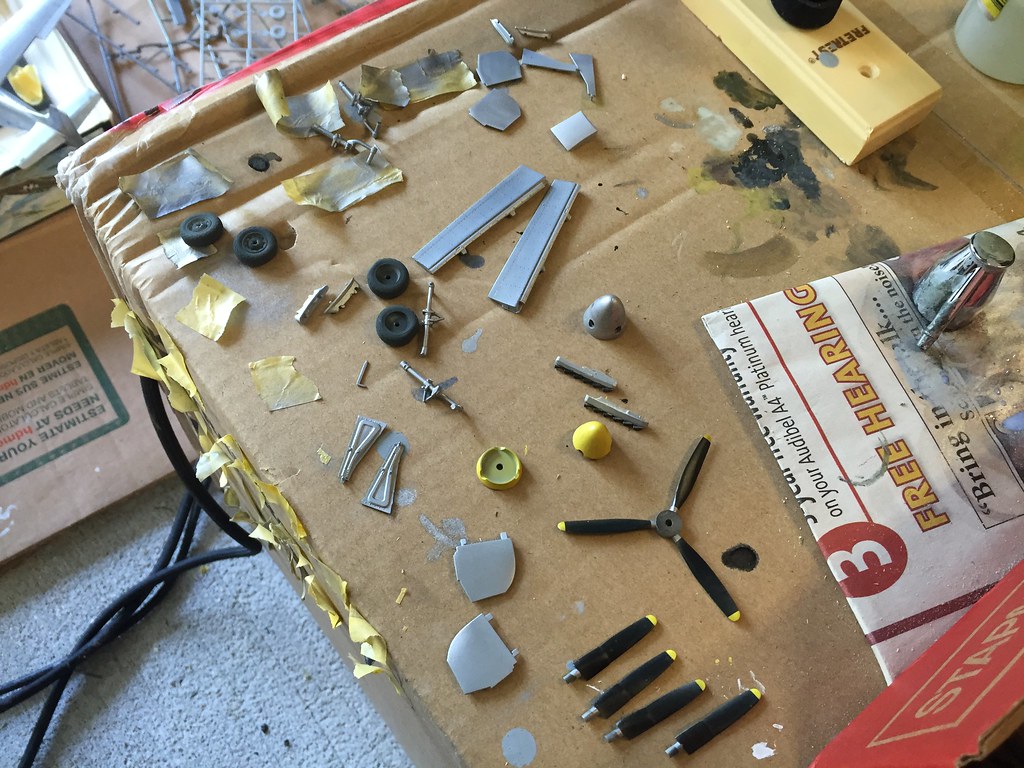
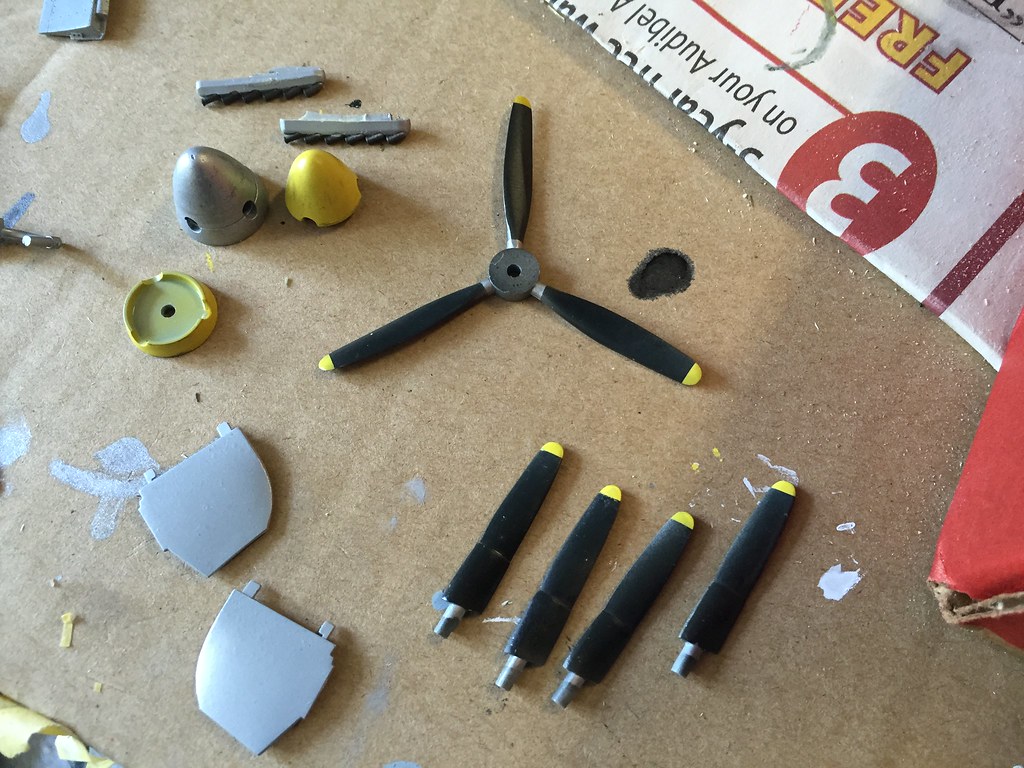
Along with completing the NMF painting on the -D, I've addressed the gear doors and props. 

 Untitled by Britt Vallot, on Flickr

 Untitled by Britt Vallot, on Flickr

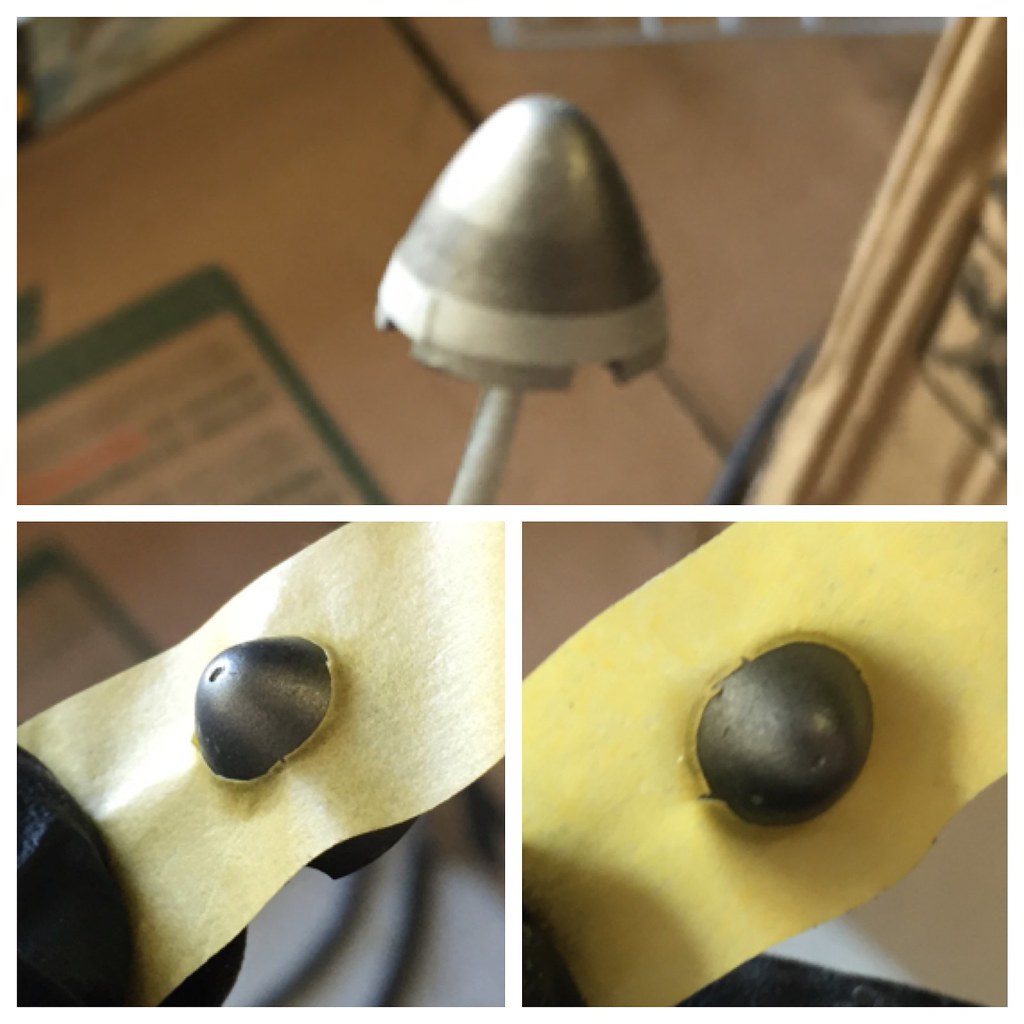
As for the spinner, I've noticed in a lot of bare metal spinners there's a certain pattern of light and dark bands that run down to the base. I'm not sure what exactly causes it or rather how, but I knew how I'd represent it. In the past, I'd have gone to my trusty Tamiya tape where I cut a cross in to it and then a circle out from connecting the ends and stretch it out across the conical surface to get a tight seal for paint. But with the Tamiya curve tape available it's much easier to tape off sections like this. Here's what I came up with.

 Untitled by Britt Vallot, on Flickr

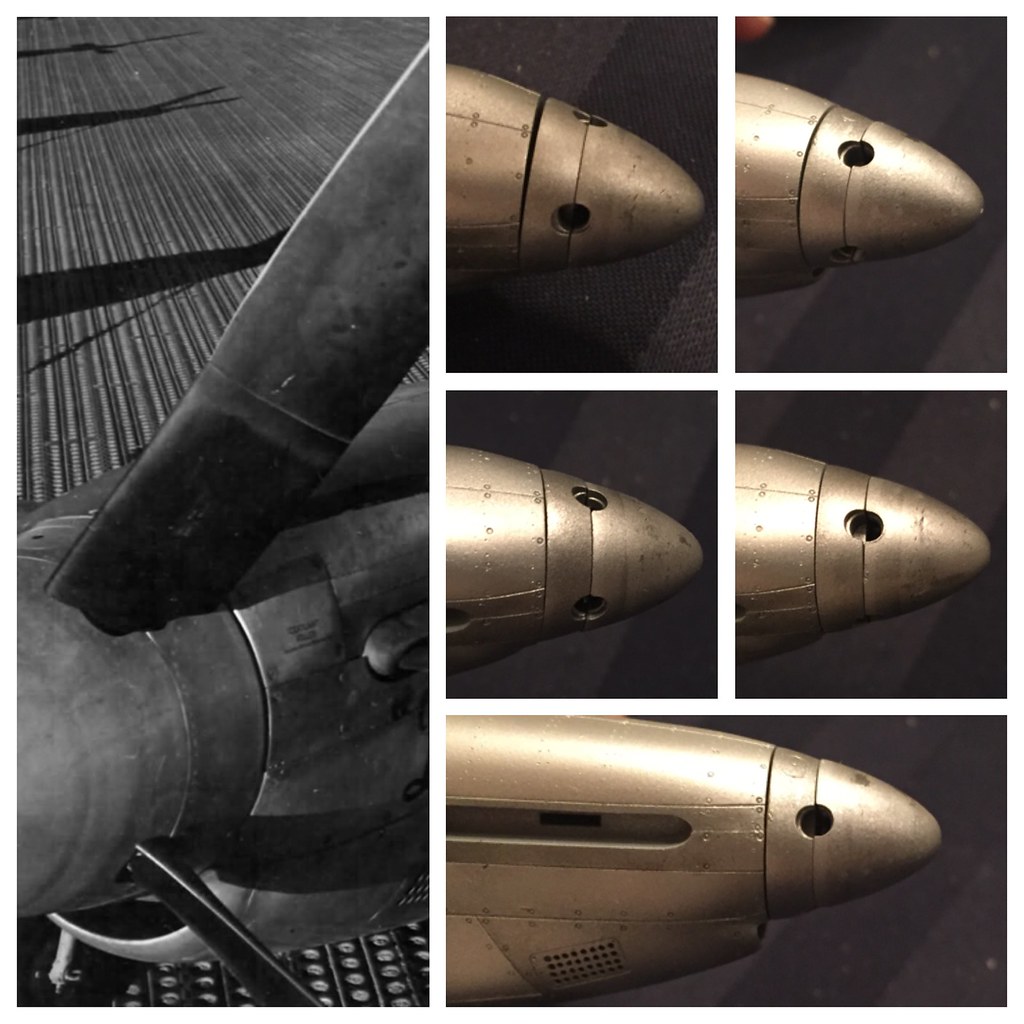
After a couple of marked off sections and removal and the overlap of Aluminum over Magnesium, this was the result. I came back and very lightly buffed the surface to bring out a little extra character. The pictures aren't quite doing it justice but it did come out rather close to the picture in the left frame.

 Untitled by Britt Vallot, on Flickr

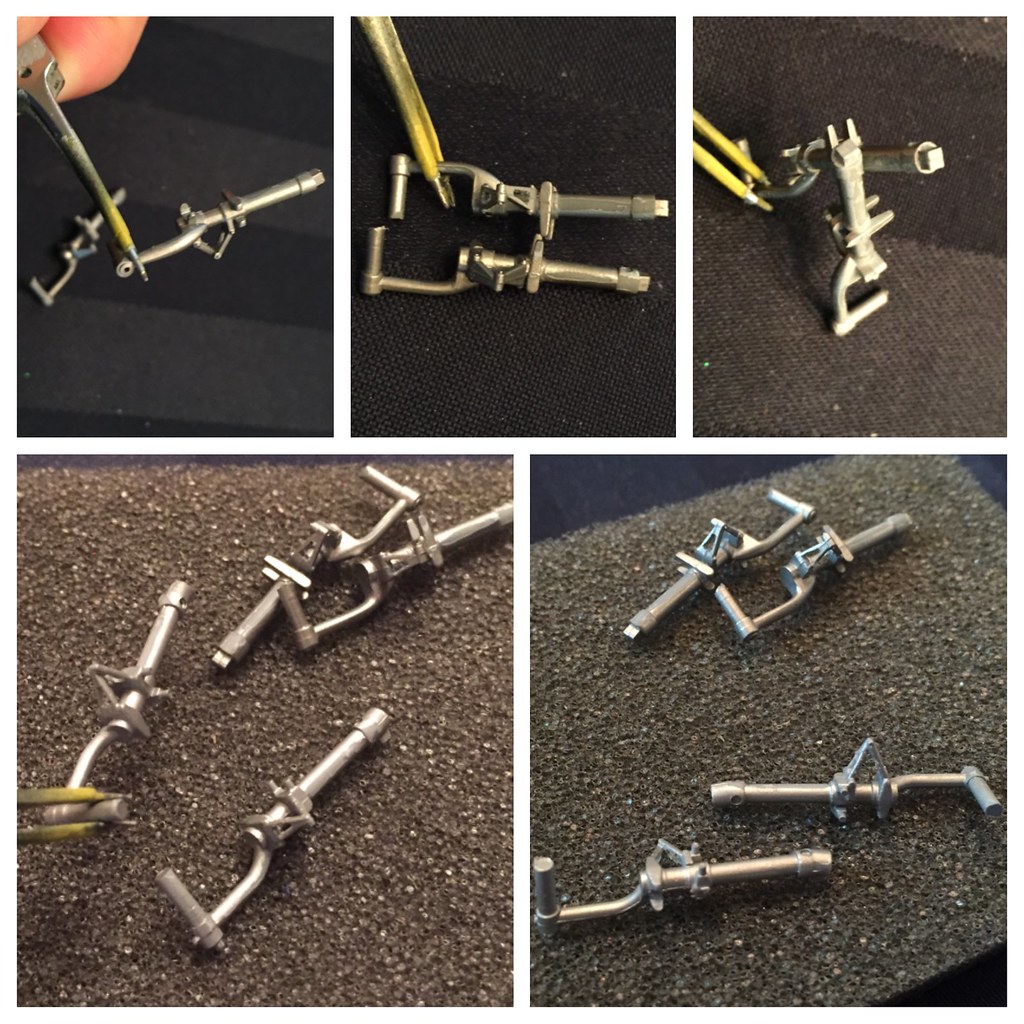
Bringing my attention back to the landing gear, I noticed the oleo scissors were solid. No problem. I drilled three holes to mark three points that I'd clean up with a brand new No. 11 blade based off of photos. It opens up this space and makes it a bit more true to life. In the top right frame, you'll notice a flat filled in space that shoots off the strut at the base near the tire. This should be two flanges that apparently are set up to accomodate something. I haven't been able to find out what...perhaps a mustang pro can provide some input here but I've carved out the middle very carefully and you'll notice in the photos how this looks after. I sanded some seams down that I noticed slipped my attention...repaint is on the way. On the -D I've drilled out the hole for the eyelets that fit into here. I'll be doing that with brass wire later. Easy. The -A from AccuMinn already had a piece here that I simply drilled a tiny hole through to make this feature. Carefully too I might add. =]

 Untitled by Britt Vallot, on Flickr

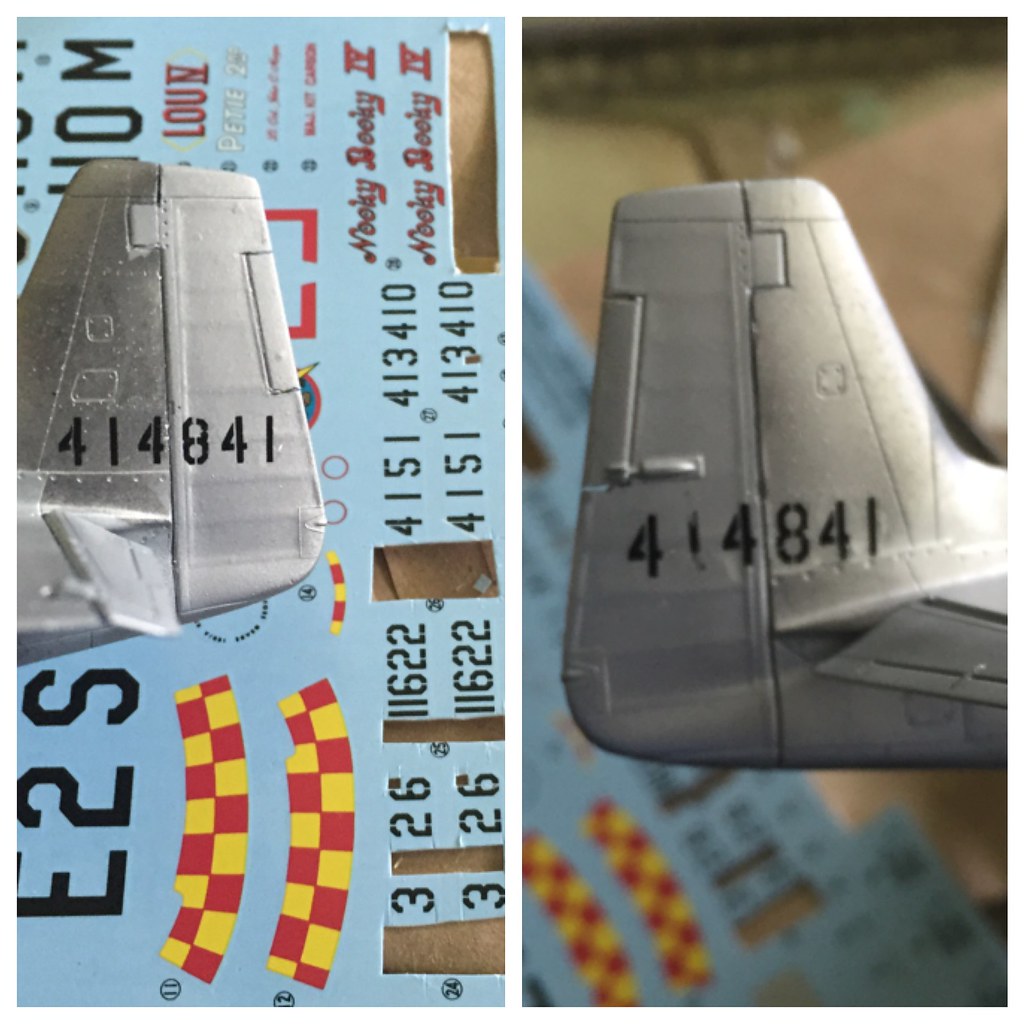
I did have a small epiphany earlier yesterday when I finally pulled out the decal sheet to tidy up the props. I started looking at everything listed when it occurred to me that there were an awful lot of 4's listed in the serial BuNo's. 4's and 1's. Shomo's actual F-6D that he made his MOH flight in is hard to come by in decals. I even just last night found a site describing a set for his P-40 and the F-6D WITH a resin set for the camera bay parts that are protruding for $7 from War Eagle decals. It was also the only site with a mention of it on the entire Internet apparently too. (womp womp) No matter...the serial number was 414841...and I had plenty of 4's, more than enough 1's, and a couple of 9's and 6's and 3's that I could blend to make an "8". So ten minutes later...done. Surgery was a success. I cut the numbers out as close as I could with my new blade so as to limit any extra decal film. Some times with weathering the borders of the film will show up and I hate this. It's almost unnoticeable until you're right up on it and damnit if you always see it after that. So skipping ahead, here's that. =]

 Untitled by Britt Vallot, on Flickr

Tomorrow. PAINT!! If I can, I may even make a quickie base since I've got plenty of scenery stuff to go around. I won't be able to make my wooden block base just yet, but I will update a post to show how that comes out on the Aircraft section. Larry's inspired me to do a pretty grass scene and seeing as I've a pretty pond in my back yard I might just be able to make it work for a quick front page photo...assuming I can square this up by tomorrow night. 


On the bench:  

Tamiya F4U-1  Kenneth Walsh


  • Member since
    July 2014
Posted by modelcrazy on Sunday, July 31, 2016 1:18 AM

That is some crazy awesome work Britt. I can't wait to see it.

Steve

Building a kit from your stash is like cutting a head off a Hydra, two more take it's place.


http://www.spamodeler.com/forum/

  • Member since
    June 2013
Posted by bvallot on Monday, August 1, 2016 8:16 AM

I began posting this last night but my laptop died. I'll have to concede to the deadline this time. I'm probably about 3 hours away from finishing for both. The F-6D doesn't have too much to fool with which is a little decieving I think and the P-51A will take a bit longer with insignia and markings and whatnot. I never do two at a time ordinarly. Just not enough time in the day. I will post something in the Aircraft section once completed and if Steve/Cody would like I can also drop one here as well for anybody email subscribed to this GB. It's no biggie either way.

I thought I'd share where I ended up before having to call it a night. I got most of England's -A painted up. Started with a Black and Black Green for the undersurface and marbled it in with a Medium Grey. I wanted a color with a slightly warmer look than just the Neutral Grey. Taped it off, and came back on top with three colors. This is something I'd been thinking about since the P-40 I did a while back for OD colors. Since they varied from brown to green so much depending on oil leaks and sunbaking, I thought I'd use that Three-Color approach here to that end. I started with Duraluminum from Alclad and put a coat of hairspray on the wings and forward fuselage. This techinque works brilliantly and I'll never waste money on anything else. Came back with a Khaki color and focused in the middle of panels...then a Olive Drab/Black Green color and tried to marble that in with a focus around the borders of the panels (not actually filling the lines so completely) I also used this color to help with so of the darker colors that often appear along the cowl. The top color is a mix from Flat Brown, White, Khaki Drab, and Black Green. This was laid on top very thinly. Took a brush and softened everything with coats of water and went to chipping. I'll come back over some of this on the right and possibly on the left. I may show it as repaints too. I've got some spots on the rudder where I've already done that. I don't want this build quite looking like a Jap plane. That's pretty much where I left it. I have a little bit left, but now it'll probably end up taking the rest of the year if I don't get a weekend somewhere soon to tidy it up. 

 Untitled by Britt Vallot, on Flickr

 Untitled by Britt Vallot, on Flickr

 Untitled by Britt Vallot, on Flickr

 Untitled by Britt Vallot, on Flickr

 Untitled by Britt Vallot, on Flickr

 Untitled by Britt Vallot, on Flickr

Thanks for having me along. Sorry I couldn't finish. There were a lot of great builds to come out of this GB. I was happy to be along for the ride. I look forward to trying a few things I picked up here...just as soon as I can get to it. =]


On the bench:  

Tamiya F4U-1  Kenneth Walsh


  • Member since
    July 2014
Posted by modelcrazy on Monday, August 1, 2016 8:48 AM

Britt, you can still post WIP here. I can extend the build for you if you need. You put in so much work I would hate to see you miss out. Let me know.

Steve

Building a kit from your stash is like cutting a head off a Hydra, two more take it's place.


http://www.spamodeler.com/forum/

  • Member since
    June 2013
Posted by bvallot on Monday, August 1, 2016 1:29 PM

Well, I do appreciate it. The only trouble that I can find is I don't know entirely how or when I'll find the time within the next month to finish these two. It could be as soon as next Sunday or as long as September some time. My job is about to have me on the go 7 days a week now. I don't want to be unfair to others on the forum. It can be your call. =] You won't break my heart either way.

I can continue to post though as I finish. I can save some of it up for two or so posts perhaps. At least this way I won't rush the finish and miss something or not put my best into it. There's a couple of things I saw that I'd like to touch up on the paint for both of these, so now I can just knock it out appropriately. I plan to put these both up on a wooden block base like the Dauntless I did a short while back. I hope to make it look quite nice. =]

On the bench:  

Tamiya F4U-1  Kenneth Walsh


  • Member since
    July 2014
Posted by modelcrazy on Monday, August 1, 2016 1:52 PM

You make a good point about being fair and I certainly don't want you to rush either of those beautiful builds.

OK, I will call an end to the GB. I want to thank you for joining in and please continue to post. I really want to see them finished.

In fact, I want to wholeheartedly thank all who joined in and completed some awesome builds. I also want to give a special thanks to CodyJ who despite his getting a new job and just being overwhelmed, co-hosting for the last year and a half and designing some out of this world badges.

Thank you everyone!!

Steve

Steve

Building a kit from your stash is like cutting a head off a Hydra, two more take it's place.


http://www.spamodeler.com/forum/

  • Member since
    September 2014
Posted by rooster513 on Monday, August 1, 2016 2:39 PM

modelcrazy

In fact, I want to wholeheartedly thank all who joined in and completed some awesome builds. I also want to give a special thanks to CodyJ who despite his getting a new job and just being overwhelmed, co-hosting for the last year and a half and designing some out of this world badges.

Thank you everyone!!

Steve


Thank you Steve & Cody for hosting an awesome Group Build. Just looked the gallery over on the front page and there were A LOT of great builds! Thanks again!

-Andy

  • Member since
    January 2015
Posted by TheMongoose on Thursday, August 18, 2016 9:49 PM

Well, I didn't manage to finish this one before the deadlilne but I thought I would post a pic just to say I tried Stick out tongue This F-82 needs alot of work to put together. 


In the pattern: Scale Shipyard's 1/48 Balao Class Sub! leaning out the list...NOT! Ha, added to it again - Viper MkVii, 1/32 THUD & F-15J plus a weekend madness build!

  • Member since
    July 2014
Posted by modelcrazy on Monday, August 22, 2016 11:31 AM

Sorry for the late responce Mongoose. Hows that F-82 fitting? BTW, you can certantly continue to post here if you wish.

Steve

Steve

Building a kit from your stash is like cutting a head off a Hydra, two more take it's place.


http://www.spamodeler.com/forum/

  • Member since
    June 2013
Posted by bvallot on Thursday, August 25, 2016 9:36 PM

I do recall a F-82 on the dockett. How is that shaping up?

Since we have some spot light on this page again, I can drop some photos of where I am with these two mustangs. I went ahead and touched up the paint on top of the -A. Much happier with it now. My Montex masks for JJ England's plane are definitely clutch and helping speed this along. I have enjoyed painting my markings way more than just using decals. It offers me considerably more control and the need to encourage decals to settle into panel lines is a thing of the past. On this particular occassion, I did encounter some issues with all the different masking. I have since corrected some of what you see here, but I haven't taken any new pictures just yet. One strange thing that happened is the adhesive from the the larger insignia mask left a residue on the fuselage causing the paint to appear darker. I'm hoping this disappears after the clear coat. Even still, easily fixed. 

 Untitled by Britt Vallot, on Flickr

 Untitled by Britt Vallot, on Flickr

 Untitled by Britt Vallot, on Flickr

 Untitled by Britt Vallot, on Flickr

 Untitled by Britt Vallot, on Flickr

 Untitled by Britt Vallot, on Flickr

 Untitled by Britt Vallot, on Flickr

The Osprey book I had that included this mustang mentioned that "Jackie" was painted on both sides although many seem to model it with just the one. If i recall correctly the decal sheet only includes one copy. I think there was even a bird of some kind painted on the right side as well at some point, but I haven't been able to locate my book since the move, and it wasn't a very good picture anyhow. I'll settle for without this time.

 Untitled by Britt Vallot, on Flickr

On the F-6D, I noticed on further inspection there wasn't any insignia on the top left wing of Shomo's plane...just the fuselage and lower right wing. I've touched up a few spots here but I will have to come back to fix the bars...they're a little out of shape along the camera port.

 Untitled by Britt Vallot, on Flickr

 Untitled by Britt Vallot, on Flickr

It won't be too long that I'll be able to get the anti-glare paint on and start weathering these up a bit more. =]

On the bench:  

Tamiya F4U-1  Kenneth Walsh


  • Member since
    July 2014
Posted by modelcrazy on Thursday, August 25, 2016 10:53 PM

Britt, those are looking great! What are you using for the chipping on the A?

Steve

Building a kit from your stash is like cutting a head off a Hydra, two more take it's place.


http://www.spamodeler.com/forum/

  • Member since
    June 2013
Posted by bvallot on Friday, August 26, 2016 9:14 AM

It's actually the hairspray method. =] It works so well, I won't ever spend a dime on anything else so long as I'm painting in the manner I currently am. 

For anybody who's unfamiliar, it's very intuitive really. I personally start with an Alclad metal surface, but I suppose any metal color paint of your choosing will work. Once, you've put your primer and then metal color down it gets sealed with a coat of hair spray. Any kind of hair spray will do...the cheaper the better I think. Pass maybe 2 or 3 coats across your surface with it and move on to your next coat of paint once it's dried. Easy! When your painting is done, take a brush and load it with water and soak the surface you intend to chip with clean deliberate strokes. Your paint may seem to stain around the edges of where the water "moves" pigment around but don't worry...none of that will show through later or at the very least I haven't ever encountered it. You'll begin to notice the painted surface lose cohesion and begin to slip off with whatever tool you're using. Depending on the kind of chipping you're looking for, you'll want different types of shapes in contact with your surface (i.e. pointy, wide-flat, narrow-flat, fan, etc) It all just depends on how much you're looking to do and what size scale you're working in. Be careful not to push too much too quickly. You may note that the paint doesn't always evenly adhere to the hairspray surface...some spots stick harder and some flake off with little ease.

I favor this over any other method I've tried in the last four years. I can get just the right kind of size and shapes of chipping that I'm looking for. The only other thing I might ever do is supplement with a sponge in spots for certain tiny types of chips, and I do this very sparingly.

Very simple! =]

On the bench:  

Tamiya F4U-1  Kenneth Walsh


  • Member since
    November 2003
  • From: Naples, FL
Posted by tempestjohnny on Friday, August 26, 2016 8:21 PM
Britt awesome work on both.


  • Member since
    June 2013
Posted by bvallot on Sunday, August 28, 2016 9:34 PM

Thanks TJ!! =] She's almost there.

I inched along today with a little more, but now I finally got my clear coat on her. I thought I'd share where I'm at since now some of this painting is better seen. With the clearcoat on, the contrast between these browns and greens I painted separately are more obvious. I left the flaps alone with the thought that they would some times be down and never stepped on or fooled with anyhow. All of this is a bit of artistic leeway. I have no photo of England's entire plane...just a couple of him close-up in his cockpit. It's all from observations of -As in the PTO during this time. Some times I'm happy to go off script. So here she is. Some of this will get muddled down a bit with the flat coat, but with some extra weathering in between I hope to have a nice worn in OD mustang. =]

 Untitled by Britt Vallot, on Flickr

 Untitled by Britt Vallot, on Flickr

 Untitled by Britt Vallot, on Flickr

 Untitled by Britt Vallot, on Flickr

 Untitled by Britt Vallot, on Flickr


On the bench:  

Tamiya F4U-1  Kenneth Walsh


  • Member since
    July 2014
Posted by modelcrazy on Tuesday, August 30, 2016 7:41 AM

Sorry for the late response Britt,

I love that look. It resembles faded and stained paint, which I'm sure that's where you were going with it. If it was, you nailed it IMO.

Steve

Building a kit from your stash is like cutting a head off a Hydra, two more take it's place.


http://www.spamodeler.com/forum/

  • Member since
    June 2013
Posted by bvallot on Tuesday, August 30, 2016 1:59 PM

Yes it is Steve. I've found the thing I'm best at with modeling scale aircraft is the painting process. So as far as weathering an aircraft goes, I tend to put a greater emphasis on what I can do up front with painting. This also saves me some steps later on, but I suppose I first started out this way because I was afraid to make mistakes with things like using the wrong kind of thinner and ruining my surface some kind of way...or really just lacking the control I need with some other means (i.e. pastels, oils, etc.) 

I just paint what I see.

On the bench:  

Tamiya F4U-1  Kenneth Walsh


  • Member since
    July 2014
Posted by modelcrazy on Tuesday, August 30, 2016 2:04 PM

Well it looks dog gone outstanding Britt Yes

Steve

Building a kit from your stash is like cutting a head off a Hydra, two more take it's place.


http://www.spamodeler.com/forum/

  • Member since
    January 2015
Posted by TheMongoose on Friday, October 14, 2016 11:24 PM

Tis super late BUT I have finished it! This is the first model I've air brushed. I wanted to do a night fighter theme with it so I knew the plane had to be smooth or every sanding mark or stray glue joint would show


In the pattern: Scale Shipyard's 1/48 Balao Class Sub! leaning out the list...NOT! Ha, added to it again - Viper MkVii, 1/32 THUD & F-15J plus a weekend madness build!

  • Member since
    July 2014
Posted by modelcrazy on Saturday, October 15, 2016 1:55 AM

That looks fantastic Mongoose Yes

I hear that is a tough kit to begin with and I doubt I could do as well with the airbrushing. 

Nicely done sir Bow Down

Steve

Building a kit from your stash is like cutting a head off a Hydra, two more take it's place.


http://www.spamodeler.com/forum/

  • Member since
    November 2003
  • From: Naples, FL
Posted by tempestjohnny on Saturday, October 15, 2016 12:55 PM
Mongoose that looks great.


  • Member since
    June 2013
Posted by bvallot on Monday, December 19, 2016 10:41 AM

I know this GB has been over for a while, but I wanted to drop these here as I've just gotten back around to making something happen. Since I'm no longer in a rush, I'm going to take more time to properly weather these two mustangs. Just a few quick photos of progress. I won't get into to everything going on here, but if anyone does have a question about what you're looking at...by all means. =]  Sorry these photos are so rushed looking.

I left off at the landing gear:

 Untitled by Britt Vallot, on Flickr

 Untitled by Britt Vallot, on Flickr

Weathering around enging cowling:

 Untitled by Britt Vallot, on Flickr

 Untitled by Britt Vallot, on Flickr

Got brave enough to see how this Squadron canopy faired...pleasantly surprised:

 Untitled by Britt Vallot, on Flickr

 Untitled by Britt Vallot, on Flickr

 Untitled by Britt Vallot, on Flickr

and the F6-D

 Untitled by Britt Vallot, on Flickr

 Untitled by Britt Vallot, on Flickr

Some weathering still to come here

 Untitled by Britt Vallot, on Flickr

 Untitled by Britt Vallot, on Flickr

 Untitled by Britt Vallot, on Flickr

 Untitled by Britt Vallot, on Flickr

 Untitled by Britt Vallot, on Flickr

I'll post some finished photos next. It'll still be some time before I can get everything in order like I want. I'm putting both of these up on a wooden base just like the P-40B and SBD-2. They ought to look nice when they're finished.  =]

On the bench:  

Tamiya F4U-1  Kenneth Walsh


  • Member since
    July 2014
Posted by modelcrazy on Monday, December 19, 2016 10:51 AM

Those are looking fantastic Britt!

Jackie looks like she was in Burma. Take your time, there's plenty of time left.

Steve

Building a kit from your stash is like cutting a head off a Hydra, two more take it's place.


http://www.spamodeler.com/forum/

  • Member since
    June 2013
Posted by bvallot on Monday, December 19, 2016 10:59 AM

Thanks. Fatherhood has haulted practically any and all building. =] I guess I don't mind so much though. I've got a pretty handsome little boy!!

On the bench:  

Tamiya F4U-1  Kenneth Walsh


  • Member since
    June 2010
Posted by 5-high on Sunday, December 25, 2016 12:50 AM

bvallot its looking good .......ive been out fixing track ..,,,,rail here for 9 months  ..sorry to everyone on this build ..never got a chance to get a minute too the bench ...now im back the mustang has a thick coat of dust ..my exhaust never showed up ..and now with my tale between my legs ..im again waiting for the parts to finish my mustang ll..  to modelcrazzy i wish to say it was great being part of my first gb ..must say its won,t be the last ...you all have give.n me a good look into our hobby .....and i must say this ...the absolute dedication and talent brought forth on this build was fantastic...kudos too all that finished and thoughs who like me ...late in the build ...from my family to all of yours in this beautiful community on finescale modeler......MERRY CHRISTMAS AND A HAPPY NEW YEAR  FROM HIGH 5BalloonsToast

  • Member since
    June 2010
Posted by 5-high on Sunday, December 25, 2016 12:56 AM
OH .....HAY IM NOT DONE ...YET ..picks soon for all ....ho...ho....hoo...merry christmas
JOIN OUR COMMUNITY!

Our community is FREE to join. To participate you must either login or register for an account.

SEARCH FORUMS
FREE NEWSLETTER
By signing up you may also receive reader surveys and occasional special offers. We do not sell, rent or trade our email lists. View our Privacy Policy.