SEARCH FINESCALE.COM

Enter keywords or a search phrase below:

1946 What If GB

55181 views
1775 replies
1 rating 2 rating 3 rating 4 rating 5 rating
  • Member since
    December 2002
  • From: Bury St Edmunds, Suffolk, England
Posted by Bish on Tuesday, February 2, 2016 3:15 PM

I finally got all the painting done on the arado, and i am really pleased with it. A couple of years ago i did my first German pre war scheme with the 3 colours on top, on a Ju 87. I really like that scheme and used it for inspiration on a Do 335 build and decided to do so again, but with colours that are even more like the pre war ones. But i used late war colours and went for a flowing soft edge scheme rather than the pre war hard edged jaggered scheme.

I first applied RLM 77 useing the same approach as underneath. I then drew the scheme on with a pencil and applied some black spotting and the RLM 81, and i managed to find an 81 thats brown and not the green version. Soon as that was applied, i added the black spots for the third colour, and here is where i remembered i should be taking photo's.

With that dry, i added the RLM 82. The black baseing has not worked as well as i had hoped. In some areas i had to tidy thing up wth more paint and this has blocked out some of the black showing through. It is ther ein some areas, but very very subtle. I don't mind to much as i had not planed to use the method when i started the build, but its certainly something i will work on in future.

So next up, my favorite bit, the decals.

I have also been working on the vehicles. I checke and the SS-100 tractor does not fit under the aircrfat, so i had to re think the dio. PJ had suggested adding a pit under the aircrfat for the bomb to be lwered into as the Americans did to load the A-Bombs under the B-29's. But i thnik that would be over doing it as the bomb and trolley do fit underneath, but it has given me an idea for another German aircraft in the stash. But it got me thinking about bringing the aircraft to the bomb rather than the otehr way round, so i needed a towing vehicle. The only one that would tow an aircrfat of this weight is an Sd.Kfz 9 Famo, and i just happene to have one that was intended for a He 177 which is heavier than the 555 would have been. So i ditched the other truck, the Famo will serve a dual role of towing and carrying the ground crew and equipment. I had to re jig the lay out and make a new base, but i thnik its going to work fine. I have also had to scratch build a tow bar. So here are the vehciles after painting and some dry brushing.

Famo on left, SS-100 and tractor on right and Kubelwagen front and centre.

People often ask about about making bases, so i thogut i would post some pics of that as i go alng as well. Only one for now. An old bit of chip board with some 18mm MDF to make it thicker and the first piece of balsa added to one side.

And thats it. Now to get those decals on.

I am a Norfolk man and i glory in being so


On the bench: Airfix 1/72nd Harrier GR.3/Fujimi 1/72nd Ju 87D-3

  • Member since
    January 2016
  • From: A Galaxy Far, Far Away
Posted by Hunter on Tuesday, February 2, 2016 3:51 PM

Bish,

That is one nice paint job. Did you take the time to mask it off or did you free hand the entire paint job? That looks great. Can't wait too see it completed.

Hunter 


  • Member since
    December 2002
  • From: Bury St Edmunds, Suffolk, England
Posted by Bish on Tuesday, February 2, 2016 4:24 PM

Thnaks Hunter, it was all done free hand. I normally use rolls of putty, but i can never get a soft edge so in past builds have had to re do the edge after taking off the masks. this time i decided just to do away with the masks altogether. Still got quite a bit to do, going to be a couple of days ading the decals from the look of it.

I am a Norfolk man and i glory in being so


On the bench: Airfix 1/72nd Harrier GR.3/Fujimi 1/72nd Ju 87D-3

  • Member since
    January 2015
Posted by Moff on Tuesday, February 2, 2016 5:46 PM

Bish

Thnaks Hunter, it was all done free hand. I normally use rolls of putty, but i can never get a soft edge so in past builds have had to re do the edge after taking off the masks. this time i decided just to do away with the masks altogether. Still got quite a bit to do, going to be a couple of days ading the decals from the look of it.


Bish, amazing job on the Arado! 


BTW, I like the idea of adding the soft edges to camouflage afterwards. It sounds like less room for error to me. I may try it out on my Waffentrager! However, I'd like your opinions on the technique.

"Gaiety is the most outstanding feature of the Soviet Union." - Josef Stalin 

  • Member since
    December 2002
  • From: Bury St Edmunds, Suffolk, England
Posted by Bish on Tuesday, February 2, 2016 5:56 PM

I only used to use the masking on aircraft, for armour i have always done it free hand, being 35th scale and not 72nd, it does not have to be so fine. But having now done this un masked, i prefer this method. The end result is the same, i just save the time to mask, un mask and go over it again. I kow a lot of people can get a soft edge with masking, bt i can't see to get a hang of it.

But give it a go and see what you think, you might even be able to get a soft edge with the mask.

I am a Norfolk man and i glory in being so


On the bench: Airfix 1/72nd Harrier GR.3/Fujimi 1/72nd Ju 87D-3

  • Member since
    November 2009
  • From: SW Virginia
Posted by Gamera on Tuesday, February 2, 2016 11:04 PM

Hey Bish, looks very good, sharp work on the camo.

And nice looking collection of ground vehicles too. I know what you mean about not wanting to put a trench in there, it's a pain to either chisel out a hole in the base, but building it up on top and making it really thick doesn't really look right either.

"I dream in fire but work in clay." -Arthur Machen


  • Member since
    December 2002
  • From: Bury St Edmunds, Suffolk, England
Posted by Bish on Wednesday, February 3, 2016 4:27 AM

Thnaks G. If i did a hole, i would make a thin base and build it up with styrofoam to put the hole in. But i didn't really fancy doing all that at this stage either.

I am a Norfolk man and i glory in being so


On the bench: Airfix 1/72nd Harrier GR.3/Fujimi 1/72nd Ju 87D-3

  • Member since
    April 2006
  • From: ON, Canada
Posted by jgeratic on Wednesday, February 3, 2016 9:38 AM

Bish, that is becoming a very keen project, and interesting camouflage, different for sure.  The colours themselves remind me a lot of what the Finns used on their vehicles, but I know that is not what is being portrayed here.

For the towing tractor that doesn't fit underneath the aircraft, what if you made a very long towbar, within reason I suppose?

regards,

Jack

  • Member since
    December 2002
  • From: Bury St Edmunds, Suffolk, England
Posted by Bish on Wednesday, February 3, 2016 10:25 AM

Ye, i suppose it does bear a resemblance to the Finnish schemes, i had not thoguht of that.

The only way the long tow bar would work is if the towing vehilce was at the rear, because of the nose wheel, and then the bomb would have to be back wards and does not sit right on the trolley. I did consider that option as the bar is close to the back and any tow bar would not need to be very long.

I am a Norfolk man and i glory in being so


On the bench: Airfix 1/72nd Harrier GR.3/Fujimi 1/72nd Ju 87D-3

  • Member since
    January 2013
Posted by jibber on Saturday, February 6, 2016 2:05 PM

Bish I'm working at a snail's pace but I dd get some work in on my German Panzertriebwagen Armored Locomotive. I'm sorry I haven't posted as usual so I hope its okay to show several photos of my progress. 

This is where I'm at. Construction is almost done, the main parts are primed and I sprayed a coat of Burnt Iron as my base color. Next will be to add oil based washes, weathering and final assembly. I'm going with one solid color with some modulation on certain parts. I hope it comes out as I envision it. 

In my next groupm of picks I'll show the same parts with my base color.

Thanks for looking, Terry

  • Member since
    December 2002
  • From: Bury St Edmunds, Suffolk, England
Posted by Bish on Saturday, February 6, 2016 3:49 PM

No worries tery, its great to see what you have when you can. Its looking really good, i do like your rail bilds.

I am a Norfolk man and i glory in being so


On the bench: Airfix 1/72nd Harrier GR.3/Fujimi 1/72nd Ju 87D-3

  • Member since
    January 2013
Posted by jibber on Saturday, February 6, 2016 6:54 PM

I experimented a little with some Mr. Hobby metal colors and decided on Burnt Iron that happened to be the lightest of the iron shades. I know after I apply an oil wash and some pin weathering it'll darken up to the right shade. Here are a few pics:

Terry

  • Member since
    January 2013
Posted by jibber on Saturday, February 6, 2016 7:00 PM

I forgot to mention that there are over 100 lugs that had to be attached to the side of the main hull and carriages. I've tried my best to understand their use and the best I can come up with is that they may be used to attached the armor plates to the superstructure. If anybody knows I'd sure would like to know. At first I thought they were for some camo netting or foliage but that just doesn't make sense, anyway this was some tedious, repetitive work but looks quite nice when it's done.

Terry

  • Member since
    July 2014
Posted by modelcrazy on Sunday, February 7, 2016 12:30 AM
I’m pretty sure I’m a glutton for punishment, but I have started the USS Prinz Eugen. She will be shown as she was just prior to Operation Crossroads on 1 July, 1946, at Bikini Island, where the atomic bomb test Able was detonated 520 feet (158 m) above the target fleet. It caused less than the expected amount of ship damage because it missed its aim point by 2,130 feet (649 m).

After much research I found a few modifications to the ship at the Philadelphia Naval Shipyard, PA. There, the ship received some minor changes and, some of the equipment was stripped off for further evaluation.
Modifications to the ship that will be shown on the build are:
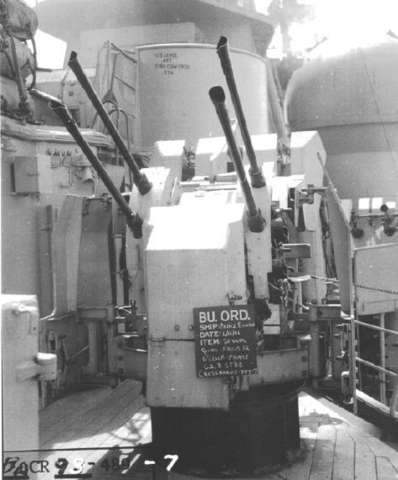
1. The two 203mm (7.992″) main guns from turret Anton were removed for evaluation. They had a range of 15NM and after interviews with the German crew and inspection onboard, it was decided to remove the guns for ashore testing.
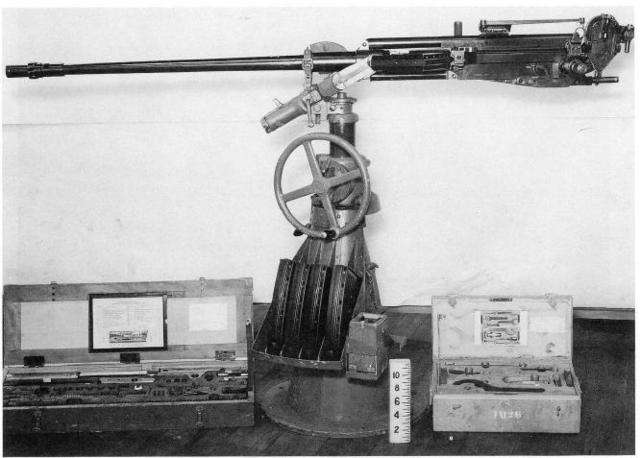
2. One Flakverling L38 quad 20mm AA gun which was shipped to Virginia along with the two 8” guns. I need to do some more investigation to find which one was removed.


3. The fore and aft deck 20mm guns which were sent to Virginia as well.


4. Most of the G7 torpedoes and the forward starboard triple launcher were removed for evaluation.


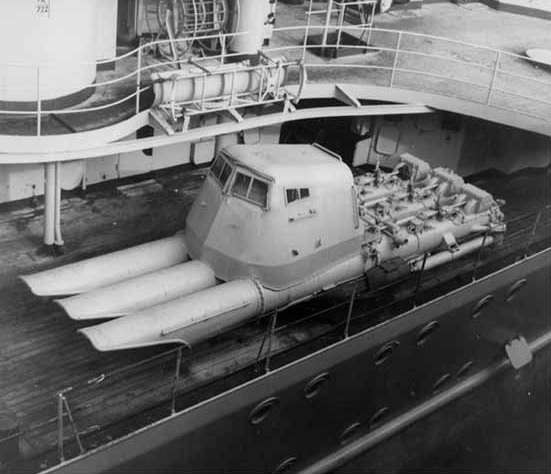
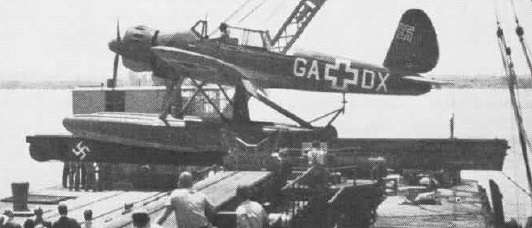
5. The two Arado Ar-196 seaplanes and catapult were removed. One was apparently inoperable and sent to the Smithsonian, where it remains boxed up today. The other was test-flown by personnel of Naval Air Station Willow Grove, PA. and the catapult was mounted ashore and used for additional test flights in 1947.


6. 
The forward starboard AA gunnery director dome was removed for study as well as the forward Zeiss rangefinder.


7. The GHG sonar was also removed and considered by WW2 standards, very advanced. This sonar was mounted on the USS Flying Fish
 
(SS-229) for further tests. The experiments gave the US Navy a head start in sonar technology against the Soviets. This unit is not visible.
8. The US Army donated a SCR-584 radar van with its wheels removed. This was lashed onto the platform of the removed forward rangefinder with two steel cables. The Army wanted to see how their gear held up to an atomic explosion.
The Prinz Eugen as she lays now at Kwajalein.
  
So after a longwinded explanation. I hope to recreate a plausible scene.
As I mentioned in an earler post, I purchased several general German PE sets and Pontos wood deck to dress the ship up a bit.
I started with the base and cut out the outline of the ship.
I then added poster board to the sides and used my usual medium acrylic gel and paper, followed by another layer of gel dabbed with a brush to create the small waves.
I sanded the gel after it was dry and then painted the surface to check how the waves looked. I may or may not keep this color and I will be adding a little more gel to add to the waves.


This build will take me a while as I have a few other things going on.

Steve

Building a kit from your stash is like cutting a head off a Hydra, two more take it's place.


http://www.spamodeler.com/forum/

  • Member since
    December 2002
  • From: Bury St Edmunds, Suffolk, England
Posted by Bish on Sunday, February 7, 2016 12:58 AM

Thats looks some tedious job Terry. Not sure what they could be used for, they seem a bit flimsy for hanging armour plate on. Be interesting to find out.

I am a Norfolk man and i glory in being so


On the bench: Airfix 1/72nd Harrier GR.3/Fujimi 1/72nd Ju 87D-3

  • Member since
    December 2002
  • From: Bury St Edmunds, Suffolk, England
Posted by Bish on Sunday, February 7, 2016 1:02 AM

Steve, sound slike you have been doing a lot of research on this. Nice to see you started.

I have not realised the Eugen was so shallow or at Kwajalein. Wasn't that a Japanese base during the war. I recall hearing that mentioned in one of those 1970's war movies, i think the batle of Midway.

I am a Norfolk man and i glory in being so


On the bench: Airfix 1/72nd Harrier GR.3/Fujimi 1/72nd Ju 87D-3

  • Member since
    July 2014
Posted by modelcrazy on Sunday, February 7, 2016 1:46 AM
Bish, you know how I love to research my builds, to get them as correct as possible. To me, this is half of the fun of building the model
Yes, The battle of Kwajalein
 Atoll was fought as part of the Marshall Islands campaign. It took place from 31 January to 3 February 1944.
 

The Eugen was damaged during the Baker underwater test, where the underwater shockwave buckled some seals and she began to list. The Eugen was then towed to Kwajalein where she continued to capsize. The turrets and gun directors fell out at this time.
 In 1997, Hurricane Paka rolled the hull a bit so that it is now almost perfectly upside down. She is now, with the loss of radiation after all these years, a dive site.
This is going to be enjoyable and unique, thanks for the idea.
Steve

Steve

Building a kit from your stash is like cutting a head off a Hydra, two more take it's place.


http://www.spamodeler.com/forum/

  • Member since
    December 2002
  • From: Bury St Edmunds, Suffolk, England
Posted by Bish on Sunday, February 7, 2016 6:58 AM

Thnaks Steve. I had always imagined it was just blown to bits. Its nice to know there is at least some left.

I am a Norfolk man and i glory in being so


On the bench: Airfix 1/72nd Harrier GR.3/Fujimi 1/72nd Ju 87D-3

  • Member since
    January 2016
  • From: A Galaxy Far, Far Away
Posted by Hunter on Sunday, February 7, 2016 7:52 AM

Bish

Thnaks Hunter, it was all done free hand. I normally use rolls of putty, but i can never get a soft edge so in past builds have had to re do the edge after taking off the masks. this time i decided just to do away with the masks altogether. Still got quite a bit to do, going to be a couple of days ading the decals from the look of it.


Bish,

What size needle and air pressure did you use to obtain that fine line in your pattern? Sorry to be a pest....Always been curious minded, and I want to learn this so I know going forward.

Thanks,

Hunter

Hunter 


  • Member since
    January 2016
  • From: A Galaxy Far, Far Away
Posted by Hunter on Sunday, February 7, 2016 7:57 AM

Steve,

What type of base or foam are you using for this dio? I noticed it looks like the same type in most of your water dio's, and does it take to most building materials (Gels, plaster paris, model clay)?

Once again, you are off to create another water master piece Bow Down Big Smile

Hunter 


  • Member since
    December 2002
  • From: Bury St Edmunds, Suffolk, England
Posted by Bish on Sunday, February 7, 2016 8:04 AM

No worries Hunter, ask all you like. I use a fine needle on my Badger 100 and have it set at about 10 to 15 psi. I did start much lower but it just spatters out of the airbrush. Get the paint/thinner mix is also very important. I can't give you a ratio as i just do it by eye. Its taken me a long time to be able to do this, i always struggled with fingur control on the tigger, but i seem to be getting there.

I am a Norfolk man and i glory in being so


On the bench: Airfix 1/72nd Harrier GR.3/Fujimi 1/72nd Ju 87D-3

  • Member since
    January 2016
  • From: A Galaxy Far, Far Away
Posted by Hunter on Sunday, February 7, 2016 8:10 AM

Bish

No worries Hunter, ask all you like. I use a fine needle on my Badger 100 and have it set at about 10 to 15 psi. I did start much lower but it just spatters out of the airbrush. Get the paint/thinner mix is also very important. I can't give you a ratio as i just do it by eye. Its taken me a long time to be able to do this, i always struggled with fingur control on the tigger, but i seem to be getting there.


Bish - When you state fine needle, is that a .20 size needle? And you are correct about the trial and error of paint/thinner ratio. I had a good time figuring that out yesterday before work.

Hunter 


  • Member since
    March 2007
  • From: NJ
Posted by JMart on Sunday, February 7, 2016 8:19 AM

Some great work in here! 

Bish - Could I join in the GB?  I have a couple Panther IIs that would fit the 1946 criteria (I think..)

Cyber-Hobby 9103 


and Dragon 6027 (which is actually the original release, CH 9103 being the "Orange box" update)

Boxart Panther II 6027 Dragon


Now, I know there are HUGE issues with the "accuracy" of those kits, mostly the turret. But I think will be a fun "What if" build for 1946. 

Cheers! James


  • Member since
    December 2002
  • From: Bury St Edmunds, Suffolk, England
Posted by Bish on Sunday, February 7, 2016 8:21 AM

I don't know the actual size i am afraid. The needles for the Badger 100 and 150 are just labeleled as XF, IL and HD, and these are Fine, Medium and Heavy needles. I have never seen a comparison of these with other needles.

I am a Norfolk man and i glory in being so


On the bench: Airfix 1/72nd Harrier GR.3/Fujimi 1/72nd Ju 87D-3

  • Member since
    December 2002
  • From: Bury St Edmunds, Suffolk, England
Posted by Bish on Sunday, February 7, 2016 8:24 AM

James, you certainly can. I built the Draon kit you have there many many years ago. It one of the few kits that have survived from before my short break in the hobby. Are you planning on building both of those or just one, eitehr way would be greta and it definatly fits the GB.

I am a Norfolk man and i glory in being so


On the bench: Airfix 1/72nd Harrier GR.3/Fujimi 1/72nd Ju 87D-3

  • Member since
    December 2002
  • From: Bury St Edmunds, Suffolk, England
Posted by Bish on Sunday, February 7, 2016 8:34 AM

James, i thought i would share these with you, one of my oldest surving builds. I know the kit was released in 1994, so i mst have built this in the late 90's, so over 15 years old. My weathering consisted of nothing more than some dry brushing and i hope my dio's have improved since this. But it a nice kit despite the issues.

I am surprised Dragon have not re-tooled this, i would certainly get a new one.

I am a Norfolk man and i glory in being so


On the bench: Airfix 1/72nd Harrier GR.3/Fujimi 1/72nd Ju 87D-3

  • Member since
    January 2016
  • From: A Galaxy Far, Far Away
Posted by Hunter on Sunday, February 7, 2016 8:43 AM

Bish - The XF sounds like the .20, IL would be .30 and the HD would be .50. That is my guess. I am not sure...but if I was a betting man I would say this is it. Thank you again sir.

Hunter 


  • Member since
    December 2002
  • From: Bury St Edmunds, Suffolk, England
Posted by Bish on Sunday, February 7, 2016 8:46 AM

I would say thats likely. I guess badger just wanted to be differant. And your very welcome.

I am a Norfolk man and i glory in being so


On the bench: Airfix 1/72nd Harrier GR.3/Fujimi 1/72nd Ju 87D-3

  • Member since
    November 2009
  • From: SW Virginia
Posted by Gamera on Sunday, February 7, 2016 10:44 AM

Hey guys nice to see all this progress!!!

Terry: You're a brave man to tackle yet another giant railroad model. Looks good, like the metallic paint there.

Steve: Very cool idea there, I'd never have thought to modify the kit to represent her at her death like that. Though now I'm thinking about a bad horror movie of her wreck swarming with radioactive National Socialist ghosts out for vengence!

James: Neat and fits right into the spirit of the build. I tried building a Panther F with that turret probably about the same time Bish did but royally screwed the thing up.

Bish: Really nice work there, thanks for sharing. I was trying to do figures at about the same time in my modeling life but I never tried to fit as many into a dio or as well.

Hunter: My two cents, I'm not sure the type of airbrush or needle is that important to fine lines. I mean you're not going to get them from a really cheap brush or an industial product designed to spray houses but as you said I think it's more getting the paint/thinner ratio right. And I don't think there's any hard and fast rules here, just keep playing with it till you get it right. After awhile you'll develop a 'feel' for the right ratios. That and practice, grab an old or cheap model and just keep working at it. I'm not sure that I or anyone else can give you advice anywhere near as good as hands on experience you'll build up on your own.

"I dream in fire but work in clay." -Arthur Machen


  • Member since
    January 2015
Posted by Moff on Sunday, February 7, 2016 5:26 PM

In case anyone's still looking for something to build, this was in an Armorama newsletter: 

http://www.armorama.com/modules.php?op=modload&name=News&file=article&sid=21594&mode=thread&order=0

"Gaiety is the most outstanding feature of the Soviet Union." - Josef Stalin 

JOIN OUR COMMUNITY!

Our community is FREE to join. To participate you must either login or register for an account.

SEARCH FORUMS
FREE NEWSLETTER
By signing up you may also receive reader surveys and occasional special offers. We do not sell, rent or trade our email lists. View our Privacy Policy.