SEARCH FINESCALE.COM

Enter keywords or a search phrase below:

75th Anniversary of 1941 Group Build (World at War)

36895 views
712 replies
1 rating 2 rating 3 rating 4 rating 5 rating
  • Member since
    September 2003
  • From: AandF in the Badger State
Posted by checkmateking02 on Thursday, July 28, 2016 12:02 PM

Looking good, Dan.

I've not tried painting figures over a black primer/basecoat, although I've read that this is done very often now.  I look forward to seeing how it goes.  

It's also curious that they recommended RLM 02, a Luftwaffe color.  There is plenty of field gray paint out there for uniforms.


  • Member since
    December 2002
  • From: Bury St Edmunds, Suffolk, England
Posted by Bish on Thursday, July 28, 2016 12:49 PM

Nice work Dan. jack beat me to it on the Uniform, though i was not sure of the date (thanks jack). Assault gun crews did have a special field crew version of the Pz Uniform.

Jack, do you not think that RLM 02 would be more suited to the Reed Green Pz denims.

I am a Norfolk man and i glory in being so


On the bench: Airfix 1/72nd Harrier GR.3/Fujimi 1/72nd Ju 87D-3

  • Member since
    December 2002
  • From: Bury St Edmunds, Suffolk, England
Posted by Bish on Thursday, July 28, 2016 12:52 PM

Check, i started priming my figures in black a while ago after reading up on figure painting. It does help with the shadows.

I am a Norfolk man and i glory in being so


On the bench: Airfix 1/72nd Harrier GR.3/Fujimi 1/72nd Ju 87D-3

  • Member since
    April 2006
  • From: ON, Canada
Posted by jgeratic on Thursday, July 28, 2016 7:17 PM

Hi Bish, about the RLM 02 for the reed green denim - I would say yes, but again there does seem to be some variety out there.   From looking at what are claimed as originals, plus factoring wash and wear, there is no clear choice.

Back to field grey, some may have seen this photo before of a collector's array of original tunics:

It's interesting that even the early war examples, (they have the dark 'bottle' green collars), have some vaiety in their shades.

regards,

Jack

  • Member since
    September 2003
  • From: AandF in the Badger State
Posted by checkmateking02 on Saturday, July 30, 2016 10:46 AM

Bish

Check, i started priming my figures in black a while ago after reading up on figure painting. It does help with the shadows.


Bish:
I picked up a book on painting wargame figures a few months ago, and priming in black seems to be pretty standard now.
 
Conventional wisdom used to be to start with a white base, paint the main colors, then add shadows and highlights last.  Maybe I need to learn something new.
 
Is it hard to get good coverage over the black with the other colors?  I've been picking up Vallejo paints, but haven't got around to trying anything, until I get group build projects done.


  • Member since
    April 2006
  • From: ON, Canada
Posted by jgeratic on Thursday, August 4, 2016 7:10 PM

So I have a second entry for this one, HobbyBoss BA-20 Soviet Armoured Car.  I will be putting it in Finnish markings for the Continuation War of 1941.

56fcc76fd723f.jpg

28468607466_9ee76a2669_b.jpg

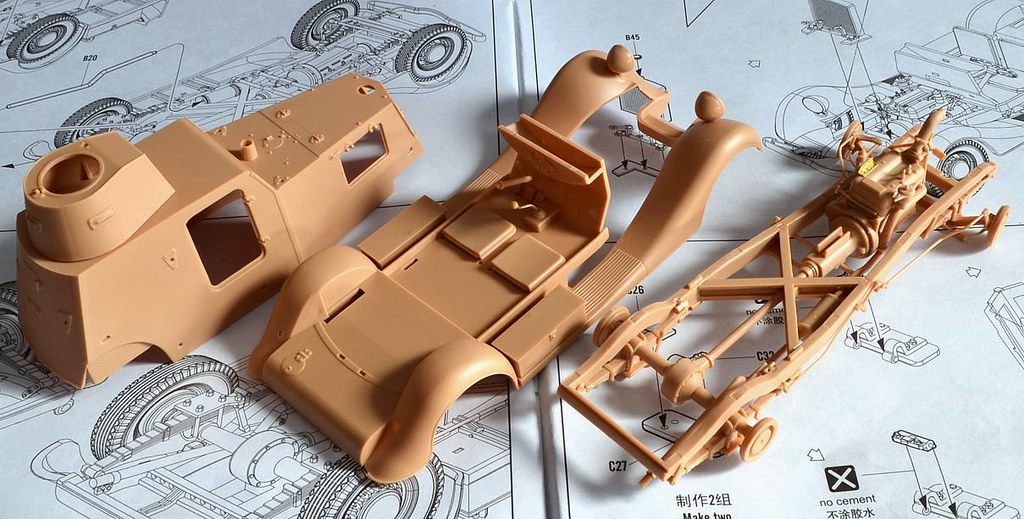
Had considered making the steering assembly workable, but there were parts either too tiny, or head scratching to determine how exactly to create a swivel point.

27884010044_836edd831f_b.jpg

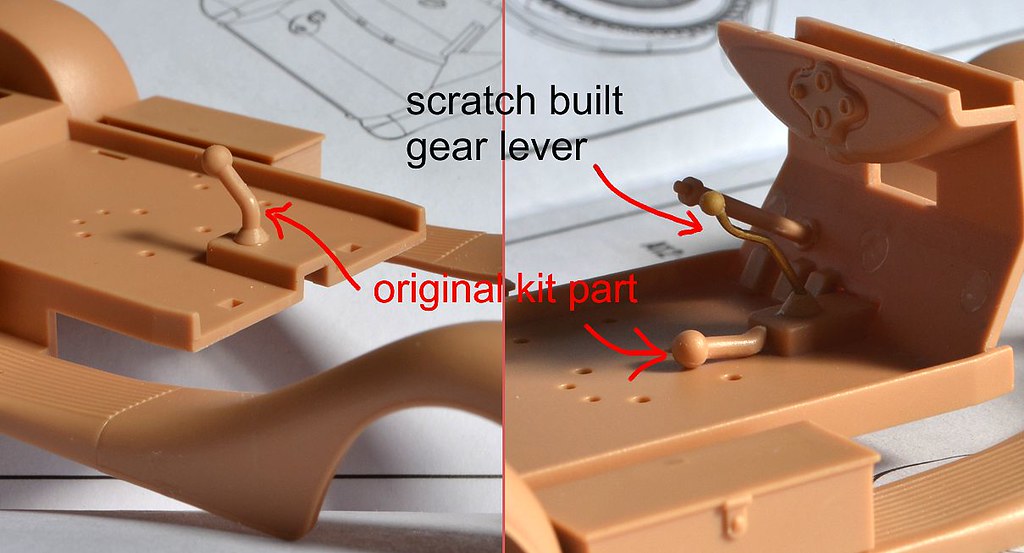
One thing I decided to improve on was the gear shifter, which might of looked fine in a Shrek movie, but not here.  A 7mm brass rod was bent to shape, and made the ball end from some putty.  The second half of the above photo shows the size difference.

large_20293543_qxI3.jpg

From a museum, this interior shot confirms my suspicion that the gear lever is out of scale - mind you, it could be a post war replacement?  Interesting too the interior, flat black  floor and mostly white inside.

Both cab doors and turret hatch will be left open, so that meant adding some scratch built items.

28154188904_0f158cde5a_b.jpg

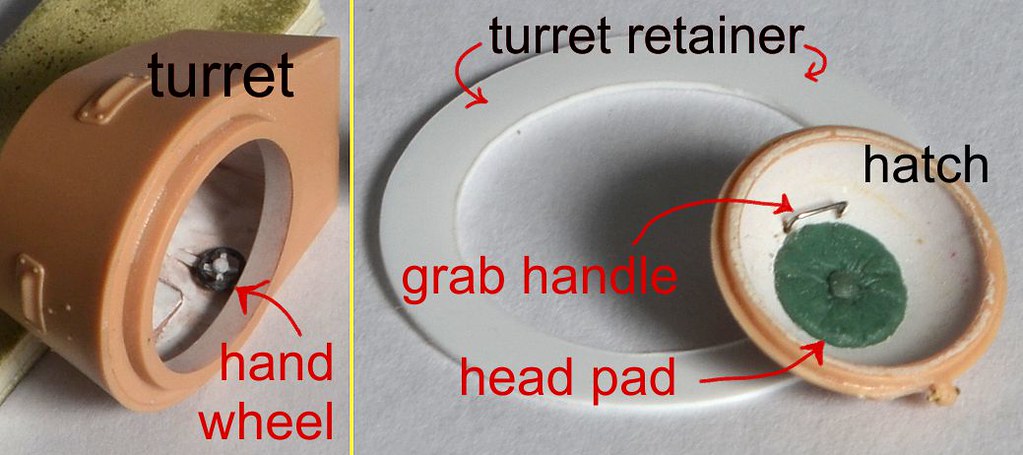
To the turret, a scratch built hand wheel was added.  There is no detail inside except for some support bracing, so I added some rectangular pieces to correspond with the visors are seen on the exterior.  It's very simplistic, and didn't bother taking a clear photo of this.  For the turret hatch, have created some padding from green stuff putty, along with a wire handle.

Should mention HobbyBoss just has the turret sitting in the hole of the cab roof, with only gravity holding it in place.  So a compass cutter was used to cut out a retainer ring from plastic sheet.

28154191174_1d4d94a8e7_b.jpg

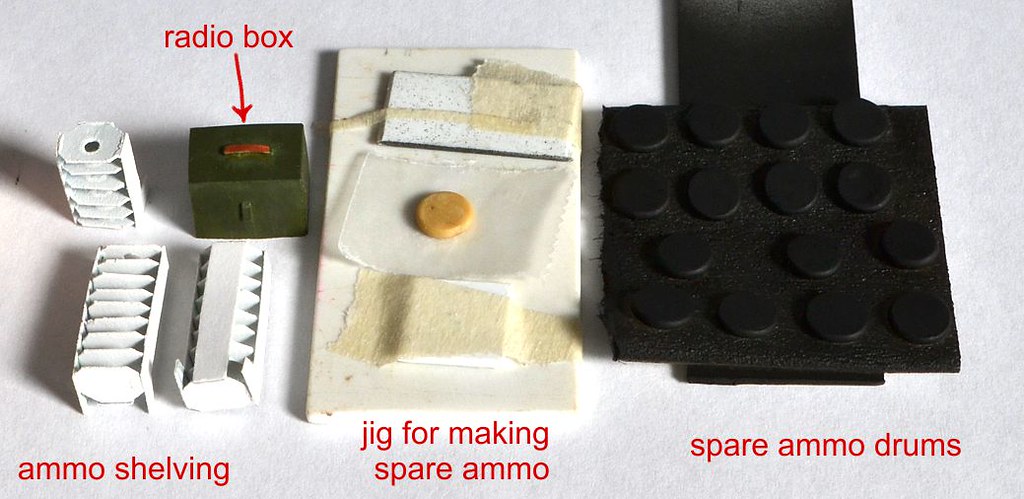
Found a pdf file of a paper model on this particular subject, so that gave me the idea to create some shelving for spare ammo.   That was  made from paper card stock and white glue.  For the drum shaped ammo, I used two part modeling putty.   After a few test creations, I was able to roll some balls of the putty, and then place them one at a time in a sort of jig.  That helped to measure how flat to squeeze them down to a constant thickness.   Strips of wax paper helped deal with their tackiness until dry.  Afterwards, sprayed with some flat black.  The radio was an afterthought.  No idea of size or shape, so just made a box with a leather handle on top.

28154190414_bae011af8e_b.jpg

28740229176_80bac9e22c_b.jpg

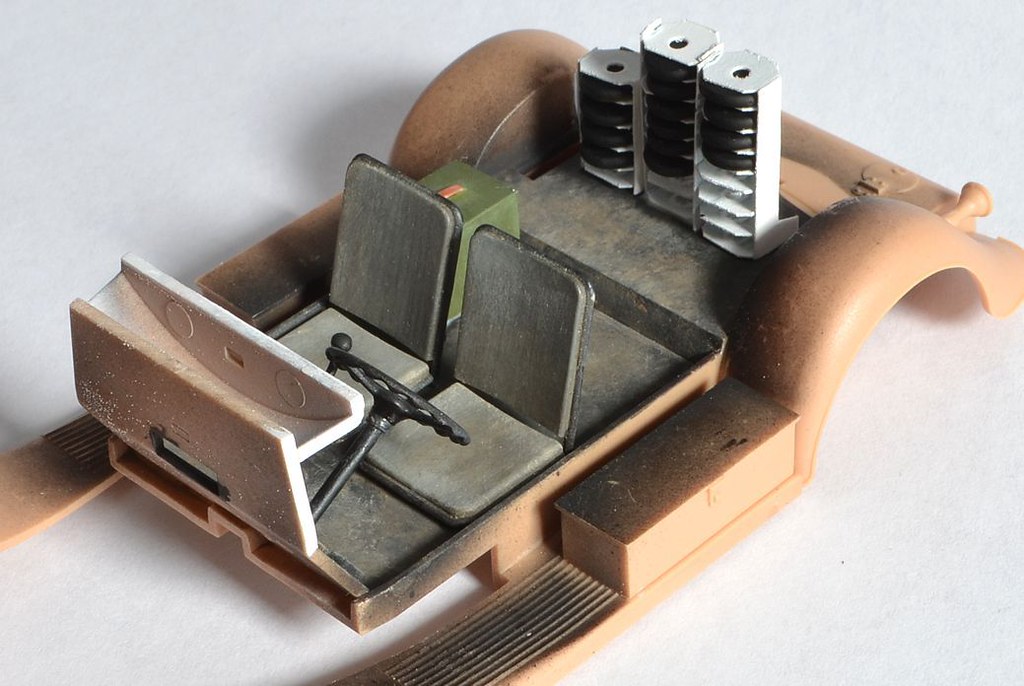
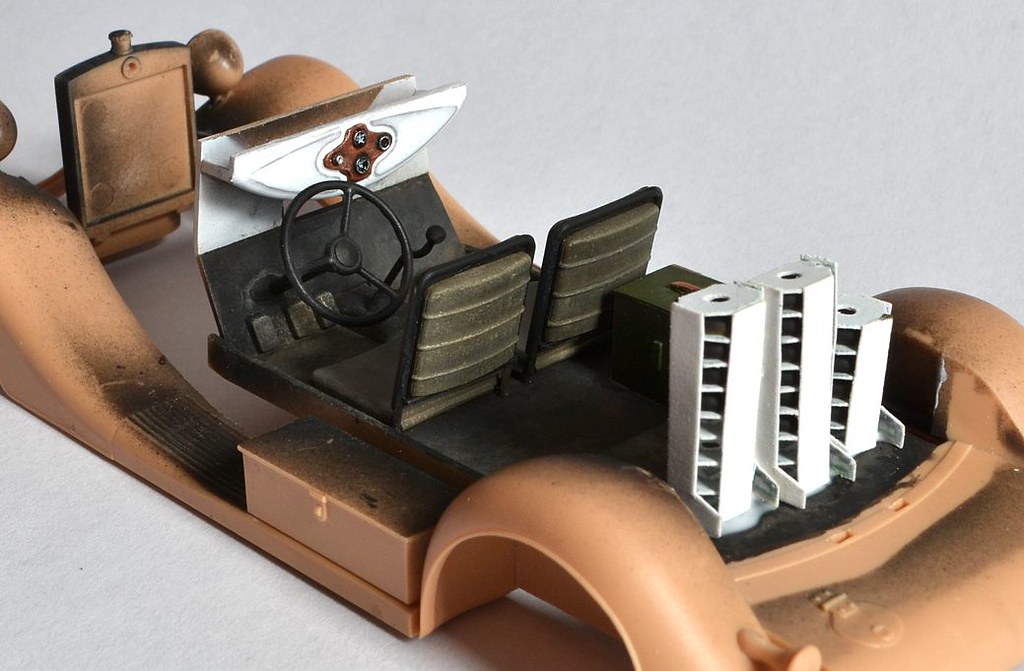
Last two photos has everything in place.  The dash board was given a wood grain finish, and although the kit supplies a couple decals for the dials, they were a bit oversize.

regards,

Jack

  • Member since
    September 2003
  • From: AandF in the Badger State
Posted by checkmateking02 on Friday, August 5, 2016 8:48 AM

Great to have another addition to the GB, Jack. I'll update the front page with the information.

And this is very engaging to see how you've improved on the basic kit. Nice work and some creative approaches you've shown us. It'll be fascinating to watch the rest of it coming together.


  • Member since
    April 2006
  • From: ON, Canada
Posted by jgeratic on Friday, August 5, 2016 9:16 AM

Thanks Check, and yes scale is 1/35. 

The kit is quite good, and they did a great job on the engine and all the workings underneath, but too bad they did not follow through the same way with the interior.

regards,

Jack

  • Member since
    September 2003
  • From: AandF in the Badger State
Posted by checkmateking02 on Friday, August 5, 2016 2:03 PM
Well, the way you've improved it makes it look pretty good.


  • Member since
    December 2002
  • From: Bury St Edmunds, Suffolk, England
Posted by Bish on Friday, August 5, 2016 2:32 PM

checkmateking02
 
Bish

Check, i started priming my figures in black a while ago after reading up on figure painting. It does help with the shadows.


Bish:
I picked up a book on painting wargame figures a few months ago, and priming in black seems to be pretty standard now.
 
Conventional wisdom used to be to start with a white base, paint the main colors, then add shadows and highlights last.  Maybe I need to learn something new.
 
Is it hard to get good coverage over the black with the other colors?  I've been picking up Vallejo paints, but haven't got around to trying anything, until I get group build projects done.


Sorry i didn't spot this sooner check. No, i have no issues covering the black with the colours i use on German figures. I switched to the vallejo after i got the Osprey book on painting SS figures. I had always struggled painting SS camo but that has some great tips and i just figured it would be easier to use the colours they do rather than try and match. And i much prefer them to tamiya. I find they brush better an di can dry brush with them which is really awkward with tamiya.

I am a Norfolk man and i glory in being so


On the bench: Airfix 1/72nd Harrier GR.3/Fujimi 1/72nd Ju 87D-3

  • Member since
    December 2002
  • From: Bury St Edmunds, Suffolk, England
Posted by Bish on Friday, August 5, 2016 2:33 PM

Nice subject Jack, off to a good start.

I am a Norfolk man and i glory in being so


On the bench: Airfix 1/72nd Harrier GR.3/Fujimi 1/72nd Ju 87D-3

  • Member since
    September 2003
  • From: AandF in the Badger State
Posted by checkmateking02 on Friday, August 5, 2016 9:44 PM
Thanks for the info, Bish. Going to try Vallejo when I get ahead on some of the GB's, and experiment with the black primer.


  • Member since
    February 2006
  • From: Cincinnati Ohio
Posted by DantheMan85 on Thursday, August 18, 2016 11:04 AM


Jgeratic: Great start to your Armored car, nice ammunition racks.


Work has went smoothly on the StuG. III. Only real problem has been the right side platform, the side with the styrene strip. The hole piece is some what warped, I don't feel like removing it so I'm using shims to attach the two anchor points with styrene strips. Figure paint is coming along great, the two on the ends get camouflage on there jackets. I'm using XF-52 as the base, Model Master medium green, and Model Master Euro Green.


On my Work Bench: Tamiya Ford GT 1/24

Up Coming: ?


  • Member since
    December 2002
  • From: Bury St Edmunds, Suffolk, England
Posted by Bish on Thursday, August 18, 2016 11:42 AM

Its looking good there Dan and nice looking figures as well.

I am a Norfolk man and i glory in being so


On the bench: Airfix 1/72nd Harrier GR.3/Fujimi 1/72nd Ju 87D-3

  • Member since
    September 2003
  • From: AandF in the Badger State
Posted by checkmateking02 on Thursday, August 18, 2016 5:33 PM
Good progress and work, Dan. Figures are coming along really well, and looking great.


  • Member since
    April 2006
  • From: ON, Canada
Posted by jgeratic on Monday, August 22, 2016 10:54 PM

Thank you Dan, I like how your StuG is turning out, and those figs should compliment it nicely.

--------------------

So about two weeks ago I started hacking apart the BA-20 armoured car.  It already had primer and even some of the body sprayed, when it was brought to my attention that the kit has some shape/dimensional issues.

The turret should be asymmetrical when viewed from atop and front.  The hatch is also too small, which would explain why testing a figure through the opening, and it would not fit - this was with it's arms unattached.

Turret cut apart to it's original pieces, plus a slice at the rear to widen the structure and help create a non-symmetrical shape.

Back together for the most part, need to add some minor details and scratch build a couple vision ports for the rear and starboard side.  Roof was completely rebuilt, and hatch was enlarged by cutting into four quadrants, followed by sandwiching plastic sheet between the cuts and reassembled.

Above are some initial cutting apart of the crew cab, which also requires correcting. From atop view, it should be wider at the plane where the armoured plate with the driver vision ports are located.  It was suggested  about 3mm is the amout to widen. 

The hinges on the bonnet will also be moved forward.  Apparently the vehicle in the Finnish museum had this section replaced with something else, so is not original.

regards,

Jack


  • Member since
    December 2002
  • From: Bury St Edmunds, Suffolk, England
Posted by Bish on Tuesday, August 23, 2016 3:26 AM

Love your dedication jack. Great work as always.

I am a Norfolk man and i glory in being so


On the bench: Airfix 1/72nd Harrier GR.3/Fujimi 1/72nd Ju 87D-3

  • Member since
    September 2003
  • From: AandF in the Badger State
Posted by checkmateking02 on Tuesday, August 23, 2016 4:25 PM
Very much improved appearance, Jack. Nice job!


  • Member since
    April 2006
  • From: ON, Canada
Posted by jgeratic on Monday, August 29, 2016 9:57 PM

Thank you Bish and Checkmate.

I've just a single photo update, but it involved quite a bit of work.  The only thing I did not mark down was the putty areas.

As far as I know, no PE set out there yet for this kit, so I decided to make my own Cool

The antenna railing wasn't necessary to replace, but since I had to make a larger section in the front to accommodate the new wider body, I decided to replace it all with brass rod since I can still see seams on the plastic one.  The diameter actually looks more to scale now based on period photos.

Still a few minor details to replace, but the new cab shape is done.

regards,

Jack

  • Member since
    September 2003
  • From: AandF in the Badger State
Posted by checkmateking02 on Tuesday, August 30, 2016 4:18 PM

Outstanding work, Jack.  Gives it an entirely different look.


  • Member since
    April 2006
  • From: ON, Canada
Posted by jgeratic on Monday, September 5, 2016 7:01 PM

Thanks Check.

------------------------------------

Last bit of details on the cab:

Most of the notations on the pictures are self-explanatory. 

The kit had the shovel bracket as a fairly thick piece of plastic, but was nicely detailed.  I needed it thinner as a storage box will be sitting in front of it.  One could just sand down the back of it, but I decided to get fancy and replace the shovel handle as well, so some scratch building was on order.

Turret is complete, sans the machine gun (it finally broke off from all the handling).

Hinge was totally scratched, and was built around three pieces of hollow brass rod 0.8mm in size. 

There are bolts cast right on the kit sprues, and the kit instructions have you slice these off and place four of these on the front of the cab, just above the two vision ports.  There was an extra four, which came in handy to replace the lost detail at the back of the turret.

regards,

Jack


  • Member since
    September 2003
  • From: AandF in the Badger State
Posted by checkmateking02 on Monday, September 5, 2016 8:41 PM

Outstanding modifications, Jack.  Really enhances the look of things.  Nice work!


  • Member since
    December 2002
  • From: Bury St Edmunds, Suffolk, England
Posted by Bish on Wednesday, September 7, 2016 12:18 AM

Some ipresive detailing there Jack. Really nice work as always.

I am a Norfolk man and i glory in being so


On the bench: Airfix 1/72nd Harrier GR.3/Fujimi 1/72nd Ju 87D-3

  • Member since
    April 2006
  • From: ON, Canada
Posted by jgeratic on Sunday, September 11, 2016 7:06 PM

Thank you Check and Bish.

------------------------------

The other main section I've been working on is the chassis and wheels.

Have ordered and received DEF Models resin tires, but they are made for the GAZ field car from Tamiya.   They do look identical detail wise, just the diameter is slightly smaller - hope that won't be a problem.  The hubs from the HobbyBoss kit fit perfectly, as seen below:

For the new resin wheels to fit, the inner wheel disc details can't be used from the base kit, and the wheels themselves have to be altered to fit the rear axle.  The front is a bit more tricky, will have to drill holes and use brass pins for a more solid joint.

Also spent a few evenings altering a German figure from Alpine, converting it to a Finnish crew member.  Using green stuff putty, it involved the following:

1. - Hornet head wearing M43 cap.  German insignia is scraped off and replaced with a cockade, to be in Finnish colours.  Also beefed up the sides a bit to resemble those in seen in period photos.

2. - Most of the alterations are on the chest/jacket areas.  Two chest pockets with scalloped flaps, pleats and buttons.  Lapels removed to form a simple collar, and a flap added to hold jacket open at neck during warm weather.

3. - Jacket is lengthened to a more proper dimension.

4.-  Some photos show the wearing of boots with the tops folded down - likely another warm weather modification.

Car all primed up, and possible posing of figure standing on running board.  Don't like how precarious the footing is (inset pic), so will have to wait until the wheels are attached for different pose leaning on the fender.

regards,

Jack

  • Member since
    September 2003
  • From: AandF in the Badger State
Posted by checkmateking02 on Sunday, September 11, 2016 7:40 PM
Very innovatice, Jack! Things are looking exceptionally good!


  • Member since
    February 2006
  • From: Cincinnati Ohio
Posted by DantheMan85 on Wednesday, September 14, 2016 10:34 AM

Thanks Bish & Checkmate.

Thanks jgeratic: The alterations your doing are adding more detail and pop to your armored car. Nice work.

Work on the StuG continues, both left and right tracks are glued up and fitted, and painted. Before I airbrushed them I dipped them into a soapy bath, using two TV dinner containers(one soapy and one water). The one's I'm using are about seven inched long by five inches wide and two inched deep. They also work great for decals.

After the tracks I finished the StuG and primed it up.


On my Work Bench: Tamiya Ford GT 1/24

Up Coming: ?


  • Member since
    December 2002
  • From: Bury St Edmunds, Suffolk, England
Posted by Bish on Thursday, September 15, 2016 1:00 AM

Thats loking greta there Jack, nice job on the figure.

I am a Norfolk man and i glory in being so


On the bench: Airfix 1/72nd Harrier GR.3/Fujimi 1/72nd Ju 87D-3

  • Member since
    December 2002
  • From: Bury St Edmunds, Suffolk, England
Posted by Bish on Thursday, September 15, 2016 1:01 AM

Liking the StuG Dan, be nice to see the paint going on.

I am a Norfolk man and i glory in being so


On the bench: Airfix 1/72nd Harrier GR.3/Fujimi 1/72nd Ju 87D-3

  • Member since
    September 2003
  • From: AandF in the Badger State
Posted by checkmateking02 on Thursday, September 15, 2016 5:33 PM

Looks like I'm going to have to buy some TV dinners, Dan!

And that StuG is looking mean and deadly--kind of hunched down and ready to spring.  Nice work!


  • Member since
    February 2006
  • From: Cincinnati Ohio
Posted by DantheMan85 on Saturday, September 17, 2016 3:46 PM

Thanks Bish & Checkmate.

After primer I airbrushed on model master gloss black as a pre-shade, for some reason that color take at least two days to dry. 

Then I followed up with two coats of Tamiya XF-63 German Grey.


Earlier today I post-shaded with a mix of XF-63 and XF-2 flat white. I might go lighter with another shade of grey.


On my Work Bench: Tamiya Ford GT 1/24

Up Coming: ?


JOIN OUR COMMUNITY!

Our community is FREE to join. To participate you must either login or register for an account.

SEARCH FORUMS
FREE NEWSLETTER
By signing up you may also receive reader surveys and occasional special offers. We do not sell, rent or trade our email lists. View our Privacy Policy.