SEARCH FINESCALE.COM

Enter keywords or a search phrase below:

75th Anniversary of 1941 Group Build (World at War)

36902 views
712 replies
1 rating 2 rating 3 rating 4 rating 5 rating
  • Member since
    April 2010
Posted by Theuns on Monday, December 19, 2016 10:43 AM

"EDIT: It may take me until 2010 to complete the Takao"

If it takes you till 2010 you are already 6 years behind schedule mate LOL

I just wonder if my model will still qualify as I have decals for the 1940 Battle of Britan ops....If the specific plane still existed in 1941 I have no idea.

Maybe the host can make a ruling on this?


Theuns

  • Member since
    July 2014
Posted by modelcrazy on Monday, December 19, 2016 12:36 PM

Wow, that was a bobo. 2020 LOL

Steve

Building a kit from your stash is like cutting a head off a Hydra, two more take it's place.


http://www.spamodeler.com/forum/

  • Member since
    September 2003
  • From: AandF in the Badger State
Posted by checkmateking02 on Monday, December 19, 2016 4:37 PM

Theuns:

If it survived 1940 and still existed in 1941, it could go here--but it should be in the markings it carried in 1941.

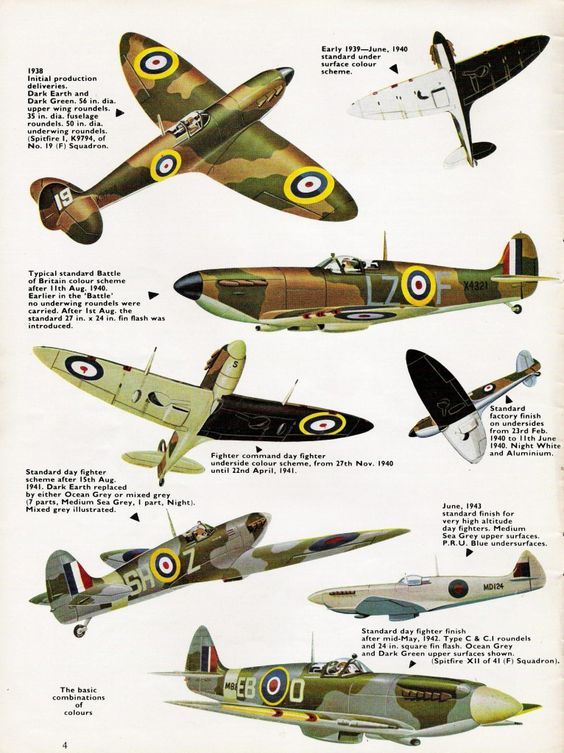
The RAF did make some changes to its markings between late '40 and '41.  The port wing was again painted black or "night," until the Spring.  In August '41, RAF also dropped Dark Earth in favor of Dark Green/Ocean Grey/Medium Sea Grey, with a rear fuselage band of Sky or some kind of light blue or grey.

If you can see the tiny captions, here's an overview I found on pinterest, where I got the information.

Alternatively, you can still enter it in the "1939-40 GB," and enter something else for the '41 GB.  There's a lot of time left till 2020, and it would be great to have you build something for it! 


  • Member since
    April 2010
Posted by Theuns on Monday, December 19, 2016 10:04 PM

I just had a look at the colour instructions of the kit now and both options are actually for June and July 1941 (again I did not read well enough!)

They however show dark green/dark earth over Sky S.


I will have to reserch it a little more.


Theuns

  • Member since
    September 2003
  • From: AandF in the Badger State
Posted by checkmateking02 on Tuesday, December 20, 2016 4:53 PM

Theuns:

if the chart I posted is correct, those colo(u)rs sound right.  The chart says the black wing was discontinued in April 1941--which would leave the underside in Sky.

And the green/grey scheme didn't take effect till 15 August, 1941.

So it looks like DE/DG over Sky would be the right choice for June and July in '41--just right for the 1941 GB.

Let me know for sure, and I'll add the Mk 2 to the front page.  I'm fond of Spitfires, so I'll be very interested to see your work.


  • Member since
    November 2003
  • From: Naples, FL
Posted by tempestjohnny on Tuesday, December 20, 2016 9:29 PM

checkmateking02
I'm fond of Spitfires, so I'll be very interested to see your work.

shhh. Don't tell Bish


  • Member since
    September 2003
  • From: AandF in the Badger State
Posted by checkmateking02 on Tuesday, December 20, 2016 9:37 PM

Zip it!

Mum's the word.


  • Member since
    April 2010
Posted by Theuns on Saturday, December 24, 2016 9:51 AM

OK, so here is my 1/32 Revell Spitfire Mk2a as it was in 1941.

I basically painted the cockpit parts and weathered them , assembly will be next.

I did not use the kits decal for the IP, I rather painted the detail on and filled the bevels with clear acrylic to look like glass faces.

The Sutton harmass on the seat is from masking tape and spare buckles.

Interestingly the seat was from a molded phonellic plastic....no idea why they did that.

Image


Theuns

  • Member since
    September 2003
  • From: AandF in the Badger State
Posted by checkmateking02 on Saturday, December 24, 2016 10:26 AM

Welcome to the GB, Theuns.  Glad to have you!  I've updated the GB roster to include your Spitfire.

That's amazing work on the IP.  Great detail!

Also I like the red-brown seat.  They were made from synthetic resin bonded paper, and came into production from 14 May, 1940, so any Spitfire after that would have them. They were used through the end of the war, and even beyond.


  • Member since
    September 2003
  • From: AandF in the Badger State
Posted by checkmateking02 on Saturday, December 24, 2016 10:31 AM

Merry Christmas!


  • Member since
    April 2010
Posted by Theuns on Sunday, December 25, 2016 9:54 AM

Latest on the cockpit.

I added thin copper wire to look like the copper tubing they used in the hydrolic system. You can see them going into and from the controller valves. There are also the elecrtical lines running to the fire controll botton on the spade handle top of the collomb.


Theuns

  • Member since
    September 2003
  • From: AandF in the Badger State
Posted by checkmateking02 on Sunday, December 25, 2016 1:23 PM

That is looking really good, Theuns!  Very realistic.


  • Member since
    April 2010
Posted by Theuns on Friday, February 24, 2017 11:13 PM

I had been wrestling with this kit for some time now, the fit is poor and loads of detail hed to be re scribed after allot of filling and sanding.

The canopy fit was so bad that the malcom hood has to be open to hide it :-(

eventually I got to priming and shading

Image

The bottom Sky came out well, I will still do loads of weathering on it

Image

The top is also faded allot with some shading coming through, (poor cell pix)

Hoping to get the green on later today.


Theuns

  • Member since
    September 2003
  • From: AandF in the Badger State
Posted by checkmateking02 on Saturday, February 25, 2017 10:31 AM

Very nice work, Theuns.  You've done well overcoming the construction challenges.  

It looks like you masked the green areas first, to preserve the pre-painted panel lines. I've wondered how that's accomplished in a multi-color camouflage scheme.

Looking forward to seeing your future progress.


  • Member since
    April 2010
Posted by Theuns on Saturday, February 25, 2017 11:10 AM

No, I basically sprayed on the brown areas leaving the green areas open.

Then I masked off the brown with masking tape and "prestic worms" and sprayed the green in the same manner to have the shading still show a little.


Theuns

  • Member since
    September 2003
  • From: AandF in the Badger State
Posted by checkmateking02 on Saturday, February 25, 2017 4:29 PM
So you sprayed the brown freehand? That's even more impressive.


  • Member since
    April 2010
Posted by Theuns on Sunday, February 26, 2017 12:02 AM

Thanx, I tend not to mask off the base colour as it leads to a ridge showing through the top colour.

I rather used humbrol 163 dark green instead of the normal humbrol 30 wich is way to "blue"

I sprayed the green and brown very thin and uneven to simulate the blotchy way it would fade, I am rather pleased with the results sofar.


Theuns

  • Member since
    September 2003
  • From: AandF in the Badger State
Posted by checkmateking02 on Sunday, February 26, 2017 12:02 PM

That turned out really well, Theuns. Very effective technique.

I've been using Colourcoats RAF paints for a while. I think MM's RAF Dark Green has the same "too blue" issue.

Well done!


  • Member since
    April 2010
Posted by Theuns on Sunday, February 26, 2017 10:18 PM

Where I live my choises as far as paints go are limited to Humbrol or Tamiya. I can find a few colours of Xtra colour but with all the rain we have been having the gloss would take for ever to cure so Humbrol was what I used.

The tamiya clear acrylic is on, it will need a pollish then I hope the decals are good in this kit...


Theuns

  • Member since
    September 2003
  • From: AandF in the Badger State
Posted by checkmateking02 on Monday, February 27, 2017 4:15 PM

I managed to get some Xtracolour before the mail services banned enamel paints. Haven't tried them yet.

Humbrol paints always seem to work well--in some cases better than Testor's MM.

Anyway, the Spitifre is looking good. I do love the RAF's DE and DG camouflage.


  • Member since
    April 2010
Posted by Theuns on Monday, February 27, 2017 10:18 PM

I found that with Humbrol I need to thin it with mineral turps, if I use other thinners I get pigment seperation in any thing higher than about 20%. With the turps I can go to 40% and still keep the paint as intended.

The Xtra colour is also very nice, the closs just takes longer to cure.

The gloss acrylic on my spitty still needs to go harder before I can pollish it, the weather here is a tad cold.


Theuns

  • Member since
    September 2003
  • From: AandF in the Badger State
Posted by checkmateking02 on Wednesday, March 1, 2017 11:00 PM

Interesting.  I always thin Humbrol with lacquer thinner--up to 50-50 for spraying--and it's been working well.

I'm kinda looking forward to trying the Xtracolour.  I had to use some MM gloss Aircraft Gray recently; thinned it quite a bit (more than normal) and was surprised how well it turned out.  I also use lacquer thinner with Testors.

Thanks for the information, Theuns.  I didn't even know enamels were compatible with turpentine.


  • Member since
    April 2010
Posted by Theuns on Saturday, March 4, 2017 10:57 PM

I have most of the Spitties decals on, the bottom wing ones were a PITA to form over a few lumps and bumps but with a few gals of microsol they are ok.Sofar I am actually quite impressed with the decals, the release well, go down and form into the detail well....I am interested to see if there will be no silvering.

I hope to get the final clearcoat on soon so that I can remove the masking from the canopy,, its been on way to long now :-(


Theuns

  • Member since
    September 2003
  • From: AandF in the Badger State
Posted by checkmateking02 on Sunday, March 5, 2017 2:24 PM
Sounds good, Theuns. I'm very interested in seeing the finished product!


  • Member since
    April 2010
Posted by Theuns on Sunday, March 12, 2017 1:13 AM

Paint and weathering turned out OK, I still need to put some oil on the bottom.

The stencling carrier film silvered like mad, even with loads of microsol. I had to carefully put tamiya  thin cement on those areas to desolve the film.


Theuns


  • Member since
    September 2003
  • From: AandF in the Badger State
Posted by checkmateking02 on Sunday, March 12, 2017 12:48 PM

Using Tamiya cement to settle decals is a technique I've not heard of.  Glad it worked.

I've got a bottle of Walther's Solvaset--supposed to be a "big gun" for decaling, but I've found a number of kinds of decals that are resistant to it.  They silver and/or won't conform well to the surface.

This is a fine looking Spitfire.  Nice work!  It's quite attractive.


  • Member since
    April 2010
Posted by Theuns on Wednesday, March 22, 2017 9:51 AM

I finally completed this model.It was a real fight in some cases but overall the thing looks like a Mk2 of the 1940's RAF era.

I went for a highly faded look to the paint, the weathering is mostly chipping and exhaust/gun soot stains.


I still need to paint the pilot figure


Theuns

  • Member since
    April 2006
  • From: ON, Canada
Posted by jgeratic on Wednesday, March 22, 2017 11:22 AM

Theuns, she looks great! Yes

Man, that livery brings back some distant memories - I think Revell did the same markings for their 1/48 Spitfire released in the late 70's.

regards,

Jack

  • Member since
    December 2002
  • From: Bury St Edmunds, Suffolk, England
Posted by Bish on Wednesday, March 22, 2017 11:40 AM

Great job on the Spit theuns, really nice finish.

Check, i have heard that Xtracolor and Colorcoats are produced in the same factory. While Xtracolor is my main paint of choice, i have used colorcoats on occasion, including on my current He 162 builds. I have noticed no differance in how they spray and i thin then the same. I did use colorcoats thinner in some Xtracolor land that was fine.

Onlydown side with colorcoats is they need a gloss coat.

I am a Norfolk man and i glory in being so


On the bench: Airfix 1/72nd Harrier GR.3/Fujimi 1/72nd Ju 87D-3

  • Member since
    September 2003
  • From: AandF in the Badger State
Posted by checkmateking02 on Wednesday, March 22, 2017 2:16 PM

Great work with the Spitfire, Theuns.  Well-done!

Would you like me to post one of the photos on the front page, or shall I wait till the pilot figure is done?  Your choice.  If you want to go with one of the posted photos, do you have a preference?

Thanks for being part of the GB!


JOIN OUR COMMUNITY!

Our community is FREE to join. To participate you must either login or register for an account.

SEARCH FORUMS
FREE NEWSLETTER
By signing up you may also receive reader surveys and occasional special offers. We do not sell, rent or trade our email lists. View our Privacy Policy.