SEARCH FINESCALE.COM

Enter keywords or a search phrase below:

2016 OTS (1/72) SMALL IS BIG

24599 views
566 replies
1 rating 2 rating 3 rating 4 rating 5 rating
  • Member since
    December 2002
Posted by Bossman on Saturday, June 25, 2016 6:01 AM

Hi All,

Not much to report on the Havoc yet.  Just got a few pieces of the cockpit cut off the sprue and sanded.  I'll probably get some work done on her today - but first I have to make a trip . . .  Wonder of Wonders !!!  There's a local toy shop that is opening an expansion to include trains, rockets, and models.  Who ever heard of such a thing ?  A real hobby shop opening ! ?   In 2016 !   I'll let you know how it goes . . .  maybe I'll catch sight of a Dodo bird on my way back . . .  (or maybe I'll just be mistaken for one).

Bish, Thanks Man !    How's the Heinkel coming along ?

Theuns,  The word "gem" is getting used alot in this GB thread - but that is one fine. tiny piece of craftsmanship on the Eindecker.  I love the paint effects you've achieved with the engine cowl, the shading of the ribbing, & the weathering of the underside - very effective and fine work !   I've read a few build articles about this kit and the "fiddley" is another word that often seems to be associated with this kit.  

Sim,  The Camel is another fiddley gem.  How's that for a mixed metaphor ?    Nice work on the rigging.  That can't be easy on such a small kit.

Crown, Nice work on the MiG.   One question - just cuz I'm not that familiar with the MiG's . . .  Are the 23 and 27 basically the same airframe aft of the cockpit ? They look so similar - and I noticed in your pics that the kit is separated at the point where the cockpit joins the fuselage.  Just curious.

Chris

  • Member since
    April 2010
Posted by Theuns on Saturday, June 25, 2016 10:38 AM

Done and dusted,rigging from EZ line.

An enjoyable  little kit.


Theuns

  • Member since
    June 2003
  • From: Rowland Heights, California
Posted by Duke Maddog on Saturday, June 25, 2016 10:58 AM

Beautiful job Theuns! Far better than mine some months back. Way to go!


Chris, to answer your question; yes, the MiG 23 and MiG 27 are the same plane from cockpit aft. The MiG-23 was a fighter/interceptor so the nose holds the air-to-air radar system and is wired for AA missiles. The MiG-27 was primarily meant for ground attack/close air support. The new nose was put on the -27 to make it easier for pilots to see the ground when attacking targets, and the hard points were wired for air-to-ground ordinance instead of air-to-air; although it did have the capacity to carry some infrared homing AA missiles for self defence. I believe; if my memory serves me correctly, the smaller nose of the -27 also holds a terrain-following radar but I am not sure. There were significanr enough differences in the airframes (nose notwithstanding) that they gave the MIG-27 it's new designation.


I hope that helps.

  • Member since
    July 2014
Posted by modelcrazy on Saturday, June 25, 2016 11:17 AM

Theuns,

That looks excelent Bow DownBow DownBow Down. The rigging turned out great.

The only thing I see wrong with it is it's not in my collection.

Steve

Building a kit from your stash is like cutting a head off a Hydra, two more take it's place.


http://www.spamodeler.com/forum/

  • Member since
    April 2010
Posted by Theuns on Sunday, June 26, 2016 4:52 AM

Thanx.


Wayne, put me down for this one aswell please.

Italeri 1/72 MH-53e


Theuns

  • Member since
    January 2014
  • From: Toronto
Posted by Rob S. on Sunday, June 26, 2016 5:58 AM

Eindecker looks great Theuns! Way to go...YesCoolYes

______________________________________________________________________________


On the Bench: Nothing on the go ATM

  • Member since
    June 2008
Posted by lewbud on Sunday, June 26, 2016 3:54 PM

Theuns, great job on that little Fokker!

Haven't done anything on the gun truck, but I've started the decals on Old Crow.  Did I mention I hate Academy's decals.. This is the first a/c I've done with invasion stripes.  Fortunately, I had a spare set from the last time I built this kit.  Next time I'll paint them on, they'll look better.  I'll get to the library tomorrow and post some pics.  Keep up the good work!

Buddy- Those who say there are no stupid questions have never worked in customer service.

  • Member since
    December 2002
  • From: Bury St Edmunds, Suffolk, England
Posted by Bish on Sunday, June 26, 2016 4:38 PM

Bossman


Bish, Thanks Man !    How's the Heinkel coming along ?


Well, seeing as you asked, i was goignt o change my entry as the whole build, which will be 3 kits only one of which was to be in the GB, i won't be able to finish this year. Just need to decide for sure what i will build, but what ever it is will be up next after the halftrack i have just started.

I am a Norfolk man and i glory in being so


On the bench: Airfix 1/72nd Harrier GR.3/Fujimi 1/72nd Ju 87D-3

  • Member since
    December 2002
  • From: Bury St Edmunds, Suffolk, England
Posted by Bish on Sunday, June 26, 2016 4:39 PM

Theuns

Done and dusted,rigging from EZ line.

An enjoyable  little kit.


Theuns


Thats really nice, great little build.

I am a Norfolk man and i glory in being so


On the bench: Airfix 1/72nd Harrier GR.3/Fujimi 1/72nd Ju 87D-3

  • Member since
    March 2006
Posted by simpilot34 on Monday, June 27, 2016 1:17 AM

Thanks MC, Duke, Theuns, Boss!

Theuns that is one little gem I would be proud of!! Well done!! The rigging on the Camel I used a product here in Oz called 'knitting in elastic' don't know what it would be called over there. It's a thin stretchy thread like stuff, which can be split and made finer if needed. Quite a good tensile strength too I might add. Looking forward to the Seahorsie!!

lewbud I agree with you on Academy's decals. The ones on the Camel were shite, just would not lay down and snuggle around anything. Only after a liberal amount of Mr. Softer did they have any kind of flexibility around details. The decals that came with my Me-262 i done a few years ago, again an Academy kit, settled down and conformed beautifully with no more than vinegar and alchohol. Confused

Cheers, Lt. Cmdr. Richie "To be prepared for war, is one of the most effectual means of preserving the peace."-George Washington
  • Member since
    April 2010
Posted by Theuns on Monday, June 27, 2016 8:39 AM
The problem with this kit is that the cabin detail basically is only a floor and some formers in the rear boom. There is no roof of formers in the front section so I have to make it all from scratch.
I cut strips of styrene and started glueing them the the fuse side. The inadequite rear detail I had to file away and will have to do like the rest of the fuse. Then I will have to somehoe figure out how to shape anbd make the roof lining.
Image
This is the effect I want but will have to take some artistic licence with some of the detail.
Image

Theuns


  • Member since
    December 2002
Posted by Bossman on Monday, June 27, 2016 6:24 PM

Theuns - that '53 looks like a very ambitious project, 'specially with all that interior "rigging" !

Lew - good to hear that you have a second set of decals for the Old Crow.  When I built that kit I doubled up on the "B6" & "S" decals so the undercolors of black or OD wouldn't bleed through.  

Academy decals are hit or miss.  I've found some of the decals in the newer kits (The SB2C-4 Helldiver & others) to be very nice !  It seems to me that the older the kit - the lower the quality of decal.

So I finally snapped sprue and slapped some paint to begin work on the Havoc.  Here's the basic plastic parts of the interior with no photoetch or washes - just some highlights with a lightened shade of ZnCr green

Hmmmmmm . . .    I'm not likin' this . . .   just a whole bunch of "cover up" to all that pretty detail,

and I'll have some filing to do as well . . .   Nothing that hasn't been overcome before.

Alla yous keep up the interesting craftsmanship and artistry thats going on here.   It's fun to watch!

Chris

  • Member since
    June 2008
Posted by lewbud on Monday, June 27, 2016 7:04 PM

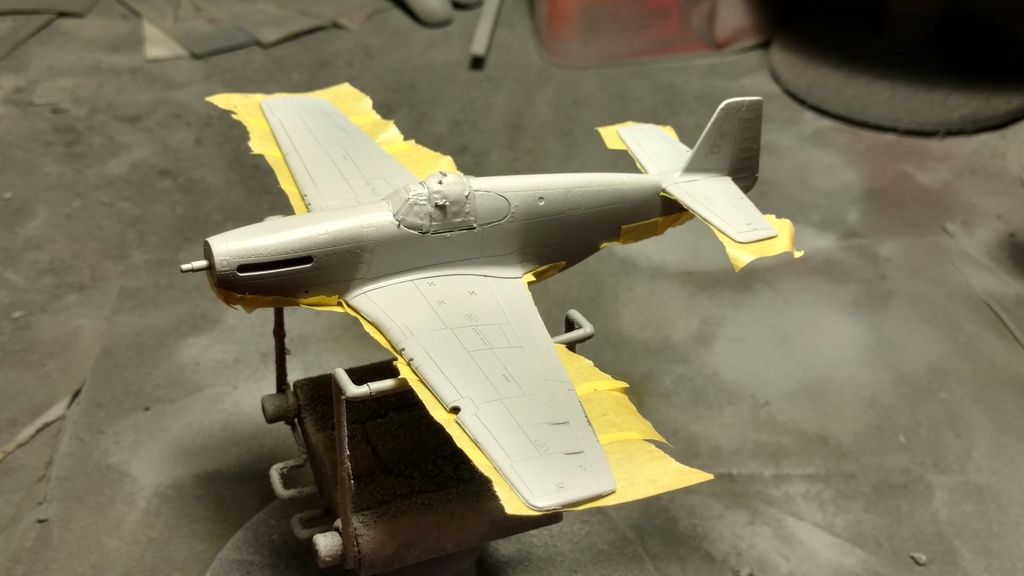
Ok, here's the update on the Mustang.  Started out as a quick build for a flash D-Day GB, however, life, malaise, lying on the floor doing nothing sort of got in the way.  The camera ate the early pics, so we get to start at the painting stage.

The tape means the Medium Gray undersides have already been shot.

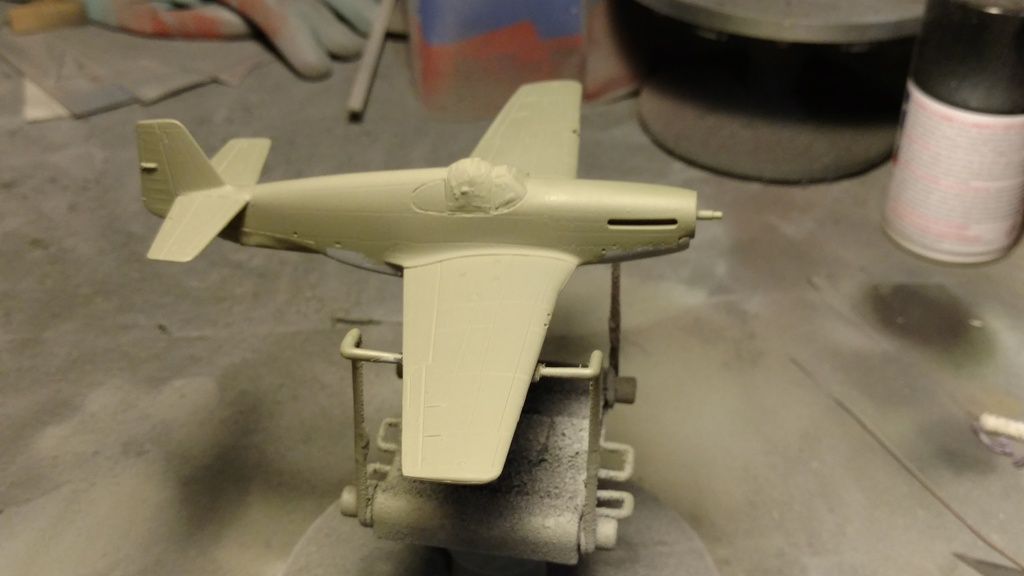
Decided I wanted a more used look for this build, so I used Model Masters Faded OD instead of my normal Tamiya OD rattle can.

Applied a coat of gloss, let the decalling begin!Propeller

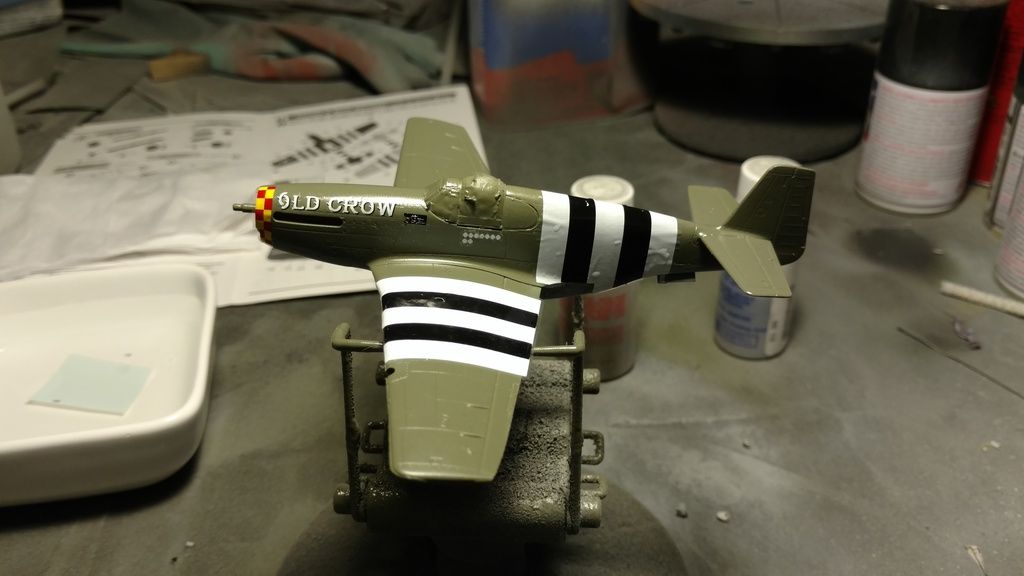
Realized later that I should have started with the bottoms, as they're keyed to the landing gear bays. So, off came the top set of stripes, and on went the bottoms.

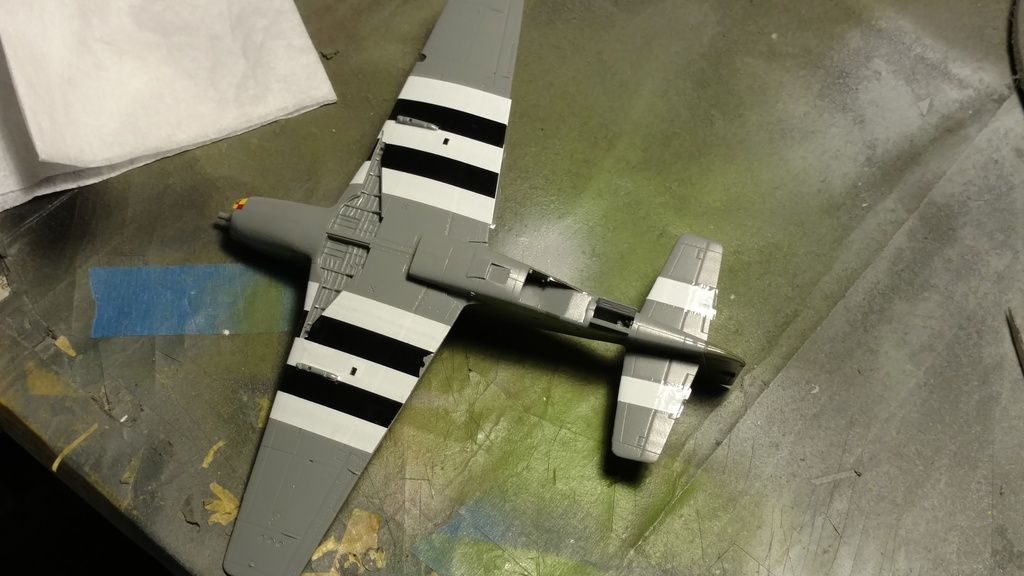
And now the wing tops and fuselage side, part deux.

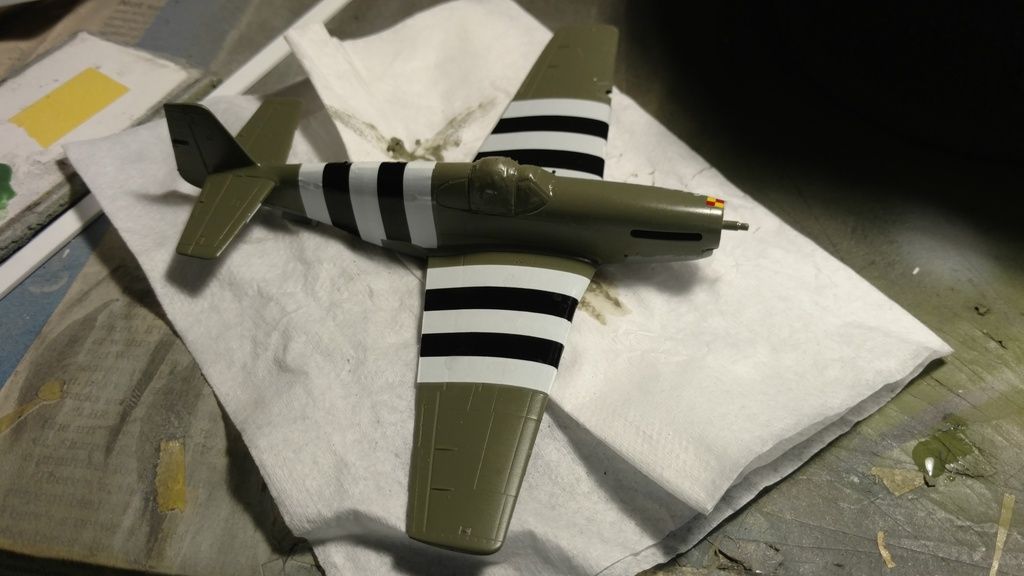
Took a lot of Microsol/set to get them to drop over the wings, but they did.  As much as I railed against them, the Academy decals are pretty tough, and will withstand some abuse.  I think the stripes behind the cockpit are a bit oversized, but then again, I don't see an invasion striped aircraft in my future should I live that long.  And that's where we're at at the moment.  IF I buckle down, I should have the decals finished by the end of the week, with a top coat of gloss on them.  More pics eventually.

Buddy- Those who say there are no stupid questions have never worked in customer service.

  • Member since
    June 2008
Posted by lewbud on Monday, June 27, 2016 7:27 PM

Today is y'alls lucky day because you get a two fer from the old lewbud.  An update on the gun truck.  For those just tuning in, this is a gun truck from a Dragon 1/72 double Humvee set.  Just your basic M998 Humvee with some hillbilly armor added to protect the gunner from small arms fire.

The start.

The gunner's area.

Mock up with the cab in place.

Without the cab.

At this point, my camera decided to eat my pictures.  In it's wisdom, Dragon made the tires and wheels separate pieces.  However, rather than make them out of vinyl like the car guys do (Thank God, they didn't), they made them out of plastic.  However, they made the wheels with a big ol' hump going around them to hold the tires in place.  However the tires don't stretch, so you've got to remove most of the hump to mount the tires on the wheels.  I had some cool pics of this but the camera decided to eat them.  So, out came the NATO green for the wheels and just about everything else, and Tamiya's rattle can Tire Rubber (did a happy dance when I found out this was back in the States) for the tires.  She is now green, and sitting upright on all fours.

Looks like I should have run it through the car wash before taking pics.  The green isn't that olive in real life.  One bad thing about the material the tires are made of, that while you can paint them, they won't hold the paint if you knock them around abit.  The next one of these I build, I'll wait until the end to put the wheels and tires on.  Hopefully, I will have found the 2-3 sets of Mig Resin tires that I bought when these came out before then.  Somehow I broke the pintle mount for the SAW, don't know if I'll replace it or not.  Thanks for looking.


Buddy- Those who say there are no stupid questions have never worked in customer service.

  • Member since
    July 2014
Posted by modelcrazy on Monday, June 27, 2016 11:25 PM

Those are really starting to look good lewbud Yes

Steve

Building a kit from your stash is like cutting a head off a Hydra, two more take it's place.


http://www.spamodeler.com/forum/

  • Member since
    March 2006
Posted by simpilot34 on Wednesday, June 29, 2016 6:53 AM

THe builds are looking great! Craftmanship at its finest!

Got a bit of bench time and got the cabane rigging done. was as easy as I hoped it would be. Put a piece acroos the top, then overlapped the bottom piece and put  bit of tension and got the right angle I think. Like I said earlier, this is going to be a two footer, looks great at two feet. lol Anyways here's a shot of the cabane rigging. Looks ok in this scale!

Cheers, Lt. Cmdr. Richie "To be prepared for war, is one of the most effectual means of preserving the peace."-George Washington
  • Member since
    July 2014
Posted by modelcrazy on Wednesday, June 29, 2016 1:36 PM

I never thought of that. Is that a drop of CA there?

Steve

Building a kit from your stash is like cutting a head off a Hydra, two more take it's place.


http://www.spamodeler.com/forum/

  • Member since
    April 2005
  • From: Australia
Posted by taxtp on Thursday, June 30, 2016 4:40 AM

Nice work on the Mustang and Humvee Lewbud. I was going to do that aircraft too, but I might vary it up to avoid audience boredom :)

I love that Eindekker Theuns, that must have sold another dozen kits for Airfix. Good to see thatneat rigging on the Camel too. I used to do a lot of biplances in 1/72, but its een a while now, maybe I'm due.

Here's an update on my Hunter GA11. Decals are on, needs a satin coat to smooth it all out.

I've made some good progress on one of my Spitfire XIXs too, I'l ltry and post some photos on the weekend.

Cheers

Tony

I'm just taking it one GB at a time.

  • Member since
    March 2006
Posted by simpilot34 on Saturday, July 2, 2016 6:25 AM

MC yes, thats a drop of CA to hold that spot. That was the only way I think I could have done that with what I was usng. Used it's pros to my advantage.

Tony your Hunter is coming along nicely!!! Nearly there!!Toast

OK, drum roll please! *crickets chirping* I'm sticking a fork in this one and calling it finished!! It's by no means perfect but it was frustratingly fun!! Peeves? The tail decal I found out AFTER I had applied it isin the wrong order, the blue is supposed to be forward. The prop is pitched in the wrong direction, and no cockpit detailing AT ALL. Wasn't worried bout it anyway just wanted to complete something lol. Anyways here's the final pics of the little.....humpback.

Wayne, one of the last two pics will be good for the front page, your choice. Still got the SM81 to go, will get going on that one again soon. Might get a couple others progressed as well. Not finished with this GB but want to thank you wayne for having me and getting this one finishedToast

Cheers, Lt. Cmdr. Richie "To be prepared for war, is one of the most effectual means of preserving the peace."-George Washington
  • Member since
    July 2014
Posted by modelcrazy on Saturday, July 2, 2016 8:01 AM

Tony,

That is one good looking Hunter. I like that paint job.

Simpilot,

Hmm, I see the prop and the tail decal problem now. Oh well, only the one who does the research will notice. The rigging turned out fantastic Bow Down That is not an easy task, one which I usually just do enough of to get the idea.

Steve

Building a kit from your stash is like cutting a head off a Hydra, two more take it's place.


http://www.spamodeler.com/forum/

  • Member since
    April 2005
  • From: Australia
Posted by taxtp on Monday, July 4, 2016 10:40 PM

I like your Camel Simpilot. I'm good to look past the flaws you mentioned and say that it will be attractive on the shelf.

I have a couple of updates to make, which I'll do in two posts.

First up, some updates on the two Spitfire XIXs that I'm building. One has most of it's decals, the other is primed and pre-shaded.

Cheers

Tony

I'm just taking it one GB at a time.

  • Member since
    April 2005
  • From: Australia
Posted by taxtp on Monday, July 4, 2016 10:48 PM

Now for the 2nd update. One of the clubs I'm in is running a competition that we will call 'Build a Female dog' on this family friendly site.

The idea is that you go into a lottery to be allocated some old 1/72 kit that will be difficult to build well.

You've got a month to build and show it at the next meeting.

so I got allocated this :

This will be another entry in this GB for me. This is what you start with:

I read a review somewhere that suggested that this might have been the old Frog kit. I built a lot of those as a kid, and it does have that feel, so it's possible. Anyway, I'm going with the Finnish option, on skis. The instructions use the same symbols as the old Frog instructions too.

Day one, I just got the parts off the sprues and tidied them up.

Cheers

Tony

I'm just taking it one GB at a time.

  • Member since
    July 2014
Posted by modelcrazy on Monday, July 4, 2016 11:35 PM

Your Spits are looking good Tony,  and I'll be interested to see your Fokker come along

Steve

Building a kit from your stash is like cutting a head off a Hydra, two more take it's place.


http://www.spamodeler.com/forum/

  • Member since
    June 2003
  • From: Rowland Heights, California
Posted by Duke Maddog on Tuesday, July 5, 2016 12:42 PM

Looking good on your Spits Tony! I think you did great getting that kit in the draw, it's not as bad as a Mach 2 or Maquette kit. You'll get it done!

  • Member since
    April 2010
Posted by Theuns on Friday, July 8, 2016 9:42 AM

The total lack of cabin detail in this Italeri MH-53 was rather dissapointing to I added the sidewall detail, will still add all the wire harnasses and piping.

I also had to make the seats from plastic card I heat formed. Still need to make the posts that hold them up.

The rear seats will be in the up posution to add some "feel" to it.


Theuns

  • Member since
    June 2008
Posted by lewbud on Saturday, July 9, 2016 1:11 PM

Richie-great job on the Camel!

Tony-your Spit is looking good! 

Theuns-looking forward to more.

As for me, Old Crow is just about decalled.  Blew the cobwebs off the gun truck.  Don't know if much more will be done as I've got a couple of club builds to finish for the Nats.


Buddy- Those who say there are no stupid questions have never worked in customer service.

  • Member since
    April 2005
  • From: Australia
Posted by taxtp on Sunday, July 10, 2016 1:33 AM

Great work on the interior of the MH-53 Theuns. That adds heaps of interest to it.

No progress on wither of the Spitfire XIXs. I managed to complete the Hunter GA11, which is a Revell Hunter FGA9 with a Freightdog conversion to GA11. The decals are from Fantasy Printshop, although I used Xtradecals roundels. I started out a project to build 5 aerobatic team Hunters, this is the fourth of them.

Cheers

Tony

I'm just taking it one GB at a time.

  • Member since
    July 2014
Posted by modelcrazy on Sunday, July 10, 2016 10:57 AM

Tony,

Nice job on the Hunter and congrats on its completion. 

I'm not really familiar with that AC and it's interesting to see that it was used for so many demonstration teams.

Steve

Building a kit from your stash is like cutting a head off a Hydra, two more take it's place.


http://www.spamodeler.com/forum/

  • Member since
    April 2005
  • From: Australia
Posted by taxtp on Sunday, July 10, 2016 11:02 PM

Hi MC,

Thanks.

It was used by 8 teams to my knowledge.

RAF - Black Arrows

RAF - Blue Diamonds

RN - Rough Diamonds

RN - Blue Herons

Swiss - Patrouille Suisse

Swedish - Acro Hunters

Indian - Thunderbirds

Belgian - Diables Rouges

Cheers

Tony

I'm just taking it one GB at a time.

  • Member since
    March 2006
Posted by simpilot34 on Sunday, July 17, 2016 1:37 AM

Thanks Guys for the kudos! Will be finishing up or at least progressing something that was started several years ago before I lay head strong back on the SM81. Might bounce back and forth.

WOW what great progress and finishes there are!

Tony the Hunter is schmicko!! Love the vignette!! Looking forward to the Fokker as well!!

Theuns, The Seastallion is looking great so far!! The lack of interior on most acft this scale is par for the course lol. However people like us tend to open things up and well we get lost in the detail!! Looking forward to seeing more!!!

Cheers, Lt. Cmdr. Richie "To be prepared for war, is one of the most effectual means of preserving the peace."-George Washington
JOIN OUR COMMUNITY!

Our community is FREE to join. To participate you must either login or register for an account.

SEARCH FORUMS
FREE NEWSLETTER
By signing up you may also receive reader surveys and occasional special offers. We do not sell, rent or trade our email lists. View our Privacy Policy.