SEARCH FINESCALE.COM

Enter keywords or a search phrase below:

The official Submarine Warfare Group Build 2016 - 2017

25649 views
611 replies
1 rating 2 rating 3 rating 4 rating 5 rating
  • Member since
    November 2008
  • From: Central Florida
Posted by plasticjunkie on Monday, October 3, 2016 10:10 AM

Both are looking SUPER Beer

The crust looks very convincing Doug.

 GIFMaker.org_jy_Ayj_O


Too many models to build, not enough time in a lifetime!!

  • Member since
    May 2013
  • From: From the Mit, but live in Mason, O high ho
Posted by hogfanfs on Monday, October 3, 2016 11:21 AM

@ rigidrider,

Man, I would think you would take better care of your completed models??? That U-boat looks like it's been on the ocean floor for 70 years! lol Great job! It really looks fantastic!


@Steve,

Your U-boat looks spectacular! I still can't get over how big that kit is! All your hard work with the PE has paid off!

 Bruce


 On the bench:  1/48 Eduard MiG-21MF

                        1/35 Takom Merkava Mk.I


  • Member since
    July 2014
Posted by modelcrazy on Tuesday, October 4, 2016 10:18 AM
Another update from last night. I finished the chipping and next will be the decals, washing, powders and oils ETC, ETC.

Steve

Building a kit from your stash is like cutting a head off a Hydra, two more take it's place.


http://www.spamodeler.com/forum/

  • Member since
    July 2014
Posted by modelcrazy on Wednesday, October 5, 2016 9:24 AM
Thanks Surf,
I went back over the deck last night and painted wood, applied some Worn Effects, resprayed the grey and “wore” it back off. I think it looks better but I will be adjusting it some with some dry brushing and powders. I also went over the areas below the waterline to remove the rust chips on the dive planes and rudders.
While that is drying I will paint the guns, lights, floatation ring and install the props tonight. I installed my own decals on the conning tower although they don’t show in this picture.
 
The 10th Flotilla emblem to the front of the tower and U-515s supposed hammer emblem on the upper sides between the upper and lower splash guards. I assume it was painted and not a shield.
  
 
I cut the emblems from the grey background.

Steve

Building a kit from your stash is like cutting a head off a Hydra, two more take it's place.


http://www.spamodeler.com/forum/

  • Member since
    October 2008
  • From: Georgia
Posted by Rigidrider on Wednesday, October 5, 2016 10:51 AM

Steve... Simply, WOW!!! 


When Life Hands You A Bucket Of Lemons...

Make Lemonade!

Then Sell It Back At $2 Bucks A Glass...

  • Member since
    December 2013
Posted by CodyJ on Thursday, October 6, 2016 10:24 AM

First off, I'd like like to thank you Steve, for taking the Gallery Part on.  I just unfortunatley cant handle that with the job.  I get about 4 to 5hrs of sleep on average and before you know it.... its been a couple weeks before I remember the forum duties.  

To all others, great work and I am amazed already with the details I see on this Subs.  I did buy a Soviet Nuke Sub.  Hope I find some time to touch it..... Tongue Tied  

See you around,

Cody J

  • Member since
    October 2009
Posted by Kentucky Colonel on Friday, October 7, 2016 6:51 AM

Wonder if this will come out soon enough for someone on here to build it.

https://www.megahobby.com/products/dkm-uboat-typeviic-trumpeter.html

  • Member since
    July 2014
Posted by modelcrazy on Friday, October 7, 2016 8:54 AM

Holy smokes, that thing must be a monster!

Steve

Building a kit from your stash is like cutting a head off a Hydra, two more take it's place.


http://www.spamodeler.com/forum/

  • Member since
    July 2014
Posted by modelcrazy on Tuesday, October 11, 2016 2:26 PM
I added some more black wash and am ready to apply some pastels. This will be followed by burnt umber oils for running rust and highlighting some chipped paint areas.
Also note the decals
 
I took the sub into my IPMS meeting on Saturday and noticed that I was missing one of the twin 20mm AA guns. Backtracking to the car I found pieces of it in the parking lot. Oh well, I wasn’t pleased with the way the 20’s were turning out anyway so I will be ordering the CMK type IX weapons set gun set from Hannants in a week or two.
This won’t hinder me form completing the build up to the point of attaching them.
Also, while the oil paint was drying I started the LF antenna aerial. I “barrowed” some wood blocks from one of my overly priced European wooden ship kits like this one….


To make the wood blocks and used some lower E guitar string for the wire. I just started this process so I am making it up as I go along.

Steve

Building a kit from your stash is like cutting a head off a Hydra, two more take it's place.


http://www.spamodeler.com/forum/

  • Member since
    December 2002
  • From: Bury St Edmunds, Suffolk, England
Posted by Bish on Tuesday, October 11, 2016 2:31 PM

Doug, wow, thats looking really impressive. I really like the growth on the boat, it looks really effective.

I am a Norfolk man and i glory in being so


On the bench: Airfix 1/72nd Harrier GR.3/Fujimi 1/72nd Ju 87D-3

  • Member since
    December 2002
  • From: Bury St Edmunds, Suffolk, England
Posted by Bish on Tuesday, October 11, 2016 2:35 PM

Steve, some great work there, i like how you have done the chipping. I need to go and make some notes.

I am a Norfolk man and i glory in being so


On the bench: Airfix 1/72nd Harrier GR.3/Fujimi 1/72nd Ju 87D-3

  • Member since
    November 2008
  • From: Central Florida
Posted by plasticjunkie on Wednesday, October 12, 2016 7:58 AM

Great job on the decals and weathering Steve. Now I will be starting on my Gato since  Matthew departed. Still have to do a few things around the house but can't wait to get started on mine.

 GIFMaker.org_jy_Ayj_O


Too many models to build, not enough time in a lifetime!!

  • Member since
    July 2014
Posted by modelcrazy on Thursday, October 13, 2016 11:28 PM
I added some running rust and I’m pleased with it. I think I need just a tad more on the port side of the conning tower. You can see the missing 20’s.
I can’t believe it. I lost the anchor!! Dog gone it!!! My wife and I looked EVERYWHERE. Oh well I still need to order the resin 20’s from Hanants, make a better base, and make the LF aerials so I will have the time to get and anchor from Revell.
In the picture with the bell, all I can think of is Das Boot. The one scene when the plane attacks and one of the crew rings the bell and yells "ALAAAAAAARM"
Well here it is so far.


Steve

Building a kit from your stash is like cutting a head off a Hydra, two more take it's place.


http://www.spamodeler.com/forum/

  • Member since
    July 2014
Posted by modelcrazy on Sunday, October 16, 2016 12:36 AM
I reworked the LF aerials, isolators and made some turnbuckles. I started the turnbuckles by twisting wire strands around a pin. I looked for some brass tubing that would work for the body but couldn’t find anything small enough. Falling back on my electronics experience I decided to use 1mm OD heat shrink tube. This seems to have worked well. I then used these same wire strands to run through and twist the insulators.
 
 
Here is the result for the port stern aerial.


Now on to the remaining aerials. I also ordered the guns from Hanants along with a 1/72 U-boat crew. I don’t know if I will be using them on this build, but I would like to get a type VII at some point and maybe use them there.

Steve

Building a kit from your stash is like cutting a head off a Hydra, two more take it's place.


http://www.spamodeler.com/forum/

  • Member since
    March 2009
  • From: Middletown, OH
Posted by Buffirn on Wednesday, October 19, 2016 8:01 PM

Please add me with the 1/72 Skipjack.  I have a couple of others that I need to work on too.  Thanks!

Jim Williams


  • Member since
    July 2014
Posted by modelcrazy on Wednesday, October 19, 2016 9:19 PM

I got you down Jim

Steve

Building a kit from your stash is like cutting a head off a Hydra, two more take it's place.


http://www.spamodeler.com/forum/

  • Member since
    October 2008
  • From: Georgia
Posted by Rigidrider on Friday, October 21, 2016 4:17 PM

OK guys, I made it back! Sorry I had to be gone for about 2 weeks but alls well and I have been chawing at the bit to get back to work. To catch up a bit... Steve... What I used as the crustation and build up on the boat is a mix of Woodland Scenic "Blended Turf" and actual beach sand mixed together then applied to an already wet down surface (very thin mix of white glue and water). Seems to do OK...And by the way, the work your doing on yours... AMAZING! Beautiful...How are you doing the "Oil canning" ? is it some type of light grinding? Reguardless, Great effect!

Bish, Thank you sir... I'm really starting to loke boats. Might  work up the nerve to do a 72nd some day soon...

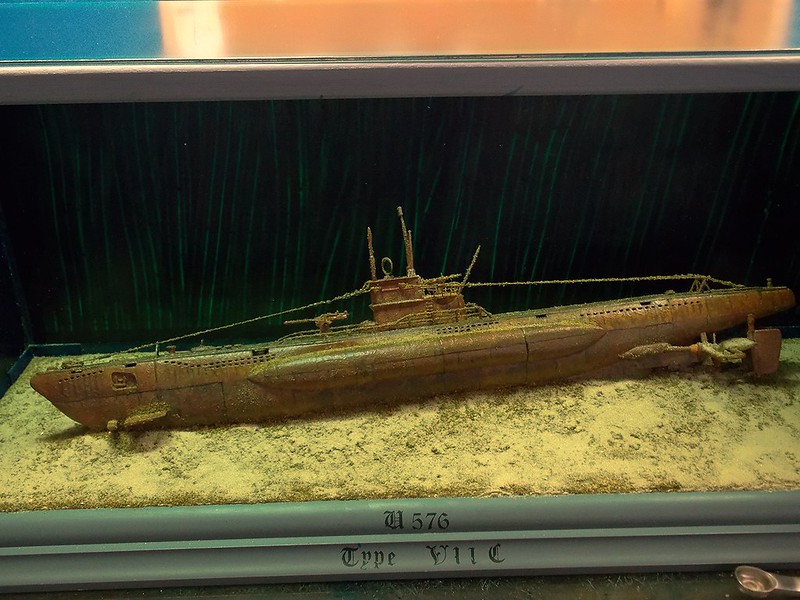
Now, I did finish and will post the final pictures, there wont be much to choose from being its a shadow box type dio. BUT... Tomorrow is a local hobby show, and I'll enter it just to see if it is even noticed(lol). So here are the finished pictures...

Here it sits before I got the top on right.

Still trying to get the right shade of green ...

And I think I'm going to go with this...

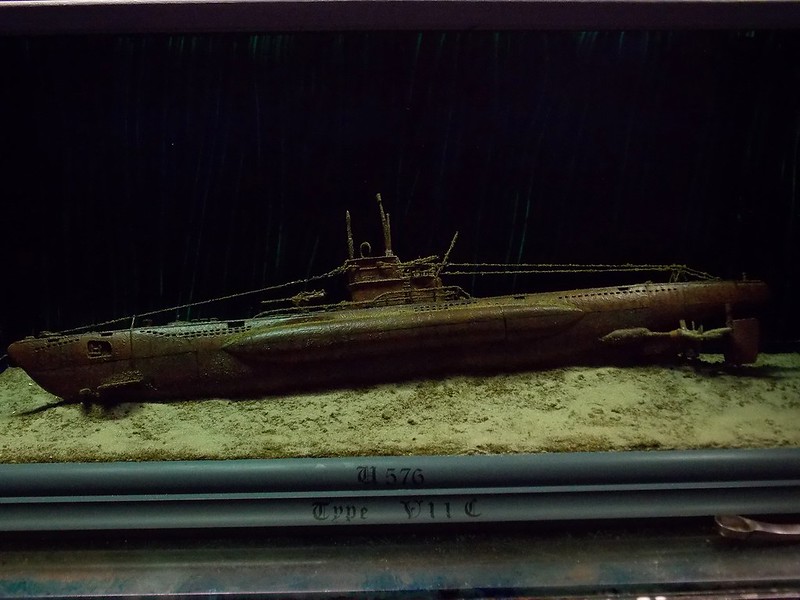
Almost identical but just a bit darker which for some reason dosen't translate on film for some reason. I know at the depth it rests at (698 ft) it would be pitch black, biut given a little artistic freedom, This will be it.

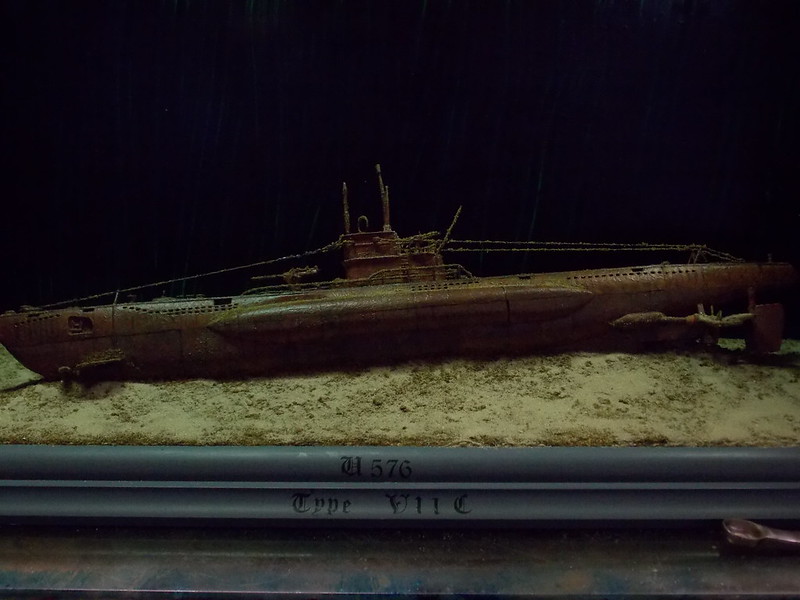
So... Thats all for this one, I'm calling it done!

I will be back in a bit for another... Good Lord willing...

Keep up the great work all!

Doug

When Life Hands You A Bucket Of Lemons...

Make Lemonade!

Then Sell It Back At $2 Bucks A Glass...

  • Member since
    November 2008
  • From: Central Florida
Posted by plasticjunkie on Sunday, October 23, 2016 7:21 AM

That looks fantastic Doug. It really looks like it's sitting at the bottom of the ocean Great job at recreating the growth.

 GIFMaker.org_jy_Ayj_O


Too many models to build, not enough time in a lifetime!!

  • Member since
    July 2014
Posted by modelcrazy on Sunday, October 23, 2016 9:41 AM

Looks fantastic Doug Yes. Really give the impression of looking at a wreck. Looking forward to see what else you come up with.

I got it up on the wall.

Steve

Building a kit from your stash is like cutting a head off a Hydra, two more take it's place.


http://www.spamodeler.com/forum/

  • Member since
    July 2014
Posted by modelcrazy on Friday, October 28, 2016 9:52 PM
I received the AA guns from Hanants today. They look very nice with brass barrels and PE. These should be fun.

Steve

Building a kit from your stash is like cutting a head off a Hydra, two more take it's place.


http://www.spamodeler.com/forum/

  • Member since
    July 2014
Posted by modelcrazy on Sunday, October 30, 2016 8:19 PM
I started the 20’s and the kit seems very nice. It’s going together very well.

Steve

Building a kit from your stash is like cutting a head off a Hydra, two more take it's place.


http://www.spamodeler.com/forum/

  • Member since
    July 2014
Posted by modelcrazy on Wednesday, November 2, 2016 3:25 PM

Here are the completed 20’s. I would recommend this AM set as a replacement of the guns on the kit. All I need to complete is the painting and wait for the anchor to arrive from Revell, although they have not responded to my request yet.

Does anybody know, are those counterweights hanging off the front of the frame under the barrels?

Steve

Building a kit from your stash is like cutting a head off a Hydra, two more take it's place.


http://www.spamodeler.com/forum/

  • Member since
    March 2007
  • From: NJ
Posted by JMart on Friday, November 11, 2016 9:02 PM

First - Steve and Doug, those are two amazing builds!

I was away from this site for about 2 years due to work/family issues, which meant that (once again!) I did not finish previous GBs and need to start new ones...  :(

Anyways, can you add me with the following entry, Cyberhobby 1047 (1:350 scale):

Image result for cyber hobby 1047

An Ohio and LA class combo, straight build, nothing fancy; something straightforward to get me going again. 

Cheers


  • Member since
    July 2014
Posted by modelcrazy on Saturday, November 12, 2016 12:29 AM

Sure! I got you down.

Steve

Building a kit from your stash is like cutting a head off a Hydra, two more take it's place.


http://www.spamodeler.com/forum/

  • Member since
    July 2014
Posted by modelcrazy on Tuesday, November 15, 2016 11:10 PM
The guns are done, and The U-boat is almost done. I just need to complete the flag and take some pics. I’m still waiting for the anchor from ROG but I’m starting to get impatient after a month so I’ll take some pics without it in a couple of days. Anyway, here are the MpM 20’s.

Steve

Building a kit from your stash is like cutting a head off a Hydra, two more take it's place.


http://www.spamodeler.com/forum/

  • Member since
    November 2008
  • From: Central Florida
Posted by plasticjunkie on Friday, November 18, 2016 4:17 PM

Looks fantastic Steve!

 GIFMaker.org_jy_Ayj_O


Too many models to build, not enough time in a lifetime!!

  • Member since
    July 2014
Posted by modelcrazy on Saturday, November 19, 2016 3:29 PM

Thanks PJ.

I’m done with the U-boat although I’m still waiting for the anchor from ROG. Don’t know if or when I’ll be getting a replacement for it.
Anyway, here it is.
   
Steve
Steve

Steve

Building a kit from your stash is like cutting a head off a Hydra, two more take it's place.


http://www.spamodeler.com/forum/

  • Member since
    October 2008
  • From: Georgia
Posted by Rigidrider on Monday, November 21, 2016 5:32 AM

Absolutely beautiful! 

When Life Hands You A Bucket Of Lemons...

Make Lemonade!

Then Sell It Back At $2 Bucks A Glass...

  • Member since
    December 2002
  • From: Bury St Edmunds, Suffolk, England
Posted by Bish on Monday, November 21, 2016 5:37 AM

Rigidrider

Absolutely beautiful! 


He said it. Steve, that is just stunning. I love the detail,weathering and everything about it. And there is certainly a lot there to learn from. I'll definatly be going through your build to work on mine.

Love it.

I am a Norfolk man and i glory in being so


On the bench: Airfix 1/72nd Harrier GR.3/Fujimi 1/72nd Ju 87D-3

  • Member since
    October 2008
  • From: Georgia
Posted by Rigidrider on Monday, November 21, 2016 7:07 AM

Steve... by the way, I forgot to mention earlier... the shrink tubing is a great idea for turnbuckles, and I will give a shot soon as I can find some that small. I do something a bit different that works amazingly well... on ebay, I order hypodermic needles about a hundered count per bag for about 5 bucks and cut down with a dremmel cut off disc. Like you , I twist wire strands into "eyes" and a dip of super glue before insertion holds them fast. The needles can be bought in about 5 or 6 sizes and gauges and make very realistic turn buckles for the WWI aircraft I like to build. Just a little info sharing. Again, your U-Boat is a thing of beauty!


When Life Hands You A Bucket Of Lemons...

Make Lemonade!

Then Sell It Back At $2 Bucks A Glass...

JOIN OUR COMMUNITY!

Our community is FREE to join. To participate you must either login or register for an account.

SEARCH FORUMS
FREE NEWSLETTER
By signing up you may also receive reader surveys and occasional special offers. We do not sell, rent or trade our email lists. View our Privacy Policy.