SEARCH FINESCALE.COM

Enter keywords or a search phrase below:

Monogram Mafia IV Group Build

51922 views
1009 replies
1 rating 2 rating 3 rating 4 rating 5 rating
  • Member since
    April 2014
Posted by B_one fixer on Monday, September 18, 2017 12:58 PM

cbaltrin

Those cutting machines come in handy don't they? 


They sure do. I dont know why I never thought of it before.

  • Member since
    February 2010
  • From: New Jersey
Posted by 68GT on Monday, September 18, 2017 6:30 PM

The P-47 got some Med Sea Gray on the underside (I think thats correact for SEAC). 

And a pic of the Phantom with preshading I thought I posted.

On Ed's bench, ???


  • Member since
    February 2014
  • From: Michigan
Posted by silentbob33 on Monday, September 18, 2017 6:56 PM
Looking great guys! B1, good thinking with the cutter

On my bench: Academy 1/35 UH-60L Black Hawk

  • Member since
    May 2004
  • From: Land of Lakes
Posted by cbaltrin on Wednesday, September 20, 2017 5:39 PM

Ich fühle mich nackt - malen mich!

 Cleaned up an primed with Mr Surfacer 1500

No idea how to paint this guy? 1943 fw190 driver

On the Bench: Too Much

  • Member since
    May 2004
  • From: Land of Lakes
Posted by cbaltrin on Wednesday, September 20, 2017 5:41 PM

And this is how the rest of the 190 is looking.


On the Bench: Too Much

  • Member since
    March 2007
  • From: Michigan
Posted by tonka on Thursday, September 21, 2017 2:53 AM

cbaltrin

Someone was building a bearcat in this GB. I have never cared much for F8F's; however, I had never really seen a real one either. Last weekend I  was a Willow Run airport in MI and saw this guy. Thought I would post it here for some inspiration!


I am building the F8,,its been a struggle for such a small 1/72 scale. But its coming along now. Im actually doing it as a blue angels BEETLE BOMB in yellow. I was at the Willow run show also! thanks for posting

]

  • Member since
    March 2005
  • From: Lancaster, South Carolina
Posted by Devil Dawg on Thursday, September 21, 2017 7:09 PM

cbaltrin

Ich fühle mich nackt - malen mich!

 Cleaned up an primed with Mr Surfacer 1500

No idea how to paint this guy? 1943 fw190 driver


Hmmmmm...... Maybe some paint and a brush? Big Smile Propeller Just joshin' ya! I couldn't tell you at all how to paint one, as I'm so bad at it, I don't even attempt to paint them. That Fw-190 is looking darned good, though. Looking forward to the seeing the finished product.

Devil Dawg

On The Bench: Tamiya 1/32nd Mitsubishi A6M5 Model 52 Zeke For Japanese Group Build

Build one at a time? Hah! That'll be the day!!

  • Member since
    November 2008
  • From: Central Florida
Posted by plasticjunkie on Thursday, September 21, 2017 7:58 PM

Luftwaffe Blue uniform, dark brown boots and jacket, brown leather helmet and gloves, yellow Mae West, tan chute straps, silver buckles.

Vallejo makes a ferfect matching Luftwaffe Blue uniform color.

 GIFMaker.org_jy_Ayj_O


Too many models to build, not enough time in a lifetime!!

  • Member since
    July 2004
  • From: Sonora Desert
Posted by stikpusher on Thursday, September 21, 2017 8:25 PM

Here's a good guide


F is for FIRE, That burns down the whole town!

U is for URANIUM... BOMBS!

N is for NO SURVIVORS...

       - Plankton

LSM


  • Member since
    November 2008
  • From: Central Florida
Posted by plasticjunkie on Thursday, September 21, 2017 8:46 PM

This is where I'm at and stopped cold due to Irma. Thank God I had no damage just a lot of junk outside to clean up. 

RLM 70/71 topside was applied.

RLM65 and 04 bands

Prop blurs got sprayed but need more tweeking.

The base is done.

Next will be decals and mounting the prop blurs to the hubs, adding the crew and guns. 

 GIFMaker.org_jy_Ayj_O


Too many models to build, not enough time in a lifetime!!

  • Member since
    July 2004
  • From: Sonora Desert
Posted by stikpusher on Thursday, September 21, 2017 8:51 PM

Looking good! It's also good to hear that you're back at the bench so quickly after Irma.

Did that base come from Hobby Lobby? It looks the same as some I've bought there.


F is for FIRE, That burns down the whole town!

U is for URANIUM... BOMBS!

N is for NO SURVIVORS...

       - Plankton

LSM


  • Member since
    July 2014
Posted by modelcrazy on Thursday, September 21, 2017 8:57 PM

Looks great PJ, and I'm so glad you didn't have any damage.

Steve

Building a kit from your stash is like cutting a head off a Hydra, two more take it's place.


http://www.spamodeler.com/forum/

  • Member since
    November 2008
  • From: Central Florida
Posted by plasticjunkie on Thursday, September 21, 2017 9:15 PM

Thanks stik and Steve. I was having Hurricane Andrew flashbacks with Irma. The eye came within 30 miles west of us and being on the NE quadrant of the storm made things uglier specially the tornado alerts.

Tonight is the first time I have been able to sit down at the bench. Decals will be next on the Dornier.

Thank God Maria will miss us. I feel very bad for the folks in PR and the affected islands. It looks like an A bomb blast in those places.

Stik

Yes the base is from HL. I grabbed it on sale a long time ago for a few cents.

 GIFMaker.org_jy_Ayj_O


Too many models to build, not enough time in a lifetime!!

  • Member since
    July 2014
Posted by modelcrazy on Thursday, September 21, 2017 10:30 PM

I haven't accomplished much since my last post but here I am on both kits. The P-40 is ready for primer and the 57 engine is ready for orange.

Steve

Building a kit from your stash is like cutting a head off a Hydra, two more take it's place.


http://www.spamodeler.com/forum/

  • Member since
    May 2004
  • From: Land of Lakes
Posted by cbaltrin on Friday, September 22, 2017 3:56 AM

stikpusher

Here's a good guide


Hey thanks stik. That's just what I need!

On the Bench: Too Much

  • Member since
    March 2005
  • From: Lancaster, South Carolina
Posted by Devil Dawg on Saturday, September 23, 2017 5:41 PM

Update to the Douglas TBD-1 Devastator:

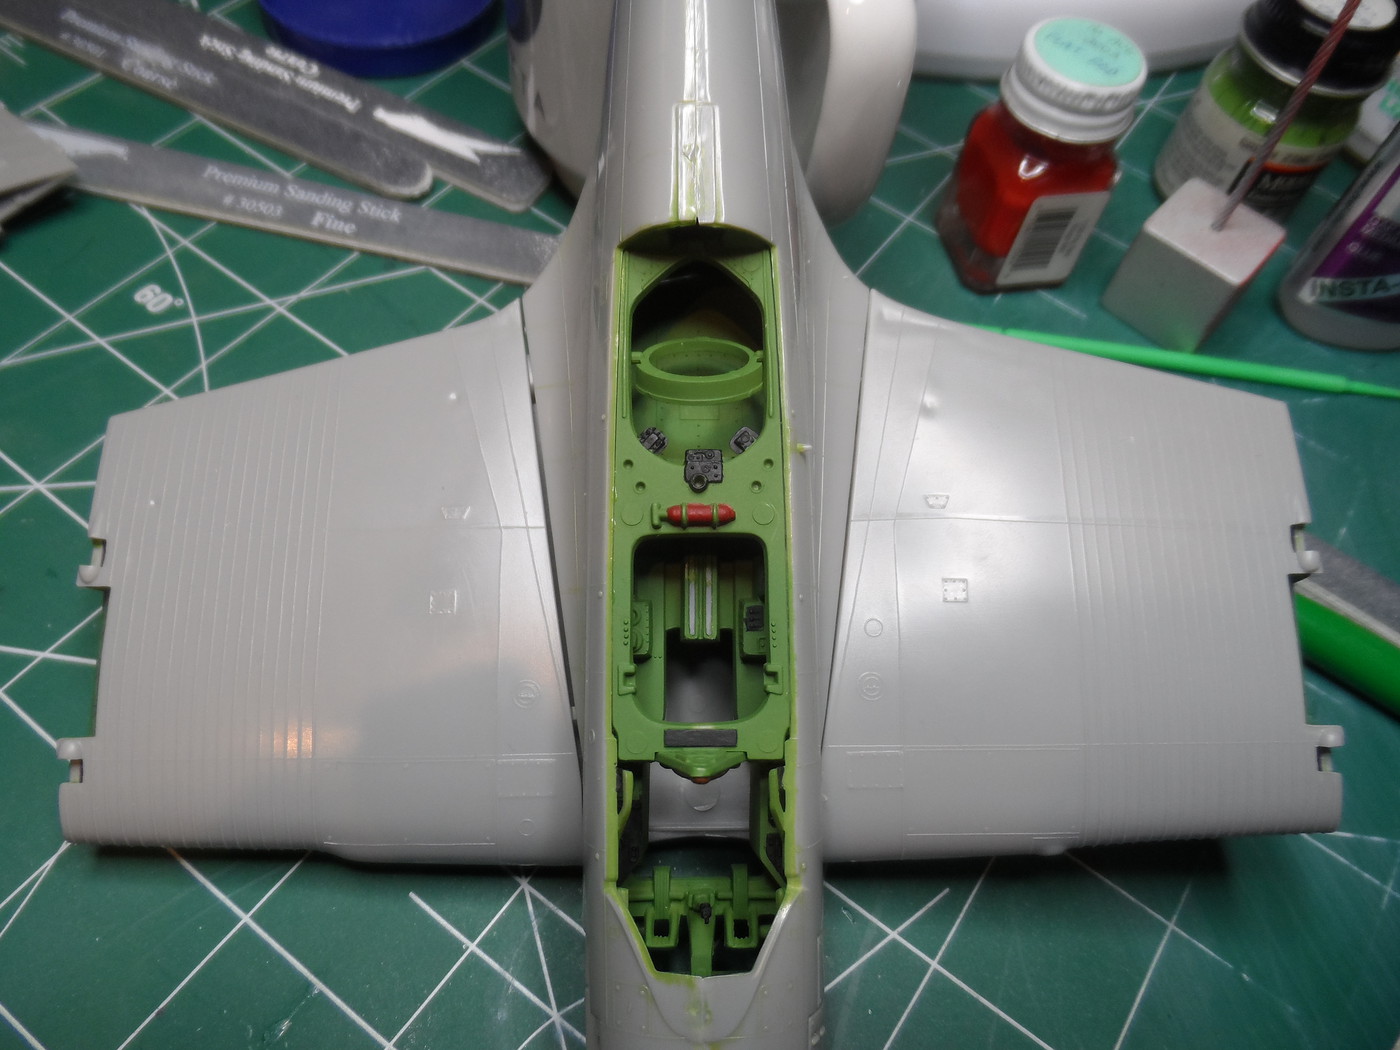
Lots of huge (or YUGE) gaps where the wing fits to the fuselage everywhere. Looks like I'm gonna be keeping Evergreen in business with this build:

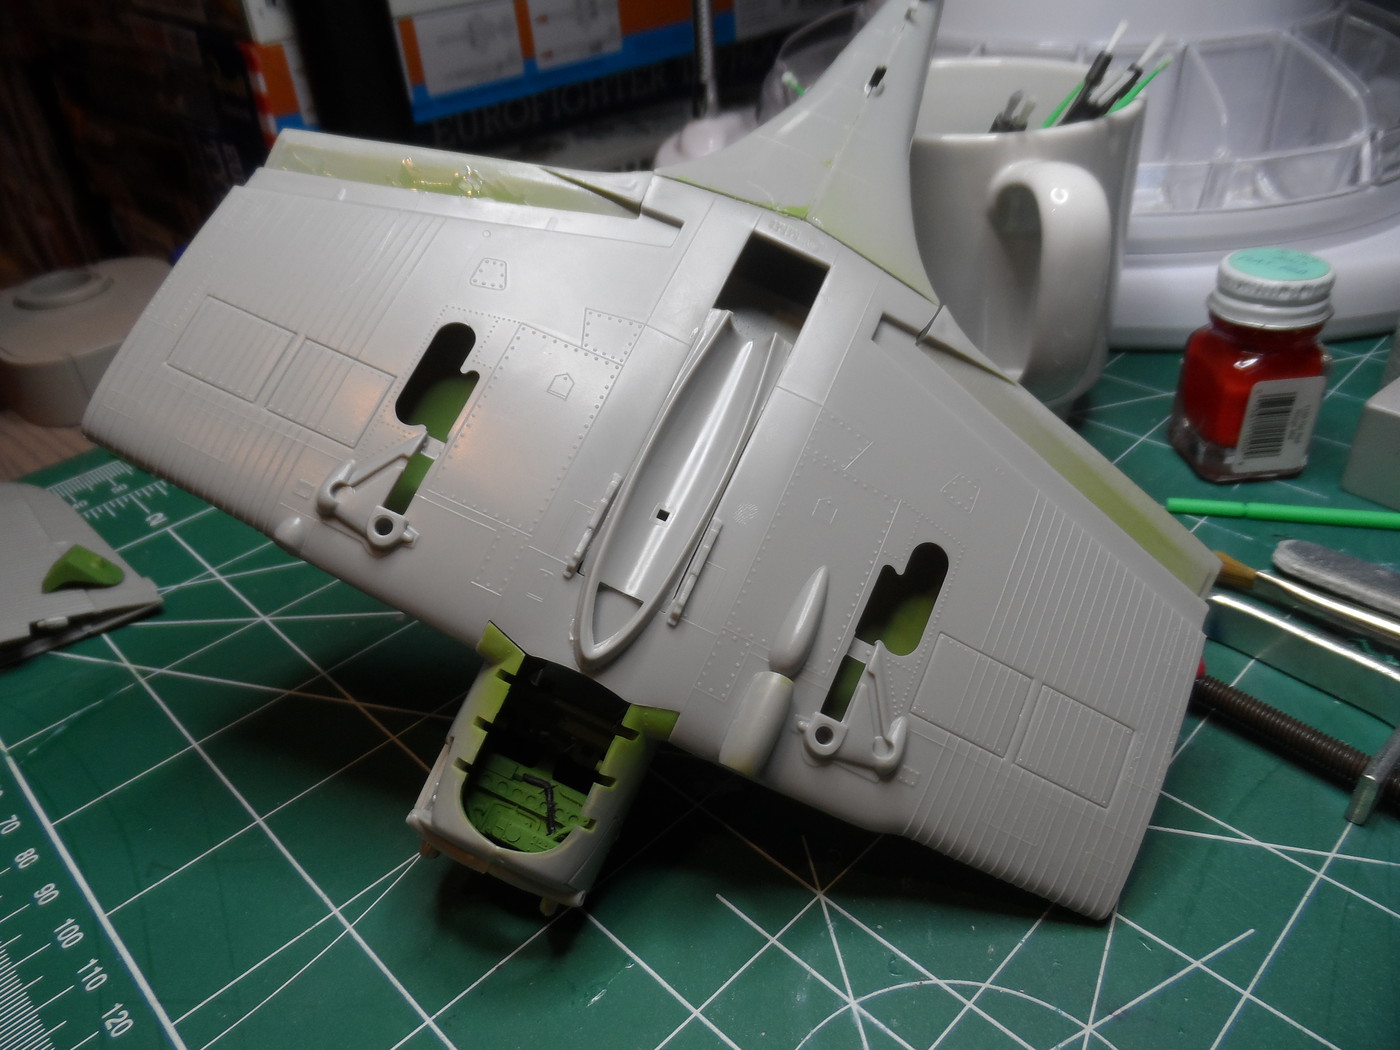
I don't remember gaps like that when I built this kit many, many years ago as a teen; or, maybe I didn't really care about the gaps when I was a teen.....

I noticed all of this by first test fitting, and, after examining everything before applying glue (good ol' Testors non-toxic tube glue!), I figured the best approach would be to keep the wing corugation lined up (misalignment of those would be the hardest to fix), and fill any gaps with sheet styrene and putty. Looks like the starboard wing shifted on me a bit while holding it together while the glue set. Oh well - better luck next time.

I also didn't notice that I was supposed to attach the tail hook before cementing the fuselage halves together. Dang It!! Bang Head I do have a good excuse for that, though - I just had cataract surgery a few weeks ago (really), so I'll blame it that. Yeah, that's the ticket.....

I was hoping to be applying some external paint this weekend, but it now looks as though I'll be filling, sanding, puttying, sanding, priming, looking for gaps, filling, sanding, etc., etc.........

This is turning out to be more fun than I thought......Indifferent Tongue Tied Sad Whistling Toast

Hope the other builds are going well for you guys!! 

Devil Dawg

On The Bench: Tamiya 1/32nd Mitsubishi A6M5 Model 52 Zeke For Japanese Group Build

Build one at a time? Hah! That'll be the day!!

  • Member since
    March 2005
  • From: Lancaster, South Carolina
Posted by Devil Dawg on Saturday, September 23, 2017 5:43 PM

Crap!! I just noticed in the pictures that both the pilot's seat and the rear gunner's seat have fallen out. They both must've decided to eject before it got worse.....

Devil Dawg

On The Bench: Tamiya 1/32nd Mitsubishi A6M5 Model 52 Zeke For Japanese Group Build

Build one at a time? Hah! That'll be the day!!

  • Member since
    March 2005
  • From: Lancaster, South Carolina
Posted by Devil Dawg on Saturday, September 23, 2017 5:54 PM

modelcrazy

I haven't accomplished much since my last post but here I am on both kits. The P-40 is ready for primer and the 57 engine is ready for orange.


Lookin' good, modelcrazy! I tried building that P-40 for my wife a few years ago (she likes the sharkmouth on it), and gave up on it. I eventually built the Hasegawa version for her. But, anyone who can tame that kit, my hat's off to ya!!

Gary


Devil Dawg

On The Bench: Tamiya 1/32nd Mitsubishi A6M5 Model 52 Zeke For Japanese Group Build

Build one at a time? Hah! That'll be the day!!

  • Member since
    March 2005
  • From: Lancaster, South Carolina
Posted by Devil Dawg on Saturday, September 23, 2017 5:56 PM

plasticjunkie

This is where I'm at and stopped cold due to Irma. Thank God I had no damage just a lot of junk outside to clean up. 

RLM 70/71 topside was applied.

RLM65 and 04 bands

Prop blurs got sprayed but need more tweeking.

The base is done.

Next will be decals and mounting the prop blurs to the hubs, adding the crew and guns. 


Lookin' awesome, plasticjunkie! 

And hey, I tried that webpage refresh, and, sure enough, it worked. Thanks for the hint.

Gary


Devil Dawg

On The Bench: Tamiya 1/32nd Mitsubishi A6M5 Model 52 Zeke For Japanese Group Build

Build one at a time? Hah! That'll be the day!!

  • Member since
    July 2004
  • From: Sonora Desert
Posted by stikpusher on Saturday, September 23, 2017 7:15 PM

CB, youre welcome for the pilot paint guide.

DD, I don't know exactly how many of those Monogram TBD's that I've built since it was first released, but I always do remember a "loose" fit of the wings to the fuselage. The last one that I built 5 years ago, was an original boxing, and it still had the gaps at the wing roots. I made shims from strip styrene to fill the gaps there. And needle files to clean up the leading edge wing seams between the corrugations.

putting those seats that fell out back in place should not be too hard as long as you still have the parts...


F is for FIRE, That burns down the whole town!

U is for URANIUM... BOMBS!

N is for NO SURVIVORS...

       - Plankton

LSM


  • Member since
    March 2005
  • From: Lancaster, South Carolina
Posted by Devil Dawg on Saturday, September 23, 2017 8:55 PM

stikpusher

DD, I don't know exactly how many of those Monogram TBD's that I've built since it was first released, but I always do remember a "loose" fit of the wings to the fuselage. The last one that I built 5 years ago, was an original boxing, and it still had the gaps at the wing roots. I made shims from strip styrene to fill the gaps there. And needle files to clean up the leading edge wing seams between the corrugations.

Yep, that's what was I planning on doing, too. Luckily, I have lots of sheet styrene, but it's all .005 & .010 inch, so I'll probably hafta glue a few pieces together to get the right thickness. Wasn't expecting that large of a gap anywhere on the wings. But, the root gaps seem to be parallel longitudinally and laterally, so filling them with sheet styrene should work out ok.

As far as needle files, I have quite a few, but none seem to be thin enough to do what I need to do. Might need to look for some smaller/thinner files.

Found the seats on my bench. Guess they fell out while I was flipping it over taking the pictures. Luckily, they're relatively large and green, so they would show up well against the carpet if they would've made it that far down.

Devil Dawg

On The Bench: Tamiya 1/32nd Mitsubishi A6M5 Model 52 Zeke For Japanese Group Build

Build one at a time? Hah! That'll be the day!!

  • Member since
    July 2004
  • From: Sonora Desert
Posted by stikpusher on Saturday, September 23, 2017 9:06 PM

Turn your needle files edgewise. on mine, one of the side edges has the ridges still, while other is smooth. 


F is for FIRE, That burns down the whole town!

U is for URANIUM... BOMBS!

N is for NO SURVIVORS...

       - Plankton

LSM


  • Member since
    March 2005
  • From: Lancaster, South Carolina
Posted by Devil Dawg on Saturday, September 23, 2017 9:33 PM

Unfortunately, none of mine are that thin, on edge or not. Guess they're not as "needly" as I need them! I bought a cheap set many years ago. Probably should've paid the few extra dollars then and bought what I needed.

Devil Dawg

On The Bench: Tamiya 1/32nd Mitsubishi A6M5 Model 52 Zeke For Japanese Group Build

Build one at a time? Hah! That'll be the day!!

  • Member since
    February 2014
  • From: Michigan
Posted by silentbob33 on Saturday, September 23, 2017 9:37 PM

PJ that's looking really nice, and glad to hear that Irma didn't give you too much trouble. I have a friend in Jacksonville and she didn't have too many problems either.

DD glad you found your seats.  That could be a bit of a pain if the pilot didn't have somewhere to sit.

On my bench: Academy 1/35 UH-60L Black Hawk

  • Member since
    March 2005
  • From: Lancaster, South Carolina
Posted by Devil Dawg on Saturday, September 23, 2017 9:45 PM

So, here is my solution for the wing gap issue:

Test-fitting, it looks like one thin piece of .010" sheet for the port side;


And two thin strips of .010" sheet for the starboard side. Neither have been glued in place yet; just wanted to see how many it would take for each gap before committing any glue.


With the strips glued in place. I gently pried the wings down slightly, slathered some Testors tube glue on boths sides of the gaps with a toothpick (didn't want superglue hampering the placement of the strips), inserted the styrene strips, then, using Tamiya tape, gently pushed the wings against the strips, which pushed the strips against the wings roots, then used the tape to hold the dihedral while the glue cures. And yep, I glued the double strips on the starboard side together with superglue before inserting them in the gap. After it cures overnight, I'll then trim the styrene strips to the shape of the wing roots, and fill with some putty as needed. Been a long time since I've had to use this technique, so I'm somewhat apprehensive about its outcome.

Gary


Devil Dawg

On The Bench: Tamiya 1/32nd Mitsubishi A6M5 Model 52 Zeke For Japanese Group Build

Build one at a time? Hah! That'll be the day!!

  • Member since
    March 2005
  • From: Lancaster, South Carolina
Posted by Devil Dawg on Saturday, September 23, 2017 9:47 PM

silentbob33

PJ that's looking really nice, and glad to hear that Irma didn't give you too much trouble. I have a friend in Jacksonville and she didn't have too many problems either.

DD glad you found your seats.  That could be a bit of a pain if the pilot didn't have somewhere to sit.

 
Thanks, silentbob.

Devil Dawg

On The Bench: Tamiya 1/32nd Mitsubishi A6M5 Model 52 Zeke For Japanese Group Build

Build one at a time? Hah! That'll be the day!!

  • Member since
    May 2004
  • From: Land of Lakes
Posted by cbaltrin on Saturday, September 23, 2017 10:18 PM

DD why don't you just heat them Wings Over a candle and stretch them out a little bit so there's no more Gap?Stick out tongue

On the Bench: Too Much

  • Member since
    November 2008
  • From: Central Florida
Posted by plasticjunkie on Saturday, September 23, 2017 10:43 PM

Gary

You are welcome. Must be a bug in this web site. That is a great way to get rid of the gaps. PPP is also useful here since it can be applied and when dry, use a water dampened Q Tip to wipe off the excess leaving a clean fill line.

Bob

Thanks. Glad your friend in Jacksonville did ok. I heard of some nasty flooding out there.

 GIFMaker.org_jy_Ayj_O


Too many models to build, not enough time in a lifetime!!

  • Member since
    July 2004
  • From: Sonora Desert
Posted by stikpusher on Saturday, September 23, 2017 10:57 PM

DD, that's the same method that I used on my last TBD build for the wing shims. Although I used a hot liquid cement instead of tube glue. Glue the strip in place, let it dry overnite, then trim and smooth out.


F is for FIRE, That burns down the whole town!

U is for URANIUM... BOMBS!

N is for NO SURVIVORS...

       - Plankton

LSM


  • Member since
    March 2017
  • From: Mid Michigan
Posted by shamoo on Sunday, September 24, 2017 6:11 PM

Boy, I was feelijng bad about the fit of the SBD wings, DD.  I got lucky though.  The sequence called for installing the lower 1/2 of the wing first, dropping in the main gear legs, then adding the top 1/2 of the wing panels.  Just setting the top on looked very much like yours.  However, I was able to first glue the butt joint of the wing to the fuselage.  Once that dried I cemented and clamped the inner part, then after that dried the outer section.  This left just a very small gap right at the leading and trailing edges.  A touch of putty should finish it off.  Could almost fill it with paint.


 2017-09-24_06-14-01 by David Brownlee, on Flickr

 2017-09-24_06-16-38 by David Brownlee, on Flickr

Basiccally the same spots on the other side, but so cloase they dont really show up with this camnera

Here's where it's sitting now:

 2017-09-24_06-12-13 by David Brownlee, on Flickr

And the main gear even work!


 2017-09-24_07-01-36 by David Brownlee, on Flickr

Next up is filling in some injector marks on the horizontzl stabilizers and painting the engine/ cowl assembly.

Dave

JOIN OUR COMMUNITY!

Our community is FREE to join. To participate you must either login or register for an account.

SEARCH FORUMS
FREE NEWSLETTER
By signing up you may also receive reader surveys and occasional special offers. We do not sell, rent or trade our email lists. View our Privacy Policy.