SEARCH FINESCALE.COM

Enter keywords or a search phrase below:

75th Anniversary of 1943 (World at War)

35776 views
633 replies
1 rating 2 rating 3 rating 4 rating 5 rating
  • Member since
    September 2016
  • From: Albany, New York
Posted by ManCityFan on Friday, May 11, 2018 7:55 AM

Bish

Looking forward to seeing how you do this Steve, i hope you will post a link to the vid once its done.


DittoYes, please!

Dwayne or Dman or just D.  All comments are welcome on my builds. 

  • Member since
    July 2014
Posted by modelcrazy on Friday, May 11, 2018 6:40 PM

LOL, well it's my first so it won't be pollished at all. I hope it dosn't dissapoint. Smile

Steve

Building a kit from your stash is like cutting a head off a Hydra, two more take it's place.


http://www.spamodeler.com/forum/

  • Member since
    July 2014
Posted by modelcrazy on Friday, May 11, 2018 7:02 PM

BTW, I will be doing four in total. This one is still water, then I'll do medium seas, heavy seas and ice, maybe not in that order. I'm looking forward to it.

Steve

Building a kit from your stash is like cutting a head off a Hydra, two more take it's place.


http://www.spamodeler.com/forum/

  • Member since
    July 2014
Posted by modelcrazy on Saturday, May 12, 2018 5:55 PM

After a second coat of gel, I used a stiff brush to stipple some gel into ripples.

Steve

Building a kit from your stash is like cutting a head off a Hydra, two more take it's place.


http://www.spamodeler.com/forum/

  • Member since
    April 2015
Posted by Mopar Madness on Saturday, May 12, 2018 7:52 PM

That’ll be a nice base for the Scharnie!

Chad

God, Family, Models...

At the plate: 1/48 Airfix Bf109 & 1/35 Tamiya Famo

On deck: Who knows!

  • Member since
    April 2005
  • From: Australia
Posted by taxtp on Monday, May 14, 2018 7:04 PM

You've got my full attention Steve. I've just bought an etch set and a Pitroad kit for the 1/700 USS San Diego. My interest has largely been piqued by your builds.

Cheers

Tony

I'm just taking it one GB at a time.

  • Member since
    July 2014
Posted by modelcrazy on Monday, May 14, 2018 10:28 PM

Thank you Tony! You humble me Embarrassed

Since this is calm water I filled in the areas along the hull with gel that would typicaly be filled with cotton. I put tape along the hull so I can remove the ship by cutting along the tape when it dries. I have glued ships in the base at this point before but it makes it difficult to paint around it, so I trying a diffrent tack this time.

Steve

Building a kit from your stash is like cutting a head off a Hydra, two more take it's place.


http://www.spamodeler.com/forum/

  • Member since
    July 2014
Posted by modelcrazy on Tuesday, May 15, 2018 12:33 PM

Now the tape removed and ship placed back into the base to check fit. Next I will add some small bow waves and wake before I paint.

Steve

Building a kit from your stash is like cutting a head off a Hydra, two more take it's place.


http://www.spamodeler.com/forum/

  • Member since
    July 2014
Posted by modelcrazy on Tuesday, May 15, 2018 5:30 PM
Adding the wave patterns, doing some studding and using the Kelvin wake pattern, everything moving through the water makes the same wave pattern.


Depending on other factors such as the body's speed and weight will determine the wave length of the diverging and transverse crest’s. at 5 kts the wave length would be 13’. I've always known this about this wake pattern, I just never new the exact details and put it into words before. So back to the build.

I added the wave patterns using the gel and laid it so it should look like little waves. Once the base is painted I can then go back and sand or add to mix it with the surrounding water. This should be subtle since the Sharn is moving slow but would be noticeable. 

This is always the point where I think, oh man I messed this up! But it always works out.

Steve

Steve

Building a kit from your stash is like cutting a head off a Hydra, two more take it's place.


http://www.spamodeler.com/forum/

  • Member since
    September 2003
  • From: AandF in the Badger State
Posted by checkmateking02 on Tuesday, May 15, 2018 10:28 PM

Very fascinating, Steve!


  • Member since
    December 2002
  • From: Bury St Edmunds, Suffolk, England
Posted by Bish on Wednesday, May 16, 2018 1:58 AM

Great work Steve and really interesting to see how this is done. Thank you.

I am a Norfolk man and i glory in being so


On the bench: Airfix 1/72nd Harrier GR.3/Fujimi 1/72nd Ju 87D-3

  • Member since
    December 2003
  • From: 37deg 40.13' N 95deg 29.10'W
Posted by scottrc on Wednesday, May 16, 2018 1:59 PM

Hi Steve,

I'm glad your doing a tutorial on the your water technique.  I'm almost to the stage with my Prinz Eugene to do a base.  

I stayed out of the color conversation, there are so many "what ifs" as to when the tops of the turrets were painted.  I thought painting schemes for US naval ship between 1941 and 1943 were complicated to track down, the German navy has really been a challenge. 

With the Prinz, I got conflicting color data were I ended up with a mix of the camo pattern of 1941 and 1943.  I am building for early 1941.  

Scott

  • Member since
    July 2014
Posted by modelcrazy on Wednesday, May 16, 2018 2:20 PM

Thanks Stick and Bish, not happy with the last so I stripped the paper off and started over. It's better to do it right than fast. No biggy, this won't take long, the process is the same. I broke one of my cardinal rules. I always cut or sand some for the wake, the only exception will be on the ice base.

It's just too difficult to add waves with the gel. So after removing the paper I sanded in the wake waves and reapplied the paper.

So back to the stippling for the ripples. I'll post when I get to the painting.

Steve

Building a kit from your stash is like cutting a head off a Hydra, two more take it's place.


http://www.spamodeler.com/forum/

  • Member since
    September 2003
  • From: AandF in the Badger State
Posted by checkmateking02 on Wednesday, May 16, 2018 2:48 PM

Looking good, Steve.


  • Member since
    February 2010
  • From: Berkeley CA/St. Paul MN
Posted by EBergerud on Friday, May 18, 2018 4:09 AM

I've promised a T-34/76 ready for Kursk. I got the ICM T-34/76 - I had a DML version that I found out was actually later. And the ICM kit had a lower part count. My first 1/350 ship was an ICM Konig done several years back and I swore that I'd never buy another ICM kit. This kit is not bad (get the Revell version rebox both tool 2015 and save $5) but I've been thinking about my old promise. Never do three Tamiya kits in a row and then switch to a Euro blend (in my case Italieri and ICM) - it simply reminds you how much time is wasted. But, it will get done. I've got some plans for a vingette that will include some static grass which isn't stuff I've worked with before. I've got an electronic gizmo and everything.

I've been busy and didn't really think anyone wanted to see progress on roadwheels. Below is a pic that shows I'm working on what I said I would. You might note that the tank body is primed black - the wheels etc will be to maybe. Might try the "black/white" techniqe: also might "black base" the kit. Regardless the weatering will take some brains because the tanks shown would have been less than six months old in July 44 - but also dirty/dusty beyond normal comprension.

Be back soon: Will try to add my views on other's builds.

Eric

 kit by Eric Bergerud, on Flickr


A model boat is much cheaper than a real one and won't sink with you in it.

  • Member since
    September 2003
  • From: AandF in the Badger State
Posted by checkmateking02 on Friday, May 18, 2018 10:51 AM

Thanks for the update, Eric.  Looking forward to seeing your build.

Just curious:

Why did you earlier swear off ICM kits?  I haven't built any, so I don't have any familiarity with them.

And:  why never do three Tamiya kits in a row?  


  • Member since
    February 2010
  • From: Berkeley CA/St. Paul MN
Posted by EBergerud on Monday, May 21, 2018 5:37 AM

Let's see: I swore off ICM kits because their 1/350 Konig was a bad kit and it was the first 1/350 ship kit I built. Oddly enough it prepared me for an ancient 1/225 scale USS Oregon which was so utterly screwed up I had to rebuild it. And then put it into gray Spanish=American War colors - one of the best kits I've made.

The T-34 should do I think. It did go together withought calamity. I'm going to see here to what degree I can use "black basing" which works nicely for yours truly with AC on tanks. This is a variation (unintentional I must add) to the "black/white" weathering technique on tanks. Below you can see the kit: it has been "painted small" on top of the black base - the sides have a darker color:

 bbasing2 by Eric Bergerud, on Flickr

 bbasing by Eric Bergerud, on Flickr

Below is the kit when the base coat is applied very lightly and very slowly. The idea is to have a surface that is not regular.

 meld2 by Eric Bergerud, on Flickr

 meld! by Eric Bergerud, on Flickr

Should note that the paint used is my "go to" Golden High Flow, the planet's best water based acrylic. It's true that you have to mix paint to get military colors, but I think that's fun.

Anyway, the base coat, no matter how deployed, just leaves you ready for weathering.


Eric


A model boat is much cheaper than a real one and won't sink with you in it.

  • Member since
    September 2003
  • From: AandF in the Badger State
Posted by checkmateking02 on Monday, May 21, 2018 3:43 PM

That looks really good, Eric.  Quite effective.

Thanks for your insights on those ICM kits.


  • Member since
    October 2009
  • From: Worcester, England.
Posted by aeroplanegripper on Monday, May 28, 2018 8:25 AM

Got this out of the stash today, ready for the off I think at the start of next month.

 This kit has been sitting around in my stash for a few years, and I cant believe I havent done it earlier, as it is one of my all time favourite aircraft. I will be doing in the scheme of "White 576" flown by 1Lt Ed Olander of VMF 214 at Torokina Bouganville in 1943. 

 Will post again when I get started.

Best Regards

Mark

"bis vivit qui bene vivit"


  • Member since
    December 2002
  • From: Bury St Edmunds, Suffolk, England
Posted by Bish on Monday, May 28, 2018 12:53 PM

Looking forward to seeing that one Mark. Need to get one of those myself.

I am a Norfolk man and i glory in being so


On the bench: Airfix 1/72nd Harrier GR.3/Fujimi 1/72nd Ju 87D-3

  • Member since
    September 2003
  • From: AandF in the Badger State
Posted by checkmateking02 on Monday, May 28, 2018 4:32 PM

Great looking plane, the Corsair.  Very sleek.  Looking forward to it, Mark.


  • Member since
    July 2014
Posted by modelcrazy on Monday, June 4, 2018 5:41 PM

I need to get back to the Scharnhorst if I'm going to have any hope in getting her done for a contest in 2 weeks. I finally received the flags and pennants from Spain, but they can be the last thing I install so they weren't holding me back.

So, I painted the base, added a small bow wave and some foam off the bow and stern. She is turning to starboard so the stern wake is off to the starboard as well. The acrylic varnish is still drying so it's still a little milky. Once dry, I will add more probably 2 more coats of varnish. I still need to add some fidily parts, hull railings and flag.

Steve

Building a kit from your stash is like cutting a head off a Hydra, two more take it's place.


http://www.spamodeler.com/forum/

  • Member since
    August 2015
  • From: the redlands Fl
Posted by crown r n7 on Monday, June 4, 2018 7:43 PM

Wow that’s nice!


 Nick.

  • Member since
    May 2015
Posted by Griffin25 on Monday, June 4, 2018 8:45 PM

That looks really cool! 


Griffin

  • Member since
    September 2003
  • From: AandF in the Badger State
Posted by checkmateking02 on Monday, June 4, 2018 8:57 PM

Looks great, Steve.


  • Member since
    July 2014
Posted by modelcrazy on Monday, June 4, 2018 9:22 PM

Thanks guys.

Steve

Building a kit from your stash is like cutting a head off a Hydra, two more take it's place.


http://www.spamodeler.com/forum/

  • Member since
    February 2010
  • From: Berkeley CA/St. Paul MN
Posted by EBergerud on Tuesday, June 5, 2018 2:15 PM

MC:

I checked the Gallery on Modelwarships and viewed your models - very nice. I like the Prinz Eugen especially: Rufe also sweet. (The bad guys made neat looking weapons in WWII: kind of like the Empire in Star Wars. The Zero had perfect lines - and I'd say both the 109 and FW190 had better lines than any allied fighter. German warships were simply fantastic - and they seemed to be designed to engage on idiot missions and thus play the role of major British morale boosters: dual purpose. Wonder if Raeder had ever heard of a "fleet in being?" Having Scharnhorst, Gneisenau, Bismarck, Tirpitz plus all of those big cruisers all operating in the Baltic and threatening a sortie would have driven the RN crazy.) 

If you can pull off the "calm, in-motion" wake well, it will be the frist I've seen. Dead calm - yes (as your Prinz Eugen shows); heavy water, definitely. (Your Hornet is a good example there - you do a good job with cotton: I think Floodberg is right that Rayon works better, and thanks to e-cigarettes is widely available cheap on eBay.) But that dead calm wake is something I can't fathom. Best of luck.

You must really load the styrene with gel - Floodberg always covered his with torn bits of typing paper and applied the gel over that. (Floodberg is a professional artist of some fame in Canada. He favors Golden products and their clear gel is simply great. Floodberg also led me to the Golden High Flow acrylic paints which I think are the best water based acrylics known to mankind and perfect for the airbrush. You do have to mix your own colors, but that's fun for me.)

Anyone interested in water bases made by a master can check the four YouTube videos of "Chris Floodberg Model Water." Chris also did a detailed water base for an issue last year in Finescale. Floodberg's techniques have changed greatly. In the base made for Finescale he used "extruded styrene" (usually used for insulation - often pink) which is denser than normal styrene and carved it with a dremel. Personally I like his normal styrene technique mostly molded using heat from a disosable cigarette lighter.

Eric


A model boat is much cheaper than a real one and won't sink with you in it.

  • Member since
    February 2010
  • From: Berkeley CA/St. Paul MN
Posted by EBergerud on Tuesday, June 5, 2018 3:01 PM

Back to the T34:

Started weathering. I'm following a long series of YTube videos done by guru Adam Wilder on a KV-1. The series is simply terrific - look at episode 3&4 to see how to do well what I tried. There are a lot of splendid professional armor modelers who have started companies - I find Wilder to be much the best at instructing and illustrating what to do. He uses enamel products and I don't: that's my choice, not the best way to make a model.

First up were oils. (Might add that a filter done with my trust Com.Art followed by a spray of Tamiya lacquer clear preceeded it - you want a gloss or satin surface for oils and for washes.)

I bought some Mig "Oilbrusher" oils. Oils in a plastic tube with thin brush inserted. Very thin. OK paints and cheap, but I'd much prefer Wilder's own oils or Gamblin "Fast Matte" oils. Although very different in consistency, both dry fast and matte. The Oilbrusher brings only a convenient tube. The brush in the tube is only good for applying dots (a good 2 or 3 brush is better for that task) and all blending has to be done with a brush anyway. So, consider the Oilbrusher a failed experiment - but the paints are fine and I'll use them. BTW: I needed a dark umber for dot fading and larger scale shading. I only had little tubes of Reeves oils - about $10 for a box of 12 - and mixed black and burnt umber. It worked perfectly well. I don't doubt for modeling use Reeves would do the job fine. I've got Wilder, Gamblin and Windsor Newton and won't throw them away. But Reeves has a very low oil content which means they dry pretty quick - which isn't bad. You need solvent of course. Wilder uses enamel thinner which I hate. (Wilder's products are excellent, and his latest line is water/acrylic based - I'm not the only modeler who doesn't like solvents. Vallejo's recent line of acrylic weathering stuff is very good.) Anyway, for oils I use a an oil paint solvent called Gamsol - made by Gamblin. Gamblin is one of the best US based oil paint companies and their stuff is top drawer. (Art house pigments are better than anything you'll find in any model line and about a quarter the price. Check Gamblin pigments - I also use upscale Sennelier.) Gamsol is especially made to be odor free and as mild as a oil paint solvent can be and still work to the exacting standards of oil painters. It's simply great unless you really find "oderless" mineral spirits "oderless" which I don't. And it's cheaper. Modelers pay a lot of money for modeling products.

Here's the dot fade (pic taken at night, but you get the idea)

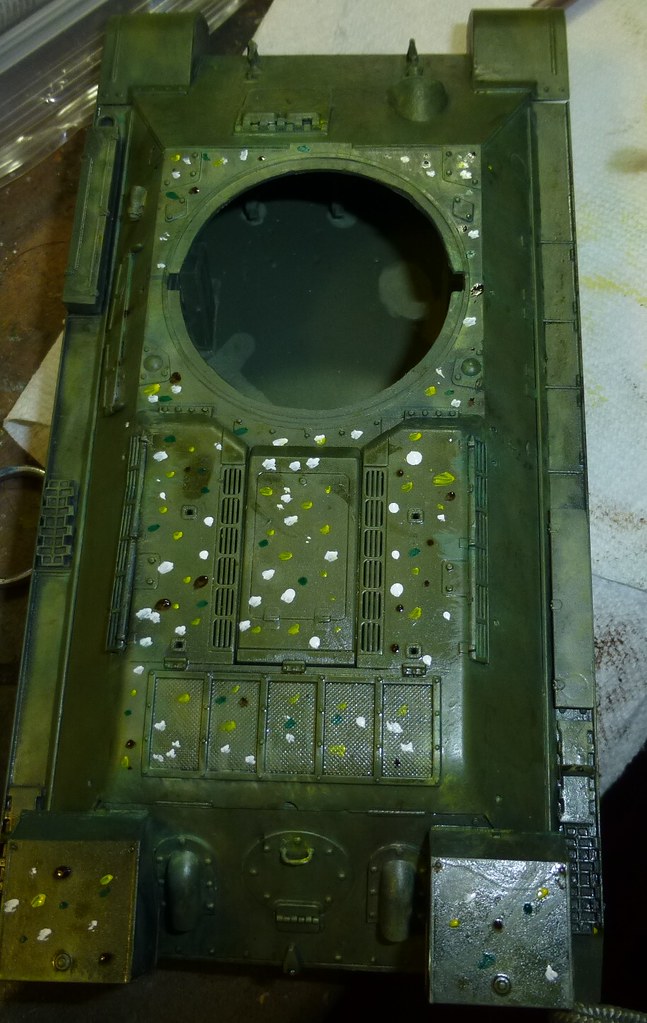
 dotfade by Eric Bergerud, on Flickr

This shows the turret after fading - It's pretty easy to see that the top is lighter than the unfaded body.

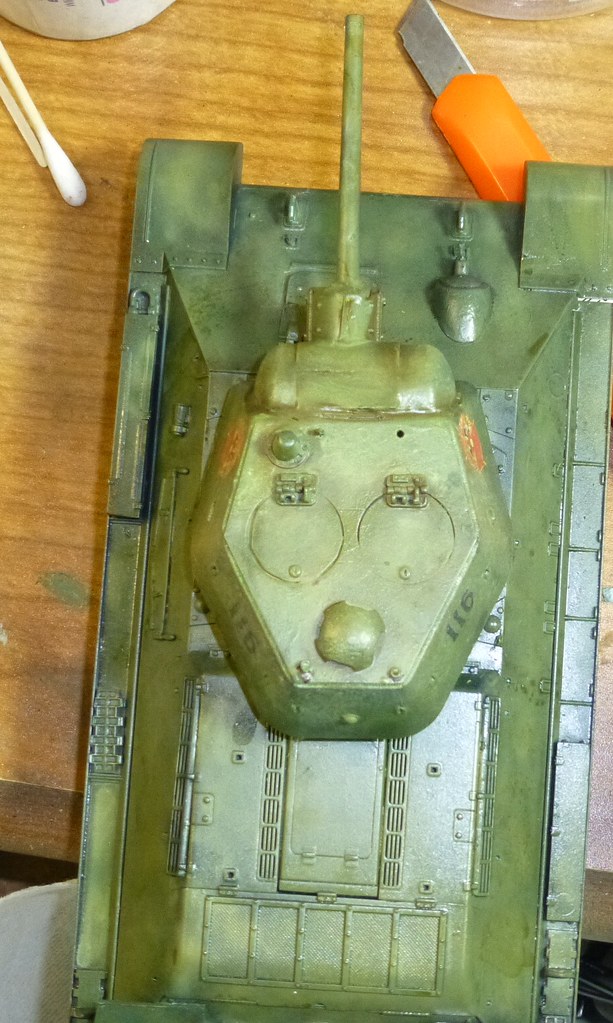
 turfade by Eric Bergerud, on Flickr

This is the tank after the oils. The irregular coloring is intact - which I want - and the color much more interesting.

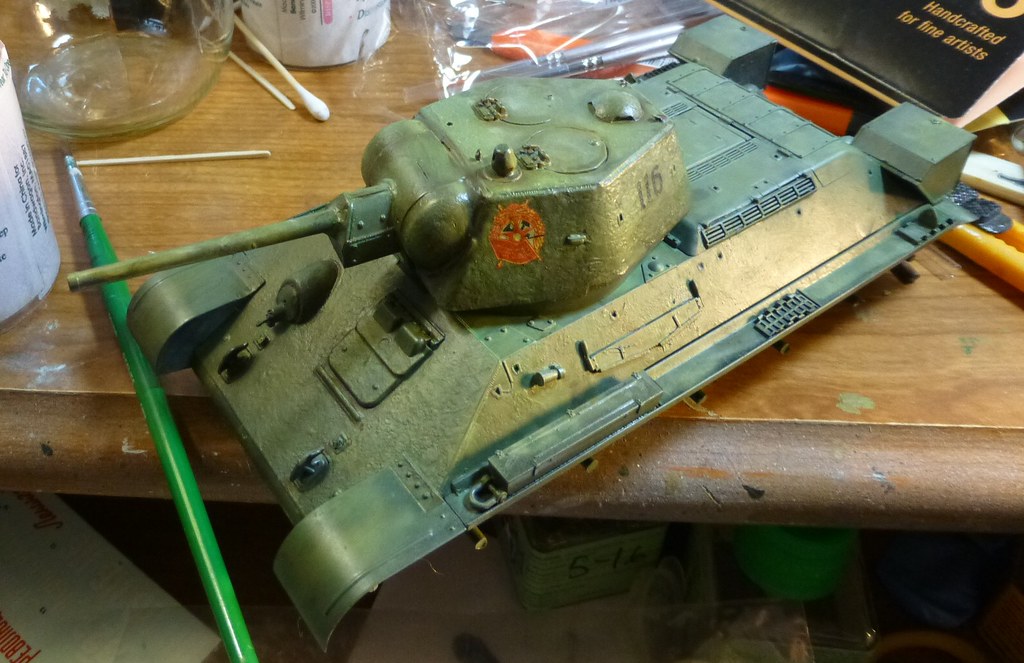
 faded by Eric Bergerud, on Flickr

Lots more weathering to come though.

Eric


A model boat is much cheaper than a real one and won't sink with you in it.

  • Member since
    July 2010
  • From: Tempe AZ
Posted by docidle on Tuesday, June 5, 2018 6:59 PM

Here's my entry. I had been working on it but it was shelved for awhile. If I need to enter something else, please let me know. This gives me a chance to finish up some of shelved models.

This is Merit's 1/48 scale early Elco 80’ PT Boat. I'm going to model her as the lead boat of that variation, the 103 boat.


  • Member since
    July 2014
Posted by modelcrazy on Tuesday, June 5, 2018 8:56 PM

Thanks Eric, I like the hard Styrofoam for several reasons and I prefer medical cotton over Rayon. Rayon is just too stingy for me to work with. I did an LA class sub using it and just had a heck of a time. I cover my bases with paper as well, it uses less gel that way. I use Golden because it's what I get from HL. I used Liquitex on a couple early water bases and didn't really have an opinion at the time.

Here is the base now that it has dried. I'm adding the hull railings now. I'm not as good as Chris by any stretch but I'll get there someday.

BTW I finished a water video for YouTube, although not professional or polished by any means but I hope somebody will get some use out of it. As soon as I get it up and working I'll post a link.

Steve

Building a kit from your stash is like cutting a head off a Hydra, two more take it's place.


http://www.spamodeler.com/forum/

JOIN OUR COMMUNITY!

Our community is FREE to join. To participate you must either login or register for an account.

SEARCH FORUMS
FREE NEWSLETTER
By signing up you may also receive reader surveys and occasional special offers. We do not sell, rent or trade our email lists. View our Privacy Policy.