SEARCH FINESCALE.COM

Enter keywords or a search phrase below:

The Race Into Space GB, October 2018 - July 2019 (Ended)

56040 views
1682 replies
1 rating 2 rating 3 rating 4 rating 5 rating
  • Member since
    January 2015
Posted by PFJN on Monday, October 15, 2018 3:38 PM

Hi,

Here are a couple images that hopefully may better show what I did to modify the wing taper on my conversion.

PF

321


1st Group BuildSP

  • Member since
    June 2018
  • From: Ohio (USA)
Posted by DRUMS01 on Monday, October 15, 2018 7:35 PM

Wow!, everyone that is participating is doing really great! I feel I need to add some progress of my own.

The first photo is the scratch built cross over and secondary (lower) strut for the LEM decent module. It will attach to the lower part of the decent stage and then to the main strut. Thanks again for the drawings as it helps in determining the angles on the various landing gear parts. 

There are 20 peices in each of these lower strut assemblies, can you see them all? The parts consists of brass, plastic, and aluminum tubing, solder, sheet plastic, jewelry bead, and lead foil. 

Next are some photos of the base silver and black of the accent stage of the LEM. I still plan to add some gold, copper, and various tints of bare metal foil before finishing the details. 

I am really enjoying this group build (my first)...

The work on here is inspiring!

Ben

"Everyones the normal until you get to know them" (Unknown)

LAST COMPLETED:

1/35 Churchill Mk IV AVRE with bridge - DONE

NEXT PROJECT:

1/35 CH-54A Tarhe Helicopter


  • Member since
    July 2014
  • From: Franklin Wi
Posted by Bakster on Monday, October 15, 2018 9:17 PM

DRUMS01
I am really enjoying this group build (my first)...

I am really enjoying your work. 

Yes

  • Member since
    July 2014
Posted by modelcrazy on Monday, October 15, 2018 10:00 PM

Outstanding work Ben

Steve

Building a kit from your stash is like cutting a head off a Hydra, two more take it's place.


http://www.spamodeler.com/forum/

GAF
  • Member since
    June 2012
  • From: Anniston, AL
Posted by GAF on Tuesday, October 16, 2018 6:05 AM

PFJN> I have to say that you must have been an illustrator with the diagrams and images you are producing!  Lovely stuff!

Ben> Glad you're enjoying the GB!  That's what a group build is supposed to be about, and helping others when they need information or ideas.  You're certainly making great progress with the LM.  I think it will look much better than the original when completed.

No pictures again tonight, as my work is mostly fill, sand, repeat!  I think I've got the RCS units on the LM upper stage smoothed out, and it's time to paint the interior sections before gluing together.  No interior layout for this one!  Then it's assembly and paint.

I'm not sure what paint job to go with on this LM.  I might go with the Revell "white and black" boilerplate version.  Not sure yet.  Still a few days away, so I'll think about it.

And here we have the first spaceship / submarine!

Today in Space History:

1976 October 16 - .

  • The capsule landed at 17:46 GMT in Lake Tengiz in -20 deg C conditions in a snowstorm. The wet parachute filled and dragged the capsule below the surface, cooling the capsule. Heating systems had to be turned off in the capsule to conserve battery power. Amphibious vehicles attempted to recover the spacecraft but could not reach it. Finally swimmers managed to attach a cable to a helicopter. The capsule was dragged for kilometres across the icy sea. Only in the morning was the crew able to emerge from the capsule. The recovery crews were surprised they were still alive.

Mission Director (GAF)

  • Member since
    November 2009
  • From: SW Virginia
Posted by Gamera on Tuesday, October 16, 2018 11:29 AM

PF & Ben: Those look awesome guys! 

"I dream in fire but work in clay." -Arthur Machen


  • Member since
    May 2011
  • From: Honolulu, Hawaii
Posted by Real G on Tuesday, October 16, 2018 12:09 PM

Ben, your LEM is looking great!  I attempted various LEM kits, but never got one across the finish line.  Yours is definitely several cuts above any of my tries!

Speaking of cuts, PFJN you are doing it old school, which is nice since most scratchbuilds these days go like “... and so I ordered the parts from Shapewayas...”. Keep it up!

“Ya ya ya, unicorn papoi!”

  • Member since
    June 2018
  • From: Ohio (USA)
Posted by DRUMS01 on Tuesday, October 16, 2018 7:28 PM

Thanks everyone! I noticed when starting my painting of the upper and lower parts of the Lunar module that there are several that claim to be accurate color charts of Apollo 11 (the Armstrong version). Upon careful review of the limited photos and several articles, I have found that the 1998 research by Paul Fjeld was later updated in August 26, 2000 and illustrated by David Weeks. That is what I consider the most accurate version of the Apollo 11 "Eagle". This meant I had to repaint several areas of both the accent and decent modules. I hope to have photos here soon, perhaps tomorrow.  

Another thing happened that I thought was funny, I put a low ball bid on a duplicate 1/48 Monogram kit that is complete and WON!... Now my problem is that I think I am going to go with my scratch built decent module versus the one from the kit (I like it better, go figure). What is even funnier is that through the process of shopping for the Monogram version, I also puschased the Revell and Dragon kits in 1/48 as well. That will give me 4 LEMs.... (none are the same by the way).

Considering I am also involved in the Modern Armor GB and the HMS Ship GB, I doubt I will be building all 4 LEM's anytime soon (smile).

v/r,

Ben


"Everyones the normal until you get to know them" (Unknown)

LAST COMPLETED:

1/35 Churchill Mk IV AVRE with bridge - DONE

NEXT PROJECT:

1/35 CH-54A Tarhe Helicopter


GAF
  • Member since
    June 2012
  • From: Anniston, AL
Posted by GAF on Tuesday, October 16, 2018 10:04 PM

Ben>  I must admit that the schemes for the LMs are something of a mystery since they were changing right up to launch!  Best evidence is pictures of them in space or on the moon when technicians couldn't get their hands on them anymore.  It's interesting that Paul Fjeld's own web-page is copyright July 31, 2001, later than David Weeks own drawings.

Congrats on the score!  I would save the new Monogram LM just in case you want to revisit it.  No sense in having only a part of a LM sitting in a box.  Smile

As for me, I've started painting the interior of the LM with just some basic colors: blue-grey and light-ivory for the ceiling.  Nothing fancy, just to keep the interior dark after I've assembled the two halves.  You can also see the scratch RCS rear unit on the left I've made from modeling clay.  Still need to fill a bit around the tabs.

After a second coat of paint, I'll cut out some windows from some clear plastic sheeting and mask them for painting.  Better to do this before assembly.

Next is the paint scheme.  I'm not going to try to replicate an authentic color scheme for this model as it is not even close to something that existed.  I want to give it a "mock-up" type paint job, perhaps like this one.

Keeping it simple is probably the best thing I can do, as I've got quite a number of scratch-build items I need to worry about.

Meanwhile, here's a photo that I've not seen before of the Apollo 11 crew.  Those brown loafers Armstrong is wearing...

Gary


  • Member since
    January 2015
Posted by PFJN on Tuesday, October 16, 2018 11:04 PM

Hi,

Over the last couple days I've been doing a bit of filling and sanding to try and clean up my mini shuttle fuselage.  I then applied a thin coat of primer, by brush, to try and help make the areas that might require a bit more wotk show up better.  I apologize that I forgot to take a picture of the model prior to applying the primer, though I was kind of embarassed by the large amount of putty that I had to use to try and smooth everything out Stick out tongue.

Anyway, here are a couple quick images to show where I am now.  Overall I am very happy with how it is turning out, though I can see several areas that appear to need just a bit more work.  I soon hope to reattach the nose though and then work on the thruster pods.

The two big outstanding issues that I currently forsee that I will eventually have to address are (1) how to model the new cockpit & (2) it appears that the model did not come with landing gear (unless I just misplaced them).

For item (1) I'm suspecting that the top of the cockpit was probably hinged on its back edge to allow the Pilot to get in and out, but I am not fully sure.  So I may just have to make a guess at some of it.

For item (2) I may have a spare 1/72 scale model that I can raid for wheels and struts.

Anyway, hopefully I will have some more to post in a day or two.

PF

3qtrSideEnd

1st Group BuildSP

  • Member since
    September 2011
  • From: Milaca, Minnesota
Posted by falconmod on Wednesday, October 17, 2018 7:12 AM

So whats the name of the purple stuff used to remove paint?   got some really old paint on the LEM and CM to get off?

John

On the Bench: 1/72 Ki-67, 1/48 T-38

1/144 AC-130, 1/72 AV-8A Harrier

GAF
  • Member since
    June 2012
  • From: Anniston, AL
Posted by GAF on Wednesday, October 17, 2018 9:27 AM

John> It really is called "Purple Stuff" and is engine degreaser.  Won't hurt plastic.  The stuff I bought was called "Purple Power" and was at Walmart.

Personally, it failed to remove the old enamel paint, but the metallic and acrylic came right off.  So I'm going with my back-up, "Easy-Off Oven Cleaner".  I know it will get the paint off.  :-)

Gary

  • Member since
    October 2010
Posted by hypertex on Wednesday, October 17, 2018 10:08 AM

All, good to see everyone's progress and well done!

The progress on my LM-5 Eagle is slow, but steady. I am continuing add texture to the ascent stage, just a few panels at a time. The technique I chose is laborious and slow, but should produce excellent results.

When the texturing is complete, I will share the technique (assuming I am happy with it).

  • Member since
    November 2009
  • From: SW Virginia
Posted by Gamera on Wednesday, October 17, 2018 11:47 AM

Gary: She's coming along well! I have some photos of an early LEM, I'll see if I can hunt them up. 

PF: Very cool! Putty is your friend- don't ever feel ashamed to use too much of it. Wink

John: I like Simple Green. If the Purple stuff doesn't do the trick it might be worth a shot.

Hypertex: Sounds cool, looking forward to the photos. 

"I dream in fire but work in clay." -Arthur Machen


GAF
  • Member since
    June 2012
  • From: Anniston, AL
Posted by GAF on Wednesday, October 17, 2018 10:50 PM

PFJN> That's a lot of filing and sanding!  But we all love that... Don't we? Indifferent  As for access, I would assume there would be a hatch.  Perhaps one overhead that could be jettisoned in case the pilot had to eject.  For such a small craft, I assume an ejection seat would be provided... maybe.

Hypertex> Look forward to see what you do!  I have a couple of more LMs that could probably use an upgrade.  Smile

Gamera> Will appreciate anything you might find, photo wise.  The upper stage is ready for paint, but there's no rush as I'm goint to get the descent state cleaned up and ready before attempting.

Progress Report:

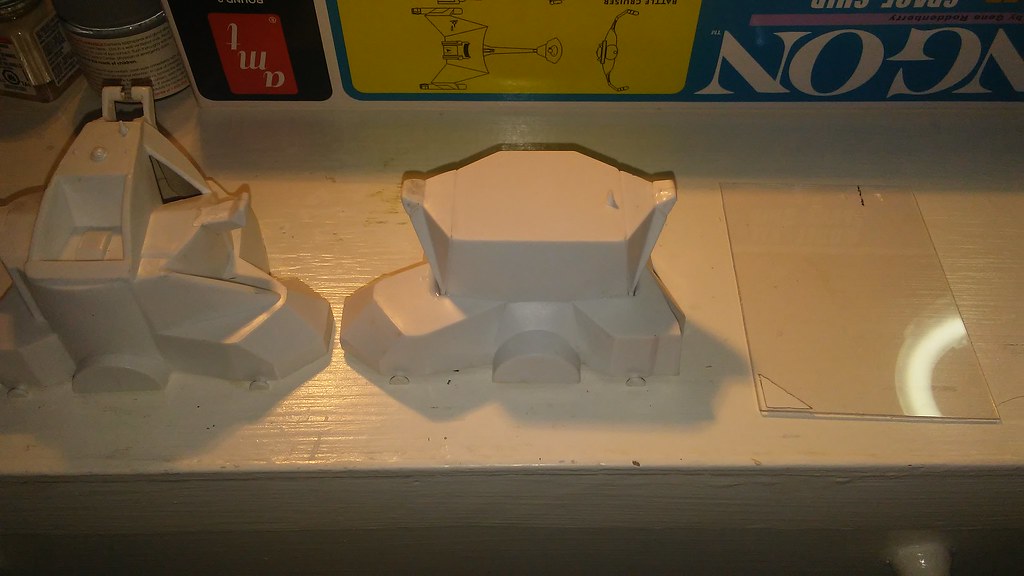
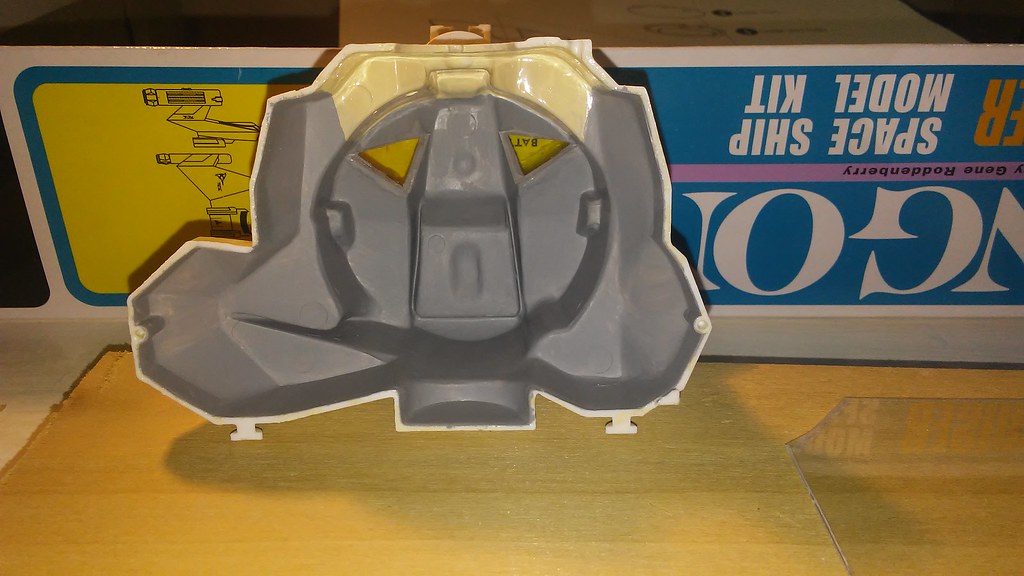
I've finished painting up the interior (though it's just a couple of colors).  After the paint was dry, I placed a small piece of paper over the window opening and traced it out with a pencil, then cut it out to use as a template.

Tracing the paper template, I then cut the windows out of a clear, plastic sheet with an X-Acto knife.  I made sure to cut them a little larger than the template.

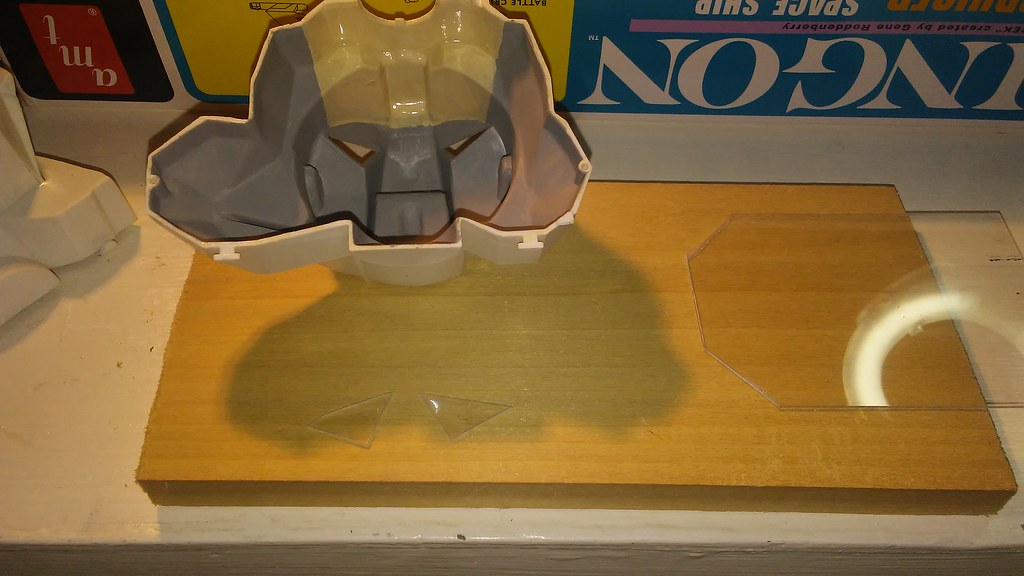
Then using Aleene's Clear Gel I glued them in position.  After the glue dried, I used the template again and cut some masks for the windows.

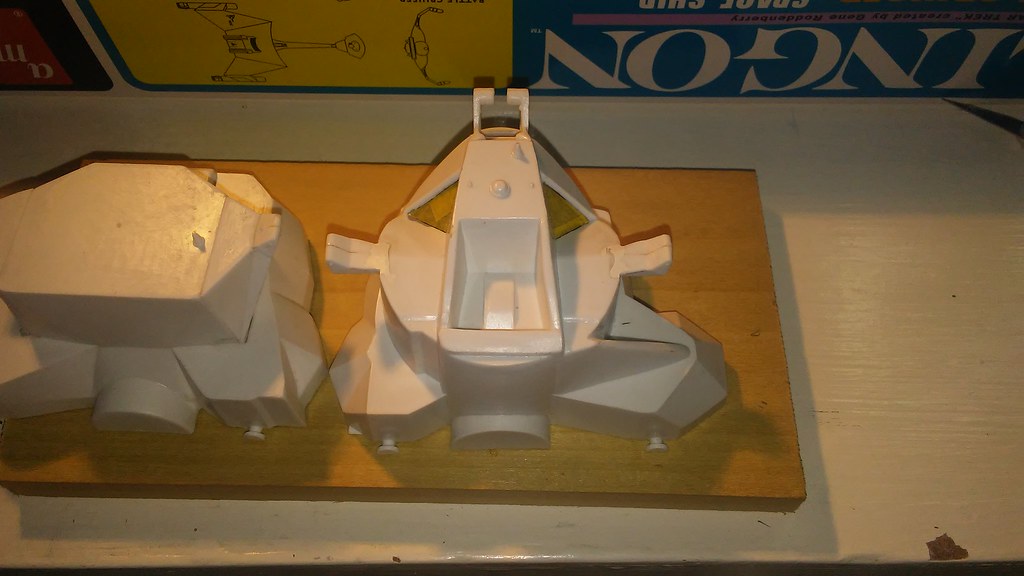
A bit more sanding and she'll be ready for paint.  Now it's on to the descent stage, and trying to decide on a paint scheme overall.

One thing I think I will do for the descent stage is make some new legs.  I have some brass tubing and plastic rod, so making some telescoping legs would look better than the ones in the kit.

Mission Director (GAF)


  • Member since
    June 2018
  • From: Ohio (USA)
Posted by DRUMS01 on Wednesday, October 17, 2018 11:22 PM

Nice work so far GAF. What scale and manufacturer is your LM kit, I forgot?

Ben

"Everyones the normal until you get to know them" (Unknown)

LAST COMPLETED:

1/35 Churchill Mk IV AVRE with bridge - DONE

NEXT PROJECT:

1/35 CH-54A Tarhe Helicopter


GAF
  • Member since
    June 2012
  • From: Anniston, AL
Posted by GAF on Wednesday, October 17, 2018 11:34 PM

Ben>  The LM is actually part of the old Revell kit "The Apollo" which depicts the upper part of the Saturn V, containing the LES, CM and SM, folding panels, LM and instrument section of the S-IVB.  The instruction book in the lower right of this image.

Gary


  • Member since
    January 2015
Posted by PFJN on Thursday, October 18, 2018 2:20 PM

GAF

PFJN> That's a lot of filing and sanding!  But we all love that... Don't we? Indifferent  As for access, I would assume there would be a hatch.  Perhaps one overhead that could be jettisoned in case the pilot had to eject.  For such a small craft, I assume an ejection seat would be provided... maybe.

...

Hi,

My suspicsion is that it might be simething like a flip up canopy like shown below, but I don't have any info to really say one way or the other.

Canopy

For now, I think this is how I will model it, maybe showing something that looks like a hinge at the back.

Pat

PS.  I reattached the nose last night and gave it a quick coating of putty/bondo and sanding sealer.  Hopefully tonight I can try and clean it up a bit. 

Nose1Nose2

I also tried my hand at 3D printing an astronaut to stand along side the model for scale.  I found the 3D model on a NASA site, and it might be for a suit that's a bit more modern than the 1970s, but it looked suitable for my needs. 

https://nasa3d.arc.nasa.gov/detail/aces

Suit

For the astronaut print I had set my printer for its slowest speed and finest layer height but still had some issues with the print out (because it is so small).  In particular his head/helmut got messed up and there is a hole in the side of his chest.  In looking over my printer settings I see that I had the density of the inside of the shape set to 50%.  So tonight I am going to try and redo the print job, increasing the density of the shape as high as I can get it, and see what happens Smile

Oops, I also just noticed from the top image that I posted in this response that the forward landing gear on the mini shuttle is further aft than the forward landing gear on the full scale shuttle.  I hadn't previously realized that, so I will have to think through a little more how to address that.  I guess I should have looked more closely before reattaching the nose Tongue Tied

1st Group BuildSP

  • Member since
    November 2009
  • From: SW Virginia
Posted by Gamera on Thursday, October 18, 2018 7:11 PM

PF: What you've got so far on the micro-shuttle looks great to me, hopefully you can get the landing gear shifted without any problems. And the astronaut looks cool to me.

Gary: Looks really cool so far!

I found the book but the earliest LEM shown is the Apollo 9 'Spider' version. I'm going to go ahead and post it in case you might find something usable with it:

And Apollo 11 LEM 'Eagle' for good measure:

Anyway the cover of the manual here. Don't know if it's still in print but it's well worth picking up if you have any interest in the subject. There's a really nice article on detailing out the Monogram 1/48th LEM kit. I've got another book in the series on the Command and Service Modules too.

"I dream in fire but work in clay." -Arthur Machen


  • Member since
    October 2010
Posted by hypertex on Friday, October 19, 2018 6:46 AM

PFJN

I also tried my hand at 3D printing an astronaut to stand along side the model for scale.  I found the 3D model on a NASA site, and it might be for a suit that's a bit more modern than the 1970s, but it looked suitable for my needs.

"Suitable" for your needs. No pun intended, right?  Ha...

Gamera: I just bought that same book last month, so it is still in print. The author is Michael J. Mackowski. It can be ordered here

http://www.spaceinminiature.com/books/order.html


  • Member since
    November 2009
  • From: SW Virginia
Posted by Gamera on Friday, October 19, 2018 7:50 AM

Thanks Hypertex, great to see them still in print, they're great manuals! I knew he'd done a couple others but not that many, I may have to order a few more for myself. 

I just hope he's okay with me posting those pages, I know it's copyrighted but I hope just four pages aren't too big an infringement. 

"I dream in fire but work in clay." -Arthur Machen


  • Member since
    January 2015
Posted by PFJN on Friday, October 19, 2018 10:27 AM

hypertex

"Suitable" for your needs. No pun intended, right?  Ha...

Gamera: I just bought that same book last month, so it is still in print. The author is Michael J. Mackowski. It can be ordered here

http://www.spaceinminiature.com/books/order.html

Hi,

Big Smile

Also, thanks for the link.  It looks like there is some really interesting info there.

Pat

1st Group BuildSP

  • Member since
    January 2015
Posted by PFJN on Friday, October 19, 2018 1:47 PM

Gamera

PF: What you've got so far on the micro-shuttle looks great to me, hopefully you can get the landing gear shifted without any problems. And the astronaut looks cool to me.

...

Hi,

I managed to cut a new forward landing gear door last night without too mauch trouble.  Next I'll either put together a wheel well out of styrene strips, or maybe 3D print one, and try to glue it into place.  After that I hope to next sart working on the aft end of the model, especially the aft "bulkhead" where the main engine nozzle wiil mount.

I haven't glued the wings into place yet, but I did dry fit them to see if there are any issues.  In addition I tried to reprint the Astronaut again, at a higher density, but still ended up with a messed up head and a hole in the left chest, which I am trying to clean up a bit with some putty.

PF

Test Fit1Test Fit2

1st Group BuildSP

  • Member since
    June 2018
  • From: Ohio (USA)
Posted by DRUMS01 on Friday, October 19, 2018 3:32 PM

Working on refining and repainting some of my lunar module.

- Here is the accent stage with the updated (hopefully correct) color markings for the "Eagle. in addition to painting I also added to foil around the RCS accent thrusters (still to be detailed) and a red border around the windows.

The kit radar antenna had the subcomponents molded into the dish in the shap of a flat "X" (it looks poor). The antenna was also molded into the antenna arms and the top of the lunar module. I decided to carefully cut the antenna from the mount and remove the molded in "x" from inside the antenna to make the basic parabolic dish. I then added some wire and small craft pieces to replicate something close to what it should look like.

Actual 

WIP

End Result 

I've been working on the decent stage by adding the gem cut buldge in quad III and repainting the copper, gold, and black on the sides. Still much more to accomplish on this.

Happy Modeling Everyone!

Ben 

"Everyones the normal until you get to know them" (Unknown)

LAST COMPLETED:

1/35 Churchill Mk IV AVRE with bridge - DONE

NEXT PROJECT:

1/35 CH-54A Tarhe Helicopter


GAF
  • Member since
    June 2012
  • From: Anniston, AL
Posted by GAF on Friday, October 19, 2018 9:24 PM

Gamera> Thank you for the LM images!  That's good information to have, especially about Spider.  I'm looking for something that was pre-flight and used as a simulator, and I think I found some more photos of the Apollo 12 crew standing in front of the LM mockup, enough to give me some painting ideas.

PFJN> I must admit, you're a scratch-building devil!  You're making such great progress on that little shuttle.  Glad you decided to tackle it!  It will make an interesting addition to the GB.  Oh, and sorry about the astronaut figure.  A bit of putty will fix him right up!  Or he's been infected by some alien parasite... either way!

Ben> I love your attention to detail!  It's the little things that add such character and depth to a model.  Wish I had that!  Tongue Tied

As for me, I'm trying to get the old paint off the Service Module.  At the moment, it's soaking in Easy-Off oven cleaner, but so far I've seen little evidence it's working.  I wonder if they've changed the formula over the years to make it more "environmentally friendly" (and less effective)?  Well, I'm giving it a good shot!  I'll post some results later.

Gary

  • Member since
    January 2015
Posted by PFJN on Friday, October 19, 2018 9:33 PM

GAF

...

PFJN> I must admit, you're a scratch-building devil!  You're making such great progress on that little shuttle.  Glad you decided to tackle it!  It will make an interesting addition to the GB.  Oh, and sorry about the astronaut figure.  A bit of putty will fix him right up!  Or he's been infected by some alien parasite... either way!

..

It could be a Brain Slug Surprise

Brain Slug

1st Group BuildSP

  • Member since
    July 2014
Posted by modelcrazy on Friday, October 19, 2018 9:53 PM

PF and Ben you guys are killing it with you scratchbuilding skills. You're and inspreation.

Steve

Building a kit from your stash is like cutting a head off a Hydra, two more take it's place.


http://www.spamodeler.com/forum/

  • Member since
    January 2015
Posted by PFJN on Friday, October 19, 2018 10:24 PM

Hi,

Thanks.  Though honestly I kind of feel like I'm just kind of haphazardly hacking away at something (though I am having fun doing it).  I am really impressed with DRUMS01's work though.  He really seems to be doing a careful and well thought out build Smile.

PF

1st Group BuildSP

  • Member since
    June 2018
  • From: Ohio (USA)
Posted by DRUMS01 on Saturday, October 20, 2018 3:53 AM

modelcrazy,

Thanks for the kudos, but I am just trying to research and replicate something close to accurate. I am surprised to find that there is very little in aftermarket P.E. for the Apollo kits; especially the 1/48 lunar module considering there are/were at least four different kits (Monogram, Revell, Dragon, Aoshimi). Still it is fun thinking things out to make the older kits better. Thats what makes it fun for me (kind of)....

Ben

"Everyones the normal until you get to know them" (Unknown)

LAST COMPLETED:

1/35 Churchill Mk IV AVRE with bridge - DONE

NEXT PROJECT:

1/35 CH-54A Tarhe Helicopter


  • Member since
    November 2010
  • From: Florida-West Central
Posted by Eagle90 on Saturday, October 20, 2018 9:52 AM

Man, what a great GB!  And the subjects are awesome!  Great work!

Well, I finally got finished with the 1/32 RF-4B!  That took up a lot of time and space (see what I did there?  LOL!)  Anyway, I got to start the Apollo 7.  It's a great kit from Airfix.  Going together rather fast actually.  I know I'll be spending more time on the painting, but it has gone together very well so far.  I think I'm going to opt out of having it be able to come apart.  All parts click together well, it's just there is not much detail to warrant me leaving it able to take apart.  Here is a pic of where I am so far.  Enjoy!


JOIN OUR COMMUNITY!

Our community is FREE to join. To participate you must either login or register for an account.

SEARCH FORUMS
FREE NEWSLETTER
By signing up you may also receive reader surveys and occasional special offers. We do not sell, rent or trade our email lists. View our Privacy Policy.